Ecostrad iQ Plus User manual

Ecostrad iQ Plus
Electric Panel Heater
PLEASE READ AND SAVE THESE INSTRUCTIONS

Ecostrad_iQ_Plus_V2.6_15022022 2
Symbols
Warning
This symbol indicates a hazard with an average risk level which, if not
avoided, could result in serious injury or death.
Warning of electrical voltage
This symbol indicates danger to the life and health of persons due to
electrical voltage.
Do not cover
This symbol located on the device indicates that it is prohibited to place
objects (such as towels, clothes etc.) above or directly in front of the device.
To avoid overheating and fire hazards, the device must not be covered.
Hot surface
This symbol located on the device indicates that its surfaces are hot during
and immediately after operation. Hot surfaces should not be touched:
danger of burns.
Do not spray
This symbol located on the device indicates that it is prohibited to spray the
device.
Observe instructions in manual
This symbol located on the device indicates that instructions in the operating
manual must be observed when installing and using the device.

Ecostrad_iQ_Plus_V2.6_15022022 3
Contents
1 | About the Manual - - - - - - - - - - - - - - - - - - - - - 4
2 | Warnings & Precautions - - - - - - - - - - - - - - - - - 4
3 | Technical Information- - - - - - - - - - - - - - - - - - - 7
4 | Installation- - - - - - - - - - - - - - - - - - - - - - - - - - 7
4-1 Fixings - - - - - - - - - - - - - - - - - - - - - - - - - 7
4-2 Wall mounting instructions - - - - - - - - - - - - - 8
4-3 Free standing instructions - - - - - - - - - - - - - 10
5 | Control Panel - - - - - - - - - - - - - - - - - - - - - - - - 11
5-1 Power switch - - - - - - - - - - - - - - - - - - - - - 11
5-2 Display - - - - - - - - - - - - - - - - - - - - - - - - - 11
5-3 Standby mode - - - - - - - - - - - - - - - - - - - - 12
5-4 Heating modes - - - - - - - - - - - - - - - - - - - - 12
5-5 Settings- - - - - - - - - - - - - - - - - - - - - - - - - 15
5-6 Child lock - - - - - - - - - - - - - - - - - - - - - - - 17
5-7 Reset to defaults - - - - - - - - - - - - - - - - - - - 17
6 | Connecting to WiFi- - - - - - - - - - - - - - - - - - - - - 17
6-1 Downloading the app - - - - - - - - - - - - - - - - 17
6-2 Connecting to the app- - - - - - - - - - - - - - - - 18
7 | Using the App - - - - - - - - - - - - - - - - - - - - - - - - 20
7-1 Home overview - - - - - - - - - - - - - - - - - - - - 20
7-2 Control interface - - - - - - - - - - - - - - - - - - - 20
7-3 Choose mode - - - - - - - - - - - - - - - - - - - - - 20
7-4 Device settings - - - - - - - - - - - - - - - - - - - - 22
7-5 Voice integration - - - - - - - - - - - - - - - - - - - 22
8 | Troubleshooting - - - - - - - - - - - - - - - - - - - - - - 24
9 | Cleaning - - - - - - - - - - - - - - - - - - - - - - - - - - - 24
10 | Warranty- - - - - - - - - - - - - - - - - - - - - - - - - - - 25
11 | ERP Ecodesign Information - - - - - - - - - - - - - - - 26
12 | Disposal - - - - - - - - - - - - - - - - - - - - - - - - - - - 27

Ecostrad_iQ_Plus_V2.6_15022022 4
1 | About the Manual
This manual describes the Ecostrad iQ Plus Panel Heater and details how to install
and use the product. It is important to thoroughly review this manual before using the
product.
For additional information regarding any aspect of the Ecostrad iQ Plus Panel Heater,
contact:
Ecostrad Ltd.
Firecrest House
Lingerfield Business Park
Market Flat Lane
Knaresborough
North Yorkshire
HG5 9JA
Tel: 0330 880 7005
Email: [email protected]
https://ecostrad.com/
2 | Warnings & Precautions
Read this manual carefully before using or installing the heater. Always store the
manual in the immediate vicinity of the heater or its site of use.
Read all safety warnings and all instructions.
The heater should only be used according to the instructions in this manual.
Failure to follow the warnings and instructions may result in electric shock, fire,
serious injury, or all of the above. Save all warnings and instructions for future
reference.
Warning
Children of less than 3 years should be kept away unless continuously
supervised. Children aged from 3 years and less than 8 years shall only
switch on/off the appliance provided that it has been placed or installed in
its intended normal operating position and they have been given
supervision or instruction concerning use of the appliance in a safe way and
understand the hazards involved. Children aged from 3 years and less than
8 years shall not plug in, regulate, or clean the appliance, or perform
maintenance.
Warning
This appliance can be used by children aged from 8 years and above and
persons with reduced physical, sensory or mental capabilities or lack of
experience and knowledge if they have been given supervision or
instruction concerning the use of the appliance in a safe way and
understand the hazards involved. Children shall not play with the
appliance. Cleaning and user maintenance shall not be made by children
without supervision.

Ecostrad_iQ_Plus_V2.6_15022022 5
Warning
Do not use the device in enclosed spaces if persons are present who cannot
leave the room independently and are not under constant supervision.
Warning
To avoid overheating and risk of fire, do not cover the heater.
Covering the heater for extended periods will activate the safety
fuse, permanently disabling the heater.
Warning
In order to avoid a hazard due to inadvertent re-setting of the thermal
cut-out, this appliance must not be supplied through an external switching
device, such as a timer, or connected to a circuit that is regularly switched
on and off by the utility.
Warning
Some parts of this product can become very hot and cause burns.
Do not touch the surface when in operation. Do not install close to
curtains or other combustible materials. Particular attention should be
given where children and vulnerable adults are present.
• Keep the power cable away from all hot parts of the appliance.
• Do not use the heater with the power cable wound up. This can cause a
dangerous build up of heat. Do not wind the cable around the appliance as this
may cause weakening and splitting of the insulation. The power cable should be
fully unwound and removed from any storage areas before use.
• Do not use the device if you detect damage to the mains plug or power cable. If
the supply cord is damaged, it must be replaced by the manufacturer, its service
agent or similarly qualified persons to avoid a hazard.
• All repairs and servicing must be carried out by a qualified person. To avoid
danger any repairs must be completed by the manufacturer, a service agent of
the manufacturer or a similarly qualified person.
• Make sure that the voltage indicated on the rating plate for this appliance
corresponds to your power outlet.
• Check for transportation damage and make sure all parts are complete after the
appliance is unpacked. Do not use if any parts are missing or damaged.
• Do not connect the product to the power supply until fully assembled and
adjusted.
• It is recommended to plug the device directly into a wall socket. Use of extension
leads is not recommended because many models do not support high-powered
appliances. Make sure any extension lead used can safely support the power
requirements of the product.
• The power cable should not be positioned under the carpet or items of furniture.
Do not run the cable where it will be a trip hazard.

Ecostrad_iQ_Plus_V2.6_15022022 6
• Do not use this device in the immediate surroundings of a bath, shower,
swimming pool or any other water container. Risk of electric shock. This
product is not suitable for bathroom use.
• The device must be placed where the switches and controllers cannot be touched
by a person in a bathtub or shower.
• Do not use the device with wet or damp hands.
• No part of the appliance should be submersed in any type of liquid.
• Cleaning should be carried out using a damp cloth only. No abrasive chemicals
or materials should be used.
• Never insert fingers or other objects or body parts into the device. Risk of electric
shock or injury.
• The device must not be located immediately below an electrical socket outlet.
• Keep all objects at least 1m away from the front, side or back of the heater.
• When wall mounted, the following safety distances from surrounding surfaces
must be observed: 20cm from the base of the heater to the ground; 80cm from
the top of the heater to any ceiling or shelf; 15cm from the sides to
non-flammable surfaces, e.g. brick walls; 30cm from the sides to flammable
objects and surfaces, e.g. curtains or wooden walls. Keep the device at a
minimum distance of one metre from curtains and other flammable materials.
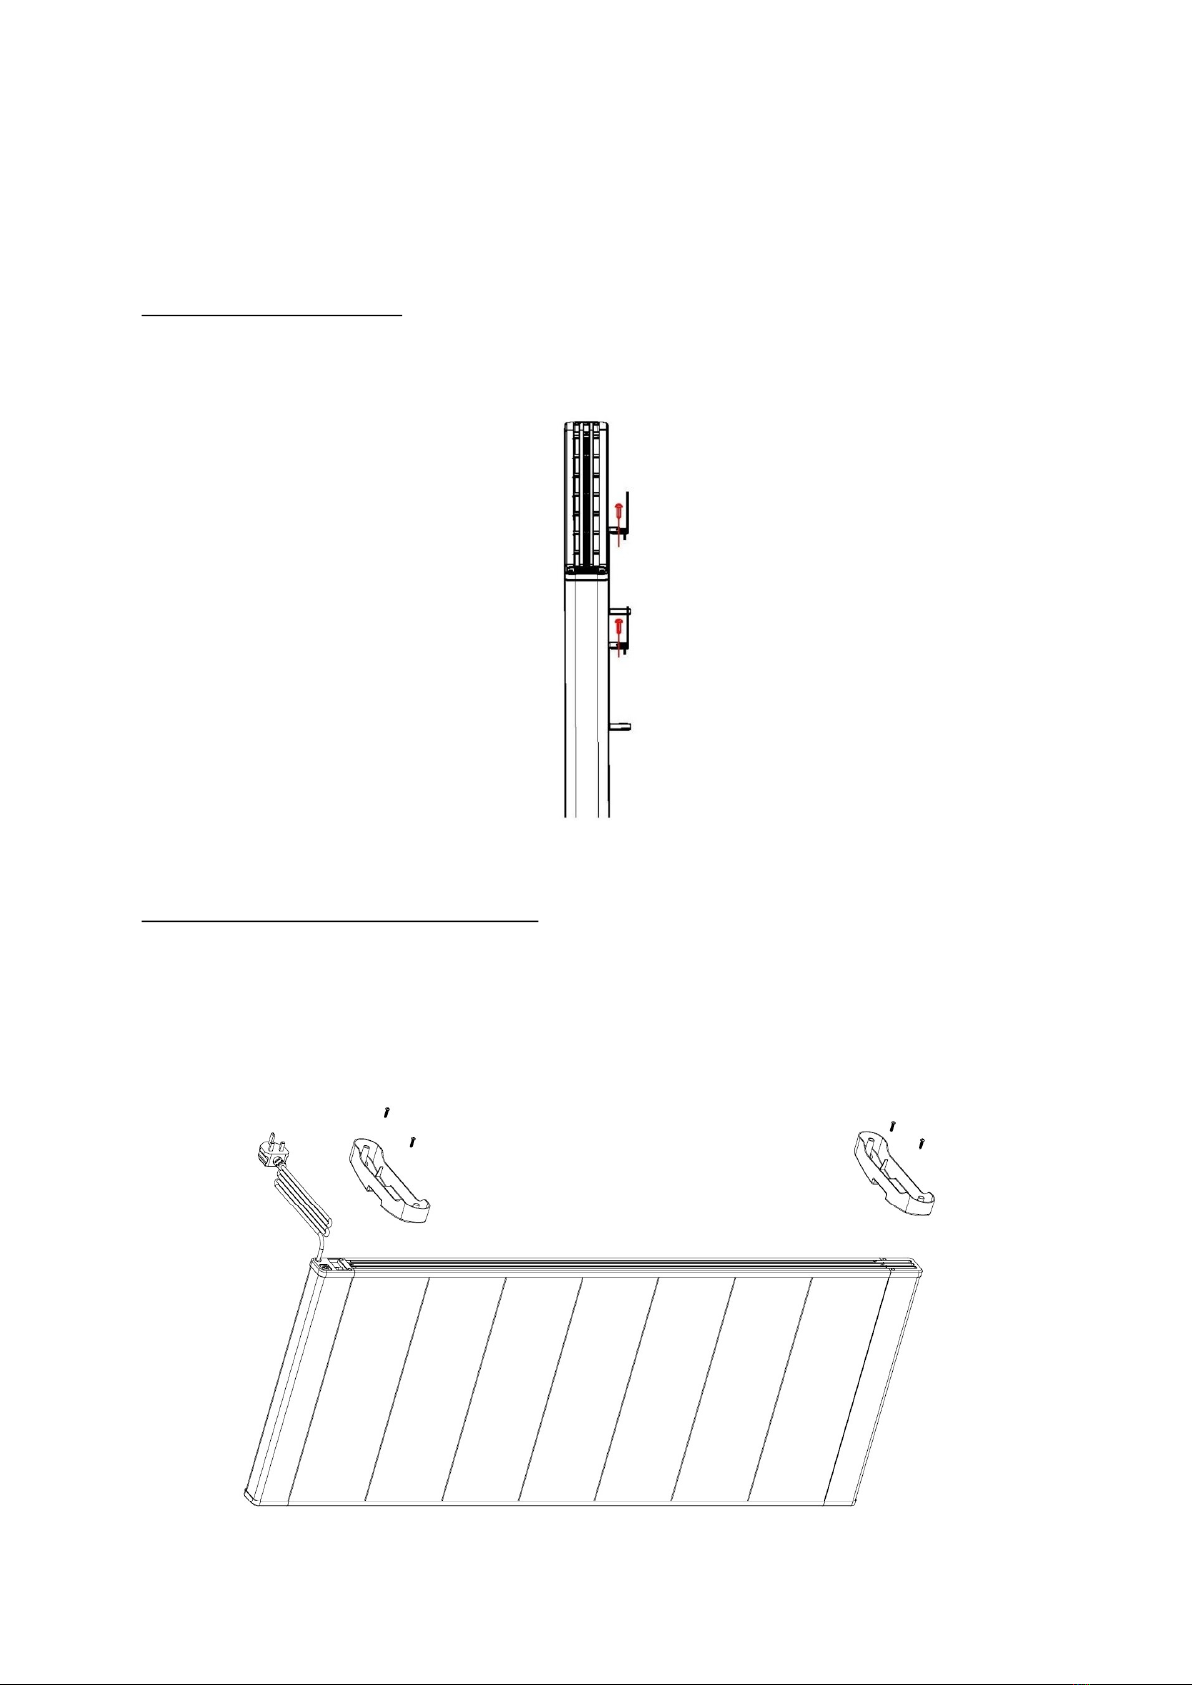
• The device must only be installed in an upright and fixed position on a smooth,
stable, heat-resistant surface.
• The device is for indoor use only.
• Make sure the minimum safety distances from walls and objects stated in
the installation instructions are observed at all times. This is very
important to prevent damage to walls, furniture and soft furnishings and
to prevent the product overheating.
• Do not use the device in rooms where contact with flammable or potentially
explosive materials like dust, gas or vapour cannot be avoided.
• Do not use in rooms or environments that have a corrosive atmosphere.
• Do not use in places where food, artwork, or delicate scientific objects are stored.
• Do not put the appliance on a bed or long, thick carpet. This can cause the air
inlet or outlet to become clogged and constitutes a fire risk.
• Do not operate the device when wet. If the device gets wet during cleaning, allow
it to dry out before using.
• Do not expose the device to water jets.
• Do not transport the device during operation.
• Do not sit on the device.
• Before carrying out maintenance, care or repair work on the device, ensure the
device is unplugged. Do not use the cable to tug the plug from the socket. Hold
the plug and pull.

Ecostrad_iQ_Plus_V2.6_15022022 7
• Switch the device off and disconnect the power cable from the mains socket
when the device is not in use.
• Allow the device to cool down before touching or transporting the device, or
attempting maintenance work.
3 | Technical Information
4 | Installation
Read all safety instructions and warnings stated in the preceding section of
this manual. Failing to follow these instructions can cause damage to life or
property.
4-1 | Fixings
Before beginning installation, check that all fixings shown in Table 2 are supplied. The
heater should only be mounted with the manufacturer’s fixings
Table 1 | Specifications
Voltage 220-240V AC / 50Hz
Wattage 500W, 1000W, 1500W,
2000W, 2500W
Temperature setting
Range
Resolution
7–30 °C
1 °C
IP Rating IP20
Appliance class Class I
Power cable length 1.4m
Table 2 | Supplied fixings
Component Image Quantity
Bracket Screws (4*12mm) 6
Feet Screws (4*20mm) 4
Wall Screws (4*35mm) 2
Wall Plugs 2
Hanging Plates 2
Wall Brackets 2
Feet 2

Ecostrad_iQ_Plus_V2.6_15022022 8
4-2 | Wall mounting instructions
WARNING - Before switching on the appliance make sure that the heater is
correctly fixed and is secure to the wall.
4-2-1 | Prepare the heater
Fix the hanging plates to the back of the heater using two 4*12mm screws for each
plate as shown in Figure 1.
4-2-2 | Prepare the wall
Choose the mounting position, respecting the minimum distances from surrounding
surfaces and objects shown in Table 3 and Figure 2.
Table 3 | Minimum safety distances
From the top of the heater to shelves or
ceiling
80cm
From base of heater to ground 20cm
From sides of heater to:
Non-flammable surfaces (e.g brick walls)
Flammable surfaces (e.g wooden walls)
15cm
30cm
From radiator to flammable materials and
objects (e.g curtains) 1m
Figure 1 | Fixing the hanging plates

Ecostrad_iQ_Plus_V2.6_15022022 9
Fix the wall brackets:
a. Use a tape measure and pencil to make two marks on the wall as per
Figure 3 and Table 4. The template provided will help you measure the
width.
Table 4 | Mounting measurements
Heater width
[mm]
A
(Mounting Width)
[mm]
B
(Min. Mounting Height)
[mm]
467 163 610
629 326 610
955 651 610
1118 814 610
1280 977 610
Figure 2 | Diagram of minimum safety distances
Figure 3 | Positions of drilling holes measurements

Ecostrad_iQ_Plus_V2.6_15022022 10
b. Using a 6mm drill bit, drill two holes where you made your marks
c. Knock a wall plug into each hole using a hammer.
d. Position the wall hangers over the holes and use the 4*35mm screws to fix
them in place.
4-2-3 | Hang the heater
Hang the heater on the wall brackets and fix in place with two 4*12mm screws, as in
Figure 4.
4-3 | Free standing instructions
To use the heater free standing, you must first affix the feet:
1. Turn the heater upside down.
2. Align the holes on the feet with the holes on the base of the heater.
3. Use two 4*20mm screws to attach each foot (see Figure 5).
Figure 4 | Secure heater to wall brackets
Figure 5 | Fixing the feet

Ecostrad_iQ_Plus_V2.6_15022022 11
5 | Control Panel
5-1 | Power switch
Before use the heater must be switched on at the
mechanical switch at the base of the unit shown in
Figure 6.
5-1-1 | Memory function
In the event of power failure or disconnection,
program and temperature settings will be
remembered and the heater will restart on the
mode it was previously running. If the heater is
connected to the WiFi, the time setting will
synchronise with the app. If the heater is not
connected to WiFi, the time will need to be re-set.
5-2 | Display
The control panel, shown in Figure 7, includes a backlit LCD display. The backlight
switches on when the panel is in use and times out after thirty seconds not in use.
Figure 6 | Power rocker switch
Figure 7 | Control screen
Set
Temperature
Standby/On
Day of the
week
Increase
time/temperature
Decrease
time/temperature
Timer
program
Mode switch
Time

Ecostrad_iQ_Plus_V2.6_15022022 12
Icons used on the control panel can be found in Table 5.
5-3 | Standby mode
When the heater first switches on it appears in standby mode, where the time is
displayed and the heater will not heat. You can use the button to switch between
standby and heating modes. When the heater first turns on, the time will appear as
00:00. You can set the correct time in timer mode, see section 5-4-4.
5-4 | Heating modes
Tap the button to switch the heater on. Tap to switch between modes. The icon
on the display will change accordingly, browsing through: Comfort , Eco ,
Anti-Freeze , Timer and Boost mode .
You can also scan this QR code to watch a instructional video on using the
following heating modes.
5-4-1 | Comfort mode
When the icon (and only the icon) displays on the screen, you
are in comfort mode. In this mode, the heater heats to a constant set
temperature. The thermostat measures the room temperature and
switches the heating on and off accordingly. The icon displays
when the heater is heating.
The default set temperature is 19 °C. Set temperature can be adjusted using the
and buttons. Set temperature range is 7-30 °C.
The temperature set in comfort mode also applies to comfort intervals when they
occur in timer mode.
Table 5 | Icons and their meanings
Symbol Meaning Symbol Meaning
Comfort Keypad locked
Eco Connected to WiFi
Anti-freeze Device is heating
Timer Open window detected
Boost mode LST mode

Ecostrad_iQ_Plus_V2.6_15022022 13
5-4-2 | Eco mode
When the icon (and only the icon) displays on the screen, you
are in eco mode. Just like comfort, in this mode the heater heats to a
constant set room temperature. However, eco mode is designed to
be set to a lower temperature, providing a low-heat, energy-saving
alternative for when you are sleeping or out.
Set temperature range is 7-30 °C and can be adjusted using the
and buttons.
The temperature set in eco mode also applies to eco intervals when they occur in
program mode.
5-4-3 | Anti-freeze mode
When the icon displays on the screen, you are in anti-freeze
mode. This is the mode to use when rooms are empty for long
periods – for instance, when you go on holiday. Anti-freeze sets the
heater to come on only when temperatures drop low, keeping the
room warm enough to prevent pipes from freezing.
Anti-freeze mode is set to 7 °C. This is not adjustable.
5-4-4 | Timer
When the icon displays on the screen, you are in timer mode. On
this mode the heater will heat as per your set program. You can
adjust set time and program from this screen by holding down the
button. NOTE - this menu times out after 30 seconds.
Setting the time
• Hold down the key until the hours appear.
• Use the and keys to set the hour.
• Press to confirm. The minutes will appear.
• Use the and keys to set the minutes. Press to confirm.
The day of the week will appear.
• Use the and keys to set the day of the week, where 1 =
Monday, 2 = Tuesday and so on.
• Press to confirm. The display will move to the program
setting stage.

Ecostrad_iQ_Plus_V2.6_15022022 14
Setting the program
The timer allows you to set a different program for every day of the week. P1 is the
schedule for Monday, P2 is the schedule for Tuesday, and so on. Each program
consists of 24 hourly slots where you can set either comfort or eco mode. The
heater will heat at the temperatures you set on comfort and eco mode.
Follow the instructions above for setting the time. When P1 appears on the screen, you
are ready to start setting your program:
• P1 and 00 will be on the screen. This means you are choosing a mode for
midnight on Monday morning.
• Press the key to set comfort mode and the key to set
economy mode.
• The bars at the bottom of the screen will change to reflect
your choice – top bar for comfort, no bar for eco, and the
display will advance to P1 01 – 1am on Monday.
• Continue pressing and to set comfort and eco
modes for the rest of the day. When you get to the end of
the day, the time will begin again at 00, midnight. You can go through the
program as many times as you need to get it right.
• When you are happy with the program for Monday, press to move on to
Tuesday.
• P2 and 00 will appear on the screen. This means you are choosing a mode for
midnight on Tuesday morning. Repeat the steps above to choose mode for each
hour.
• Press to confirm and move on to Wednesday.
• Continue this process until each day of the week is set. Press to confirm and
return to timer mode. The heater will heat as per your new program.
If you are struggling with the process of setting the program, scan this QR
code to watch an easy-to-follow programming video.
5-4-5 | Boost mode
When the icon displays on the screen, the heater is in boost
mode. When this mode is selected, the heater will work to a 30 °C
set temperature for the length of time shown on the display. The
default time is 2 hours. You can adjust this time using the and
keys, from 30 minutes to 8 hours, in intervals of half an hour.
Whilst boost is running the time on the display counts down in steps
of 30 minutes. When this time elapses, the heater switches to standby mode.
Eco Comfort

Ecostrad_iQ_Plus_V2.6_15022022 15
5-5 | Settings
The settings menu allows you to enable, disable and configure all the heater’s
supplementary functions: temperature compensation (F0), open window detection
(F2), low surface temperature setting (F3), WiFi function (F4) and time synchronisation
(F5).
Press to put the heater into standby mode and hold down for 5 seconds to enter
the settings menu. NOTE - this menu times out after 15 seconds.
You can also scan this QR to watch an instructional video on using the
advanced settings.
5-5-1 | Temperature compensation (F0)
The temperature compensation setting allows users to adjust for
any discrepancy between the average room temperature and the
temperature sensed by the thermostat. For instance, if the
temperature in the room is 18 °C, but the heater is sensing 16 °C, a
compensation factor of +2 °C will offset the difference.
The accuracy of the heater’s temperature reading can be
compromised if the unit is mounted such that the sensor is
positioned in a hot or cold spot – such as hot water pipes or a draughty doorway. The
sensor is at the bottom right of the unit.
• Press to put the heater into standby mode and hold down for 5 seconds to
enter the settings menu.
• F0 will appear on the screen, followed by the current set temperature
compensation. Default is 0 °C.
• Use the and keys to adjust. Temperature compensation can be adjusted
from -5 to 5 °C in steps of 1 °C.
• Press to confirm and move onto the next setting.
5-5-2 | Open window detection (F2)
Open window detection is an energy-saving feature designed to cut power to the unit
if a window is opened. If the heater detects a sudden drop in temperature (2 °C or
more within 5 minutes, the icon will appear and the heater will switch to
anti-freeze mode to prevent energy wastage as heat escapes through the
window. The F2 setting controls how long the heater waits before switching back to
the original heating mode. Open window detection is disabled by default.
• Press to put the heater into standby mode and hold down for 5 seconds to
enter the settings menu.
• Press to skip through the settings until F2 appears on the screen, followed by
the current setting. Default is “oF” - disabled.

Ecostrad_iQ_Plus_V2.6_15022022 16
• Use the and keys to adjust. Choose 60 or 90 to enable the feature and set
the number of minutes, or choose “oF” to disable detection.
• Press to confirm and move onto the next setting.
5-5-3 | Low surface temperature setting (F3)
The LST setting allows you to lower the heater’s temperature limit, providing peace of
mind if you’re using the heater in a room where children or vulnerable adults are
present. When this setting is disabled, the heater runs at its default safety limit: if the
internal thermostat detects a temperature over approx. 70 °C, the heater will stop
heating until it drops back below the limit. Enabling the LST setting gives you a choice
of five lower limits: approx. 40 °C, 45 °C, 50 °C, 55 °C and 60 °C. While some parts of
the device may get hotter than this limit, depending on environmental factors, the
overall maximum temperature of the heater will be significantly reduced.
When the LST setting is enabled, the symbol shows on the display.
Please be aware that lowering the temperature limit will reduce the heater’s
maximum heat output, which may impact its effectiveness in your space. If you plan
to use the temperature limit permanently, you may need to install additional heaters
in your room to compensate. The LST setting is disabled by default.
• Press to put the heater into standby mode and hold down for 5 seconds to
enter the settings menu.
• Press to skip through the settings until F3 appears on the screen, followed by
the current setting. Default is “oF” - disabled.
• Use the and keys to adjust. Low surface temperature can be set to 40, 45,
50, 55, 60, or “oF” to disable.
• Press to confirm and move onto the next setting.
5-5-4 | WiFi function (F4)
This setting allows you to enable or disable the heater’s connection to WiFi. Disabling
the connection is temporary: if you have already added the heater to your app
account, disabling the connection will not remove it. You will be able to control via the
app as soon as you re-enable the connection. The icon appears on the screen
when the WiFi function is enabled: when it is flashing, the connection has been lost or
not yet made; when it is steady, a connection is active.
• Press to put the heater into standby mode and hold down for 5 seconds to
enter the settings menu.
• Press to skip through the settings until F4 appears on the screen, followed by
the current setting. Default is “oN” - enabled.
• Use the and keys to adjust. Select “oN” to enable and “oF” to disable.

Ecostrad_iQ_Plus_V2.6_15022022 17
• Press to confirm and move onto the next setting.
5-5-5 | Time synchronisation (F5)
This setting controls whether the time set on the heater automatically synchronises
with the time on the app when the unit is controlled via WiFi.
• Press to put the heater into standby mode and hold down for 5 seconds to
enter the settings menu.
• Press to skip through the settings until F5 appears on the screen, followed by
the current setting. Default is “oN” - enabled.
• Use the and keys to adjust. Select “oN” to enable and “oF” to disable.
Press to confirm and move onto the next setting.
5-6 | Child lock
Press and hold the and keys for 5 seconds to lock the display. The icon will
appear and all keys will be locked, except for standby button. To unlock, repeat this
process, and the icon will disappear.
5-7 | Reset to defaults
Press to put the heater in standby mode. Press and hold the key for 10 seconds
to restore the device to default settings: Comfort: 19 °C, Eco: 19 °C, Time: 00:00, Day:
1 (Monday), Program: 24/7 Eco Intervals, Temperature Compensation: 0 °C, Open
Window Detection: Disabled, LST Setting: Disabled, WiFi Function: Enabled, Time
Synchronisation: Enabled.
6 | Connecting to WiFi
6-1 | Downloading the app
The Ecostrad iQ Plus Panel Heater is designed to work with the Smart Life
app.
Scan the code below to go to the app. Press install and follow the app's
instructions to create an account.
NOTE — The Smart Life app is a constantly evolving third party system.
This guide was correct at time of printing but may differ slightly from
future versions. The app is designed to work on Android or iOS but older
software versions may affect app presentation and performance.

Ecostrad_iQ_Plus_V2.6_15022022 18
6-2 | Connecting to the app
1. Ensure WiFi control is enabled in the heater settings. If the icon is flashing, the
WiFi connection is enabled and you can move to step 2. If the icon is not flashing,
go to section 5-5-4 and follow the instructions to enable.
2. To put the heater in pairing mode, press to enter standby mode and hold
down until the screen switches to the connection screen. This begins a 99
second count down, giving you 3 minutes to make the connection on the app.
3. On the home page of the app, press + or "Add Device".
4. The app should start scanning, as shown by the icon at the top of the screen (see
Figure 8). If this icon and text does not show, press in the top right-hand
corner.
5. The app will demonstrate that it has found the heater (Figure 9). Press “Add”.
6. The app may ask you to choose your WiFi network and enter the password. Press
"Next".
7. The heater will begin connecting. When it is successfully added,
the word "PASS" will show on the display screen and a tick mark
will appear beside the heater on the app. Press “NEXT”, as
shown in Figure 9.
Figure 8 | Adding device on Smart Life app

Ecostrad_iQ_Plus_V2.6_15022022 19
8. When successfully connected, the heater will appear as below on the app. Press
to change its name or "Done" to return to the home screen.
WiFi Connection — Troubleshooting
If your heater does not connect on the first attempt:
• Make sure both the heater and your smart device are in range
of your router.
• Make sure you complete the connection process in 99 seconds.
If the display reaches the end of the countdown, it will show
"FAIL" on the display, and you must begin the process again.
• Ensure your router has a strong internet connection.
• Ensure WiFi and Bluetooth are enabled on your smart device.
Figure 9 | Finding device on Smart Life app

Ecostrad_iQ_Plus_V2.6_15022022 20
• Depending on your device type and settings, location services may need to be
enabled to achieve connection.
• Make sure the app has registered successfully.
• Make sure your smart device is connected to the same WiFi network as that to
which you are attempting to connect the heater.
• Ensure you are connected to a 2.4G WiFi band. See instructions within the app if
you are currently connected to a 5G band.
• Check any local restrictions on your WiFi. WiFi networks in public places such as
hotels and airports may require extra identification steps.
7 | Using the App
NOTE – The Smart Life app is a constantly evolving third party system. The guide
below was correct at time of printing but may differ slightly from future versions.
7-1 | Home overview
You can use the Smart Life app to control multiple devices. All
devices are displayed on the home screen with their status.
Possible statuses:
• Online — Heater will respond to app commands.
• Offline — Device is turned off at wall or power switch. It
cannot be controlled by the app.
7-2 | Control interface
Tap the heater listing to go to the control interface, as
demonstrated in Figure 10 below.
Here you can turn the heater off and on, adjust set
temperatures, choose mode and access weekly programmer
and device settings.
7-3 | Choose mode
Tap the mode icon on the control interface to
choose mode.The four options correspond to the
five modes on the control panel.
7-3-1 | Comfort, eco & anti-freeze mode
In comfort and eco mode, simply use the sliding
dial or the – and + keys to adjust the set
temperature. The anti-freeze set temperature
cannot be adjusted.
Table of contents
Other Ecostrad Electric Heater manuals

Ecostrad
Ecostrad ALLERTON User manual

Ecostrad
Ecostrad Scala User manual

Ecostrad
Ecostrad iQ WiFi User manual

Ecostrad
Ecostrad GH-20F-APP User manual

Ecostrad
Ecostrad ALLORA Vertical User manual

Ecostrad
Ecostrad iQ Plus Series User manual

Ecostrad
Ecostrad Cube User manual

Ecostrad
Ecostrad Fina-E User manual

Ecostrad
Ecostrad Klasse iQ User manual