Ecovolt Joule Therm JT6r User manual

JS10/2
User Manual
Aluminum Electric Radiator with
Kaolin Ceramic Heat Plates
JT6r, JT9r, JT12r, JT15r, JT20r
Please read this manual carefully before use

JS10/2
IMPORTANT SAFEGUARDS
When using an electrical appliance, basic safety precautions
should always be observed, including the following:
READ ALL INSTRUCTIONS BEFORE USING
WARNING: To reduce the risk of fire, electrical shock, or injury
to person:
1. Connect the appliance to single-phase AC supply of the voltage
specified on the rating plate 230V +/- 10%
2. In order to avoid overheating do not cover the heater.
3. Extreme caution is necessary when any heater is used by or
near children, disabled persons or elderly persons as the
surface area is hot
4. The heater must not be located immediately below an electrical
Socket-outlet.
5. Do not run power cord under carpeting and do not cover cord
with throw rugs, runners or the like. Arrange cord away from
traffic area and where it will not be a trip hazard.
6. Do not operate the heater with a damaged cord or plug; always

JS10/2
inspect the power cord before installation.
7. If the supply cord is damaged, it must be replaced by the
manufacturer, its service agent or a similarly qualified person in
order to avoid a hazard.
8. Never use an extension cord as this may overheat and may
cause a fire.
9. Use the heater in a well-ventilated area. Use the heater on flat,
dry surfaces only.
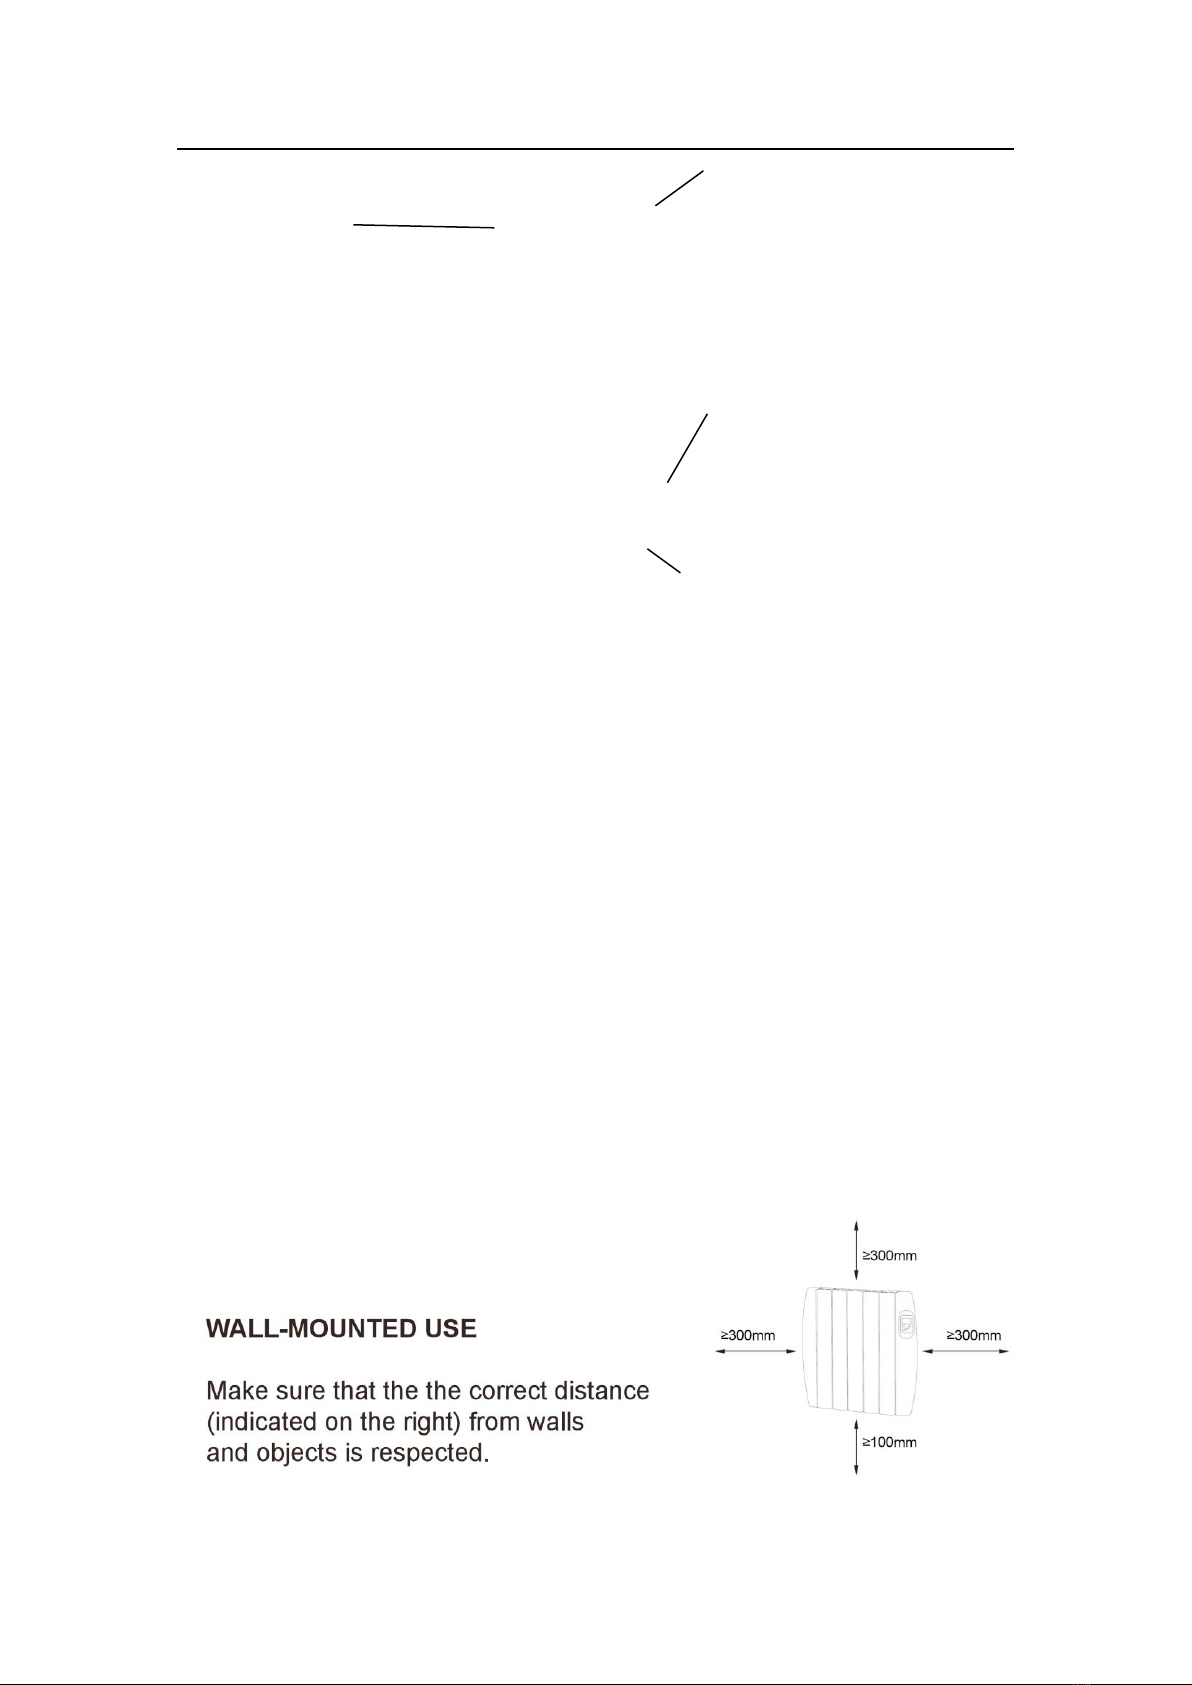
10.Do not place this heater near flammable materials, surfaces or
substances, as there may be a risk of fire. Keep the above
flammable materials, surfaces or substances at least 300mm
from the front of the product and keep them away from the sides
and rear.
11.Do not use the heater in any areas where petrol, paint or other
flammable liquids are stored e.g. Garages or workshops.
12.Don’t use this heater in the immediate surroundings of a bath, a
shower or a swimming pool. Always seek advice in locating a
suitable position for such areas. The heater should be installed
so that cannot be touched by a person using a bath or shower.
13.This heater is hot when in use. To avoid burns and personal
injury, avoid contact for long periods with the heater.
14.Before moving the heater, unplug it and let it cool down for 45
minutes. If provided, use handles when moving the product.
15.Be sure that no other appliances are in use on the same
electrical circuit as your product as an overload can occur. Seek
professional advice from an electrician before installing the
product
16.This appliance is not intended for use by persons (including
children) with reduced physical, sensory or mental capabilities,
or lack of experience and knowledge, unless they have been
given supervision or instruction concerning use of the appliance

JS10/2
by a person responsible for their safety.
17.Children should be supervised to ensure that they do not play
with the appliance.
18.This appliance can be used by children aged from 8 years and
above and persons with reduced physical, sensory or mental
capabilities or lack of experience and knowledge if they have
been given supervision or instruction concerning use of the
appliance in a safe way and understand the hazards involved.
Children shall not play with the appliance. Cleaning and user
maintenance shall not be made by children without supervision.
19.Children of less than 3 years should be kept away unless
continuously supervised.
SAVE THESE INSTRUCTIONS
SPECIFICATIONS
MODEL
NO
FINS
NET SIZE
RATED
VOLTAGE
RATED POWER
JT6r
4
500x80x580mm
~230V/50Hz
600W
JT9r
5
580x80x580mm
~230V/50Hz
900W
JT12r
8
820x80x580mm
~230V/50Hz
1200W
JT15r
10
980x80x580mm
~230V/50Hz
1500W
JT20r
12
1140x80x580mm
~230V/50Hz
2000W
STRUCTURE AND PARTS
OUT LET
LCD SCREEN
JS10/2
CHARACTERISTIC
1. 1 heat setting
2. Over heating protection
3. With digital LCD
4. Room temperature setting
5. Room temperature sensor
6. Digital clock, digital week calendar
7. Multi-running mode: daily program mode, weekly program mode, free use mode, pilot
system function
8. Anti-frost function
9. Wall-mount use
10.Built in RF Communication. 868Mhz
INSTALLATION
POWER SWITCH
TEMPERATURE SENSOR
FINS

JS10/2
A. Refer picture (1) & (2), fix the plastic hooks on the back of radiator by contra rotating knob.
B. Refer picture (3) & (4), use screw to fix the hanging rack.
C. Refer picture (5) & (6), make sure side A is up & side B is down position for the hanging rack.
Do not make hanging rack in wrong direction.
D. Refer picture (5) & (6), put the hanging rack on the wall as a guide ruler(please make sure
the holes at parallel level), use a pen to mark the hole position, and drill holes on the wall with
φ8mm drill bit.
Warning: be sure to maintain a distance of at least 30cm between the heater, floor, walls,
etc. When drilling holes, always check to make sure that there is no wiring, pipework,
etc.
E. Refer picture (7), insert the plastic wall plug and fasten the hanging rack on the wall with

JS10/2
screws.
F. Refer picture (8), gently insert the heater body of the bottom to the hanging rack first, then
push the heater body to be hooked on the whole hanging rack and fasten the hanging rack
with hanging sheathing by screw.
INSTRUCTIONS FOR USE
Warning: Before using the heater make sure that it is mounted tightly on the wall.
Damage may occur if it is not secured in place.
Take some time to read and understand the display and buttons before attempting to
program.
Display & Buttons
LCD Lock
Explanation
If any of the
buttons are
not pressed
within 40s,
the keypad
will lock ( )
automatically.
To unlock the
keypad, press and until the ( ) disappears.
1
Time Display
8
Frost Protection
2
Weekday
9
Standby Mode
3
Program Name
10
Lock Icon
4
PROG
11
Room/SET TEMP. Display
5
PROG Mode
12
Clock
6
Comfort Mode
13
Heating Icon
7
Economy Mode
14
Programmable Time Display

JS10/2
Set Temperature
Normally, the LCD displays room temperature. If you want to change the set temperature,
press or buttons, the set temperature will flash. Using and button again
to increase or decrease the set temperature to the desired one. After 10s of non – use of the
keypad the display will revert back to the selected one.
Temperature Setting Range: 5°C ~ 60°C
Mode Temperature. Pre-set
A B
To set the mode temperature, use the following steps:
(1) Press and hold button for 5 seconds. The COMFORT mode icon display (A) will
be shown. Using and buttons to change the temp.
(2) Press button. The ECONOMY mode icon display (B) will be shown. Using
and buttons to change the temp.
(3) Press to save the settings.
Working Mode Selection
COMFORT ECONOMY PROG
To toggle between modes use button. After selection, the heater will work according to
the selection.

JS10/2
Adjusting the Time and Day Setting
To set the time and day with the following steps:
(1) Press and hold button for around 3 seconds. The minutes (top left of the display)
flashes. Using and buttons to change the minutes.
(2) Press the button. The hour (top left in the display) flashes. Using and
buttons to change the hours.
(3) Press the button. The day display (top left in the display) will flash as a number. Using
and buttons to select weekday. Use 1 for Monday, 2 for Tuesday, 3 for
Wednesday, 4 for Thursday, 5 for Friday, 6 for Saturday and 7 for Sunday.
Program Settings
(4) Press button, the COMFORT mode ( ) appears on the display, the figures
flashes. Press and to set the hour of COMFORT Mode.
(5) Press Button, change Mode from COMFORT to ECONOMY ( ) Using the
and buttons to set the hour to your desired time. Toggle between modes to select the
desired program you want to suit your heating needs.
(6) Press the button after selecting the desired setting for this day, it will automatically
skip to next day, you have the option of skipping to other day by pressing button.
(7) After all days setting, Press to save the settings.
Parameter Settings
Under off status, press button and button at the same time to enter into parameter
setting... Each press of
button toggles between item settings. After setting press to log out.

JS10/2
No.
Item
Range
Default
01
Temp. Calibration
-8℃~+8℃
0℃
02
High Temp. Limit
5℃~ 60℃
35℃
03
Low Temp. Limit
5℃~ 60℃
5℃
04
Frost Protection
5℃~10℃
--: Frost Protection OFF
5℃
05
Buzzer Sound
0:OFF 1: ON
1: ON
06
Factory Reset
0; 1( Reset)
0;
Note: If factory reset is required, long press PRG to activate it.
JS10/2 Controller
This part of the manual only applies if your JOULETHERM heaters are being
controlled by the JS10/2 controller.
JS10/2 is a central controller, it is 4.3inch TFT color touch screen, giving central
control up to 40 zones or 40 heating devices.
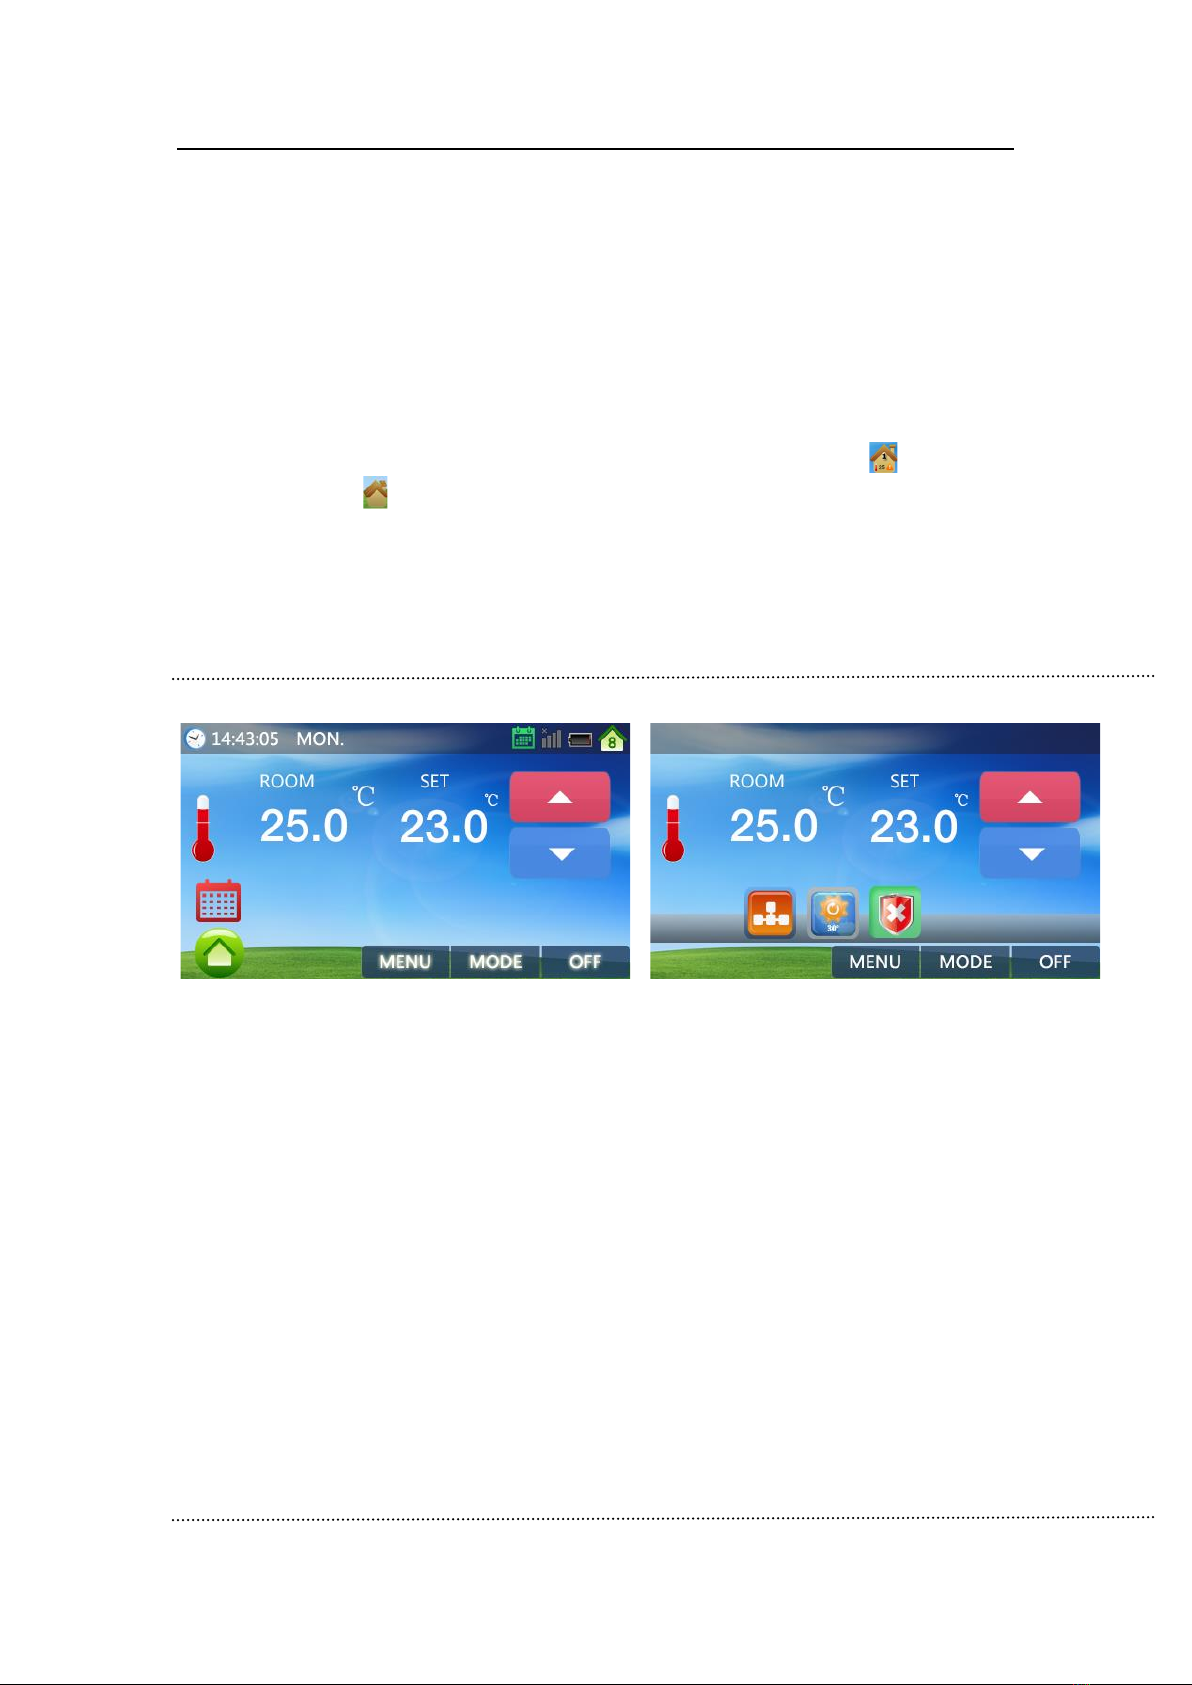
Home Page
JS10/2
2-1 2-2
Power on your JS10/2 touch screen controller, the main page will display as shown in figure (2-1).
There are five zones, select one of the zones and pair all heaters with the controller. (For ID
Paring method please see ID Pairing section in this manual)
Once pairing is complete, you can see the current temperature and working mode of each room
as shown in figure (2-2). If you want change setting individually, you can press as shown in
figure (3-1), or press for group control as shown in figure (4-1)
Individual Control
3-1 3-2
1. ON/OFF: switch on/off heater
2. MODE: Use to select the Comfort Mode, Economy Mode or Auto(PRG.)Mode, then selected
heater will work according to pre-set temp.
3. MENU: Use to set Auto Mode Schedule, Mode Temperature Pre-set and Frost Protection
Temp. Setting.
Group Control
Press Up Button to increase the set temp.

JS10/2
4-1
4-1: Group ON/OFF
Please press to turn on all heaters, and press to turn off all heaters.
4-2: Mode Select
There are totally four modes, which are Comfort mode, Economy Mode, PRG. Mode and Boost
Mode, you can group control all heaters’ working mode here, once selected, all heaters will work
according to pre-set mode temp. at each heaters.
4-3: Boost Mode
In Boost mode, the heaters from room 1 to room 7 at each zone is constantly activated in comfort
mode for a certain minutes. After desired time, heaters returns to previous working mode. You
can change the desired time by pressing UP and Down button. Setting range is 30M~180M.
Comfort Mode
Economy Mode
PRG. Mode
Boost Mode
JS10/2
If you want to stop boost mode during working, please change mode to Economy mode or PRG.
Mode. Please notes, if change to Economy mode, it can’t stop boost mode, as all heaters works in
comfort mode under boost mode.
Menu Setting
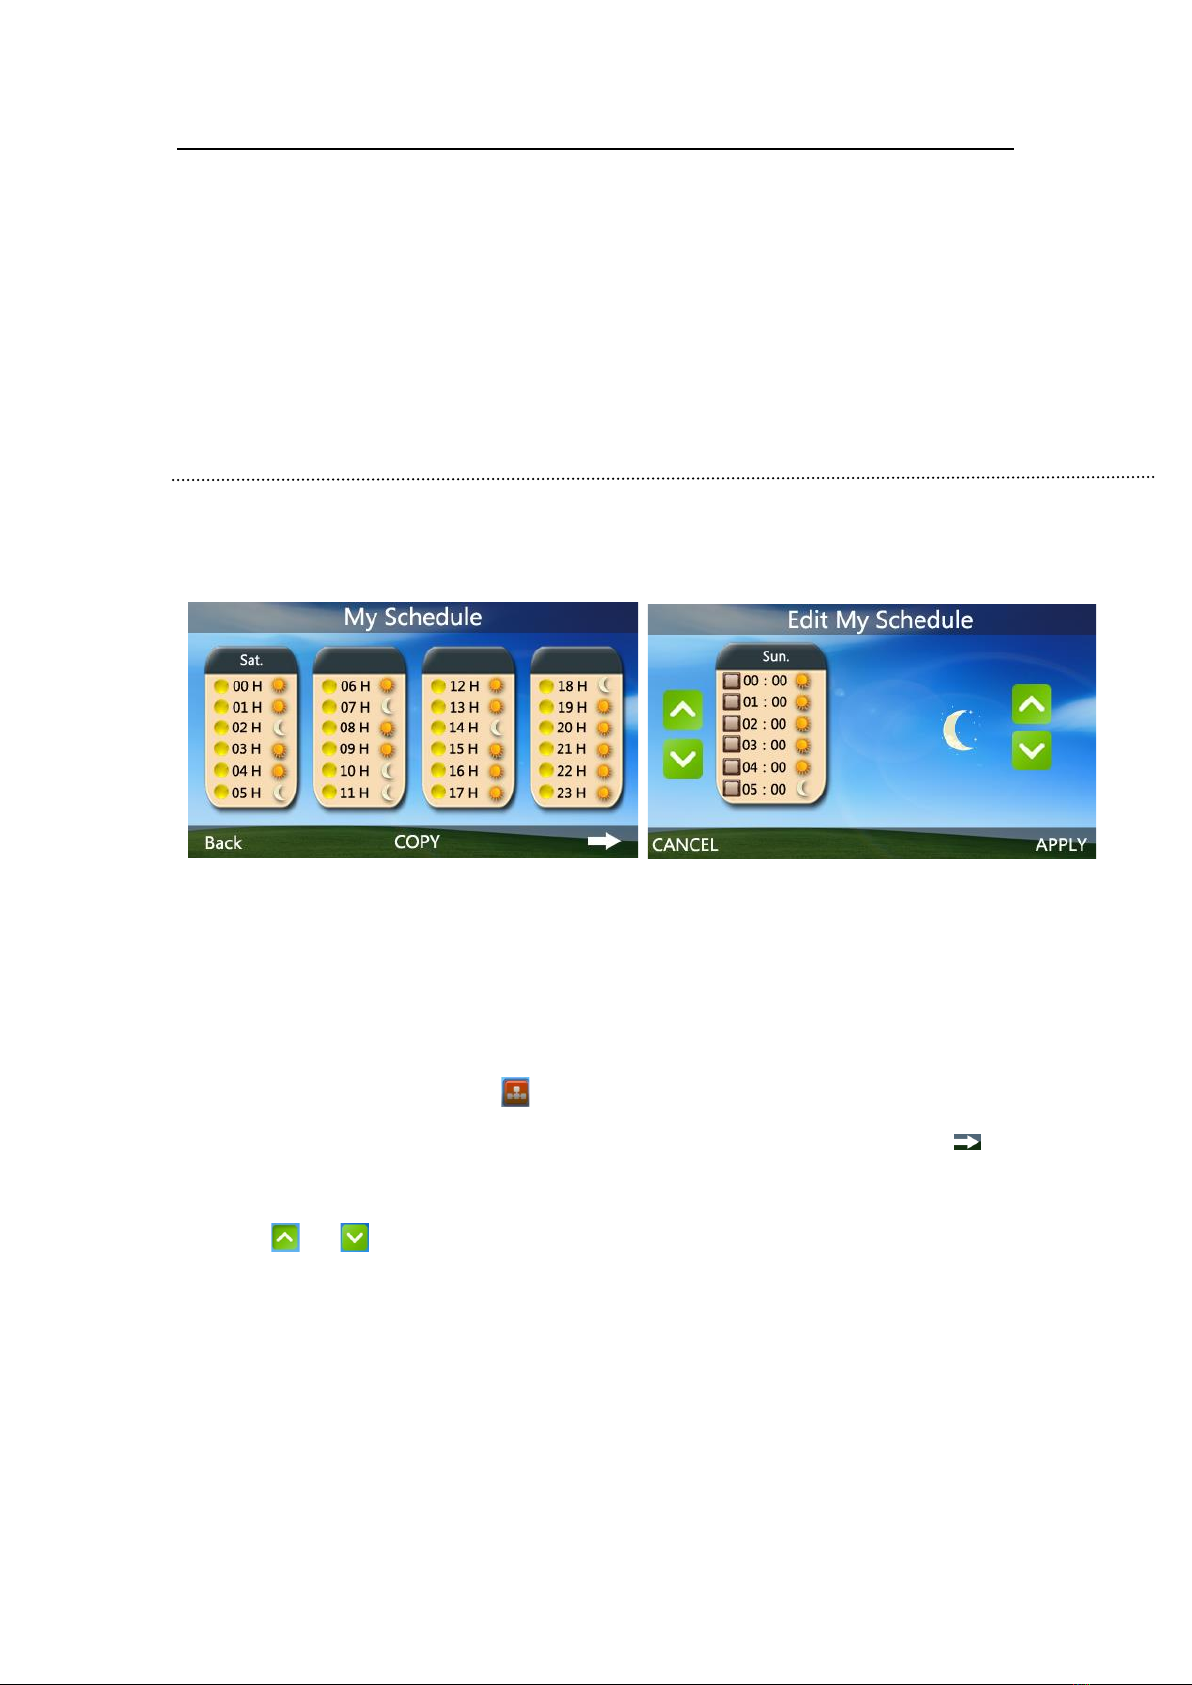
5-1: Auto Mode Schedule Pre-set
5-1-1 5-1-2
1. Press Menu Button, and choose button to enter My Schedule to review 7 days 24 hour
programmable setting as shown in figure (5-1-1). There are a total 7 pages, Press to
select the next page.
2. Press or to change time and working mode. Press APPLY to save to settings.
3. Once complete, press CANCEL to return to My Schedule page for other days settings.
JS10/2
5-1-3
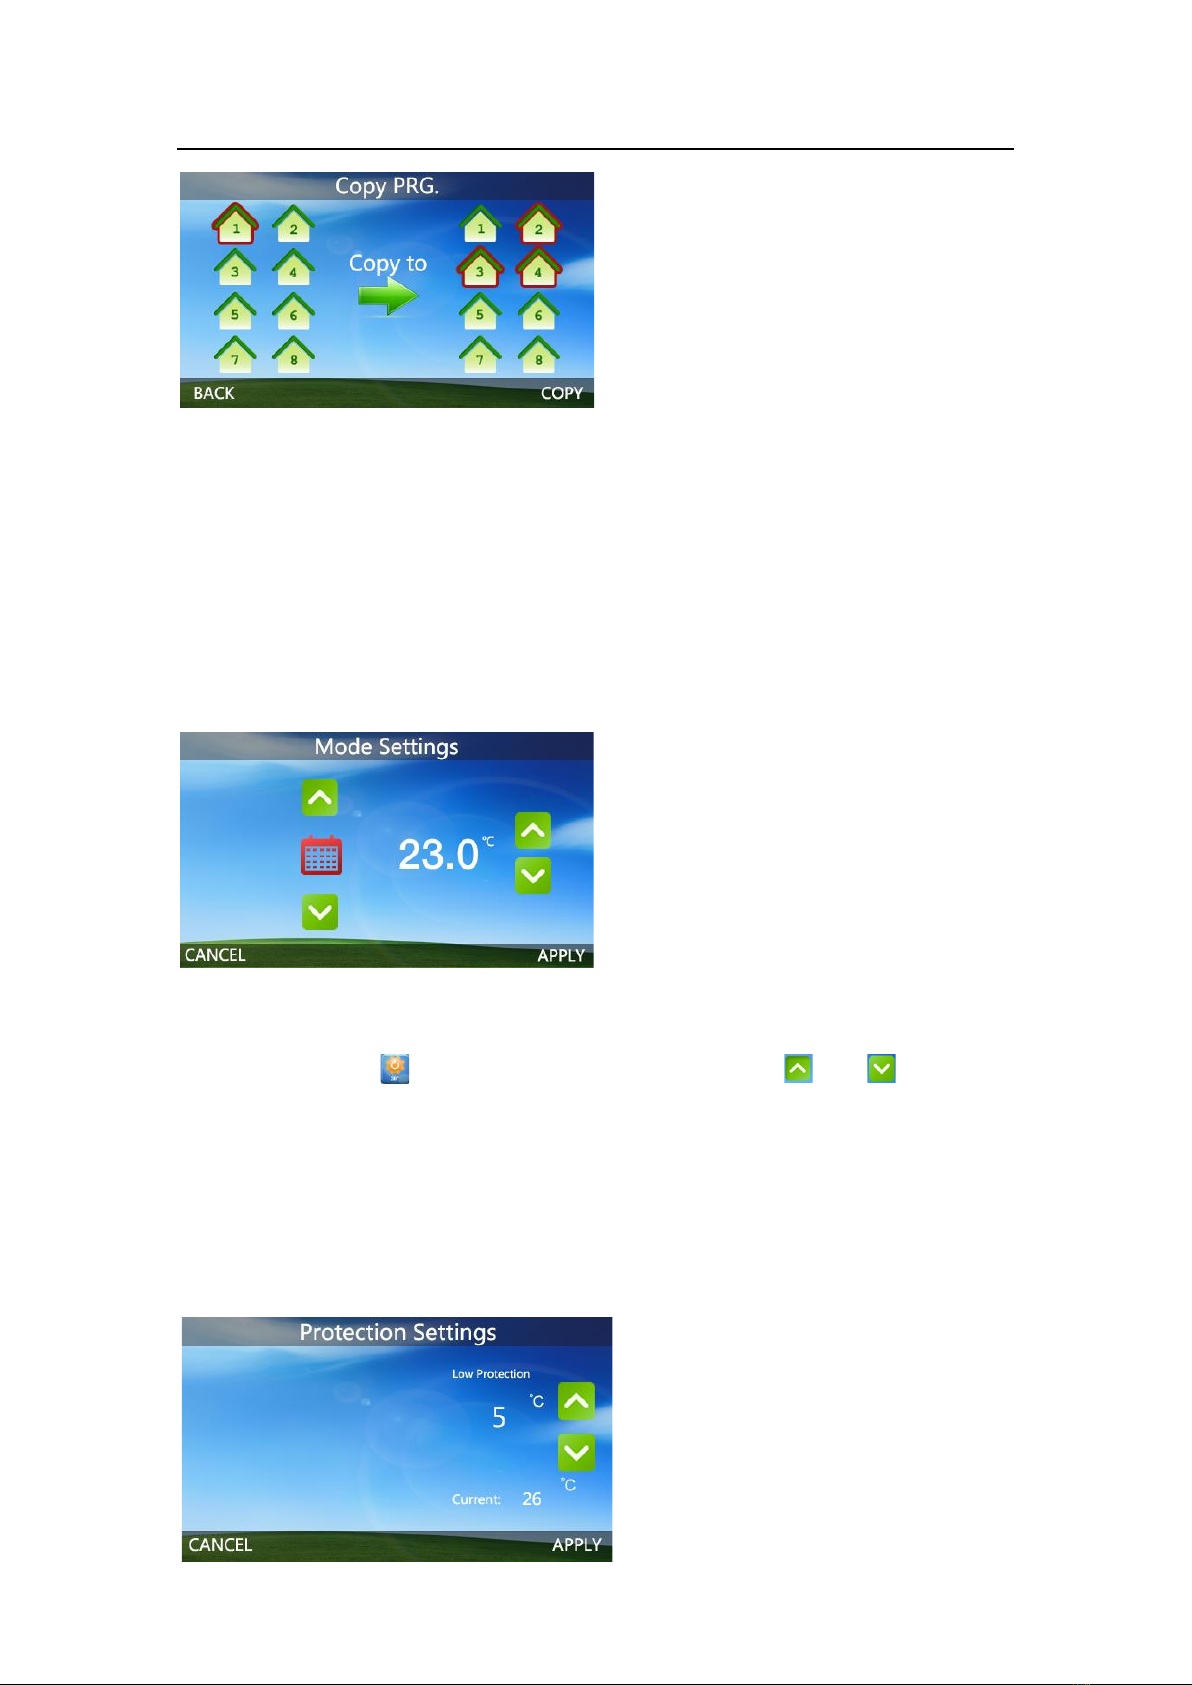
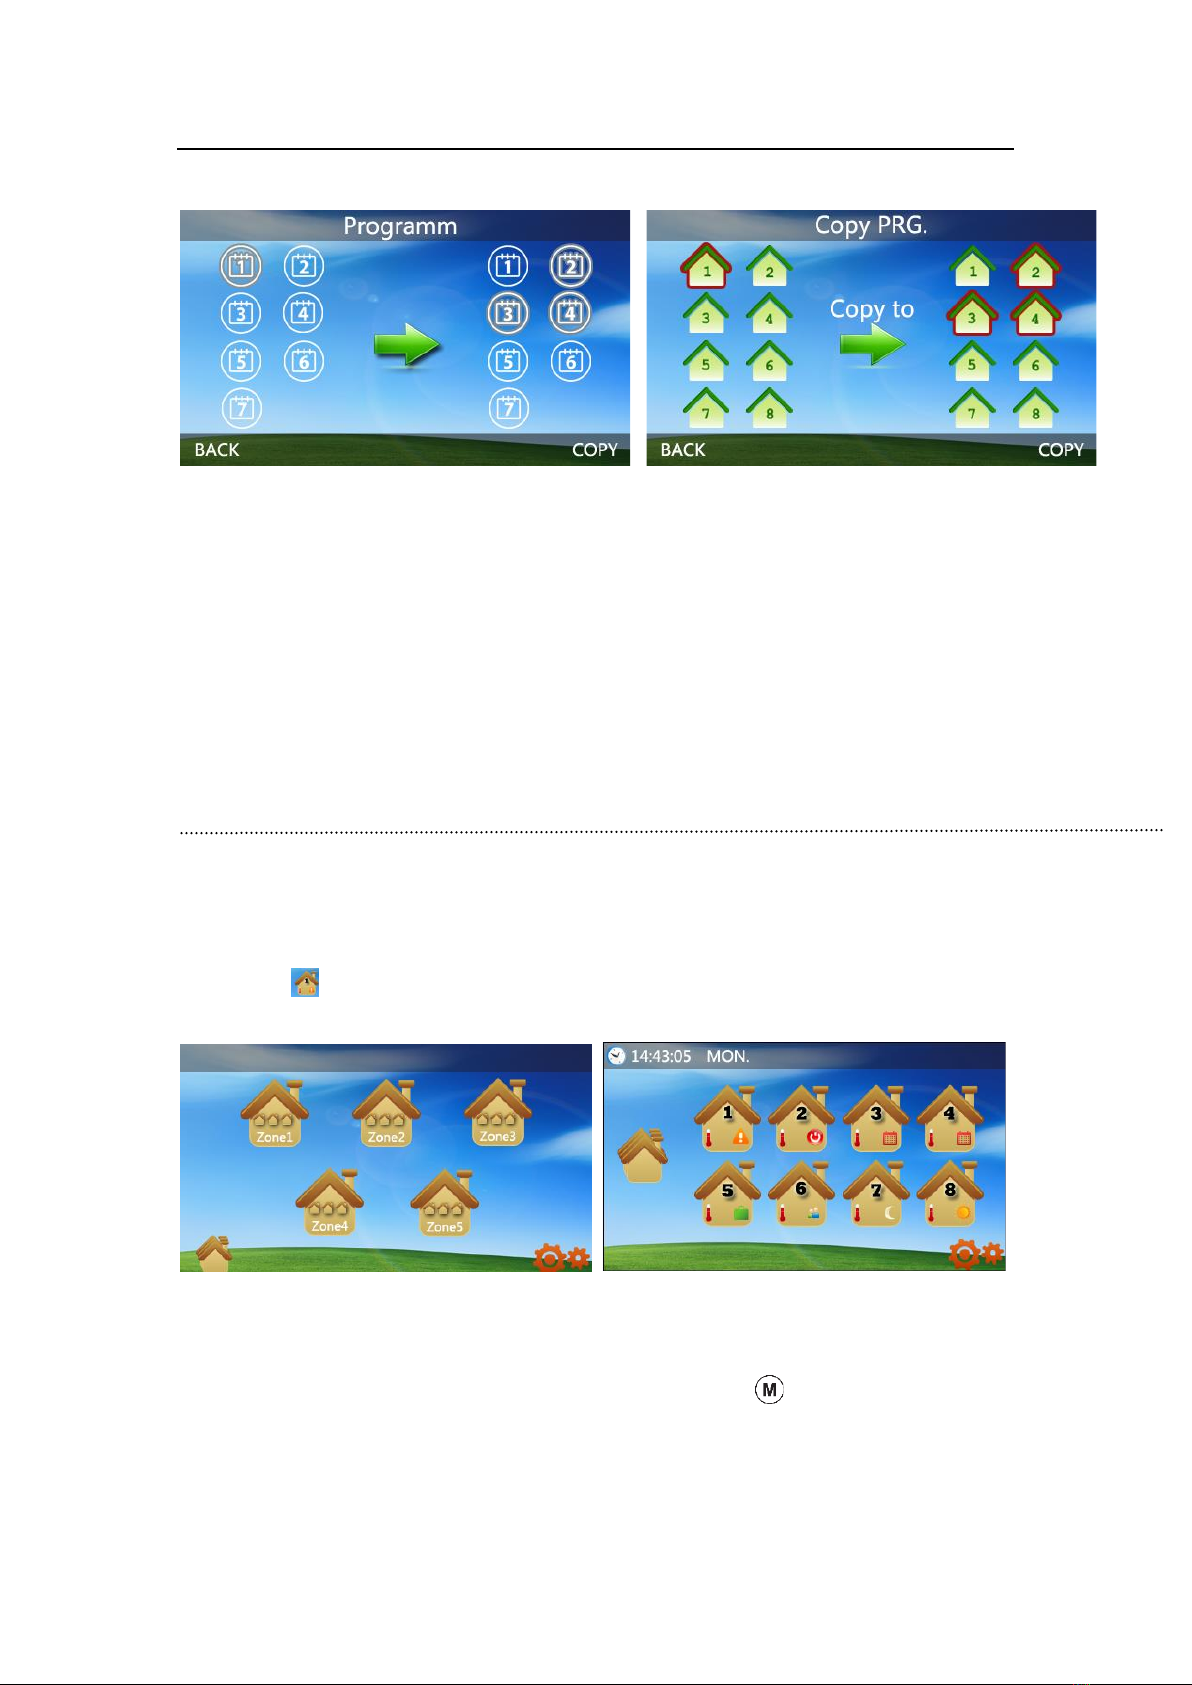
After the day’s pre-set settings have been completed, and you want other heaters have the same
working schedule, simply press COPY as shown in figure (5-1-3). After copying is complete, press
COPY again to save, and use CANCEL to return.
5-2: Mode Temperature Pre-set
5-2-1
Press Menu then select button to enter Mode Settings page, using and buttons you
can select the mode and adjust its pre-setting temperature as shown in figure (5-2-1). Once
complete press APPY to save setting and return to main page (3-1).
5-3: Frost Protection Temperature Pre-set

JS10/2
Press Menu then select button to enter Protection Settings page. You can set High
Protection temp. & Low Protection temp. by and button. Once completed press APPLY
to save.
Copy Setting
JS10/2 with two copy functions, from here you can copy the weekdays and copy the
program to all heaters.
6-1-1 6-1-2
After the day’s pre-set settings have been completed, and you want other days have the same working
schedule as this day, press COPY as shown in the figure(6-1-1), then press icon in figure (6-1-2) to
figure (6-1-3), here you can copy schedule from one day to other days freely. In figure (6-1-3) number 1 –
7 can be seen. These represent the days of the week with 1 representing Monday, 2 is Tuesday etc.
If want other heaters have the same working schedule, please press icon in figure (6-1-2) to figure
(6-1-4), here you can copy one heaters schedule to other heaters. After copying is complete, press
COPY again to save, and use BACK to return.
JS10/2
6-1-3 6-1-4
After coping is completed, please press cancel to return to the main screen.
ID Pairing
1. Turn Master controller to zone page and press the zone you are going to pair (Pic.1), then long press
the house ICON you are going to pair. For example, to pair the first heater with house 1. Long press
this icon , the ID code will show on the screen.
Pic. 1 Pic. 2
2. (1) If going to Pair with Heater, then Turn heater off, and long press button, the heater ID code
show on screen. The master controller ID code show as FF FF, After paring success, the master will
show “ find the slave”, Master ID code FF FF change to actual digit.

JS10/2
Before Pairing After paring
(2) If going to pair with slave thermostat, then turn thermostat to off by press M button , and long press
M button, the ID code show on screen. The master controller ID code show as FF FF, After paring
success, the master will show “ find the slave”, Master ID code FF FF will change to an actual
digit.
OFF Page Before Pairing After paring
Time & Language Setting
7-1 7-2

JS10/2
Press button in picture 2-1, then you will enter a Menu page as 7-1. Here you can select
the language you like, or can press to page 7-2 to edit date & time.
Technical Data
Frequency: 868 MHz
Channel selection: By programming the thermostat and the receiver.
Switching options: 7 days 24 hour programming
Temperature settings: 5°C ~ 60°C
Certification: CE/ROHS
Installation
Step 1: Release the face plate
Place the unit face down on a hard surface, push the three clips located on the bottom of thermostat with
a screwdriver to release the face plate.
Sep 2: Disconnect ribbon cable & remove face plate
Once the face plate has been gently opened, disconnect the ribbon cable to release the face plate.

JS10/2
Step3: Mount base plate to wall & connect the ribbon cable
Install the base plate to wall tightly with provided screw, then reconnect the ribbon cable and reset the
face plate(bottom edge first)
Size
Front(unit:mm)
Thickness (unit:mm)
Mounting Hole (unit:mm)

JS10/2
MAINTENANCE
1. Always allow the heater to cool down before cleaning it.
2. Wipe the exterior surface of the heater occasionally with a soft damp cloth (not dripping wet)
and dry the exterior surface before operating the heater.
WARNING:
Do not immerse the heater in water.
Do not use any cleaning chemicals such as detergents and abrasives.
Do not allow the interior to get wet as this could create a hazard.
Light accumulated may be removed from the heater with a soft dry cloth.
To store away the heater, put the heater back into its original package and store it in a
clean dry place.
In case of malfunction or doubt, do not try to repair the heater yourself; it may result in
a fire hazard or electric shock.
CONFORMITY WITH DIRECTIVES
This manual suits for next models
4
Table of contents
Other Ecovolt Heater manuals

Popular Heater manuals by other brands


VITAL ENERGY EUROPE
VITAL ENERGY EUROPE vThermt Installation, commissioning and maintenance manual

Generac Power Systems
Generac Power Systems MAC1.2G owner's manual

Comfort Glow
Comfort Glow CEH625 owner's manual

Unold
Unold RONDO OSZILLIEREND Instructions for use

Rotel
Rotel Turbo System 2200 Instructions for use

BVF
BVF REMINA Installation and user manual


