ECOWITT WH40 User manual

1
Wireless Self-emptying Rain
Gauge Sensor
Model: WH40
Contents
1. Introduction ..................................................................3
2. Unpacking .................................................................... 3
3. Features ........................................................................ 4
4. Setup Guide ..................................................................5
4.1 Site Survey ............................................................. 5
4.2 Rain Gauge Sensor Set Up and Installation .......... 6
4.2.1 Install rain gauge filter ....................................7
4.2.2 Install rain collector top .................................. 8
4.2.3 Install Batteries in rain gauge sensor ..............9
5. Mounting ....................................................................10
6. Wi-Fi Configure with gateway .................................. 14
6.1 Pair with Gateway ................................................14
6.2 Wi-Fi Connection for the Gateway ......................15
7. View Online Data on WS View Plus or Ecowitt App 15
8. Maintenance ...............................................................16
9. Specification .............................................................. 17
10. Warranty Information .............................................. 18

2
*Please scan the QR code to
read English manual and keep it
for future reference
*Bitte scannen Sie den QR-Code
zudeutsche Anleitung lesen und
aufbewahren füZukunftsbezug
*Si prega di scansionare il codice
QR perleggi il manuale italiano e
conservalo perReferenza futura
Instruction manuals
https://www.ecowitt.com/support/download/49

3
1. Introduction
Thanks for purchasing this WH40 wireless rain gauge
sensor. This device measures rainfall rate, rainfall
amount daily, weekly, monthly and yearly. The data can
be streamed by Wi-Fi Gateway(sold separately) and can
be viewed online Data on WS View Plus or Ecowitt App
mobile application after the Wi-Fi configuration done.
To ensure the best product performance, please read this
manual and retain it for future reference.
2. Unpacking
Open your rain gauge sensor box and inspect that the
contents are intact (nothing broken) and complete
(nothing missing). Inside you should find the following:
QTY
Item Description
1
Rain gauge sensor
1
U-Bolts set for mounting on a pole (2pcs)
1
Threaded nuts for U-Bolts set (M5 size) (4pcs)
1
Metal mounting plate set to be used with U-Bolts
1
Stainless steel filter (for rain collector)
1
User manual (this manual)
Table 1: Package content

4
If any component is missing from the package, or broken,
please contact our Customer Service department to
resolve the issue.
3. Features
Measures rainfall amount every 49 seconds.
Long wireless range, up to 300 feet (100 meters) in open
areas.
When paired with a Wi-Fi Gateway:
Monitor live sensor data on the Live Data page of the
WS View Plus or Ecowitt App (requires the gateway
and your phone is using the same Wi-Fi network):
Rain Rate / Event / Day / Week / Month / Year
Rain sensor calibration and customized initial rain
value functions available on the WS View Plus or
Ecowitt App
View current rainfall data on WU Dashboard of the
WS View Plus or Ecowitt App (requires to upload to
Weather Underground first)
When paired with a Weather Station Console
(WH5360/HP2553/HP3501):
View rainfall data in real-time on the Display
Rain sensor calibration and customized initial rain
value functions available on the console (Note: The

5
WH5360 only has calibration function.)
When uploaded to Ecowitt Weather Server:
View current rainfall data & history records & graph
on the website
Set and receive email alerts from the server
Sensor name can be edited on the website
Remote monitoring with smart phone, laptop, or
computer by visiting the website
4. Setup Guide
4.1 Site Survey
Location of the sensor is paramount to good data
collection. Abbreviated instructions follow, but for a
detailed reference, see:
https://www.weather.gov/media/epz/mesonet/CWOP-Sit
ing.pdf.
Perform a site survey before installing the rain sensor.
Consider the following:
Ideally mounted at a height of 4 to 6 feet, or 1.5 to 2
meters above the ground.
Ideally located at a horizontal distance of 4 times the
height, above the rain gauge, of the nearest
obstruction.
6
Ensure the rain gauge is mounted level to the ground,
away from any horizontal surface that can introduce
rain-splashing or surrounding snow buildup.
Note: If the rain gauge sensor was mounted less than
3.3 feet or 1 meter above the ground, the
electromagnetic waves would be absorbed by
the earth when raining. Which may cause
inaccurate rainfall data transmitting.
4.2 Rain Gauge Sensor Set Up and Installation
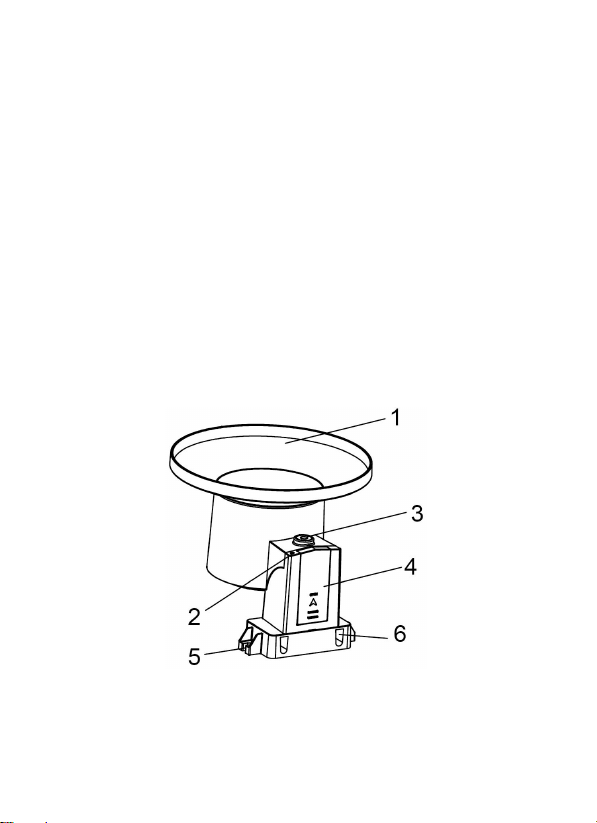
See Figure 1 to locate and understand all the parts of the
rain gauge sensor once fully assembled.
Figure 1: Sensor assembly components

7
1 Rain collector top
4 Battery compartment door
2 LED Indicator
5 Surface installation screw hole
3 Bubble level
6 U-bolt installation hole
Table 2: Sensor assembly detailed items
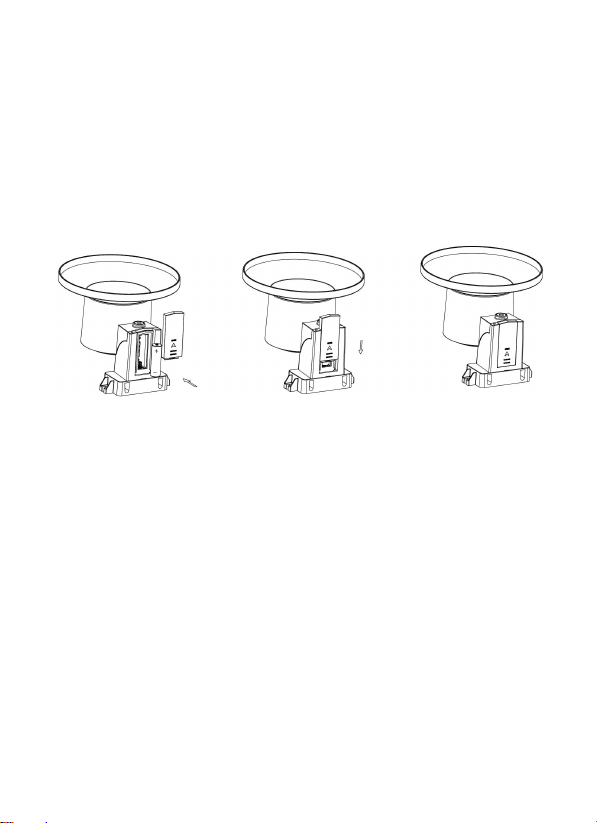
4.2.1 Install rain gauge filter
There’s a stainless steel filter included in the package.
It’s aimed to stop leaves or bird's dropping to avoid the
obstruction of the cone hole. The installation is as simple
as the below figures show:
Hook the filter hook on the edge of the rain collector to
install the filter(as the figure 2 shows on the left).
Take out the filter hook from the edge to uninstall the
filter(as the figure 2 shows on the right).

8
Figure 2: Rain gauge filter in/un-installation diagram
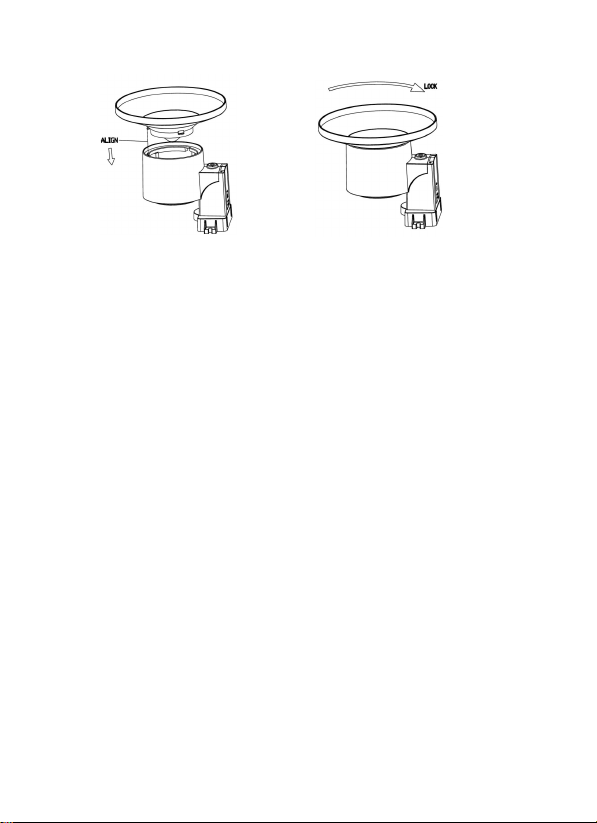
4.2.2 Install rain collector top
Align the rain collector top with the rain bucket, pay
attention to the lock groove position as shown on the left
side in Figure 3. Next, lock the top clockwise to the lock
groove position, as shown on the right side of the figure,
until it comes to a stop and the top cannot be removed
from the bucket. Failure to do this may cause the
collector top to blow away in strong winds!
Figure 3: Rain collector top installation diagram
9
4.2.3 Install Batteries in rain gauge sensor
Remove the battery door on the back of the sensor by
sliding it in the direction of the arrow. Insert one AA
battery as described and put compartment door back and
slide it in the opposite direction to lock.
Figure 4: Rain gauge sensor battery installation
diagram
The LED indicator on the top of the battery door (item 2)
will turn on for 4 seconds and then flash once every 49
seconds indicating sensor data transmission. If you did
not pay attention, you may have missed the initial
indication. You can always remove the batteries and start
over, but if you see the flash once every 49 seconds,
everything should be OK.
Note: If no LED light up or is lighted permanently,
make sure the battery is inserted the correct way
or a proper reset is happened. Do not install the

10
batteries backwards. You can permanently
damage the outdoor sensor.
Lithium batteries are recommended for the best
performance. We do not recommend rechargeable
batteries. They have lower voltages, do not operate well
at wide temperature ranges, and do not last as long,
resulting in poorer reception.
5. Mounting
Before you mount
Before proceeding with the outdoor mounting detailed in
this section, you may want to skip to WIFI configuration
instructions in section 6 and onwards first, while you
keep the assembled outdoor sensor package nearby
(although preferably not closer than 5 ft. from the
gateway). This will make any troubleshooting and
adjustments easier and avoids any distance or
interference related issues from the setup.
After WIFI configuration is completed and everything is
working, return here for outdoor mounting. If issues
show up after outdoor mounting they are almost
certainly related to distance, obstacles etc.
11
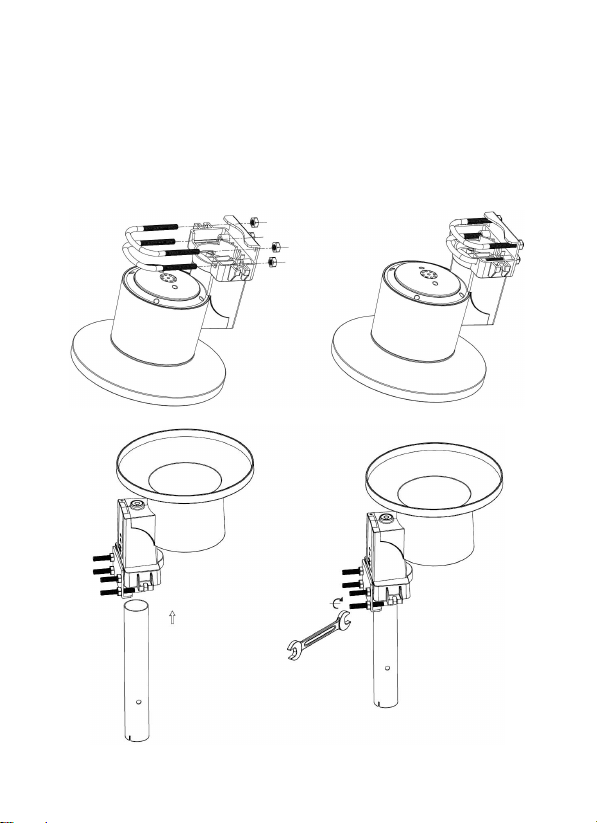
Mount with U-bolts
The mounting assembly includes two U-Bolts and a
bracket that tightens around a 1" to 2” diameter pole (not
included) using the four U-Bolt nuts.
12
Note: Use the bubble level beside the rain sensor as a
guide to verify that the sensor is leveled.
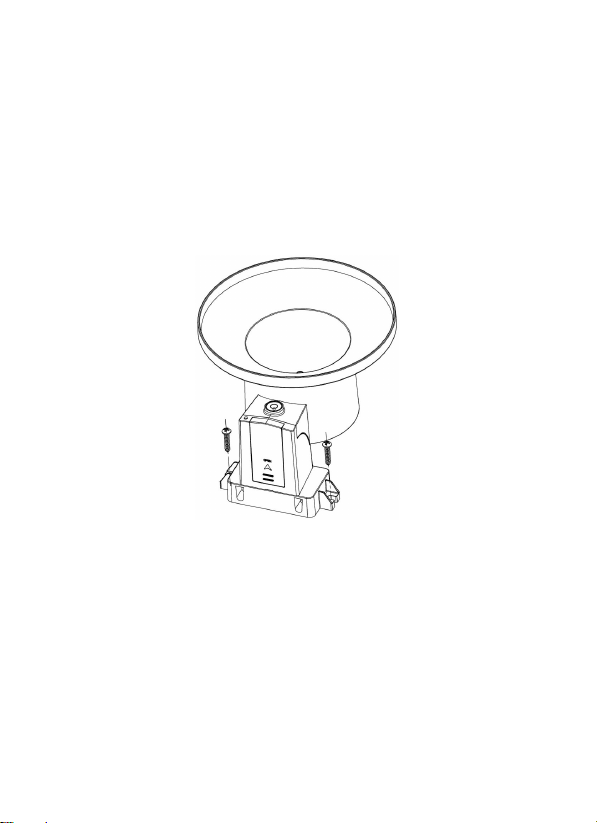
Mount with screws
The mounting assembly also includes two screws for
installation on a flat place.
Note: Use the bubble level beside the rain sensor as a
guide to verify that the sensor is leveled.
Best Practices for Wireless Communication
Wireless communication is susceptible to interference,
distance, walls and metal barriers. We recommend the
following best practices for trouble free wireless
communication.

13
1.
Electro-Magnetic Interference (EMI).
Keep the console several feet away from computer
monitors and TVs.
2.
Radio Frequency Interference (RFI).
If you have other 915/433/868 MHz devices(same
frequency with your device) and communication is
intermittent, try turning off these other devices for
troubleshooting purposes. You may need to relocate the
transmitters or receivers to avoid intermittent
communication.
3.
Line of Sight Rating.
This device is rated at 300 feet(100 meters) line of sight
(no interference, barriers or walls) but typically you will
get 100 feet(30 meters) maximum under most real-world
installations, which include passing through barriers or
walls.
4.
Metal Barriers.
Radio frequency will not pass through metal barriers
such as aluminum siding. If you have metal siding, align
the remote and console through a window to get a clear
line of sight.

14
6. Wi-Fi Configure with gateway
This rain sensor doesn’t has a display function and you
need to use our WS View Plus or Ecowitt App to view
the rainfall data on your mobile application after pairing
this device with our Wi-Fi Gateway(sold separately).
Note: If you are testing the setup with the rain sensor
nearby and indoor, you may want to consider connecting
to Wi-Fi, but not yet configuring any of the weather
services. The reason is that the rainfall bucket may be
tripped during handling, causing rain to register while it
may not actually have been raining. One way to prevent
this is to follow all instructions, except to use an
incorrect password, on purpose! Then, after final outdoor
installation, come back and change the password after
clearing data history. That will start uploading to the
services with a clean slate.
6.1 Pair with Gateway
If the WiFi Gateway has been in operation, and you have
never had any rain sensor setup before, just power up
rain sensor and the WiFi Gateway will pick rain data
automatically. You can check that on the Live Data page
of the WS View Plus or Ecowitt App.

15
If you want to use a new sensor to replace the old one,
please try the following:
1. Open the Sensor ID page on the WS View Plus or
Ecowitt App, and find your old sensor ID.
2. Power off the old sensor and power on the new sensor.
3. Click Re-register on the Sensor ID page.
Then the new sensor will be learned and the old sensor
will be erased.
6.2 Wi-Fi Connection for the Gateway
For this part, please refer to the manual of the Wi-Fi
gateway.
Any question, please contact the customer service.
7. View Online Data on WS View Plus or Ecowitt App
When the Wi-Fi configuration is done, you can view the
live data of your rain sensor on the WS View Plus or
Ecowitt App.
Please download WS View Plus/ Ecowitt App from
Google Store/ Apple Store/ Website.
User manuals can be found by scanning the QR code
below.

16
8. Maintenance
The following steps should be taken for proper
maintenance of your station
Clean Rain Gauge
Check the rain gauge every 3 months. Rotate the funnel
counterclockwise and lift it up. Clean the funnel and
bucket with a damp cloth to remove any dirt, debris and
insects. Spray the array lightly with insecticide, if there’s
a bug infestation.
17
Replacing batteries regularly
Batteries of the outdoor sensor array should be replaced
every 1-2 years. In applications where data dropouts
cannot be tolerated, check the batteries every 3 months
and apply a corrosion preventing compound (not
included) on the battery terminals for protection.
Prevent snow build up
In snowy environments, use anti-icing silicon spray on
the top of the rain collection top, to prevent snow build
up.
9. Specification
Transmission distance in open field: 100m(300 feet)
Frequency: 915/868/433MHz (North America: 915MHz;
Europe: 868MHz; Other areas: 433MHz)
Rainfall measuring range: 0--6000mm ; Accuracy: ±5%
Sensor reporting interval: 49 seconds

18
Note: The frequency is fixed and could not be changed.
Power consumption
Rain sensor: 1xAA Alkaline batteries (not included)
Battery life: Minimum 12 months
10. Warranty Information
We disclaim any responsibility for any technical
error or printing error, or the consequences thereof.
All trademarks and patents are recognized.
We provide a 1-year limited warranty on this product
against manufacturing defects, or defects in materials
and workmanship.
This limited warranty begins on the original date of
purchase, is valid only on products purchased, and only
to the original purchaser of this product. To receive
warranty service, the purchaser must contact us for
problem determination and service procedures.
This limited warranty covers only actual defects within
the product itself and does not cover the cost of
installation or removal from a fixed installation, normal
set-up or adjustments, or claims based on
misrepresentation by the seller, or performance
variations resulting from installation-related
circumstances.
Table of contents
Other ECOWITT Accessories manuals


Popular Accessories manuals by other brands


Burkert
Burkert 8020 Low Power Instruction manual addendum

OHM ELECTRIC
OHM ELECTRIC Cool Cabi OCA-S350BCD-A200 instruction manual

Burster
Burster 8661 Operation manuals

PCB Piezotronics
PCB Piezotronics M215B Installation and operating manual

PCB Piezotronics
PCB Piezotronics 8180-SH410A Installation and operating manual

Aethra
Aethra ADSL71-2Plus Technical specifications