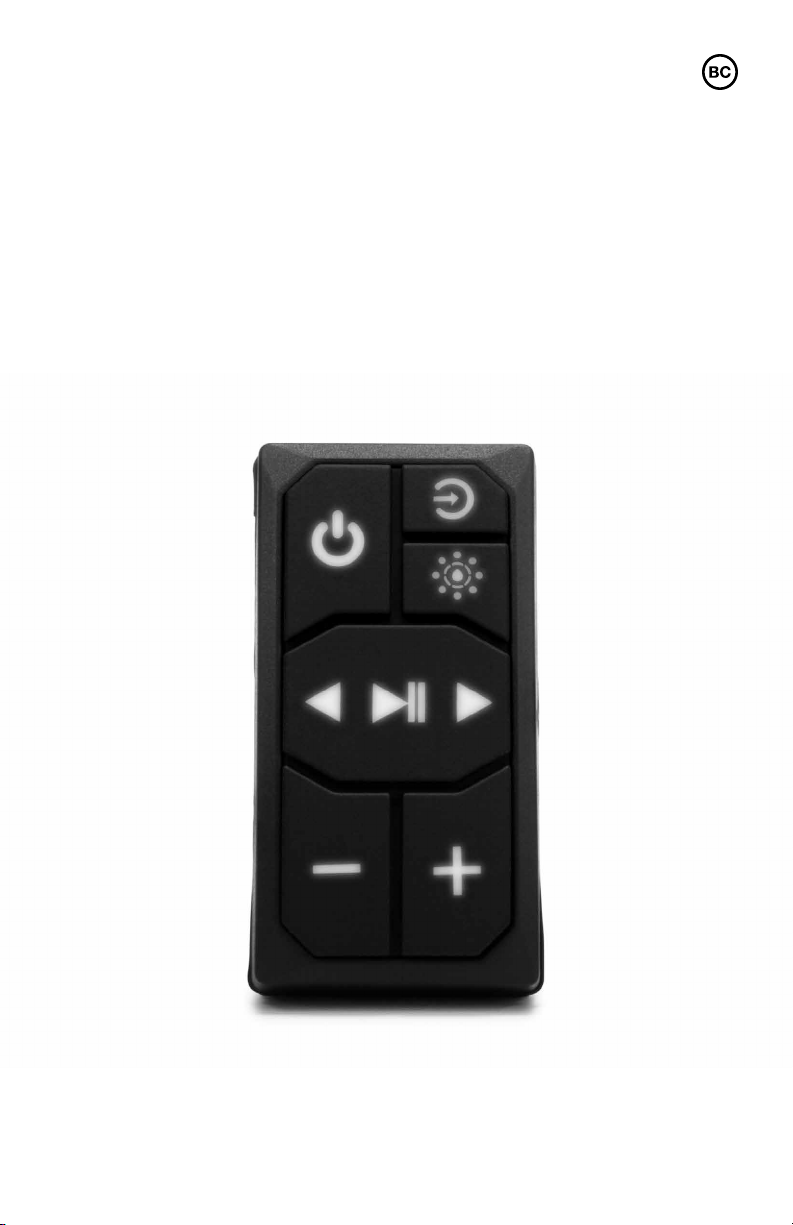
EcoxGear SOUNDEXTREME SEI-SERXBT User manual

User Guide
Bluetooth Receiver
Remote Control
Model: SEI-SERXBT

2
· Please read this User Guide before installation and use.
· CAUTION: The power input voltage range for your Bluetooth®
Receiver Remote Control (referred to as Receiver) is 9V to 16V.
It is designed to work with a +12V DC battery power supply. If
your vehicle battery power output is not 12V (e.g., 24V, 36V, or
48V), you will need a voltage converter with 12V output (e.g.,
a 48V-to-12V converter). Connecting the Receiver directly to
higher voltages will cause damage to your device and VOID
THE PRODUCT WARRANTY.
· The Receiver has a Remote Turn-On Input feature; this is an
optional connection to your vehicle ignition switch so you can turn
the Receiver on or o via the ignition switch. When this input has a
signal between 12V to 56V, the Receiver will turn on. When there is
no input voltage, the Receiver will turn o.
· The Receiver’s audio outputs are pre-amplified signals that need
to be connected to a power amplifier, radio, or powered speakers
(sold separately).
· The Receiver fits in a standard Carling rocker switch opening,
which is commonly used in the dashboard of many o-road
vehicles, boats, and golf cars. The Receiver panel is waterproof;
however, the housing behind the panel is only splash proof.
· CAUTION: In order to make sure there is no potential damage to
your audio system, unplug or power o your audio equipment until
after all connections are completed.
Important

3
Introduction
Features
The Receiver is an all-in-one device that supports Bluetooth,
EcoCast, and Aux-In.
Bluetooth
The Receiver utilizes Bluetooth 5.1, which provides up to 100 foot
Bluetooth range and dual simultaneous smartphone connections.
EcoCast
The Receiver also has EcoCast built-in, which allows the Receiver
to broadcast (transmit) or receive audio streams to/from other
EcoCast-enabled products. ECOXGEAR and SoundExtreme
have a complete line of EcoCast-enabled speakers, soundbars,
subwoofers, and radios.
If you currently do not have any other EcoCast-enabled product to
work with the Receiver, you can skip all EcoCast-related content.
All EcoCast-enabled products have two optional streaming modes:
· EcoCast Transmitting Mode. When set in this mode, the EcoCast-
enabled product transmits either Aux-In or Bluetooth Audio to
multiple wirelessly connected EcoCast-enabled products.
· EcoCast Receiving Mode. When set in this mode, this Receiver
product receives audio from another EcoCast transmitting audio
product, like a SoundExtreme soundbar, radio, or tower speaker.
Receiver Audio Modes
The Receiver has the following 4 Audio Modes: Speaker (Bluetooth)
Mode, EcoCast Transmitting Mode, EcoCast Receiving Mode, and
Aux-In Mode. Refer to the following table for details.

4
Introduction
RECEIVER AUDIO MODE CONNECTED TO PHONE ECOCAST
Speaker (Bluetooth) Yes Disabled
EcoCast Transmitting Yes Transmitting
EcoCast Receiving No Receiving
Aux-In No Disabled or
Enabled
(Transmitting)

5
AUDIO INPUT TO RECEIVER AUDIO OUTPUT TO AMPLIFIER
The Receiver is connected to a
phone’s Bluetooth signal.
Audio Output via the RCA cables that
are connected to an amplifier, radio,
soundbar, etc.
The Receiver is connected to a
phone’s Bluetooth signal.
Audio Output via the RCA cables
that are connected to an amplifier,
radio, soundbar, etc., as well as
sending audio wirelessly to other
EcoCast-enabled products.
The Receiver receives audio
streams from a wirelessly
connected EcoCast-enabled
product in Transmitting Mode.
Audio Output via the RCA cables that
are connected to an amplifier, radio,
soundbar, etc.
The Receiver receives audio from
an Aux-In audio source.
Audio Output via the RCA cables that
are connected to an amplifier, radio,
soundbar, etc. If enabled (Transmitting),
it also broadcasts the Aux-In Audio to
multiple wirelessly connected EcoCast-
enabled products.
Introduction

6
Receiver Layout
Receiver Overview
Audio Outputs: Right
(Red) / Left (White)
Power Button Audio Mode Button
EcoCast Button
Play / Pause and
Tracking Buttons
Volume Buttons
Amp-On (Yellow)
Aux-In Input
Power Inputs: +12V Wire
(Red) / GND Wire (Black)
Remote Turn-On
Wire (Dark Blue)
Inputs and Outputs

7
Receiver Overview
Connectors
Inputs:
· Power +12V, GND
· Remote Turn-On (input signal: 12 - 56V) – When this input is
connected to your vehicle’s ignition switch (or rocker switch or
any switch accessory panel), it will turn on or o without having to
press the Power Button .
· Aux In – 3.5mm audio jack. This input can be used to connect an
additional soundbar, or other audio source, like your phone, CD
player, MP3 player, etc.
Outputs:
· Amp-On – With this output, you can turn on the audio power
amplifier the Receiver is connected to.
· RCA Aux-Out – This is the audio output. The Red and White RCA
Jacks are the Right and Left audio channels, respectively. Connect
the device to an audio power amplifier with RCA to RCA cables
(not included) or RCA to 3.5mm audio cables (not included).
Buttons and LED Status Indicators
On / O
The Receiver can be turned on and off by the following methods:
· If you connect the Remote Turn-On Input to your vehicle’s ignition
switch or a switch accessory panel, you can turn it on or o by
turning the ignition switch on or o.
· If you leave the Remote Turn-On Input unconnected, press and
hold the Power Button to turn the Receiver on or o.
Backlit Buttons
When the Receiver is on, all the backlit buttons on the Receiver can
be turned on or turned off by short-pressing the Power Button .

8
Receiver Overview
Mute
· When the Receiver is playing music, double-click the Power
Button to mute or unmute your audio.
· When the Receiver is muted, short-press any button to unmute.
Enable Bluetooth and EcoCast Pairing
· Short-press EcoCast Button to enable EcoCast pairing.
· Press and hold the EcoCast Button to enable Bluetooth
pairing. The Receiver will announce, “Ready to connect.” If the
Receiver has already connected to a phone, press and hold the
EcoCast Button to disconnect the connected phone and
enable pairing to a new phone.
· Press and at the same time to clear Bluetooth pairing records.
LED Status Indicator and Voice Prompts
There is a LED Status Indicator behind the Power Button and the
Audio Mode Button . The LEDs correspond to different functions:
i. Speaker (Bluetooth) Audio Mode
· When the Audio Mode is switched to Bluetooth Mode, the
Receiver will announce, “Speaker Mode. Ready to connect.” The
LED Status Indicator behind the Audio Mode Button will shine
solid Blue, indicating the Audio Source is set to Bluetooth. The
LED Status Indicator behind the Power Button will flash Blue,
indicating that Bluetooth pairing has been enabled.
· Once the Receiver has successfully connected to a phone, it will
announce, “Your Phone is Connected.” The LED Status Indicator
behind the Power Button will shine solid Blue.
ii. EcoCast Audio Mode
· When the Audio Mode is switched to EcoCast Transmitting Mode,
the Receiver will announce, “EcoCast Transmitting.” The LED

9
Receiver Overview
Status Indicator behind the Audio Mode Button will flash Red,
indicating EcoCast pairing has been enabled.
· When the Audio Source is switched to EcoCast Receiving Mode,
the Receiver will announce, “EcoCast Receiving”. The Status LED
behind the Audio Mode Button will flash Green, indicating
EcoCast pairing has been enabled. Once the Receiver is paired
and connected to a speaker in EcoCast Transmitting mode, it will
announce, “Connection successful.” The Status LED will shine
solid Green.
iii. Aux-In Audio Mode
· When the Audio Source is switched to Aux-In Audio Mode, the
Receiver will announce, “Aux-In.” The Status LED behind the Audio
Mode Button will shine solid Yellow.
The following table lists all the Button functions with related Status
LED indications and voice prompts.

10
Receiver Overview
BUTTON ACTION FUNCTION
Press and Hold
(for 3 seconds)
To turn on / o the Receiver.
Short-Press To turn on / o the Backlit Buttons.
Double-Click To mute / unmute audio.
Short-Press To cycle through each of the four Audio
Source Modes.

11
Receiver Overview
LED STATUS INDICATOR VOICE PROMPT
· On: The Receiver is connected to a phone.
· O: No LED.
N/A
N/A N/A
N/A N/A
Bluetooth Audio Mode
· Solid Blue – Bluetooth Mode.
Power Button LED Status Indicator
· Flashing Blue – Pairing ready.
· Solid Blue – Pairing successful.
· "Speaker Mode.
Ready to connect."
· " Your phone is connected."
EcoCast Transmitting Audio Mode
· Flashing Red – Pairing ready.
· Solid Red – Pairing not enabled.
· "EcoCast Transmitting."
EcoCast Receiving Audio Mode
· Flashing Green – Pairing ready.
· Solid Green – Pairing successful.
· "EcoCast Receiving."
· "Connection successful."
Aux-In Audio Mode
· Flashing Yellow – EcoCast Transmitting,
pairing ready.
· Solid Yellow – Aux-In Audio Mode enabled.
· "Aux-In."
· "EcoCast enabled."
· "EcoCast disabled."

12
Receiver Overview
BUTTON ACTION FUNCTION
Short-Press EcoCast Pairing.
Press and Hold
(for 3 seconds)
Bluetooth Pairing.
Short-Press Play or pause.
Short-Press Skip to next track.
Short-Press Skip to previous track.
Short-Press Increase volume.
Press and Hold
(for 3 seconds)
Increase volume continuously.
Short-Press Decrease volume.
Press and Hold
(for 3 seconds)
Decrease volume continuously.

13
Receiver Overview
LED STATUS INDICATOR VOICE PROMPT
· Flashing Red, Green, or Yellow, depending
on the Audio Mode.
N/A
· Flashing Blue. · "Ready to connect."
N/A N/A
N/A N/A
N/A N/A
N/A N/A
N/A N/A
N/A N/A
N/A N/A

14
Installation and Wiring
Installing Your Receiver Onto Your Vehicle
The Receiver is designed to snap into a standard Carling style
rocker switch opening.
· If you already have that style of an opening on your vehicle, you can
simply snap the Receiver into place.
· If your vehicle doesn’t already have that style of an opening, you
will need to cut a rectangular hole into your vehicle. Before you cut,
please refer to the dimensions under the Specifications section to
determine the cutout size.
Connecting to 12VDC Power Supply
The Receiver does not have an internal battery. It must be connected
to an external 12VDC power supply to function. When you install
the Receiver to a battery or a voltage regulator on a golf cart, a boat,
a quad bike, a UTV, or another vehicle, you need to make sure that
your vehicle battery or battery pack terminal voltage is 12VDC. If the
battery terminal voltage is not 12V, you will need a DC–DC converter
with output 12V. Connecting the Receiver to a non-12VDC power
source will lead to a malfunction or damage to the Receiver.
Recommendation: If you are not familiar with all of the vehicle’s
battery or ignition switch connections, consult your vehicle’s manual
or a technician. Incorrect connections
to your vehicle’s battery or ignition
signal terminal may cause damage to
your speaker and your vehicle.
Connect the +12V and GND wires
to the 12VDC power supply.
· Make sure that the RED Wire
is connected to +12V battery’s
positive (+) terminal and the
BLACK Wire is connected to
battery’s negative (-) terminal. Black Wire Red Wire

15
Installation and Wiring
WARNING! Only connect to a 12V power supply. Do NOT connect to
a 24V, 36V, or 48V power supply. Connecting the Receiver directly to
these higher voltages will cause damage to the Receiver and VOID
THE PRODUCT WARRANTY.
Connecting the Remote Turn-On Input Wire to a Switch
Besides the 12V power supply, the Receiver has an optional Remote
Turn-On Signal Input to turn on and power o via your vehicle's
ignition switch. The input voltage range to turn on is 12V to 56V.
When the input voltage is 0, it will power o the receiver.
You will need to connect the (Dark Blue) Remote Turn-On Wire to the
vehicle ignition switch with an extension cable (not included). If you
are not able to connect it to your vehicle's ignition switch, connect
this input to a rocker switch (not included), then connect the rocker
switch to a 12V to 56V power supply on your vehicle or to a switch
accessory panel.
Connecting to a Switch
To connect the Receiver to your vehicle’s ignition switch, a rocker
switch, or the vehicles switched power distribution panel, follow the
steps below:
1. Connect the (Dark Blue) Remote Turn-On Wire to the
Accessories terminal of your switch with an extension cable.
2. Once the connections are completed, the Receiver will turn on or
o when the switch is turned on or o.
Remote Turn-On Wire

16
Installation and Wiring
Connecting Your Audio Output
1. Connect the audio output to the audio power amplifier inputs with
an RCA to RCA cable (not included) or an RCA to 3.5mm audio
cable (not included).
2. Connect the AMP-On Wire (Yellow) to the Remote-Control input
on the audio power amplifier. This feature will turn your amplifier on
when the Receiver is turned on.

17
Audio Functions
First Time Pairing in Speaker (Bluetooth) Mode
1. Press and hold the Power Button to turn on the Receiver. If
the Receiver is in Speaker (Bluetooth) Mode, it will announce,
"Speaker Mode. Ready to connect,” and the LED Status Indicator
behind the Power Button will flash Blue.
· If you do not hear this voice prompt, you can switch the Audio
Mode to Speaker Mode by short-pressing the Audio Mode
Button to cycle through the Audio Modes.
2. Refer to your phone’s Bluetooth settings. Search for and select
‘SoundEX-Rocker’ to pair and connect.
3. Once paired and connected to your phone, the Receiver will
announce, “Your phone is connected,” and the LED Status
Indicator behind the Power Button will shine solid Blue.
Dual Simultaneous Connections and Switching Media
Player Between Two Phones
Your Receiver can maintain simultaneous connections with two
smartphones, which allows you and your family or friends to share
music by switching the music playback between your phone and

18
Audio Functions
your family member or friend’s phone. Follow the steps outlined
below to switch back and forth between two phones:
1. Connect your phone to the Receiver.
2. Press and hold the EcoCast Button for 3 seconds. This will
disconnect your phone and enable Bluetooth pairing. Connect a
second phone to the Receiver.
3. Press and hold the Power Button to turn o the Receiver. Then
press and hold the button again to turn it on.
4. Your Receiver will automatically reconnect to both phones.
5. On the first phone, play a selected music track on your phone.
Your Receiver will play your music.
6. On the second phone, select music to play. Your Receiver will play
the music from the second phone. The music on the first phone will
pause or stop.
7. If you want to switch back to your phone, press the play button
on your phone's media player. Your Receiver will play the music
on your phone. The media player on the second phone will
pause or stop.
8. You can now switch back and forth between the two phones.

19
Audio Functions
Like the Bluetooth pairing between the Receiver and your phone,
there is an EcoCast pairing process. To enable EcoCast pairing,
follow the steps below:
1. Turn on the Receiver (Tx) and put it into Speaker Mode. Connect to
your phone and play your desired audio.
2. Press the Audio Mode Button to switch the Receiver to
EcoCast Transmitting Mode. The LED Status Indicator will flash
Red, and the speaker will announce, “EcoCast transmitting.”
3. Turn on an EcoCast-enabled product (e.g. an SE28 soundbar,
Speaker A) and put it into EcoCast Receiving Mode. The LED
Status Indicator will flash Green, and the speaker will announce,
“EcoCast receiving.”
EcoCast – Stream Music Between Multiple Speakers
The Receiver has EcoCast built-in, which allows it to broadcast
(transmit) or receive wireless audio streams to or from other
EcoCast-enabled products.
EcoCast: First Time Pairing in EcoCast Mode
x100
A
Tx

20
Audio Functions
4. Once the connection between the products is successful,
Speaker A will announce, “Connection successful,” and start
playing music.
EcoCast: Additional Receiving Speakers
A
B
C
Tx
To add additional EcoCast-enabled products, follow the steps below:
1. Turn on additional EcoCast-enabled products (Speaker B and
Speaker C) and put them into EcoCast Receiving Mode. The LED
Status Indicator will flash Green, and the product will announce,
“EcoCast receiving.”
2. On the Receiver, press the EcoCast Button . The LED Status
Indicator will flash Red.
3. Once the connection between the products is successful,
Speaker B (and Speaker C) will announce, “Connection
successful,” and start playing audio.
Notes:
· If all the products are turned o, then turned on, the product(s) in
EcoCast Receiving Mode (Speakers A, B, and C) will automatically
reconnect to the product in EcoCast Transmitting Mode (the
Table of contents
Other EcoxGear Remote Control manuals
Popular Remote Control manuals by other brands

Jøtul
Jøtul GI 160 BF Installation and operating instructions

Byron
Byron Home Easy HE-310 installation instructions

Lennox
Lennox RG51Q/BGE manual

Home
Home URC 4 instruction manual

Flying Industry Development
Flying Industry Development 0020481 quick guide

Mitsubishi Electric
Mitsubishi Electric PAC-SF44SRA installation manual