manuals.online logo
Brands
  1. Home
  2. •
  3. Brands
  4. •
  5. Edge-Core
  6. •
  7. Switch
  8. •
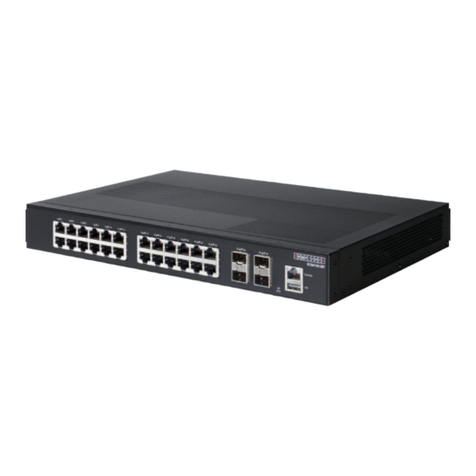
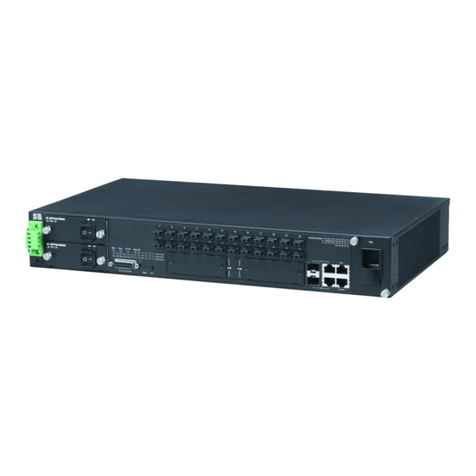
  9. Edge-Core ECS5520 Series User manual

Edge-Core ECS5520 Series User manual

– 1 –
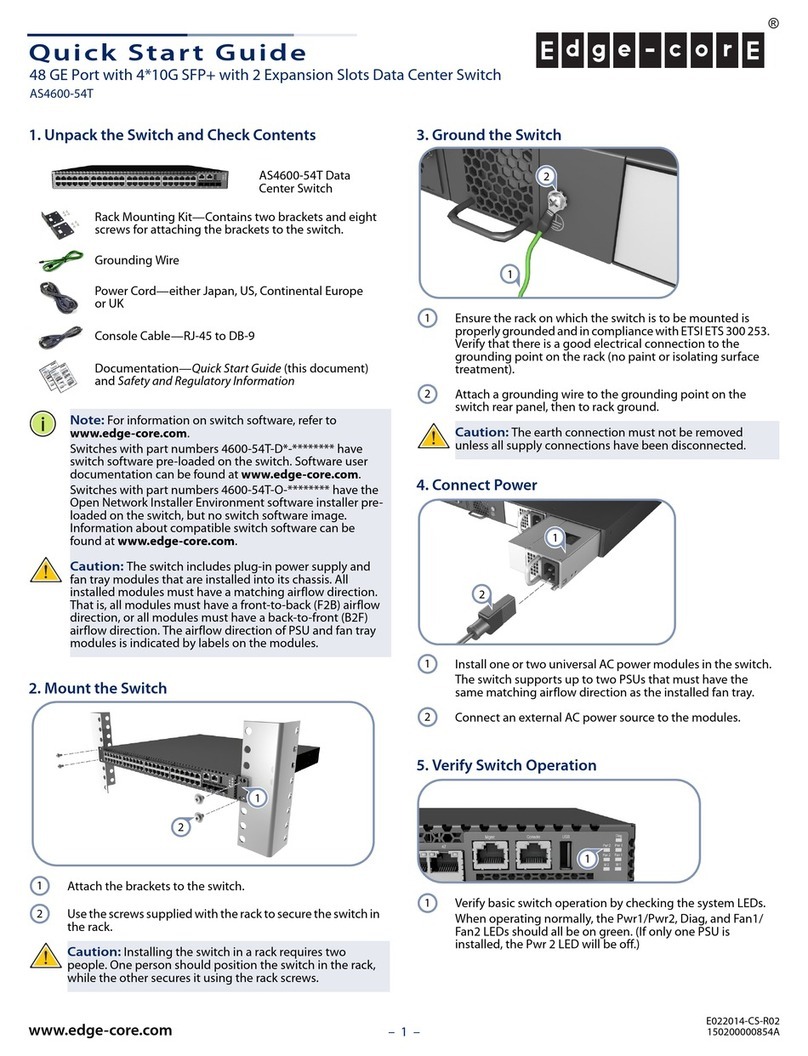
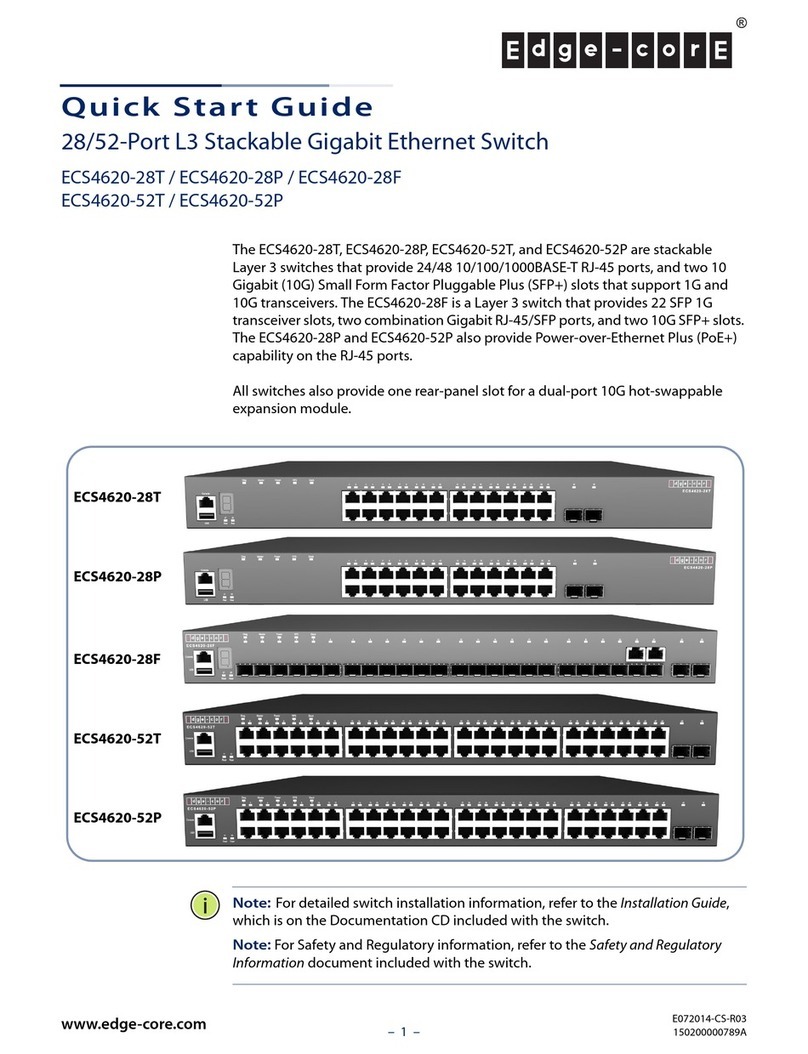
Quick Start Guide
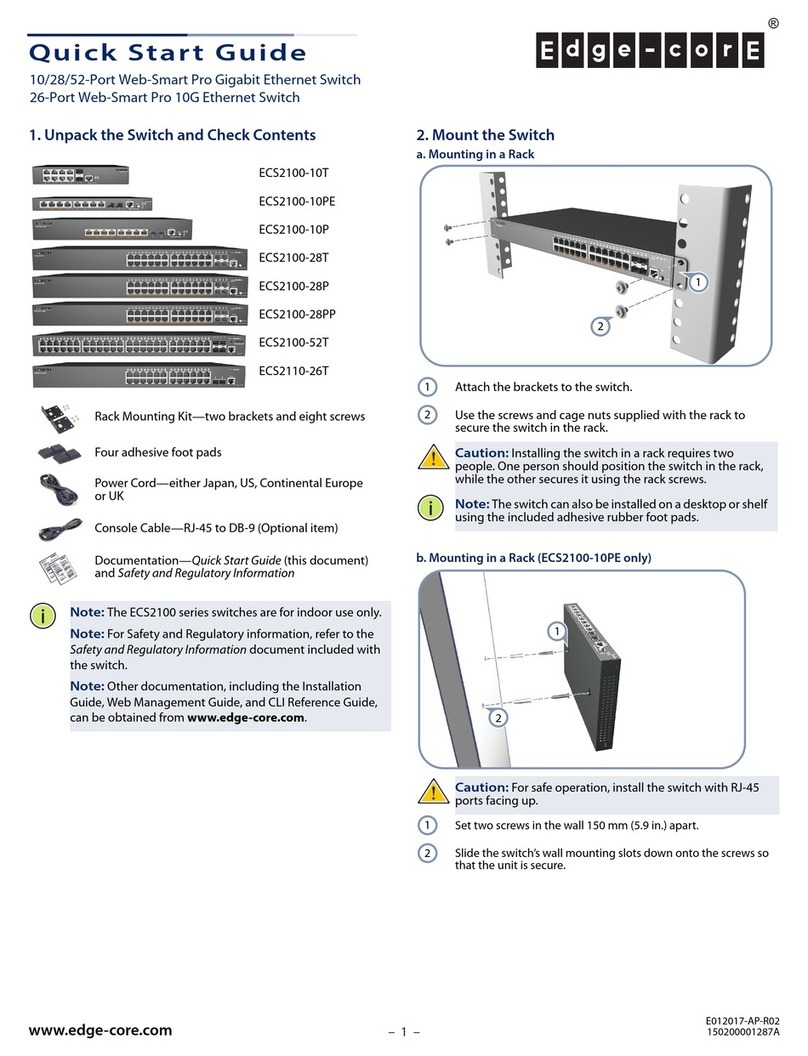
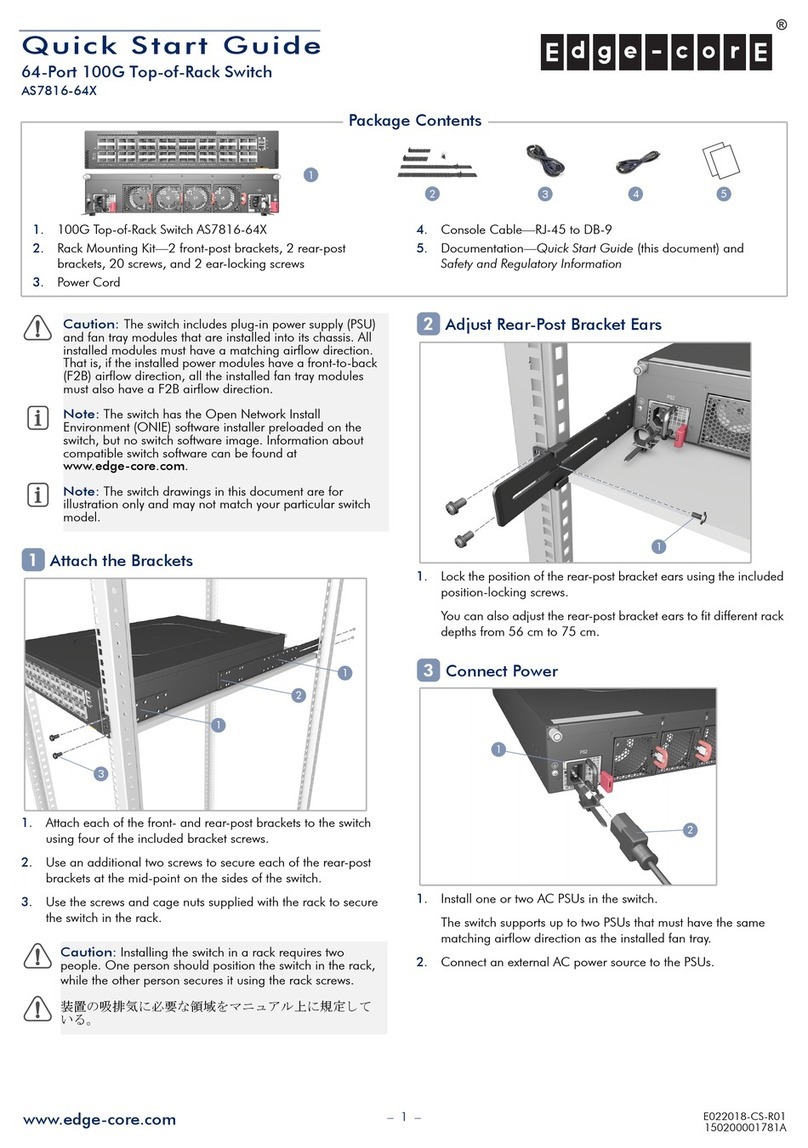
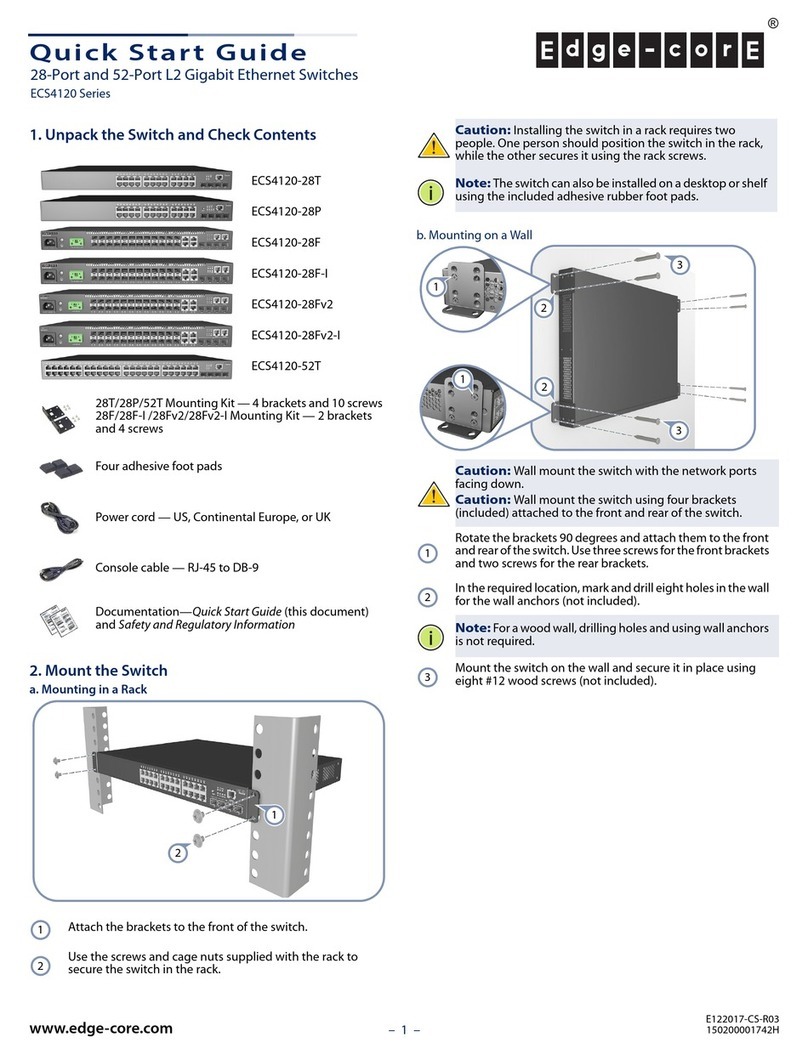
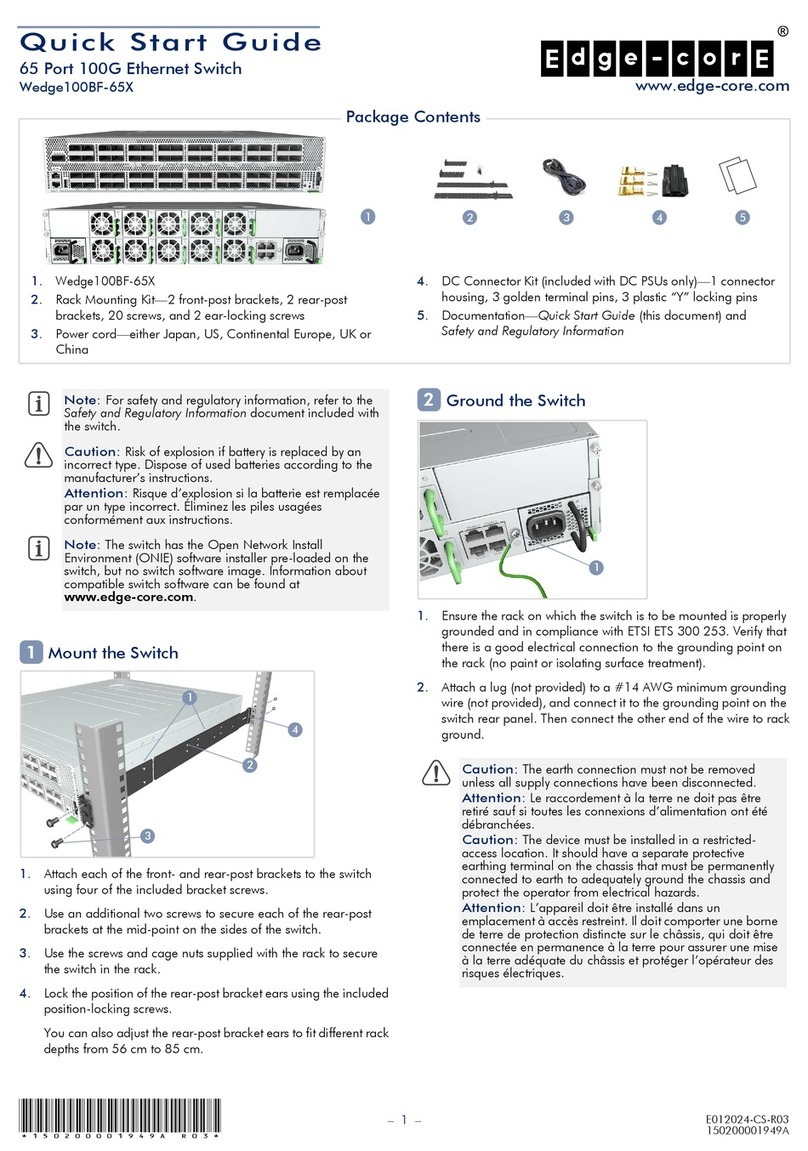
Mount the Switch
1. Attach the brackets to the switch.
2. Use the screws and cage nuts supplied with the rack to secure
the switch in the rack.
Ground the Switch
1. Ensure the rack on which the switch is to be mounted is properly
grounded and in compliance with ETSI ETS 300 253. Verify that
there is a good electrical connection to the grounding point on
the rack (no paint or isolating surface treatment)
2. Attach a lug (not provided) to a #18 AWG minimum grounding
wire (not provided), and connect it to the grounding point on the
switch rear panel. Connect the other end of the wire to rack
ground.
Connect Power
a. Connecting AC Power
1. Install one or two universal AC PSUs in the switch.
2. Connect an external AC power source to the PSUs.
b. (Optional) Connecting DC Power
1. Install one or two DC PSUs in the switch.
2. Connect the DC power supply wires to the supplied connector as
follows:
■A – Blue Wire: DC Return
■B – Brown Wire: -36 – -72 VDC
■C– Yellow Wire - Chassis Ground
3. Insert the DC supply connector into the DC PSU power input
socket.
Note:
The switch can also be installed on a desktop or shelf
using the included adhesive rubber foot pads.
Caution:
The earth connection must not be removed unless
all supply connections have been disconnected.
Attention:
Le raccordement à la terre ne doit pas être retiré
sauf si toutes les connexions d’alimentation ont été
débranchées.
1
2
1
2
1
2
Caution:
The device must be installed in a restricted-access
location. It should have a separate protective earthing terminal
on the chassis that must be permanently connected to earth to
adequately ground the chassis and protect the operator from
electrical hazards.
Attention:
L’appareil doit être installé dans un emplacement
à accès restreint. Il doit comporter une borne de terre de
protection distincte sur le châssis, qui doit être connectée en
permanence à la terre pour assurer une mise à la terre
adéquate du châssis et protéger l’opérateur des risques
électriques.
Note:
For international use, you may need to change the AC
line cord. You must use line cord sets that have been approved
for the socket type in your country.
3
1
2
1
1
2
A
B
C
1
3
E072020-CS-R01
150200002210H
www.edge-core.com
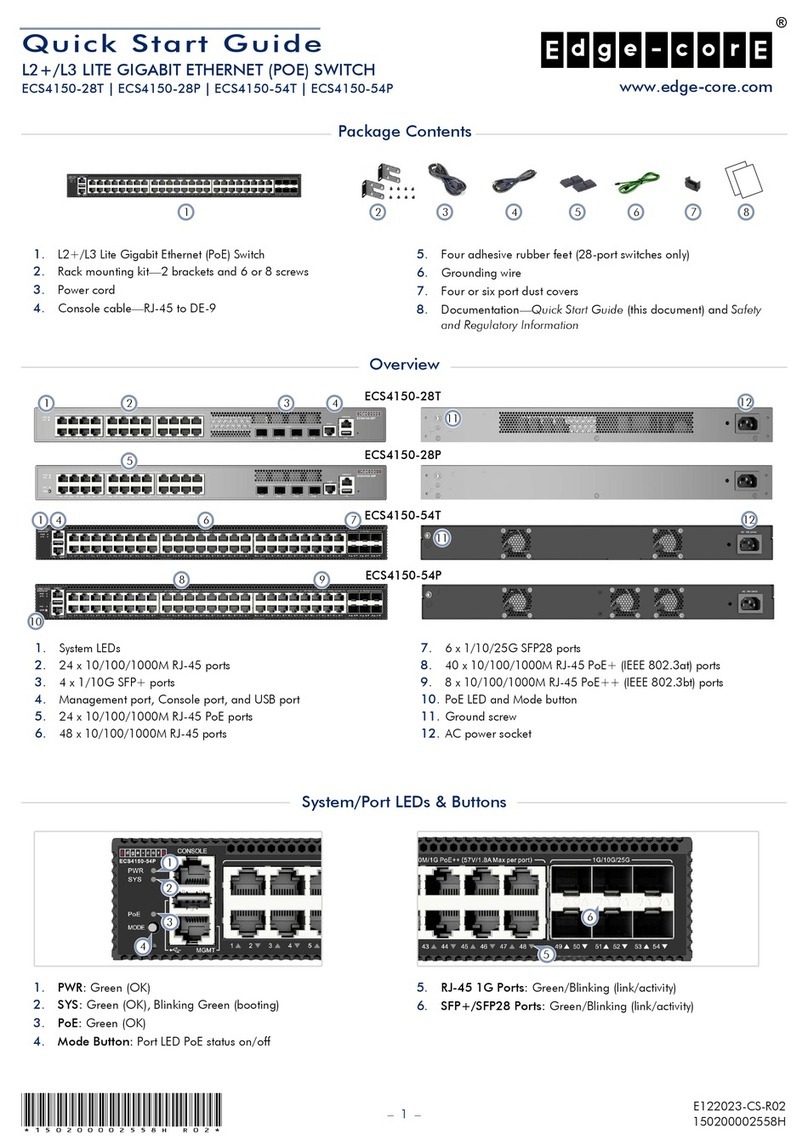
16-Port L2+/L3 Lite 10G Switch with Two 40G Uplinks
ECS5520-18X | ECS5520-18T
1.
ECS5520-18X or ECS5520-18T (with 1 AC PSU)
2. Rack Mounting Kit—2 brackets and 8 screws
3. Four adhesive rubber feet
4. Power cord
5. Console cable—RJ-45 to DB-9
6. Documentation—Quick Start Guide (this document) and
Safety and Regulatory Information
2 5
1
43 6
Package Contents
*150200002210H_R01*
Quick Start Guide
– 2 –
Verify Switch Operation
1. Verify basic switch operation by checking the system LEDs.When
operating normally, the PSU1/PSU2 and the DIAG LED should
all be on green.
Perform Initial Configuration
1. At this point you may need to make a few basic switch
configuration changes before connecting to the network. It is
suggested to connect to the switch console port to perform this
task.
2. The serial port’s configuration requirements are as follows:
115200 bps, 8 characters, no parity, one stop bit, 8 data bits,
and no flow control.
3. You can log in to the command-line interface (CLI) using default
settings: User “admin” with password “admin”.
4. For information on initial switch configuration, refer to the CLI
Reference Guide.
Connect Network Cables
1. For the SFP/SFP+/QSFP+ slots, first install SFP/SFP+/QSFP+
transceivers and then connect fiber optic cabling to the
transceiver ports. The following transceivers are supported:
■1000BASE-SX (ET4201-SX)
■1000BASE-LX (ET4201-LX)
■10GBASE-SR (ET5402-SR)
■10GBASE-LR (ET5402-LR)
■40GBASE-SR4 (ET6401-SR4)
■40GBASE-LR4 (ET6401-LR4)
2. As connections are made, check the port status LEDs to be sure
the links are valid:
■On/Blinking Green — Port has a valid link. Blinking
indicates network activity
Caution:
Use a UL/IEC/EN 60950-1 certified power supply
to connect to a DC converter, and #14 AWG wire to connect
to a DC PSU.
Attention:
Utilisez une alimentation certifiée UL/IEC/EN
60950-1 pour le connecter à un convertisseur CC et un câble
AWG #14 pour vous connecter à une alimentation CC.
4
1
1
5
1
6
1
2
Hardware Specifications
Switch Chassis
Size (WxDxH) ECS5520-18X:
43.8 x 28.0 x 4.3 cm (17.26 x 11.02 x 1.71 in.)
ECS5520-18T:
44.0 x 28.0 x 4.4 cm (17.32 x 11.02 x 1.73 in.)
Weight ECS5520-18X: 3.9 kg (8.6 lb) with 1 PSU
ECS5520-18T: 4.1 kg (9.04 lb) with 1 PSU
Temperature Operating: 0° C to 50° C (32° F to 122° F)
Storage: -40° C to 70° C (-40° F to 158° F)
Humidity Operating: 5% to 95% (non-condensing)
AC PSU Power Specification
AC Input Power 100–240 VAC 50–60 Hz, 3–1.5 A
PSU Power Rating 150 W x 2 AC PSU
DC PSU Power Specification
DC Input Power -36– -72 VDC, 6–3 A
PSU Power Rating 150 W x 2 DC PSU
Regulatory Compliances
Emissions AS/NZS CISPR 32:2015
EN 61000-3-2: 2014, Class A
EN 61000-3-3: 2013
FCC, Class A
VCCI, Class A
CNS 13438
GB/T9254-2008
Immunity EN55032: 2015/AC:2016
EN55024: 2010+A1: 2015
Safety IEC 60950-1:2005+A1:2009+A2:2013
IEC 62368-1:2014
UL 62368-1, 2014-12-1, CAN/CSA C22.2
No.62368-1-14, 2014-12
BSMI Safety Standard CNS14336-1
GB4943.1-2011
Taiwan RoHS CNS 15663
– 3 –
快速入門指南
安裝交換器
1. 將擴充托架安裝於交換器上。
2. 使用隨機櫃提供的螺絲和固定螺母,將交換器固定在機櫃上。
連接接地線
1. 請確保對機架正確實施接地,並確保符合 ETSI ETS 300 253。請
確認機架上的接地點的電氣導通狀態良好 (確保沒有油漆或絕
緣表面處理)。
2. 將 18 號 AWG 接地線連接至交換器背面面板上的接地點上。然
後將接地線的另一端連接至機架的接地。
連接電源
a. 連接 AC 電源
1. 在交換器上安裝 1 個或 2 個通用 AC 電源模組。
2. 將外部 AC 電源連接至模組。
b. ( 選配 ) 連接 DC 電源
1. 在交換器上安裝 1 個或 2 個 DC 電源模組。
2. 將直流電源線連接到電源線連接器如下:
■A – 藍線 : DC 回流
■B – 棕線 : -36 – -72 VDC
■C – 黃線 : Chassis Ground
3. 將 DC 電源連接器插入 DC PSU 電源輸入插座。
注意 : 也可以使用附帶的自黏腳墊安裝在桌面或架上。
警告 : 接地線在電源尚未切斷前請勿移除。
警告 : 設備必須安裝在受限訪問位置。 機箱上應有一個單獨
的保護接地端子,必須永久連接到地面,以充分地接地底
盤,並保護操作人員免受電氣危害。
1
2
1
2
1
2
注意 : 請使用適合當地電源規格且經檢驗合格的電源線,以
符合各國的安全規範。
注意:在 DC Converter 的前端必須使用 UL/IEC/EN 60950-
1 認證的電源供應器連接 DC PSU 。使用 #14 AWG 線連接至
DC 電源模組。
3
1
2
1
1
2
A
B
C
1
3
10G 超高速網路交換機
ECS5520-18X | ECS5520-18T
1.
ECS5520-18X
或 ECS5520-18T
( 搭配一顆 AC 電源 )
2. 機櫃安裝套件-包含兩個托架及八個螺絲
3. 4 個自黏腳墊
4. 電源線
5. 主控台纜線 —RJ-45 到 DB-9
6. 文件 — 快速入門指南 (本文件)和安全與法規資訊
2 543 6
1
包裝內容物
www.edge-core.com
快速入門指南
– 4 –
確認交換器操作
1. 透過檢查系統 LED,確認交換器的基本運轉情況。 如運轉正常,
PSU1/PSU2 和 DIAG 會亮起綠燈。
執行初次系統啟動
1. 建議在連接網路前使用主控台纜線執行初始設定。
2. 設定序列埠的如下:115200 bps、8 個字元、無同位檢查、1
個停止位元、8 個資料位元且無流量控制。
3. 使用預設設定 ( 使用者為 「admin」,密碼 「admin」) 登入
命令列介面 (CLI)。
4. 有關更多初始化設定,請參考 CLI 指南。
連接網路線
1. 對於 SFP/SFP+/QSFP+ 埠,先安裝 SFP/SFP+/QSFP+ 收發
器,再將光纖線連接至收發器連接埠,支持下列收發器 :
■1000BASE-SX (ET4201-SX)
■1000BASE-LX (ET4201-LX)
■10GBASE-SR (ET5402-SR)
■10GBASE-LR (ET5402-LR)
■40GBASE-SR4 (ET6401-SR4)
■40GBASE-LR4 (ET6401-LR4)
2. 完成連接後,檢查連接埠狀態 LED,確保連結有效。
■開機 / 閃爍綠燈 — 有效連接。燈號閃爍表示網路正在運
作中。
4
1
1
5
1
6
1
2
硬體規格
交換器機殼規格
尺寸 (WxDxH) ECS5520-18X:
43.8 x 28.0 x 4.3 cm (17.26 x 11.02 x 1.71 in.)
ECS5520-18T:
44.0 x 28.0 x 4.4 cm (17.32 x 11.02 x 1.73 in.)
重量 ECS5520-18X: 3.9 kg (8.6 lb) 含 1 個電源模組
ECS5520-18T: 4.1 kg (9.04 lb) 含 1 個電源模組
溫度 操作 : 0° C to 50° C (32° F to 122° F)
儲存 : -40° C to 70° C (-40° F to 158° F)
濕度 操作 : 5% to 95% ( 無冷凝 )
AC PSU 電源規格
AC 輸入電源 100–240 VAC 50–60 Hz, 3–1.5 A
PSU Power Rating 150 W x 2 AC PSU
DC PSU 電源規格
DC 輸入電源 -36– -72 VDC, 6–3 A
PSU Power Rating 150 W x 2 DC PSU
管制符合性
輻射 AS/NZS CISPR 32:2015
EN 61000-3-2: 2014, Class A
EN 61000-3-3: 2013
FCC, Class A
VCCI, Class A
CNS 13438
GB/T9254-2008
抗擾性 EN55032: 2015/AC:2016
EN55024: 2010+A1: 2015
安全 IEC 60950-1:2005+A1:2009+A2:2013
IEC 62368-1:2014
UL 62368-1, 2014-12-1, CAN/CSA C22.2
No.62368-1-14, 2014-12
BSMI Safety Standard CNS14336-1
GB4943.1-2011
Taiwan RoHS CNS 15663

This manual suits for next models

2

Other Edge-Core Switch manuals

Edge-Core ECS2100-10T User manual

Edge-Core

Edge-Core ECS2100-10T User manual

Edge-Core Wedge-16X-AC User manual

Edge-Core

Edge-Core Wedge-16X-AC User manual

Edge-Core ES4524D User manual

Edge-Core

Edge-Core ES4524D User manual

Edge-Core ECS3510-52T User manual

Edge-Core

Edge-Core ECS3510-52T User manual

Edge-Core ECS2100-10P User manual

Edge-Core

Edge-Core ECS2100-10P User manual

Edge-Core AS5610-52X User manual

Edge-Core

Edge-Core AS5610-52X User manual

Edge-Core ES4650F User manual

Edge-Core

Edge-Core ES4650F User manual

Edge-Core AS4610-30T User manual

Edge-Core

Edge-Core AS4610-30T User manual

Edge-Core ECS4120 Series User manual

Edge-Core

Edge-Core ECS4120 Series User manual

Edge-Core ES4308-POE Programming manual

Edge-Core

Edge-Core ES4308-POE Programming manual

Edge-Core ES3510MA-DC Programming manual

Edge-Core

Edge-Core ES3510MA-DC Programming manual

Edge-Core ECS4650-54T User manual

Edge-Core

Edge-Core ECS4650-54T User manual

Edge-Core ES4524M-PoE User manual

Edge-Core

Edge-Core ES4524M-PoE User manual

Edge-Core ECS2100-10P User manual

Edge-Core

Edge-Core ECS2100-10P User manual

Edge-Core ES4626F Programming manual

Edge-Core

Edge-Core ES4626F Programming manual

Edge-Core ES4524M-PoE Programming manual

Edge-Core

Edge-Core ES4524M-PoE Programming manual

Edge-Core ES4512C User manual

Edge-Core

Edge-Core ES4512C User manual

Edge-Core AS6701-32X User manual

Edge-Core

Edge-Core AS6701-32X User manual

Edge-Core AS7535-28XBE User manual

Edge-Core

Edge-Core AS7535-28XBE User manual

Edge-Core ECS5510-48S User manual

Edge-Core

Edge-Core ECS5510-48S User manual

Edge-Core ECS3510-28F User manual

Edge-Core

Edge-Core ECS3510-28F User manual

Edge-Core ECS4810-12M-EUK User manual

Edge-Core

Edge-Core ECS4810-12M-EUK User manual

Edge-Core AS9926-24D User manual

Edge-Core

Edge-Core AS9926-24D User manual

Edge-Core AS7312-54XS User manual

Edge-Core

Edge-Core AS7312-54XS User manual

Popular Switch manuals by other brands

schmersal T3Z 068 operating instructions

schmersal

schmersal T3Z 068 operating instructions

NETGEAR GS510TLP Hardware installation guide

NETGEAR

NETGEAR GS510TLP Hardware installation guide

H3C S5820V2-48S Installation quick guide

H3C

H3C S5820V2-48S Installation quick guide

Allied Telesis x950-52XTQm installation guide

Allied Telesis

Allied Telesis x950-52XTQm installation guide

Avocent AutoView 2000 Installer/user guide

Avocent

Avocent AutoView 2000 Installer/user guide

Enerpac PSCK3 instruction sheet

Enerpac

Enerpac PSCK3 instruction sheet

Pilz PSEN cs1.13p operating manual

Pilz

Pilz PSEN cs1.13p operating manual

Atlona AT-HDMI-24M user manual

Atlona

Atlona AT-HDMI-24M user manual

King Pigeon N80 user manual

King Pigeon

King Pigeon N80 user manual

Pilz PSEN 1.1p-29 operating manual

Pilz

Pilz PSEN 1.1p-29 operating manual

Avaya Cajun P580 user guide

Avaya

Avaya Cajun P580 user guide

Comelit IX9150 Technical manual

Comelit

Comelit IX9150 Technical manual

MCD Elektronik USB HUB 6-PORT manual

MCD Elektronik

MCD Elektronik USB HUB 6-PORT manual

Renkforce 2497597 operating instructions

Renkforce

Renkforce 2497597 operating instructions

Yamaha SWP2 owner's manual

Yamaha

Yamaha SWP2 owner's manual

ANTAIRA LNP-2602G-SFP Series Hardware manual

ANTAIRA

ANTAIRA LNP-2602G-SFP Series Hardware manual

Planet Networking & Communication XGS3-24042 Quick installation guide

Planet Networking & Communication

Planet Networking & Communication XGS3-24042 Quick installation guide

GESTRA TRS 5-52 installation instructions

GESTRA

GESTRA TRS 5-52 installation instructions

manuals.online logo
manuals.online logoBrands
  • About & Mission
  • Contact us
  • Privacy Policy
  • Terms and Conditions

Copyright 2025 Manuals.Online. All Rights Reserved.