EDL CRYO-CAL-1 User manual

CRYO-CAL-1 & CRYO-CAL-2-LI
User Manual
The Temperature People®
Since 1943
244 Oakland Drive Danville, VA 24540
Toll-Free: 1.800.342.5335 • Fax: 434.799.0847
Electronic Development Labs, Inc.

Table of Contents
Introduction ........................................................................................................ 2
Installation and Set Up......................................................................................... 4
Assembly............................................................................................................. 4
Connecting to Power Source (CC2)........................................................................ 4
Rear Panel Fuse & On / Off Switch (CC2)................................................................ 4
Operating Interface (CC2)..................................................................................... 4
Controller Features and Alerts (CC2) ..................................................................... 5
Soft Keys (CC2)..................................................................................................... 5
iTools (CC2).......................................................................................................... 5
Initial Start Up (CC2) ............................................................................................ 6
Filling.................................................................................................................. 6
Use and Operation at Boiling Point of LN2............................................................ 6
Use and Operation above Boiling Point of LN2 ..................................................... 7
Cleaning and Storage of Dewar ............................................................................ 7
Charts and Graphs ............................................................................................... 8
Specications ...................................................................................................... 9
Charts and Graphs Continued............................................................................... 9
Service............................................................................................................... 10
Calibration......................................................................................................... 10
Warranty ........................................................................................................... 10
EDL Quality Assured Sensors .............................................................................. 11
Our Most Popular Products................................................................................. 12
Trust in Electronic Development Laboratories, Inc............................................... 13

1
WARNING
PLEASE READ FIRST
Warning! When measuring high or low temperatures, standard safety
precautions must be followed:
1. Use insulated, cryogenic or high temperature gloves.
2. Wear protective, shatterproof face shields.
3.Wearreproofprotectiveclothingwhenworkingwithhotliquids.
Warning! When measuring operating machinery,never insert your hands or
arms. Use correct extension handles at all times.
Warning! These instruments are not for use in hazardous (explosive) areas.
Warning! These instruments are designed and built for temperature
measurement. Any other use voids warranty.
CRYOGENIC WARNINGS
• Observe All Internal Laboratory Safety Precautions for Cryogenic Fluids
• Do Not Remove the Lid Until the Dewar has Reached Room Temperature
• Make Sure the Dewar is Clean Before Filling
•AlwaysWeartheProperSafetyEquipment
•AlwaysWearGlovesDesignedforUsewithUltraCold(Cryogenic)Liquids
• Always Wear Safety Glasses When Using or Near this Product
• Place the Dewar on a Solid Surface that Cannot Be Easily Moved
• Do Not Use Near Open Flames or Sparks
• Never Attempt to Seal the Dewar

2
Introduction
CRYO-CAL series calibrators are used to calibrate temperature sensors by comparison from the
boiling point of liquid nitrogen (LN2) to room temperature. They are simple, self-contained devices
that use several different types of cooling media.No pumps or closed pressure systems are required
due to the passive cooling of the LN2. Comparison calibrations are achieved using a reference sensor
to obtain the real temperature of the internal equalization block.
The CRYO-CAL-1 (CC1) is a single point device that is typically used at the boiling point of LN2, the
sublimation point of CO2, or at the ice point.Calibrations are performed within the block inside of its
dewar which keeps the medium at a constant temperature without a heating element or controller.
The CRYO-CAL-2-LI (CC2) is an advanced version of the CRYO-CAL-1. It is a variable point device
that features a dewar and block asembly with the addition of a heater and controller that allows
for testing at temperatures from -196 °C (77K) up to 0 °C. Comparison calibrations are performed
within the dewar using a temperature controlled block that is immersed in the LN2. A low voltage,
direct current, non-inductively wound heating element is used to heat the block to the desired
temperature. Comparison calibrations are typically performed at the lowest temperature rst.
Important Notes
Please read this entire manual before operating the CC1 or CC2 Cryogenic calibrators.
Please read and follow ALL of the recommended safety precautions while using this device.
Make sure that all personnel operating this device are properly trained in the use of
Cryogenicuids.
3
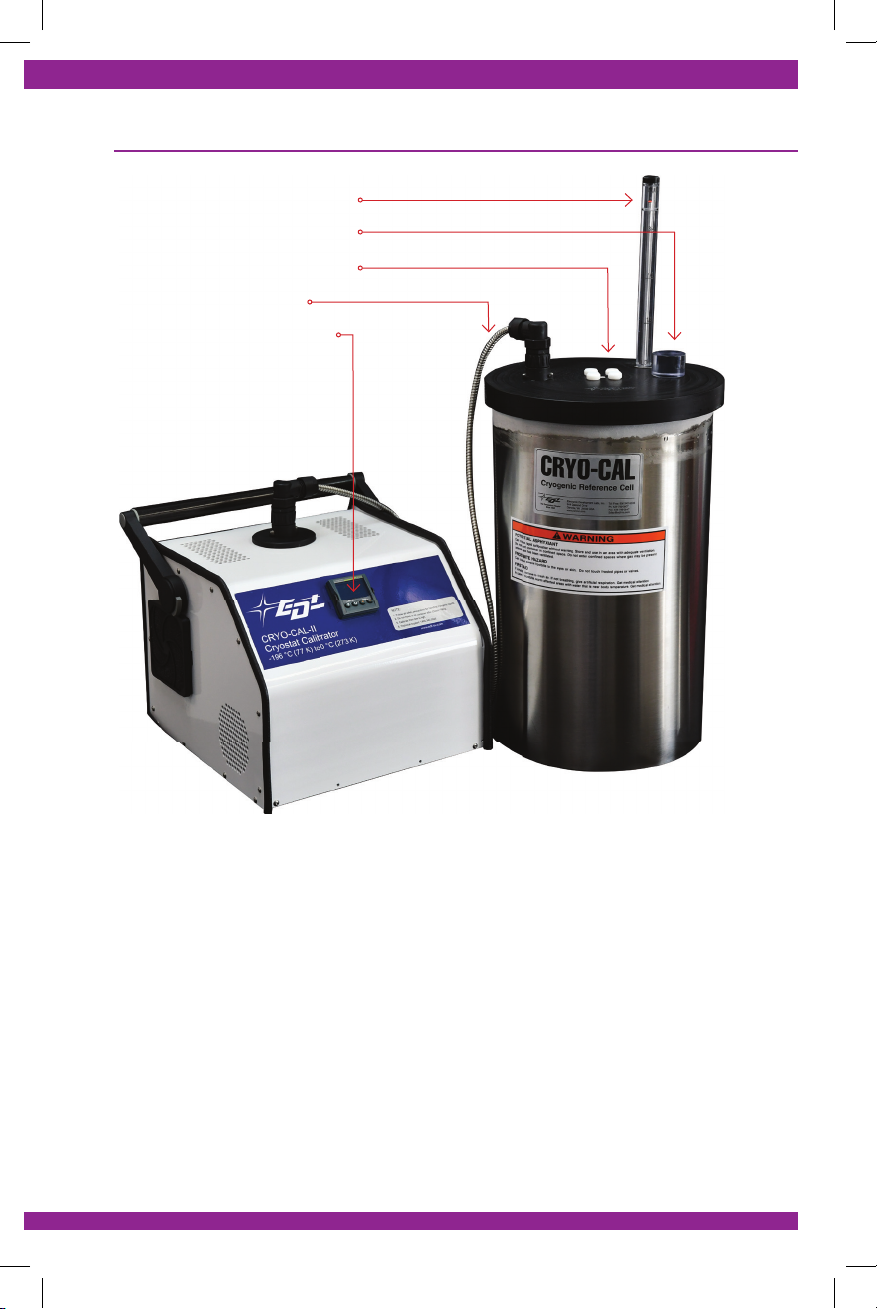
Fill Indicator
Fill Hole
Guide Tubes
Cable
Controller
Diagram
Installation and Set Up
CC1 & CC2: Unpack and carefully inspect the unit for any damage that may have occurred in
shipping. It is important to alert EDL immediately if there are any visible signs of damage to the
instrument or shipping box. Retain all packaging and external boxes.
CC2: Do Not Plug In the Unit Until It Has Been Inspected. There should be no loose parts or any
bent or damaged surfaces on the calibrator. Make sure there are no stray pieces of packing material
anywhere in or on the calibrator.
Assembly
CC1 & CC2: Assure that the Dewar is clean and free from debris. If needed, the Dewar may be
cleaned using Acetone followed by an alcohol rinse.The Dewar should then be rinsed using distilled
water and then thoroughly dried using a clean wipe.
CC1 & CC2: Place the block with lid assembly onto Dewar and place the correct size bushings in
the lid.
CC2: Connect the cable to the control unit and to the connection on the lid. These are keyed
connectors and will only t one way. Once engaged, tighten the rings.
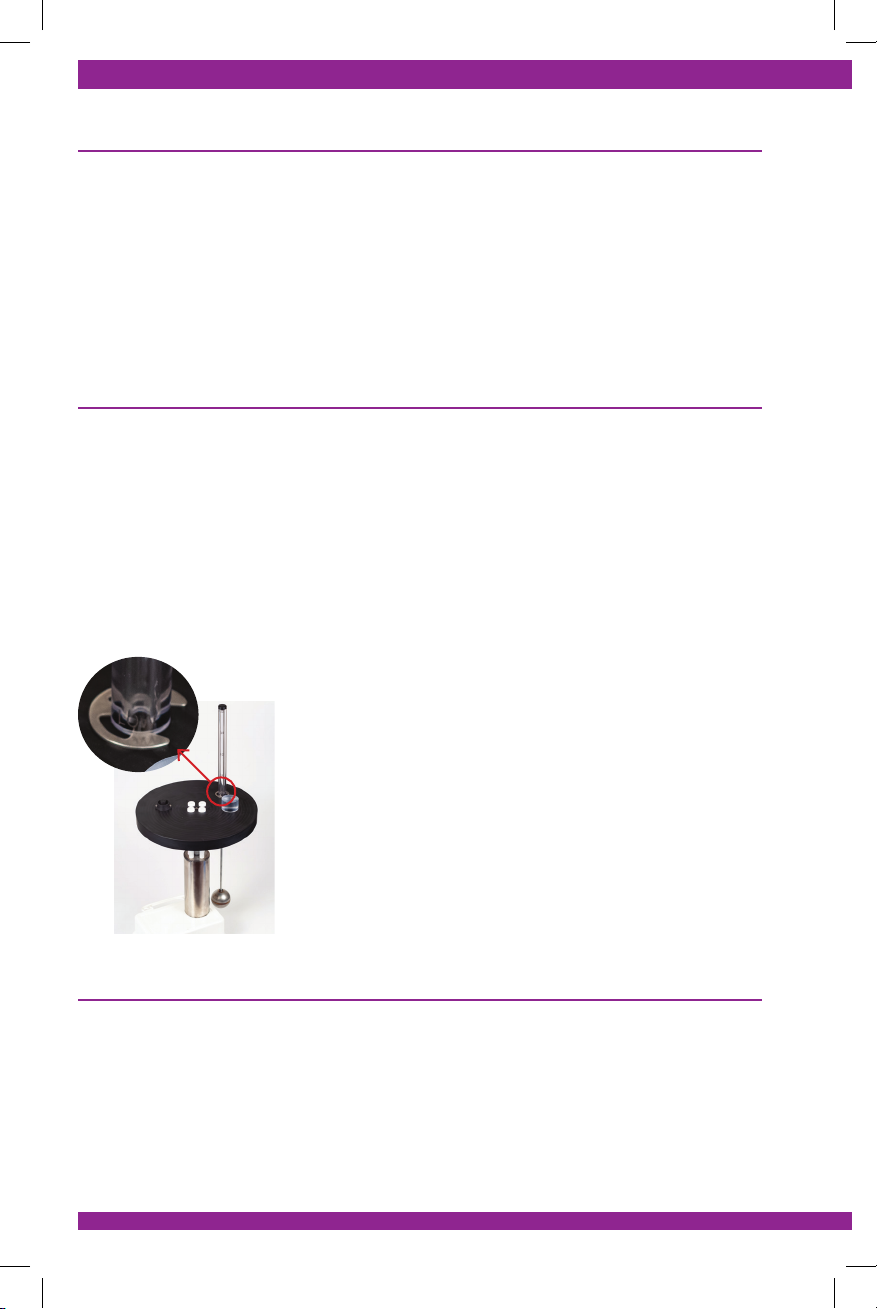
CC2 Fill Indicator: The Fill Indicator requires only minor assembly.
When you unpack the CRYO-CAL-2-LI, remove the Fill Indicator
from the plastic bag and carefully remove the piece of tape holding
the tube to the fl oat. Remove the top E-clip from the Fill Indicator
tube by putting a little force against the open legs of the E-clip. Once
unpacked, you can slide the Fill Indicator up through the lid. There
will be some small resistance felt as the tube is pushed through the
hole in the lid; this is due to the engraving of the indicator tube.
Once it is fully through the lid,slide the E-clip into the upper position
on the indicator tube to trap it into place (this is the same place it was
removed from).
Connecting to Power Source (CC2)
The CC2 is available in both 110VAC and 240VAC versions.The standard power required for this unit
is 110VAC, 60Hz with a maximum current requirement of 10.0 Amperes.
Plug the cord into the power input module on the back of the unit and then plug the other end into
any 110VAC (240VAC as applicable) outlet capable of supplying the required current. The outlet
must be grounded in order to reduce the hazard of electric shock!
4
E-clip
5
Rear Panel Fuse & On / Off Switch (CC2)
The rear panel houses the main power fuse and the On/Off Switch, and limits the current to the
entire unit. This is a 10 Amp fuse and should not be altered for any reason.
Operating Interface (CC2)
On the front panel of the CC2 you will nd four Soft Keys on the Controller. Full operation of the
CC2 is accomplished through the four Soft Keys on the Controller. For convenience, full operation
of the CC2 can also be accomplished through a computer attached to the RS-232 Port via iTools.
Soft Keys (CC2)
All programming functions can be performed using the two small Up and Down buttons on the
front of the Controller. The unit ships preprogrammed and can be used immediately.
To set the Set Point Temperature, press the Up and Down buttons and adjust the temperature
until the lower display shows the Set Point Temperature desired. Once the temperature is set, the
lower display will show the desired temperature. Once temperature is stabilized, you may begin
your calibrations.
The two Left Most Buttons on the Controller are used when the unit has an Alert. See Initial Start
Up on Page 6.
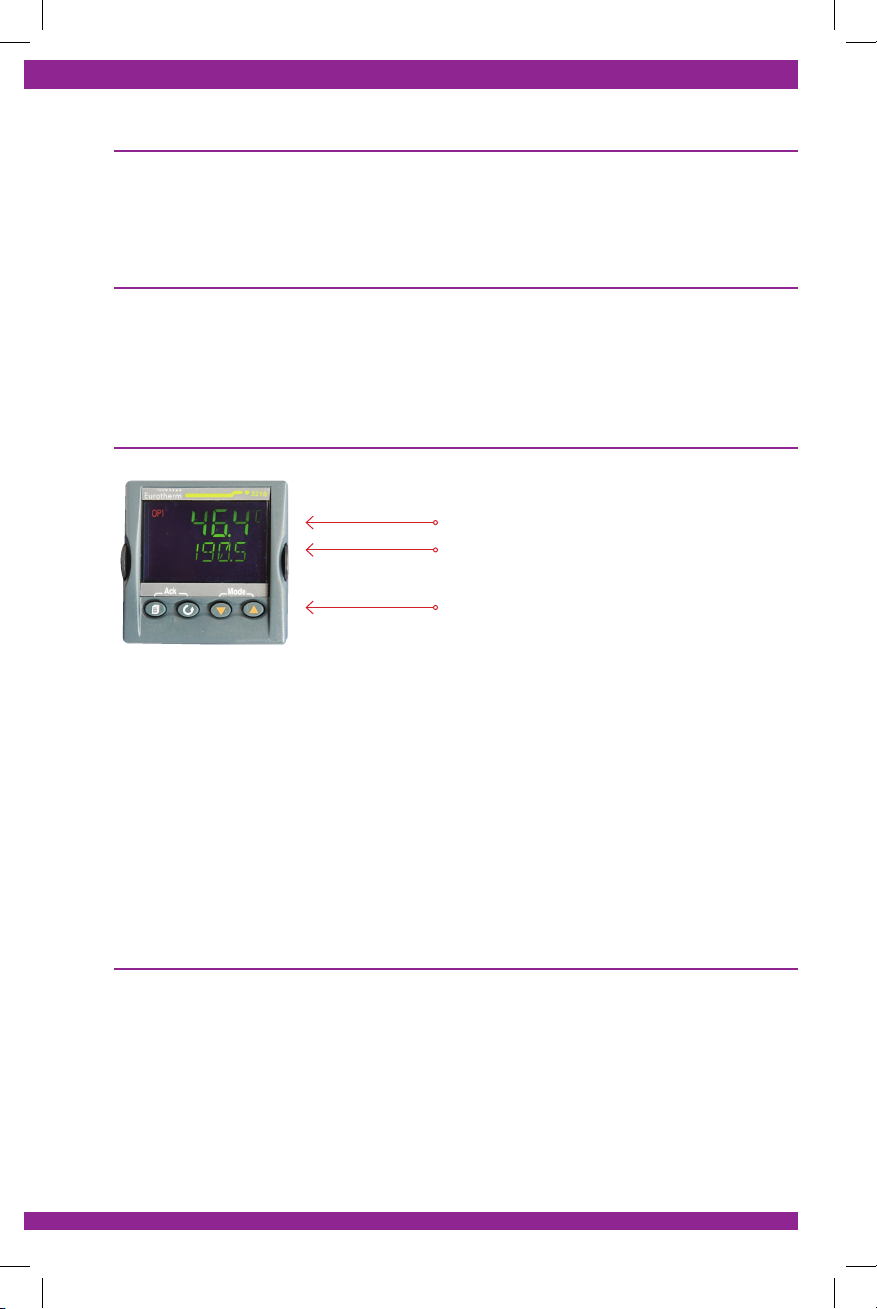
Controller Features and Alerts (CC2)
These calibrators utilize high quality Eurotherm 3216 Controllers to maintain their high accuracy.
This advanced technology features a very stable temperature control with a calibrated PID loop.The
two-line display allows you to see the set temperature along with the actual temperature reading at
all times. The top temperature reading shows the Current Temperature of the Block. The bottom
temperature reading shows the Set Point Temperature. The Controller will also display Alerts
when portions of the unit are malfunctioning. See Initial Start Up on Page 6.
Current Temperature
Set Point Temperature
Soft Keys

6
iTools (CC2)
The Controllers work automatically with the iTools software. A limited-feature, free version of iTools
is included with your calibrator. iTools allows you full access to the Controller’s features without
having to use the Controller.
We recommend purchasing the license for the full version of iTools from Eurotherm to unlock the
program’s full functionality.
Note: iTools gives you complete access to all controller settings and features – including
those that should not be altered. Operate with care! In order to maintain the high accuracy
and safe operation of the preprogrammed CRYO-CAL-2-LI, do not change any of the operating
parameters! Use iTools for controlling temperature and basic informational purposes only.
For a demonstration of the iTools software, please visit https://youtu.be/OoQMysZOxvo.
To purchase the license for iTools, please visit http://www.eurotherm.com/itools/.
Initial Start Up (CC2)
Turn on the control unit using the On/Off Switch located on the back of the
control unit. Use the front keys on the controller to set the temperature to -199.9
°C.The unit should be set to -199.9 °C prior to the initial startup.This is below the
boiling point of LN2 so you can lower the temperature faster.
Note: If the controller is turned on before connecting the cable is attached, a
“sensor break” alert will occur. Make sure the cable is properly connected and
if needed acknowledge an alert by simultaneously pushing the two Left Most
Buttons on the Controller.
Filling
CC1 & CC2: Place an appropriate funnel in the opening. Begin lling the Dewar with LN2and
continue lling until the Dewar is full. You can also pre ll the Dewar and slowly lower the block into
the fl uid; this is not the recommended procedure due to the increased risk while lowering the block.
CC2: When lling the Dewar for operation above the boiling point of LN2, the fl uid level should be
above the block, but not above the spacer tubes. The only time the level of LN2is above the spacer
tubes is when you are working at the boiling point of LN2or trying to cool the block quickly.
Allow the Dewar to rest and equilibrate.There should only be a small amount of vapor escaping the
lid. Top off the Dewar with LN2before starting to take measurements.
Note: When working at the boiling point of LN2, the ll indicator should be above full. At
temperatures below -80 °C, the level should be maintained above 1/2.
On/Off Switch

7
Use and Operation at Boiling Point of LN2
CC1 & CC2: The supplied rubber stoppers should be placed in the unused holes to minimize air
currents in the Dewar. They should not be pressed tight. Over time condensation and ice will build
up on the lid around the sensors and the Tefl on bushings.
CC2: Insert the correctly sized spacer tubes into the block holes. This will reduce the air space and
improve your measurement accuracy.
CC1 & CC2: Readings can now be taken at the boiling point of nitrogen. The realized value will
be slightly different than the theoretical value due to the purity of the nitrogen, local atmospheric
pressure, and the resultant pressure within the Dewar. At this point the Dewar can be re lled and
readings taken over a period of several hours if necessary.
NOTE: Remember, it is advisable to have the fl uid above the spacer tubes when working at this
temperature.
Slowly insert your sensors into the holes in the top of the Dewar. This should be done slowly to
prevent excessive thermal shock in the sensor, and it will also prevent a physical shock from hitting
the bottom of the well.
More vapors will escape the Dewar during this process. Re- lling is optional and depends on the
amount of LN2lost during this process. Pre-cooling the sensors will reduce the loss and need for
re lling.
Use and Operation above Boiling Point of LN2
CC1: The Dewar may also be lled with a mixture of alcohol and dry ice to form a gel like mixture
having a temperature of about -78 °C. This temperature is approximately the sublimation point of
solid carbon dioxide (Dry Ice). A mixture of shaved ice and distilled water can be used to for 0 °C.
Distilled water should be used to make the ice used in this mixture.
CC2: Set the temperature controller to the desired set point. Some of the nitrogen will boil off as
the block inside begins to heat. When this happens do not re ll the Dewar with LN2. The block is
designed to reduce thermal gradients when the Dewar is not completely full. The block will reach
the set point and then stabilize for some period, typically 15 to 30 minutes after reaching the set
point.
NOTE: Place the correct size spacer tubes in the CC2 wells before cooling it; it can be extremely
dangerous to change the tubes and unneccessarily dangerous to do so at cryogenic temperatures.
Depending on the length of time and the temperature of your testing, you will need to periodically
add additional LN2. When you add LN2during a test at temperatures above 77K (-196 ºC) you will
note a small change in the plateau. We recommend lling the Dewar when you are changing
temperature, this will minimize the stabilization time.
We recommend working up from the boiling point of LN2toward room temperature. In order to
quickly go down in temperature, you will need to top off the Dewar with LN2, this requires lling
above the spacer tubes. The system will function up to room temperature but will perform the best
from -196 °C to 0 °C.
Cleaning and Storage of Dewar
When calibration is completed the Dewar can be cleaned for storage. Allow the unit to reach room
temperature. Remove the lid and block assembly. Wipe out the Dewar and allow the block to dry.
It may be warmed in an oven up to about 40 °C to hasten the drying process. The Dewar may be
stored with the block lid assembly in place but it must remain in the vertical position.Do not tilt the
Dewar or lay it on its side for storage if it is assembled.
Specifi cations
Temperature Range -196 °C (77 K) to 0 °C (273 K)
Dewar Dimensions 25.71cm (10 1/8") Diameter x 43.18cm (17") H
Capacity: ~ 13.9 Liters
Wells (4) 8mm holes with (4) included tubes designed for 0.250” sensors
Total Insertion Length 27.94cm (11") Minimum
Immersion Depth 14.40mm (5.66") (In Block)
Dewar Material Stainless Steel Vacuum Insulated
Block Material OFHC / Copper
Lid Material Polycarbonate
Minimum Use Temperature -196 °C (77 K)
Maximum Use Temperature 0 °C (273 K)
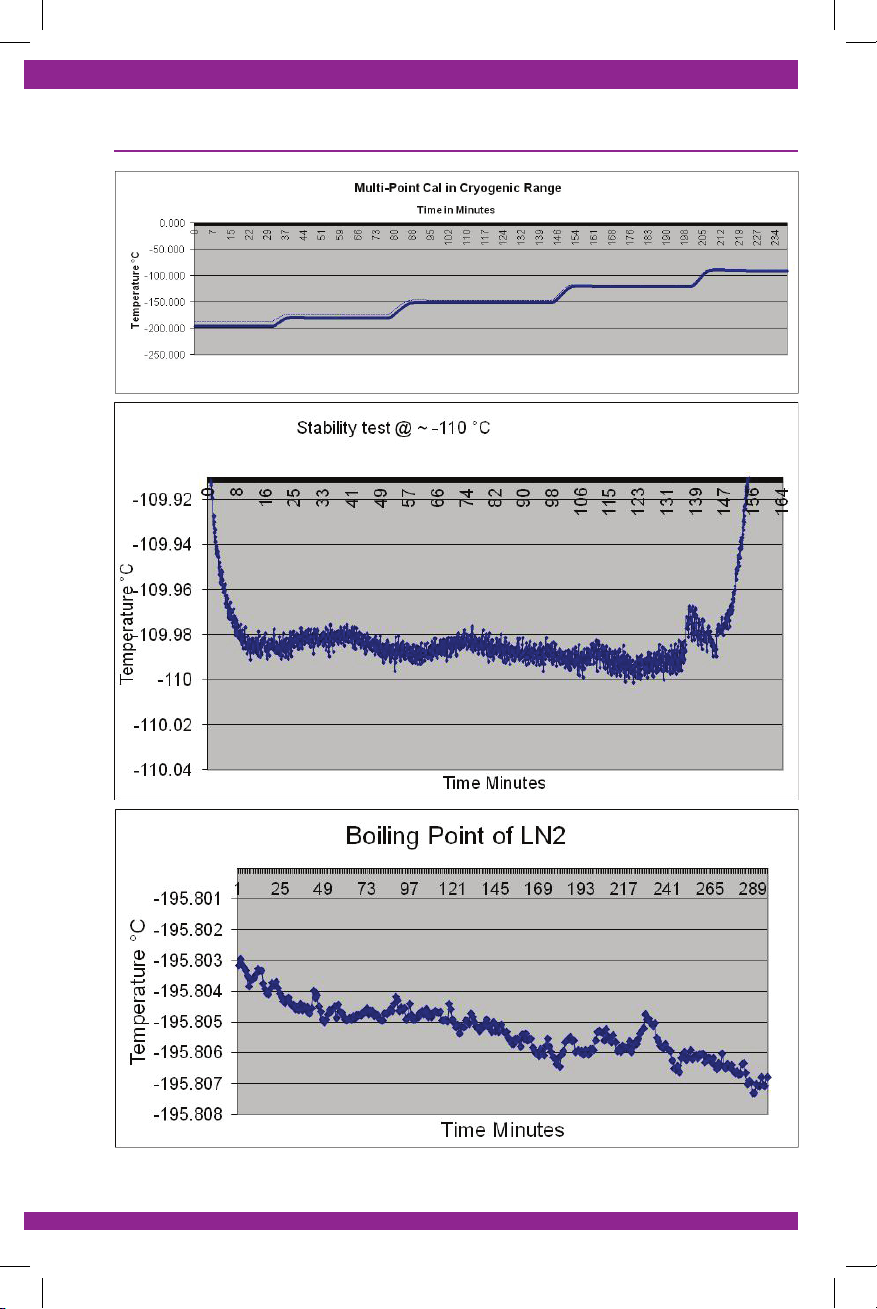
Stability / 15 minutes < 5mK
Uniformity < 5mK
Resolution 0.1 °C
Interface RS-232 Interface and iTools
Power 120VAC or 240VAC, 10 amp, 50/60Hz
NOTE: Standard 0.250” spacer tubes are included with purchase. Additional spacer tubes and
guides are available to accommodate your choice of sensor diameters of 0.125”, 0.1875”, and
0.276”.
Service
9
9
Charts and Graphs

10
It is not recommended to perform in-house repairs on your EDL instruments. If the instrument gets
damaged or requires service/re-calibration, it is recommended to be returned to the manufacturer.
Visitwww.edl-inc.com/repairsformore informationandinstructions.Forhelp,contact 800.342.5335
Note: Tampering with the instrument may cause additional or more severe damage, and will
void the warranty if applicable.
If returning for service or calibration, be sure to place instrument in a corrugated container with
ample packaging around the instrument to prevent further damage in transit. Be sure to label the
outside of the package “Fragile – Handle with Care” and to insure for the full value of the instrument.
The manufacturer accepts no responsibility for damages or loss during transit.
Important: When sending instruments in for service, include a completed Repair Form with full
contact information and speci c details as to the nature of the repair service required.
Print a Repair Form online at www.edl-inc.com/repairs.
Send instruments to: Electronic Development Labs, Inc., Attn: Repairs, 244 Oakland Dr., Danville,
VA 24540 USA.
Calibration
All precision instruments, including calibrators,should be re-calibrated regularly in a NIST traceable
laboratory. Keeping your precision calibrator up to date with a regular calibration schedule
is important to maintain high quality speci cations. Additionally, a traceable and accredited
Calibration Certi cate is required if your plant operates according to a quality control system, or if it
is essential for you to provide proof of measurements and traceability to your customers. In critical
applications, the cost of an out of tolerance situation can be extremely high and it may be a safer
practice for you to calibrate your equipment more often than the standard yearly calibration that is
recommended. EDL provides NISTtraceable calibrations and repair services on all our products (and
those of other manufacturer’s). Our calibration services are guaranteed to be of the highest quality.
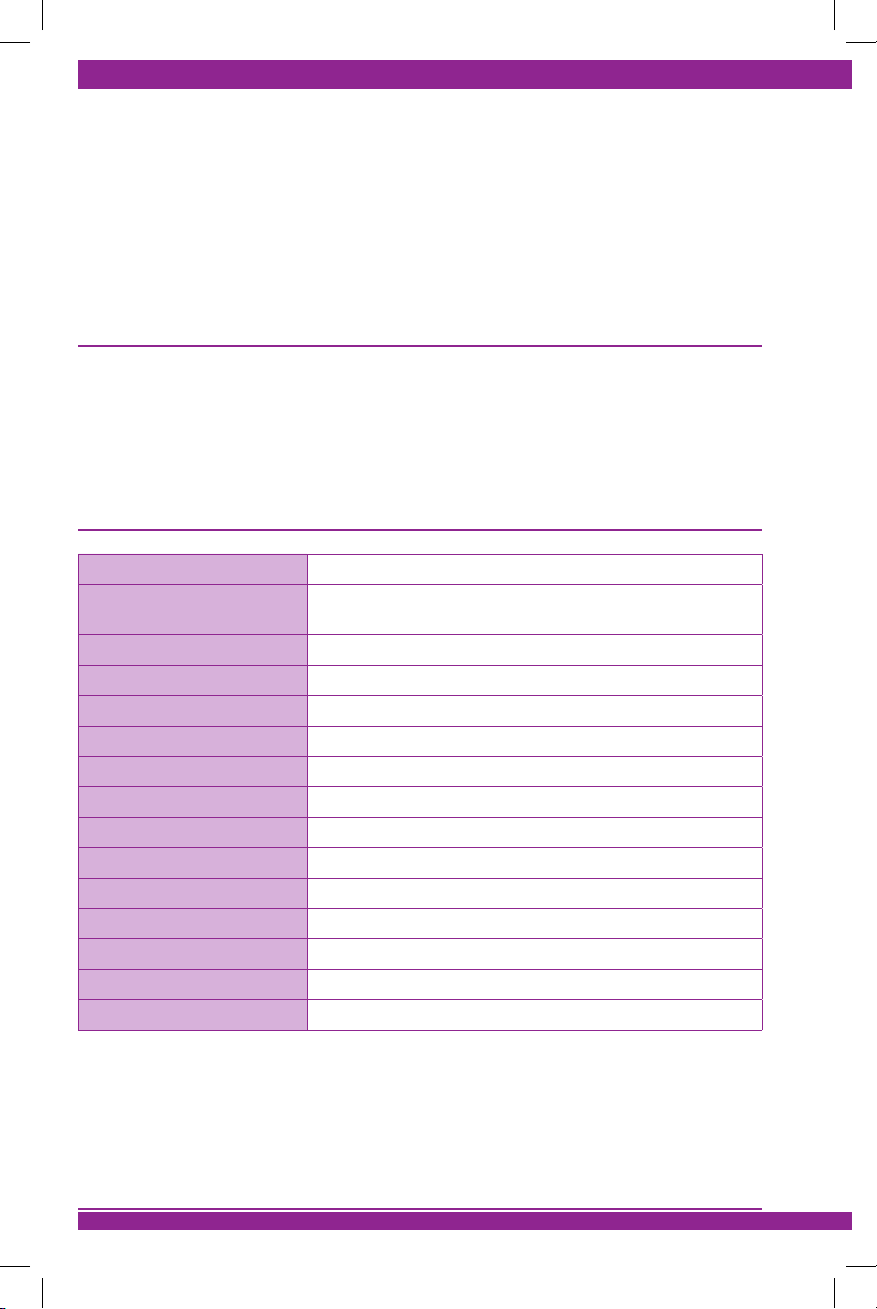
Drywell Calibrator Range
Cold Bath Range
Cryo-Cal 2 Range
50 °C
0 °C
-50 °C
-100 °C
-150 °C
-200 °C
Boiling Point of Nitrogen
Triple Point of Argon
Boiling Point of Argon
Boiling Point of Oxygen
Sublimination of Carbon Dioxide
Triple Point of Mercury
Triple Point of Water
Gallium Melting Point
-195.77 ºC
-189.344 ºC
-185.83 ºC
-182.94 ºC
-78.5 ºC
-38.8344 ºC
0.01 ºC
29.76 ºC
-195.77
-195.77-195.77
-189.344
-189.344-189.344
-185.83
-185.83-185.83
-182.94
-182.94-182.94
Boiling Point of Nitrogen
Boiling Point of Oxygen
Boiling Point of Nitrogen
Triple Point of Argon
Boiling Point of Argon
Boiling Point of Oxygen
Boiling Point of Nitrogen
Triple Point of Argon
Boiling Point of Argon
Boiling Point of Oxygen
Triple Point of Argon
Cryo-Cal 2 RangeCryo-Cal 2 Range
Sublimination of Carbon Dioxide
Sublimination of Carbon DioxideSublimination of Carbon Dioxide
-78.5
-78.5-78.5
-78.5-78.5
Triple Point of Mercury
-38.8344
0.01
Triple Point of Water
Triple Point of Water
Triple Point of Water
º
Gallium Melting Point
Gallium Melting Point
Cold Bath RangeCold Bath Range
Drywell Calibrator RangeDrywell Calibrator Range
Drywell Calibrator RangeDrywell Calibrator Range

11
See Service section above.
Warranty
Please complete the included Warranty Card and return by USPS, or complete the Warranty
Submission online at www.edl-inc.com/warranty.
Electronic Development Labs, Inc. (EDL) warrants this product to be free from defects in material
and workmanship under normal use and service for a period of one year. This warranty extends
only to the original purchaser (a purchase from EDL or recognized EDL distributor is an original
purchaser). This warranty does not apply to: (1) cosmetic damage, such as scratches, nicks and
dents; (2) consumable parts, such as batteries, unless product damage has occurred due to a defect
in materials or workmanship; or (3) damage caused by accident, abuse, misuse, water, fl ood, re,
or other acts of nature or external causes. In addition, EDL reserves the right to refuse warranty
claims against products or services that are obtained and/or used in contravention of the laws of any
country. Should EDL be unable to repair or replace the product within a reasonable amount of time,
the purchaser’s exclusive remedy shall be a refund of the purchase price upon return of the product.
In the event of failure of a product covered by this warranty, EDL will repair the instrument when
it is returned by the purchaser, freight prepaid, to our manufacturing facility within the applicable
warranty period. Repairs or replacements will be made without charge and with return freight
paid by EDL, unless the failure was caused by misuse, neglect, accident, or abnormal conditions
of operation or storage, in which case repairs will be billed at a reasonable cost. In such cases, an
estimate will be submitted before work is started, if requested. The foregoing warranty is in lieu
of all other warranties, expressed or implied, including but not limited to any implied warranty of
merchantability, tness, adequacy for any particular purpose or use. EDL shall not be liable for any
special, incidental, or consequential damages, whether in contract, tort, or otherwise.
EDL Quality Assured Sensors
We strongly recommend you use EDL sensors with our instruments. We manufacture a full line
of standard thermocouple sensors with tips specially designed for measuring gas temperatures,
liquids, smooth fl at surfaces, contoured surfaces, rough surfaces, ns, radiators, ovens, steam traps,
concrete, asphalt, plastics, rubber, molds, and most other industrial measurement applications. If
you need it measured, we have a sensor for it!
All EDL sensors are manufactured from the same high quality thermocouple wire used in the sensor
tips and guarantees the best possible accuracy, even in the most adverse conditions. Extension wire
is inferior and is never used. This means that even if the lead wire is exposed to high temperatures,
the accuracy of our sensors is unaffected. Our standard Tefl on®-insulated, steel-braided lead is
usable in environments up to 287 °C (550 °F), with additional options available for more extreme
temperatures.

12
If you need a customized solution tailored speci cally to your needs, our engineering team has
the knowledge and experience to create a new solution for you. Contact us at 1.800.DIAL.EDL
(1.800.342.5335) and let’s get started on something groundbreaking!
Our Most Popular Products
Pocket-Probe® Digital - Our rugged and reliable portable single-sensor pyrometer has been the
industry standard for decades.
Pocket-Probe® Steel-Cased Digital Pyrometer - Our Pocket-Probe is tough, but with a steel case
it’s even tougher. You won’t nd a stronger pyrometer anywhere else!
Pocket Probe® Extended Range Digital Pyrometer - Our legendary pyrometer upgraded for use
in extreme ambient environments, from -30 °C to 72 °C.
Pocket-Probe® Sealed Digital Pyrometer - This sealed pyrometer is impervious to moisture,
contaminants, and dust--plus it fl oats!
Pocket-Probe® V Digital Pyrometer - With an extended reach integrated into the pyrometer, the
Pocket-Probe® V features safe one-handed operation and uses our money saving sensor tips.
Pocket-Probe® Analog Pyrometer - The US Navy’s #1 pyrometer! With no electric power source
needed, this is the safest pyrometer available for explosive environments.
E-Z Probe® & E-Z Probe® Ultra Pyrometers - Fast and affordable, the E-Z Probe® and the E-Z Probe®
Ultra deliver EDL’s legendary accuracy that’s easy to use (and easy on the wallet!)
Temperature Kits - These all-in-one packages include instruments and sensors tailored to the
speci c needs of several industries, such as pipeline, plastics, or food & beverage.
Calibrators - We offer a range of temperature calibraton equipment, including: Infrared, Surface,
Comparison Cryostat, Dry Well, Mini-Liquid Bath, Floor Size Liquid Bath, and Furnace Calibrators
with more than 30 standard models to choose from,accommodating temperature ranges from -196
°C up to 1500 °C. All feature accuracy, ease of use, speed, versatility, and advanced functions with
iTools software. Our calibrator options include the largest IR target, and the coldest & hottest surface
of our quality portable temperature calibrators. We also offer RTDs, thermistors, temperature
controllers, accessories and compression ttings. Visit www.edl-inc.com for product information.
Trust in Electronic Development Laboratories, Inc.

13
EDL has a long tradition of excellence because being the best isn’t nearly enough for us. Every
year, every day, we push ourselves to go beyond our best. That’s why no matter what it is, every EDL
product is the most accurate, most cost-effective, most sturdy, longest lasting in its class.
Our ethic of continual improvement has been the core of our company since day one. We were
established in 1943 as a repair house for temperature instruments, and it was not long before we
were not just repairing instruments, but producing a better product. Our drive to be the best made
our future obvious: we could make superior instruments, so we did.
We’re committed to being the best temperature equipment manufacturer in America.Our products
don’t just make the world go ‘round; they make it bigger.
The legacy of EDL is the legacy of innovation and progress of 20th century America. Hand in hand
with hundreds of satis ed clients, we’re forging ahead in the 21st century, pushing boundaries and
preserving the good works that bene t all of us.
If you’re a long-time customer, we appreciate the mutual support. If you’re new to our business, we
can’t wait to help you build a legacy as long-lasting as ours.
244 Oakland Drive Danville, VA 24540
Toll-Free: 1.800.342.5335 • Fax: 434.799.0847
V1.08/22
The Temperature People®
Since 1943
Electronic Development Labs, Inc.
This manual suits for next models
1
Table of contents
Other EDL Laboratory Equipment manuals


