Edwards & Co sicuro ISOFIX User manual

Instruction
manual
sicuro™ ISOFIX
Convertible Car Seat
Keep for future reference.
To reduce the risk of serious injury or death, read this owner’s
manual prior to installing and using this car seat.
Suitable for child from 9kg (around 12 months) to 36 kg (12 years).
Conforms to European ECE R44/04 in Group I, II & III as approved by
Land Transport NZ.
designed & printed in NZ
UNIVERSAL
GROUP I 9-18KG
SEMI-UNIVERSAL
GROUP II 15-25KG
GROUP III 22-36KG

Hi there
Firstly, thanks for choosing Edwards & Co - it truly means a lot to us
that you have chosen one of our car seats to keep your family safe.
A number of international surveys have consistently shown that a
high proportion of child restraints are incorrectly installed and used.
Therefore we strongly recommend that you carefully read through
this instruction manual before placing your child in this car seat.
We believe in long lasting relationships with our customers, and
we’d love you to keep in touch. You can sign up for our website
newsletter or follow us on Facebook. And remember that if you
need help we’re a simple phone call or email away.
Enjoy your product, and again, remember to read this manual
carefully!
Regards
Mark Edwards Warwick Edwards
WEB - edwardsandcobaby.com
FB - facebook.com/edwardsandcobaby/
Introduction

GENERAL WARNINGS 4
INSTALLATION INFORMATION 6
WHERE TO INSTALL THE CAR SEAT 7
FEATURES OF YOUR CAR SEAT 8
SECURING THE SEAT TO YOUR CAR 10
GROUP I (9-18KG) INSTALLATION
SECURING THE HARNESS 12
ADJUSTING THE HEIGHT OF THE
HEAD REST & SHOULDER BELT 14
GROUP II & III (15-36KG) BOOSTER SEAT 15
INSTALLATION
REMOVING THE HARNESS SYSTEM 16
INSTALLING THE HARNESS SYSTEM 18
MAINTENANCE AND CLEANING 20
WARRANTY INFORMATION 21
Contents
3

GENERAL WARNINGS
To reduce the risk of SERIOUS INJURY or DEATH, read this owner’s
manual and your vehicle owner’s manual before installing and using
this car seat. By properly using this car seat and following these
instructions (and the instructions that accompany your vehicle),
you will greatly reduce the risk of serious injury or death to your
child from a collision.
• NEVER LEAVE YOUR CHILD UNATTENDED IN THE CAR SEAT
• NEVER USE THIS CAR SEAT IN A PASSENGER SEAT FITTED
WITH AIRBAGS.
• NEVER use the car seat without fastening it into your vehicle.
• NEVER alter or modify the car seat in any way as this may
aect its performance in the event of a collision.
• The harness SHOULD ALWAYS be easily accessible. It is
important that your child can be released quickly in the event of
an emergency.
• This is an ISOFIX car seat and must only be used in a vehicle
with an approved ISOFIX and tether strap system.
• ALWAYS refer to your vehicle’s handbook before using this seat
in your vehicle.
• This car seat is only suitable for children in Group I (9-18kg),
Group II (15-25kg) and Group III (22-36kg) (about 12 months to
12 years old).
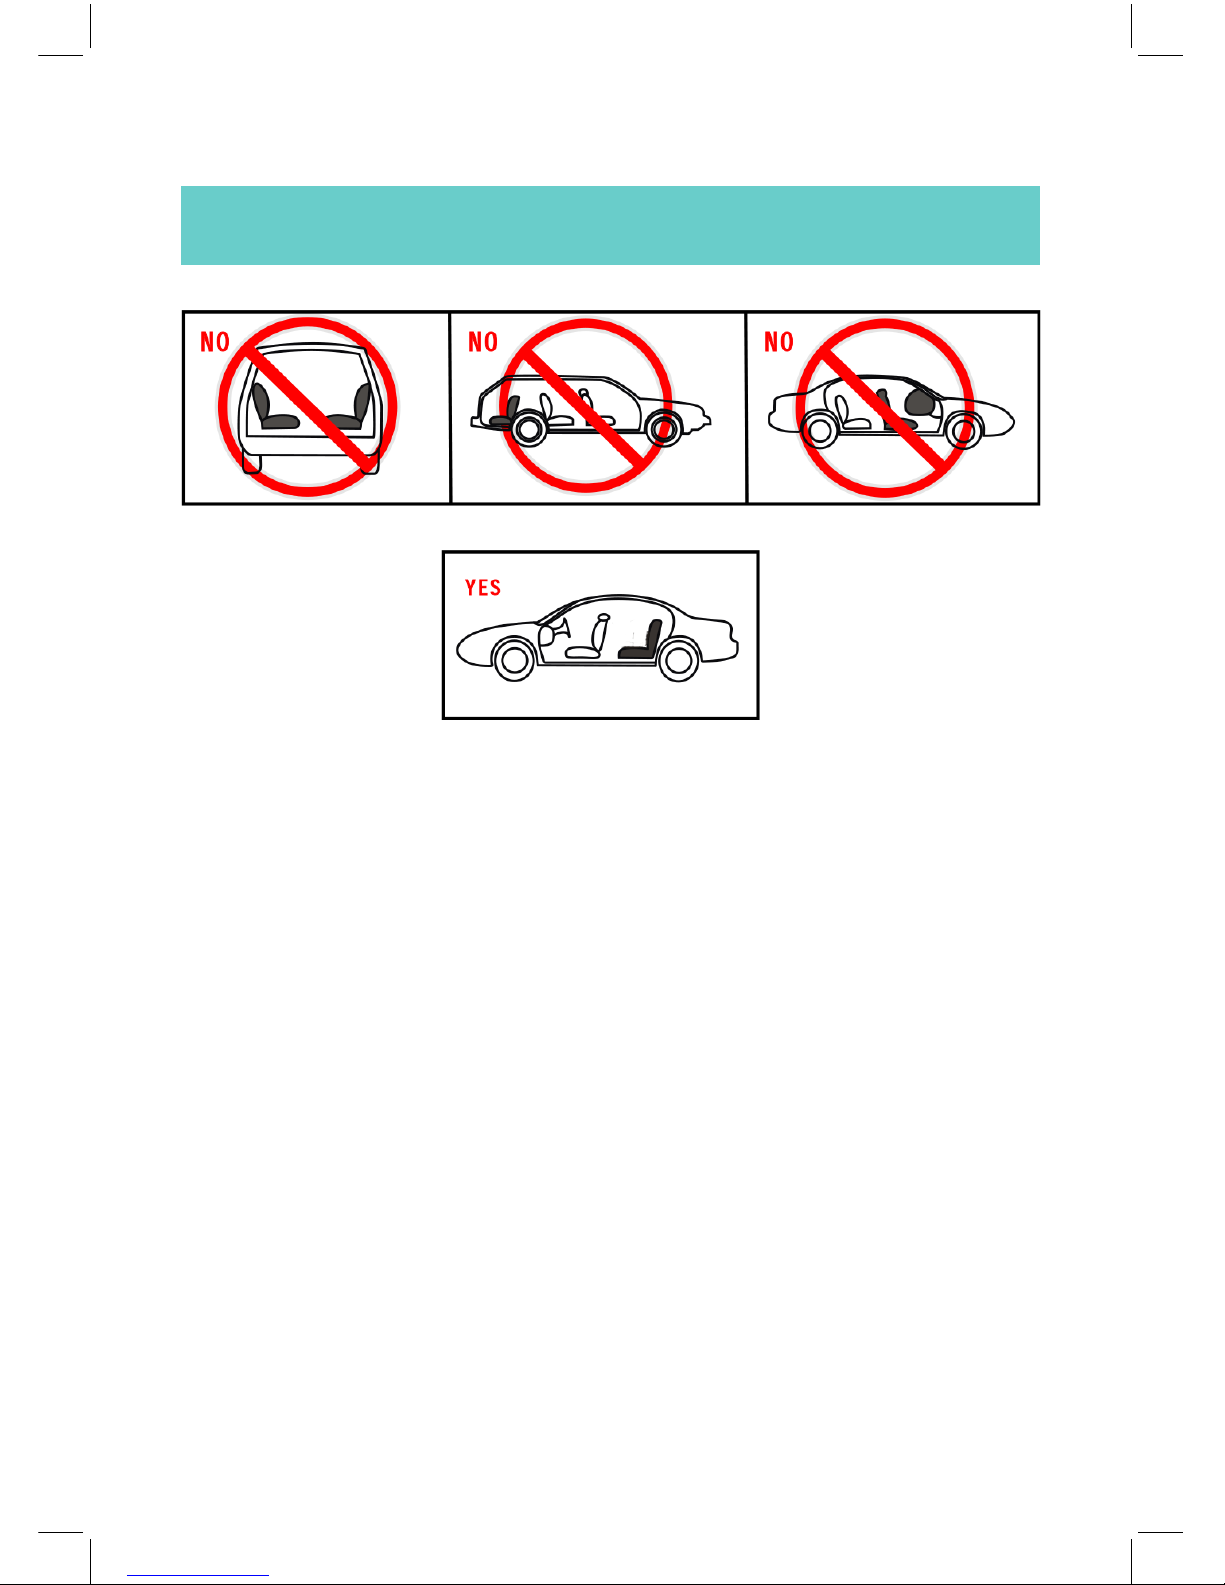
• ONLY FIT this restraint in a forward-facing passenger seat.
NEVER fit into a rear-facing or side facing passenger seat.
• The safest placement for the car seat is in the rear seat and it
must only be used in a forward facing position that is fitted for
an automatic 3-point safety belt, which is approved by ECE R16
or an equivalent standard.
• When installed in Group II and III, the vehicle seat belt must be
threaded along the red belt guide on the car seat. Never try to
use belt routings other than specified.
designed in NZ 4

• The belts MUST NOT be twisted under any circumstances.
• DISCARD the seat if it is involved in a serious collision EVEN
if no damage is visible.
• This car seat should not be purchased or sold as a second
hand item unless you are sure about it’s history.
• Do not to use this car seat if it is older than 10 years from the
manufacture date (stamped on the side of the seat) as its
protection in an accident may be reduced.
• Fabrics of the seat are integral to its performance in the
event of a collision. NEVER remove or replace the fabrics of
the seat unless it has been approved by Edwards & Co.
• Fit the harness firmly to the child. A loose restraint or
harness is DANGEROUS.
GENERAL WARNINGS
designed in NZ 5
NOTICE
1. This is a Universal child restraint. It is approved to Regulation
No.44,04 series of amendments, for general use in vehicles
and it will fit most, but not all, vehicle seats.
2. A correct fit is ensured if the vehicle manufacturer has
declared in the vehicle handbook that the vehicle is capable of
accepting a Universal child restraint for this age group.
3. This child restraint has been classified as Universal under
more stringent conditions than those which applied to earlier
designs which do not carry this notice.
4. If in doubt, consult either the child restraint manufacturer or
the retailer

• This car seat must always be installed to your car using it’s
ISOFIX anchors combined with the top tether strap.
• In Group I (9-18kg) your child must be secured using the seat’s
harness system, and the the seat frame must be installed to
your vehicle’s ISOFIX anchors combined with top tether.
• In Group II (15-25kg) and Group III (22-36kg) your child must
be secured to the seat using your car’s 3 point seat belt (F1)
and the seat frame must be installed to your vehicle’s ISOFIX
anchors combined with top tether.
Seat Recline
The sicuro™ car seat can be used in four dierent recline positions
(F2).
To recline, pull the positioning handle under the front of the seat
forwards or backwards (you can feel the spring underneath), then
release the handle at your required position until you hear a distinct
CLICK!
INSTALLATION INFORMATION
designed in NZ 6

Where to install the car seat
IMPORTANT - this car seat is only suitable for approved vehicles
fitted with a 3 point seat static or retractable seat belt.
IMPORTANT - always install this car seat into a forward-facing
passenger seat as indicated above. A forward-facing passenger
seat faces towards the direction of the car’s movement. Never
install this car seat in a rear-facing or side-facing passenger seat.
IMPORTANT - never install this car seat into a passenger seat
fitted with airbags.
F4
7
designed in NZ

Features of your car seat
1 - Lifting Handle
2.1 - Group III Belt Guide Slot
2.2 - Group II Belt Guide Slot
3 - Headrest
4 - Peg
5 - Shell
6 - Backrest
7 - Belt Guide Hole
8 - Lap Belt Guide
9 - Belt Yoke
10 - Base
11 - Side Protection System
12 - ISOFIX anchors
13 - ISOFIX Adjuster Button
14 - Top Tether
designed in NZ 8

Features of your car seat (cont’d)
15 - Head Pillow
16 - Cushion
17 - Shoulder Belt Pad
18 - Shoulder Belt
19 - Central Buckle
20 - Crotch Strap
21 - Buckle Pad
22 - Sitting Pillow
23 - Adjuster Cover
24 - Adjuster Belt
25 - Positioning Handle
designed in NZ 9

Securing the seat to your car
1. 2. 3.
1. Place the car seat on the vehicle passenger seat.
2. Extend the ISOFIX anchors by rotating the ISOFIX adjuster button
in an anti-clock wise direction and simultaneously pulling the
ISOFIX anchor arm outwards (towards the seat) as far as it goes
(1).
3. Move the car seat towards the back of vehicle’s seat and match
the ISOFIX anchors to the vehicle’s anchoring point until you hear
a CLICK! (2).
4. The ISOFIX connection indicator (located on the ISOFIX anchor)
will change to GREEN. This indicates the anchor is connected.
5. To tighten the car seat against your vehicle seat, rotate the
adjuster button in anti-clock wise direction and push the car seat
into to the back of vehicle’s seat as much much as possible (2).
Release the adjuster button and check the seat is tight against
the passenger seat.
10
designed in NZ

Securing the seat to your car (cont.)
6. Hook the tether strap to your vehicle’s tether anchor point.
Then tighten the strap as tight as possible (3).
IMPORTANT - this seat must always be installed with ISOFIX and
tether strap. This covers Group I, II and III.
IMPORTANT - refer to your vehicle’s handbook before using this
ISOFIX seat.
designed in NZ 11

Securing your child to the harness
1. Loosen the shoulder belts by pressing the release button found
near the crotch (F8), and pulling the shoulder belts towards you
(F9).
IMPORTANT - be careful not to pull the shoulder belt pads when
adjusting the shoulder belt.
2. Open the buckle by pressing the red button (F10).
3. Part the belts over the sides of the shell (F11).
4. Place your child into the shell checking that there are no toys or
other hard objects in the shell (F12).
GROUP I (9-18kg)
designed in NZ 12

Securing your child to the harness cont.
5. Match buckle tongue sections together and insert them into
the buckle (F13).
6. Tighten the shoulder belts by pulling the adjuster belt (F14).
The belts should be tightly secured (so that you can only fit
one or two fingers between your child’s shoulders and the
belt).
IMPORTANT - after you have connected the harness, check it by
trying to move it side to side. It shouldn’t move more than an inch
at either side. If it does, tighten the straps or try installing it again.
IMPORTANT - the belts should never be twisted. If you are unable
to click the tongue sections into the buckle, unlock the buckle by
pressing the red button and try again.
13
GROUP I (9-18kg)
designed in NZ

Adjusting the height of the head rest and
shoulder belt
1. The shoulder belt height can be raised or lowered by adjusting
the head rest. To adjust the head rest, use one hand and
squeeze the lever behind the head rest (F15)(15) whilst holding
the seat with your other hand for support (FI5)(16), then raise
or lower it and release the lever until you hear a CLICK! There
are four headrest positions.
2. The correct height of the shoulder belts is attained when the
belt disappears into the shell slightly above the shoulder of the
child. Ensure that the shoulder belts fit comfortably over the
child’s shoulder (F16).
IMPORTANT - to adjust the height of the shoulder belts you may
need to loosen the harness system. The shoulder belts can be
loosened by pressing the release button of the adjuster and pulling
the shoulder belts towards you as far as possible (see F9).
GROUP I (9-18kg)
F15
F16
designed in NZ 14

Using the restraint as a booster seat
GROUP II (15-25KG) AND GROUP III (22-36KG)
This installation method applies for a child within Group II( 15-25kg)
and Group III (22-36kg). In this setting your child is restrained to the
car seat using your vehicles 3-point seat belt.
IMPORTANT - this car seat should be secured to your vehicle’s
passenger seat using the ISOFIX anchors plus top tether.
1. Remove the harness system, including the belt pads, central
buckle and crotch strap (see section “Removing the harness
system”).
2. Place your child into the car seat.
3. Thread the vehicle’s shoulder belt through the Group II belt
guide slot (F17) or Group III belt guide slot (F18), over your childs
shoulder and through the lower guide hole (F19) to the seat belt
buckle. The shoulder strap should sit on your child’s shoulder
and not on their neck.
4. Join the selt belt and buckle up. The final setup is shown in F20.
5. Adjust the headrest by squeezing the handle behind the head rest
and raising or lowering it appropriate to your child’s height (see
“Adjusting the height of the head rest and shoulder belt”).
designed in NZ
15
F18
F19 F20
F17

Removing the harness system
1. Loosen the shoulder belts by pressing the release button of the
adjuster (found near the crotch) and pulling the shoulder belts
towards you as far as possible. IMPORTANT - avoid pulling the
belt pads when doing so. For more information on adjusting the
harness to the section “Securing your child to the harness”.
2. Recline the seat to the sleeping position (see the section “Seat
recline” on page 6).
3. Open the peg on the back of the seat and remove the holding rod
to separate the back of the seat from the seat base (F21).
4. Remove the shoulder belts F22 (K) and the shoulder pad belts
F22 (J) from the yoke.
5. Pull the shoulder belts and the shoulder pad belts through the
front of the seat (F23) (1) and (2). Pull out the headrest (F23)(H).
F21 F22
F23
designed in NZ
16 16

6. Remove the lower lap belt anchor clips (J) from the anchor
housing inside the seat shell (1) & (2), by threading them
through the seat shell (K) and back around behind the seat
through slot (L).
Removing the harness system (cont..)
2. Remove the buckle anchor clips located under the seat (at
the crotch) by threading them through the seat slot (F25).
Note - this may take some practice!
3. Remove the seat cover by loosening the clips around the
edge of the seat.
F24
F25
designed in NZ 17

Installing the harness system
1. Place the cover on the shell and fit is around the frame. Leave
the bottom part of the cover loose.
Installing the lap belts
2. Pull the lap belt anchor clip (F26)(C) through the belt clip slot
(F26)(1) or (2). Anchor the clip by threading it through the
anchor slot (which goes back through the seat) and lodging it
horizontally so the slip can’t pass through the slot.
Installing the buckle
3. Thread the anchor clip (F26)(D) through the buckle clip slot (the
reverse action of F25 on previous page). Anchor the clip in the
anchor slot ensuring it cannot be pulled through.
F26
designed in NZ 18

Installing the Shoulder Belts and Head Rest
4. Thread both the shoulder pad belts through the shell UNDER
the metal bar and link them together on the yoke (F28)(J).
5. Thread the shoulder belts through the shoulder belt pads, head
pillow, the cover and the shell; then OVER the metal bar fixed at
the back of the seat (F27) (I).
6. At the back of the seat, attach to the belt ends to the belt yoke
(F28) (K). Make sure that the belts are flat and not twisted.
7. Secure the seat to the seat base by inserting the rod through
the bar of the seat and securing the peg (see F21 on previous
page).
8. Check the fit of the harness by pulling the adjusting belt.
F27
Installing the harness system (cont.)
F28
designed in NZ 19

Cleaning the fabric cover
• Hand wash in warm water only.
• NEVER tumble dry.
Important information
• NEVER lubricate or oil any part of the seat.
• Only use mild detergents.
• Only ever wipe clean the seat shell, harness and EPS foam
lining.
• NEVER use solvents, harsh detergents or washing up liquids as
these may damage the harness and seat.
• NEVER wring any fabrics.
• Dry thoroughly before storage.
• Store in a well-ventilated area, away from direct sunlight which
could damage or fade your car seat.
• Store in a safe place when it is not being used. Avoid placing
heavy objects on top of it.
• NEVER allow the seat to come into contact with corrosive
substances such as battery acid or petroleum products.
Removing or installing the harness and cover:
• The harness system must be removed before removing the
cover. See the section ‘Removing the harness system” for more
information.
• To re-install the harness system and cover see the section
“Installing the harness system”.
Maintenance and cleaning
designed in NZ 20
Table of contents
Other Edwards & Co Car Seat manuals

Edwards & Co
Edwards & Co AVERY FA0062 User manual

Edwards & Co
Edwards & Co Ed & Co multi-fix PA0101 User manual

Edwards & Co
Edwards & Co Ed & Co FA005 User manual

Edwards & Co
Edwards & Co Avery Base Unit User manual

Edwards & Co
Edwards & Co PA0100 User manual

Edwards & Co
Edwards & Co Ed & Co multi-fix PA0101 User manual

Edwards & Co
Edwards & Co Capsule 2 Series User manual