Edwards & Co Avery Base Unit User manual

Avery Base
Unit
FA0062
Use + Care Guide

AVERY BASE UNIT - USE + CARE GUIDE
2
Suitable for 0 to 13 kg
(Subject to other fitting criteria as stated in this manual.)
Certified to European ECE R44/04 in Group 0+ as
approved by Waka Kotahi NZTA.
IMPORTANT
• Keep these instructions for future reference.
• Always follow the manufacturer’s instructions.
• Read all instructions carefully before assembly and use of
this Avery Base Unit.
• The correct use and maintenance of this product is essential.

AVERY BASE UNIT - USE + CARE GUIDE
3
Welcome
Thank you for choosing Edwards & Co;
your family is now part of ours.
Firstly, thanks for choosing Edwards & Co - it truly means a
lot to us that you have chosen one of our child restraints to
keep your family safe.
A lot of time and money is spent ensuring that your child
restraint is the safest it can be. But to get the maximum
protection from your child restraint it is very important that
you read this instruction manual carefully. In particular, pay
attention to the warnings included as well as the correct
installation methods provided. Subtle differences can make
a huge difference when it comes to safety.
We believe in long lasting
relationships with our
customers, and we’d love
you to keep in touch.
You can sign up to
our newsletter via our
website or follow us on
Facebook and Instagram.
And remember that if
you need anything we’re
a simple phone call or
email away.
We’re so glad you came along for the ride.
From the team at Edwards & Co.
EDWARDSANDCOBABY.COM

AVERY BASE UNIT - USE + CARE GUIDE
4
Warnings 5
What’s in the box 7
Avery Base Unit components 8
Preparing the Avery Base Unit 9
Attaching the stabilising bar 10
Extending the support leg 11
Storing the support leg 12
Installing the Avery Base Unit 14
Where to install the Avery Base Unit 15
Important installation information 16
Installing the Avery Base Unit with the vehicle belt 17
Installing the Avery Base Unit with the ISOFIX system 23
Using the Avery Capsule with the Avery Base Unit 29
Safety checklist 31
How to care for and maintain your Avery Base Unit 32
Determining the base unit’s expiry date 34
WARRANTY 35
Contents

AVERY BASE UNIT - USE + CARE GUIDE
5
Warnings
TO AVOID INJURY OR DEATH
To reduce the risk of SERIOUS INJURY or DEATH, read this owner’s
manual and your vehicle owner’s manual before installing and using
this base unit. By properly using this base unit and following these
instructions, you will greatly reduce the risk of serious injury or death to
your child from a collision.
Maximum limits
Weight Limit: 13kg when used with a compatible Edwards & Co capsule.
See capsule manual for all fitting criteria.
Never leave your child unattended
NEVER leave your child unattended in the child restraint.
Position in vehicle
Never use this child restraint base in a vehicle passenger seat fitted with
airbags.
Only fit on a forward-facing vehicle passenger seat.
Never fit into a rear-facing or side-facing vehicle seat.
The rear vehicle seat is safest.
Vehicle compatibility
This product is an approved ISOFIX CHILD RESTRAINT SYSTEM. It is
approved to regulation No.44/04.
ALWAYS refer to your vehicle’s handbook before using this product. The
mass group and the ISOFIX size class for which this product is intended
is: Group 0+, E – ISO/R1.

AVERY BASE UNIT - USE + CARE GUIDE
6
This product is designed to be installed using ISOFIX OR the vehicle seat
belt. NEVER use the product with the ISOFIX anchors and vehicle seat
belt together.
This product fits vehicles with positions approved with ISOFIX anchors,
depending on the category of the child seat and of the fixture.
When this product is used with your vehicle’s 3-point seat belt, it
is ONLY SUITABLE for use in vehicles fitted with a 3-point static or
retractable seat belt that is approved to ECE Regulation No.16 or
equivalent standards.
If in doubt, contact the child restraint manufacturer or the retailer.
Capsule compatibility
This child restraint base is only compatible with
Edwards & Co capsule models FA0050, FA0053 and FA0062.
NEVER use this product with another capsule shell.
Correct use of the base unit
NEVER use this product without installing it securely into your vehicle.
NEVER alter or modify this product in any way. This can affect its
performance in the event of a collision.
DISCARD this product if it is involved in a serious collision EVEN if no
damage is visible.
Base unit expiry
Do not use this base unit if it is older than 7 years from the manufacture
date. The materials can weaken over time and the protection it provides
in an accident may be reduced. See “Determining the base unit’s expiry
date”.
This child restraint should not be purchased or sold as a second hand
item unless you are sure about its history.

AVERY BASE UNIT - USE + CARE GUIDE
7
What’s in the box
Use + Care Guide
(this instruction
manual)
1 x Base Unit 1 x Stabilising Bar
3 x Screws (inc. 1 spare)
2 x ISOFIX Guides 1 x Vehicle Belt Locking Device

AVERY BASE UNIT - USE + CARE GUIDE
8
Avery Base Unit components
Stabilising
Bar
Vehicle Belt
Locking Device
ISOFIX
Connectors
Support
Leg
Support Leg
Adjuster
Button
Capsule
Release
Lever
Vehicle
Belt
Guide

AVERY BASE UNIT - USE + CARE GUIDE
9
Preparing
the
Avery
Base Unit
AVERY BASE UNIT - USE + CARE GUIDE
10
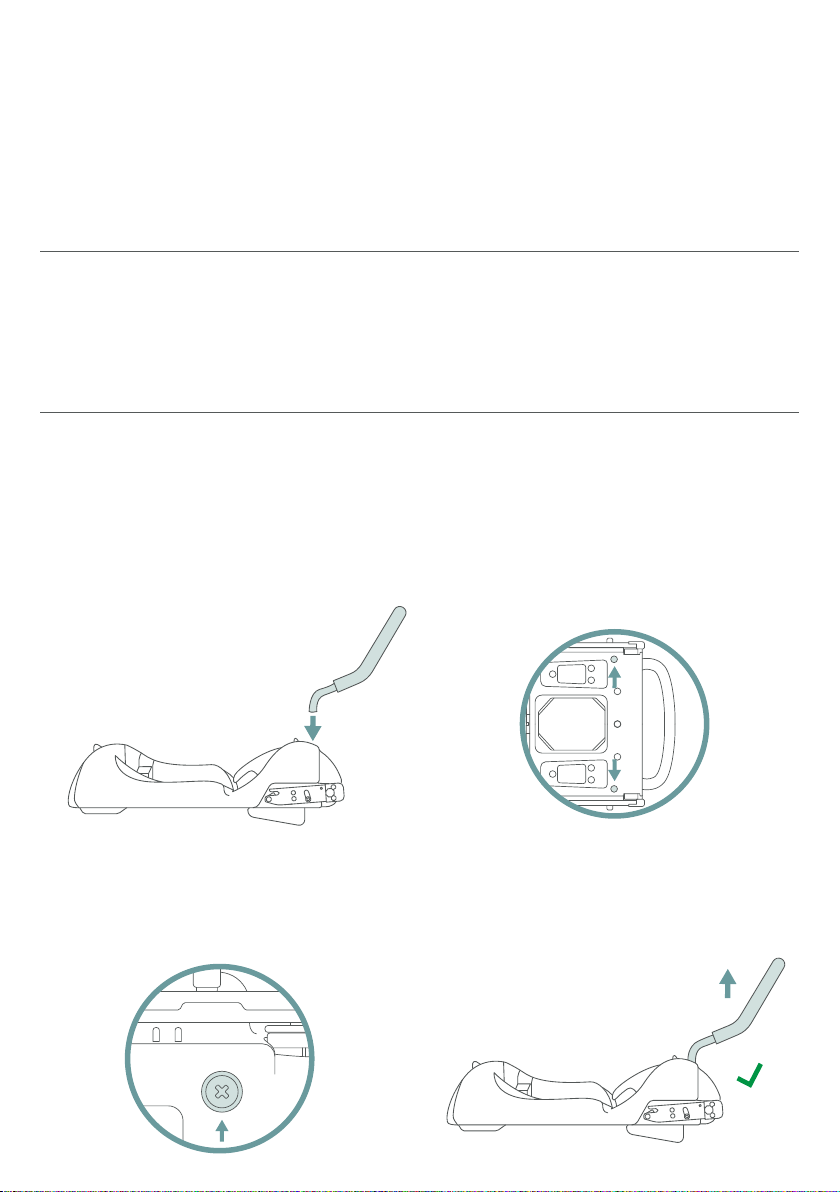
Note: Tools required - small “Phillips” screwdriver.
Important: This base unit cannot be used without the
stabilising bar in place.
Attaching the stabilising bar
1. Insert the stabilising bar into
the holes at the rear of the
base unit.
Important: Press the ends
of the stabilising bar down
firmly until they reach the
base of the holes.
2. Turn the base unit on its side
and insert the two screws into
the corresponding holes on
the underside of the base unit.
3. Using a Phillips screwdriver,
fasten the screws until the
stabilising bar is secure and
cannot be removed.
4. Pull upwards on the stabilising
bar to check it is secure.
This manual suits for next models
1
Table of contents
Other Edwards & Co Car Seat manuals

Edwards & Co
Edwards & Co Ed & Co FA005 User manual

Edwards & Co
Edwards & Co Ed & Co multi-fix PA0101 User manual

Edwards & Co
Edwards & Co sicuro ISOFIX User manual

Edwards & Co
Edwards & Co Capsule 2 Series User manual

Edwards & Co
Edwards & Co AVERY FA0062 User manual

Edwards & Co
Edwards & Co Ed & Co multi-fix PA0101 User manual

Edwards & Co
Edwards & Co PA0100 User manual


