EFILive AutoCal User manual

EFILive AutoCal Customer Quick Start
Guide
IdahoRob
atptrucks.com
(208)685-1000

EFILive AutoCal Customer Quick Start Guide
- 1 -
support@efilive.com
www.efilive.com
AutoCal Package Contents
The contents of your AutoCal product may vary due to be supplied directly from your
tuner or parts supplier. At a minimum your AutoCal will be shipped with:
•EFILive AutoCal hardware device.
•EFILive OBDII cable (J1962-A to RJ45). Used to hook to Truck
•EFILive USB cable (USB-A to USB-B). Used to hook to computer
Registering AutoCal
Your AutoCal product must be registered to activate the product warranty. Product
registration and warranty information can be entered on the EFILive website directly by
visiting the link below.
Warranty & Product Registration: http://www.efilive.com/product_registration.html
Installing the EFILive Software
In order to copy files to and from your AutoCal device and your computer (covered in a
later section) the EFILive version 8 software must be installed. The installation of the
software also provides the device drivers (see below) for your AutoCal device.
EFILive software downloads:
http://forum.efilive.com/showthread.php?18430-Release-Candidate-9-
Feb-09-2012
Drivers
The drivers necessary for your AutoCal device should be installed automatically as part
of the software installation.
If issues are experienced with driver installation please see the article named ‘Loading
FlashScan & AutoCal Drivers’ at the EFILive Knowledgebase by visiting the link below
EFILive Knowledgebase: http://support.efilive.com/kb.php

EFILive AutoCal Customer Quick Start Guide
- 2 -
support@efilive.com
www.efilive.com
Connecting AutoCal
Using AutoCal
The following instructions describe the functionality and use of your AutoCal device.
The menu structure and entries are based on the Simple Menu structure as this is the
default and recommend mode for most customers.
Step one:
Hook up the AutoCal to the OBDII port and turn your key to the run position
(engine off).
Scroll through the options until you see this first read option.
R
e
a
d 1 Read the calibration from the first configured controller type.
Typically this will be done to read your stock vehicle
calibration.Your correct ecm should already be loaded in
position#1

EFILive AutoCal Customer Quick Start Guide
- 3 -
support@efilive.com
www.efilive.com
Step two:
Using EFILive Explorer read and copy the stock tune to your desktop
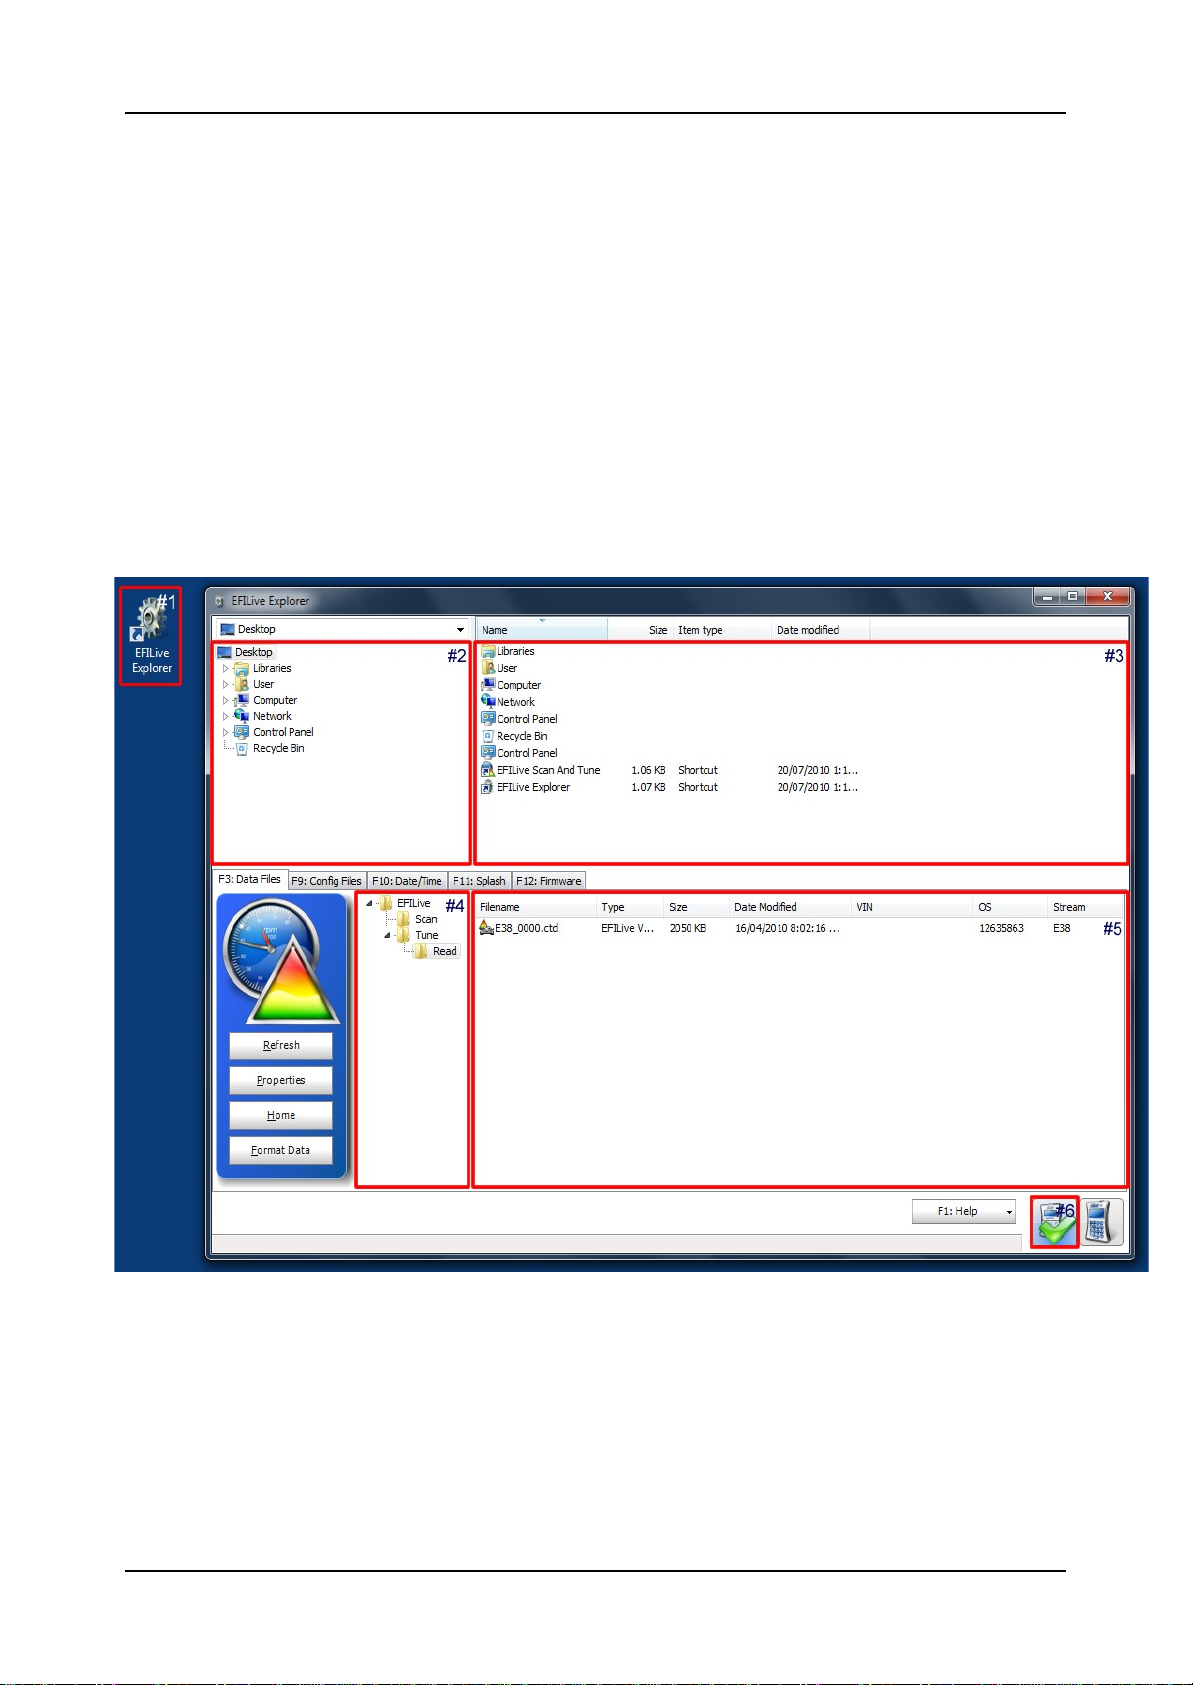
Connect AutoCal to your computer and open EFI Explorer from your desk
top. Click F3 Data Files. Then click and drag tune from example #5 in the
Picture below onto your desktop in window #2. This is the file you email to
The EFILive Explorer application is used to copy files to and from your AutoCal device.
Generally the file Copy, Move, Rename and Delete operations function similarly to the
Windows Explorer functions you are familiar with on your Windows computer operating
system.
EFILive AutoCal Customer Quick Start Guide
- 4 -
support@efilive.com
www.efilive.com
•#1: Desktop shortcut; double click on the EFILive Explorer desktop shortcut to
open the application.
•#2: Computer folder list; folders present on your computer (resembling Windows
Explorer).
•#3: Computer file list; listing of files in the currently selected folder of the #2 pane.
•#4: AutoCal folder list; folders present on the internal flash memory of your
AutoCal device. This folder structure is described further in the next section.
•#5: AutoCal file list; listing of files in the currently selected folder of the #4 pane.
The example shown is indicative of what would be shown if you had read your
stock E38 engine controller to send to your tuner.
•#6: AutoCal connection status; the green tick indicates that your AutoCal device
is connected and recognised by the EFILive Explorer application. If your AutoCal
device was not connected before starting EFILive Explorer click on the AutoCal
icon to connect EFILive Explorer to your device.
Step Three:
Idaho Rob will email custom tunes. Save them in a place for you to retrieve them to be
loaded into the AutoCal.

EFILive AutoCal Customer Quick Start Guide
- 5 -
support@efilive.com
www.efilive.com
l
1
i
c
e
n
s
e
C
U
N
o
w
1) Save tunes to a known place
2) Connect AutoCal to the computer
3) Open EFI Explorer. Should look like the window above.
4) Find the tune file(s) in window example # 3 above and drag down to the tune entry in
position #4 of the above picture. I’ll have it labeled AutoCal
5) This will load the tune file(s) into your AutoCal
Step Four:
Take the AutoCal to the truck and go to Full flash for LBZ/LMM or Program 1-3 for
LLY/LB7/Cummins
Program the first supplied vehicle operating system and
calibration (full-flash) into your vehicles engine or
transmission controller.
License the AutoCal to your ECM
Licensing a Controller
The first time a flash is performed to a new controller (using the Prog 1 thru Full 5
AutoCal menu options shown below) it must be allocated an available VIN license). To
perform the allocation you will be presented with a question on the AutoCal
L Press the Ok button on the AutoCal keypad to confirm you
wish to license the controller to the AutoCal device.
E ?
A
r
e
y
o
u
S
u
r
e
?
This is a final confirmation you wish to allocate the license. Pressing the Ok button on the
AutoCal keypad performs.
Load tune file into truck.

EFILive AutoCal Customer Quick Start Guide
- 6 -
support@efilive.com
www.efilive.com
V8 will be how you load in your PID list also for whichever PID’s you would like to see. I
have preloaded your AutoCal with the basic PID list for your convenience. To
add/modify to this list>connect AutoCal to Computer> open V8 from desk top>F5
BBX>F2 Scan.
Give us a call if you have questions on anything listed in the guide.
Thank you

Table of contents
Other EFILive Diagnostic Equipment manuals


