Egardia Key pad User manual

installation guide
Key pad
1
INSTALLATION GUIDE KEY PAD
Congratulations on the purchase of your Egardia key pad.
Customer Service
Please visit www.egardia.com if you would like further information about the installation and use of
Egardia. The answers to a number of frequently asked questions can be found at
www.egardia.com/userquestions.
This package has been put together with care. Please contact our customer service if you would like
any help during installation or if something is missing from the package. Never return a package
without prior instruction from our customer service.
Key pad
The key pad is an easy way to operate your Egardia alarm system from inside your home. Each
registered user is able to turn the alarm system on or off using his/her valid PIN code. Also, the key
pad allows you to partially activate your alarm system (ON, partially). This is particularly useful for
e.g. safeguarding the downstairs floor while you are sleeping upstairs.
When the button "HELP" is pressed a panic alarm will be triggered and all your registered contact
will instantly receive an alarm message.
In your Egardia account you can enter a PIN code for each authorized user. Via the tab "Alarm
history" you can always see which particular user has turned the alarm system on or off.
Please note! By both burglar alarms and panic alarms the gateway will emit a very constant and
loud audible signal. A panic alarm can only be deactivated by the key pad. Enter a valid PIN code
and press to deactivate the panic alarm.
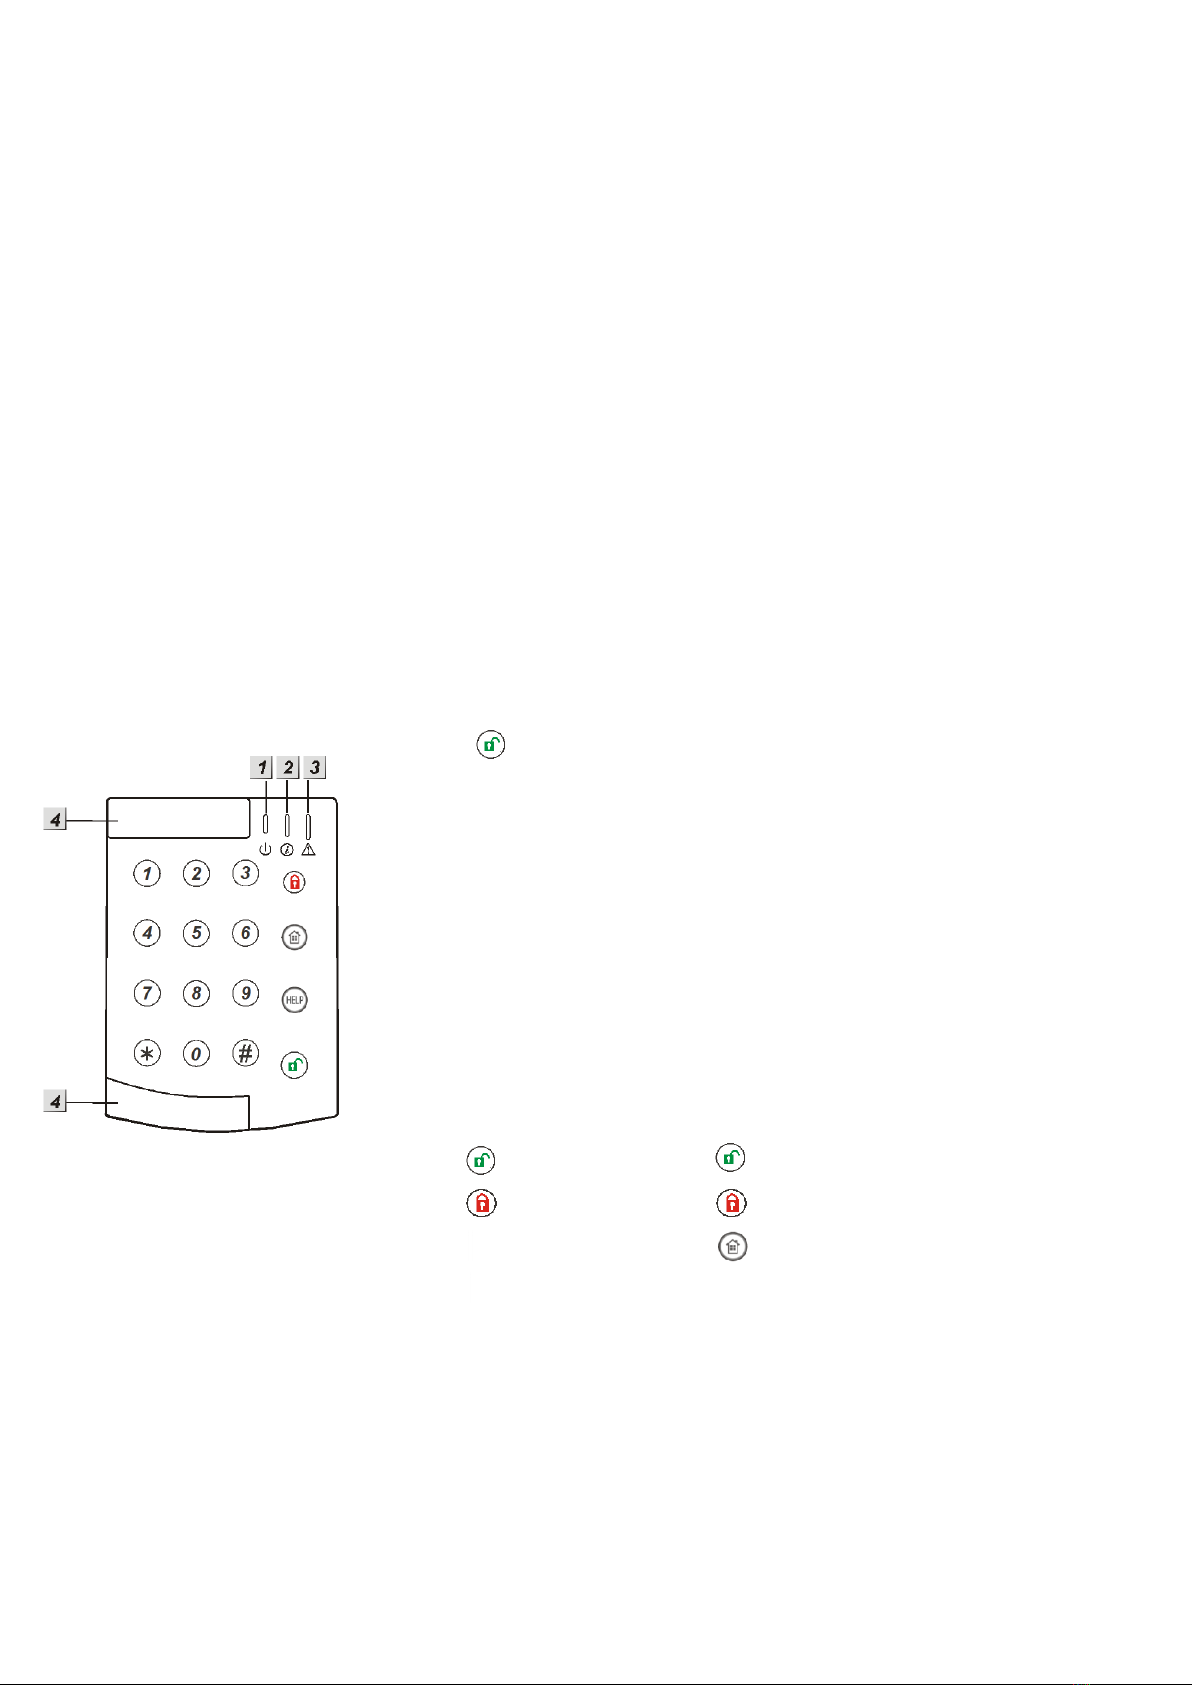
OVERVIEW KEY PAD
1. Indicator light Activity (green) –The green indicator light glows for a few seconds after
a button has been pressed.
2. Indicator light Transmit (red) –The red indicator light flashes a few times to indicate a
signal is being sent to the gateway.
3. Fault light (orange) –The orange indicator light flashes continuously when the batteries
need replacing.
4. Mounting holes –Situated under the 2 caps are the mounting holes.
Key pad keys:
Numerical keys (1 –9, *, 0, #): To enter PIN codes.
: Enter [PIN code] followed by to deactivate the alarm ("OFF").
: Enter [PIN code] followed by to activate the alarm ("ON").
: Enter [PIN code] followed by to partially activate the alarm ("ON, partially").
: Press to immediately activate the panic alarm function.
Website Egardia
www.egardia.com

2
INSTALLING THE KEY PAD
The installation process of the Egardia key pad consists of four easy steps.
STEP 1.
CHECK CONTENTS
CHECK THE CONTENTS OF THE BOX
STEP 2.
ADD TO ALARM SYSTEM
REGISTER THE KEY FOB WITH YOUR
EGARDIA ALARM SYSTEM
STEP 3.
MOUNT KEY PAD
DETERMINE THE LOCATION AND
MOUNT THE KEY PAD
STEP 4.
CHECK AND TEST
CHECK AND TEST THE KEY PAD
STEP 1: CHECK CONTENTS
Check the contents of the packaging for the following parts:
1. Key pad (battery is factory installed in the key pad)
2. Bag containing screws and plugs
3. Velcro tapes for mounting
STEP 2: ADD TO ALARM SYSTEM
You are now about to register the key pad with your Egardia alarm system.
1. Remove the plastic battery tab at the back of the key pad to activate the battery. Ensure the
tab has been completely removed! The green indicator light will glow and the red indicator light
will flash 5 times. Wait till both indicator lights extinguish.
2. Ensure at your gateway that the alarm is turned off. The top indicator light (Status) and the
bottom indicator light (Online) are lit green.
3. Press the "Reset" button at the side of the gateway for at least 5 seconds. The top indicator
light (Status) of your gateway flashes green to indicate it is searching for new accessories.
4. Press the asterisk key (*) and the hash key (#) simultaneously for at least 3 seconds. The
gateway beeps once to indicate the key pad is successfully registered. The gateway beeps
twice to indicate the key pad has already been successfully registered.
5. Press again the "Reset" button at the side of the gateway for at least 5 seconds if no more
accessories are being added. The gateway returns to normal operation.
6. Login to your Egardia account and go to the tab "Alarm system". The registered key pad will
appear after a few minutes.
7. Rename the key pad for easy recognition.
STEP 3: MOUNT KEY PAD
Place the key pad close to the door normally used to enter and leave the property. Before mounting
use the key fob to test the desired mounting place is within range of the gateway.
Important guidelines
Place the key pad close to the main front or back door to easily operate the Egardia alarm
system when leaving or entering the building.
Place the key pad where it is not visible from outside.
Mount the key pad at a comfortable height but out of reach for small children.
Before mounting the key pad
remove the plastic battery tab at
the back of the key pad to
activate the battery. The
indicator lights of the key pad
will now flash a few times.

3
Instructions
1. The key pad can be mounted using the Velcro tapes or by using the screws.
2. For mounting with screws:
a. Remove the front caps of the key pad to reveal the mounting holes.
b. Use the 2 mounting holes as a template to mark the drill holes on the wall.
c. Drill the holes and use the plugs for stone or plaster walls.
d. Secure the key pad to the wall using the screws.
e. Replace the protective caps to cover the mounting holes.
STEP 4: CHECK AND TEST
To make sure that the key fob functions correctly it is advisable to test the key pad.
Turn your alarm system on using the key pad. You need to press the keys of the key pad firmly. A
single short beep will confirm that the keys are active. Four beeps indicate that the PIN code has
not been entered correctly. If your alarm system is triggered the key pad has been installed
correctly.
Please note! The key pad incorporates a battery saving function. When a key is pressed the
key pad will be activated for 5 seconds. In the case the key pad is not being used or the
alarm had been successfully turned on or off or the time in between pressing the keys is
longer than 5 seconds the indicator lights will automatically go out to increase battery life.
Congratulations! The installation is complete.
MAINTENANCE
Battery
The key pad is powered by one CR2450 3V 540mAH lithium button cell battery. Depending on use,
the average life of the battery is 2-4 years. The key pad itself will indicate when the battery is low.
When the battery has power left for about one month the orange indicator light flashes every time a
key of the key pad is pressed.
Replacing the battery
1. Ensure that the alarm is turned off.
2. Open the key pad by removing the 3 screws at the back.
3. Remove the old battery. Wait 5 minutes before inserting a new CR2450 3V 540mAH lithium
button cell battery. Ensure that the battery polarization is correct.
4. Close the key pad by replacing the 3 screws at the back.


