manuals.online logo
Brands
  1. Home
  2. •
  3. Brands
  4. •
  5. ACT
  6. •
  7. Keypad
  8. •
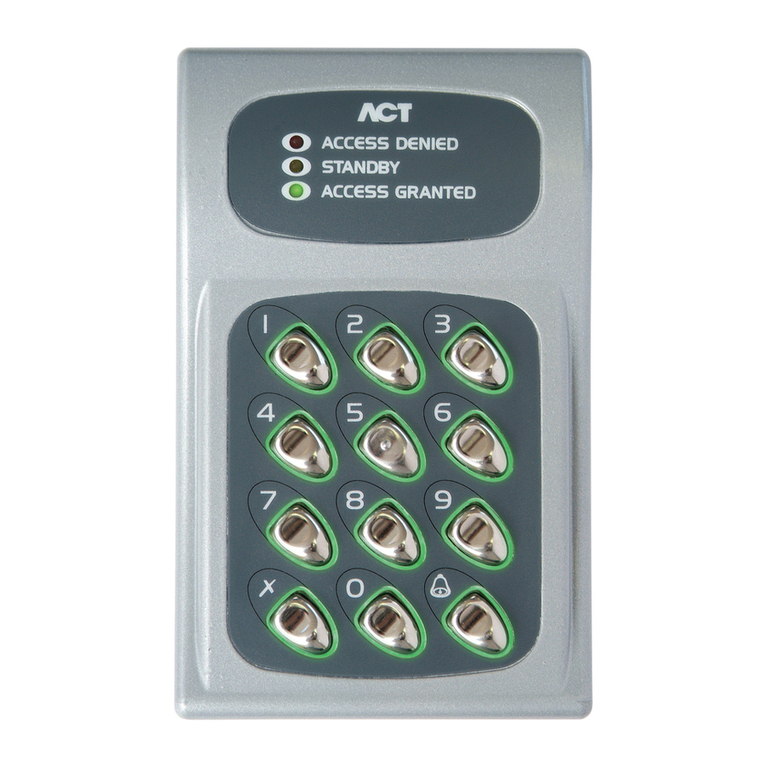
  9. ACT ACT PRO 1030 User manual

ACT ACT PRO 1030 User manual

This manual suits for next models

3

Other ACT Keypad manuals

ACT ACT 10 Instruction sheet

ACT

ACT ACT 10 Instruction sheet

ACT ACT5 DIGITAL KEYPAD Quick start guide

ACT

ACT ACT5 DIGITAL KEYPAD Quick start guide

ACT ACT 10 DIGITAL KEYPAD User manual

ACT

ACT ACT 10 DIGITAL KEYPAD User manual

ACT ACTENTRY A10 User manual

ACT

ACT ACTENTRY A10 User manual

ACT ENTRY A10 User manual

ACT

ACT ENTRY A10 User manual

ACT ACT10 DIGITAL KEYPAD Quick start guide

ACT

ACT ACT10 DIGITAL KEYPAD Quick start guide

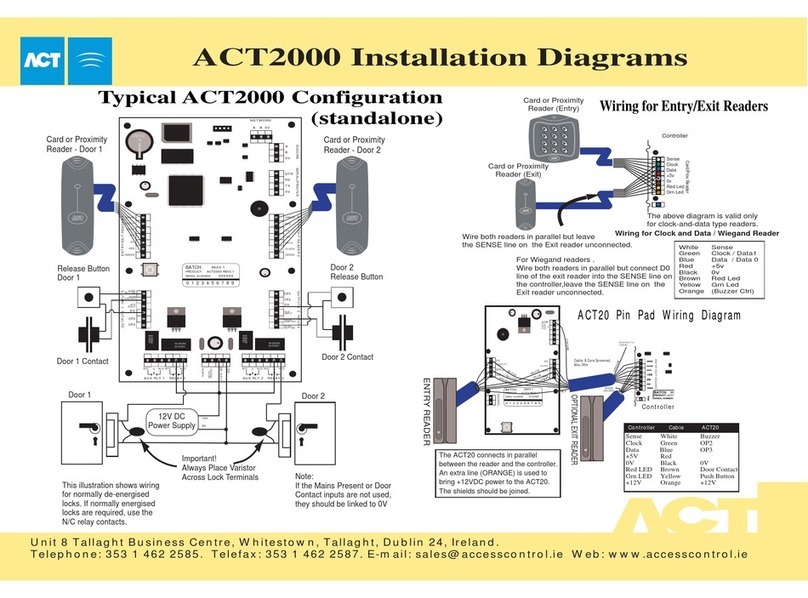
ACT ACT2000 - ACCESS CONTROL UNIT - INSTALLERS User manual

ACT

ACT ACT2000 - ACCESS CONTROL UNIT - INSTALLERS User manual

ACT ACT20 PIN ENTRY KEYPAD User manual

ACT

ACT ACT20 PIN ENTRY KEYPAD User manual

ACT ACT1000 - ACCESS CONTROL UNIT - INSTALLERS User manual

ACT

ACT ACT1000 - ACCESS CONTROL UNIT - INSTALLERS User manual

ACT 5 PROX Instruction sheet

ACT

ACT 5 PROX Instruction sheet

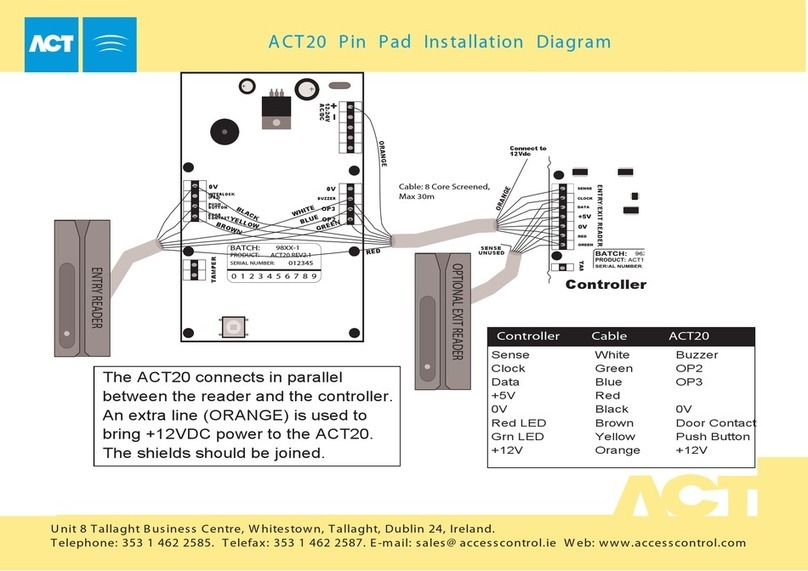
ACT ACT20 PIN PAD - INSTALLATION DIAGRAM User manual

ACT

ACT ACT20 PIN PAD - INSTALLATION DIAGRAM User manual

ACT 5 DIGITAL KEYPAD Quick start guide

ACT

ACT 5 DIGITAL KEYPAD Quick start guide

ACT 5e prox User manual

ACT

ACT 5e prox User manual

ACT 5 PROX User manual

ACT

ACT 5 PROX User manual

ACT ACT5 PROX User manual

ACT

ACT ACT5 PROX User manual

ACT ACT 10 Product guide

ACT

ACT ACT 10 Product guide

Popular Keypad manuals by other brands

AAA 6150RFAAA Installation and setup guide

AAA

AAA 6150RFAAA Installation and setup guide

Fermax MDS Installation and programming manual

Fermax

Fermax MDS Installation and programming manual

Cardin SSB Series manual

Cardin

Cardin SSB Series manual

Harman Kardon KP 1 Specifications

Harman Kardon

Harman Kardon KP 1 Specifications

CYP CR-KP1 Operation manual

CYP

CYP CR-KP1 Operation manual

Aeware k-35 Series Quick reference card

Aeware

Aeware k-35 Series Quick reference card

Aritech CS-175 Series user guide

Aritech

Aritech CS-175 Series user guide

Lenze AC Tech MC SERIES installation instructions

Lenze AC Tech

Lenze AC Tech MC SERIES installation instructions

Burg Wächter secuENTRY 7711 operating instructions

Burg Wächter

Burg Wächter secuENTRY 7711 operating instructions

Aeware in.k450 Tech book

Aeware

Aeware in.k450 Tech book

Lenze EPM-H410 operating instructions

Lenze

Lenze EPM-H410 operating instructions

Toshiba RKP007Z user manual

Toshiba

Toshiba RKP007Z user manual

Elmes Electronic KB1 quick start guide

Elmes Electronic

Elmes Electronic KB1 quick start guide

Clare Controls ClareOne CLR-C1-PNC Installation sheet

Clare Controls

Clare Controls ClareOne CLR-C1-PNC Installation sheet

FM Electronics 4180 quick start guide

FM Electronics

FM Electronics 4180 quick start guide

AMX MIO-PRESTIGE-S Dimensional drawing

AMX

AMX MIO-PRESTIGE-S Dimensional drawing

why pro WHY-KP user manual

why pro

why pro WHY-KP user manual

GE NetworX NX-1500E user manual

GE

GE NetworX NX-1500E user manual

manuals.online logo
manuals.online logoBrands
  • About & Mission
  • Contact us
  • Privacy Policy
  • Terms and Conditions

Copyright 2025 Manuals.Online. All Rights Reserved.

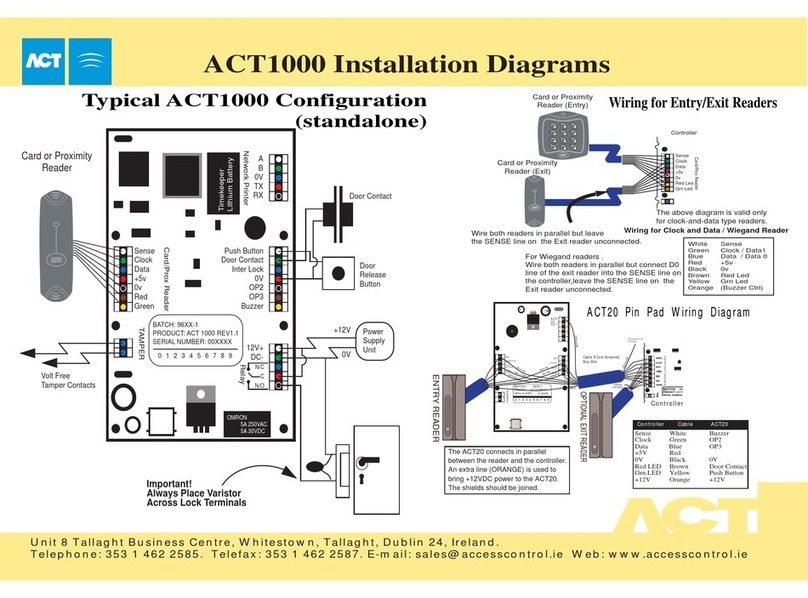
The above diagram is valid only
for clock-and-data type readers.
ACT1050 Pin and Proximity
Reader (Entry)
ACT1030 Proximity
Reader (Exit)
Wire both readers in parallel but leave
the SENSE line on the Exit reader unconnected.
Controller
Sense
Clock
Data
+5v
0v
Red Led
Grn Led
Card/Prox Reader
2 31
5 64
8 97
0
White
Green
Blue
Red
Black
Brown
Yellow
Orange
Sense
Clock / Data1
Data / Data 0
+5v
0v
Red Led
Grn Led
(Buzzer Ctrl)
Wiring for Clock and Data / Wiegand Reader
The +5V reader supply on ACT controllers is normally rated
at 100mA. Typically this is sufficient to power 2 ACT readers.
Note however that readers from other manufacturers may need
to be powered separately if their current requirements exceed
this or if they require 12V.
The standard wiring colours for
ACTPro Proximity and Pin readers
is shown above. Readers
should be a maximum of 30m
from the controller when powered
from +5V and a maximum of 100m
when powered from +12V.
OMRON
5A 250VAC
5A 30VDC
OMRON
1A 125VAC
1A 30VDC
5-12V dc
0V
0 1 2 3 4 5 6 7 8 9
B A T C H:
P R O DUC T :
S E R IA L NU MB ER :
02X X-1
AC T P ro R E V 1.3
00X XX X
Data / D0
Clock / D1
Sense
R ed L E D
G rn L E D
B uzz C trl
Internal buzzer is
activated by applying
0V to Buzz Ctrl
Rear view of ACTPro 1040/1050/1060
connected to the ACT2000/1000/DS100
For Wiegand readers .
Wire both readers in parallel but connect D0
line of the exit reader into the SENSE line on
the controller,leave the SENSE line on the
Exit reader unconnected.
U nit 8 Tallaght B usines s Centre, W hitestown, T allaght, Dublin 24, Ireland.
Telephone: 353 1 462 2585. Telefax: 353 1 462 2587. E-m ail: sales @ accesscontrol.ie W eb: www.access control.ie
Wiring for Entry/Exit Readers
ACTPro Product Range
1030/1040/1050/1060
Downloaded from: http://www.guardianalarms.net
Mounting instructions for surface mount unit
Security screw supplied with
the unit.
Place the Reader / Keypad onto the surface mount
collar and clip down into place.Use the security
screw supplied to attach the unit to the surfce mount
collar.
Place the Reader / Keypad onto the
surface mount collar and clip down into
place.Use the security screw supplied to
attach the unit to the surfce mount collar.
Mounting instructions for flush mount unit
View showing mounting plate
before spacers are broken away by
installer.
Fig 2
The surface mount collar is
mounted on the wall using
the fixing kit supplied in
the box.
Mounting plate is attached to the pattress
box using the screws supplied, ENSURE
the corect spacers have been used to
bridge the gap between the mounting
plate and the fixing wings of the pattress
box to avoid the mounting plate being
distorted.
Standard pattress
box.
Fig 1
Spacers break
away from main
component when
required by
installer for use.
SCREWS
Security screw supplied with
the unit.
Place the cap onto
the unit and push
firmly into place.
Note:
Determine the distance between the pattre
and the mounting plate, using the spacers
are labeled 1mm to 4mm. This allows the
installer to make the required spacer leng
10mm by stacking each spacer together.
Place the cap onto
the unit and push
firmly into place.
View showing
spacers stacking