Egg Medical Eggnest XR 2.0 Troubleshooting guide

1

Our goal at Egg Medical® is to reduce the scatter radiation
exposure of physicians, nurses, technicians and others who use x-
ray imaging to perform life-saving diagnostic and therapeutic
procedures for patients. If you have suggestions for
improvements, please contact us at www.eggmedical.com/info or
write us at info@eggmedical.com.
Please see www.eggmedical.com/documents to access the most up-to-
date manuals and additional information

3

TABLE OF CONTENTS
EggNest XR™ Scatter Radiation Protection Platform...................................................................................................5
Components of the EggNest XR™ Scatter Radiation Protection Platform .............................................................. 6
Carbon Fiber Base Platform Components ................................................................................................................6
Arm Boards......................................................................................................................................................................7
Side and Head Flex Shields .......................................................................................................................................... 8
Side Flex Shields (Left and Right) ...........................................................................................................................8
Head Flex Shields (Left and Right) .........................................................................................................................9
The Workbench.............................................................................................................................................................10
Clear Spot Shield ..........................................................................................................................................................11
Pillow and Corner Head Flip Shield...........................................................................................................................12
Installation of the EggNest XR™.....................................................................................................................................13
1. Prepare the x-ray table............................................................................................................................................13
2. Place the EggNest XR™Base Platform on the x-ray table................................................................................13
3. Secure the EggNest XR™Base Platform to the x-ray table .............................................................................13
Step 4: Attach the Side Flex Shields onto the around the EggNest XR Platform ............................................14
Step 5: Insert the Arm Boards....................................................................................................................................15
Step 6: Insert the Clear Spot Shield .........................................................................................................................15
Step 7: Insert the Workbench onto the large Side Leg Rail.................................................................................15
Step 8: Attach the Pillow Shield to Head Rail Screw Knobs ...............................................................................16
Step 9: Place Left and Right Corner Head Shields on Mattress Topper............................................................17
Patient Loading.................................................................................................................................................................18
Operation During The Procedure...................................................................................................................................20
Tips for optimal use of the EggNest XR™.................................................................................................................20
Precautions........................................................................................................................................................................21
Scatter Radiation Protection......................................................................................................................................21
Patient loading ..............................................................................................................................................................21
Patient stability on the EggNest XR™........................................................................................................................21
Contact with the x-ray system...................................................................................................................................21
Safety using the Clear Spot Shield............................................................................................................................22
Pinching hazards..........................................................................................................................................................22
EggNest XR™FAQ’s ..........................................................................................................................................................23
Cleaning .........................................................................................................................................................................26
Periodic x-ray examination .........................................................................................................................................27

5
DESCRIPTION OF EGGNEST XR™
The EggNest XR™ is an integrated scatter radiation protection shielding system. It is designed to
protect ALL of the healthcare workers in the procedure room from scatter radiation during
medical procedures employing x-ray imaging in the range of 70-100 keV energy levels.
1
This
manual describes the initial set-up and use of the EggNest XR™, the recommended care of the
EggNest XR™, and resource for effective use.
The effectiveness of the EggNest XR™in blocking scatter radiation depends on proper use of the
shielding system. The set-up of x-ray procedure rooms varies. Each EggNest XR™ should be
configured for the best operation in the x-ray laboratory environment in which it is used.
*Optional shields can be designed for specific procedures to maximize healthcare staff protection.
Please contact Egg Medical, Inc. for details.
Figure 1: EggNest XR 2.0 with all of its system components to block scatter radiation
1
The EggNest XR is not intended for use to protect users from radiation with energies >100 keV or
radiation in the gamma range

COMPONENTS OF THE EGGNEST XR™SCATTER RADIATION
PROTECTION PLATFORM
Carbon Fiber Base Platform Components
The Base Platform is a carbon fiber shell with internal radiation shielding material and quad layer
memory foam insert, covered by a detachable Reflex vinyl covered foam pad. The Base Platform
has an attached Head Rail around the upper half and Left and Right Side Rails on the lower half.
The Base Platform rests on the x-ray table in the place of the patient mattress. Additional
components attach to the Head Rail, Side Rails and Receiving Channels on the Base Platform.
A detailed description of the components are as follows:
a. The carbon fiber shell consists of two carbon fiber pieces: an upper shell that has integrated
supports for the arm boards, and a lower shell.
I. The two shells are joined together during the manufacturing process with two pair of
screw fasteners.
II. The Arm Board supports have two cylindrical Receiving Channels on each side.
These channels receive the Arm Board support posts. The channels are through-
holes to facilitate cleaning and their circular shape also allows rotation of accessories
that are inserted.
b. The EggNest XR™ has a two-tier split mattress system made of vinyl that is impermeable to
fluids and has an anti-bacterial coating.
c. A thin Head Rail is attached to the upper carbon fiber shell. The Flex Shields (see below) fit
over and attach to the Head Rail.
Figure 2 Carbon fiber base platform showing the internal shielding and the attached rails.

7
d. The Side Rails attach to the lower carbon fiber shell. The Workbench (see below) and other
items attach to the Side Rails.
e. Strap holders provide anchoring points for the table strap and the patient strap
Arm Boards
The EggNest XR™ comes with Right and Left Arm Boards.
Arm Boards with side Flip Shields fit into a Receiving Channel and the Base Platform. The Arm
Boards can be rotated outward to support the arm. The Flip Shields block radiation scattered
from the chest. Flip Shields fold down for the patient loading (patient left shown).
Each Arm Board attaches to Base Platform using a cylindrical connector that fits into the
Receiving Channels on the Base Platform. The body of the arm board is radiolucent to facilitate
radial access imaging. The sides of the Arm Boards have three Flip Shields that flip down for
patient loading and up for radiation protection during the procedure. This allows the user to
adjust the shields to optimize workflow during and after the procedure.
Figure 3 Shown is the carbon fiber base platform with a 2 tier split foam mattress for EggNest XR™
Figure 4 Left sided carbon fiber Arm Board with Flip Shields up for radiation protection and down
for patient loading.

Side and Head Flex Shields
Left and Right Head Flex Shields and Side Flex Shields attach to the Head and Side Rail on the
Base Platform. These shields block scatter radiation from below the table at the head end of the
table (patient right side shown).
Side Flex Shields (Left and Right)
There are two Side Flex Shields, one right and one left. Each Side Flex Shield has three
components:
a. A top attachment bar that fits over and attaches to the Head Rail. When attached to the
Base Platform, the sliding support arm can be pulled away from the table using the handle
that is on the longer arm. This will cause the Arm Board to move outward as well. The
movement is intended to facilitate radial or brachial artery access by abducting the arm
about 30°. The x-ray source can be moved under the abducted arm board in order to
visualize blood vessels in the arm.
b. A larger arm of the Side Flex Shield is attached to the head end of the arm. The Flex Shields
have an internal stay to give it a shape that helps prevent interaction with the x-ray tube
housing and creates a center of gravity that cause the Flex Shields to passively swing under
the x-ray table.
Figure 5 Right Head Flex Shield and Side Flex Shields attached to the Head and side rail.

9
c. The smaller arm of the Side Flex Shield on the caudal end of the shield has a similar design.
When the Side Flex Shield is adducted against the Base Platform, the Flex Shields reduce
radiation scatter below the table. When they are abducted, they form a protective shield
while allowing arm visualization with x-ray.
Head Flex Shields (Left and Right)
There are two Head Flex Shields, one right and one left. The Head Flex Shield has three
components.
a. A support bar that fits over and attaches to the Head Rail on the Base Platform
b. Low profile knobbed screws that lock the Head Flex Shield to the Head Rail
c. A pleated hanging Flex Shield that provides scatter radiation protection.
Figure 7 Left Head Flex Shield attached and secured to the rail at the head of the EggNest XR™ system.
Figure 6: Sliding support arm for left Side Flex Shield can be moved out to support the arm
board for radial procedures

The Workbench
The Workbench attaches to the larger Side Leg Rail on the Base Platform on either side. This
provides a work surface and shielding to the operator and scrub assistant (this can be
customized to meet your tableside control needs).
The Workbench shields radiation and serves as a work surface. It has three shielded surfaces
that unfold to an adjustable worktable. The Workbench is attached to the Side Rail of the Base
Platform, typically on the right side of the platform. It has a “U” bracket under the Workbench
that will attach to the Side Leg Rail. The top surface is attached to the middle, horizontal surface
with position hinges that hold their position when rotated. The middle surface is a working
surface. The lower surface is attached with the same position hinges.
Figure 8: Work Bench with Flip Shield up and the lower Side Leg Rail on patient right
side that supports the Work Bench
Figure 9: Workbench attached to the side rail with “Flip” shielding raised for radiation protection
and lowered for patient loading

11
Clear Spot Shield
The Clear Spot Shield with Hanging Drape are attached to a flexible arm that is adjusted and
moved for ideal positioning when inserted into designated support block on large rail (see figure
11).
The Clear Spot Shield blocks radiation scattering off the patient above the Base Platform. In
some positions, it is designed to work in tandem with the Hanging Shield in the room (not an
EggNest component). Also, the Clear Spot Shield with Hanging Drape requires a sterile drape to
cover both the shield and the flexible arm.
The Clear Spot Shield is a transparent acrylic radiation shield that is used to block radiation to the
operator’s upper body. The Clear Spot Shield is mounted on an adjustable, somewhat flexible
tube that fits into one of several dedicated Receiving Channels on the Base Platform or onto a
slidable Flexible Arm Post Bracket mounted on a Side Rail.
Figure 10: The image shows the Clear Spot Shield and its support block

Pillow and Corner Head Flip Shield
Pillow and Corner Head Flip Shields provide additional head and shoulder scatter protection for
staff working near the patient’s head during procedures. The Pillow Flip Shield attaches to the
head rail and can be lowered for patient loading and then raised to block scatter radiation
emitting from the patient’s head area. Both the left and right Corner Head Flip Shield are
positioned around the top mattress and can be easily removed.
The Corner Head Flip Shield provides radiation protection built into the top and bottom of the
base which is positioned over the corner of the two-tier mattress. The side flip shield is lowered
during patient loading and raised for radiation protection after the patient is loaded and before a
sterile drape is placed on the patient.
Figure 11: The Pillow Flip Shield and the Corner Head Flip Shield used to provide radiation protection at
the head of the table

13
INSTALLATION OF THE EGGNEST XR™
The EggNest XR™is designed to rest on a standard x-ray table, replacing the patient mattress.
1. Prepare the x-ray table
•Remove existing x-ray table mattress
2. Place the EggNest XR™Base Platform on the x-ray table
•Adjust so that the head end of the table and the EggNest XR™ are aligned
•Adjust so the EggNest is centered equally side to side
3. Secure the EggNest XR™Base Platform to the x-ray table
Using the strap attachments under the platform, and secure the EggNest XR™ Base Platform to
the x-ray table. Ensure that the strips are tightly connected in order to prevent the Base Platform
from moving. There are two loops in the arm board on each side. The portion of the loop under
the table is used to secure a Velcro strip to the Base Platform. Either set of loops can be used,
but always pair the left and right loops at the same headward distance. Loop the Velcro strip
through each loop under the arm board support and connect in the middle by pressing the
“fuzzy” layer against the “hook” layer.
Figure 12: The base platform for the EggNest XR™ system on the x-ray table
with no components attached
Figure 13: Secure the EggNest XR™ system to the X-ray
table with Velcro straps
4. Attach the Side Flex Shields onto the around the EggNest XR
Platform
There are two Side Flex Shields and that need to be placed on the Side Rail of the EggNest.
These are marked with either a “Left” or “Right” sticker. In addition, there are two Head Flex
Shields that need to be attached and secured to the head and shoulder area of the EggNest.
a. Attach the Left and Right Side Flex Shields to the rail on the side of the EggNest XR™
Platform.
b. The existing Table Shield (also referred to as the Table Skirt) should be positioned slightly
outside of the Side Flex Shields, overlapping the two shields.
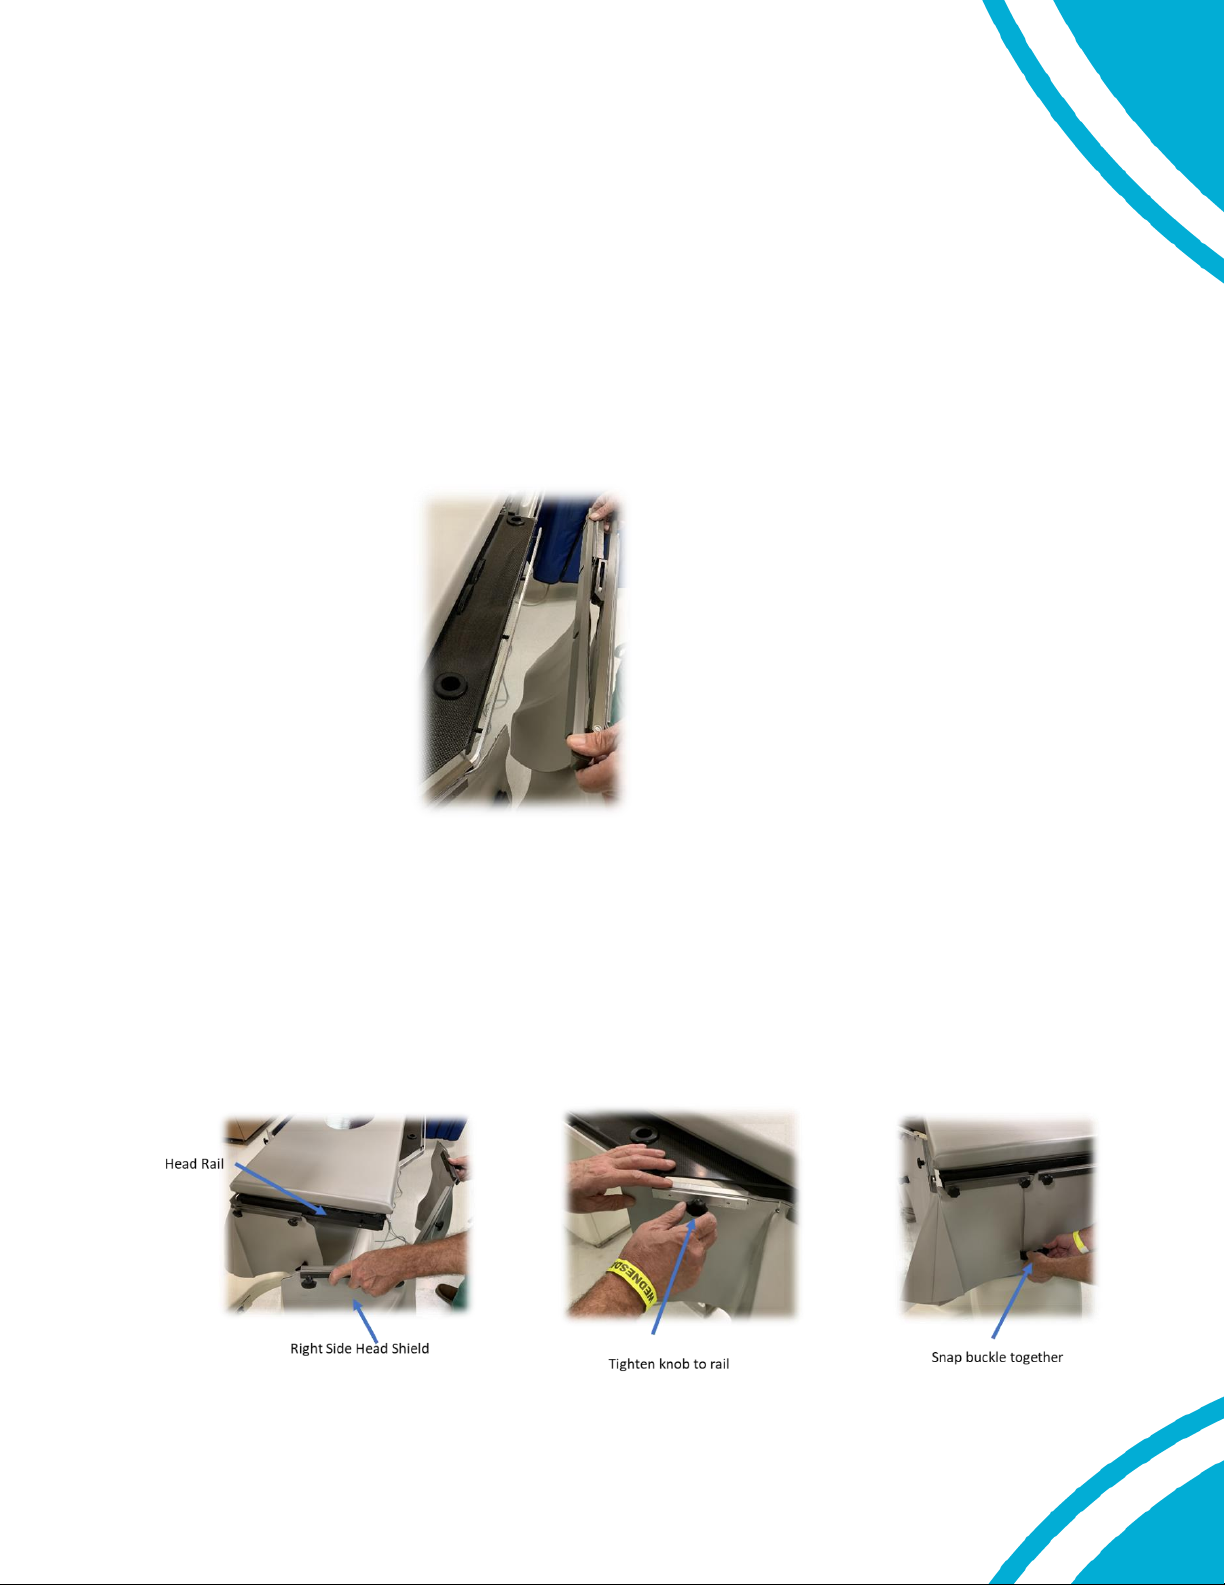
c. Attach the Left and Right Side Head Shields to the head rail by placing the “U” channel over
the rail at the head of the EggNest XR™ Platform. Insure that the channel over the rail is
securely in place. Tighten set screws on the Head Shields
Figure 14: Attaching the Side Flex Shields to the rails on the
patient’s right side of the EggNest XR™ system
Figure 15: Place the Head Flex Shield on the head rail and secure it by tightening knobs

15
5. Insert the Arm Boards
6. Insert the Clear Spot Shield
Insert the Clear Spot Shield into the dedicated Block on the Rail Receiving Channel. Once the
spot shield mounting block is in the desired position, the desired position on the Rail, it can be
tightened with the thumb lock.
Figure 17: Placing the Clear Spot Shield into bracket on left side of the EggNest XR™
7. Insert the Workbench onto the large Side Leg Rail
To attach the Workbench by placing the U channel onto the Side Rail. Once placed on the rail,
the Workbench can be adjusted left or right to border with the arm board support or the table
controls. Ensure that the lower flap running underneath the work bench is “tucked-in” between
the EggNest XR™ and the table top, and is out of the way of any controls on the rail. The flip
shielding can be lowered for patient loading and raised to block scatter radiation.
Figure 16: Insert Arm Boards post into cylindrical Receiving Channel

8. Attach the Pillow Shield to Head Rail Screw Knobs
Attach the Pillow Shield by aligning the cut-out “U’s” on the bottom of the shield to the screw
knobs that hold the Head Flex Shield in place. Only attach the Pillow Shield once you have
attached the Head Shield. After the shield is in place on the four screws, tighten them to secure
the Pillow Shield to the Head Shield rail. Once in place, the Pillow Shield can be raised and
lowered as needed. Periodically exam the screw knobs to ensure a secure hold of the Pillow
Shield.
Figure 18: Attaching the Workbench to the rail on patients lower right
Figure 19: Attaching, securing and raising the Pillow Shield at patient’s head

17
9. Place Left and Right Corner Head Shields on Mattress Topper
The Corner Head Shields slide under the upper corner of the top mattress to fit securely in place.
These do not need to be removed for patient loading and unloading. The Corner Head Shield has
a top and bottom carbon fiber board that provides radiation protection from the X-ray beam
coming through the table. The patient’s sheet and pillow are put on top of the carbon fiber board.
The Corner Head Shield can easily be removed and reattached if imaging of the neck or head is
required.
Figure 20: Placing the Corner Head Flip Shield over the top mattress

PATIENT LOADING
Prepare the EggNest XR™for patient loading by:
1. Make sure that the EggNest XR™ has been wiped down according to hospital policy to
remove foreign or biological material and that the EggNest XR™ is attached to the x-ray table
2. Fold the Arm Board and Corner Shield flaps down
3. If loading from the right, fold the Workbench flaps down
4. If loading from the left, remove the Clear Spot shield and stow
5. If using a patient bed, slide the bed next to the EggNest XR™
i) Using a sliding board or hover mat, move the patient from the bed to the EggNest XR™
ii) Take care that neither the patient bed or the EggNest XR™move as the patient could fall
through the gap.
6. With the patient on the EggNest XR™, cover with sheet and attach the Patient Safety Strap, as
directed by your hospital policy.
Figure 21: The EggNest XR™ with shields in the “down” position for patient loading

19
7. If a radial approach is anticipated, position the Arm Board. Rotating the Arm Board out from
the table can most easily be accomplished by pulling the handle below the Arm Board.The
handle travel will stop when the shield is rotated about 30out from the EggNest XR™. If
more abduction is desired, the Arm Board will continue to rotate, but x-ray visualization will be
impaired.
8. Once the patient is resting on the EggNest XR™ raise all the flip shields (left and right Arm
Board, Workbench, left and right Head Corner Shield and Pillow Shield.) Then position the
Clear Spot Shield along patient abdomen to align with hanging shield.
After transferring the patient to the EggNest XR™ and positioning the shielding, the sterile
drape can be placed using hospital policy. The edges of the drape should extend over the
EggNest XR™ Arm Board and Workbench flaps, and over the Workbench itself.
Figure 22: Patient Safety Velcro strap

OPERATION DURING THE PROCEDURE
In general, the EggNest XR™ operates passively during the procedure. The c-arm x-ray gantry
can be rotated to achieve the desired radiographic views. The x-ray gantry may contact the
EggNest XR™ Flex shields when rotated out of the PA projection. The lower part of the gantry will
push the Flex shields away as the gantry turns.
1) The easiest way to rotate from one angle to another is to swing the x-ray gantry through
the neutral (PA) position between views.
2) The arm board flip shields may be adjusted during the procedure under the sterile drape
to accommodate access and optimize shielding.
Tips for optimal use of the EggNest XR™
•Make sure that the patient head is aligned just below the top of the EggNest XR™
•Flip the Flip Shields up before draping the patient
•When transferring the patient off the table, check to see if the arm gel pads moved with
the patient.
•By combining the hanging shield and the Clear Spot Shield you create a the “box”! This
set up significantly reduces the operators head exposure to scatter radiation.
Flip Shields Down to Load
Flip Shields Raised for Procedure
Figure 23: The EggNest XR™ system with all radiation protecting components in the “down” position for patient
loading and “Up” for radiation protection
Table of contents


