ehang GHOSTDRONE 2.0 LTE User manual

LTE OPERATING MANUAL

EHang Intelligent Equipment (Guangzhou) Co., Ltd. reserves the right to interpret this Operating Manual.
www.ehang.com
Business Hour: Monday – Friday 9:00 A.M – 5:00 P.M (CST&Shex)
Customer Service Phone: 400-622-1638
GHOSTDRONE 2.0 LTE Operating Manual
includes packing list, assembly, parts
and specification information.
Congratulations on purchasing your new GHOSTDRONE 2.0 LTE!
or contact our customer service hotline: 400-800-7056.
www.ehang.com
www.twitter.com/ehang
www.facebook.com/theghostdrone
www.instagram.com/ehang.official/
forum.ehang.com
Thank you, and enjoy your GHOSTDRONE!

TABLE OF CONTENTS
Assembly
Installing/ Removing the Propellers ---------------------------------------------- 06
Introduction
Features -------------------------------------------------------------------------------- 03
Waypoints Surveying ---------------------------------------------------------------- 03
Flight Task Implementation --------------------------------------------------------- 04
GHOSTDRONE Diagram ----------------------------------------------------------- 04
Battery Diagram ----------------------------------------------------------------------- 04
Tablet Diagram ------------------------------------------------------------------------ 05
Connecting Devices
Turning on Your Drone -------------------------------------------------------------- 17
Turning on Your Tablet ,Portable Wi-Fi and EHANG Pro Software ------ 17
Connecting the Drone --------------------------------------------------------------- 17
WARNINGS
Warnings -------------------------------------------------------------------------------- 01
Accessories
Smart Flight Battery ------------------------------------------------------------------ 08
3D Gimbal for Spherical Camera ----------------------------------------------- 13
Spherical Camera ------------------------------------------------------------------- 13
Copter Indicator Lights Instructions ------------------------------------------- 14
Tablet and Portable Wi-Fi ---------------------------------------------------------- 15
SIM Card Installation/Removal ---------------------------------------------------- 16
Software Application
Interfaces Introduction --------------------------------------------------------------- 19
Input Image Transmission Address ----------------------------------------------- 21
Flight Parameters Settings --------------------------------------------------------- 22
Unlock to Take off --------------------------------------------------------------------- 23
Touch-to-Go Mode -------------------------------------------------------------------- 24
GHOSTDRONE 2.0 LTE

Settings ---------------------------------------------------------------------------------- 31
Favorite Waypoint --------------------------------------------------------------------- 26
Flight Plan ------------------------------------------------------------------------------ 27
Add Favorite Waypoints ------------------------------------------------------------- 27
TABLE OF CONTENTS
Parameters
Renaming the Drone ----------------------------------------------------------------- 33
Compass Calibration ---------------------------------------------------------------- 33
Drone ------------------------------------------------------------------------------------ 36
Smart Flight Battery ------------------------------------------------------------------ 36
4G Communication ------------------------------------------------------------------- 37
3D Gimbal for Spherical Camera ------------------------------------------------- 37
Spherical Camera --------------------------------------------------------------------- 37
Power Adapter ------------------------------------------------------------------------- 38
Live Stream Video -------------------------------------------------------------------- 38
Tablets ----------------------------------------------------------------------------------- 38
Tablet Power Adapter ---------------------------------------------------------------- 39
Tablet Battery -------------------------------------------------------------------------- 39
GHOSTDRONE 2.0 LTE

01
1. WARNINGS
WARNINGS:
Before flying, please consult flight documentation from the International Civil Aviation
Organization (ICAO) and local aviation authorities regarding the management of local
air space and unmanned aircraft operation. Users are liable for any actions against
the national laws due to the violation of relevant regulations and any personal injuries
or property damages caused by noncompliance with the instructions and warnings of
this manual, and all ensuing legal liability is solely theirs.
1. The drone requires cautious operation during flight. If you are flying your GHOST-
DRONE 2.0 LTE for the first time, please fly it in an open area in order to experience its
various functions safely.
2. DO NOT fly in restricted air zones .
3. DO NOT fly near obstacles, people, power lines, trees, above waters or any other
environments which are not safe for flying.
4. The drone may not fly properly near tall buildings due to GPS interferences. Please fly it
in an open area to reduce positioning error.
5. DO NOT fly in or around congested electromagnetic (EM) environments. The drone
must be kept at least 200 m (656 ft.) away from strong EM sources, including signal towers
and ground stations. EM interference can cause malfunctioning situations such as failure to
take off or loss of control.
6. DO NOT fly the drone in inclement weather conditions, including extreme temperatures,
heavy snow, strong wind (above force 6), storm or fog.
7. It is recommended to always retain line-of-sight with the drone during flight. Losing sight
of the drone may result in accidents.
8. GHOSTRONE 2.0 LTE is not suitable for use by children or teenagers under 18 years of
age.
9. Please make sure your tablet and the drone have sufficient battery before flying.

02
10. Stand clear of the drone (at least 5m or 16ft) with its head facing away from you when
ready to fly. Please keep away from any other unsafe elements (such as obstacles,
crowds, power lines, etc.)
11. To avoid injury, DO NOT approach or touch the propellers while they are spinning.
12. Please keep an eye on the real-time battery of your tablet and the drone. We strongly
suggest to land the drone when the battery of either device is low.

03
2. Introduction
Mainly featuring flight planning and cruising flight, GHOSTRONE 2.0 LTE aims at providing flight
solutions for commercial users. The drone can be flexibly mounted with various loads to satisfy the
customized requirements from different industries.
For easier operation and control, GHOSTDRONE 2.0 LTE replaces the traditional RC control with the
HD tablet-based ground-to-air interaction. The software function of waypoints flight has been optimized
and enhanced. And by creatively adopting the 4G technology for remote communication, ultra-distance
control has now become feasible. With the 4G communication enabled to realize the central manage-
ment of remote control, users can set up flexible configurations in the TL (Takeoff & Landing) / OC
(Operation & Control) sites.
Drone: GHOSTDRONE 2.0 LTE drone body (1), 4G dedicated communication SIM card (1)
Load: spherical camera & gimbal (1)
Ground control devices: 10.6-inch HD tablet (1), 4G dedicated communication SIM card (1)
Ground control software: EHANG Pro
Communication fees: real-time 4G SIM card data usage (for a 10-minute flight, around 100M upstream
and downstream data respectively)
Users can control the drone to take off/land with just one tap via the ground control device (10.6-inch
tablet).
Tap a point on the tablet map to let the drone fly autonomously towards the destination.
When the drone reaches the destination, users can adjust the parameters, including drone heading,
gimbal pitch, etc., via the micro-control function.
Users can keep record of a proper location/flight task by clicking “My Favorite Waypoint” on the tablet.
Users can view the real-time transmitted images and flight data on the ground control device. The
communication between the drone and the ground control device is totally based on 4G signals
transmission. And there are no specific requirements of flight direction, antenna orientation or operation
skills in ultra-long-distance flight.
In waypoints surveying, users should try to avoid those areas where 4G signals are poor based on the
actual circumstances.
■ Waypoints Surveying
■ Features
04
1. After planning a complete flight path, users can save the confirmed flight path for further flights.
2. The drone can be remotely controlled by the operator in any location within the communication range.
3. The operator is able to monitor the drone status via the real-time images and flight data transmitted
back to the tablet.
4. The communication between the drone and the ground control device is totally based on 4G signals
transmission. And there are no specific requirements of flight direction, antenna orientation or operation
skills in ultra-long-distance flight.
■ Flight Task Implementation
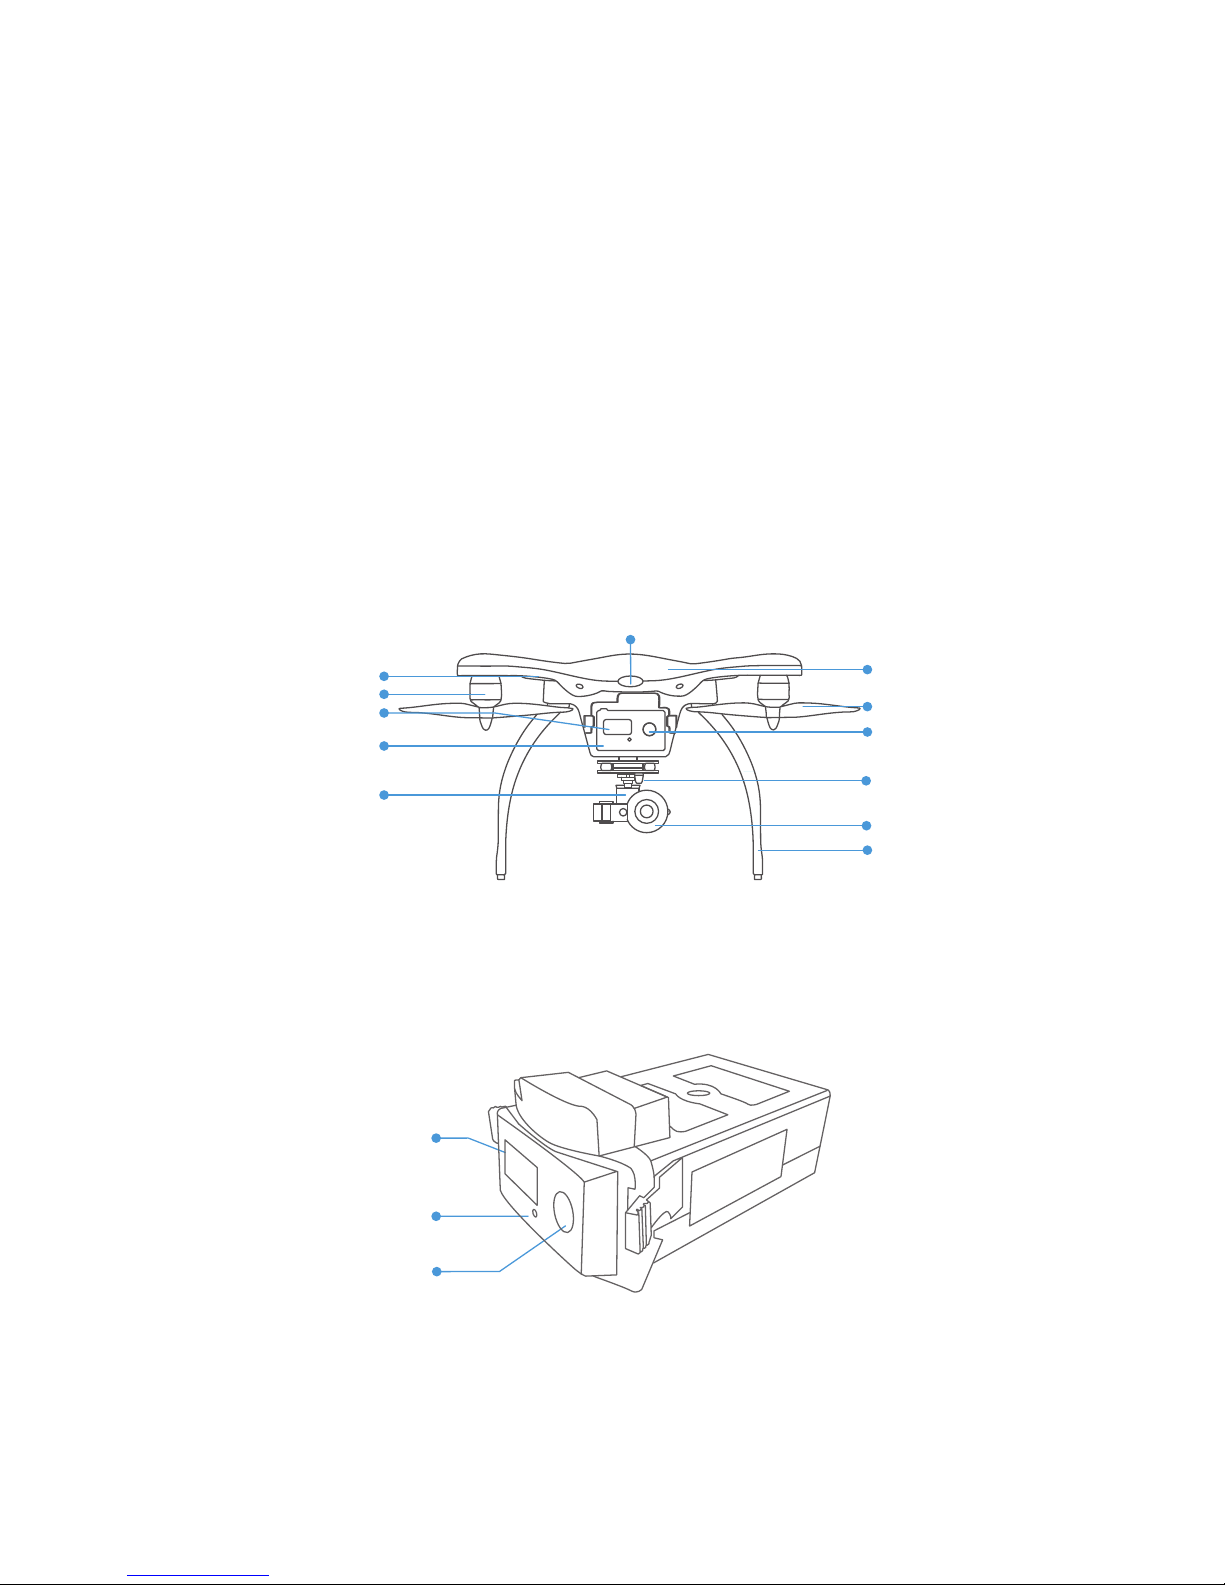
■ Battery Diagram
■ GHOSTDRONE Diagram
Front Indicator Light
Spherical Camera
Landing Gear
Copter Body
Propeller
Mushroom Antenna
for GHOSDRONE
3D Gimbal for
Spherical Camera
Motor
Smart Flight Battery
Copter Indicator Lights
Power Button
LCD Screen
Power Button
Indicator Light
LCD Screen

05
■ Tablet Diagram
Power Button
Headphone Jack
Speaker
Microphone
Camera
Volume Button
USB Port
SD Card Slot
USB Port
HDMI Port

06
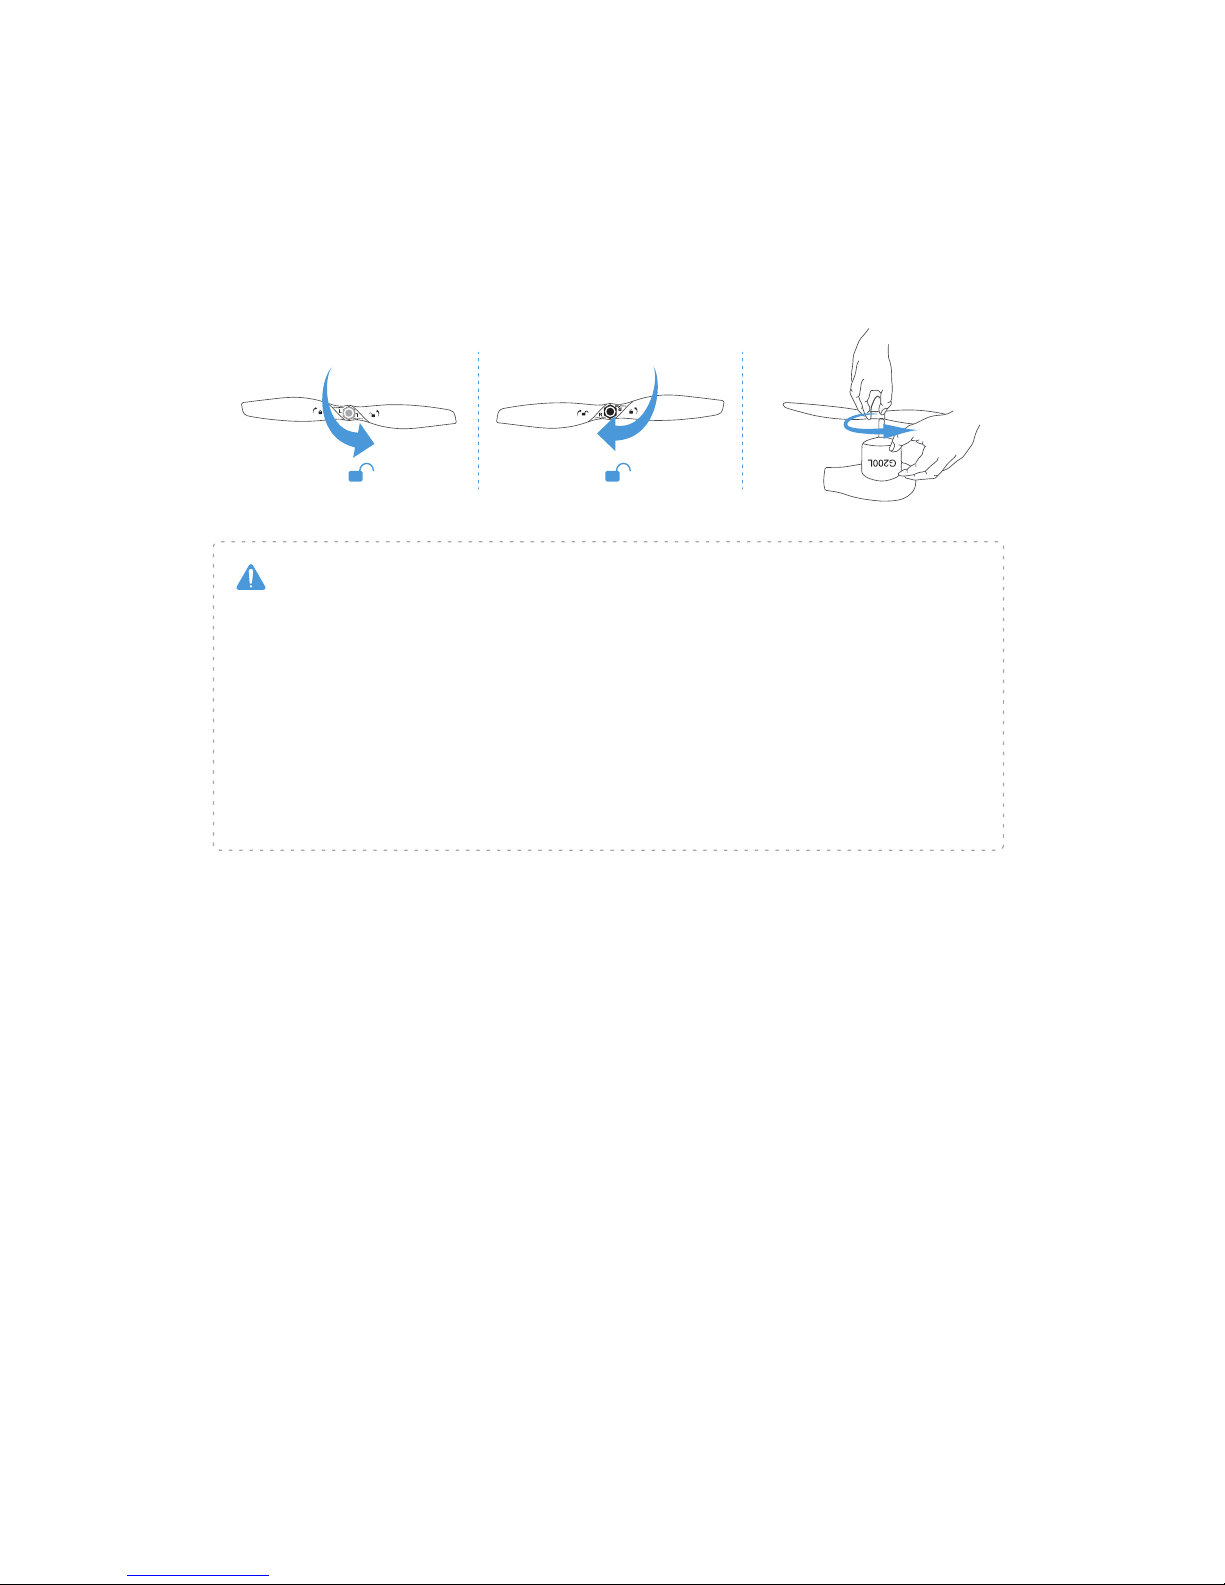
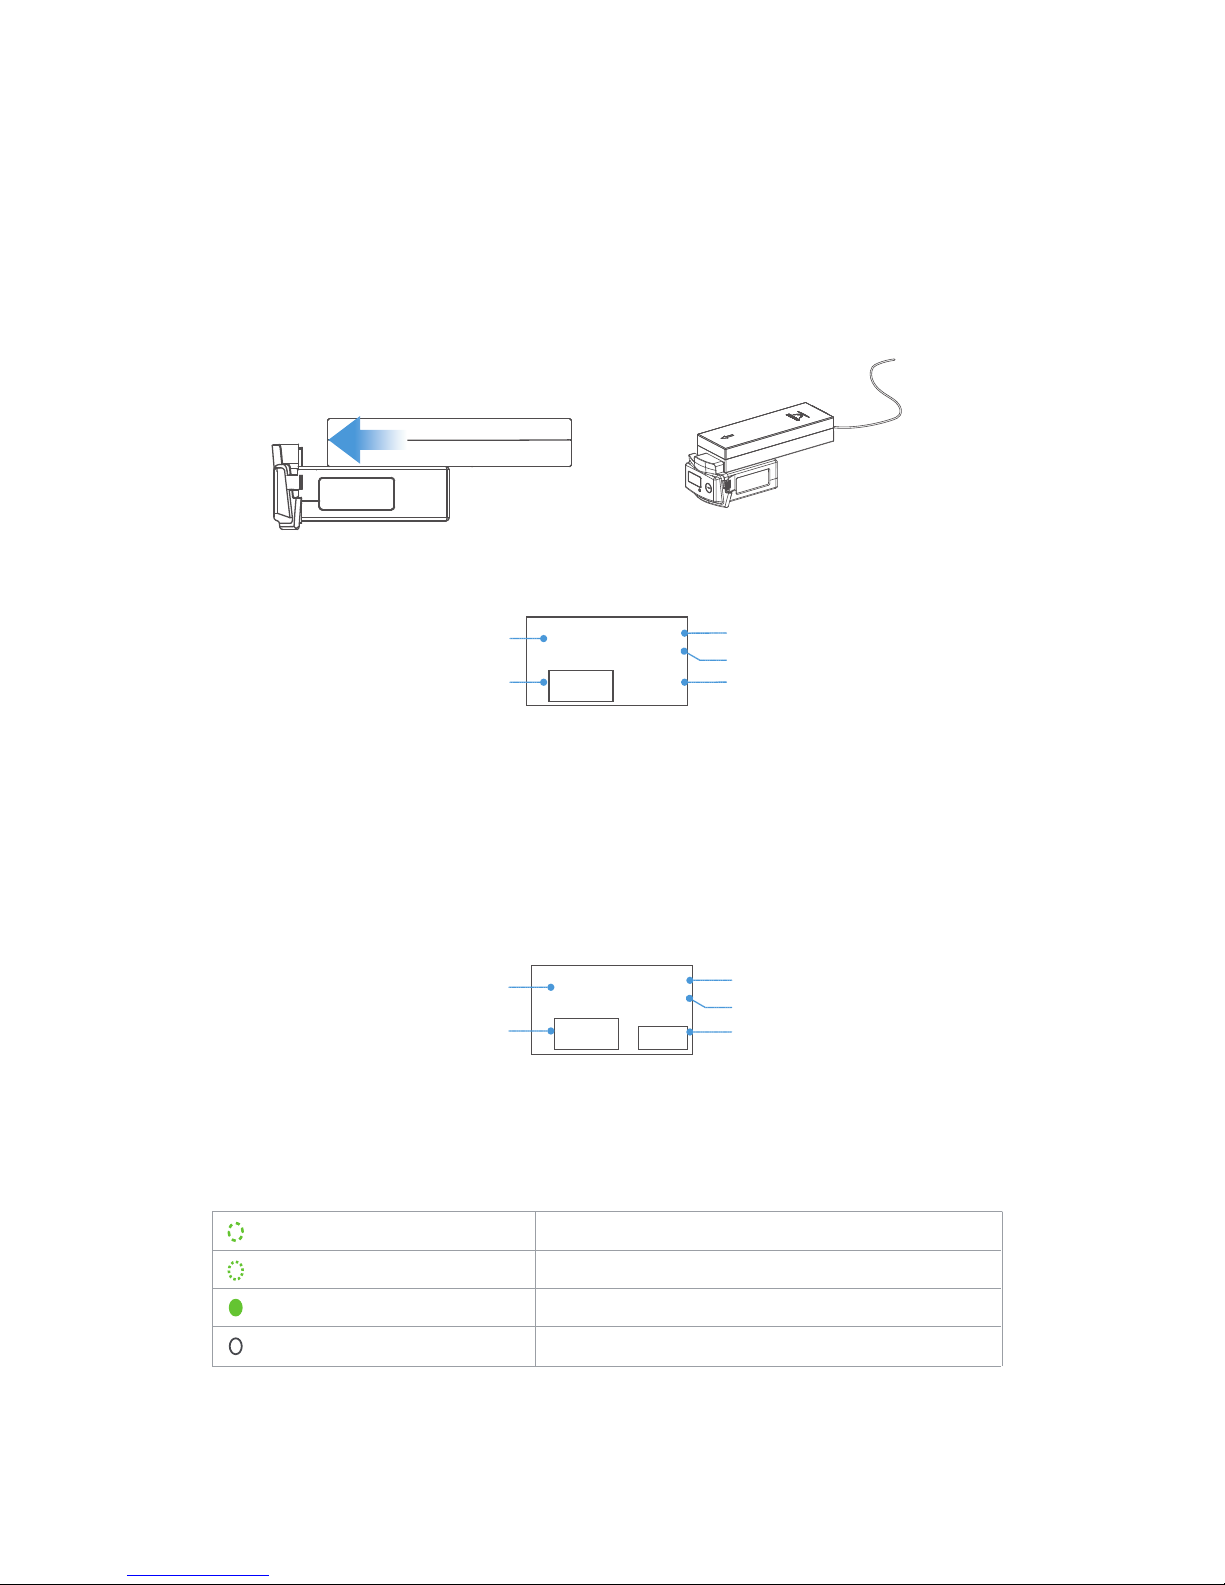
Installation
1. Put the drone upside down.
3. Attach the black nut propellers to the R motors in the same way.
2. Match the silver nut propellers with the L motors (with silver motor shaft), and tighten the propel-
lers according to the LOCK instructions.
3. Assembly
■ Installing/ Removing the Propellers
Legends
Lock: Tighten the propeller in this direction.
Unlock: Remove the propeller in this direction.
GHOSTDRONE 2.0 LTE uses 2-bladed 8.5-inch self-tightening propellers. Propeller nuts
have two colors, silver and black. Each indicates different rotating directions, and should be
installed to the motor shaft with the same color.
07
1. Check that the propellers are installed correctly and firmly before each flight.
2. It is necessary to check that all propellers are in good condition. DO NOT use any dam-
aged, aged or deformed propellers.
3. To avoid injury, DO NOT approach or touch the propellers or motors while they are spin-
ning. Be careful not to get cut by the thin propeller blades.
4. For a better and safer flight experience, please use original EHang propellers. EHang does
not offer warranty for propellers. If you need to replace your propellers, please go to our web-
site www.ehang.com.
Warning
Disassembling
Keep the motor deadlocked in place with one hand and remove the propeller according to the
UNLOCK instructions.
08
4. Accessories
Battery Diagram
Improper use of battery may lead to fire, explosion or other dangers. Please
be familiar with the product before using.
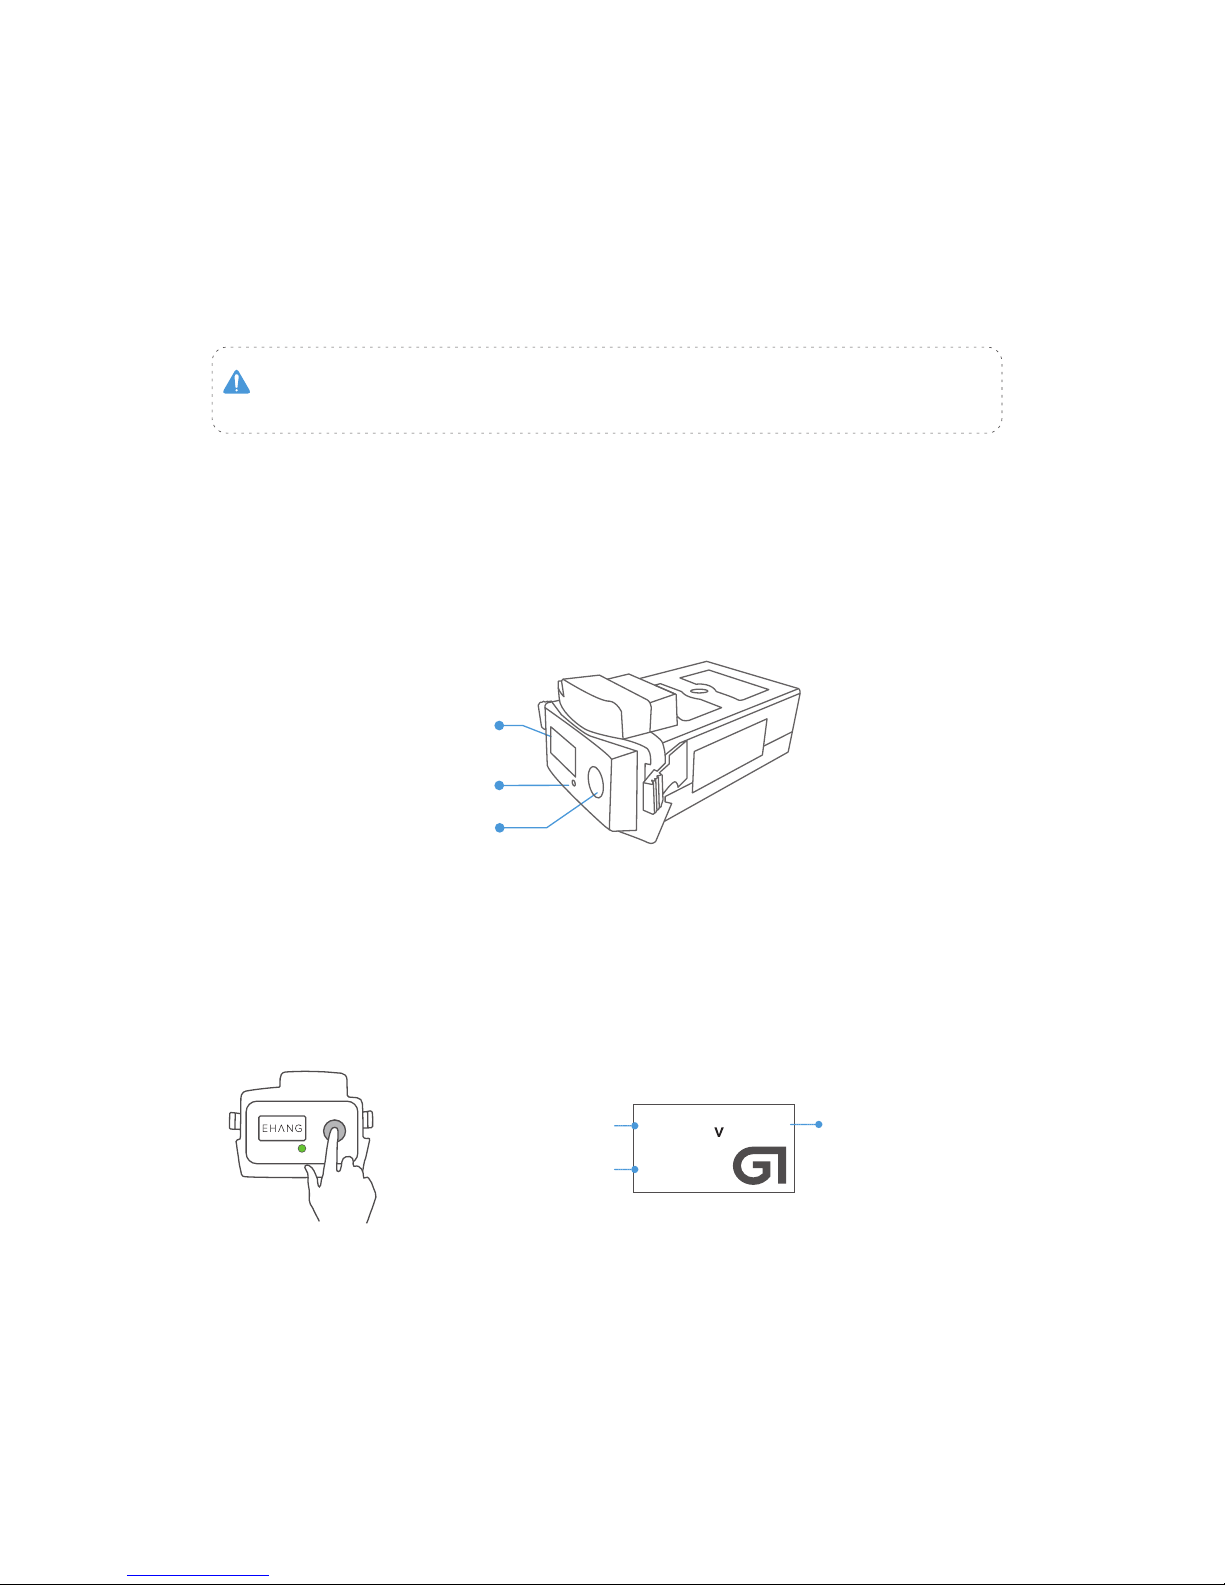
■ Smart Flight Battery
The smart flight battery is specially designed for the GHOSTDRONE 2.0 LTE, with capacity of
4500 mAh, voltage of 17.4 V, charge-discharge management functionality and a smart display
screen. The battery should only be charged by EHang power adapter.
Note: When the battery is powered off, press the power button to check the battery life. (Main
interface will display for 3 seconds while the LED Indicator light stays off during the whole
process.)
Powering On
Press the power button shortly, then quickly press and hold the button again. Don’t release it
until the last letter “G” of logo “EHANG” fully appears on the screen. The LED indicator light
turns on once the battery is turned on, referring to the diagram below.
Main Interface
Remaining Battery Life
Battery Remaining
Capacity
Remaining
Total Voltage 16.66
4516
mAh
98%
Power Button
Indicator Light
LCD Screen
09
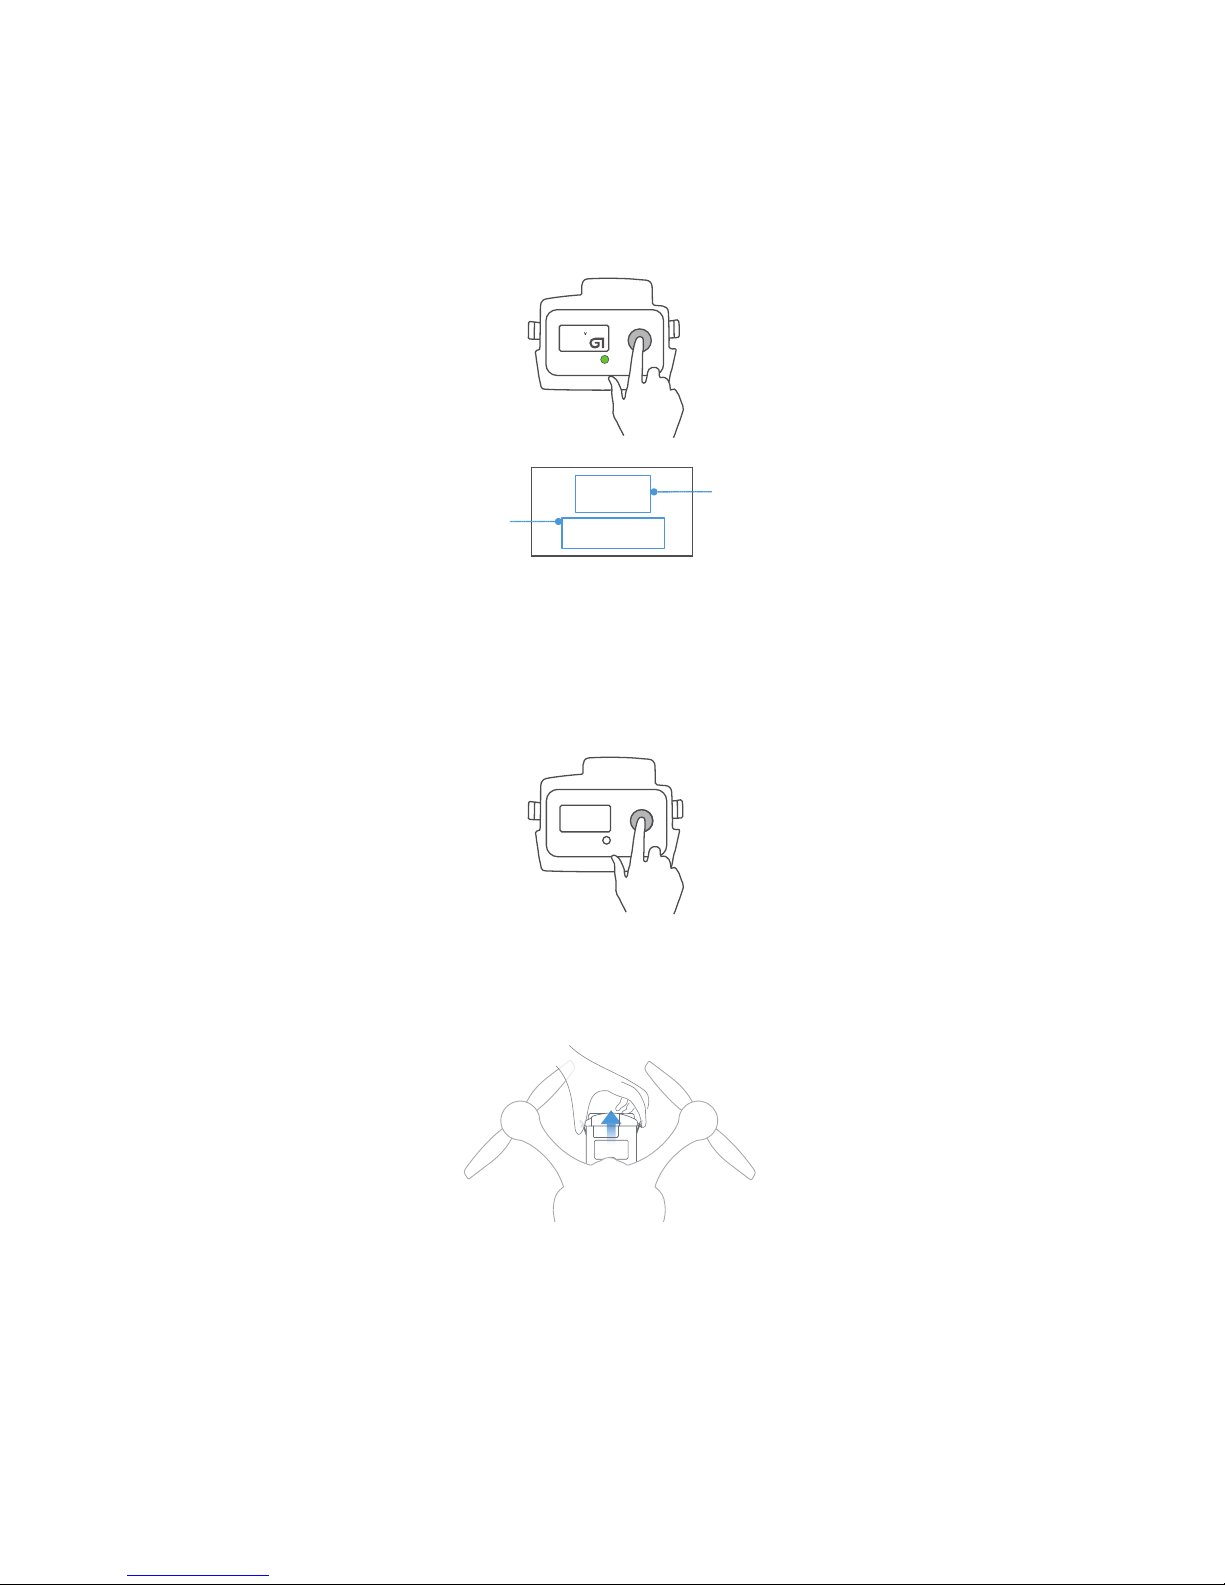
Powering Off
Press the power button shortly, then press and hold again until the ‘!’ of ‘SEE YOU !’ message
disappears on the screen.
SEE YOU!
16.66
4516
mAh
98%
Secondary Interface
Seperate
Chamber’s Voltage
Electronic Current
Battery Lifespan Percentage
Number of Fully Charge
and Discharge Cycle
Cell1:
Cell2:
Cell3:
Cell4:
4.162V
4.167V
4.161V
4.164V
Current: -0.021A
Cycle: 6
Health: 99%
Battery Removal & Installation
Remove Battery
Turn off the battery first. Hold the battery handles to remove it from the battery compartment.
Note: DO NOT remove or install the battery into the copter when it is powered on, otherwise the
battery will be damaged.
After turning on the battery you can enter the battery status interface by clicking the ON button,
to return to the main interface click the ON button again.
Install Battery
Hold the battery handles and push the battery into the battery compartment until you hear a
click.
10
LED Indicator Light Instructions
Low frequency flash (Green)
High frequency flash (Green)
Solid green
Light off
Charging
Low battery
Working
Standby
Battery Discharging
When the battery is discharging, the LED indicator light stays on and the screen displays as
below:
Discharge Interface
min
Discharging Current
Voltage
Remaining
Discharge Time
Accumulated
Discharging Time
Remaining Battery Life 97% - 2.756A
16.541V
Discharging...
97 00:14
Battery Charging
Connect the battery to the power adapter, and then connect the power adapter to a wall socket
(use the plug if necessary). Once connected successfully, the LED indicator light flashes slowly
and the screen displays current battery information as below:
Charging Interface
Charging Current
Sum Voltage
Seperate Chamber’s Voltage
Remaining Time to
Fully Charge the Battery
Remaining Battery Life 98% 1.025A
16.690V
Charging...
4.172V
4.177V
4.173V
4.170V
min
11
Battery
Power Adapter

11
1. Only the EHang power adapter should be used to charge the battery.
2. DO NOT use batteries from other companies for the GHOSTDRONE. EHang is not
responsible for any accidents caused by third party batteries.
3. DO NOT use used LiPo batteries. EHang is not responsible for any dangerous
accidents caused by used batteries.
4. DO NOT use the battery if it is inflated, damaged or deformed. DO NOT charge or
discharge the battery if it is inflated, damaged or deformed.
5. DO NOT plug or unplug the battery into the copter when it is powered on, otherwise the
battery will be damaged.
6. DO NOT overcharge the battery. DO NOT “trickle” charge the battery.
7. DO NOT leave the battery unattended when charging for a long time.
8. DO NOT charge or store the battery under direct sunlight. Please store batteries at
room temperature. DO NOT store batteries under high or low temperature condition.
9. Recharge the battery only after it cools down to room temperature. Use the charged
battery only after it cools down to room temperature.
10. DO NOT use the battery in strong electrostatic or electromagnetic environments,
otherwise the electronic protection devices might be damaged leading to dangerous
accidents.
11. DO NOT use any conducting wires or any metallic substance that would cause
batteries to develop a short circuit.
12. DO NOT attempt to dismantle the battery case. DO NOT attempt to dismantle, pierce
or cut a battery.
13. DO NOT discharge the battery below 3.0 V per cell. Ideally you never want to go below
3.2 V per cell to maintain a healthy battery. 2.9 V per cell and lower will cause permanent
damage.
14. DO NOT leave the battery sitting around on a full charge for more than 2-3 days. If by
the 3rd day you realize you are not going to use your battery, you need to discharge your
battery down to 3.6 V-3.8 V per cell for safe storage until you are ready to use the battery
again.
15. Depending on how they are used, most LiPo batteries typically do not last longer than
300 charge cycles. Leaving the batteries around on a full or depleted charge all the time,
running them completely dead, or exposing them to high temperatures will shorten this
lifespan dramatically.
16. Always pack your batteries in your carry-on bag and never in your checked baggage
when traveling on an airplane. It’s the law.
Warning

12
1. The battery should be stored in an environment with the temperature of 23±5°C.
2. The battery must be stored in places away from children, water, fire and metal.
3. Always keep a Class D fire extinguisher near your battery charging/discharging and
storage area. The battery charging/discharging and storage area should be free from any
materials which can catch fire such as wooden tables, carpets, or gasoline containers.
The ideal surfaces for charging and storing batteries are concrete or ceramic.
4. DO NOT use your flight case/travel case for long term battery storage. The foam and
plastic in these cases can help spread a fire caused by batteries. Always use a fire proof
container such as a metal ammo box or fire proof safe for storage.
5. If the battery is not being used for more than 1 week, keep the battery capacity between
50% to 60%. Charge and discharge the battery once every two months.
6. Do not discard batteries in general household waste. Damaged or unusable batteries
must be disposed in containers specially reserved for this purpose. When disposing of
batteries, follow appropriate local guidelines and regulations.
Storage Instructions
13
Spherical camera is lightweight with a design that tremendously reduces wind friction, especial-
ly under air turbulence when maneuvering at high speed. It has low picture deformation and
performs well under low illumination conditions.
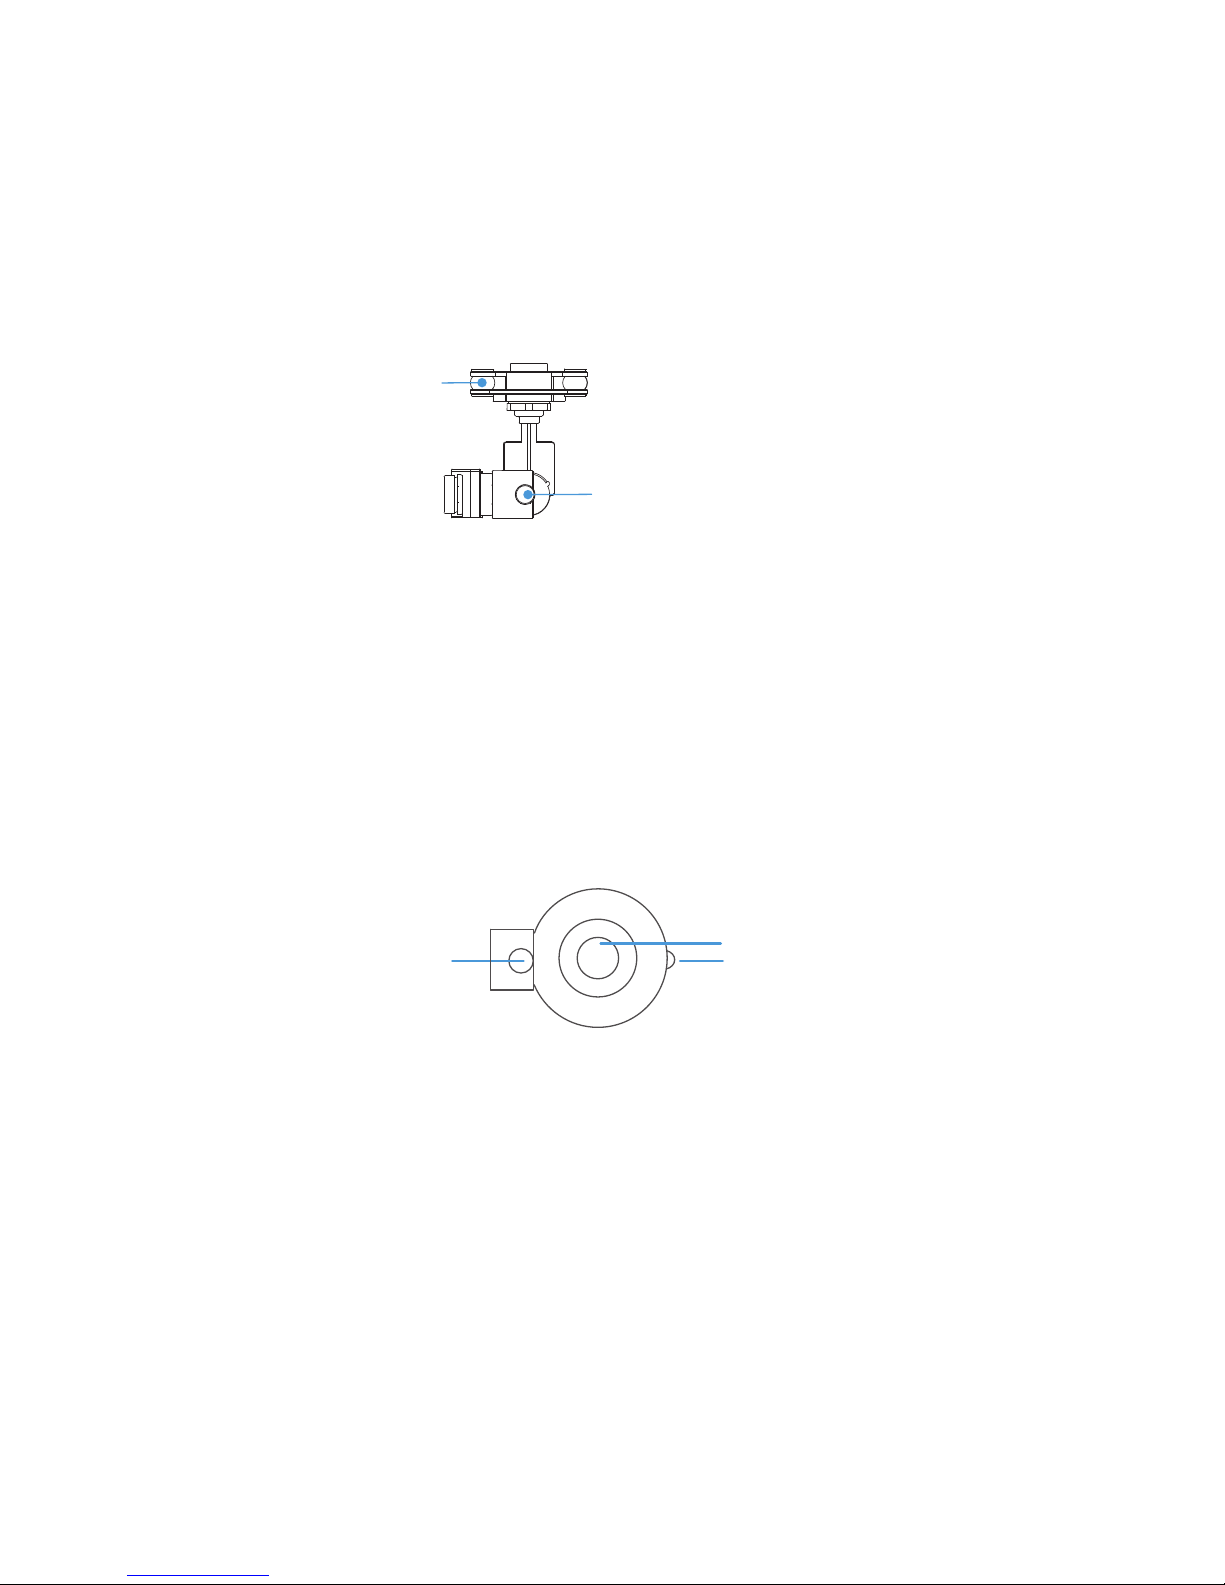
■ Spherical Camera
Screw holes
Lens
On/Off indicator light
■ 3D Gimbal for Spherical Camera
The 3D Gimbal for Spherical camera is equipped with a specialized 3D gimbal. Its ultra-thin
motor makes it very light and responsive. The same time, we adopt the bracketing gimbal
design that makes the gimbal and the camera more stable.
Hexagon socket head cap screws
Damper
Spherical camera supports up to 30 frames per second high quality video recording with 4K
resolution, and up to 12 mega pixel images. Standard storage is 16 GB Class 10 Micro SD
card, and supports up to 64 GB. Micro SD card with Class 10, UHS-1 or higher is recommend-
ed to support high speed video data storage.
How to use the camera
You can control the camera's start and stop recording in the flying interface of the EHANG
PRO. Click the camera recording icon once to start recording and click again to stop. You can
also take photos by clicking the photo button located next to the recording button (Note: Photos
cannot be taken while the camera is recording).

14
■ Copter Indicator Lights Instructions
On GHOSTDRONE 2.0, there are four arm indicator lights and one front indicator light. The
front indicator light displays multiple colors; the two front arm indicator lights display red; and
the rear two lights display blue.
The following chart describes the display status of the lights and their corresponding explana-
tion.
3D Lock: Lock copter’s current three-dimension location using GPS.
High Frequency Flash: Flash rapidly.
Low Frequency Flash: Flash slowly.
Terminologies
Front Indicator Light:
Front Arm Indicator Light:
Legend
Rear Arm Indicator Light:
Low Frequency Flash SolidHigh Frequency
Initializing.
Unlock check failed, do not unlock.
GPS is 3D locked. Ready to unlock.
GPS is not 3D locked. Unlock successful.
GPS is 3D locked. Unlock successful.
Low battery. (Not related to unlock or not.)
Control signal not receive.
Aircraft Indicator Light Status Information Chart
Front Indicator Light Arm Indicator Light Descriptions
After powering on, front indicator
light shows in white solid color
then flashes in blue and green at
high frequency until stop
High frequency flash (red)
Low frequency flash (yellow)
Low frequency flash (blue)
Solid yellow
Solid green
Low frequency flash (yellow)
Flashes in yellow and blue at
low frequency alternately
GPS is not 3D locked. Unlock is only
accessible in manual mode.

15
Turning On Your Tablet
Portable Wi-Fi
■Tablet & Portable Wi-Fi
Note: The name and password of the Wi-Fi
is enclosed on the back of the device.
Press and hold the Power button for 5 seconds to turn on the portable Wi-Fi. The indi-
cator light will turn to solid green.
Turn on the tablet and search the Wi-Fi name, then enter the password to connect.
Press and hold the power button
for 5 seconds
The indictor light turns solid
red when searching signals
Successfully powered on
when the indictor light turns
solid green
1. Press and hold the Power button for 2 seconds to turn on your tablet.
2. If the lock screen image displays, swipe your finger from the bottom of the display to
switch to the login screen, and then enter the passwords to log in to Windows.
Locking the Screen
Shortly press the Power button once to lock the screen.
WLAN网络名称:
XXXXXX-XXXX
WLAN初始密码:
XXXXXXXX
Power Button
16
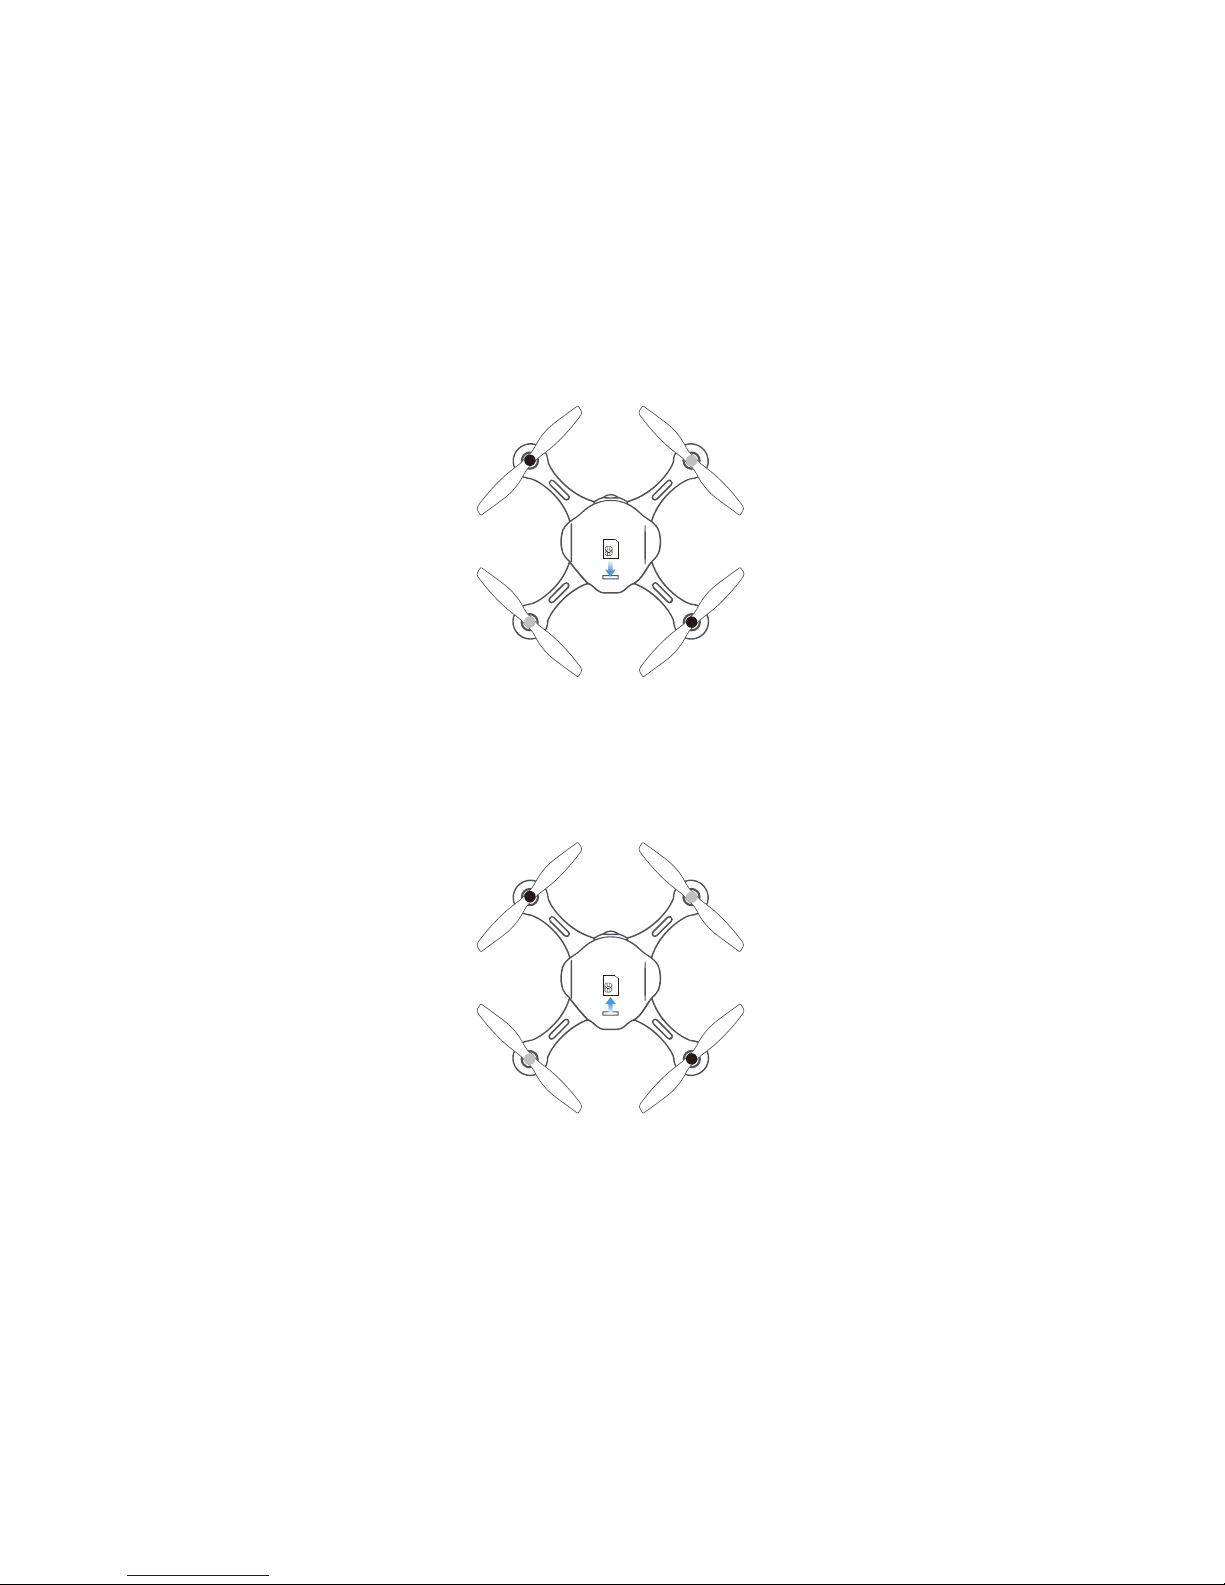
■ SIM Card Installation/Removal
As shown below, gently insert the SIM card into the slot, then press to firmly secure it.
The SIM card slot is located in the drone bottom on the rear side.
As shown below, apply a small amount of pressure until the SIM card pops out from the
slot, then gently remove it.
rear side
rear side
Table of contents
Other ehang Drone manuals


