ehang Falcon-B410 User manual
User Manual
Falcon-B410
Please read carefully this user guide and keep it well for further reference if necessary.

Guangzhou EHang Intelligent Technology Co., Ltd. reserves the right to interpret this Operating Manual.
www.ehang.com
Business Hour: (GMT+8)9:00am-6:00pm,Monday to Friday
Customer Service Phone: (+86)020-29028899
Falcon-B410 User Manual
includes packing list, assembly, parts
and specification information.
Congratulations on purchasing your new Falcon-B410!
or contact our customer service hotline: (+86)020-29028899.
www.ehang.com
www.twitter.com/ehang
www.facebook.com/theghostdrone
www.instagram.com/ehang.official/
forum.ehang.com
Thank you, and enjoy your Falcon-B410!

Tablet
Model and Specs ------------------------------------------------------ 14
EHANG Pro Installation ---------------------------------------------- 14
SIM Card Installation -------------------------------------------------- 15
Table of Contents
Falcon-B410
Propeller Installation and Removal
Signs ---------------------------------------------------------------------- 05
Installation --------------------------------------------------------------- 05
Removal ----------------------------------------------------------------- 05
Aircraft Introduction
Aircraft Diagram ------------------------------------------------------- 03
Product List ------------------------------------------------------------- 03
Know before You Fly -------------------------------------------------- 01
Warnings ----------------------------------------------------------------- 02
Battery Charging and Use
Battery Diagram -------------------------------------------------------- 06
Battery Charging ------------------------------------------------------- 06
How to Use -------------------------------------------------------------- 07
Landing Gear Unfolding and Folding
Unfolding ---------------------------------------------------------------- 08
Folding -------------------------------------------------------------------- 08
Gimbal Installation and Removal
Diagram -------------------------------------------------------------------09
Installation ----------------------------------------------------------------09
Removal -------------------------------------------------------------------10
Communication Box Use and Charging
Diagram -------------------------------------------------------------------11
How to Use ---------------------------------------------------------------11
Charging ------------------------------------------------------------------11
Maintenance
Propeller Maintenance -------------------------------------------------12
Battery Storage and Maintenance ----------------------------------12
Landing Gear Maintenance ------------------------------------------13

EHANG Pro Configuration and Application
Acquiring Registration Code ---------------------------------------- 16
Connecting Devices --------------------------------------------------- 16
WiFi Mode --------------------------------------------------------------- 16
SIM Card 4G Mode ---------------------------------------------------- 16
Parameters
Aircraft ------------------------------------------------------------------- 36
Communication Box --------------------------------------------------- 36
4K Spherical Camera & Gimbal ---------------------------------- 36
Thermal Imaging Camera -------------------------------------------- 37
10x Infrared Thermal Imaging Camera --------------------------- 37
Tablet ---------------------------------------------------------------------- 38
Tablet Power Adapter ------------------------------------------------- 38
Tablet Battery ----------------------------------------------------------- 38
Flight Control Interfaces
Interfaces Introduction ---------------------------------------------- 20
Flight Settings ----------------------------------------------------------- 22
Acquiring Image Transmission ------------------------------------- 23
Unlocking to Take off ------------------------------------------------ 24
Touch-to-Go Flight ------------------------------------------------------25
Flight Plan ----------------------------------------------------------------27
Favorite Waypoints -----------------------------------------------------29
Photos and Videos ------------------------------------------------------30
Renaming Aircraft -------------------------------------------------------32
Calibrating Compass ---------------------------------------------------32
Pre-flight Check ------------------------------------------------------- 35
Flight Tips --------------------------------------------------------------- 35
Pre-flight Check and Flight Tips
Settings
Basic Settings ------------------------------------------------------------34

Laws & Regulations
With a curb weight of 4-15 kg and a takeoff weight of 7-25 kg, Falcon-B410 is categorized into the
Ⅲclass of civil UAV. It is governed and bound by the Civil Aviation Law (2015 Amendment) of the
People’s Republic of China amended and issued by the NPC Standing Committee on April 24th,
2015, the Provisions on the Operation of Light and Small UAVs (for Trial Implementation) and the
Administrative Provisions on UAV Pilots issued respectively on September 29th, 2015 and July
11th, 2016 by the Flight Standards Department of Civil Aviation Administration of China.
Pilots Qualification
The pilot must hold a valid Pilot Certificate of Civil
UAV System issued by the Aircraft Owners and
Pilots Association (hereinafter abbreviated as
“AOPA”) of China.
UAV Electronic Fence
The operators should install and use electronic
fences.
UAV Cloud
The operator should access the UAV cloud. And the
latest status should be reported at least once per
second in densely populated areas and at least
once every 30 seconds in other areas.
Third-party Liability Insurance
The UAV operator should be covered by the
third-party liability insurance.
Airspace Application
Prior to operating a civil UAV not connected to the
UAV cloud yet, application should be filed to the
regulatory authority and effective monitoring
methods be provided.
ID Card
For users who have not accessed the UAV cloud
system, there should be ID cards pasted onto the
UAV surface that clearly show the relevant informa-
tion including the UAV model, serial NO., the name
and contact info of its owner, etc., so that the UAV
owner and operator can be quickly traced to in the
The operator and pilot shall abide by relevant
laws, administrative regulations or local
policies. And the liability and ensuing conse-
quences of any violation against these laws,
regulations or policies should be sorely borne
by the operator and pilot.
event of UAV crash.
No Careless or Reckless Operation
The UAV shall be operated with care and caution to
prevent any personal injury or property loss.
Pre-flight Preparation
a. To know the weather conditions in the flight
areas.
b. To confirm that the conditions of the flight areas
conform to the conditions required by the UAV
operation manual.
c. To check and confirm that the components/parts
of the UAV, fuel or battery storage, communication
signals conform to the operational requirements.
Users of UAV cloud system shall confirm their
access to the system.
d. To make contingency plan that includes the
predetermined locations for emergency landing.
Others
The pilot is not allowed to operate the UAV within 8
hours after having any drinks that include alcohol,
or under the influence of alcohol or any drug, or
when his/her work competence adversely affects
the flight safety.
Know before You Fly
01

Please note the following warnings
Before flying, please read carefully relevant documents issued by the International Civil Aviation
Organization (ICAO) and local aviation authorities regarding the management of local air space
and unmanned aircraft operation. Users are liable for any actions against the national laws due to
the violation of relevant regulations and any personal injuries or property damages caused by
noncompliance with the instructions and warnings of this manual, and all ensuing legal liability is
solely theirs.
1. The drone requires cautious operation during
flight. If you are flying your Falcon B-400 for the first
time, please fly it in an open area in order to experi-
ence its various functions safely.
2. DO NOT fly in restricted air zones.
3. DO NOT fly near obstacles, people, power lines,
trees, above waters or any other environments
which are not safe for flying.
4. The drone may not fly properly near tall buildings
due to GPS interferences. Please fly it in an open
area to reduce positioning error.
5. DO NOT fly in or around congested electromag-
netic (EM) environments. The drone must be kept at
least 200 m (656 ft.) away from strong EM sources,
including signal towers and ground stations. EM
interference can cause malfunctioning situations
such as failure to take off or loss of control.
6. DO NOT fly the drone in inclement weather
conditions, including extreme temperatures, heavy
snow, strong wind (above force 6), storm or fog.
7. It is recommended to always retain line-of-sight
with the drone during flight. Losing sight of the
drone may result in accidents.
8. Falcon B-400 is not suitable for use by children or
teenagers under 18 years of age.
9. Please make sure your tablet, the G-Box and the
drone have sufficient battery before flying.
10. Stand clear of the drone (at least 10m or 33ft)
with its head facing away from you when ready to
fly. Please keep away from any other unsafe
elements (such as obstacles, crowds, power lines,
etc.)
11. To avoid injury, DO NOT approach or touch the
propellers while they are spinning.
12. During flight, the G-Box should be kept within a
distance of 3 meters from the tablet. DO NOT place
the G-Box on the ground or put it into the pocket, or
it may lead to communication loss. Orient the main
antenna of the G-Box towards the drone to acquire
optimal communication.
13. Please keep an eye on the real-time battery of
your tablet and the drone. We strongly suggest to
land the drone when the battery of either device is
low.
Warnings
02

Aircraft Diagram
Product List
1
2
3
4
5
1
2
3
4
5
Headlamp
Motor
Propeller
Landing Gear
Battery
Specially designed for industrial applications, Falcon-B410 is a high-performance drone that can
be used in multiple scenarios including inspections, mapping, forest firefighting, transportation
and professional aerial shooting. With 4 axes and 8 propellers, the drone’s airframe is made up of
carbon fiber materials of extremely high specific strength, ensuring its strength and stiffness while
reducing the weight to a maximum extent. The flight control system boasts the redundancy design
of dual sensors to ensure the flight safety and stability. The drone also comes with a large-capaci-
ty battery for longer flight duration.
Falcon-B410*1 19-inch Propeller L*4
Tablet*1 Communication Box*1
19-inch Propeller R*4
Tablet Charger*1 Charger*1
Smart Battery*1
Note: Before flying Falcon-B400, please check whether all the products in the product list are included in
the package.
*
天鹰-B400*1 17寸螺旋桨L*4
平板电脑*1
17寸螺旋桨R*4
地面通讯盒*1 平板电脑充电器*1 充电器*1
智能电池*1
Aircraft Introduction
03
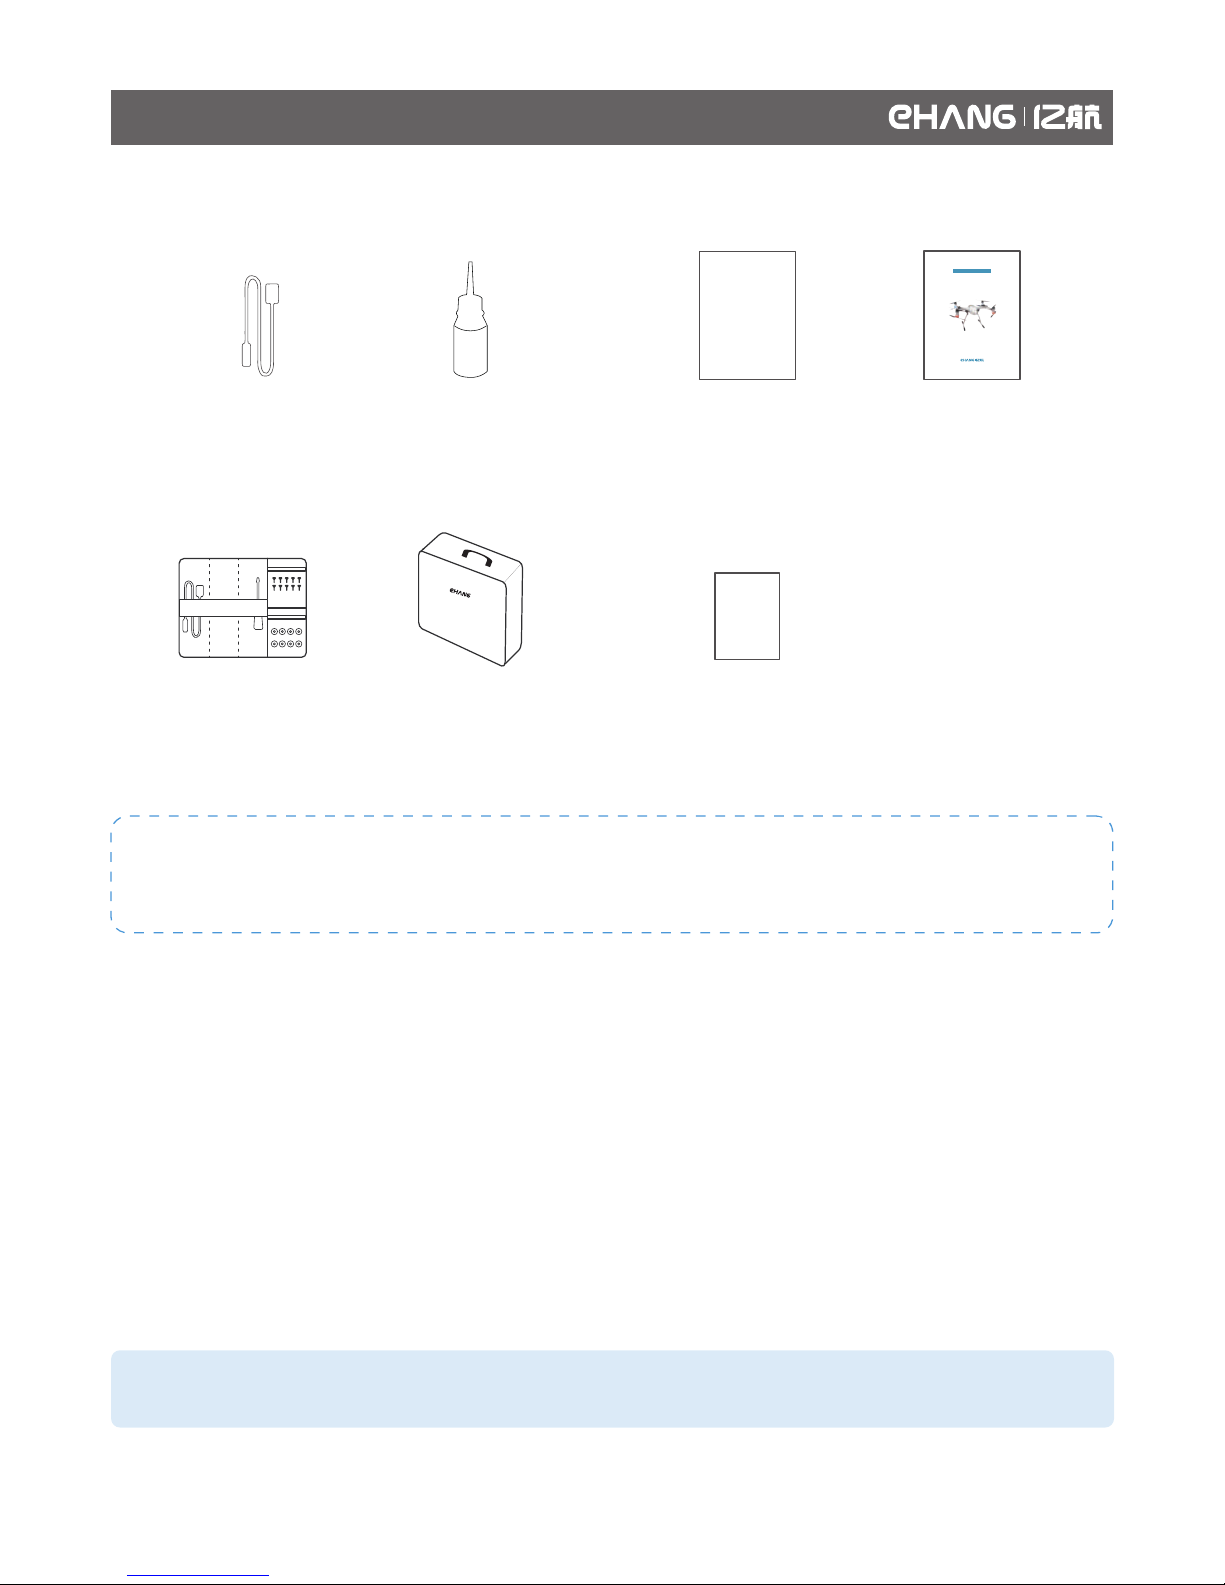
USB cable*1
A4 Adhesive Label*1
User Guide*1Real-name Registration
Guide*1
Fireproof Box*1
Accessory Kit*1
实名
登记
指引
Lubricant*1
The accessory kit includes: USB cable*1, Hex key*1, 2mm screw*10, 2-M4*25, screw*4, round gasket*8.
The USB cable can be used to charge the ground station.
用户手册
天鹰-B400
Each drone comes with one tablet. Users can order extra tablets based on your needs.
*
Aircraft Introduction
04

Falcon-B410 uses dual-blade 19-inch carbon fiber propellers, each drone comes with 8 dual-blade propellers.
Signs
The propellers are distinguished by the silver and blue “EHANG” logo. The propellers with silver “EHANG”
rotate clockwise, while those with blue “EHANG” rotate anticlockwise.
Installation
1. As shown below, place the propeller with a silver
logo onto a motor with a silver dot on its side, put
the gasket on the middle of the propeller, then use
the hex key to tighten the screws.
Removal
Use the hex key to remove the screws one by one,
then remove the gaskets and propellers.
2. Place the propeller with a blue logo onto a motor
with a blue dot on its side, put the gasket on the
middle of the propeller, then use the hex key to
tighten the screws.
Note:
Please make sure that all the logos are facing upward.
Propeller Installation and Removal
05
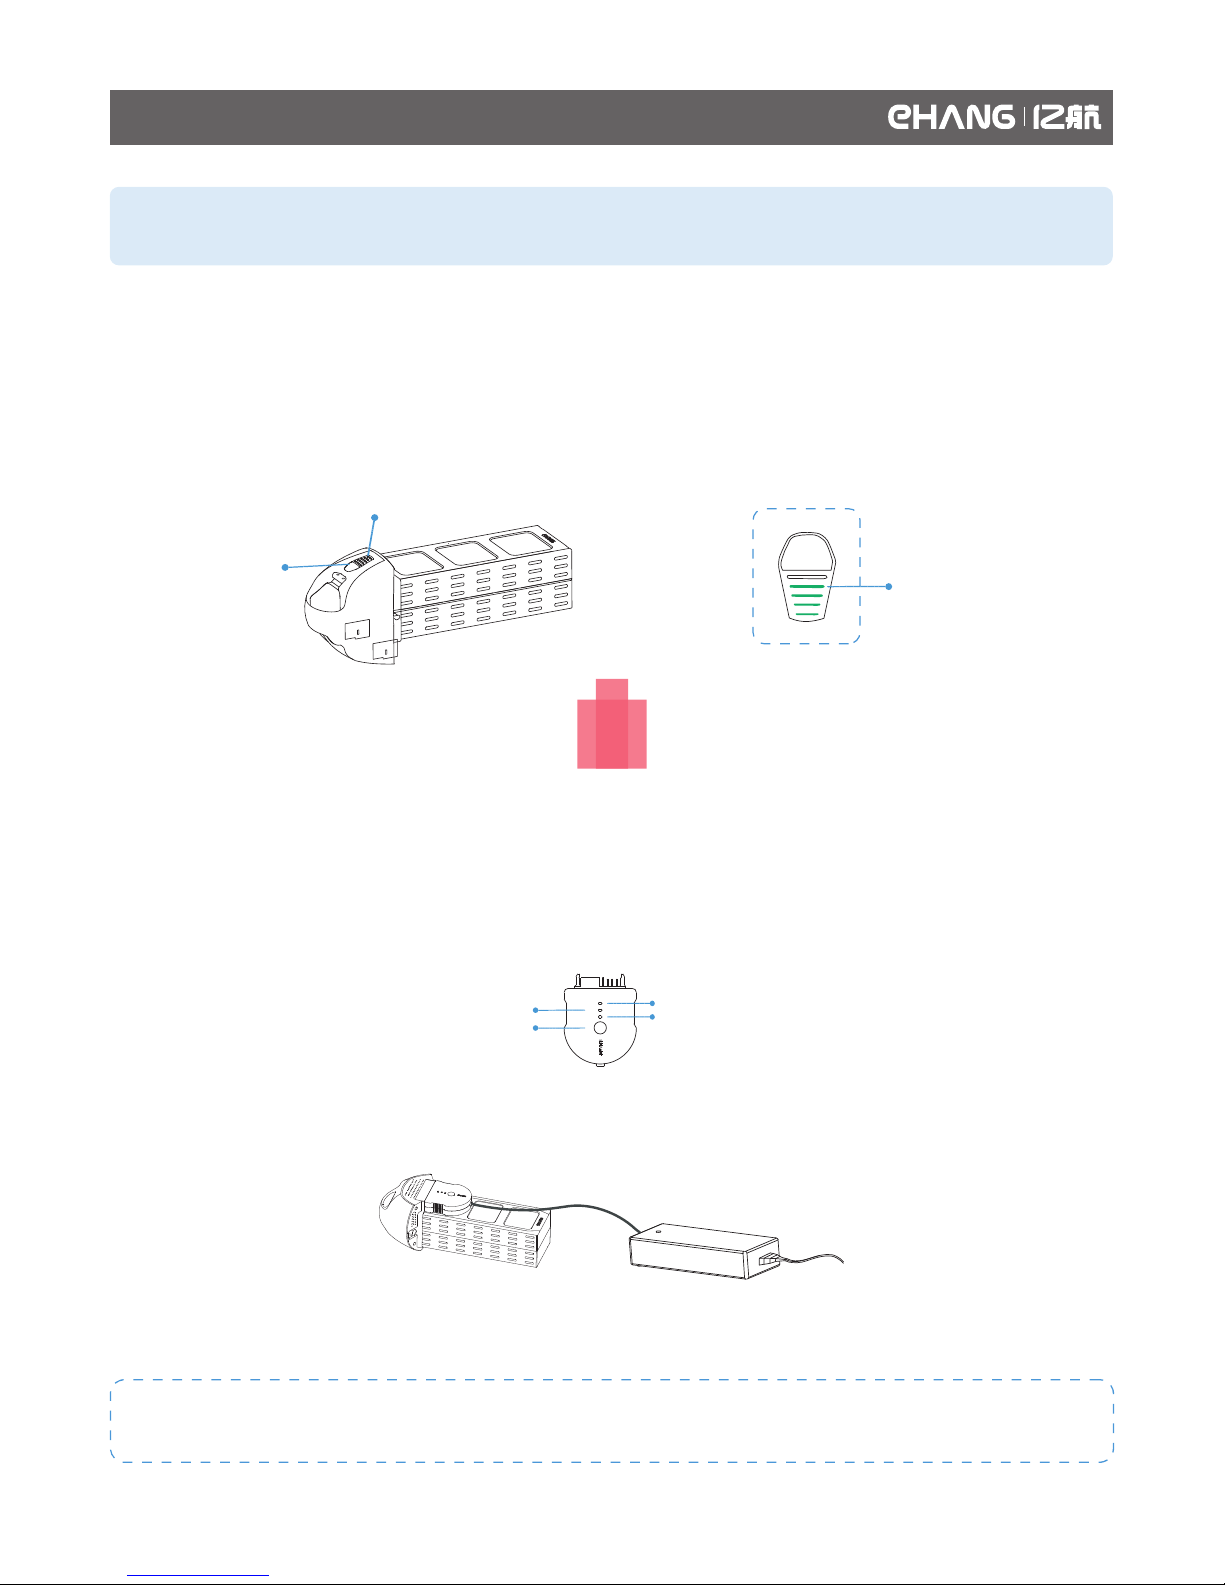
Battery level indicator light
Power button
Battery level indicator light
Note: Incorrect use of the battery may lead to fire, explosion or other hazards. Please make sure to familiar-
ize yourself with the product before use.
The smart flight battery uses 12S lithium polymer battery with a capacity of 15000 mAh and a voltage of 44.4 V.
Charging of the flight battery must use the proprietary EHANG power adapter.
Battery Diagram
Battery Charging
Use the power adaptor to connect the battery with the power source. The power adaptor provides two kinds of
charging mode: normal charging mode and storage charging mode.
If the battery is to be frequently used, please select the normal charging mode. If the battery is to be left idle
for a long time, please select the storage charging mode.
Charging plug
Normal charging mode-Red light
Charging completed-Green light
Mode selection button Storage charging mode-Blue light
Charging Diagram
Note: Generally, it takes 2.5 hours to fully charge a battery. Please charge the battery in cool and dry
environments.
Battery Charging and Use
06
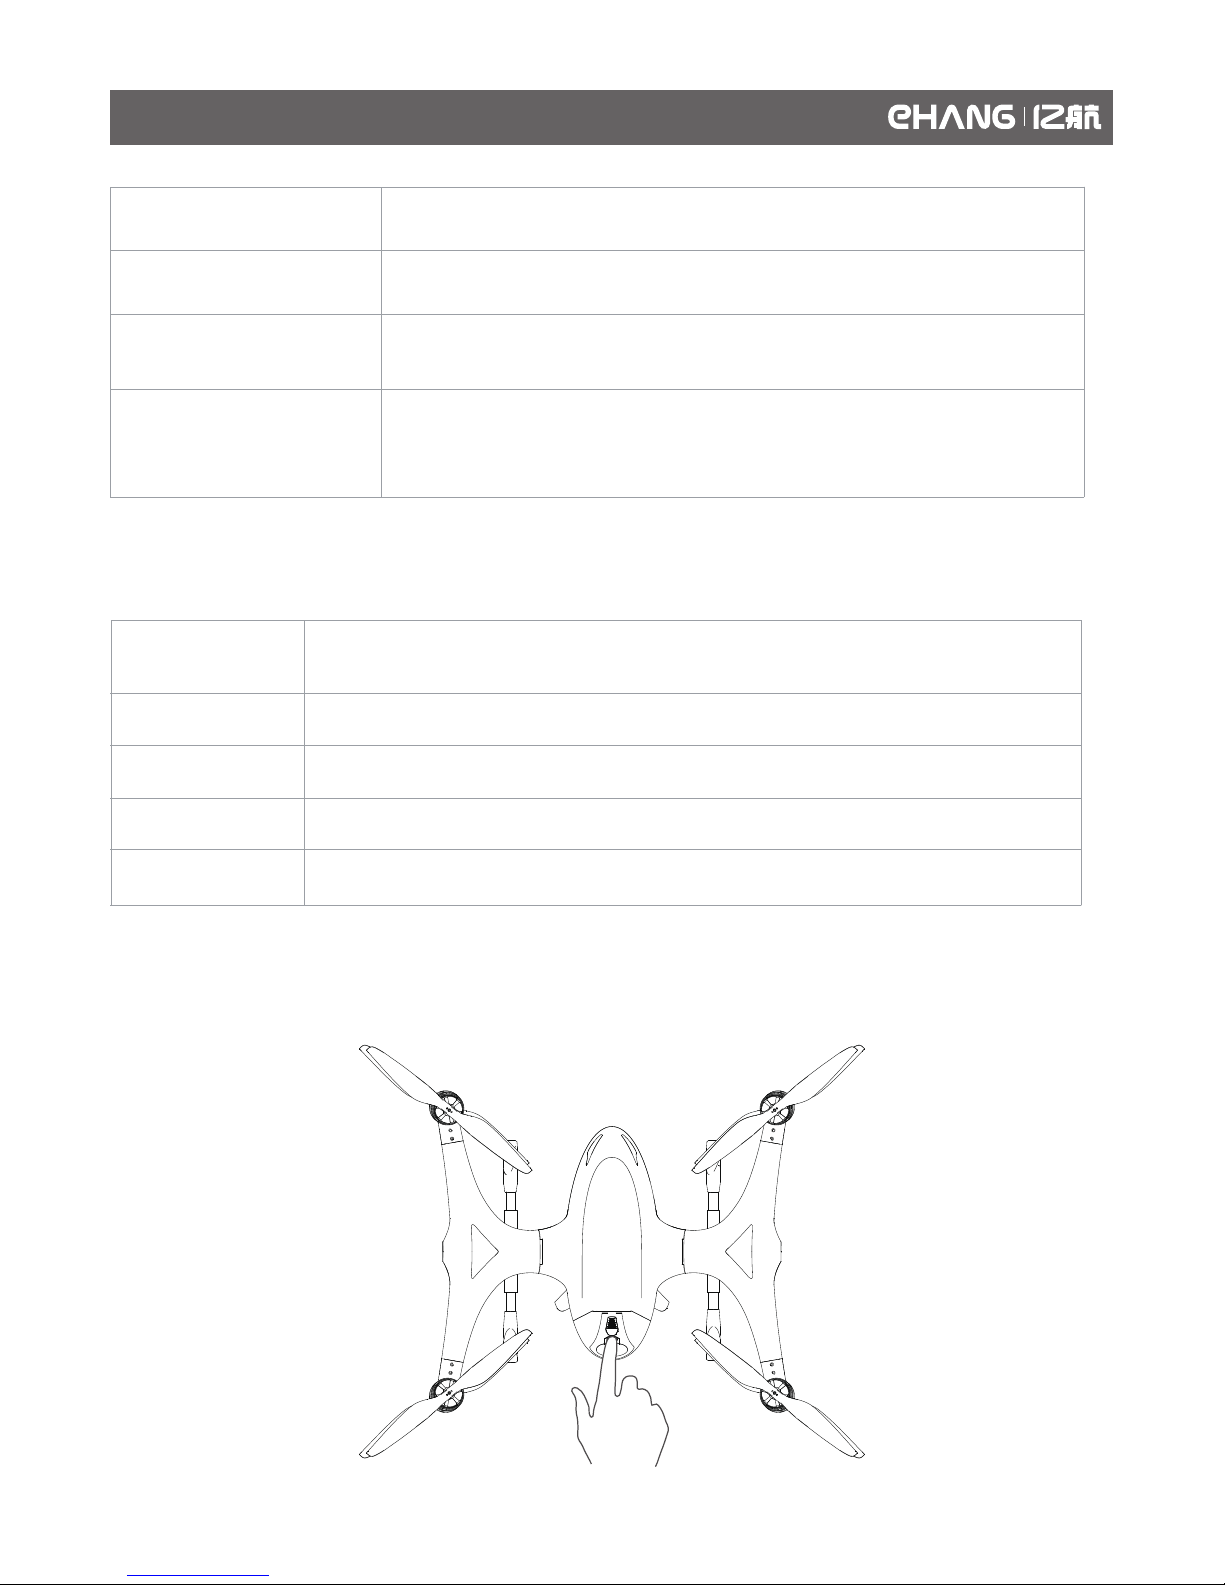
Check Battery Level
The corresponding indicator light flashes.
The five indicator lights remain on.
Powering On
Powering Off
Charging
Fulling Charged
Press twice and hold the power button to power on the battery, the indicator light
will flash at first and then remain on.
Press the power button shortly, more lights indicate higher battery level.
Press and hold the power button until the indicator light is off.
How to Use
As shown below, press the battery buckle and insert the battery into the battery compartment, pull the handler
to make sure the battery is tightly secured.
Step 1: Connecting
Step 2: Turning on the battery
Step 3: Select charging mode
Step 4: Completing charging
Use the power adaptor to connect the battery with the power source.
Press twice and hold the button to turn on the battery.
When the green light remains on, it means the battery has been fully charged, and the
power adaptor will automatically disconnect the power source. The battery then enters
standby mode and automatically powers off in around 15 minutes.
Press the mode selection button shortly to select the charging mode (Storage
charging mode is not applicable for batteries with voltages above 46V).
Battery Charging and Use
07
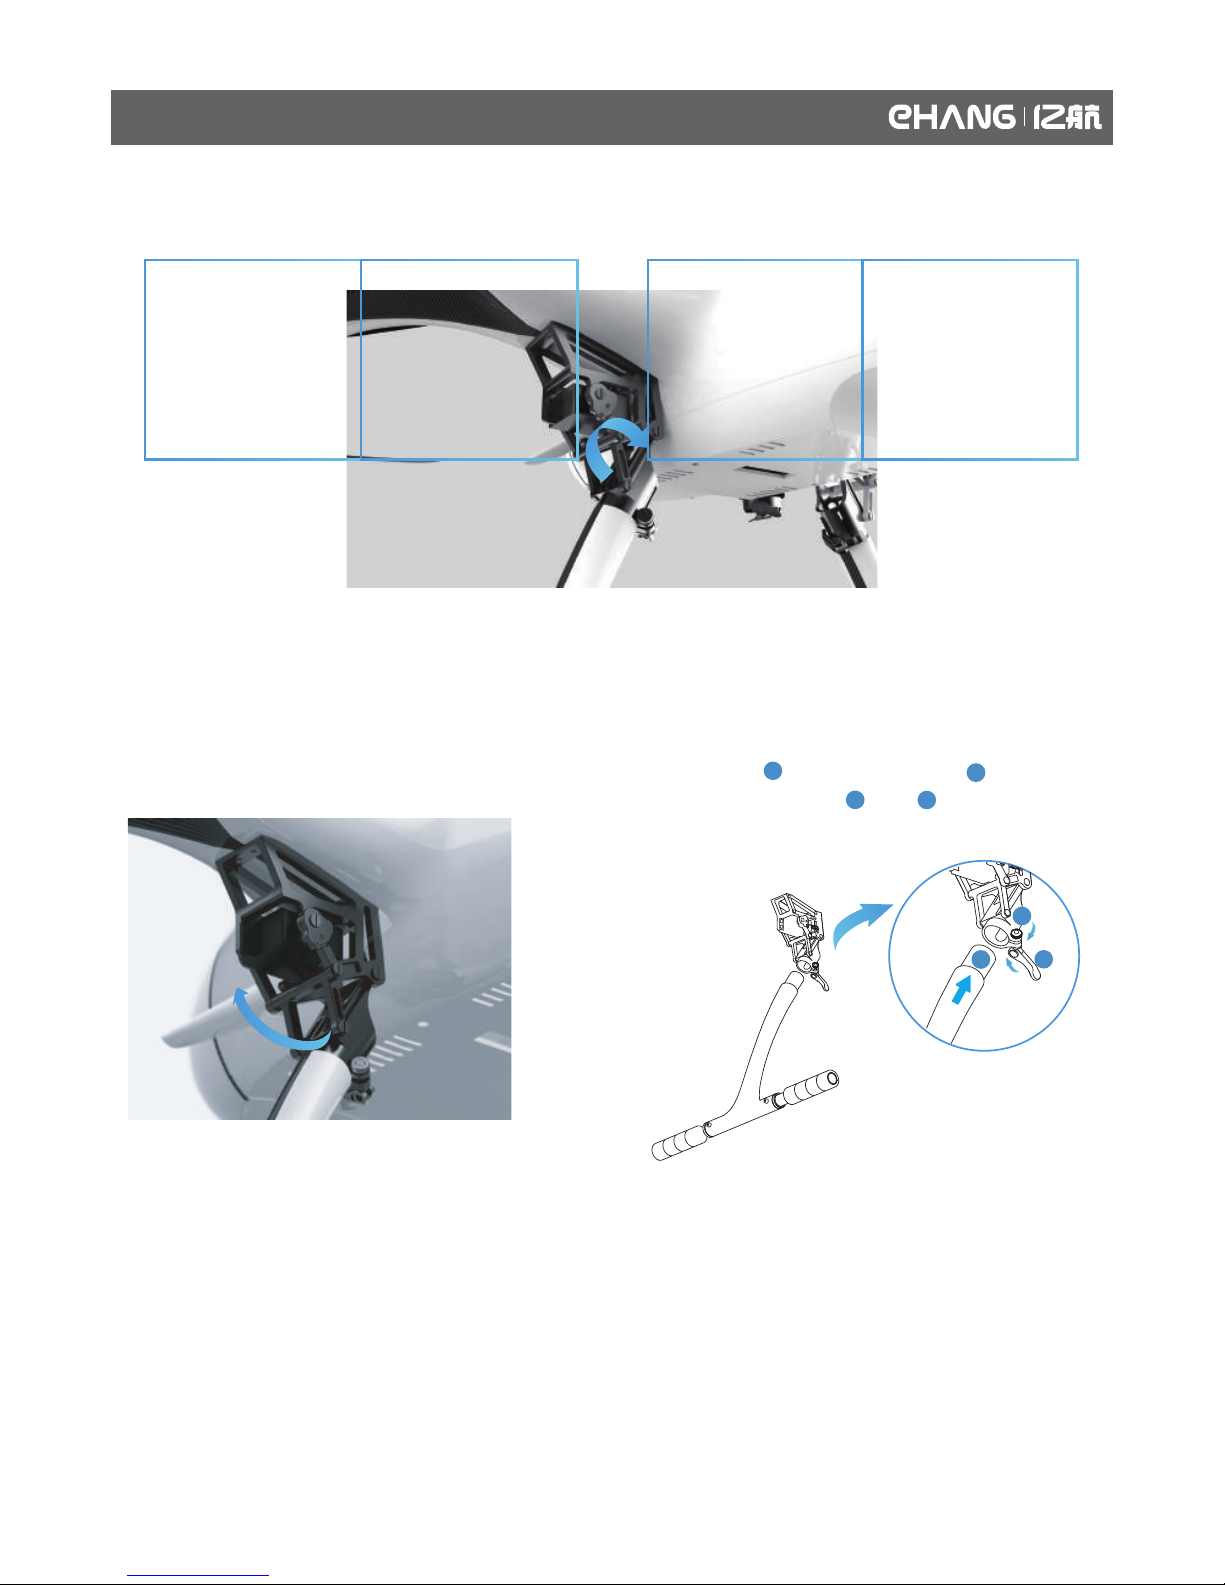
2. In case the two landing gears are unbalanced,
you can pull outward and adjust to a balanced
position, then tighten and following the
directions of the arrows.
Unfolding
Loosen the two straps and pull the landing gear downward to the maximum extent, then lock the clamp.
Folding
1. Unlock the clamp and pull upward to fold landing
gear, then tighten the strap.
Unfolding and Folding the Landing Gear
08
2
2
2
1
1
3
3

Diagram
The gimbal and the communication module are mounted on the bottom of the drone. Unfold the antennas as
shown below when flying the drone.
Installation
1. As shown below, connect of the communica-
tion module to of the gimbal with the black
cable. And connect on the drone bottom to of
the gimbal with the colorful flat cable.
2. Match the gimbal grooves to the screws as
shown below.
Communication Module
Gimbal
Gimbal Installation and Removal
09
2
1
4
2
1
4
3
3

3. As shown below, follow the arrow direction to
push and tighten the gimbal to the drone.
5. Place the drone on a flat surface, gently shake
the gimbal to check whether it is tightly secured
and successfully installed.
Gimbal Installation and Removal
10
4. Turn clockwise and tighten the screws on the
two sides of the gimbal.
Removal
1. Untie the cables that connect the gimbal
respectively with the drone and the communica-
tion module.
1
1
2
2
2. Loosen the screws and remove the gimbal.

Note: You can use USB cable to connect and charge the
Communication Box, and the current shall be maintained at no
less than 500 mA.
Power Button
USB Port
Battery Level Indicator Light
Antenna
charging/battery level indicator lights Charging Diagram
Communication Box is the communication device that transmits signals for EHANG Falcon B-410,
and it connects EHANG Pro with the Falcon via Wi-Fi. It is recommended to keep it within 3 meters
from the tablet to ensure optimum signals.
Diagram
How to Use Charging
During flight, the Communication Box must
be kept within 3 meters from the controlling
computer and the antennas must be pulled
upward. Please always maintain within the
communication range to prevent any commu-
nication loss.
Warnings
3m
Press once, then quickly press and
hold until the indicator light turns
off.
The indicator light flashes.
The four indicator lights remain on.
Powering On
Powering Off
Charging
Fulling Charged
Check Battery Level
Press once, then quickly press and
hold to turn it on.
More lights indicate higher battery
level.
When powered on, the indicator
light will remain on.
Communication Box Use and Charging
11

Removal: Use the screwdriver to remove the
screws on the motors, then remove the gasket.
Maintenance: If the drone is to be left unused for a
long period, it is recommended to remove the
propellers and put them into a flannelette bag to
prevent them from dust, moisture, exposure to
sunlight, aging, pressure and impact.
Propeller Maintenance
If the battery is to be left unused for a long period,
please select the storage charging mode to make
sure the battery will not be over-discharged. A
battery fully charged in this mode will have a
battery level of 80% (48V), and is ready for a
storage period of 2 months.
6. DO NOT leave a charging battery unattended for
a long time.
7. DO NOT charge/discharge or store batteries
with direct exposure to sunlight. DO NOT store
batteries in high/low temperatures.
8. When charging a used battery or using a
charged battery, wait until it cools down to normal
temperature.
9. DO NOT use batteries in strong electrostatic or
electromagnetic environments, or its electronic
protection device may be damaged.
10. DO NOT use conducting wires or other metal
objects to cause short circuit of batteries.
11. DO NOT dismantle the battery shells. DO NOT
disassemble or change the battery circuits in any
manner. DO NOT pierce the batteries.
12. Please keep the battery in your carry-on
baggage instead of the checked baggage.
1. The ideal storage temperature of the batteries is
23±5℃.
2. Keep the batteries away from children, water,
fire or metal objects.
3. Cement or pottery are ideal materials on which
you can store or charge/discharge batteries. DO
NOT charge batteries on combustible objects. DO
NOT put combustibles such as wooden furniture,
blankets or oil bottles in battery storage zones.
Please put a fire extinguisher near the battery
storage zone.
4. It is recommended to use fireproof bags or
boxes when charging/discharging or storing the
batteries.
5. Please maintain the battery level at 50%-60%
when the battery is to be left unused for a long
period. Charge/discharge the battery once every
two months.
6. DO NOT dispose the battery as daily waste.
Damaged or unavailable batteries should be put
into special containers with specific use. Batteries
belong to electronic/electric waste, please
recycle/dispose them in accordance with local
regulations.
1. The battery must be charged with the proprietary
EHANG power adaptor.
2. DO NOT use any non-EHANG batteries. EHANG
bears no liability for any incident caused by using
non-EHANG batteries.
3. DO NOT use second-hand batteries. EHANG
bears no liability for any incident caused by using
second-hand batteries.
4. DO NOT use or store swelling, damaged or
deformed batteries. DO NOT charge/discharge
swelling, damaged or deformed batteries.
5. DO NOT charge the battery when it’s powered
on, or it may be damaged.
Battery Storage and Maintenance
Storage Tips
Use Tips
Maintenance
12

Maintenance of Landing Gears
Maintenance is required as the foldable parts of the landing gears are connected by axes. Adding lubricants is
the main maintenance method.
Note
1. When manually rotating the axes, make it slow enough to avoid any damage to the actuator gears.
2. If the rotation is stuck, check if there is any foreign object stopping the rotation. Clean the foreign object
before adding the lubricants.
3. If noises are generated when rotating the actuator, it indicates that the actuator has been damaged,
please contact the customer service for replacement.
4. The spring comes with high elasticity. Please be cautious not to be injured by the spring in maintenance.
5. The foldable parts of the landing gears will release a “KaDa” sound when self-locking.
6. DO NOT disassemble and modify the mechanical structures.
Lubrication process:
1. Add a small amount of lubricants to the positions marked below as well as to the axes joints.
2. After adding the lubricants, slows rotate the axes to make the whole structure fully lubricated.
3. Wipe out redundant lubricants left on the surface.
Lubricated positions-front Lubricated positions-back
Maintenance
13
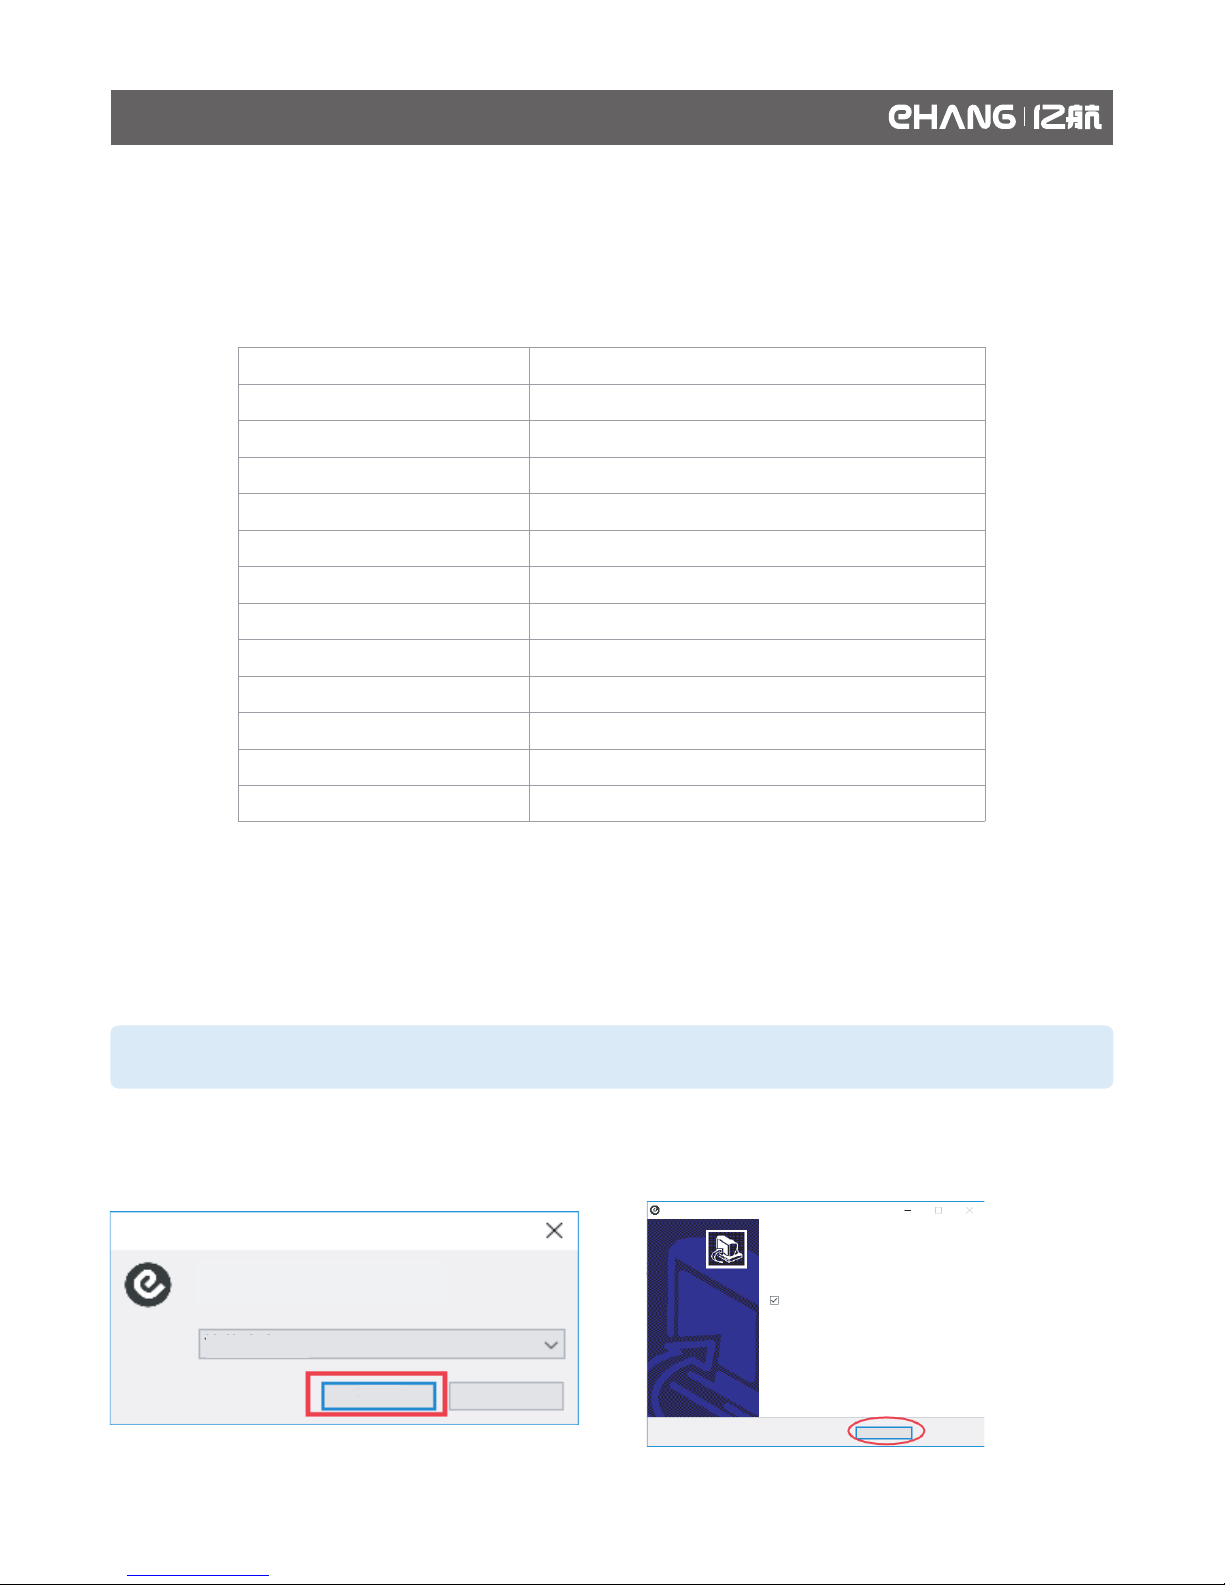
Make sure smooth network connection for the first installation. Open the installation package, select the
language and tap “OK”.
1. Tap “next” until the software is successfully installed, then tap “OK”, a EHANG Pro icon will appear on the
desktop and the software will start running in default.
Note: The default installation directory is C:\Program Files (x86)\ EHANG Pro.
Model and Configuration
Install EHANG Pro
Model:Dell Venue Pro 11
Configuration
Tablet
Simple Chinese
OK Cancel
Select Language
install - EHang Pro
EHang Pro installation completed
Select the installation language
Click “Complete” to exit the installation.
EHANG Pro has been installed in your computer,
you can run the software via its shortcut.
Running
OK
14
Chipset
Processor Type
Memory Capacity
Communication Network Adaptor
LCD Screen Size
Dimension
Max Resolution
Front Camera
Rear Camera
Storage
Battery Type
Weight
Operating Environment Temperature
4 GB / 8 GB
WLAN, LTE, HSPA+
10.8-inch HD
250.20*149.25 mm Diagonal: 239.04 mm
1920 x 1080 Pixels
OV 2722(2 Megapixels)
IMX 175(8 Megapixels)
NGFF SSD 128 GB / 256 GB
2-chip lithium-ion (36 WHr)
240.00 g (0.53 lb)
0℃~+40℃
Intel Lynx Point
Intel Haswell ULX Y series CPU

2. When running EHANG Pro for the first time, you’ll see a popup window where you can type in the registra-
tion code.
3. Type in the registration code and tap “OK”, when successfully verified, the page will automatically redirect
to the main interface.
SIM Card Installation
Install Micro-SIM Card
CAUTION: Removing the Micro-SIM card when the tablet is on may cause data loss or damage the card.
Make sure your tablet is turned off or the network is disconnected when removing the card.
4. Install the micro-SIM card into its slot.
2. Pry the base cover in the direction indicated and
lift it at an upward angle to remove it from the
tablet.
3. Slide the release latch to unlock the battery. Lift
and remove the battery from the tablet.
1. Press and hold the power button to turn off the
tablet.
Power button/ Lock-screen
OK
Registration Code
Tablet
15

The registration codes are provided by EHANG, also applicable for registration in computers. Each registra-
tion code can only be used for limited times, please keep your code well.
Acquire Registration Code
Connect Devices
There are two ways to connect a drone with the software. See below their brief introductions.
Communication Box+ Falcon+ Software WIFI Connection
1
WIFI
WIFI
Communication Box Falcon EHANG Pro
1. Turn on the drone: Place the drone on a flat
surface. Press twice and hold the power button until
the indicator light flashes to turn on the drone.
3. Open the software: Tap the software icon to open
the software.
4. Connect Communication Box: Search the WIFI
“EHANGBat-GND_xxxxxxxx”, xxxxxxxx is the
password, type in the password to complete
connection.
2. Turn on the ground station: Press and hold the
power button until the indicator light remains on to
turn on the ground station.
EHANG Pro Software Configuration and Application
16
Table of contents
Other ehang Drone manuals


