Ehrgeiz BABYBEAM4 User manual

Manual released for Software Version 2.0.0.3 from 02/06/2017
This Manual is released on 2/21/2017
USER MANUAL

Manual released for Software Version 2.0.0.3 from 02/06/2017
This Manual is released on 2/21/2017
CONTENTS
Introduction.............................. 1
Safety Instructions .................. 1
Delivery Contents ................... 3
Fixture Dimensions................. 3
Installations .............................. 4
Installation on the floor........... 4
Installation hanging ................ 4
Safety attachment ................... 4
Omega Bracket ....................... 5
Connections.............................. 6
Mains & DMX .......................... 6
DMX ....................................... 7
Operations................................ 8
Menu control .......................... 8
Menu map .............................. 9
Software updates .................. 11
DMX Modes .......................... 11
std-8 Standard Mode........... 11
tl1-5 Mode.......................... 12
tl2-6 Mode.......................... 12
RGBW-4 Mode ..................... 12
RGB-3 Mode........................ 12
Easy-2 Mode ....................... 12
Services .................................. 13
Trouble Shooting .................. 13
Maintenance ......................... 13
Appendix ................................... I
Specifications........................... I
Exploded drawing ................... II
Spareparts ............................. III
eventCON® ............................ IV
Colourwheel table .................. VI
Shutter Channel Table ........... VII
Dimmer Curves ..................... VII
USER MANUAL

Introduction Safety Instructions
1
Introduction
Thank you for your purchase and usage of the Ehrgeiz BabyBeam 4.
You have chosen a reliable product with outstanding features like the unique
eventCON® connector system or the Tilt Index. The device is easy to use and
is made of high quality components.
Every Ehrgeiz Product is checked before shipping to secure you are able to
receive a great product without compromise. This is not a toy. Our ambitious
aim is to get you a reliable working tool.
Safety Instructions
In General
In order to maintain the condition and to ensure a safe operation, it is
important for all users to follow the safety instructions and warning notes
written in this manual.
Do not operate the fixture with missing or damaged covers, shields or any
optical component.
Please consider that unauthorized modifications to the device are forbidden
due to safety reasons.
If the device is operated in any way that’s not described in this manual, the
product may suffer damage and the guarantee will become void.
Furthermore, misuse may lead to dangers like short-circuit, burns, electric
shock, burns due to ultraviolet radiation, lamp explosion, crash, etc.
IP67 protection rating
The fixture is protected against dust (first digit 6) and against Immersion, up
to 1m depth tested for 30 minutes (second digit 7).
Prevention from electrical shock
Make sure to ground (earth) the fixture electrically. (It’s essential to connect
the yellow/green conductor to earth)
Main Connection
Do not apply any AC mains power to the fixture at any other voltage than
that specified.
Never let the eventCON® cable come into contact with other cables. Treat the
eventCON® cable and all connections with the mains with particular caution.
Make sure the eventCON® cable is never crimped or damaged by sharp
edges.
Rigging
Check that all external covers and rigging hardware are securely fastened.
When choosing the installation-location, please make sure that the fixture is
not exposed to extreme heat. There should not be any cables lying around.
You endanger your own and the safety of others.

Introduction Safety Instructions
2
Make sure that the area below the installation place is cordoned off when
rigging, de-rigging or servicing the fixture.
If suspending from a rigging structure, fasten the fixture to a rigging clamp
with an M10 bolt screwed into the threaded hole in the center of the base of
the fixture. The bolt must be screwed at 20-25mm into the fixture. If the
fixture is suspended by any other method, an M10 bolt must be screwed into
this hole so that it is 20-25mm into the fixture.
Make sure all fixtures are operated and installed by qualified personnel with
the relevant national certifications.
Install as described in this manual a secondary attachment such as a safety
wire that is approved by an official body. The safety wire must comply with
EN 60598-2-17 Section 17.6.6 and be capable of bearing a static suspended
load ten times the weight of the fixture.
Positioning:
The fixture must be positioned at least 0.2m minimum distance to illuminate
objects.
Keep all inflammable materials at least 0.2m from this fixture.
Allow to place the fixture on an inflammable surface.
The maximum ambient temperature of 45°C may not be exceeded.
The exterior of this fixture can reach a very high temperature during
operation. Avoid contact by persons and materials.
Maintenance:
This fixture is for professional use only. It is not for household use.
Always unplug the mains for any maintenance.
Risk of eye injury:
Do not stare directly into the light when it is switch on. Do not look at LEDs
with magnifying glasses, telescopes, binoculars, or similar optical
instruments that may concentrate the light output.
Introduction Delivery Contents
3
Delivery Contents
You received your BabyBeam 4 with the following content
-BabyBeam 4 4x15W Osram LED Beamlight with 8° beam angle
-eventCON® Input cable Input cable with Neutrik XLR and Schuko merging to Eventcon
-Diffusor kit 18°/58° Filters
-Diffusor Screws Set of 4 Screws for Replacement
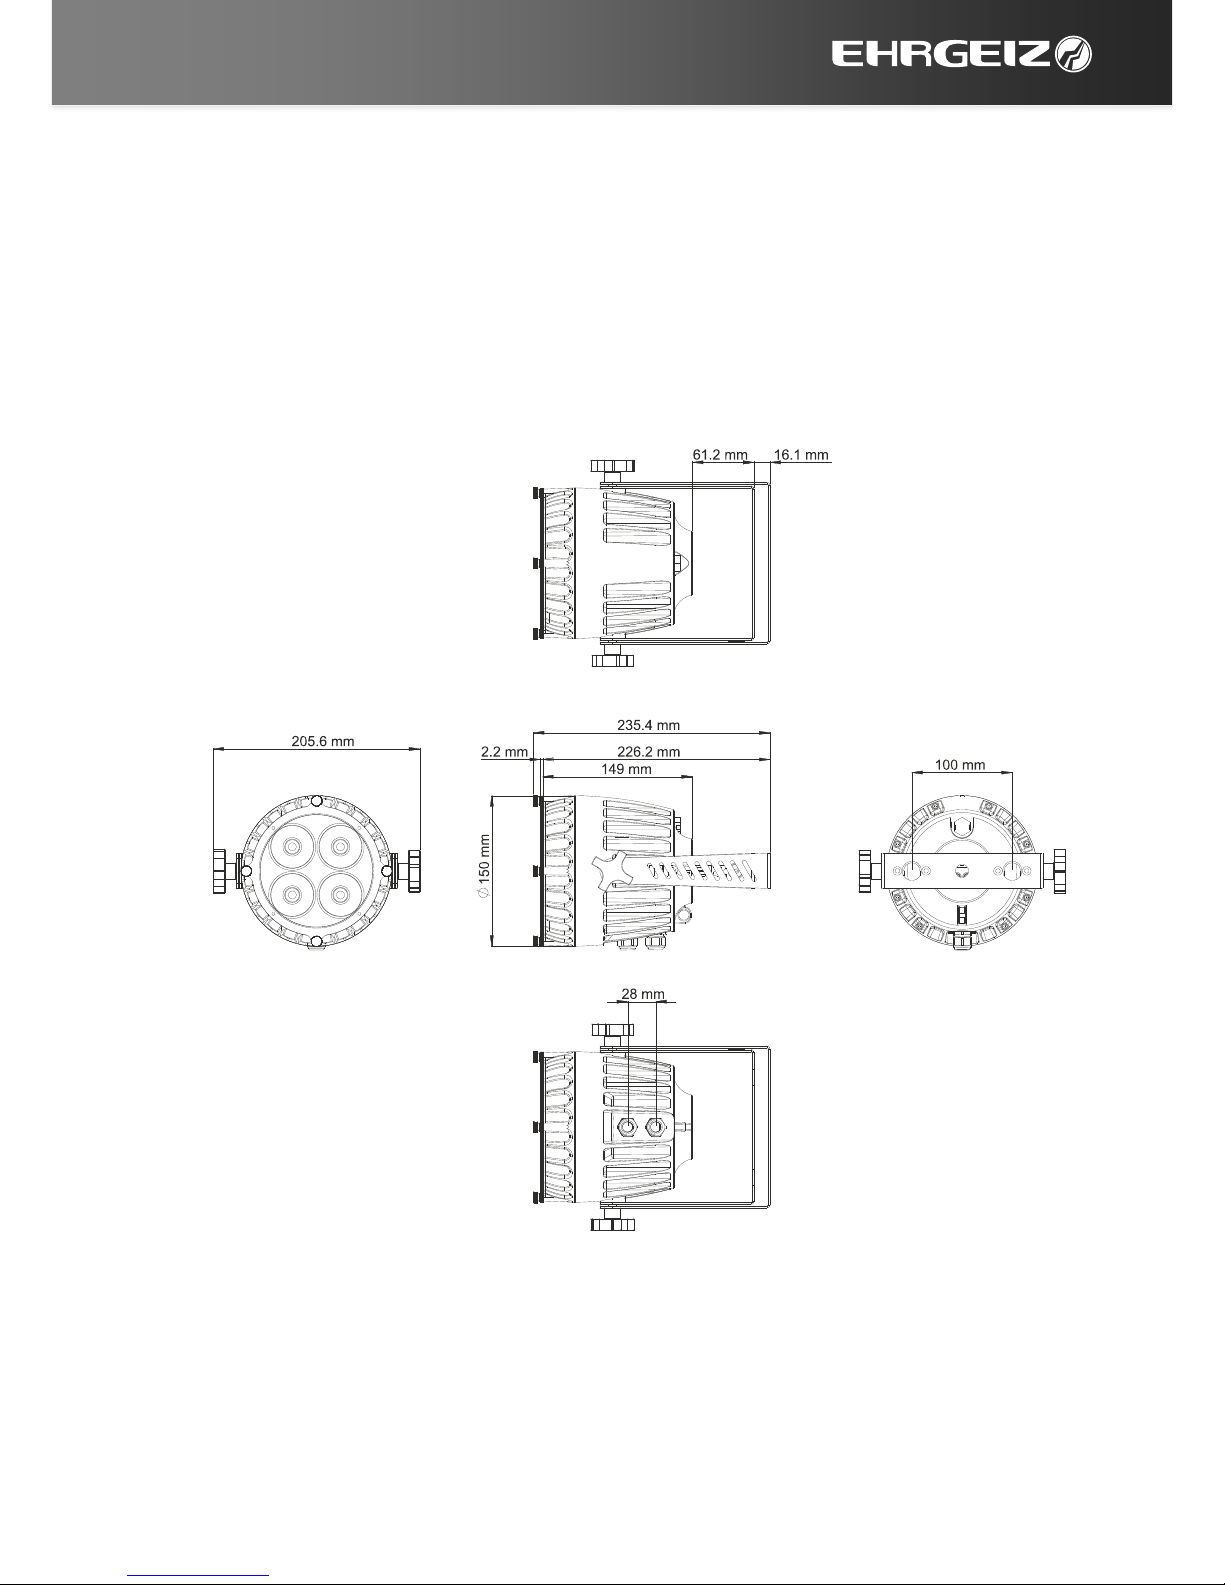
Fixture Dimensions
Dimensions in mm

Installations Installation on the floor
4
Installations
Your BabyBeam 4 can be installed in every kind of following positions. Please
see the explanations and rely to the Instructions for a safe operation and
secure handling.
Installation on the floor
You could place the BabyBeam 4 on the floor. Please
make sure the surface is plane and the reliability of
the floor is sufficient.
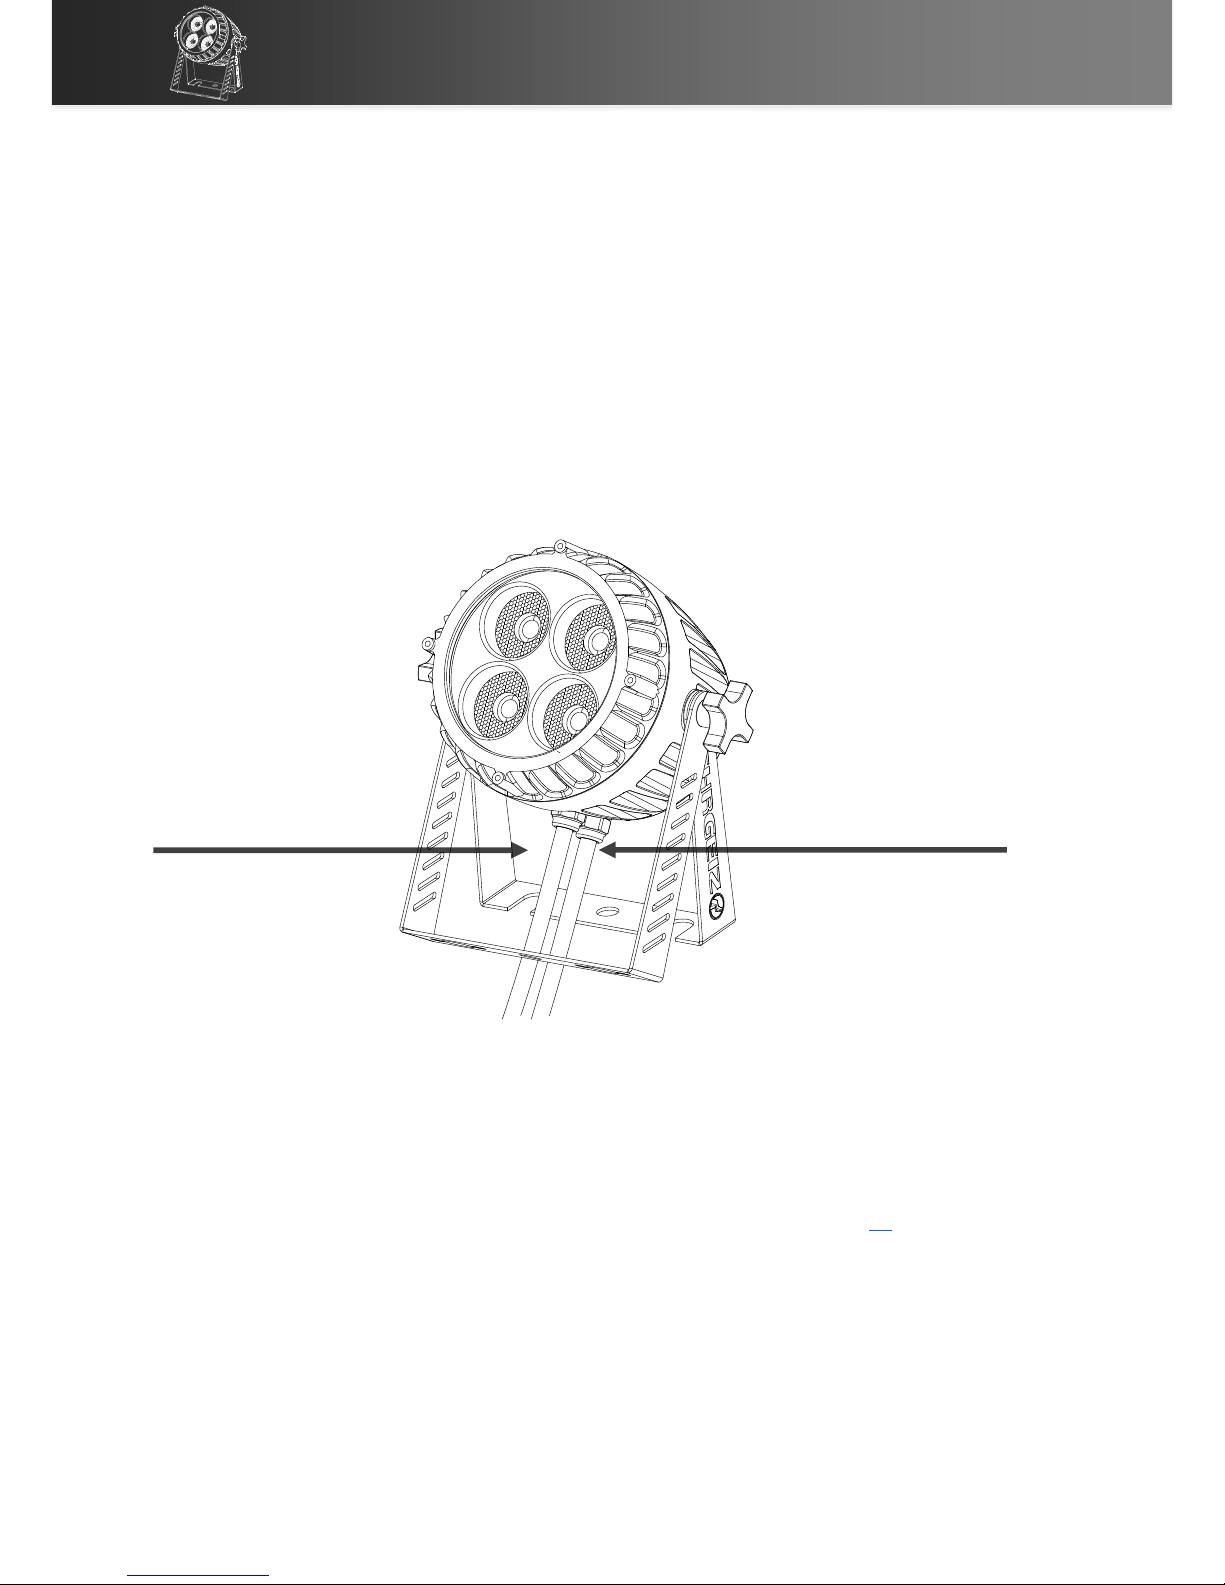
Installation hanging
You can attach the BabyBeam 4 to a Truss or Pipe
facing down or to the side.
Safety attachment
Please attach the Safety rope to the dedicated eyelet
integrated into the housing.
Safety

Installations Omega Bracket
5
Omega Bracket
There are optional Omega Bracket fittings available for your BabyBeam 4.
Attach them with the screws onto the suspension:
Connections Mains & DMX
6
Connections
Mains & DMX
The eventCON® system is an innovative VDE certified connection System for
professional use. It offers one connection for Power supply as well as the
DMX signal. You will only be in need for one cable. You are able to loop
through to the next device, while the BabyBeam 4 offers you an input and
output.
The connection of the Power supply has to be done by qualified personnel
only. Do not connect the BabyBeam 4 if you are not able to survey the
consequences.
Do not try to connect another Type of Plug than an original eventCON®. Do
not use any force to connect the eventCON® plug. You could use the outlet
for connecting additional devices. The internal Power wiring is done with a
cable cross section of 2.5mm².
The eventCON® System offers a big range of optional cables and mergers.
For further information see Chapter eventCON® on Appendix page IV
output
input

Connections DMX
7
DMX
We recommend the use of High quality XLR connectors like original NEUTRIK.
Please use real DMX cable with a surge impedance of 110 Ω.
Please notice that the USITT DMX Standard does allow the use a max of 32
DMX fixtures in one line. You should terminate the signal by a 120 Ωresistor.
In the Standard mode the BabyBeam 4 uses 8 DMX channels.
Connect the devices and increase the value of the DMX channel by 8 from
one device to another
Controller
DMX Address 1
DMX Address 9
DMX Address 17
Operations Menu control
8
Operations
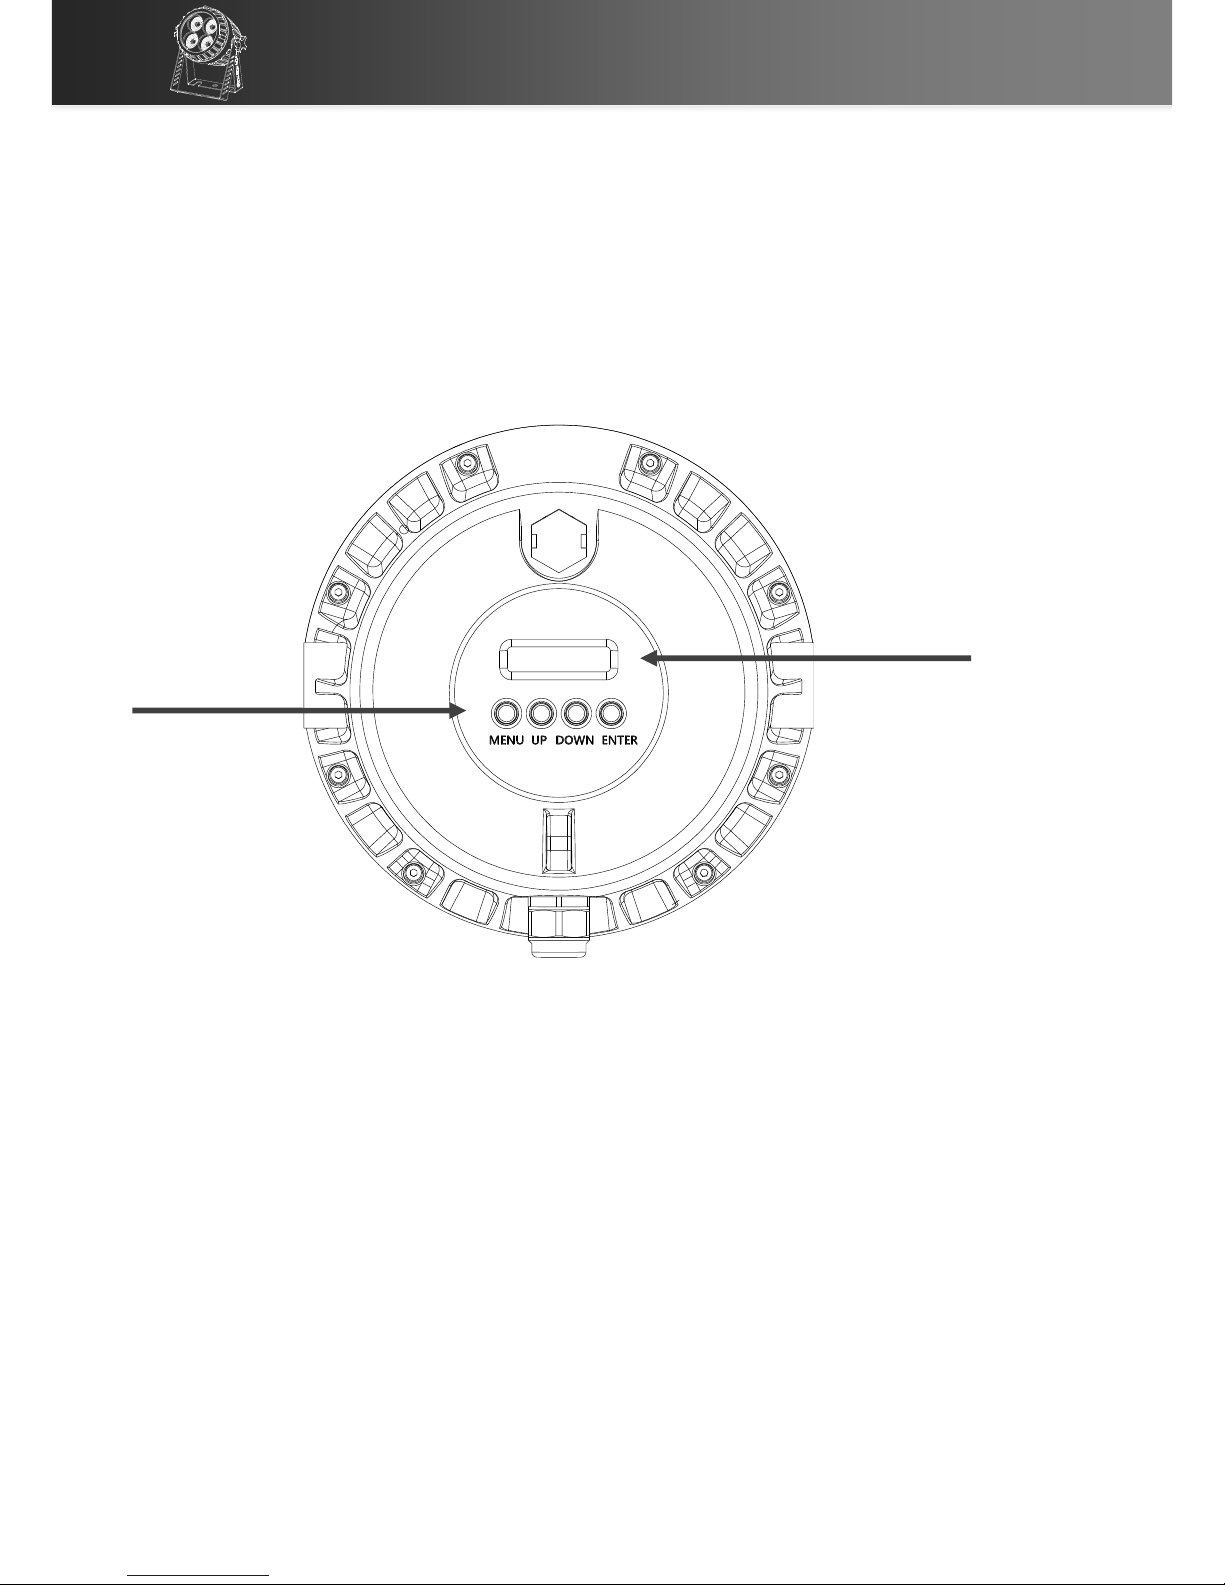
Menu control
Your BabyBeam 4 has an easy to read and setup display and Menu. It is
programmed with a lot of built in functions as well as DMX Modes for
different applications.
The Menu of the BabyBeam 4 is mainly intuitive. You will find a menu map on
the following pages. The four buttons are used to scroll the values, select a
setting or hop back in the menu structure:
Menu Go back in the menu structure or leave a value as it is
Enter Go forward in the menu structure or confirm the selected value
UP/DOWN Scroll up / down in the menu structure or scroll the selected
value
display
Input buttons

Operations Menu map
9
Menu map
Addr
1 - 512
►Choose your DMX address
Pers
Mode
Std-8
►8 Channels with all features
Easy-2
►2 channels with colourwheel & dimmer
rgb-3
►3 Channels with RGB
rgbw-4
►4 Channels with RGBW
tl1-5
►5 Channels with RGBW & dimmer
tl2-6
►6 Channels with RGBW, dimmer, strobe
dimmer_speed
smooth
►Dimmerspeed smooth
Fast
►Dimmerspeed Fast
triger
no
►enable sound triggering of internal program
yes
Mic level
Std
►choose the sensitivity of the mic
low
Hi
temp unit
Cel
►display the temperature in °Celsius
FHt
►display the temperature in °Fahrenheit
no dmx
Hold
►hold last output in case of signal loss
close
►shut down output in case of signal loss
static
►play static mode in case of signal loss
prog1
►play prog 1 in case of signal loss
sound1
►play prog 1 sound triggered in case of signal loss
prog2
►play prog 2 in case of signal loss
sound2
►play prog 2 sound triggered in case of signal loss
prog3
►play prog 3 in case of signal loss
sound3
►play prog 3 sound triggered in case of signal loss
lock
off
►disable lock
on
►enable device lock
set
000
►set a password
disp_time
on
►display is always on
1 min
►display is shut down after 1 minute
5 min
►display is shut down after 5 minutes
60 min
►display is shut down after 60 minutes
boot_mode
auto
►auto
dmx
►react to dmx after boot
static
►play static after boot
prog1
►play prog 1 after boot
sound1
►play prog 1 with sound
prog2
►play prog 2 after boot
sound2
►play prog 2 with sound
prog3
►play prog 3 after boot
sound3
►play prog 3 with sound
dmx hp
on
►if enabled, dmx is always takes highest priority
off
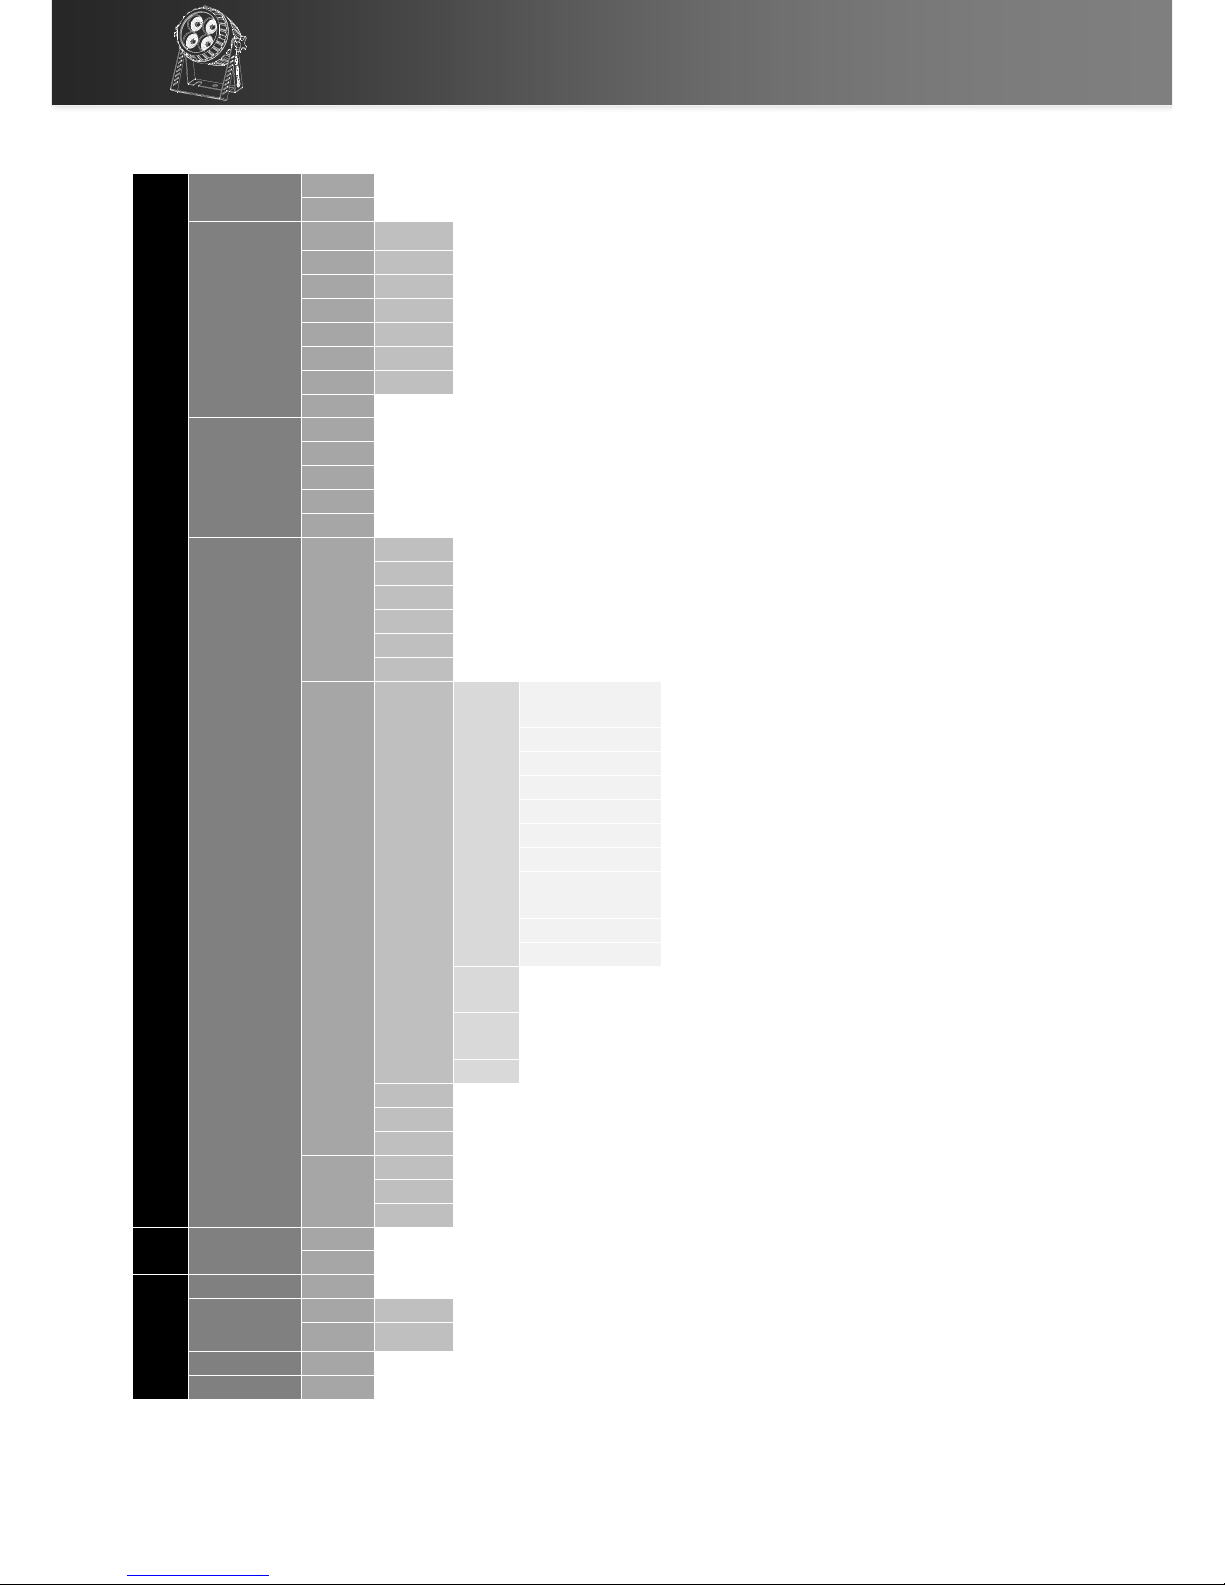
Operations Menu map
10
alone
test
on
►play a test sequence
off
►stop the test sequence
static
red
0-255
►Set a colour, shutter & dimmer for the static stand alone
green
0-255
blue
0-255
white
0-255
dimmer
0-255
macro
0-255
shuter
0-255
reset
►reset the values for the static stand alone
salone
alone
►device runs stand alone program
master
►device runs the stand alone and sends slave sig
slave 1
►device runs slave signal 1
slave 2
►device runs slave signal 2
slave 3
►device runs slave signal 3
prog
play
prog 1
►Play Prog 1 (while played, speed is displayed and can be edited)
sound1
►Play Prog 1 sound triggered
prog 2
►Play Prog 2 (while played, speed is displayed and can be edited)
sound 2
►Play Prog 2 sound triggered
prog 3
►Play Prog 3 (while played, speed is displayed and can be edited)
sound3
►Play Prog 3 sound triggered
edit
prog01
step01
Capt
►capture and save the actual DMX
input
Skip
►abort editing of this step
red (0-255)
►change the value for red
green (0-255)
►change the value for green
blue (0-255)
►change the value for blue
white (0-255)
►change the value for white
dimmer (0-255)
►change the value for dimmer
macro (0-255)
►change the value for color Wheel
macro
shuter (0-255)
►change the value for shutter
save
►save the manually inserted values
hold00
►Select hold time in seconds
(0 - 999)
fade00
►Select fade time in seconds
(0 - 999)
step02
►see above
speed1
►Set default Speed for Prog 1
prog 2
►see above
prog 3
►see above
reset
prog 1
►set the program 1 back to default
prog 2
►set the program 2 back to default
prog 3
►set the program 3 back to default
serv
default
no
►does nothing :)
yes
►set device back to factory default settings
info
hour
XXX
►see total working time of the device
temp
actual
XXC
►see the actual temperature
max
XXC
►see the max temperature the device had
firmware
_1121_
►see the firmware actually installed
Serial
A0508
►see the serialnumber of the device

Operations Software updates
11
Software updates
Your BabyBeam 4 can be updated via the DMX connection, so no need to
open it.
If you experience an issue which could probably be solved by a Firmware
Update, please contact your Ehrgeiz Dealer for further instructions.
DMX Modes
You can set up your BabyBeam 4 in 6 different DMX Modes:
std-8 Standard Mode
Page11; Uses 8 DMX channels
tl1-5 Mode
Page 12; Uses 5 DMX channels
tl2-6 Mode
Page 12; Uses 6 DMX channels
RGBW-4 Mode
Page 12; Uses 4 DMX channels
RGB-3 Mode
Page 12; Uses 3 DMX channels
Easy-2 Mode
Page 12; Uses 2 DMX channels
std-8 Standard Mode
CH
Function
1
Colour Wheel (see Colour Wheel chart / Appendix Page VI)
2
Red
3
Green
4
Blue
5
White
6
Shutter (see Shutter effects chart / Appendix Page VII)
7
Dimmer
8
CTO

Operations DMX Modes
12
tl1-5 Mode
CH
Function
1
Dimmer
2
Red
3
Green
4
Blue
5
White
tl2-6 Mode
CH
Function
1
Dimmer
2
Red
3
Green
4
Blue
5
White
6
Shutter (see Shutter effects chart / Appendix Page VII)
RGBW-4 Mode
CH
Function
1
Red
2
Green
3
Blue
4
White
RGB-3 Mode
CH
Function
1
Red
2
Green
3
Blue
4
White
Easy-2 Mode
CH
Function
1
Colour Wheel (see Colour Wheel chart / Appendix Page VI)
2
Dimmer

Services Trouble Shooting
13
Services
Trouble Shooting
Problem
Causes
Solutions
No Display / Not
switched on
No power to fixture
Check AC mains power and connections
Inspect connections and cables. Correct poor
connections. Repair or replace damaged cables
Check the power supply voltage.
Fixture does not
respond to DMX
correctly.
Incorrect fixture DMX addressing
Check the fixture is assign to correct DMX address
(See Page 9)
Incorrect DMX mode
Check fixture is set to correct DMX mode (See Page
11)
Fault on data link
check for the data link is correctly linked from the
DMX source if all cables are in good condition
Other device on DMX link
defective.
Unplug eventCON® IN and OUT connectors and
connect them directly together to bypass one
fixture at a time until normal operation is regained
Data transmission lines should
be terminated.
Insert termination plug in OUTPUT of the last fixture
on the link.
LC-Display works
but no light outputs
can be generated.
Faulty DMX link
Run built-in test mode or static control mode to
verify if LEDs are illuminated
Broken parts / wires / LEDs
Have fixtures serviced by an Ehrgeiz service
technician
Maintenance
There are no serviceable Part inside your BabyBeam 4. If problems occur,
contact your Ehrgeiz dealer or a qualified Ehrgeiz Service technician.
Use a slightly moist and smooth cloth to clean the device. Do not use any
aggressive detergents.
We are sure you will have a sophisticated experience with your BabyBeam 4.

Services Maintenance
14

Appendix Specifications
I
Appendix
Specifications
Light source
4 x 15W Class RGBW LED
Rated lumen output: 1.100 lm
LED Life Expectancy: approx. 50.000 hours
Optical system
ConsistentColor™ Optics
Beam angle 8°
Functions
RGBW, 8 bit color mixing (16 bit with software
update)
SteadyColor™ Dimming
Seamless CTO
Virtual color wheel with 39 colours including
whites (2.700 K, 3.200 K, 4.200 K, 5.600 K,
7.200 K and 8.000 K)
High resolution dimmer 0–100%
Strobe with variable speed (max. 20Hz )
Pre-programmed random strobe & pulse effects
Thermal
Maximum ambient temperature: 45 ° C (113 ° F)
Internal noiseless fan
Control and programming
Setting & Addressing: 1x6 characters LED display
& 4 buttons
Protocol: USITT DMX-512
Control channels: 2,3,4,5,6,8
6 DMX protocol modes
3-editable programs, each up to 25 steps
Stand-alone mode
Firmware update via DMX-line
DMX In/Out: eventCON®
Power In/Out: eventCON®
Electrical Specifications
Electronic switching power supply with auto-
sensing
Input voltage: 100–240V AC, 50/60 Hz
Max. power consumption: 45 W
Mecanical Specification
IP67 rating
Height including bracket: 231.8 mm (9.12")
Height without bracket: 153.8 mm (6.05")
Width: 205.6 mm (8.09")
Depth: 158 mm (6.22")
Weight: 2.7 kg (5.95 lbs)
Included accessories
Cable Merger eventCON® / Schuko + XLR-3
Diffusion filter 18° & 58°
Available Accessoires
Omega bracket Kit
1 x Diagonal Omega bracket
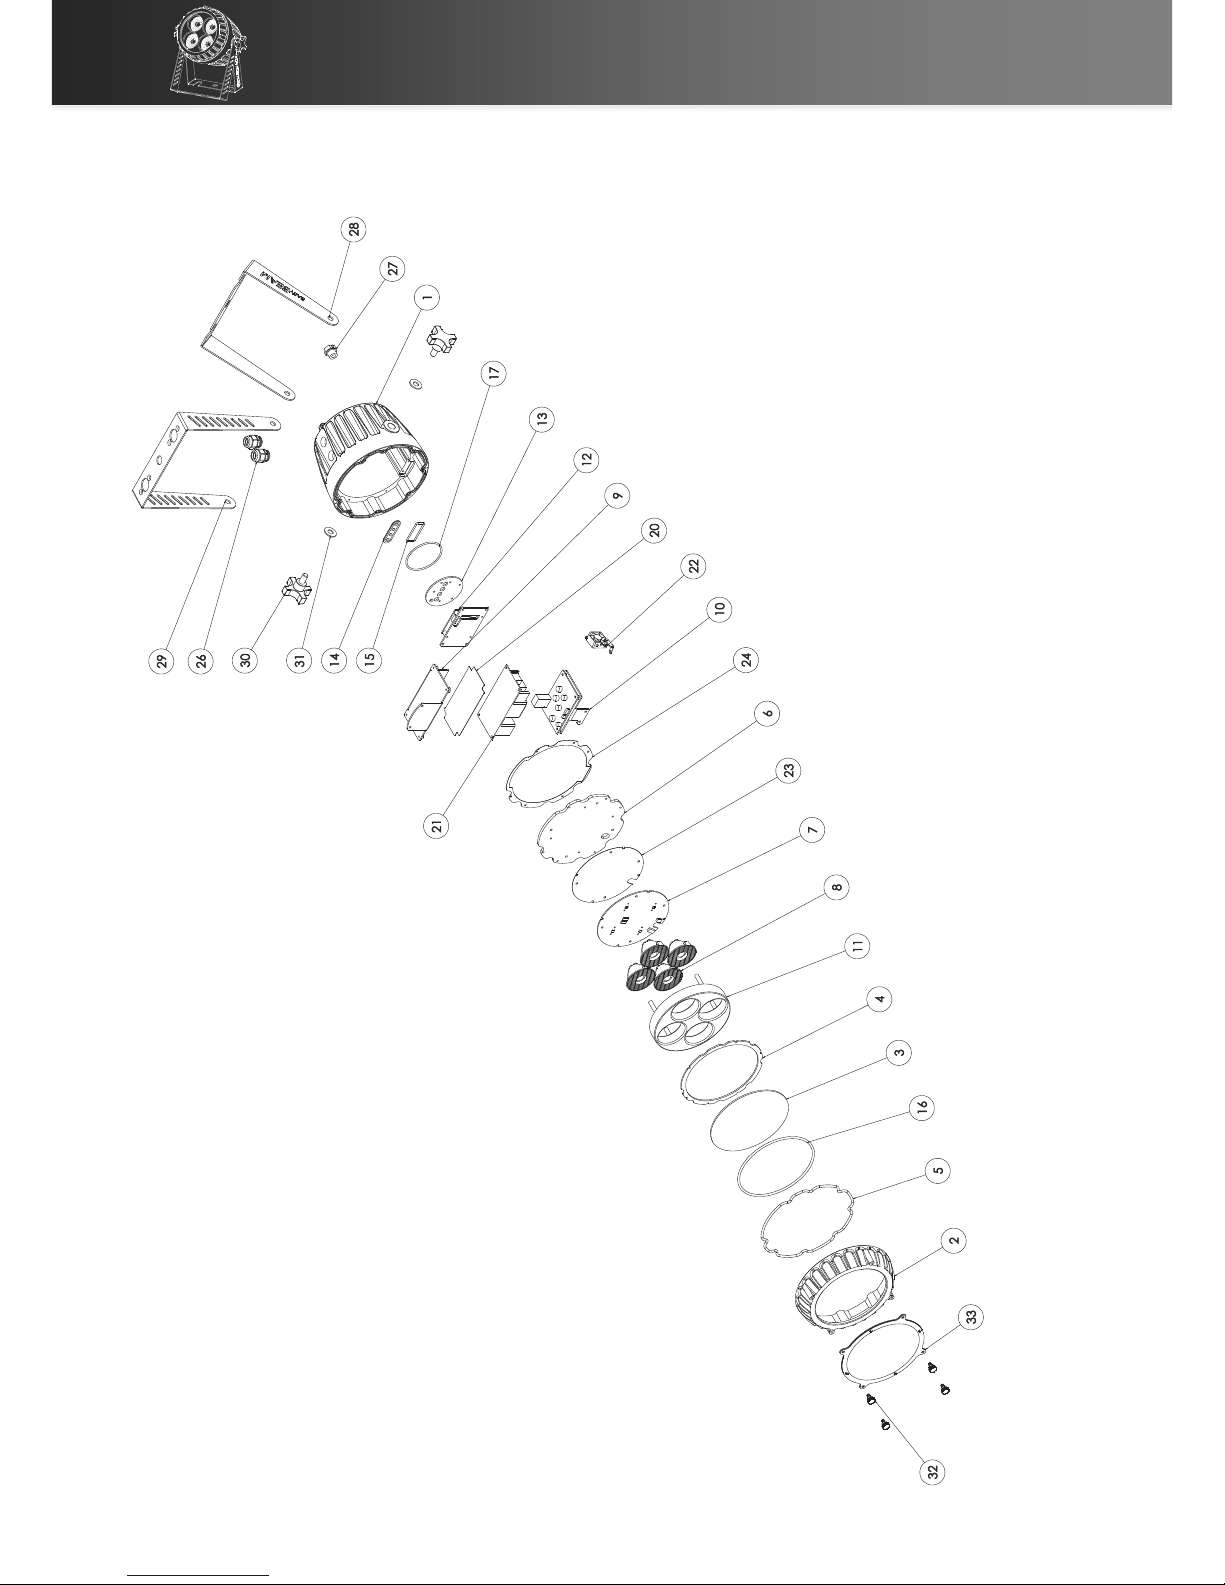
Appendix Exploded drawing
II
Exploded drawing

Appendix Spareparts
III
Spareparts
#
Description (EN)
Q'TY
Item
No.
1
Fixture Housing Base
1
106270
2
Fixture Housing Top
1
106253
3
Front Lens
1
106255
4
Clamp
1
106256
5
Sealing Ring Fixture Housing
1
106260
6
LED Board Heat-Sink
1
106259
7
Babybeam4 LED Board
1
105711
8
8 Deg. LED Lens
4
106258
9
PSU Bracket
1
106263
10
Driver Board Bracket Sub Assy A
1
105712
11
Lens Holder
1
106257
12
Control Board
1
105713
13
Rear Water-sealing Plate
1
106264
14
Water-sealing Rubber for Input Button
1
106267
15
Water-sealing O-ring
1
106266
16
Top Water-sealing O-Ring-1
1
106254
17
Bottom Water-sealing O-Ring
1
106265
20
Power Isolation Mylar
1
114440
21
Power Supply Unit (PSU)
1
106261
23
Heat Transfer Pad LED Board
1
24
Isolation Pad LED Board
1
106260
26
Waterproof PG Glands
2
106273
27
Waterproof Air Ventilation Valve
1
106271
28
Fixture Bracket A ( LOGO)
1
106272
29
Fixture Bracket B
1
106274
30
Bracket Securing Screw Knob
2
106269
31
Standing Bracket Rubber Stop
2
106268
32
Diffusor Holder Screw x4
1
106252
22.1
Bracket for Fan
1
113615
22.2
Fan 25x25x10
1
113616
33.1
Diffusor 18 deg.
1
106294
33.2
Diffusor 58 deg.
1
106295

Appendix eventCON®
IV
eventCON®
The eventCON is a new, innovative cable connector system, which combines
power and DMX signal in one cable and one plug. This is the revolution of
connection in lighting. The plug is IP67 certified and can be assembled in the
customers need without losing the IP certification. The VDE certification
attests the eventCON system a power current up to 16A.
Thanks to the future-oriented mechanism the plug just needs to be inserted
into the connector and locks automatically. By turning the sleeve the
connection is unlocked.
Innovative cablin solutions simplify the work in the event industry. In order
that the eventCON system works with your classic fixtures we have developed
adapter sets which connect classic XLR/Schuko/PowerCON with the
eventCON system.
Technial Data:
Contact durability
1000
Upper limiting temperature / °C
105
Rated voltage (Power) / V
250
Lower limiting temperature /°C
-40
Rated voltage (Signal) / V
30
Pollution degree
3
Rated impulse voltage / V
2500
Insulating medium group
II
Rated current (Power) / A
16
Protection class
IP67
Rated current (Signal) / A
2
Support structure material
PA66
Cable cross-section (Power) / mm²
1,5
Contact material
Copper base, gilded
Cable cross-section (Signal) / mm²
0,5
Connection method
Solder connection
Number of poles (Power)
3
Connection type
Fee plug connector
Number of poles (Signal)
3
Pull relief / mm
7,5 –9,5
Environmental temperature / °C
40
Table of contents
Other Ehrgeiz Lighting Equipment manuals


