Eikon SBi-POD User manual

SBi-POD / SBi-PRO
USB Audio Interfaces
USER’S MANUAL
MANUALE D’USO
ENGLISH
ITALIANO
96MAN00169-REV.36/22

IMPORTANT SAFETY INSTRUCTIONS
Watch for these symbols:
xThe lightning flash with arrowhead symbol within an equilateral triangle is intended to alert the user to the
presence of uninsulated “dangerous voltage” within the product’s enclosure, that may be of sufficient
magnitude to constitute a risk of electric shock to persons.
xThe exclamation point within an equilateral triangle is intended to alert the user to the presence of
important operating and maintenance (servicing) instructions in the literature accompanying the
appliance.
1. Read these instructions.
2. Keep these instructions.
3. Heed all warnings.
4. Follow all instructions.
5. Do not use this apparatus near water.
6. Clean only with dry cloth.
7. Do not block any ventilation openings. Install in accordance with the manufacturer’s instructions.
8. Do not install near any heat sources such as radiators, heat registers, stoves, or other apparatus (including
amplifiers) that produce heat.
9. Do not defeat the safety purpose of the polarized or grounding-type plug. A polarized plug has two blades
with one wider than the other. A grounding-type plug has two blades and a third grounding prong. The
wide blade or the third prong are provided for your safety. If the provided plug does not fit into your outlet,
consult an electrician for replacement of the obsolete outlet.
10. Protect the power cord from being walked on or pinched, particularly at plugs, convenience receptacles,
and the point where they exit from the apparatus.
11. Only use attachments/accessories specified by the manufacturer.
12. Use only with the cart, stand, tripod, bracket, or table specified by the manufacturer, or sold with the
apparatus. When a cart is used, use caution when moving the cart/apparatus combination to avoid injury
from tip-over.
13. Unplug this apparatus during lightning storms or when unused for long periods of time.
14. Refer all servicing to qualified service personnel. Servicing is required when the apparatus has been
damaged in any way, such as power supply cord or plug is damaged, liquid has been spilled or objects have
fallen into the apparatus, the apparatus has been exposed to rain or moisture, does not operate normally,
or has been dropped.
15. Warning: to reduce the risk of fire or electric shock, do not expose this apparatus to rain or moisture.
16. Do not expose this equipment to dripping or splashing and ensure that no objects filled with liquids, such
as vases, are placed on the equipment.
17. To completely disconnect this apparatus from the ac mains, disconnect the power supply cord plug from
the ac receptacle.
18. The mains plug of the power supply cord shall remain readily operable.
19. This apparatus contains potentially lethal voltages. To prevent electric shock or hazard, do not remove the
chassis, input module or ac input covers. No user serviceable parts inside. Refer servicing to qualified
service personnel.
20. This owner’s manual should be considered as a part of the product, it must accompany it at all times, and it
needs to be delivered to the new user when this product is sold. In this way the new owner will be aware of
all the installation, operating and safety instructions.
21. This apparatus should only be connected to a power source of type specified in this owner’s manual or on
the unit.
22. You can clean the exterior of the unit with compressed air or with a dry cloth.
23. Don’t clean the unit using solvents like trichloroethylene, thinners, alcohol, or other volatile or flammable
fluids.
24. To reduce the risk, close supervision is necessary when the product is used near children.
25. The product and its software, when used in combination with an amplifier, headphones or speakers, may
be able to produce sound levels that could cause permanent hearing loss. DO NOT operate for long periods
of time at a high level or at a level that is uncomfortable. If you encounter any hearing loss or ringing in the
ears, you should consult an audiologist.
2

DISPOSAL OF OLD ELECTRICAL & ELECTRONIC EQUIPMENT
This marking shown on the product or its literature, indicates that it should not be disposed with other household
wastes at the end of its working life. To prevent possible harm to the environment or human health from
uncontrolled waste disposal, please separate this from other types of wastes and recycle it responsibly to
promote the sustainable reuse of material resources. Household users should contact either the retailer where
they purchased this product, or their local government office, for details of where and how they can take this item for
environmentally safe recycling. Business users should contact their supplier and check the terms and conditions of the
purchase contract. This product should not be mixed with other commercial wastes for disposal.
DECLARATION OF CONFORMITY
USA
Important notice: DO NOT MODIFY THE UNIT!
This product, when installed as indicated in the instructions contained in this manual, meets FCC requirement.
Modifications not expressly approved by PROEL may avoid your authority, granted by the FCC, to use the product.
IMPORTANT: When connecting this product to accessories and/or another product, use only high quality shielded cables.
Cable (s) supplied with this product MUST be used. Follow all installation instructions. Failure to follow instructions could
void your FFC authorization to use this product in the USA.
NOTE: This product has been tested and found to comply with the limits for a Class B Digital device, pursuant to Part 15 of
the FCC rules. These limits are designed to provide a reasonable protection against harmful interference in a residential
environment. This equipment generates, uses and radiates radio frequency energy and, if not installed and used according
to the instructions found in the user’s manual, may cause interferences harmful to the operation to other electronic
devices. Compliance with FCC regulations does not guarantee that interferences will not occur in all the installations. If this
product is found to be the source of interferences, which can be determined by turning the unit “OFF” and “ON”, please try
to eliminate the problem by using one of the following measures:
ͻZĞůŽĐĂƚĞĞŝƚher this product or the device that is affected by the interference.
ͻhƐĞƉŽǁĞƌŽƵƚůĞƚƐƚŚĂƚĂƌĞŽŶĚŝĨĨĞƌĞŶƚďƌĂŶĐŚ;ĐŝƌĐƵŝƚďƌĞĂŬĞƌŽƌĨƵƐĞͿĐŝƌĐƵŝƚƐŽƌŝŶƐƚĂůůůŝŶĞĨŝůƚĞƌ;ƐͿ
ͻ/ŶƚŚĞĐĂƐĞŽĨƌĂĚŝŽŽƌdsŝŶƚĞƌĨĞƌĞŶĐĞƐƌĞůŽĐĂƚĞƌĞŽƌŝĞŶƚƚŚĞĂŶƚĞŶŶa. If the antenna lead-in is 300 ohm ribbon lead,
change the lead-in to coaxial cable.
CANADA
NOTICE: This class B digital apparatus meets all the requirements of the Canadian Interference-Causing Equipment
Regulation.
AVIS: Cet appareil numérique de la classe B respecte toutes les exigences du Règlement sur le matériel brouilleur du
Canada.
EUROPE
The product is in compliance with the following European Directives:
EMC 2014/30/EU, LVD 2014/35/EU, RoHS 2011/65/EU and WEEE 2012/19/EU.
LIMITED WARRANTY
Proel warrants all materials, workmanship and proper operation of this product for a period of two years from the original
date of purchase. If any defects are found in the materials or workmanship or if the product fails to function properly
during the applicable warranty period, the owner should inform about these defects the dealer or the distributor, providing
receipt or invoice of date of purchase and defect detailed description. This warranty does not extend to damage resulting
from improper installation, misuse, neglect or abuse. Proel S.p.A. will verify damage on returned units, and when the unit
has been properly used and warranty is still valid, then the unit will be replaced or repaired. Proel S.p.A. is not responsible
for any “direct damage” or “indirect damage” caused by product defectiveness.
xThis unit package has been submitted to ISTA 1A integrity tests. We suggest you control the unit conditions
immediately after unpacking it.
xIf any damage is found, immediately advise the dealer. Keep all unit packaging parts to allow inspection.
xProel is not responsible for any damage that occurs during shipment.
xProducts are sold “delivered ex warehouse” and shipment is at charge and risk of the buyer.
xPossible damages to unit should be immediately notified to forwarder. Each complaint for package tampered with
should be done within eight days from product receipt.
3

CONDITIONS OF USE
Proel do not accept any liability for damage caused to third parties due to improper installation, use of non-original spare
parts, lack of maintenance, tampering or improper use of this product, including disregard of acceptable and applicable
safety standards. Proel strongly recommends that this loudspeaker cabinet be suspended taking into consideration all
current National, Federal, State and Local regulations. The product must be installed be qualified personal. Please contact
the manufacturer for further information.
4

INTRODUCTION
Thank you for choosing this EIKON product and for your trust in our brand, synonymous
of professionalism, accuracy, high quality and reliability. All our products comply with
national and international regulations and are designed for continuous use in professional
applications.
DESCRIPTION
SBi-POD and SBi-PRO are USB audio interfaces designed to offer studio quality for home
or mobile recording, live stream or podcasting. Utilizing high-grade components,
premium circuitry and a compact and rugged design, they provide a full set of features
and top performances for musicians, songwriters content creators and podcasters.
ͻHigh-definition MIC preamps with extended dynamic range and 48V phantom
power
ͻHigh-resolution 24-bit/192KHz USB2.0 interface for a flawless audio quality
ͻZero-latency DIRECT MONITORING with STEREO/MONO selection
ͻAnalog outputs with separate level control for connecting studio monitors and
headphones
ͻMinijack AUX input/output for recording or podcasting applications directly on
tablet or smartphone
ͻUSB bus powered for easy mobile recording
ͻRugged, road-proof aluminum chassis for maximum protection
Visit https://www.eikon-audio.com/ to download the latest USB ASIO
driver for your SBi interface.
5

FRONT PANEL FEATURES
1 XLR connector
This is a female XLR connector that accepts balanced or unbalanced signals from
microphones.
2JACKconnector
This is a female JACK connector that accepts balanced or unbalanced signals from
instruments or line level sources.
3GAIN
This knob controls the gain of the input preamp. Use it to adjust the level of the input
to ensure that you are capturing a good signal without overloading. The knob also
features a LED indicator to help with setting input gain.
6

4CLIP
If the input signal overloads, the LED will illuminate red. If this happens, turn down
the Gain knob.
5 +48V
48V switch turns on phantom power for the input. Only certain types of microphones,
like condenser microphones, require phantom power to function properly. Please
check your microphone’s user manual to determine which type it is. Phantom power
may damage some equipment, like certain ribbon microphones. Ensure that you are
only using phantom power with microphones that require it. Do not connect or
disconnect microphones while phantom power is turned on. Turn off phantom power
first, then connect or disconnect the microphone.
6 LINE / INST
The INST switch toggles the high-impedance circuit of the input. When recording
instruments with pickups, like guitar and bass, using the high-impedance setting
adjusts the internal circuit so that you can plug the instrument directly into the input
without having to first plug it into an amplifier or a direct box. When using other types
of inputs, like synthesizers or line level equipment, leave this switch in the LINE
position.
NOTE: in the SBi-PRO the LINE/INST switch only affects the impedance of the ¼” JACK
input.
7 MONITOR
The MONITOR knob controls the volume of the signal sent to the speakers (outputs L
& R on the rear panel).
8HEADPHONESKNOB
The HEADPHONES knob adjusts the volume of the headphones output.
9HEADPHONESJACK
The ¼” stereo jack headphone output can be used for connecting headphones. The
headphones output mirrors the Monitor output with a proper volume control.
10 USB LED
This LED is illuminated when the SBi interface is powered thru the USB connectors on
the rear panel.
11 MONITORING KNOB
This knob allows to balance the signal sent to MONITOR and HEADPHONES outputs
between direct input signal and the DAW signal.
ͻFULL LEFT (DIRECT): MAX signal from IN 1&2, NO signal from DAW
7

ͻCENTER: same signal from IN 1&2 and DAW
ͻFULL RIGHT (DAW): MAX signal from DAW, NO signal from IN 1&2
12 MONO / STEREO
This switch sets if the DIRECT INPUT signals are sent to MONITOR and HEADPHONES
outputs as MONO (INPUTS 1 & 2 added together and sent both to L & R OUTPUTS) or
STEREO (INPUT 1 sent to L OUTPUT, INPUT 2 sent to R OUTPUT).
REAR PANEL FEATURES
8

13 USB port
Use it to connect the interface to an USB port on your computer with the included
USB cable. SBi-POD and SBi-PRO are bus-powered thru this connector, so they don’t
require an external power supply.
This port can also provide power to the interface when used on-the-go with a
smartphone or a tablet connected to the AUX INPUT: just connect here a 5V power
bank (or a phone charger, if a power outlet is available) to power it (see further in the
manual).
14 DC IN
SBi-POD is provided with an additional USB-C port for powering it on-the-go using a
5V power bank or a phone charger (see previous point and further in the manual).
15 REC SOURCE
This switch allows to select the recording source sent to the computer via USB port:
xMIX: sends to recording a combination of INPUT1/INPUT2 mixed with the
computer playback
xCH1-2: sends to recording INPUT1 and INPUT2
xLOOPBACK: allows you to record just the playback from the computer without
INPUT1 and INPUT2
CH1-2 is the typical use with a DAW software, while MIX and LOOPBACK
can be used in particular applications. Pay attention to avoid loops that
can cause high noises and damage the speakers.
16 DIRECT MONITOR
This switch allows to select the direct monitoring sent to MONITOR and HEADPHONES
outputs:
xOFF: no direct monitoring from INPUT 1 & INPUT 2
xMONO: INPUTS 1 & 2 are added together and sent both to LEFT & RIGHT OUTPUTS
xON: INPUT 1 is sent to LEFT OUTPUT, INPUT 2 is sent to RIGHT OUTPUT
17 AUX INPUT
This 4-pin mini-jack allows to connect a smartphone or a tablet to the interface using
the provided 4-pin cable: in this way you can record audio from the interface to the
smartphone/tablet or play audio from the smartphone/tablet to the interface (see
further in the manual).
18 LINE OUTPUTS
These 1/4” balanced stereo outputs can be connected to active studio monitors or
other devices such as amplifiers and mixers.
9
USING SBi-POD AND SBi-PRO WITH YOUR DAW
Most audio applications have their own audio settings, where you can select the active
audio device. Here we will show you how to configure the SBi-POD and SBi-PRO with
some audio applications. The process will be similar in all other audio applications.
9Core Audio is a native Mac audio protocol. All audio devices are built on top of this
framework.
9Windows contains several available audio protocols. ASIO is optimized for low-
latency and high-fidelity. We recommend using the ASIO driver provided by EIKON
for best results.
9Choosing a buffer size is dependent on many factors. The CPU, RAM, connection
type, interface in use, and simultaneous channels can all affect what buffer size is
needed. Increasing the buffer size can help with audio dropouts, crackling, and
other performance issues. However, increasing the buffer size will increase the
latency between the input and output data.
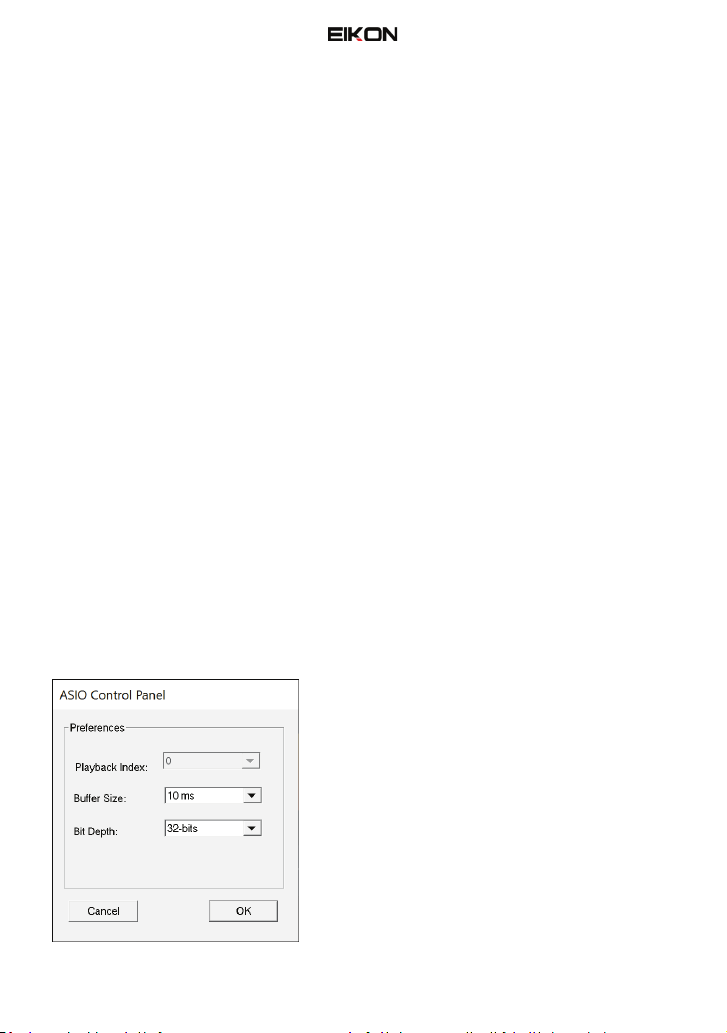
Regardless of which application you use, there will be several additional controls in the
audio preferences, some in the ASIO control panel, some in the software setting:
xBuffer Size: determines how quickly the computer will process audio data – the
smaller the buffer size the faster it will process audio, resulting in less latency at the
expense of higher CPU usage.
xBit Depth: determines the resolution of each sample, 16bit is the CD quality, 24bit
is the typical dynamic in audio PRO, 32bit is the Audiophile resolution that exceed
the S/N performances. For best performance set it at 24bits.
xSample Rate specifies the sampling rate at which the SBi interface converts audio.
The higher is the sample rate, the more accurate is the signal acquisition, but each
time you double the sample rate you double also the acquisition data. 44.1KHz (CD
quality) and 48KHz (PCM quality) are the typical sample rates used in most
application for less latency and memory usage.
Note: if audio dropouts, crackling, or other
performance issues is noted during the recording,
you can try to eliminate them recalling from the
software in use the ASIO Control Panel pop up
(note that sometimes the setting windows of the
software in use has these parameters already in
its proper window), then try to increase the buffer
size or decrease the bit depth or both.
10

MacOS COMPUTER SETUP
If you want to use the SBi interface as your computer's default audio playback and
recording device, please follow the instructions below.
Note: most pro audio applications have their own audio preferences where you can select
the SBi as the active audio device. If you intend to only use the SBi for playback and
recording with these applications, it is not necessary to change the default system audio
input and output.
1. No specific driver is required, simply connect the SBi interface to the MacOS
computer.
2. Navigate to your Applications folder.
3. Double-click System Preferences.
4. Click the Sound icon.
5. If you want all computer audio - such as audio from browsers and movie players -
to be played back through the SBi interface, click the Output tab and select the
EIKON USB ASIO as the default output device.
11
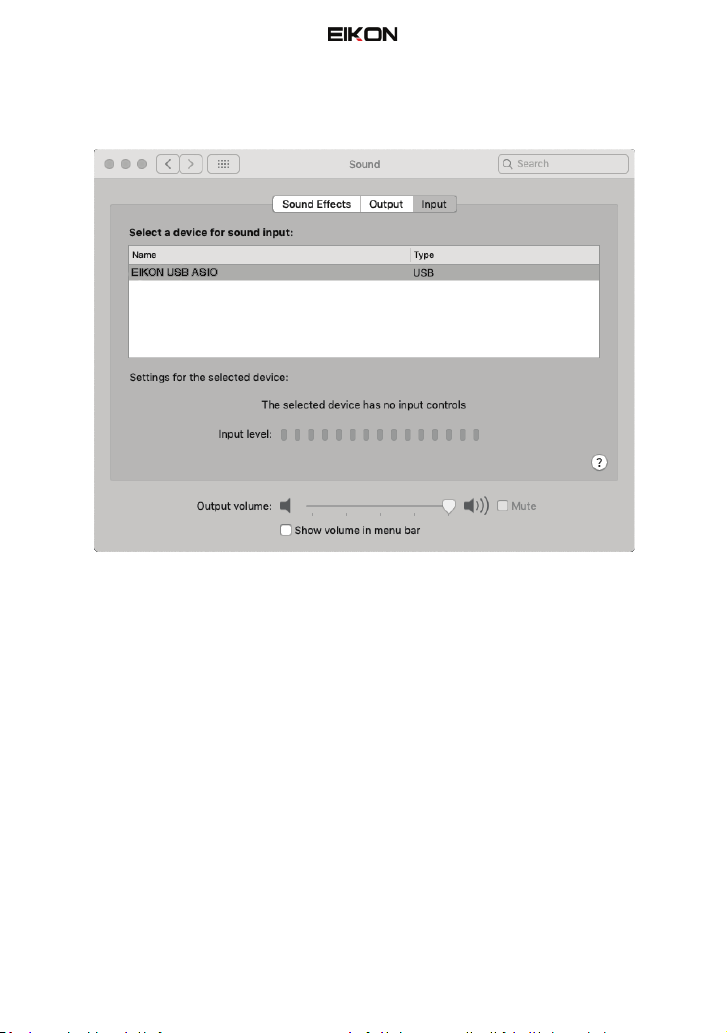
6. If you want to use a microphone connected to the SBi interface as the default
sound input into your computer, click the Input tab and select the EIKON USB ASIO
as the default input device.
12

WINDOWS COMPUTER SETUP
Most pro audio applications have their own audio preferences where you can select the
SBi as the active audio device. If you intend to only use the SBi for playback and recording
with these applications, it is not necessary to change the default system audio input and
output.
1. Please visit https://www.eikon-audio.com/ and download the latest USB driver for
your SBi interface. Unzip the file, double-click the “PROEL S.p.A. USB Audio
Drivers_setup_WHQL.exe” and follow the on-screen instructions.
Note: usually on almost all computers
the “Do you want to allow this app to
make changes to your device” pop-up
appears when a program tries to make
changes that require administrator
privileges.
Confirm clicking on “Yes” button.
Click on “Install” button.
The green bar shows the progress of
the installation procedure.
13

When requested, connect the interface
to a free USB port of your computer (if
it isn't already), then press “OK” to
complete the installation.
When this window appears, the
installation is completed. Press
“Finish” button to close this window.
2. If you would like to use the SBi interface as your computer's default audio playback
and recording device, please follow the instructions below.
3. After the installation is completed, navigate to Settings.
4. Click the Sound tab.
5. If you would like all computer audio - such as audio from browsers and movie
players - to be played back through the SBi interface, choose “Speakers (EIKON USB
ASIO)” from the Output menu.
6. If you would like to use a microphone connected to the SBi interface as the default
sound input into your computer, choose the input channel “Line In (EIKON USB
ASIO)” from the Input menu.
14

WINDOWS UNINSTALLING
In case you need to update the ASIO driver, when you run the new driver installation, the
software automatically detects a previous version installed that must be uninstalled first.
A previous driver version is detected and
this pop up warn the user that a reboot will
be necessary at the end of the procedure.
Press “OK” to proceed.
Press Next.
15

Confirm clicking on “Uninstall”.
Press “Finish”.
Press “OK” to restart the computer: after
that you have to re-run the installation
procedure to install the new driver.
WORKING WITH DAW AUDIO SOFTWARE
SBi interfaces provide audio input and output for Core Audio compatible audio
applications on the Mac, including Logic Pro and GarageBand, and any ASIO compatible
applications on Windows, including other software applications such as Ableton Live, Avid
Pro Tools, Cockos Reaper, Propellerhead Reason, Steinberg Cubase and Nuendo, Cakewalk
by BandLab, PreSonus Studio One, Bitwig, and others applications dedicated to
podcasting, meeting and conferencing, including OBS Studio, Anchor Spotify, Pocket Cast,
Apple Podcast, Zoom and so on.
The following sections show how to set the driver correctly on some softwares,
considering that for all softwares you have to proceed in a similar way (see also the
proper software documentation).
For audio software running under Windows, go to the menu item or preferences where
you choose the ASIO driver you wish to use, and then choose EIKON USB ASIO. Depending
16

on the software in use, some audio acquisition parameters can be adjusted directly from
the software preference window and some other clicking on a proper “Control Panel”
button.
WAVEFORM by TRAKTION (WINDOWS)
ABLETON LIVE (WINDOWS)
17

GARAGE BAND (APPLE)
ABLETON LIVE (APPLE)
18

PODCAST ON-THE-GO
SBi interfaces include a special feature the allows you to make high-quality recordings or
live streams on-the-go without even the need for a computer. A 4-pin mini-jack connector
on the rear panel allows to connect a mobile phone or a tablet (using the provided cable
4-pin cable) and to record and publish a podcast using dedicated apps such as Anchor,
Pocket Cast, Apple Podcast and others.
The example below shows as you can quickly arrange a setup with your phone/tablet, a
power bank to power the SBi interface and one or two professional microphones to
obtain studio-grade recordings for the best podcasting experience.
19

TECHNICAL SPECIFICATIONS
Sbi-POD Sbi-PRO
Microphone Preamp
Type XLR female, balanced XLR female, balanced
Frequency Response (±3.0 dB) 10 Hz to 22 kHz 10 Hz to 22 kHz
Input Impedance (Balanced) ϭϯϮŬɏ ϭϯϮŬɏ
THD+N (unwtd, 1 kHz @ +4 dBu Output, Unity Gain) < 0.005% < 0.005%
S/N Ratio (Unity Gain, Ref. = +4 dBu, 20 Hz to 22 kHz) > 94 dB > 99 dB
Common Mode Rejection Ratio (1 kHz, 40 dB Gain) > 65 dB > 65 dB
Gain Control Range (± 1 dB) 0 dB to 40 dB 0 dB to 45 dB
Max Input Level (Unity Gain, 1 kHz @ 0.1% THD+N) +0 dBu -2 dBu
Phantom Power (±2 VDC) +48 VDC +48 VDC
Line Input
Max Input Level (Unity Gain, 1 kHz @ 0.1% THD+N) +14 dBu +22 dBu
Type JACK ¼" TRS female,
balanced
JACK ¼" TRS female,
balanced
Input Impedance ϭϱŬɏ ϭϱŬɏ
Instrument Input
Max Input Level (Unity Gain, 1 kHz @ 0.1% THD+N) +14 dBu +22 dBu
Type JACK ¼" TS female,
unbalanced
JACK ¼" TS female,
unbalanced
Input Impedance ϭDɏ ϭDɏ
Line Outputs
Type JACK ¼" TRS female,
balanced
JACK ¼" TRS female,
balanced
Output Impedance ϲϬϬɏ ϲϬϬɏ
Headphone Output
Type JACK ¼" TRS active stereo JACK ¼" TRS active stereo
Maximum Output ϱϬŵtĐŚΛϯϮɏ>ŽĂĚ ϱϬŵtĐŚΛϯϮɏ>ŽĂĚ
Frequency Response (±1.0 dB) 10 Hz - 25 kHz 10 Hz - 25 kHz
Digital Audio
ADC Dynamic Range (A-wtd, 48 kHz Sample Rate) 107 dB 108 dB
DAC Dynamic Range (A-wtd, 48 kHz Sample Rate) 108 dB 109 dB
Bit Depth 16 / 24 /32 16 / 24 /32
Reference Level for 0 dBFS +14 dBu +10 dBu
Internal Sample Frequency Selections (kHz) 44.1, 48, 88.2, 96, 176.4,
192
44.1, 48, 88.2, 96, 176.4,
192
Power USB bus-powered USB bus-powered
Physical
Height 52 mm (2.05") 52 mm (2.05")
Depth 106 mm (4.17") 106 mm (4.17")
Width 160 mm (6.30") 160 mm (6.30")
Weight 0.53 kg (1.17 lbs) 0.55 kg (1.21 lbs)
20
This manual suits for next models
1
Table of contents
Languages:


