eKids iHome iSF-36 User manual

Model: iSF-36
CHARGE
BEFORE
USE
Getting Started
Computer USB port
Charge via USB AC adaptor, computer USB port, or other powered USB port
Computer connected
to working outlet
OR
USB Adaptor
(not included)
• For questions or comments regarding this or other eKids products,
please call our toll-free number: 1-800-288-2792.
Also visit our website: www.ekids.com
If problems persist, please do not attempt to repair unit; see warranty
for factory service.
If the unit does not respond:
• Make sure unit is completely charged.
• Use the extended wire of a paperclip or other thin tool to press in
the Reset Button.
• To re-pair your device, press the Bluetooth Pairing Button on the
front of the unit.
Note: The rechargeable battery can be replaced only by eKids
Consumer Repair Department.
Questions or Comments
Troubleshooting
FCC Information
eKids, LLC warrants this product to be free from defects in
workmanship and materials, under normal use and conditions, for a
period of one (1) year from the date of original purchase.
Should this product fail to function in a satisfactory manner, it is best to
first return it to the store where it was originally purchased. Should this
fail to resolve the matter and service still be required by reason of any
defect or malfunction during the warranty period, eKids will repair or, at
its discretion, replace this product without charge. This decision is
subject to verification of the defect or malfunction upon delivery of this
product to the Factory Service Center authorized by Customer Service.
If service is required, please call Customer Service at 1-800-288-2792
to obtain a Return Authorization Number and shipping instructions. A
copy of the sales receipt is required to validate in-warranty coverage.
Disclaimer of Warranty
NOTE: This warranty is valid only if the product is used for the purpose
for which it was designed. It does not cover (i) products which have
been damaged by negligence or willful actions, misuse or accident, or
which have been modified or repaired by unauthorized persons; (ii)
cracked or broken cabinets, or units damaged by excessive heat; (iii)
damage to digital media players, CD’s or tape cassettes (if applicable);
(iv) the cost of shipping this product to the Factory Service Center and
its return to the owner.
This warranty is valid only in the United States of America and does not
extend to owners of the product other than to the original purchaser. In
no event will eKids or any of its affiliates, contractors, resellers, their
officers, directors, shareholders, members or agents be liable to you or
any third party for any consequential or incidental damages, any lost
profits, actual, exemplary or punitive damages. (Some states do not
allow limitations on implied warranties or exclusion of consequential
damages, so these restrictions may not apply to you.) This warranty
gives you specific legal rights, and you may also have other rights
which vary from state to state.
Your acknowledgment and agreement to fully and completely abide by
the above mentioned disclaimer of warranty is contractually binding to
you upon your transfer of currency (money order, cashier's check, or
credit card) for purchase of your eKids products.
© 2020 eKids, LLC
Questions? Visit www.ekids.com
or call 1-800-288-2792
1299 Main Street Rahway NJ 07065
PO Box 2228
BELFAST, BT5 9GD
• It is important to keep the unit as dry and clean as possible. You
may clean the cabinet with a cloth or sponge moistened with mild
soap and water. Do not attempt to use strong cleansers or solvents,
as they may cause damage.
• Battery chargers used with the unit are to be regularly examined for
damage to the cord, plug, enclosure and other parts, and in the
event of such damage, they must not be used until the damage has
been repaired.
Maintenance
This device complies with Part 15 of the FCC rules.
Operation is subject to the following two conditions:
(1) this device may not cause harmful interference,
and (2) this device must accept any interference
received, including interference that may cause undesired operation.
This equipment complies with FCC radiation exposure limits set forth
for an uncontrolled environment .
NOTE: This equipment has been tested and found to comply with the
limits for a Class B digital device, pursuant to Part 15 of the FCC rules.
These limits are designed to provide reasonable protection against harmful
interference in a residential installation. This equipment generates, uses,
and can radiate radio frequency energy and, if not installed and used in
accordance with the instructions, may cause harmful interference to radio
communications. However, there is no guarantee that interference will
not occur in a particular installation. If this equipment does cause harmful
interference to radio or television reception, which can be determined by
turning the equipment off and on, the user is encouraged to try to correct
the interference by one or more of the following measures:
• Reorient or relocate the receiving antenna.
• Increase the separation between the equipment and receiver.
• Connect the equipment into an outlet on a circuit different from
that to which the receiver is connected.
• Consult the dealer or an experienced radio/TV technician for help.
This equipment should be installed and operated with minimum distance
20cm between the radiator & your body.
WARNING: Changes or modifications to this unit not expressly approved
by the party responsible for compliance could void the user's authority
to operate the equipment.
CAN ICES-3 (B)/NMB-3(B)
RF Exposure
This equipment complies with FCC radiation exposure limits set forth
for an uncontrolled environment.
This transmitter must not be co-located or operating in conjunction with
any other antenna or transmitter.
Bluetooth Digital Karaoke
with Party Lights
FCC ID: EMO36A
IC: 986B-36A
HVIN:iSF-36a
There are two ways to listen to music with this unit:
• In USB Mode you can connect a flash drive to the unit and listen to
your stored songs.
• In Bluetooth Mode you can stream music from your smartphone or
other Bluetooth device.
Note: After 15 minutes of no audio activity, the unit will time out.
Press the Power ON/OFF button to resume audio function.
Charging The Unit
1. Connect the included micro USB cord to the micro USB charging
port on the back of the unit.
2. Connect the standard USB plug end of the cord to a power USB port
on a computer or other USB charging device.
For first time use, charge unit for about 5 hours.
Note: The Battery Low Icon will appear on the display when it is time to
charge the unit. The Battery Full icon will appear when charging is
complete.
Use the Mode Button to set the unit to USB Mode.
• Connect a USB flash drive to the Playback USB port on the front of
the unit. (USB Mode is compatible with .mp3 and .wav files only.)
• Press the Power Button to turn the unit ON.
• When a USB drive is detected, the number of files on the USB drive
will appear on the LCD display.
• Press Play, then press the “10+/Folder+” Button to advance
through 10 files at a time on the USB drive. Press and hold the
“10+/Folder+” Button to start at file #1 and use the Forward and
Reverse buttons to navigate tracks one at a time.
Repeat/Shuffle Button (Works only in USB Mode):
• Press the Repeat Button to repeat the current track.
• Press again to repeat all tracks within the current folder.
• Press a third time to repeat all songs on the flash drive.
• Press a fourth time to Shuffle all tracks on the flash drive.
• Press a fifth time to turn Repeat/Shuffle OFF.
Record your performance and save it to a USB flash drive!
Recording Bluetooth Audio:
• To start, use the Mode Button to set the unit to Bluetooth Mode.
• Plug a USB flash drive into the Record USB port on the front of the
unit.
• Make sure the microphone is connected to the unit and the
Microphone ON/OFF Switch is turned ON.
• Select a song from your audio device, and press Play.
• Press the Record Button. The Recording Indicator will glow to
confirm the unit is recording audio. Sing into the microphone to
record your voice over the music.
• When you finish your performance, press the Record Button to
stop recording. The audio will be saved to your USB flash drive.
Recording USB Audio:
• To start, use the Mode Button to set the unit to USB Mode.
• Plug a USB flash drive that includes the music you want to record
with into the Playback USB port on the front of the unit.
• Plug another USB drive into the Record USB port (your recording
will save to this USB drive).
• Make sure the microphone is connected to the unit and the
Microphone ON/OFF Switch is turned ON.
• Select a song from the Playback USB drive, and press Play.
• Press the Record Button. The Recording Indicator will glow to
confirm the unit is recording audio. Sing into the microphone to
record your voice over the music.
• When you finish your performance, press the Record Button to
stop recording. The audio will be saved to the Record USB drive.
Listening to Recordings:
• Use the Mode Button to set the unit to USB Mode.
• Connect a USB flash drive to the Playback USB Port.
• Use the Forward, Reverse, 10+/Folder+ Buttons to navigate
through files on your connected USB flash drive, then press Play
to listen!
Sharing Recordings:
• Remove the USB flash drive from the unit and connect to a
computer to share your performances!
Using USB Mode
• Use the Mode Button to set the unit to Bluetooth Mode.
• Turn on your Bluetooth device and make it “discoverable” by
turning on Bluetooth mode (check in Options or Settings).
• “Karaoke 36” should appear in your device’s Bluetooth menu. If
“Not Connected” or a similar message appears, select “Karaoke
36” to connect it.
• The Bluetooth indicator will glow solid once connected. Put your
Bluetooth device in play mode to begin streaming music.
• Use the “Forward” “Reverse” and “Play/Pause” buttons on the unit
to navigate tracks.
• Pairing automatically occurs in Bluetooth mode. If no device is
connected within 3 minutes, pairing mode will time out. Press and
hold the Bluetooth Pairing button to re-pair a device.
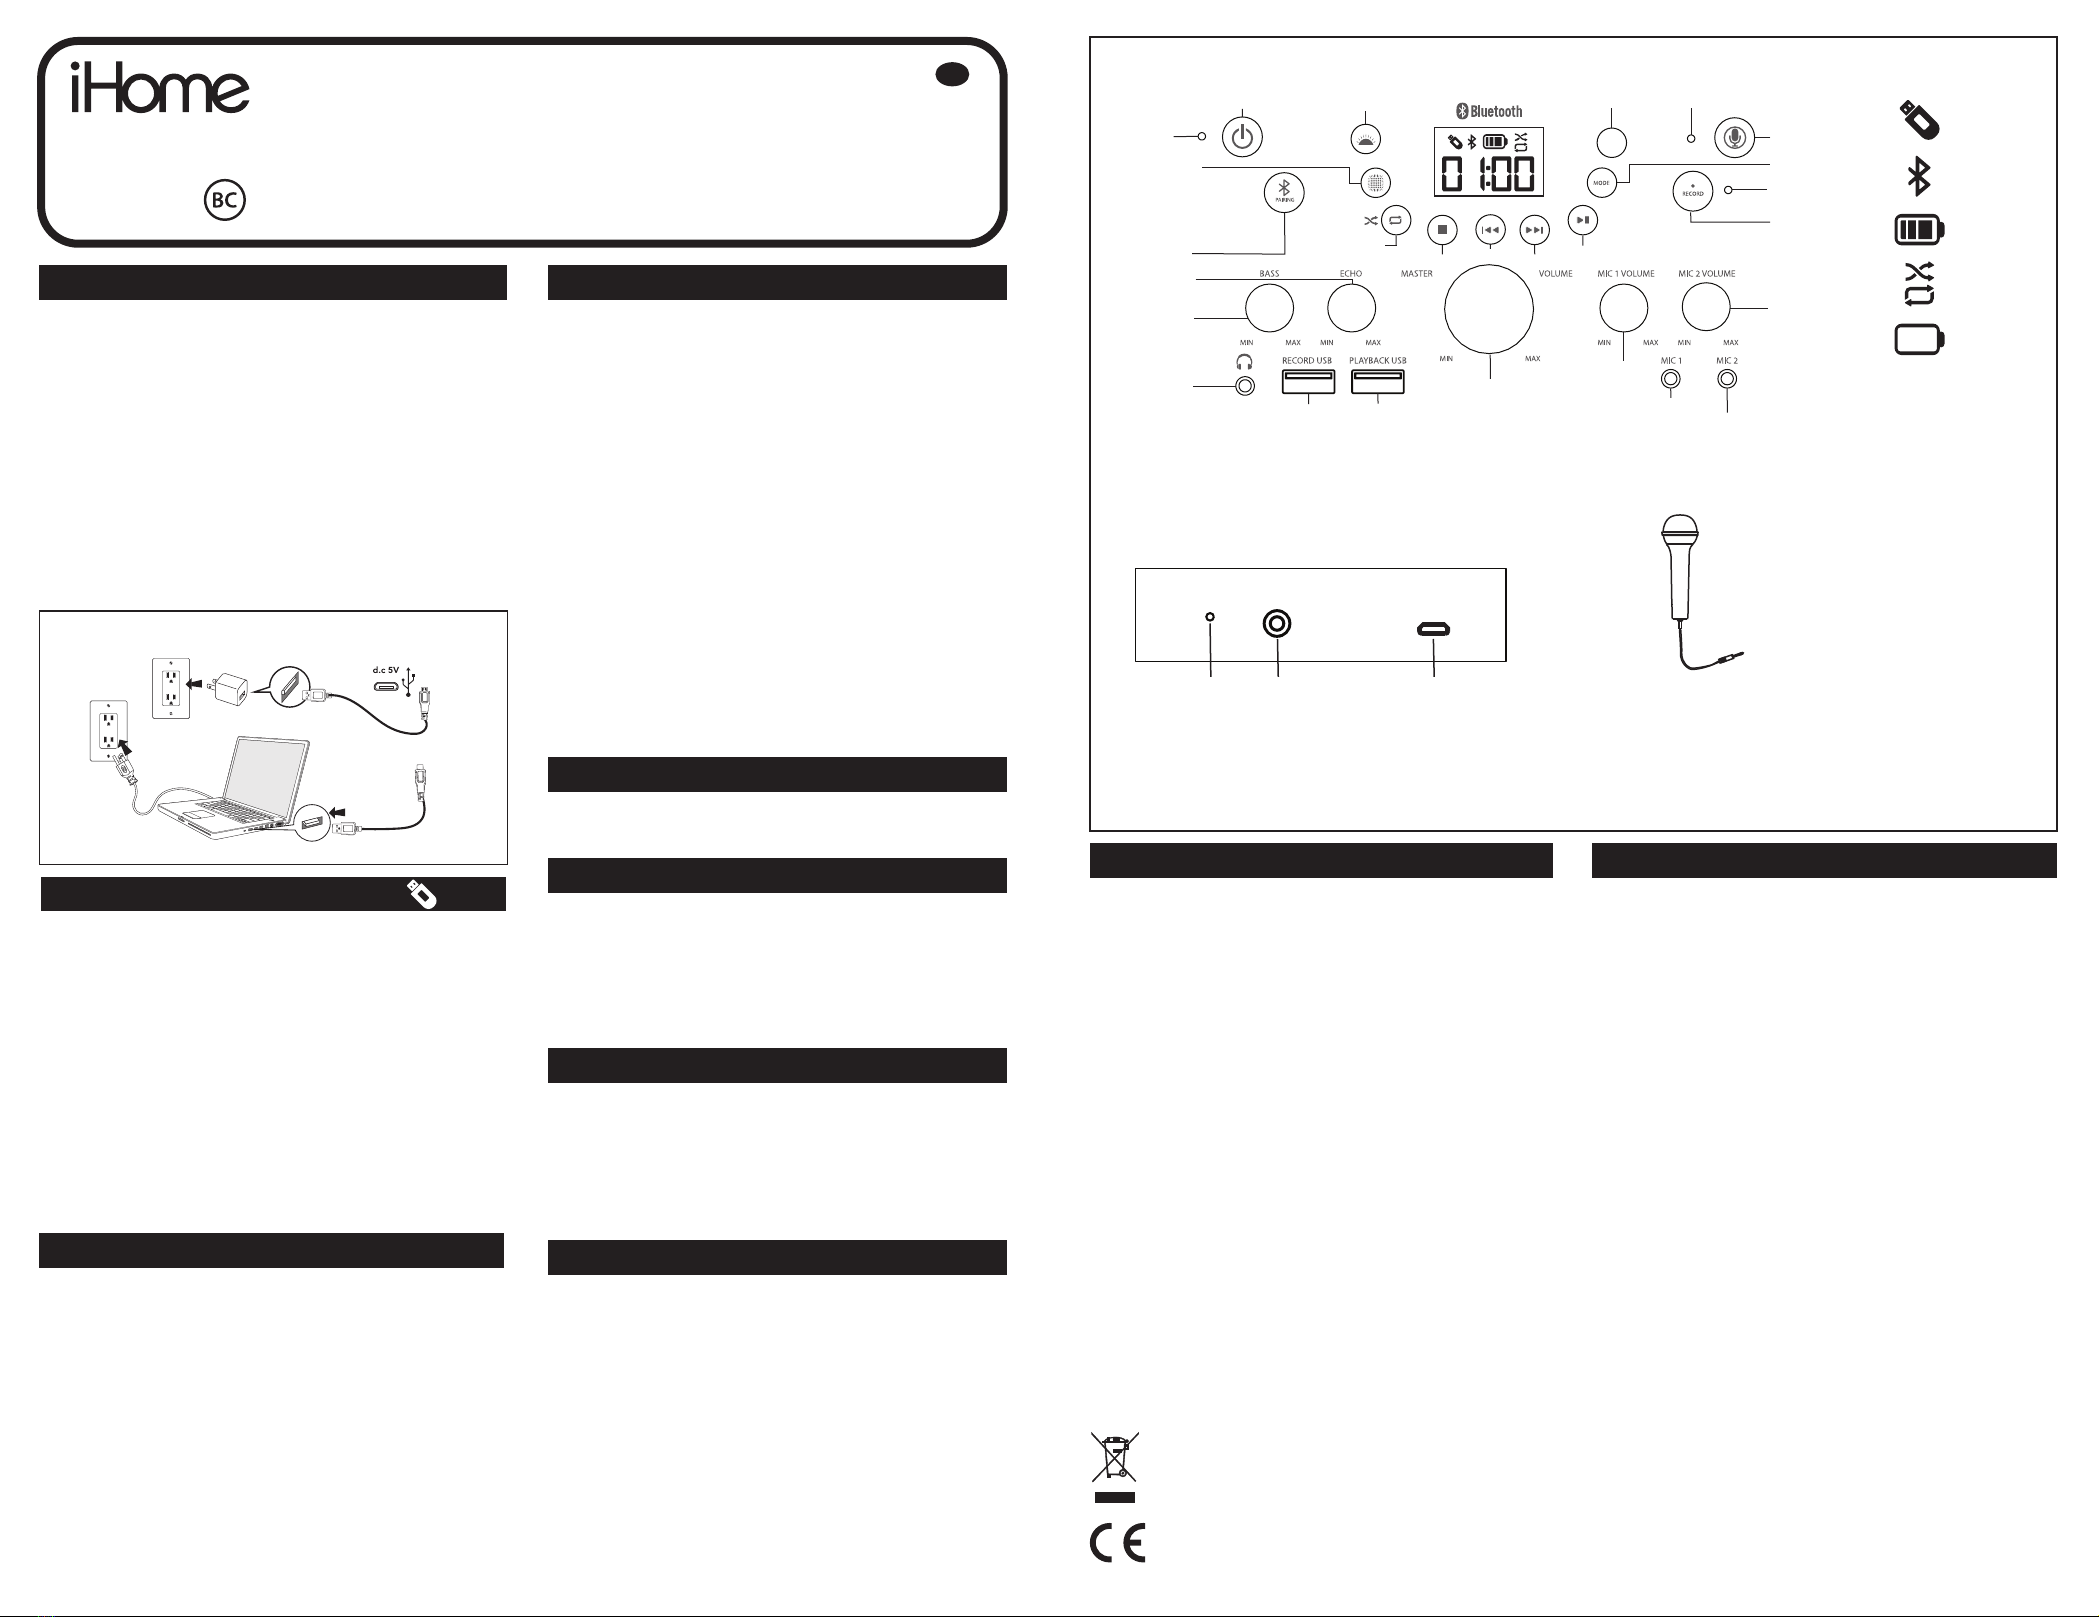
DISPLAY ICONS
USB
Mode
Bluetooth
Mode
Battery
Full
Shuffle ON
Battery Low
Voice Control:
When the unit is in Bluetooth mode, you can access Siri or Google Assistant using voice commands.
To use this feature:
• With the unit in BT mode, press and hold the Voice Control Button for 2 seconds to activate Siri/Google via your paired smartphone.
• Once you hear a confirmation tone, speak into the Voice Control Microphone (next to Voice Control Button) to make your voice
commands.
For best performance, use a high speed 3.1 USB drive (not
included) when recording audio from this unit.
Note: Using a lower speed USB drive may cause skipping or
poor performance of the Bluetooth audio stream.
Sometimes skipping in recorded music may occur,
depending on the online streaming speed of your phone.
Limited One-Year Warranty
FRONT OF UNIT
USING THE MICROPHONE
• Connect the microphone to the Mic Jack
1 or 2 on the front of the unit.
• Slide the Microphone ON/OFF switch to
the ON position.
• Control mic volume using the rotary dial
on the front of the unit.
• When not in use, store the microphone in
the clips on each side of the unit.
Recording to the USB Drive
Using Bluetooth Mode
BACK OF UNIT
Line OutReset USB Charging Port
LINE OUT
RESET
DC 5V
This product bears the selective sorting symbol for waste
electrical and electronic equipment (WEEE).
This means that this product must be handled pursuant to
European Directive 2012/19/EU in order to be recycled or
dismantled to minimize its impact on the environment.
For further information, please contact your local or regional
authorities.
Electronic products not included in the selective sorting
process are potentially dangerous for the environment and
human health due to the presence of hazardous substances.
Power ON/OFF
Power
Indicator
Bluetooth
Pairing
Top Projection
Light Show
Front Speaker
Light Show
Repeat/
Shuffle
Adjustable
Bass
Adjustable
Echo
Headphone
Jack
USB Port
(For Recording Audio)
USB Port
(For Playing Audio)
Master Volume
Stop Reverse Forward Play/Pause
10+/Folder+
Mode
Select USB or Bluetooth
Record
Save audio to USB Port
Recording
Indicator
Voice Control
Voice Control Microphone
Microphone 1
Volume
Microphone 2
Volume
Mic 1
Jack Mic 2
Jack
10+/
FOLDER+
Bass and Echo
• Turn the Bass rotary dial to adjust the bass effect of the unit.
• Turn the Echo rotary dial to adjust the echo effect as you sing
through the microphone.
Repeat ON
ENG
iSF36.5ONLINEIB-ENG-072820-A

Modèle: iSF-36
CHARGER
AVANT
UTILISATION
Karaoké Bluetooth avec
lumières de fête
FRE
iSF36.5ONLINEIB-FRE-072820-A
Mise en route
Port USB de l'ordinateur
La charge peut se faire par un adaptateur secteur USB, un port USB alimenté
d'un ordinateur ou autre chargeur.
Ordinateur connecté à
une prise sous tension
OU
Adaptateur USB
(non fourni)
• Si vous avez des questions ou des commentaires concernant ce
produit ou d'autres produits eKids, appelez le numéro gratuit:
1-800-288-2792 Visitez aussi notre site Internet: www.ekids.com
ISi les problèmes persistent, n'essayez pas de réparer l'unité; voir
la garantie pour le service d'usine.
Si l’unité ne répond pas :
• Assurez-vous que l'unité est complètement chargée.
• Utilisez un trombone ou un autre objet pointu similaire pour
appuyer sur le bouton de réinitialisation.
• Appuyez sur le bouton de couplage Bluetooth situé à l’arrière de
l’unité pour effectuer un nouveau couplage.
Remarque : La batterie rechargeable ne doit être remplacée que par
un service à la clientèle eKids.
Questions ou commentaires
Dépannage
Information FCC
eKids, LLC, garantit que cet appareil est exempt de tout vice de
fabrication et de matériaux, dans des conditions normales d'utilisation,
pour une période d'un (1) ans à compter de la date d'achat initial.
Si ce produit ne fonctionne pas de manière satisfaisante, il est
préférable de le retourner d’abord au magasin où il a été acheté à
l’origine. Si cela ne résout pas le problème et que le service est
toujours requis en raison d’un défaut ou d’un dysfonctionnement
pendant la période de garantie, eKids réparera ou, à sa discrétion,
remplacera ce produit sans frais. Cette décision est soumise à la
vérification du défaut ou du dysfonctionnement lors de la livraison de
ce produit au centre de service d’usine autorisé par le service client.
Si le service est requis, veuillez appeler le service à la clientèle au
1-800-288-2792 pour obtenir un numéro d’autorisation de retour et des
instructions d’expédition. Une copie du reçu de vente est obligatoire
pour bénéficier d’une couverture sous garantie.
Exclusions de garantie
REMARQUE : Cette garantie n’est valable que si le produit est utilisé
dans le but pour lequel il a été conçu. Elle ne couvre pas (i) tout
appareil qui a été endommagé par négligence, actes délibérés,
mauvaise utilisation, accident, qui a été altéré ou réparé par des
personnes non autorisées ; (ii) tout appareil dont le boîtier est
fissuré/brisé ou qui a été endommagé par une chaleur excessive ; (iii)
tout appareil dont le lecteur CD/cassettes est endommagé (s'il existe) ;
(iv) les frais d'expédition de l'appareil au centre de services et de retour
à son propriétaire.
Cette garantie n’est valable qu’aux États-Unis d’Amérique et ne
s’étend pas aux propriétaires du produit autres qu’à l’acheteur
d’origine. En aucun cas, eKids, l'une de ses filiales, sous-traitants,
revendeurs, dirigeants, administrateurs, actionnaires, membres ou
agents ne seront tenus responsables envers vous ou un tiers de tout
dommage direct ou indirect, toute perte de profits, d'indemnisation
au-delà du dommage subi. (Certains États n'autorisent pas de
limitations de garanties implicites ou l'exclusion de dommages
consécutifs, il se peut donc que ces restrictions ne s'appliquent pas
dans votre cas.) Il vous confère des droits légales, et vous pouvez
permet d'avoir d'autres droits qui varient d'un État à l'autre.
Votre reconnaissance et votre accord de respecter pleinement et
complètement la clause de non-responsabilité susmentionnée vous lie
contractuellement lors de votre transfert de monnaie (mandat, chèque
de banque ou carte de crédit) pour l’achat de vos produits eKids.
© 2020 eKids, LLC
Des questions? Visitez www.ekids.com
ou composez le 1-800-288-2792
1299 Main Street Rahway NJ 07065
PO Box 2228
BELFAST, BT5 9GD
• Il est important que l'unité reste sèche et propre. Vous pouvez
nettoyer l'enceinte avec un chiffon ou une éponge humidifiée avec
un savon doux et de l'eau. N’essayez pas d'utiliser de nettoyants
ou de solvants plus forts car ils peuvent endommager l'unité.
• Les chargeurs de batteries utilisés avec les unité doivent être
inspectés régulièrement pour vérifier si leurs cordons/fiches/boîtiers
ou autres pièces ne sont pas endommagés, si c’est le cas, ils ne
doivent pas être utilisés avant que le dommage n’ait été réparé.
Entretien
Ce dispositif est conforme à la partie 15 des
réglementations du FCC. Son fonctionnement est
soumis aux deux conditions suivantes : (1) ce
dispositif peut causer des interférences nocives,
et (2) ce dispositif doit accepter toute interférence
reçue, incluant l'interférence qui peut causer une opération indésirable.
REMARQUE : Cet équipement a été testé et se conforme aux limites
pour un dispositif digital de Classe B, selon la partie 15 des
réglementations du FCC. Ces limites sont conçues pour offrir une
protection raisonnable contre les interférences nocives d’une installation
résidentielle. Cet équipement génère, utilise et peut émettre une énergie
de fréquence par radio et, s’il n’est pas installé et utilisé selon les directives,
peut causer une interférence nocive aux communications par radio.
Cependant, il n’y a aucune garantie qu’une interférence ne prendra pas
place dans une installation particulière. Si cet équipement ne cause pas
d’interférence nocive à la réception de la radio ou du téléviseur, ce qui
peut être déterminé en allumant et fermant l’équipement, l’utilisateur est
encouragé à tenter de corriger l’interférence en utilisant l’un ou l’autre
des moyens suivants :
• Réorienter ou déplacer l'antenne réceptrice.
• Éloigner davantage l’appareil du récepteur.
• Branchez l'équipement sur une prise ou un circuit auquel le récepteur
n'est pas branché.
• Contactez votre revendeur ou un technicien radio/TV qualifié.
Cet équipement doit être installé et utilisé à une distance minimale de
20 cm entre le radiateur et votre corps.
AVERTISSEMENT : Tout changement ou modification apporté à cet
appareil sans le consentement expresse de la partie responsable pour
la conformité peut annuler le droit de l'utilisateur d'utiliser cet appareil.
CAN ICES-3 (B)/NMB-3(B)
Exposition aux RF
Cet équipement est conforme aux limites d’exposition aux rayonnements
FCC établies pour un environnement non contrôlé.
Ce transmetteur ne doit pas être installé ou utilisé en conjonction avec
une autre antenne ou un autre transmetteur.
FCC ID: EMO36A
IC: 986B-36A
HVIN:iSF-36a
Il existe deux façons d’écouter de la musique avec cette unité :
• En mode USB, vous pouvez connecter une clé à l’unité et écouter les
fichiers qui y sont stockés.
• En mode Bluetooth, vous pouvez diffuser de la musique à partir d’un
smartphone ou d’un autre appareil Bluetooth.
Remarque : Après 15 minutes sans activité audio, l'unité s'éteindra.
Appuyez sur le bouton Allumer/Éteindre pour reprendre la fonction audio.
Recharge de l'unité
1. Branchez le câble micro USB inclus dans le port de charge micro
USB à l'arrière de l'unité.
2. Connectez l'extrémité USB standard du câble à un port USB
alimenté d'un ordinateur ou d’un autre chargeur USB.
Avant la première utilisation, chargez l’unité pendant environ 5 heures.
Remarque : L’icône de batterie faible apparaît sur l’écran lorsqu’il est
temps de charger l’unité. L’icône Batterie pleine apparaît lorsque la
charge est terminée.
Utilisez le bouton de mode pour régler l’unité en mode USB.
• Connectez une clé USB au port de lecture USB à l’avant de l’unité. (Le
mode USB est compatible avec les fichiers .mp3 et .wav uniquement.)
• Appuyez sur le bouton d'alimentation pour allumer l'unité.
• Lorsque la clé USB est détectée, le nombre de fichiers apparaît
sur l’écran LCD.
• Appuyez sur Lecture, puis appuyez sur le bouton «10+/Dossier+»
pour avancer de 10 fichiers à la fois sur la clé USB. Maintenez
appuyé le bouton «10+/Dossier+» pour commencer au fichier n° 1
et utilisez les boutons avant et arrière pour parcourir les morceaux
un par un.
Bouton de Répétition/Aléatoire (fonctionne uniquement en mode USB) :
• Appuyez sur le bouton Répéter pour répéter la piste en cours.
• Appuyez à nouveau pour répéter tous les morceaux du dossier actuel.
• Appuyez une troisième fois pour répéter toutes les chansons sur le
lecteur flash.
• Appuyez une quatrième fois pour mélanger tous les morceaux sur la
clé USB.
• Appuyez une cinquième fois pour désactiver la Répétition/Lecture
Aléatoire.
Enregistrez vos chansons sur une clé USB !
Enregistrement audio Bluetooth :
• Pour commencer, utilisez le bouton Mode pour régler l’unité en
mode Bluetooth.
• Connectez une clé USB au port d’enregistrement USB à l’avant
de l’unité.
• Assurez-vous que le micro est connecté à l’unité et que
l’interrupteur Micro Allumer/Éteindre est sur Allumer.
• Sélectionnez une chanson sur votre appareil audio et appuyez sur
Lecture.
• Appuyez sur le bouton Enregistrer. Le voyant d’enregistrement
s’allume pour indiquer que l’unité enregistre l'audio. Chantez dans
le micro pour enregistrer votre voix sur la musique.
• Lorsque vous avez terminé votre chanson, appuyez à nouveau
sur le bouton Enregistrer pour arrêter l’enregistrement. L’audio
sera enregistré sur votre clé USB.
Enregistrement audio USB :
• Pour commencer, utilisez le bouton Mode pour régler l’unité sur
mode USB.
• Branchez une clé USB contenant la musique que vous souhaitez
enregistrer dans le port de lecture USB à l’avant de l’unité.
• Branchez une autre clé USB dans le port d’enregistrement USB
(votre enregistrement sera sauvegardé sur cette clé USB).
• Assurez-vous que le micro est connecté à l’unité et que
l’interrupteur Micro Allumer/Éteindre est sur Allumer.
• Sélectionnez un morceau dans port de lecture USB et appuyez
sur Lecture.
• Appuyez sur le bouton Enregistrer. Le voyant d’enregistrement
s’allume pour indiquer que l’unité enregistre l'audio. Chantez dans
le micro pour enregistrer votre voix sur la musique.
• Lorsque vous avez terminé votre chanson, appuyez à nouveau
sur le bouton Enregistrer pour arrêter l’enregistrement. L’audio
sera enregistré sur votre clé USB.
Écouter les enregistrements :
• Utilisez le bouton Mode pour régler l’unité en mode USB.
• Connectez une clé USB au port de lecture USB.
• Utilisez les boutons Suivant, Précédent, 10+ ou Dossier+ pour
parcourir les fichiers sur votre clé USB connectée, puis appuyez
sur Play pour écouter!
Partager des enregistrements :
• Retirez la clé USB de l’unité et connectez-vous à un ordinateur
pour partager vos chansons !
Utilisation du mode USB
Utilisez le bouton Mode pour régler l’unité en mode Bluetooth.
• Allumez votre appareil Bluetooth et rendez-le «détectable» en
activant le mode Bluetooth (consulter Options ou Paramètres).
• «Karaoke 36» devrait apparaître dans le menu Bluetooth de votre
appareil. Si le message «Not Connected» ou un message similaire
apparaît, sélectionnez «Karaoke 36» pour connecter l'unité.
• Le voyant Bluetooth s’allumera une fois connecté. Mettez votre appareil
Bluetooth en mode lecture pour commencer à diffuser de la musique.
• Utilisez les boutons «Suivant» «Précédent» et «Play/Pause» de
l’unité pour parcourir les pistes.
• Le couplage se produit automatiquement en mode Bluetooth. Si
aucun appareil n’est connecté dans les 3 minutes, le mode de
couplage expire. Maintenez appuyé le bouton Couplage pour coupler
de nouveau un appareil.
Graves et Écho
• Tournez le bouton rotatif Bass pour régler l'effet des graves de
l'unité.
• Tournez le bouton rotatif de Écho pour régler le effet des d’écho
lorsque vous chantez à travers le micro.
Garantie limitée d'un an
Enregistrement sur la clé USB
Utilisation du mode Bluetooth
Ce produit porte le symbole du tri sélectif des déchets
d'équipements électriques et électroniques (DEEE).
Cela signifie que ce produit doit être traité conformément à
la directive européenne 2012/19/EU afin d'être recyclé soit
démantelé afin de minimiser son impact sur
l'environnement.
Pour de plus amples renseignements, merci de contacter
les autorités locales ou régionales.
Les produits électroniques non inclus dans le processus de
tri sélectif sont potentiellement dangereux pour
l'environnement et la santé humaine en raison de la
présence de substances dangereuses.
ICÔNES AFFICHÉS
Mode
USB
Mode
Bluetooth
Batterie
pleine
Lecture Aléatoire
Activée
Batterie faible
Commande vocale :
Lorsque l’unité est en mode Bluetooth, vous pouvez accéder à Siri ou à Google Assistant à l’aide de commandes vocales.
Pour utiliser cette fonction :
• Avec l’unité en mode BT, maintenez appuyé le bouton de Commande vocale pendant 2 secondes pour activer Siri/Google via votre
smartphone couplé.
• Une fois vous entendez une tonalité de confirmation, parlez dans le Micro de commande vocale (à côté du bouton de Commande vocale)
pour effectuer vos commandes vocales.
Pour de meilleures performances, utilisez une clé USB 3.1 haute vitesse
(non incluse) lors de l'enregistrement audio à partir de cette unité.
Remarque : L'utilisation d'une clé USB à faible vitesse peut entraîner des
sauts ou de mauvaises performances du flux audio Bluetooth.
Il peut parfois arriver que la musique enregistrée soit ignorée, selon la
vitesse de diffusion en ligne de votre téléphone.
AVANT DE L’UNITÉ
UTILISATION DU MICRO
• Connectez le micro au port Mic 1 ou 2
situé à l’arrière de l’unité.
• Positionnez l’interrupteur
Allumer/Éteindre du micro sur Allumer.
• Réglez le volume du micro à l’aide du
bouton rotatif situé à l’avant de l’unité.
• Lorsqu’il n’est pas utilisé, rangez le
micro dans les clips de chaque côté de
l’unité.
ARRIÈRE DE L’UNITÉ
Sortie ligneRéinitialisation Port de charge USB
LINE OUT
RESET
DC 5V
Allumer/Éteindre
Témoin de
marche
Couplage
Bluetooth
Jeu de lumière
d’en haut
Jeu de lumière du
haut-parleur avant
Répétition/
Aléatoire
Graves
réglables
Écho
réglable
Prise
casque
Port USB
(pour l’enregistrement audio)
Port USB
(pour lecture audio)
Volume principal
Arrêt Précédent Suivant Lecture/Pause
10+/Dossier
suivant
Mode
Sélectionnez USB
ou Bluetooth
Enregistrer
Enregistrer l’audio
sur le port USB
Indicateur
d’enregistrement
Commande vocale
Micro de commande vocale
Volume
micro 1
Volume micro 2
Port
micro 1 Port
micro 2
10+/
FOLDER+
Répéter Activé

Modell: iSF-36
Informationen der FCC
eKids, LLC, eine hundertprozentige Tochtergesellschaft von KIDdesigns,
gewährleistet für einen Zeitraum von einem (1) Jahr ab dem ursprünglichen
Kaufdatum, dass dieses Produkt unter normalen Nutzungsbedingungen frei
von Mängeln ist, die auf Material- und Verarbeitungsfehler zurückzuführen
sind. Sollte dieses Produkt nicht zufriedenstellend funktionieren, so geben
Sie es an Ihren Fachhändler zurück. Lässt sich das Problem nicht lösen und
während des Garantiezeitraums ist eine Reparatur aufgrund eines Defekts
oder einer Fehlfunktion notwendig, so nimmt eKids diese Reparatur
kostenlos vor oder tauscht das Gerät nach eigenem Ermessen um. Diese
Entscheidung unterliegt der Bestätigung des Defekts oder der Fehlfunktion
nach Übersendung des Geräts an den durch das Werk autorisierten
Kundendienst. Wenn Serviceleistungen erforderlich sind, wenden Sie sich
an den Kundendienst unter +1-800-288-2792, um eine Rücksendenummer
und Versandanweisungen zu erhalten. Eine Kopie des Kaufbelegs ist
erforderlich, um die Gewährleistungsdeckung zu bestätigen.
Haftungsausschluss
HINWEIS: Diese Garantie ist nur gültig, wenn das Produkt zum Zweck
verwendet wird, zu dem es konzipiert wurde. Nicht abgedeckt sind (i)
Produkte, die fahrlässig oder vorsätzlich, durch Zweckentfremdung oder
Unfall beschädigt wurden oder die durch Unbefugte verändert oder repariert
wurden; (ii) gesprungene oder zerbrochene Gehäuse oder Geräte, die
durch übermäßige Hitze beschädigt wurden; (iii) Schäden an digitalen
Mediaplayern, CDs oder Kassetten (falls zutreffend); (iv) die Versandkosten
des Produkts zum autorisierten Kundendienst sowie die Kosten der
Rücksendung.
Diese Garantie gilt nur für den Erstbesitzer und nur in den Vereinigten
Staaten von Amerika. Keinesfalls haftet eKids oder einer seiner Partner,
Subunternehmer, Einzelhändler, deren Angestellte, leitende Angestellte,
Anteilseigner, Mitglieder oder Vertreter Ihnen oder Dritten gegenüber für
mittelbare oder beiläufig entstandene Schäden, Gewinnverlust, tatsächliche
Schäden oder Schadenersatz. (Einige Staaten erlauben keine
Einschränkungen stillschweigender Garantien oder den Ausschluss von
Folgeschäden, so können Sie diese Einschränkungen nicht für Sie geltend
machen.) Diese Garantie gibt Ihnen bestimmte Rechte, und Sie haben
möglicherweise auch andere Rechte, die von Staat zu Staat variieren.
Ihre Anerkenntnis und Zustimmung und Ihre vollständige Befolgung des
vorstehenden Haftungsausschlusses ist mit der Überweisung
(Zahlungsanweisung, Scheck oder Kreditkarte) des Kaufpreises für Ihr
eKids-Produkt vertraglich bindend.
© 2020 eKids, LLC
Questions? Visit www.ekids.com
or call 1-800-288-2792
1299 Main Street Rahway NJ 07065
PO Box 2228
BELFAST, BT5 9GD
Das Gerät erfüllt die FCC-Grenzwerte für
Strahlenexposition in einer unkontrollierten Umgebung.
Das Gerät entspricht Teil 15 der FCC-Bestimmungen.
Der Betrieb unterliegt den folgenden zwei
Bedingungen: (1) Dieses Gerät darf keine schädlichen
Störungen verursachen, und (2) dieses Gerät muss alle empfangenen
Störungen akzeptieren, einschließlich Störungen, die einen unerwünschten
Betrieb verursachen können.
Hinweis: Dieses Gerät wurde getestet und entspricht den Grenzwerten für
digitale Geräte der Klasse B gemäß Teil 15 der FCC-Bestimmungen. Diese
Grenzwerte sollen einen angemessenen Schutz gegen schädliche Störungen
in Wohngebieten bieten. Dieses Gerät erzeugt, nutzt und strahlt
Hochfrequenzenergie aus. Wenn es nicht gemäß den Anweisungen installiert
und verwendet wird, kann es Funkstörungen beschädigen. Es kann jedoch
nicht garantiert werden, dass bei einer bestimmten Installation keine Störungen
auftreten. Wenn dieses Gerät den Radio- oder Fernsehempfang schädigt,
was durch Aus- und Einschalten des Geräts festgestellt werden kann, wird
der Benutzer aufgefordert, zu versuchen, die Störung durch eine oder mehrere
der folgenden Maßnahmen zu korrigieren:
• Setzen Sie die Empfangsantenne zurück.
• Erhöhen Sie den Abstand zwischen Gerät und Empfänger.
• Stecken Sie das Gerät in eine Steckdose eines anderen Stromkreises als
den, an den der Empfänger angeschlossen ist.
• Wenden Sie sich an den Händler oder einen erfahrenen Radio- /
Fernsehtechniker.
Dieses Gerät sollte mit einem Mindestabstand von 20 cm zwischen dem
Sender und Ihrem Körper installiert und betrieben werden.
Warnung: Änderungen, die nicht ausdrücklich vom Hersteller genehmigt
wurden, können zum Verlust der Betriebsgenehmigung führen.
CAN ICES-3 (B)/NMB-3(B)
HF-Belichtung
Das Gerät entspricht den Grenzwerten der FCC Strahlenbelastung für eine
nicht-kontrollierte Umgebung.
Dieser Sender darf nicht zusammen mit einer anderen Antenne oder einem
anderen Sender aufgestellt oder betrieben werden.
Digitales Bluetooth-Karaoke-System
mit Partybeleuchtung
FCC ID: EMO36A
IC: 986B-36A
HVIN:iSF-36a
Zeichnen Sie Ihre Darbietung und speichern Sie sie auf einem USB-Stick!
Bluetooth-Audioaufnahme:
• Verwenden Sie die Modus-Taste, um das Gerät in den
Bluetooth-Modus zu versetzen.
• Schließen Sie ein USB-Flash-Laufwerk an den
USB-Aufnahmeanschluss an der Vorderseite des Gerätes an.
• Vergewissern Sie sich, dass das Mikrofon mit dem Gerät verbunden
und der Ein-/Ausschalter des Mikrofons auf die Ein-Position
eingestellt ist.
• Wählen Sie ein Lied von Ihrem Audiogerät und drücken Sie
Wiedergabe.
• Drücken Sie die Aufnahmetaste. Die Aufnahmeanzeige zeigt durch
Leuchten an, dass Audio aufgenommen wird. Singen Sie ins
Mikrofon, um Ihre Stimme gemeinsam mit der Musik aufzunehmen.
• Sobald Sie mit Ihrer Performance fertig sind, drücken Sie die
Aufnahmetaste zum Stoppen der Aufnahme erneut. Das Audio wird
auf Ihrem USB-Flash-Laufwerk gespeichert.
USB-Audioaufnahme:
• Stellen Sie das Gerät zum Starten über die Modustaste auf den
USB-Modus ein.
• Schließen Sie ein USB-Flash-Laufwerk mit der Musik, die Sie
aufnehmen möchten, an den USB-Wiedergabeanschluss an der
Vorderseite des Gerätes an.
• Verbinden Sie ein anderes USB-Laufwerk mit dem
USB-Aufnahmeanschluss (Ihre Aufnahme wird auf diesem
USB-Laufwerk gespeichert).
• Vergewissern Sie sich, dass das Mikrofon mit dem Gerät verbunden
und der Ein-/Ausschalter des Mikrofons auf die Ein-Position
eingestellt ist.
• Wählen Sie ein Lied vom USB-Wiedergabelaufwerk und drücken Sie
Wiedergabe.
• Drücken Sie die Aufnahmetaste. Die Aufnahmeanzeige zeigt durch
Leuchten an, dass Audio aufgenommen wird. Singen Sie ins
Mikrofon, um Ihre Stimme gemeinsam mit der Musik aufzunehmen.
• Sobald Sie mit Ihrer Performance fertig sind, drücken Sie die
Aufnahmetaste zum Stoppen der Aufnahme erneut. Das Audio
wird auf Ihrem USB-Flash-Laufwerk gespeichert.
Aufnahmen abspielen:
• Verwenden Sie die Modus-Taste, um das Gerät in den USB-Modus
zu versetzen.
• Verbinden Sie ein USB-Flash-Laufwerk mit dem
USB-Wiedergabeanschluss.
• Verwenden Sie die Tasten „Vorwärts“, „Zurück“, „+10 Titel / nächster
Ordner“, um durch Dateien auf Ihrem angeschlossenen USB-Stick
zu navigieren, und drücken Sie dann zum Anhören die
Wiedergabetaste!
Aufnahmen teilen:
• Entfernen Sie das USB-Flash-Laufwerk vom Gerät und verbinden
Sie es zum Teilen Ihrer Darbietungen mit einem Computer!
DISPLAYSYMBOLE
USB-
Modus
Bluetooth-
Modus
Akku vollständig
geladen
Zufallswiedergabe
EIN
Akkuladestand
niedrig
Sprachsteuerung:
Wenn sich das Gerät im Bluetooth-Modus befindet, können Sie über Sprachbefehle auf Siri oder Google Assistant zugreifen.
So verwenden Sie diese Funktion:
• Halten Sie im BT-Modus die Sprachsteuerungstaste für 2 Sekunden gedrückt, um Siri / Google über Ihr gekoppeltes Smartphone zu aktivieren.
• Wenn Sie einen Bestätigungston hören, sprechen Sie in das Mikrofon für die Sprachsteuerung (neben derSprachsteuerungstaste),
um Sprachbefehle zu geben.
Verwenden Sie für die beste Leistung ein
Hochgeschwindigkeits-USB3.1-Speichermedium (nicht im Lieferumfang
enthalten), wenn Sie Audio von diesem Gerät aufnehmen.
Hinweis: Die Verwendung eines USB-Speichermediums mit niedrigerer
Geschwindigkeit kann zum Überspringen oder zu schlechter Leistung des
Bluetooth-Audiostreams führen.
Abhängig von der Online-Streaming-Geschwindigkeit Ihres Telefons kann
es gelegentlich zum Überspringen von aufgezeichneter Musik kommen.
Eingeschränkte einjährige Garantie
VORDERSEITE DES GERÄTES
VERWENDUNG DES MIKROFONS
Auf USB-Laufwerk aufnehmen
RÜCKSEITE DES GERÄTS
Line-AusgangRücksetzung USB-Ladeanschluss
LINE OUT
RESET
DC 5V
Ein-/Aus-Taste
Betriebsanzeige
Bluetooth-
Kopplung
Lichtshow –
Projektion oben
Lichtshow –
Frontlautsprecher
Wiederholen /
Zufallswiedergabe
Einstellbarer
Bass
Einstellbares
Echo
Kopfhörerbuchse
USB-Anschluss
(zur Audioaufnahme)
USB-Anschluss
(zur Audiowiedergabe)
Gesamtlautstärke
Stopp Zurück Vorwärts Wiedergabe/Pause
+10 Titel /
nächster Ordner
Modus
USB oder Bluetooth wählen
Aufnahme
Audio an USB-Anschluss speichern
Aufnahme-
LED
Sprachsteuerung
Mikrofon für Sprachsteuerung
Mikrofon-1-
Lautstärke
Mikrofon-2-
Lautstärke
Mikrofon-1-
Anschluss Mikrofon-2-
Anschluss
10+/
FOLDER+
Bass und Echo
• Drehen Sie den Bass-Drehregler, um den Bass-Effekt des Geräts
einzustellen.
• Passen Sie die Echo-Effekt durch Drehen der Echo-Regler, während
Sie durch das Mikrofon singen.
Wiederholung EIN
• Bei Fragen oder Kommentaren zu diesem oder anderen eKids-Produkten
rufen Sie bitte unsere gebührenfreie Nummer an: 1-800-288-2792.
Besuchen Sie auch unsere Website: www.ekids.com
Wenn die Probleme weiterhin bestehen, versuchen Sie bitte nicht, das
Gerät zu reparieren. Siehe Garantie für den Werksservice.
Wenn das Gerät nicht reagiert:
• Vergewissern Sie sich, dass das Gerät vollständig aufgeladen ist.
• Verwenden Sie eine aufgebogene Büroklammer oder ein anderes
dünnes Werkzeug, um die Reset-Taste zu drücken.
• Um Ihr Gerät erneut zu koppeln, drücken Sie die
Bluetooth-Kopplungs-Taste auf der Vorderseite des Geräts.
Hinweis: Der Akku kann nur von der Reparaturabteilung für
Verbrauchergeräte von eKids ausgetauscht werden.
Fragen oder Kommentare
Problembehandlung
• Es ist wichtig, das Gerät so trocken und sauber wie möglich zu halten.
Reinigen Sie das Gehäuse mit einem feuchten Tuch oder Schwamm
und ggf. etwas mildem Reinigungsmittel. Verwenden Sie keine
aggressiven Reinigungs- oder Lösungsmittel, das führt zu Schäden
am Gerät.
• Batterieladegeräte, die mit dem Gerät verwendet werden, sind
regelmäßig auf Schäden an Kabel, Stecker, Gehäuse und anderen
Teilen zu untersuchen. Im Schadensfall dürfen sie erst verwendet
werden, wenn die Schäden behoben sind.
Pflege
Stellen Sie das Gerät über den Moduswähler auf den USB-Modus ein.
• Verbinden Sie ein USB-Flash-Laufwerk mit dem USB-Wiedergabean-
schluss auf der Vorderseite des Gerätes. (USB-Modus ist nur mit .mp3-
und .wav-Dateien kompatibel.)
• Drücken Sie zum Einschalten des Gerätes die Ein-/Austaste.
• Wenn ein USB-Laufwerk erkannt wird, wird die Anzahl der Dateien auf
dem USB-Laufwerk im LCD-Display angezeigt.
• Drücken Sie die Wiedergabetaste und dann die Taste „+10 Titel /
nächster Ordner“, um 10 Dateien auf dem USB-Laufwerk zu übersprin-
gen. Halten Sie die Taste „+10 Titel / nächster Ordner“ gedrückt, um mit
Titel 1 zu beginnen und navigieren Sie mit den Tasten „Vorwärts“ und
„Zurück“ nacheinander durch die Titel.
Taste „Wiederholen / Zufallswiedergabe“
(funktioniert nur im USB-Modus):
• Drücken Sie die Taste „Wiederholen“, um den aktuellen Titel zu wieder-
holen.
• Drücken Sie die Taste erneut, um alle Titel im aktuellen Ordner zu
wiederholen.
• Drücken Sie die Taste ein drittes Mal, um alle Titel auf dem USB-Lauf-
werk zu wiederholen.
• Drücken Sie die Taste ein viertes Mal, um alle Titel auf dem Flash-Lauf-
werk zufällig wiederzugeben.
• Drücken Sie die Taste ein fünftes Mal, um „Wiederholen / Zufallswie-
dergabe“ auszuschalten.
Verwendung des USB-Modus
• Verwenden Sie die Modus-Taste, um das Gerät in den
Bluetooth-Modus zu versetzen.
• Schalten Sie Ihr Bluetooth-Gerät ein und machen Sie es durch das
Einschalten des Bluetooth-Modus „sichtbar“ (zu finden unter Optionen
oder Einstellungen).
• „Karaoke 36“ sollte im Bluetooth-Menü Ihres Gerätes erscheinen.
Falls „Not Connected“ oder eine ähnliche Meldung erscheint, wählen
Sie zur Herstellung einer Verbindung „Karaoke 36“.
• Die Bluetooth-Anzeige leuchtet bei Verbindung dauerhaft. Versetzen
Sie Ihr Bluetooth-Gerät in den Wiedergabemodus, um mit dem
Streamen von Musik zu beginnen.
• Verwenden Sie die Tasten „Vorwärts“, „Rückwärts“ und
„Wiedergabe/Pause“ am Gerät, um durch die Titel zu navigieren.
• Im Bluetooth-Modus erfolgt die Kopplung automatisch. Wenn innerhalb
von 3 Minuten kein Gerät verbunden ist, wird der Kopplungsmodus
beendet. Halten Sie die Bluetooth-Kopplungstaste gedrückt, um ein
Gerät erneut zu koppeln.
Verwendung des Bluetooth-Modus
GER
VOR
GEBRAUCH
LADEN
• Schließen Sie das Mikrofon an die
Mikrofonbuchse 1 oder 2 auf der
Vorderseite des Geräts an.
• Schieben Sie den Ein-/Ausschalter des
Mikrofons in die Ein-Position.
• Steuern Sie die Mikrofonlautstärke über
den Drehregler an der Vorderseite des
Gerätes.
• Bewahren Sie das Mikrofon bei
Nichtverwendung in den Clips an den
Seiten des Gerätes auf.
Dieses Produkt fällt in die Kategorie „Elektro- und
Elektronik-Altgeräte“.
Das bedeutet, dass dieses Produkt in Übereinstimmung mit der
Richtlinie 2012/19/EU des Europäischen Parlaments und Rates
entsorgt oder demontiert werden muss, um schädliche
Auswirkungen auf die Umwelt zu minimieren.
Weitere Informationen erhalten Sie bei lokalen und regionalen
Behörden.
Elektro- und Elektronikprodukte, die dem Sortierungsverfahren
nicht unterworfen werden, stellen wegen gefährlicher
Substanzen eine potentielle Gefahr für die Umwelt und die
Gesundheit der Allgemeinheit dar.
Erste Schritte
Laden Sie das Gerät via USB-Netzadapter (AC), USB-Port (Computer) oder
über einen anderen netzbetriebenen USB-Port auf.
Es gibt zwei Möglichkeiten, mit diesem Gerät Musik zu hören:
• Im USB-Modus können Sie ein Flash-Laufwerk an das Gerät
anschließen und Ihre gespeicherten Songs anhören.
• Im Bluetooth-Modus können Sie Musik von Ihrem Smartphone oder
einem anderen Bluetooth-Gerät streamen.
Hinweis: Nach 15 Minuten ohne Audioaktivität tritt eine Zeitüberschreitung am
Gerät auf. Drücken Sie zum Fortsetzen der Audiofunktion die Ein-/Austaste.
Gerät laden
1. Schließen Sie das mitgelieferte Micro-USB-Kabel an den
Micro-USB-Ladeanschluss auf der Rückseite des Geräts an.
2. Schließen Sie das Standard-USB-Steckerende des Kabels an einen mit
Strom versorgten USB-Anschluss eines Computers oder an ein
anderes USB-Ladegerät an. Laden Sie das Gerät vor der ersten
Verwendung etwa 5 Stunden lang auf.
Hinweis: Das Symbol für niedrigen Akkustand wird auf dem Display
angezeigt, wenn das Gerät aufgeladen werden muss. Das Symbol für
vollständige Aufladung wird angezeigt, wenn der Ladevorgang
abgeschlossen ist.
netzversorgter
Computer Computer USB-Port
ODER
USB-Netzadapter
(nicht enthalten)
iSF36.5ONLINEIB-GER-072820-A

Modello: iSF-36
CARICARE
PRIMA
DELL'USO
Karaoke digitale Bluetooth con
luci ad effetti speciali
ITA
iSF36.5ONLINEIB-ITA-072820-A
Cenni introduttivi
Porta USB Computer
Caricare mediante adattatore CA USB, porta USB del computer o altra porta
USB alimentata
Computer collegato a
una presa di corrente
OPPURE
Adattatore USB
(non incluso)
• Per domande o commenti relativi a questo o altro prodotti eKids,
chiamare il numero verde: 1-800-288-2792.
Visitare anche il nostro sito web: www.ekids.com
Se i problemi persistono, non tentare di riparare l'unità; vedere la
garanzia per il servizio di fabbrica.
Se l'unità non risponde:
• Accertarsi che l'unità sia completamente carica.
• Utilizzare la parte estesa di una graffetta o di un altro strumento
sottile per premere il pulsante Reset.
• Per ricollegare il dispositivo, premere il pulsante di accoppiamento
Bluetooth sul anteriore dell'unità.
Nota: la batteria ricaricabile può essere sostituita solo da eKids
Consumer Repair Department.
Domande e commenti
Risoluzione dei problemi
Informazioni FCC
eKids, LLC garantisce che questo prodotto sia privo di difetti di
manodopera e materiali, in condizioni ed uso normali, per un periodo di
un (1) anno dalla data di acquisto originale.
Se il prodotto non riesce a funzionare in modo corretto, è meglio
restituirlo al negozio dove era stato acquistato originariamente. Se
nemmeno così si risolvesse la questione e fosse necessaria della
manutenzione a causa di difetti o di malfunzionamento durante il
periodo di garanzia, eKids riparerà, o a sua discrezione sostituirà il
prodotto gratuitamente. Questa decisione è soggetta alla verifica del
difetto o malfunzionamento al momento della fornitura del presente
prodotto al centro assistenza autorizzato dal Servizio Clienti.
Se è necessaria assistenza, chiamare il Servizio Clienti al numero
1-800-288-2792 per ottenere un Numero di autorizzazione alla
restituzione e le istruzioni per la spedizione. Per rendere valida la
copertura della garanzia è necessaria una copia della prova di
acquisto.
Disclaimer di Garanzia
NOTA: Questa garanzia è valida solo se il prodotto è usato per lo scopo
per il quale è stato progettato. Non copre prodotti (i) che sono stati
danneggiati da azioni negligenti o volontarie, uso improprio o incidente,
o che sono stati riparati da terzi non autorizzati; (ii) involucri crepati o
rotti, o unità danneggiate dal calore eccessivo; (iii) danni a lettori
multimediali digitali, CD o audiocassette (se applicabile); (iv) i costi di
spedizione del prodotto al centro assistenza e del ritorno al
proprietario.
Questa garanzia è valida solo negli Stati Uniti d'America e non si
estende ad altre persone oltre all'acquirente originale. In nessun caso
eKids o i suoi affiliati, dipendenti, rivenditori, funzionari, direttori,
azionisti, membri o agenti saranno responsabili nei riguardi suoi o di
parti terze per qualunque danno conseguente o accidentale, perdite di
profitto, danni reali, esemplari o punitivi. (Alcuni Stati non consentono
limitazioni su garanzie implicite o esclusione di danni consequenziali,
quindi queste limitazioni potrebbero non applicarsi al tuo caso.) Questa
garanzia conferisce all'utente diritti legali specifici ed è possibile che
l'utente disponga di altri diritti che possono variare da uno stato all'altro.
Il vostro accordo e la vostra accettazione sono pienamente e
totalmente sostenuti dal disclaimer di garanzia di cui sopra che è
contrattualmente vincolante dal momento del pagamento (ordine
monetario, assegno o carta di credito) dell'acquisto del prodotto eKids.
© 2020 eKids, LLC
Avete domande? Visitare www.ekids.com
o chiamare 1-800-288-2792
1299 Main Street Rahway NJ 07065
PO Box 2228
BELFAST, BT5 9GD
• È importate tenere l’unità quanto più asciutta e pulita possibile. Pulire
la superficie con una spugna o un panno inumidito con sapone
delicato e acqua. Non utilizzare detergenti aggressivi, in quanto
potrebbero causare danni.
• I caricabatterie usati con il unità devono essere regolarmente
esaminati per danni al cavo, spina, alloggiamento e altre parti, e nel
caso di tali danni, esse non devono essere usate fino alla riparazione
del nastro.
Manutenzione
Questo dispositivo è conforme alla Parte 15 delle
norme FCC. L'uso è condizionato dalle seguenti due
condizioni: (1) Questo dispositivo non può provocare
interferenze dannose e (2) questo dispositivo deve
accettare qualsiasi interferenza ricevuta, anche quelle
che possono causare un funzionamento anomalo.
Questo dispositivo è conforme ai limiti di esposizione delle radiazioni FCC
definiti per un ambiente non controllato.
NOTA: Questa apparecchiatura è stata sottoposta a test e trovata conforme
ai limiti per i dispositivi digitali di classe B, ai sensi della parte 15 delle Norme
FCC. Questi limiti sono stati stabiliti per garantire una protezione ragionevole
contro interferenze dannose in zone residenziali. Questa apparecchiatura
produce, utilizza e può irradiare radiofrequenze e se non è installata e usata
seguendo le istruzioni fornite può causare interferenze dannose alle
comunicazioni radio. Tuttavia, non è garantito in alcun modo che tali
interferenze non occorrano se viene eseguita un'installazione particolare.
Se questa apparecchiatura provoca interferenze dannose alla ricezione
radiotelevisiva, fatto che può essere rilevato accendendo e spegnendo
l'apparecchiatura, l'utente è incoraggiato a cercare di correggere l'interferenza
adottando una o più delle seguenti misure:
• Riorientare o riposizionare l'antenna di ricezione.
• Aumentare la distanza tra l'apparecchiatura e il ricevitore.
• Collegare l'apparecchiatura a una presa di corrente che sia in un circuito
diverso da quello a cui è collegato il ricevitore.
• Rivolgersi al rivenditore o a un tecnico radio/TV qualificato per assistenza.
Questo dispositivo deve essere installato e operato con una distanza minima
di 20 cm tra il radiatore e il proprio corpo.
AVVERTENZA: Variazioni o modifiche a questa unità non espressamente
approvate effettuate da terzi possono invalidare il diritto dell'utente a utilizzare
l'apparecchio.
CAN ICES-3 (B)/NMB-3(B)
Esposizione RF
Questo dispositivo è conforme ai limiti di esposizione delle radiazioni FCC
definiti per un ambiente non controllato.
Questo trasmettitore non deve essere collocato vicino ad altre antenne o
trasmettitori.
FCC ID: EMO36A
IC: 986B-36A
HVIN:iSF-36a
Questa unità consente di ascoltare la musica in due modi:
• In modalità USB è possibile collegare un'unità flash all'unità e
ascoltare i brani memorizzati.
• In modalità Bluetooth è possibile ascoltare musica in streaming dallo
smartphone o da un altro dispositivo Bluetooth.
Nota: dopo 15 minuti di nessuna attività audio, l'unità si spegne. Premere
il pulsante di accensione/spegnimento per riprendere la funzione audio.
Het apparaat opladen
1. Sluit de meegeleverde microUSB-kabel aan op de
microUSB-laadpoort op de achterzijde van het apparaat.
2. Sluit de standaard USB-stekker aan op USB-poort op een computer
of een ander USB-oplaadapparaat. Laad het apparaat ongeveer vijf
uur op voor het eerste gebruik.
Nota: L’icona della batteria scarica appare sul display quando è
necessario caricare la batteria. Dopo aver completamente caricato la
batteria, sul display appare la corrispondente icona.
Premere il pulsante Modalità per accedere alla modalità USB.
• Collegare un'unità flash USB alla porta USB di riproduzione sulla
parte frontale dell'unità. (La modalità USB è compatibile solo con file
.mp3 e .wav.)
• Premete l’interruttore per accendere l'unità.
• Quando un'unità USB è rilevata, il numero di file sull'unità USB
apparirà sul display LCD.
• Premere Riproduzione, quindi premere il pulsante “10+/Cartella+” per
scorrere in avanti di 10 tracce alla volta sull’unità USB. Tenere premu-
to il pulsante “10+/Cartella+” per andare alla traccia 1, quindi utilizzare
i pulsanti Avanti e Indietro per navigare tra le tracce una alla volta.
Pulsante Ripetizione/Riproduzione casuale (funzione solo in
modalità USB):
• Premere il pulsante Ripetizione per ripetere la traccia corrente.
• Premere di nuovo per ripetere tutte le tracce contenute nella cartella
corrente.
• Premere una terza volta per ripetere tutti i brani su un'unità flash.
• Premere una quarta volta per ripetere tutte le tracce dell’unità USB
in modalità casuale.
• Premere una quinta volta per disattivare la modalità Ripetizione
/Riproduzione casuale.
Registrare la propria performance e salvarla su un'unità flash USB!
Registrazione audio Bluetooth:
• Per cominciare, premere il pulsante Modalità per accedere alla
modalità Bluetooth.
• Inserire un'unità flash USB nella porta di registrazione USB sulla
parte anteriore dell'unità.
• Assicurarsi che il microfono sia collegato all'unità e che l'interruttore
di accensione/spegnimento del microfono sia acceso.
• Selezionare un brano dal proprio dispositivo audio e premere
Riproduzione.
• Premere il pulsante Registrazione. L'indicatore Registrazione si
accende per confermare che l'unità sia in registrazione audio.
Cantare nel microfono per registrare la propria voce sulla musica.
• Quando si finisce la propria prestazione, premere nuovamente il
pulsante Registrazione per interrompere la registrazione. L'audio
sarà salvato sulla propria unità flash USB.
Registrazione audio USB:
• Per cominciare, premere il pulsante Modalità per accedere alla
modalità USB.
• Inserire un'unità flash USB con la musica che si desidera registrare
nella porta USB di riproduzione sul lato anteriore dell'unità.
• Inserire un'altra unità USB nella porta USB di registrazione (la
registrazione verrà salvata su questa unità USB).
• Assicurarsi che il microfono sia collegato all'unità e che l'interruttore
di accensione/spegnimento del microfono sia acceso.
• Selezionare un brano dalla chiavetta USB di riproduzione e
premere Play.
• Premere il pulsante Registrazione. L'indicatore Registrazione si
accende per confermare che l'unità sia in registrazione audio.
Cantare nel microfono per registrare la propria voce sulla musica.
• Quando si finisce la propria prestazione, premere nuovamente il
pulsante Registrazione per interrompere la registrazione. L'audio
sarà salvato sulla propria unità flash USB.
Ascolto delle registrazioni:
• Premere il pulsante Modalità per accedere alla modalità USB.
• Collegare un'unità di memoria flash USB alla porta di riproduzione
USB.
• Utilizzare i pulsanti Avanti, Indietro, 10+ o Cartella+ per muoversi
tra i file sulla propria unità flash USB collegata, quindi premere
Riproduzione per ascoltare!
Condivisione registrazioni:
• Rimuovere l'unità flash USB dall'unità e collegare a un computer
per condividere le proprie performance!
Utilizzo della modalità USB
Utilizzare il pulsante Modalità per accedere alla modalità Bluetooth.
• Accendere il proprio dispositivo Bluetooth e renderlo “rilevabile”
attivando la modalità Bluetooth (controllare in Opzioni o
Impostazioni).
• “Karaoke 36” dovrebbe apparire nel menu Bluetooth del proprio
dispositivo. Se appare “Not Connected” o un messaggio simile,
selezionare “Karaoke 36” per collegarlo.
• L'indicatore Bluetooth si accende fisso una volta. Mettere il proprio
dispositivo Bluetooth in modalità riproduzione per avviare lo
streaming della musica.
• Utilizzare i pulsanti "Avanti" "Indietro" e "Riproduci / Pausa" sull'unità
per navigare tra le tracce.
• L'accoppiamento avviene automaticamente in modalità Bluetooth.
Se nessun dispositivo è collegato entro 3 minuti, la modalità di
accoppiamento si chiude. Tenere premuto il pulsante di
associazione Bluetooth per associare di nuovo il dispositivo.
Bassi e eco
• Ruotare la manopola dei bassi per regolare l'effetto dei bassi
dell'unità.
• Ruotare la manopola Echo per regolare l'effetto di eco mentre si
canta nel microfono.
Garanzia limitata di 1 anno
Opnemen op een USB-drive
Utilizzo della modalità Bluetooth
Questo prodotto è contrassegnato dal simbolo per la cernita
selettiva per i rifiuti di apparecchiature elettriche ed elettroniche
(RAEE).
Ciò significa che esso deve essere trattato in conformità con la
direttiva europea 2012/19/EU , onde riciclarlo o smontarlo
riducendo al minimo l'impatto sull'ambiente.
Per ulteriori informazioni, contattare le autorità locali o regionali.
I prodotti elettronici non smaltiti con un processo di cernita
selettiva sono potenzialmente pericolosi per l'ambiente e la
salute umana, a causa della presenza di sostenze nocive.
ICONE DISPLAY
Modalità
USB
Modalità
Bluetooth
Batteria
carica
Riproduzione
casuale attiva
Batteria
scarica
Controllo vocale:
Quando l’unità è in modalità Bluetooth, è possibile accedere a Siri o all’assistente Google utilizzando la funzione di comando vocale.
Per utilizzare questa funzione:
• Quando l’unità è in modalità Bluetooth, tenere premuto per due secondi il pulsante di controllo vocale per attivare Siri/Google tramite lo
smartphone collegato.
• Dopo aver sentito un tono di conferma, parlare nel microfono di controllo vocale (accanto al pulsante di controllo vocale) per impartire
i comandi vocali.
Quando si registra l'audio da questa unità, per prestazioni ottimali,
utilizzare un'unità USB 3.1 ad alta velocità (non inclusa).
Nota: L'uso di un'unità USB a velocità inferiore può causare salti o
scarse prestazioni del flusso audio Bluetooth.
A seconda della velocità di streaming online del telefono, a volte la
musica registrata potrebbe saltare.
PARTE ANTERIORE DELL'UNITÀ
USO DEL MICROFONO
• Collegare il microfono al jack per
microfono 1 o 2 sul retro dell'unità.
• Portare l'interruttore ON/OFF del
microfono in posizione ON.
• Controllare il volume del microfono
utilizzando la manopola sul lato frontale
dell'unità.
• Quando non in uso, conservare il
microfono nelle clip su ciascun lato
dell'unità.
RETRO DELL'UNITÀ
Linea uscitaRipristino Porta USB per la ricarica
LINE OUT
RESET
DC 5V
Accensione/
Spegnimento
Indicatore
alimentazione
Associazione
Bluetooth
TProiezione
luci superiore
Proiezione di
luci anteriore
Ripet./
Riprod. casuale
Bassi
regolabili
Eco regolabile
Jack cuffia
Porta USB
(per la registrazione audio)
Porta USB
(per la riproduzione audio)
Volume Master
Stop Indietro Avanti Riproduzione/Pausa
10+/Cartella+
Modalità
Selezionare USB o Bluetooth
Registrazione
Salvare l’audio via porta USB
Indicatore
registrazione
Controllo vocale
Microfono controllo vocale
Volume
microfono 1
Volume
microfono 2
Ingresso
Mic 1 Ingresso
Mic 2
10+/
FOLDER+
Ripetizione
attiva
Model: iSF-26
OPLADEN
VÓÓR
GEBRUIK
Bluetooth-karaoke met
Feestverlichting
DUT
iSF26.5ONLINEIB-DUT-072720-A
Aan de slag
USB-poort van de computer
Opladen via de USB AC-adapter, USB-poort van de computer, of een andere
actieve USB-poort
Computer verbonden met
een actief stopcontact
OF
USB AC-adapter
(niet inclusief)
• Voor vragen of opmerkingen met betrekking tot dit, of andere
eKids-producten kunt u contact opnemen met ons gratis nummer:
1-800-288-2792.
Bezoek onze website: www.ekids.com
Als er problemen blijven aanhouden, probeer het apparaat dan niet
te repareren maar bekijk de garantievoorwaarden voor
fabrieksdiensten.
Als het apparaat niet reageert:
• Zorg ervoor dat het apparaat volledig opgeladen is.
• Gebruik een verbogen paperclip of een ander dun voorwerp om de
Resettoets in te drukken.
• Druk op de toets Bluetooth-koppeling op de achterzijde van het
apparaat om uw apparaat opnieuw te koppelen.
Opmerking: De oplaadbare batterij kan alleen worden vervangen
door eKids Consumer Repair Department.
Vragen of opmerkingen
Problemen oplossen FCC-informatie
eKids, LLC garandeert dat dit product gedurende een periode van één
(1) jaar vanaf de aanvankelijke aankoopdatum vrij is van fabricage- en
materiaalfouten bij normaal gebruik en normale omstandigheden.
Mocht dit product niet naar behoren functioneren, dan kunt u het het
beste terugsturen naar de winkel waar het oorspronkelijk was
aangeschaft. Mocht dit het probleem niet verhelpen en blijkt service
nog steeds nodig te zijn wegens een defect of storing tijdens de
garantieperiode, dan zal eKids dit product kosteloos repareren of naar
eigen goeddunken vervangen. Deze beslissing is afhankelijk van
verificatie van het defect of de storing bij levering van dit product aan
het door de klantendienst geautoriseerde Fabrieksservicecentrum.
Als service is vereist, bel dan a.u.b. onze Klantendienst op
1-800-288-2792 om een Retourauthorisatienummer en informatie over
het versturen te krijgen. Er is een kopie van de aankoopbon vereist om
de garantiedekking te valideren.
Afwijzing van garantie
OPMERKING: Deze garantie is alleen geldig als het product wordt
gebruikt voor het doeleinde waarvoor deze was ontworpen. Het heeft
geen betrekking op (i) producten die zijn beschadigd door nalatigheid
of opzettelijke acties, misbruik of ongelukken, of die zijn gemodificeerd
of gerepareerd door onbevoegde personen; (ii) gebarsten of gebroken
behuizingen, of apparaten beschadigd door teveel hitte; (iii) schade
aan digitale mediaspelers, cd's of cassettes (indien van toepassing);
(iv) de verzendkosten van van dit product naar het
Fabrieksservicecetrum en de teruggave aan de eigenaar.
Deze garantie is alleen geldig in de Verenigde Staten van Amerika en
geldt niet voor eigenaren van het product anders dan de
oorspronkelijke koper. In geen geval zullen eKids of een van haar
gelieerde ondernemingen, contractanten, wederverkopers, hun
functionarissen, directeuren, aandeelhouders, leden of agenten
aansprakelijk zijn jegens u of een derde partij voor enige gevolgschade
of incidentele schade, winstderving, daadwerkelijke, voorbeeldige of
bestraffende schade. (Sommige staten staan geen beperkingen toe op
impliciete garanties of uitsluiting van gevolgschade, dus deze
beperkingen zijn mogelijk niet op u van toepassing.) Deze garantie
geeft u specifieke wettelijke rechten en u hebt mogelijk ook andere
rechten die van staat tot staat verschillen.
Uw erkenning en instemming om volledig en compleet te voldoen aan
de bovengenoemde afwijzing van garantie is contractueel bindend
voor u bij het overmaken van valuta (postwissel, cheque of creditcard)
voor de aankoop van uw eKids-producten.
© 2020 eKids, LLC
Vragen? Ga naar www.ekids.com
of bel 1-800-288-2792
1299 Main Street Rahway NJ 07065
PO Box 2228
BELFAST, BT5 9GD
• Het is belangrijk om het apparaat zo droog en schoon mogelijk te
houden. Maakde behuizing schoon met een vochtige doek of spons
en een mild reinigingsmiddel. Gebruik geen schuurmiddelen of
oplosmiddelen omdat deze schade kunnen veroorzaken.
• Batterijladers gebruikt met het eenheid dienen regelmatig te worden
gecontroleerd op schade aan de kabel, stekker, behuizing en andere
onderdelen, en in het geval van schade mogen deze niet worden
gebruikt totdat de beschadiging is hersteld.
Onderhoud
Dit apparaat voldoet aan Deel 15 van de
FCC-richtlijnen. Gebruik is toegestaan onder de
volgende twee voorwaarden: (1) dit toestel mag geen
schadelijke interferentie veroorzaken, en (2) dit toestel
moet elke ontvangen interferentie accepteren, inclusief
interferentie die ongewenste werking kan veroorzaken.
Deze apparatuur voldoet aan de FCC-limieten voor blootstelling aan straling
vastgesteld voor een ongecontroleerde omgeving.
OPMERKING: Deze apparatuur is getest en voldoet aan de limieten voor
een digitaal toestel van Klasse B, overeenkomstig Deel 15 van de FCC-Regels.
Deze limieten zijn opgesteld om een redelijke bescherming te bieden tegen
schadelijke interferentie bij installatie in een woonwijk. Deze apparatuur
genereert, gebruikt en kan radiofrequente-energie uitstralen en kan, indien
niet in overeenstemming met de instructies geïnstalleerd en gebruikt,
schadelijke interferentie met radiocommunicatie veroorzaken. Er is echter
geen garantie dat er geen interferentie zal optreden bij een bepaalde installatie.
Als deze apparatuur schadelijke interferentie veroorzaakt bij uw radio- of
televisieontvangst, wat kan worden vastgesteld door de apparatuur uit en
aan te zetten, wordt de gebruiker aangeraden deze interferentie te corrigeren
m.b.v. een of meer van de volgende maatregelen:
• Kies een andere antenne-richting of verplaats de antenne.
• Vergroot de afstand tussen de apparatuur en de ontvanger.
• Sluit de apparatuur aan op een stopcontact dat bij een andere groep hoort
dan het stopcontact waarop de ontvanger is aangesloten.
• Raadpleeg de dealer of een ervaren radio-/TV-technicus.
Deze apparatuur dient te worden geïnstalleerd en gebruikt met een minimale
afstand van 20cm tussen de radiator en uw lichaam.
WAARSCHUWING: Wijzigingen of aanpassingen aan dit station die niet
uitdrukkelijk zijn goedgekeurd door de partij die verantwoordelijk is voor de
naleving van voorschriften, kan eventueel de machtiging van de gebruiker
om het toestel te gebruiken nietig verklaren.
CAN ICES-3 (B)/NMB-3(B)
RF-blootstelling
Deze apparatuur voldoet aan de FCC-limieten voor blootstelling aan
straling vastgesteld voor een ongecontroleerde omgeving.
Deze zender mag niet samen met een andere antenne of zender worden
geplaatst of gebruikt.
FCC ID: EMO36A
IC: 986B-36A
HVIN:iSF-36a
Er zijn twee manieren om met dit apparaat naar muziek te luisteren:
• U kunt in de USB-modus een flashdrive aansluiten op het apparaat
om naar uw opgeslagen tracks te luisteren.
• U kunt in de Bluetooth-modus muziek streamen van uw smartphone
of ander Bluetooth-apparaat.
Opmerking: Het apparaat zal na 15 minuten zonder audioweergave
automatisch uitschakelen. Druk op de toets AAN/UIT om de
audiofunctie te hervatten.
Het apparaat opladen
1. Sluit de meegeleverde microUSB-kabel aan op de
microUSB-laadpoort op de achterzijde van het apparaat.
2. Sluit de standaard USB-stekker aan op USB-poort op een computer
of een ander USB-oplaadapparaat. Laad het apparaat ongeveer vijf
uur op voor het eerste gebruik.
Opmerking: Het pictogram Batterij bijna leeg verschijnt op het
beeldscherm wanneer het tijd is om het apparaat op te laden. Het
pictogram Batterij vol verschijnt wanneer het opladen is voltooid.
Gebruik de Modusknop om het apparaat in te stellen op de
USB-modus.
• Steek een USB-flashdrive in de USB-poort op de voorzijde van het
apparaat. (De USB-modus is alleen compatibel met bestanden in
het formaat .mp3 of .wav.)
• Druk op de aan-/uitknop om het apparaat AAN te schakelen.
• Wanneer er een USB-station is gedetecteerd, wordt het aantal
bestanden op uw USB-station weergegeven op het LCD-scherm.
• Druk op Afspelen en druk op de knop ‘10+/Folder+’ om door 10
bestanden per keer te bladeren op het USB-station. Houd de knop
‘10+/Folder+’ ingedrukt om te beginnen bij bestand nummer 1 en
gebruik de knoppen Verder en Terug om door de bestanden te bladeren.
De knop Herhalen/Shuffelen (werkt alleen in USB-modus):
• Druk op de Herhaaltoets om de huidige track te herhalen.
• Druk nogmaals om alle tracks te herhalen binnen de huidige map.
• Druk een derde keer in om alle liedjes op de flashdrive te herhalen.
• Druk een vierde keer om alle tracks te shuffelen op het USB-station.
• Druk een vijfde keer om Herhalen/Shuffelen uit te schakelen.
Neem uw show op en sla het op een USB-flashdrive op!
Audio opnemen:
• Om te beginnen gebruikt u de Modusknop om het apparaat in te
stellen in Bluetooth-modus.
• Steek een USB-flashdrive in de USB-poort op de voorzijde van het
apparaat.
• Zorg ervoor dat de microfoon is aangesloten op het apparaat en
de AAN-/UIT-microfoonschakelaar op de stand AAN staat.
• Kies een liedje op uw audio-apparaat en druk op Start.
• Druk op de Opnametoets. De Opname-indicator zal branden om
aan te geven dat het apparaat nu audio opneemt. Zing in de
microfoon om uw stem samen met de muziek op te nemen.
• Wanneer u klaar bent met uw optreden, drukt u nogmaals op de
Opnametoets om te stoppen met opnemen. De audio zal worden
opgeslagen op uw USB-flashdrive.
Naar opnames luisteren:
• Gebruik de Modusknop om het apparaat in te stellen in
USB-modus.
• Gebruik de toets Volgende, Vorige, 10+ of Folder+ om uw
bestanden op de aangesloten USB-flashdrive te doorlopen en
druk vervolgens op Start om te luisteren!
Opnames delen:
• Haal de USB-flashdrive uit het apparaat en sluit deze aan op een
computer om uw optredens te delen met anderen!
De USB-modus gebruiken
Gebruik de Modusknop om het apparaat in te stellen in
Bluetoothmodus.
• Schakel het Bluetooth-apparaat in maak het “discoverable” door de
Bluetooth-modus in te schakelen (kijk in Opties of Instellingen).
• “Karaoke 26” dient te verschijnen in het Bluetooth-menu van uw
apparaat. Als “Not Connected” of een dergelijke melding verschijnt,
selecteer dan “Karaoke 26” om de verbinding tot stand te brengen.
• De Bluetooth-indicator zal constant blijven branden nadat de
verbinding is geslaagd. Stel uw Bluetooth-apparaat in op
afspeelmodus om te beginnen met het streamen van muziek.
• Gebruik de toetsen “Volgende”, “Vorige” en “Afspelen/Pauze” op
het apparaat voor tracknavigatie.
• • Hert koppelen wordt automatisch uitgevoerd in de
Bluetooth-modus. Als er binnen 3 minuten geen apparaat wordt
verbonden, dan zal de koppelingsmodus automatisch worden
verlaten. Houd de knop Bluetooth koppelen ingedrukt om een
apparaat opnieuw te koppelen.
Echomodi
Druk op de Echotoets voor stoere stemeffecten! Druk meerdere
keren in om de 8 verschillende echomodi te doorlopen naargelang u
in de microfoon zingt. Beperkte garantie van één jaar
Opnemen op een USB-drive
De Bluetooth-modus gebruiken
Dit product bevat het symbool voor selectief sorteren van afval
van elektrische uitrustingen en elektronica (WEEE).
Dit betekent dat dit product moet worden gehanteerd
overeenkomstig de Europese richtlijn 2012/19/EU ten einde te
worden gerecycled of gedemonteerd om de impact op het milieu
te minimaliseren.
Neem contact op met uw plaatselijke of regionale overheid voor
meer informatie. plaatselijke of regionale overheid.
Elektronische producten die niet selectief gesorteerd worden,
zijn potentieel gevaarlijk voor het milieu en de gezondheid van
de mens omwille van de aanwezigheid van gevaarlijke stoffen.
ICOONTJES OP
DE DISPLAY
USB-modus
Bluetooth-
modus
Batterij vol
Shuffle AAN
Batterij bijna
leeg
Spraakbediening:
Wanneer het apparaat in Bluetooth-modus is, kunt u toegang krijgen tot Siri of Google Assistant via spraakopdrachten.
Gebruik deze functie:
• Als het apparaat in BT-modus staat, houdt u de knop spraakbediening 2 seconden ingedrukt om Siri/Google te activeren via de gekoppelde
smartphone.
• Zodra u de bevestigingstoon hoort, spreekt u in de Microfoon voor spraakbediening (naast de knop Spraakbediening) om een
spraakopdracht in te voeren.
FGebruik voor de beste prestaties een supersnelle 3.1 USB-stick
(niet inbegrepen) bij het opnemen van audio vanaf dit toestel.
Opmerking: Wanneer een USB-stick met lagere snelheid wordt
gebruikt, kan dit leiden tot overslaan of slechte prestaties van de
Bluetooth-audiostream.
Soms kan het voorkomen dat opgenomen muziek wordt overgeslagen,
afhankelijk van de online streaming-snelheid van uw telefoon.
VOORZIJDE VAN HET APPARAAT
DE MICROFOON GEBRUIKEN
• Sluit de microfoon aan op
Microfooningang 1 of 2 op de achterzijde
van het apparaat.
• Schuif de AAN-/UIT-microfoonschakelaar
naar de stand AAN.
• Regel het volume met de draaiknop op de
voorzijde van het apparaat.
• Berg de microfoon op in de klemmen aan
beide zijden van het apparaat wanneer
niet in gebruik.
ACHTERZIJDE VAN HET APPARAAT
LijnuitgangReset USB-oplaadpoort
LINE OUT
RESET
DC 5V
AAN-/UIT-schakelaar
Aan-/
uitindicator
Bluetooth
koppeling
Topprojectie
lichtshow
Lichtshow
voorste luidspreker
Herhalen/
Willekeurig
Aanpasbare
bas
Aanpasbare
echo
Aansluiting
hoofdtelefoon
USB-poort
(voor audio opnemen)
USB-poort
(voor audio afspelen)
Hoofdvolume
Stop Vorige Volgende Start/Pauze
10+/Map+
Modus
USB of Bluetooth selecteren
Opname
Audio naar USB-poort
opslaan
Opname-indicator
Spraakbediening
Microfoon spraakbediening
Volume
microfoon 1
Mic 2-aansluiting
Mic 1-aansluiting
Mic 2-aansluiting
10+/
FOLDER+
Herhalen AAN
Table of contents
Languages:
Other eKids Karaoke System manuals


