EkoOkna RAFF-I User manual

ASSEMBLY INSTRUCTION
OF THE RAFF-I EXTERNAL VENETIAN BLINDS
1.INFORMATION ABOUT THE INSTRUCTION
This manual includes a descriptive section as well as a section with drawings showing the main stages of assembly. The section
with drawings is in the part with directions for assembly. These instructions should be treated as original according to the records
of the European Directive 2006/42 / EC. These instructions contain important information about the product. Please read them
carefully and follow them.
2.INFORMATION BEFORE THE ASSEMBLY
Before installing the EVB package, its condition and correctness should be checked. Pay particular attention to the condition
of the straps and ladders (if any). The packed box and rails should be stored in a dry place until assembly. It is forbidden to
stack boxes, rest objects on boxes or place items on boxes. Prior to installation, the condition of the building’s EVB should be
assessed. If necessary, additionally attach the box or guides directly to the building or EVB. Additional reinforcements of the
RAFF-i box must be attached to the lintel of the building. The EVB package may only be installed in the RAFF-i box when it is in
a technically perfect condition. No additional structural elements or non-system fixings may be mounted on the box. They can
adversely affect the function of the EVB and lead to damage to it. The end positions of the EVB package are preset. In case
of de-programming, they must be set again in accordance with the manual of the motor used in the EVB package.
Electrical installations must be performed by authorized electricians in accordance with the requirements of the country where
the installation takes place. When working at greater heights, installers and construction elements must be secured against
falling. Some components of the RAFF-i system can be cut from sharp edges!
ASSEMBLY INSTRUCTION
OF THE RAFF-I EXTERNAL VENETIAN BLINDS
3.INSTALLATION OF THE EXTERNAL VENETIAN BLINDS
In order for the EVB to meet its technical properties, the correct production process and correct assembly are
important
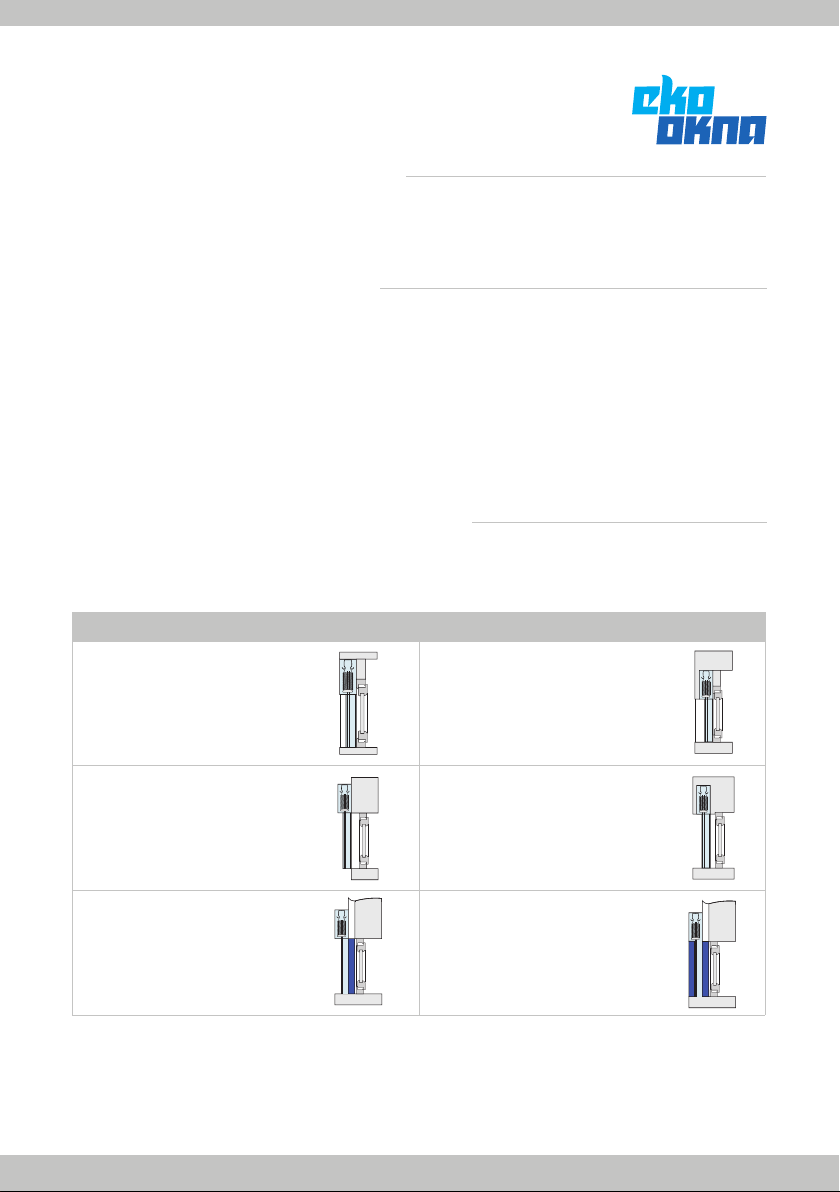
EXAMPLES OF CONSTRUCTION VARIANTS
On the reveal in the version of a
visible box..
On the reveal in the flush-mounted
version of the box.
On the wall in a flush-mounte
version.
On the wall in the visible version.
On the window in the visible
version with the use of offsets.
On the window in the visible
version with the use of offsets at the
back and front (e.g., for a recess).
ASSEMBLY INSTRUCTION
OF THE RAFF-I EXTERNAL VENETIAN BLINDS
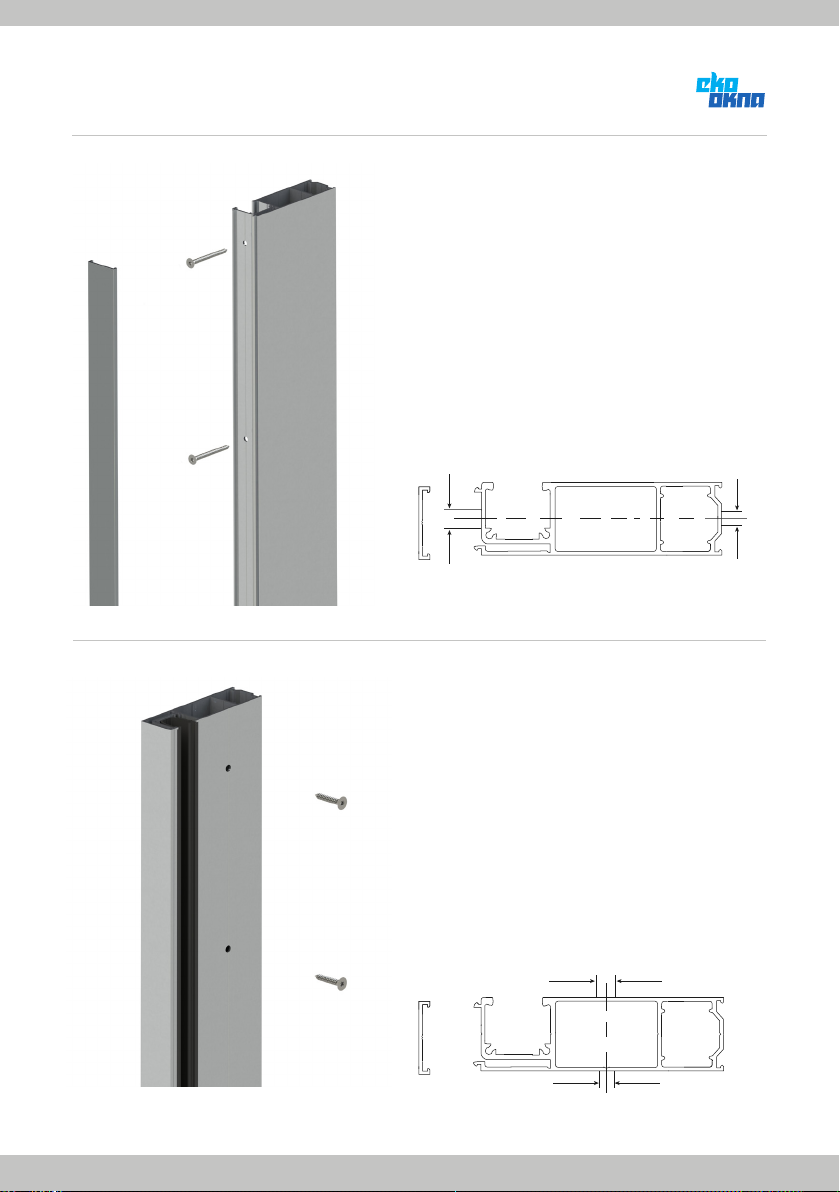
FRONT GUIDE MOUNTING
Drill mounting holes in the guide from the front in the
numbers shown below, depending on the length of the
guide.
With the guide bar length:
≤ 150 cm: 2 fixings on the FS
≤ 250 cm: 3 fixings on the FS
> 250 cm: 5 fixings on the FS
> 300 cm: 7 fixings on the FS
Mount the MONOBLOCK EKOOKNA
Aluminum guide on the EVB or window frame using
assembly screws (not included). Plug from the front with
the enclosed aluminum profile.
Ø10
Ø5
Ø10
Ø5
ASSEMBLY OF THE GUIDING RAILS
ON THE SIDE
Drill mounting holes on the side of the guide in the
numbers shown below, depending on the length of the
guide.
With the guide bar length:
≤ 150 cm: 2 fixings on the FS
≤ 250 cm: 3 fixings on the FS
> 250 cm: 5 fixings on the FS
> 300 cm: 7 fixings on the FS
Attach the MONOBLOCK EKOOKNA
Aluminum guide to the side of the EVB or other surface
using assembly screws (not included in the set).

ASSEMBLY INSTRUCTION
OF THE RAFF-I EXTERNAL VENETIAN BLINDS
Attach the MONOBLOCK EKOOKNA aluminum
guide to the side of the EVB or other surface using
assembly screws (not included in the set). Plug from the
front with the enclosed aluminum profile.
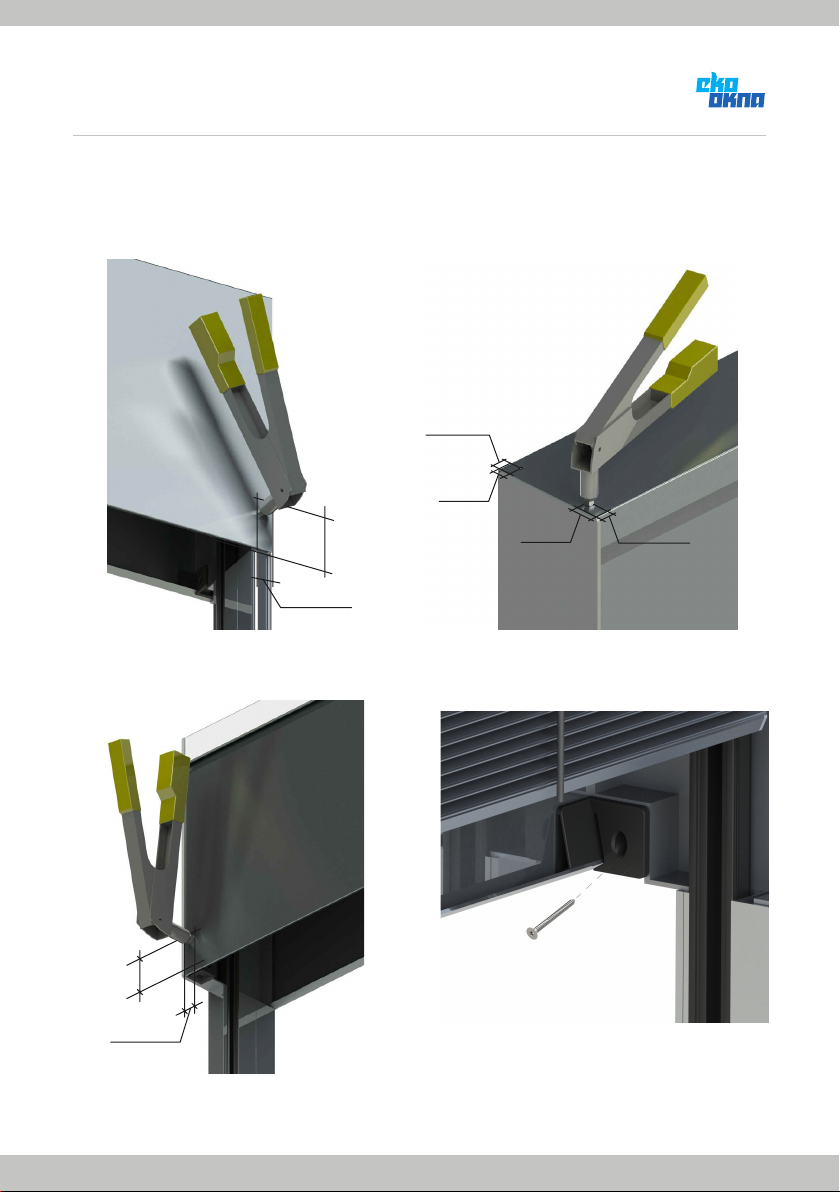
In the case of additional system reinforcements of the
RAFF-i boxes, attach the box to the lintel.
Mounting screws are not included.
Place the box from the top. There are special pins pro-
-truding from the box, which just need to be inserted into
previously mounted guides.
ASSEMBLY INSTRUCTION
OF THE RAFF-I EXTERNAL VENETIAN BLINDS
HOW TO ASSEMBLE THE REVISION HATCH:
Attach the box cover plates to the side covers with rivets in accordance with the drawings below.
10-15mm25mm
25mm
10-15mm
10-15mm
50mm
10-15mm
50mm
* Alternative method of mounting the revision hatch
The front wall of the box (revision hatch) can be fixed
with a fastening element in the side wall of the box.

ASSEMBLY INSTRUCTION
OF THE RAFF-I EXTERNAL VENETIAN BLINDS
Place the EVB package in the box. The package sho-
uld be attached to the box with automatic grips instal-
led inside the box on the side walls and on ad-ditional
box reinforcements.
Insert the PVC guide in such a way that the guides of
the EVB shutter set are inside it.
TIPS:
◾Press the PVC guide so that it is seated
in the aluminum MONOBLOK EKOOKNA guide.
◾The PVC guide should be disassembled before
removing the package from the RAFF-i box again.
Correctly mounted set of blinds in the PVC guide,
inside the RAFF-i system box.
38 mm
Attach the guide to the box, as shown in the
graphic below.
ASSEMBLY INSTRUCTION
OF THE RAFF-I EXTERNAL VENETIAN BLINDS

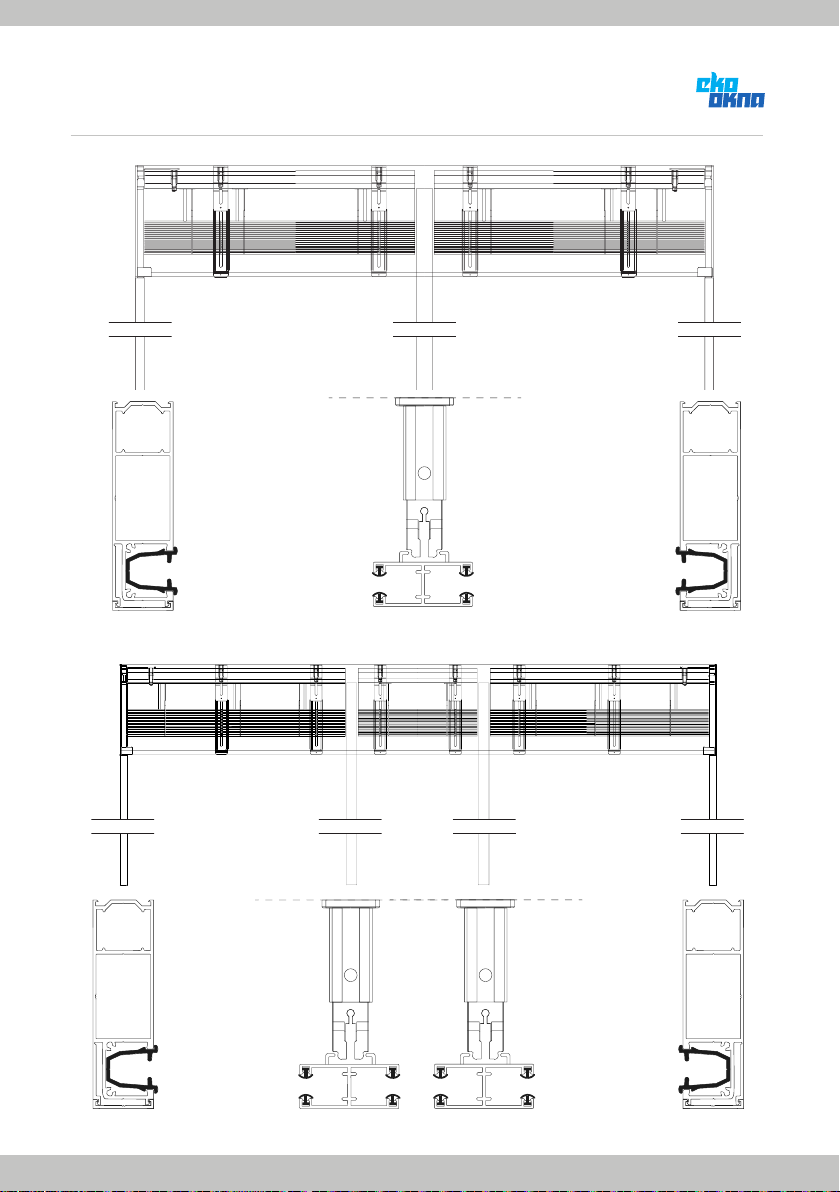
ASSEMBLY INSTRUCTION
OF THE RAFF-I EXTERNAL VENETIAN BLINDS
Guide
MONOBLOCK FROM EKOOKNA Guide
RAFF-e (A 45)
27 mm
92 mm
DIVIDER guide
TYPE 4
22,5 mm
21,1 mm
40 mm
70-90 mm
20 mm
27 mm
Embedment RAFF-e 10 mm Embedment RAFF-e 10 mm
Embedment RAFF-e 20 mm
92 mm
24 mm
27 mm
24 mm
24 mm
20 mm
27 mm
Guide PVC (A40)

ASSEMBLY INSTRUCTION
OF THE RAFF-I EXTERNAL VENETIAN BLINDS
EKO-OKNA’S EMBEDMENT IN A MONOBLOCK GUIDING RAIL:
Application examples
1.INTERNAL EMBEDMENT
2.EXTERNAL EMBEDMENT
3.EXTERNAL AND INTERNAL EMBEDMENT
When choosing the embedment, please consider a use of an internal/external plaster carrier.
EMBEDMENT
EMBEDMENT
EMBEDMENT
EMBEDMENT
STYROFOAM STYRODUR

ASSEMBLY INSTRUCTION
OF THE RAFF-I EXTERNAL VENETIAN BLINDS
EMBEDMENT IN A RAFF-e GUIDING RAIL
When choosing the embedment, please consider a use of an internal plaster carrier.
INSTALLATIE STYROFOAM

ASSEMBLY INSTRUCTION
OF THE RAFF-I EXTERNAL VENETIAN BLINDS
______________________________________________________________________________________
______________________________________________________________________________________
______________________________________________________________________________________
______________________________________________________________________________________
______________________________________________________________________________________
______________________________________________________________________________________
______________________________________________________________________________________
______________________________________________________________________________________
______________________________________________________________________________________
______________________________________________________________________________________
______________________________________________________________________________________
______________________________________________________________________________________
______________________________________________________________________________________
______________________________________________________________________________________
______________________________________________________________________________________
______________________________________________________________________________________
______________________________________________________________________________________
______________________________________________________________________________________
______________________________________________________________________________________
______________________________________________________________________________________
______________________________________________________________________________________
______________________________________________________________________________________
______________________________________________________________________________________
______________________________________________________________________________________
______________________________________________________________________________________
______________________________________________________________________________________
______________________________________________________________________________________
______________________________________________________________________________________
______________________________________________________________________________________
______________________________________________________________________________________
______________________________________________________________________________________
______________________________________________________________________________________
______________________________________________________________________________________
All figures are indicative only
and may not fully represent the actual product.
NOTES

www.ekookna.com
Eko-Okna S.A. ul. Spacerowa 4 47-480 Kornice
06/2022
Table of contents
Other EkoOkna Window Blind manuals

Popular Window Blind manuals by other brands


Ametek
Ametek Dunkermotoren DCD22 manual

Velux
Velux Z0V Series manual

Screen Innovations
Screen Innovations Nano Box installation instructions

TUISS
TUISS Twist2Fit installation guide

John Lewis
John Lewis FAUX WOOD VENETIAN BLIND instruction manual

Swiss Sonnenschutz
Swiss Sonnenschutz Wood Line Series Assembly and operating instructions

sun collection
sun collection FALTSTORE UP & DOWN Assembly instructions

Graywind
Graywind 58511 user guide

Stobag
Stobag SG2400_7 Installation

Isotra
Isotra Vivera CONTROL AND MAINTENANCE MANUAL

ALTA
ALTA HONEYCOMB SHADES installation instructions

John Lewis
John Lewis DAY & NIGHT ROLLER BLIND instruction manual