EL-produkter Naise N260 User manual

Important: Please read the instruction manual carefully prior to installation and keep it for future reference.
Mounting: Wall or Ceiling
Light features:
Ra: >80
Life Time: 5 years
Light Source: LED SMD2835
Input:220V-240VAC 50/60Hz
Ordering code
N260 12 SOF
Power
(W)
12
Function
Description
On/off HF sensor
LED Fixture
Product
Fitting series
N260
N260 12 SDM 12
Sensor-DIM
(Bi-level dimming)
LED Fixture
N260
N260 12 STM 12
Corridor function
(Tri-level dimming)
LED Fixture
N260
Color temperature:
30K
40K
50K
CCT(K)
3000
4000
5000
1020
1068
1116
Lumen
Color temperature
Warm White
Natural White
Cool White
Code
OPERATING MANUAL
Naise N260 - Sensor
No.
1
2
3
Qty.
3
3
2
Usage
Fix light
Rawl Plug
Rubber plug
Pic.
Accessories
3
Ceiling Mounting Installation:
Push the securing lugs on the both
sides.
Fix the base to the surface with
screws.
21
Twist the diffuser.
260
89
C0/ C18 0: C90/ C270:
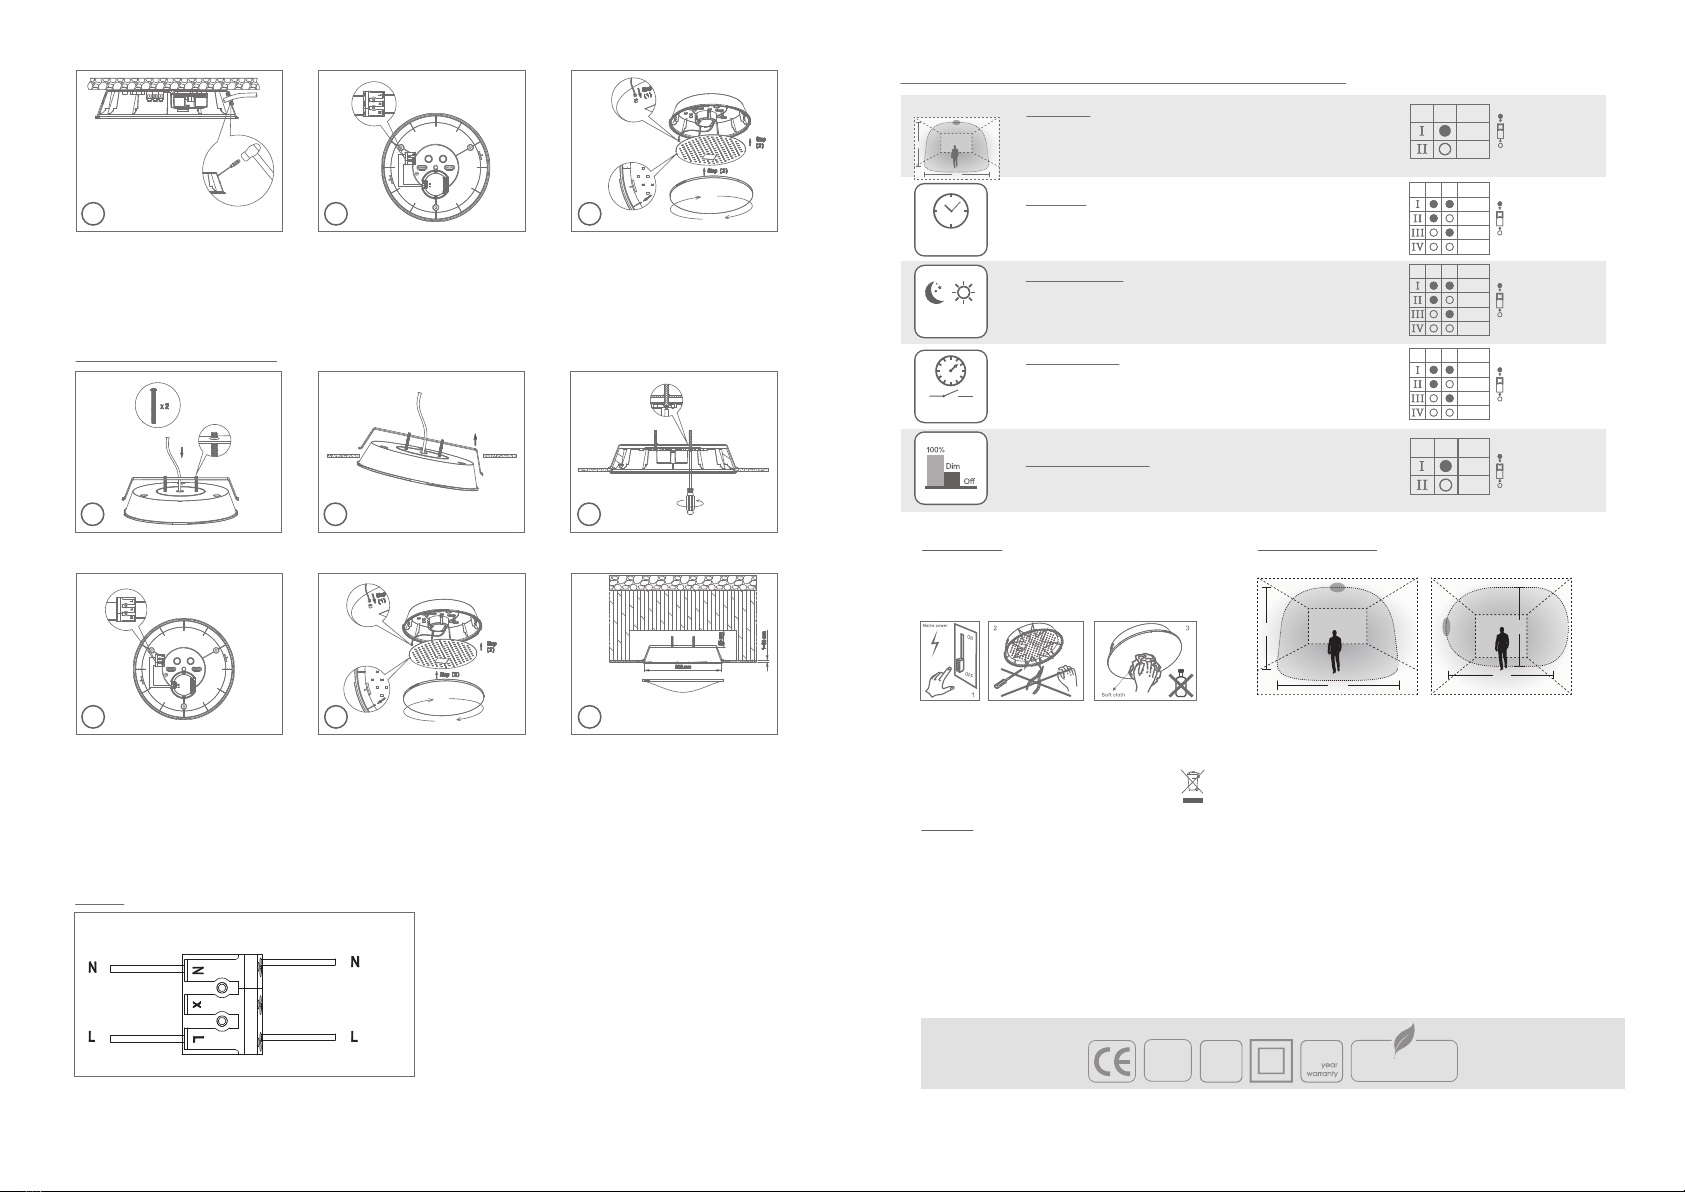
Put the fixture into the hole. Fix the base to the surface with
screws.
Connect the base with the bracket.
Step(1): Connect the driver with the
PCB board via the cable.
Step(2): Fix the PCB board on the
base.
Step(3): Close the diffuser.
Hole dimension.Wiring.
Wiring Step(1): Connect the driver with the
PCB board via the cable
Step(2): Fix the PCB board on the
base
Step(3):Close the diffuser
Break the knock-out holes on the
cover.
3
Recessed Mounting Installation:
21
6
54
6
54
Wiring:
rosneS
Setting options ( For code N260 12 SOF/N260 12 SDM/N260 12 STM)
Sensitivity can be adjusted by selecting the combination
on the DIP switches for different applications.
I – 5s
II – 90s
III – 3min
IV – 10min
I – 0s
II – 10s
III – 10min
IV – +∞
Hold-time refers to the time period that the light remains
100% on if no more movement is detected.
This is the time period that the light remains at a low level
before it is completely turned off.
I – 100%
II – 50%
100%
50%
1
6 7
0s
10s
10min
+∞
I – Disable
II – 50Lux
III – 10Lux
IV – 2Lux
Daylight sensor
Different daylight threshold can be preset on DIP switches.
Light will always turn on upon movement if daylight sensor
is disabled.
Stand- by dim level
Light can be dimmed to different levels after hold-time.
I – 10%
II – 30%
10%
30%
8
Disable
50Lux
10Lux
2Lux
4 5
5s
90s
3min
10min
2 3
Sensitivity
Stand- by time
Hold-time
2~50Lux
Stand-by period
0s~+
8
Hold-time
5s~30min
ceiling mounting pattern (m)
6m
12m
Detection Pattern
ceiling mounting pattern (m)
6m
12m
wall mounting pattern (m)
9m
4m
RoHS
5
IP54
SAA
Caution:
1. Cut off the main power first
2. Don’t touch LED while maintaining or cleaning
3. Don't use chemical reagent to clean lamp.
Environmental protection: waste electrical products
should not be disposed of with household waste. Please
recycle where facilities exist. Check with your local
authority or retailer for recycling advice.
Maintenance
1. The product must be installed by professional technicians and power supply must be cut off before installation.
2. The installation wiring must be 0.75mm2at least and wired in accordance with the latest IEE electrical
regulations or the national requirements.
3. Do not touch the electronic circuit and its components.
4. Contact an authorised technical service centre for any repairs possibly required use only original spare parts.
5. Do not touch LED while installing or maintaining.
6. The LED light source can not be replaced.
This manual suits for next models
3
Other EL-produkter Security Sensor manuals


