manuals.online logo
Brands
  1. Home
  2. •
  3. Brands
  4. •
  5. AVE
  6. •
  7. Security Sensor
  8. •
  9. AVE AF969R User manual

AVE AF969R User manual

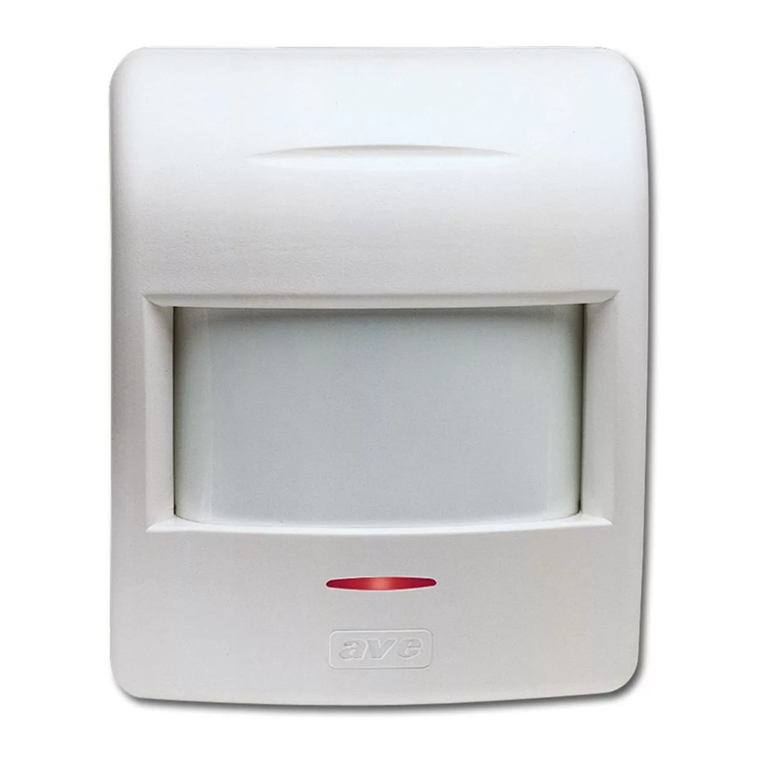
AF969R
Rivelatore IR-P via radio da esterni
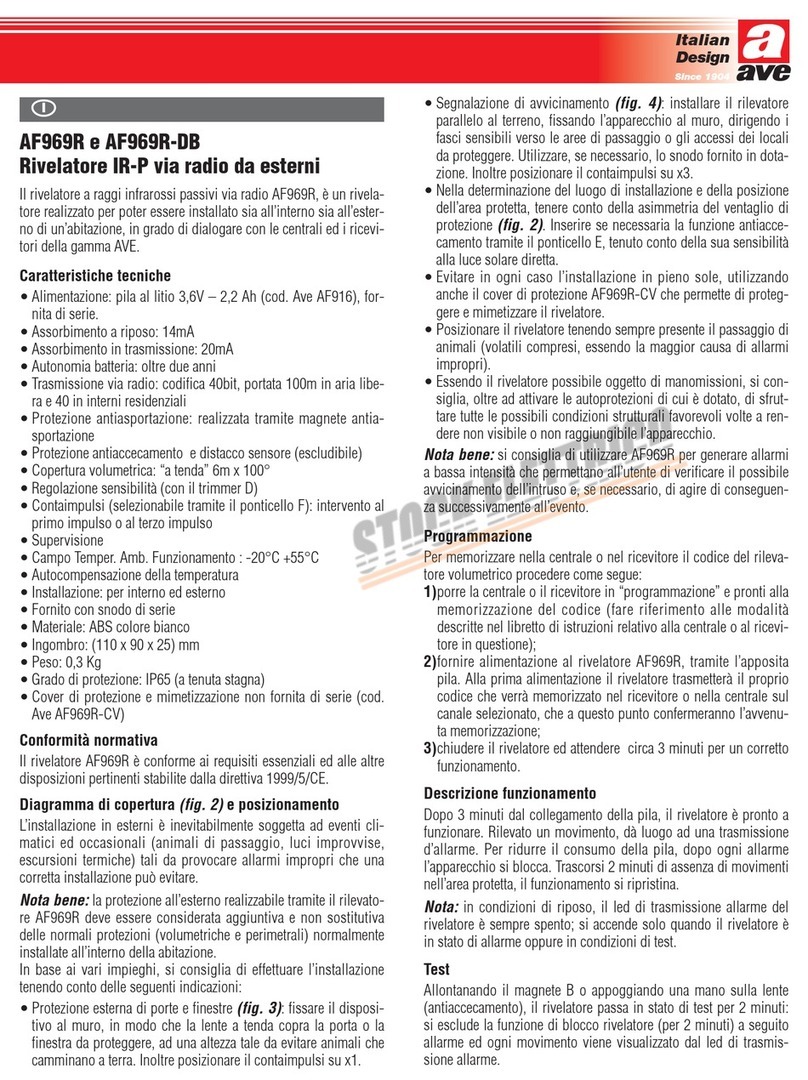
Il rivelatore a raggi infrarossi passivi via radio AF969R, è un rivela-
tore realizzato per poter essere installato sia all’interno sia all’ester-
no di un’abitazione, in grado di dialogare con le centrali ed i ricevi-
tori della gamma AVE.
Caratteristiche tecniche
•Alimentazione: pila al litio 3,6V – 2,2 Ah (cod. Ave AF916), for-
nita di serie.
•Assorbimento a riposo: 14mA
•Assorbimento in trasmissione: 20mA
•Autonomia batteria: oltre due anni
•Trasmissione via radio: codifica 40bit, portata 100m in aria libe-
ra e 40 in interni residenziali
•Protezione antiasportazione: realizzata tramite magnete antia-
sportazione
•Protezione antiaccecamento e distacco sensore (escludibile)
•Copertura volumetrica: “a tenda” 6m x 100°
•Regolazione sensibilità (con il trimmer D)
•Contaimpulsi (selezionabile tramite il ponticello F): intervento al
primo impulso o al terzo impulso
•Supervisione
•Campo Temper. Amb. Funzionamento : -20°C +55°C
•Autocompensazione della temperatura
•Installazione: per interno ed esterno
•Fornito con snodo di serie
•Materiale: ABS colore bianco
•Ingombro: (110 x 90 x 25) mm
•Peso: 0,3 Kg
•Grado di protezione: IP65 (a tenuta stagna)
•Cover di protezione e mimetizzazione non fornita di serie (cod.
Ave AF969R-CV)
Conformità normativa
Il rivelatore AF969R è conforme ai requisiti essenziali ed alle altre
disposizioni pertinenti stabilite dalla direttiva 1999/5/CE.
Diagramma di copertura (fig. 2) e posizionamento
L’installazione in esterni è inevitabilmente soggetta ad eventi cli-
matici ed occasionali (animali di passaggio, luci improvvise,
escursioni termiche) tali da provocare allarmi impropri che una
corretta installazione può evitare.
Nota bene: la protezione all’esterno realizzabile tramite il rilevato-
re AF969R deve essere considerata aggiuntiva e non sostitutiva
delle normali protezioni (volumetriche e perimetrali) normalmente
installate all’interno della abitazione.
In base ai vari impieghi, si consiglia di effettuare l’installazione
tenendo conto delle seguenti indicazioni:
•Protezione esterna di porte e finestre (fig. 3): fissare il disposi-
tivo al muro, in modo che la lente a tenda copra la porta o la
finestra da proteggere, ad una altezza tale da evitare animali che
camminano a terra. Inoltre posizionare il contaimpulsi su x1.
•Segnalazione di avvicinamento (fig. 4): installare il rilevatore
parallelo al terreno, fissando l’apparecchio al muro, dirigendo i
fasci sensibili verso le aree di passaggio o gli accessi dei locali
da proteggere. Utilizzare, se necessario, lo snodo fornito in dota-
zione. Inoltre posizionare il contaimpulsi su x3.
•Nella determinazione del luogo di installazione e della posizione
dell’area protetta, tenere conto della asimmetria del ventaglio di
protezione (fig. 2). Inserire se necessaria la funzione antiacce-
camento tramite il ponticello E, tenuto conto della sua sensibilità
alla luce solare diretta.
•Evitare in ogni caso l’installazione in pieno sole, utilizzando
anche il cover di protezione AF969R-CV che permette di proteg-
gere e mimetizzare il rivelatore.
•Posizionare il rivelatore tenendo sempre presente il passaggio di
animali (volatili compresi, essendo la maggior causa di allarmi
impropri).
•Essendo il rivelatore possibile oggetto di manomissioni, si con-
siglia, oltre ad attivare le autoprotezioni di cui è dotato, di sfrut-
tare tutte le possibili condizioni strutturali favorevoli volte a ren-
dere non visibile o non raggiungibile l’apparecchio.
Nota bene: si consiglia di utilizzare AF969R per generare allarmi
a bassa intensità che permettano all’utente di verificare il possibile
avvicinamento dell’intruso e, se necessario, di agire di conseguen-
za successivamente all’evento.
Programmazione
Per memorizzare nella centrale o nel ricevitore il codice del rileva-
tore volumetrico procedere come segue:
1)porre la centrale o il ricevitore in “programmazione” e pronti alla
memorizzazione del codice (fare riferimento alle modalità
descritte nel libretto di istruzioni relativo alla centrale o al ricevi-
tore in questione);
2)fornire alimentazione al rivelatore AF969R, tramite l’apposita
pila. Alla prima alimentazione il rivelatore trasmetterà il proprio
codice che verrà memorizzato nel ricevitore o nella centrale sul
canale selezionato, che a questo punto confermeranno l’avvenu-
ta memorizzazione;
3)chiudere il rivelatore ed attendere circa 3 minuti per un corretto
funzionamento.
Descrizione funzionamento
Dopo 3 minuti dal collegamento della pila, il rivelatore è pronto a
funzionare. Rilevato un movimento, dà luogo ad una trasmissione
Hi-Tech
Electric Solution

C446 1-09-2003 14:08 Pagina 2
d’allarme. Per ridurre il consumo della pila, dopo ogni allarme
l’apparecchio si blocca. Trascorsi 2 minuti di assenza di movimenti
nell’area protetta, il funzionamento si ripristina.
Nota: in condizioni di riposo, il led di trasmissione allarme del
rivelatore è sempre spento; si accende solo quando il rivelatore è
in stato di allarme oppure in condizioni di test.
Test
Allontanando il magnete B o appoggiando una mano sulla lente
(antiaccecamento), il rivelatore passa in stato di test per 2 minuti:
si esclude la funzione di blocco rivelatore (per 2 minuti) a seguito
allarme ed ogni movimento viene visualizzato dal led di trasmis-
sione allarme.
Regolare a questo punto la sensibilità (2m = 50% trimmer – 6m =
70/90% trimmer) tenendo conto che deve essere più elevata nel
caso di protezioni “a tenda”.
Nota: dopo 2 minuti di quiete l’apparecchio ritorna al funziona-
mento normale.
Antiaccecamento
Un ostacolo collocato davanti al rilevatore viene individuato e pro-
voca una trasmissione di allarme tamper (fig.5).
Nota: la funzione è sensibile alla luce solare diretta sulla lente,
quindi è escludibile tramite il ponticello E.
Antiasportazione
La funzione è possibile soltanto tramite l’apposito magnete B fissa-
to nella posizione indicata in fig.6, oppure installando la calotta di
protezione (cod. Ave AF969R-CV) completa di magnete.
Nota: se il magnete non viene installato (fig. 7, montaggio con
snodo) la funzione è esclusa automaticamente.
AF969R
Outdoor passive infrared radio detector
The AF969R is a passive infrared radio detector suitable for indoor
and outdoor installation, which can dialogue with AVE control
panels and receivers.
Technical data
•Power supply: 3.6V-2.2 Ah lithium battery (code AVE AF916),
supplied with the kit
•Electrical input when quiescent: 14mA
•Electrical input during transmission: 20mA
•Battery range of operation: over 2 years
•Radio transmission: 40bit coding, 100 m range in free air, 40 m
in living rooms
•Tamper protection: by means of a tamper magnet
•Blind protective device and sensor removal (can be excluded)
protection
•Protected area: 6 m x 100° “curtain-effect” protection
•Sensitivity setting (by means of trimmer D)
•Pulse-counter (to be selected by means of jumper F): tripping at
first or third pulse
•Supervisory function
•Operating room temperature: -20°C + 55°C
•Temperature self-balance
•Positioning: indoors and outdoors
•Supplied with standard articulated joint
•Material: white ABS
•Dimensions: (110 x 90 x 25) mm
•Weight: 0.3 Kg
•Protection degree: IP65 (hermetic seal)
•Protection cover not supplied with the kit (code AVE AF969R-
CV)
Standard compliance
The detector AF969R is in compliance with the essential require-
ments and other relevant provision of directive 1999/5/EC.
Range (fig. 2) and positioning
Outdoor installation implies that the device is exposed to the
effects of atmospheric agents and other (such as animals, sudden
lighting and thermal range) able to cause unsuitable alarms that a
proper installation can prevent.
Note: the outdoor protection ensured by the AF969R detector is
an additional protection that does not replace the other traditional
indoor protections (volumetric and door and window protections).
According to the intended use, installation is to be carried out fol-
lowing the instructions below:

C446 1-09-2003 14:08 Pagina 3
•Doors and windows external protection (fig. 3). The device
must be installed on the wall. The range of the “curtain-effect”
lens must cover the door or window to be protected; it must be
installed at a proper distance from the floor after considering the
passage of animals. Put the pulse-counter on x1.
•People’s approach (fig. 4). The detector must be parallel to the
floor and the device must be installed to the wall; the rays must
be directed towards passageways or the access to the rooms that
must be protected, using, if necessary, the articulated joints sup-
plied by AVE. Put the pulse-counter on x3.
•When deciding the spot of installation and the position of the
protected area, consider the asymmetry of the protection range
(fig. 2). If necessary, activate the blind protective function by
means of jumper E, after considering its sensitivity to direct sun-
light.
•In any case, avoid installing the device at direct sunlight and
use the protection cover AF969R-CV to protect and conceal the
detector.
•Install the detector always thinking to any passage of animals
(even birds which are the main cause of unsuitable alarms).
•Due to the risk of tampering, we suggest, besides using its self-
protecting devices, doing your best efforts to conceal the device
so that it cannot be found by ill-intentioned persons.
Note: We also suggest using the device AF969R to generate low-
intensity alarms allowing the user to detect an ill-intended person
approaching, and take the necessary steps.
Programming
To store the volumetric detector code onto the control panel or the
receiver, do as follows:
1)prepare the control panel or the receiver for “programming” and
for storing the code (refer to the instructions of the User’s
manual relating to the control panel or the receiver);
2)energize the detector AF969R using the corresponding battery.
When energized for the first time, the detector transmits its code
to the receiver or the control panel for storing onto the selected
channel. Storing is then confirmed;
3)close the detector and wait about 3 minutes for correct opera-
tion.
Operation description
3 minutes after connecting the battery, the detector is ready for use.
When a movement is detected, an alarm starts. To reduce battery
consumption, the device stops after every alarm. After 2 minutes
with no movements detected in the protected area, the device goes
ON.
Note: if quiescent, the detector’s alarm transmission led is always
OFF and it goes ON only when the detector goes under alarm or
during a test.
Test
Moving away magnet B or putting a hand onto the lens (blind pro-
tective function) the detector goes into a test status for 2 minutes:
the detector locking function is disabled (for 2 minutes) due to the
alarm and every movement is signalled by the alarm transmission
led.
Sensitivity must now be set (2 m = 50% trimmer – 6 m = 70/90%
trimmer) by keeping in mind that it should be higher in the presen-
ce of “curtain-effect” protections.
Note: after 2 minutes in the quiescent status, the device goes back
to its normal operation.
Blind protective function
A hindrance placed in front of the detector is detected and causes
the tamper alarm (fig.5).
Note: : this function is sensible to direct sunlight onto the lens
and it can be disabled by means of jumper E.
Tamper device
This is possible only if magnet B is fixed in the position shown in
fig. 6, or if a protection cover (AF969R-CV) is installed together
with the magnet.
Note: if the magnet is not installed (fig. 7, assembly with articu-
lated joint) this function is automatically disabled.
C446 1-09-2003 14:08 Pagina 4
6 m
0,5 m
100°
AVVERTENZE
I prodotti devono essere commercializzati in confezione originale, in caso contrario al rivenditore e/o
installatore è fatto obbligo di applicare e di trasmettere all'utilizzatore le istruzioni d'uso che accom-
pagnano il prodotto. Dopo aver aperto l'imballaggio, assicurarsi dell'integrità dell'apparecchio, nel
dubbio non utilizzare l'apparecchio e rivolgersi a personale professionalmente qualificato.
L'apparecchio, anche se imballato, deve essere maneggiato con cura e immagazzinato in luogo
asciutto ad una temperatura compresa tra –5…+40°C.
Si ricorda inoltre:
•Il prodotto, se non diversamente specificato, è destinato all'utilizzo in luoghi asciutti e non polve-
rosi. Per ambienti particolari utilizzare prodotti specifici.
•Nel caso di prodotti alimentati con batterie quando queste sono scariche vanno sostituite con un
modello equivalente e smaltite secondo le vigenti norme. Nel caso dovesse verificarsi fuoriuscita
del liquido, sostituirle immediatamente, pulire accuratamente l’alloggio delle batterie, proteggendo-
si le mani con guanti al silicone. In caso di contatto con il liquido lavarsi accuratamente le mani.
• Nel caso di prodotti utilizzanti batterie al Litio, unitamente a quanto sopra, tenere conto che queste
presentano pericolo d’esplosione; devono quindi essere sostituite da personale specializzato.
DIRECTIONS
The products must be sold in their original packing. Where this is not the case, the retailer and/or
the installer must apply and transmit the instructions for use supplied with the product to the user.
After opening the packing, check the product’s ntegrity; in case of doubt, do not use the equipment
and consult skilled personnel. Even when wrapped in its packing, the equipment must be handled
with care and stored in a dry room at a temperature between –5 and +40°C.
Remember:
• If not otherwise indicated, the product must be used in dry rooms free of dust.
Use specific products for special environments.
•In the case of products powered by batteries, should they be discharged, they must be replaced
with similar batteries and disposed according to the rules in force. In the case of liquid leaks,
replace them immediately, clean the battery housing with care wearing silicone gloves. In the case
of liquid contact, wash your hands carefully.
•In the case of products powered with lithium batteries, in addition to the above precautions,
remember that they must be replaced by skilled personnel as they present explosion hazard.
C.446 - 00 - 281102
Fig.1 aposizione della pila
bmagnete antiasportazione
crelè magnetico (Reed) per
antiasportazione
dtrimmer regolazione sensibilità
eponticello abilitazione
antiaccecamento
fponticello contaimpulsi
abattery location
btamper magnet
cmagnetic relay (Reed) for
tamper function
dsensitivity setting trimmer
eblind function enabling jumper
fpulse-counter jumper
–
+
+
e
OFF
ON
d
ba
c
f
x1x3
Fig.2
X
Y
X
Y
0,15 m tamper
Fig.5
10 mm
bbb
Fig.6
Fig.7
Fig.3
Fig.4
C446 1-09-2003 14:08 Pagina 1

Other AVE Security Sensor manuals

AVE AF45 62 Series User manual

AVE

AVE AF45 62 Series User manual

AVE domina AF976R-DB User manual

AVE

AVE domina AF976R-DB User manual

AVE AF970R User manual

AVE

AVE AF970R User manual

AVE AF974R-DB User manual

AVE

AVE AF974R-DB User manual

AVE AF974R-DB User manual

AVE

AVE AF974R-DB User manual

AVE domina AF968R-DBN User manual

AVE

AVE domina AF968R-DBN User manual

AVE Domina Smart AF964R-DB User manual

AVE

AVE Domina Smart AF964R-DB User manual

AVE AF964R-DB User manual

AVE

AVE AF964R-DB User manual

AVE AF975R-DB User manual

AVE

AVE AF975R-DB User manual

AVE LUCE AMICA 44 068/3F Series User manual

AVE

AVE LUCE AMICA 44 068/3F Series User manual

AVE LUCE AMICA User manual

AVE

AVE LUCE AMICA User manual

AVE AF969R User manual

AVE

AVE AF969R User manual

AVE LUCE AMICA 44 068/3F Series User manual

AVE

AVE LUCE AMICA 44 068/3F Series User manual

AVE AF45362 User manual

AVE

AVE AF45362 User manual

AVE AF969F User manual

AVE

AVE AF969F User manual

AVE AF962 User manual

AVE

AVE AF962 User manual

AVE AF962 User manual

AVE

AVE AF962 User manual

Popular Security Sensor manuals by other brands

Tavool TH511 quick start guide

Tavool

Tavool TH511 quick start guide

DSG DG-50 installation instructions

DSG

DSG DG-50 installation instructions

schmersal RSS 36-D-R-ST-DU manual

schmersal

schmersal RSS 36-D-R-ST-DU manual

LaserLiner CombiFinder Plus quick start guide

LaserLiner

LaserLiner CombiFinder Plus quick start guide

Optex OA-EDGE T Quick reference guide

Optex

Optex OA-EDGE T Quick reference guide

DINUY DM KNT 002 quick start guide

DINUY

DINUY DM KNT 002 quick start guide

S+S Regeltechnik AERASGARD RLQ-CO2-W Operating Instructions, Mounting & Installation

S+S Regeltechnik

S+S Regeltechnik AERASGARD RLQ-CO2-W Operating Instructions, Mounting & Installation

IMI SENSORS 682B05 operating guide

IMI SENSORS

IMI SENSORS 682B05 operating guide

Haneco SKYLUX Smart Control installation guide

Haneco

Haneco SKYLUX Smart Control installation guide

System Sensor EBR Installation and maintenance instructions

System Sensor

System Sensor EBR Installation and maintenance instructions

Leica Ultra user manual

Leica

Leica Ultra user manual

Panasonic SF4B-F31G(V2) instruction manual

Panasonic

Panasonic SF4B-F31G(V2) instruction manual

AJAX FireProtect 2 Jeweller manual

AJAX

AJAX FireProtect 2 Jeweller manual

Bosch ISN-AP1-T installation guide

Bosch

Bosch ISN-AP1-T installation guide

Reno A&E BX-LP Series operating instructions

Reno A&E

Reno A&E BX-LP Series operating instructions

GE H-10 Operation and service

GE

GE H-10 Operation and service

TECHNI-PRO TNP801 operating instructions

TECHNI-PRO

TECHNI-PRO TNP801 operating instructions

Leeo Smart Alert quick start guide

Leeo

Leeo Smart Alert quick start guide

manuals.online logo
manuals.online logoBrands
  • About & Mission
  • Contact us
  • Privacy Policy
  • Terms and Conditions

Copyright 2025 Manuals.Online. All Rights Reserved.