Electric Mobility Euro Liteway 3 Plus User manual

El ctric Mobility Euro Limit d, Canal Way, Ilminst r , Som rs t TA19 9DL
T l phon : 01460 258100 www. l ctricmobility.co.uk Issu 1: 06/09
Lit way 3 & 4 Plus
Scoot rs
Own rs Manual & S rvic R cord
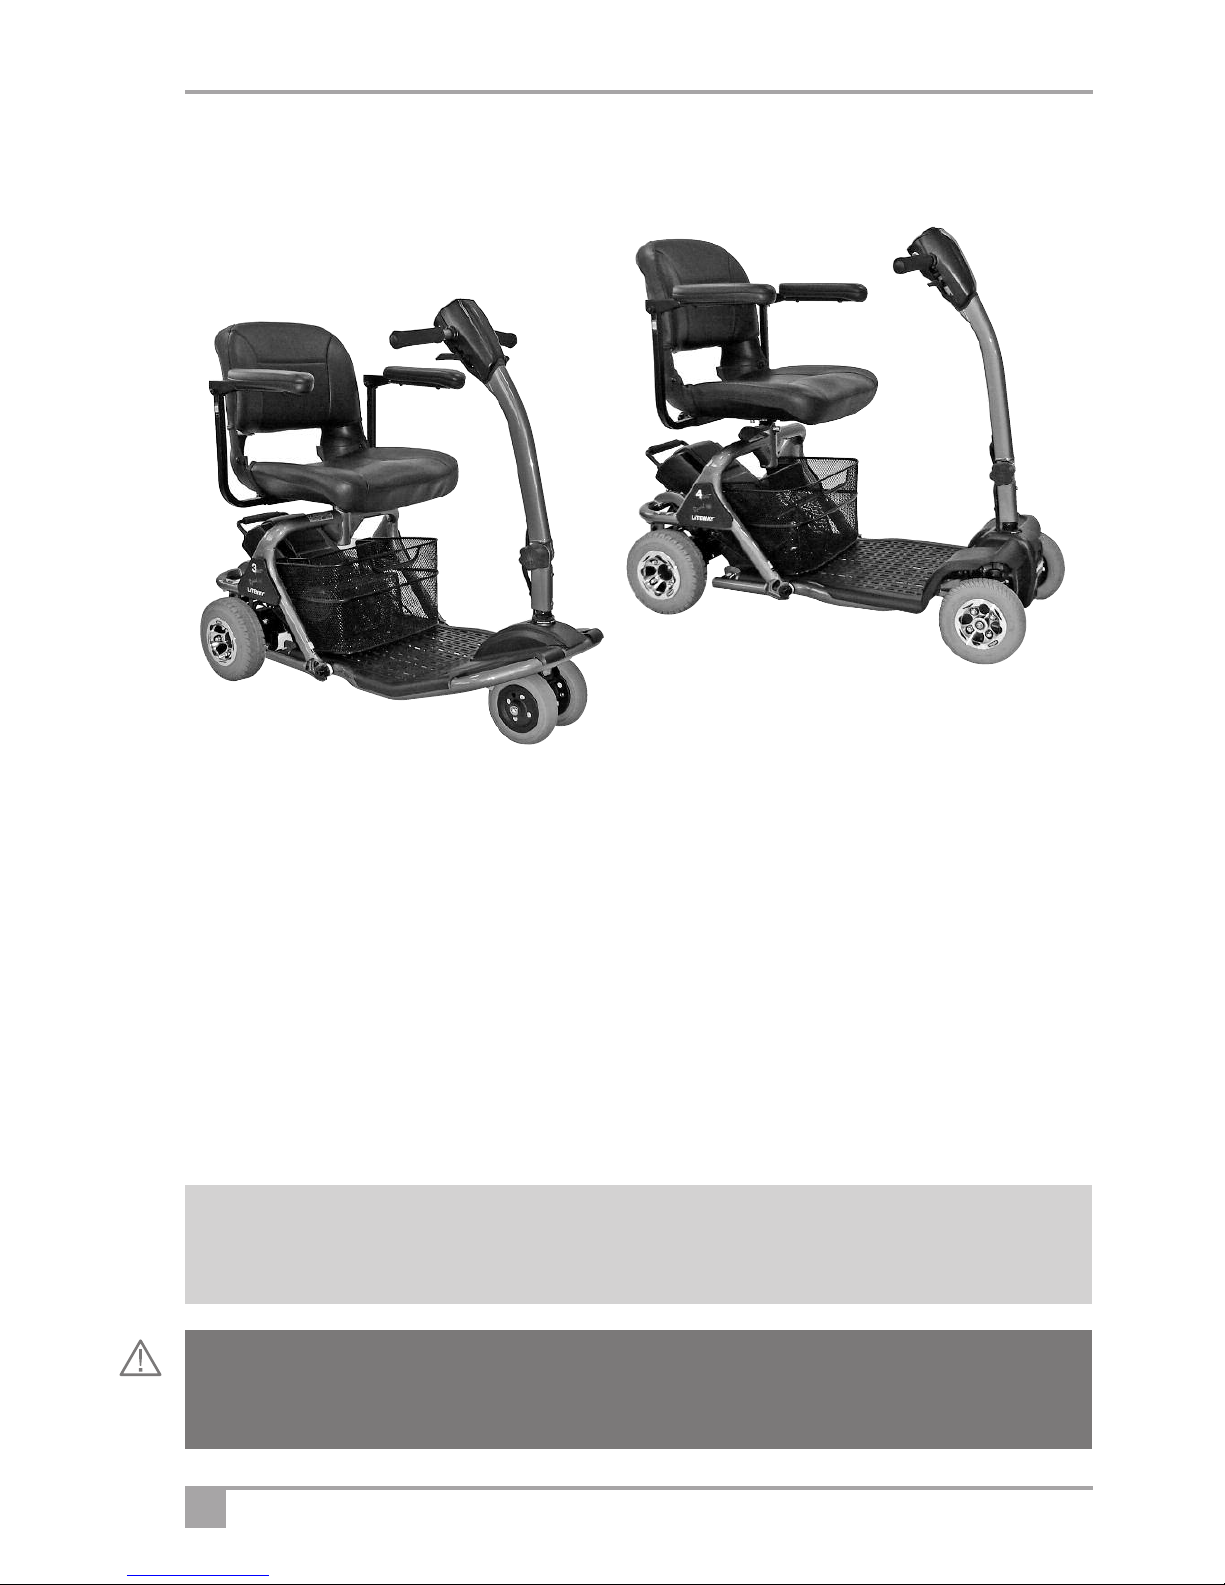
Lit way 4 Plus
Lit way 3 Plus
El ctric Mobility Euro Ltd off rs th s lightw ight, mano uvrabl scoot rs for conv ni nt indoor and outdoor
us . Th y can b asily and quickly dismantl d for transporting in th boot of a car. So long as your scoot r is
maintain d and op rat d in accordanc with this manual it should last for many y ars, and provid you with
fr dom and ind p nd nc .
Pl as r ad this manual thoroughly b for using this scoot r. If you hav any doubts about warnings or
instructions, ask your d al r for an xplanation. If at any tim you f l you may not b abl to control th v hicl
saf ly, do not driv , but consult your d al r for a solution. If you think th scoot r may b damag d, do not driv
it but contact your d al r for advic .
W sugg st that you k p this manual in a saf plac . It contains ss ntial information on th op ration of th
scoot r and includ s th maint nanc r cords. If at any tim you f l you may not b abl to control th
v hicl saf ly, do not driv , but consult your d al r for a solution.
2
2Lit way 3 & 4 Plus Scoot r Own r’s Manual & S rvic R cord
Notic
All El ctric Mobility V hicl s ar sold through authoris d d al rs. Mak sur your d al r d monstrat s all
th f atur s of th product prior to, or wh n, it is d liv r d.
Warning!
This manual contains important saf ty notic s. Pl as tak tim to r ad and und rstand th m. Ignoring
th m may ndang r you or oth rs.
Lit way 4 Plus
Lit way 3 Plus

3
Cont nts D al r information 4
Fatur s and layout 4
Saf ty information 5
Int nd d us 5
Saf ty Information 6
Controls - Dashboard 8
Controls - Driving Controls & Acc l rator 9
Fr wh l D vic 9
Brak s 9
Armr st adjustm nt 10
Swiv l s at 10
Till r folding 10
Driving th v hicl 11
Driving th v hicl - hazards 12
Transporting your scoot r 13
Ass mbling your scoot r 14
Batt ry charging 15
Additional saf ty information 16
Us r maint nanc 17
S rvicing & maint nanc 17
Diagnostic Tabl 18
Troubl shooting guid 19
Fr qu ntly ask d qu stions 20
Engin rs ch cklist 21
Guarant & Warranty 22
T chnical information r garding EMI 22
T chnical sp cification - Lit way 3 Plus 23
T chnical sp cification - Lit way 4 Plus 24
Brochur r qu st 25
Warranty Card - d al r information 25
S rvic log 27
4Lit way 3 & 4 Plus Scoot r Own r’s Manual & S rvic R cord
D al r Information
For product information s s rial numb r plat on th s at post und r th s at.
Manufactur r
Electric Mobility Euro Limited
Canal Way, Ilminst r, Som rs t TA19 9DL
Company R gistration in England No. 2419231
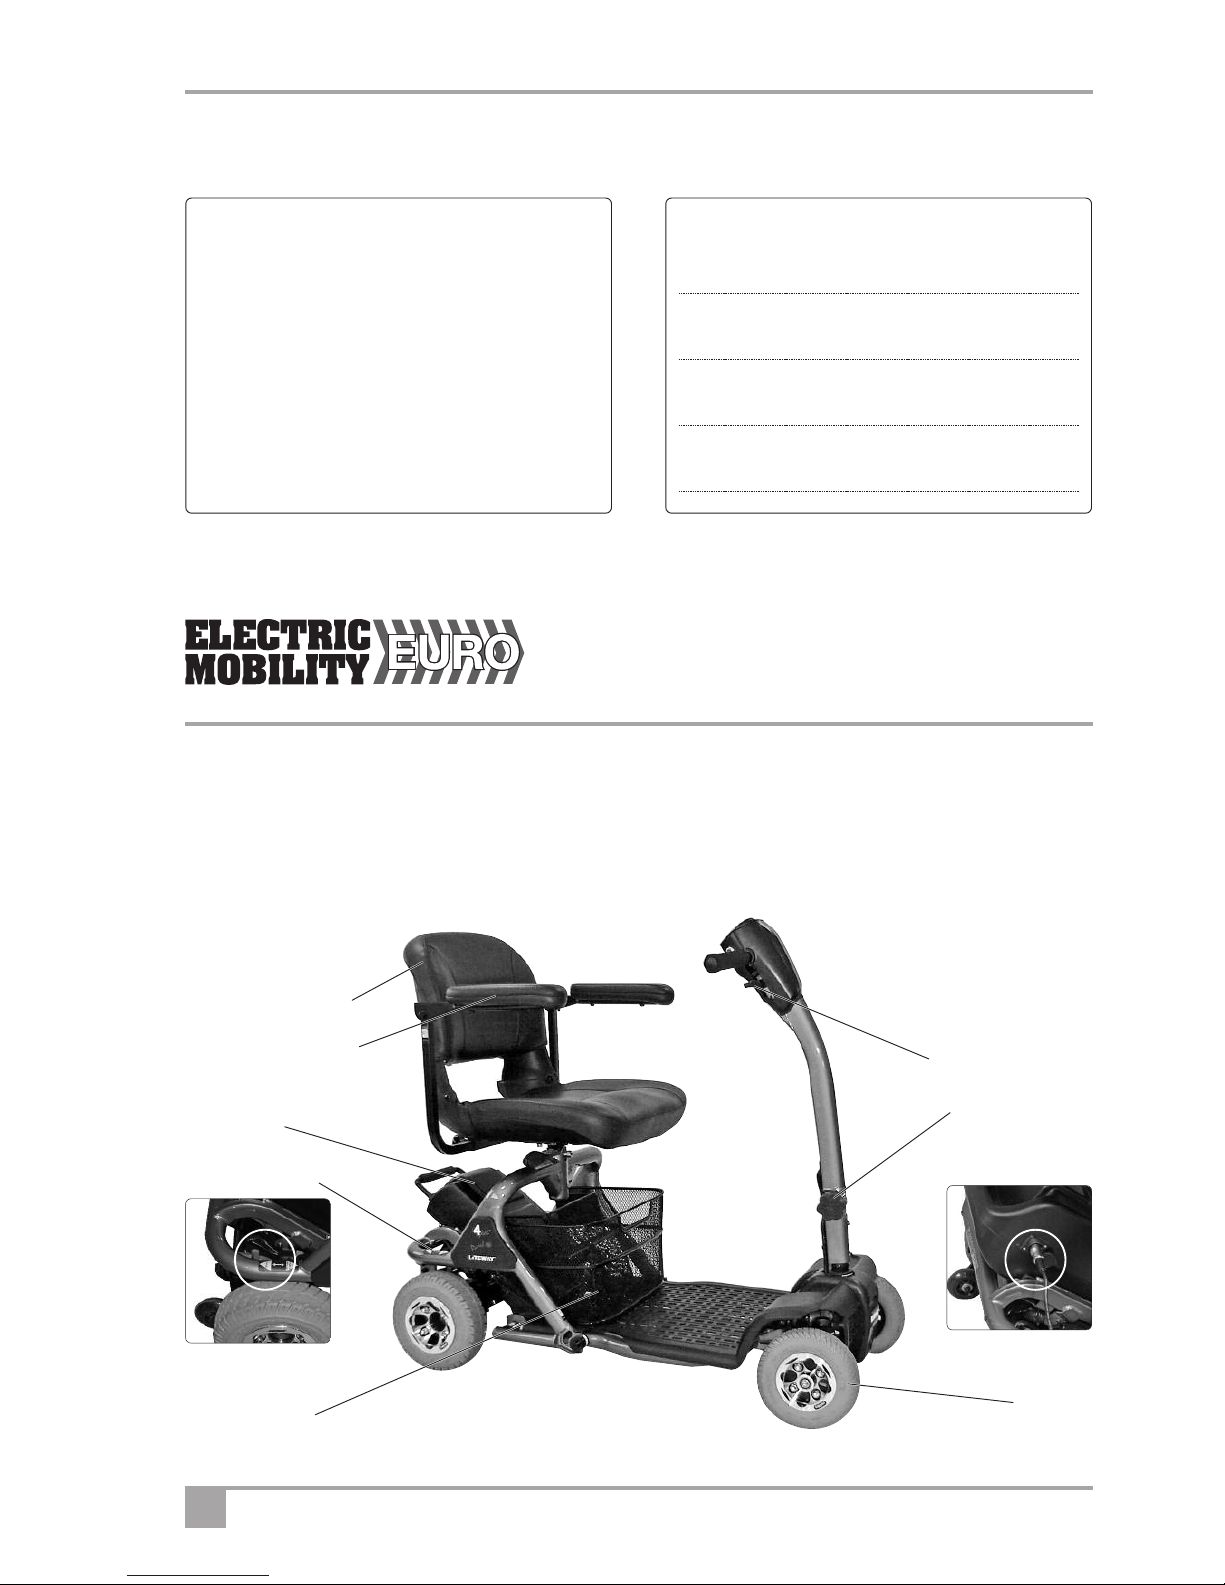
F atur s and Layout
Photo shows Lit way 4 Plus mod l scoot r. Th Lit way 3 Plus is a 3 wh l v rsion. S th sp cification for
diff r nc s.
This is your contact numb r
for s rvic and support
D al r Stamp
T l phon :
Email:
Product Mod l Numb r
S rial Numb r
Dat of Purchas
Own r
Fold down backr st
Fold up / adjustabl
armr sts
Fr wh l l v r
Und r s at
storag bask t
Fing r control l v r
Till r adjustm nt
Charging cabl
Solid tyr s
all round
Batt ry box

5
Saf ty Information
R ad this manual thoroughly b for driving or op rating th v hicl .
This handbook is applicabl for all mod ls.
If you hav any doubt about th cont nt of this manual phon your d al r to r solv th probl m. Pl as r ad
this manual, and nsur your scoot r is s rvic d r gularly.
© 2009 El ctric Mobility Euro Ltd.
No liability is assum d with r sp ct to th us of any information contain d in this publication. Whil v ry
pr caution has b n tak n in th pr paration of this publication El ctric Mobility Euro Ltd. assum s no
r sponsibility for rrors or omissions nor is any liability assum d for damag s r sulting from th us of
information contain d in this publication. This publication, as w ll as th op rational d tails d scrib d
h r in, is subj ct to chang without notic .
Int nd d us of th v hicl
This v hicl is d sign d for us by adults with a disability (up to th maximum r comm nd d w ight - s
T chnical Sp cification sh t) who r quir a robust but lightw ight and transportabl scoot r that is id al for
indoor us as w ll as shopping and oth r visits. Lit way scoot rs hav b n sp cifically d sign d to b quickly
and asily disass mbl d for transportation by car.
Th scoot rs ar int nd d for us in th hom , and for shopping ar as and trips on r asonably pav d ar as.
K rbs should b avoid d, but th scoot rs can mount k rbs and small obstacl s up to that sp cifi d in th
T chnical Sp cification sh t.
3-wh l d scoot rs ar mor mano uvrabl , but marginally l ss stabl , than quival nt 4-wh l d mod ls. In
fact, th Lit way 3 has two small front wh ls clos tog th r to improv stability. How v r, th Lit way 3 plus is
d sign d for us wh r stability is l ss important than mano uvrability, for instanc wh n us d in th hom . Th
Lit way 4 Plus is a 4 mph pav m nt scoot r which can b rapidly tak n apart for stowag in a car boot.
Us rs could ndang r th ms lv s and oth rs if th y ar not capabl of driving this scoot r saf ly. D al rs will
advis on th most suitabl v hicl from th El ctric Mobility rang , but it is up to us rs to nsur that th y
hav th manual d xt rity to driv th v hicl , ad quat sight and h aring to p rc iv dang r in tim , and can
at all tim s op rat th scoot r saf ly in th xp ct d conditions. If in doubt w sugg st you consult a
h althcar prof ssional or your n ar st d al r for advic on th most suitabl scoot r for your particular
condition. Us rs should also r gularly ass ss th ir ability to op rat th ir v hicl saf ly.
Lit way 3 Plus scoot rs hav small front wh ls for good mano uvrability in th hom ; th Lit way 4 Plus has
larg r wh ls. N ith r scoot r should b us d on un v n, pothol d or rutt d surfac s or slipp ry grassy ar as.
Within this manual th r ar important saf ty notic s. Th y ar cl arly mark d with th sign (l ft)
Mak sur that you und rstand all th s notic s. If you hav any doubt, contact your d al r.

6Lit way 3 & 4 Plus Scoot r Own r’s Manual & S rvic R cord
Saf ty Information
G n ral Warnings
Warning ! Th op ration of scoot rs can ndang r th lif of th driv r or third parti s. Any driv r should
always b fully capabl of op rating this v hicl saf ly.
Warning ! Sitting for long p riods may incr as th chanc of thrombos s or pr ssur sor s. Us rs pron to
such conditions ar advis d to tak m dical advic .
Warning ! Th Lit way Plus scoot rs hav b n d sign d and t st d for driv rs with w ights up to thos in
th T chnical Sp cification Sh t. Th s w ights should n v r b xc d d.
Warning ! Und r-s at Bask t. Th bask t mount d b low th s at has a w ight limit of 10 lbs or 4.5 kgs. Do
not xc d this as it could aff ct stability and p rformanc . Do not carry or attach anything to th
handl bars or controls as this could aff ct driving saf ty.
Warning ! Do not xc d th sp cification; do not modify this scoot r or us it oth r than as a scoot r.
Warning ! Pass ng rs, v n childr n, should n v r b carri d.
Warning ! El ctromagn tic int rf r nc may aff ct th driving of this scoot r:
• Do not op rat d vic s such as CB radios or mobil phon s whil th v hicl is switch d on.
• Avoid g tting clos to transmitt r masts, such as t l vision and radio stations.
If your v hicl v r starts to op rat by its lf switch it off and r port this to your D al r.
Warning ! Th op ration of any scoot r may aff ct s nsitiv l ctronic circuits such as alarm syst ms or
automatic doors in shops.
Driving
Warning ! Fr wh l d vic B for g tting on th scoot r, always ch ck that th fr wh l l v r is in th
"Driv ” Position (s pag 9). Wh n th l v r is in th Fr wh l position th r is no braking and
th scoot r could run down a slop and caus injury or v n d ath.
NEVER SIT ON THE SCOOTER WHEN IN FREEWHEEL.
Warning ! Transf rring On and Off Do not att mpt to g t on or off your Scoot r unl ss it is switch d off, at
r st, and on a stabl , l v l surfac . N v r g t on or off on a hill.
Warning ! Damag B for driving off ch ck th scoot r for damag , particularly that which might aff ct th
st ring, or th attachm nt of th r ar part to th front of th scoot r.
Warning ! Corr ct Ass mbly B for driving off always ch ck th r ar part is corr ctly ass mbl d to th front
of th scoot r and th till r is s cur in th upright position.
Warning ! Batt ry Charg B for driving off always ch ck th batt ry indicator. If you ar in any doubt,
nsur th batt ri s ar fully charg d b for starting on a journ y.

7
Warning ! Armr sts Do not us armr sts as a support wh n g tting in or out of your scoot r. Mak sur th y
ar low r d and s cur b for your start off oth rwis you might fall out.
Warning ! Slop s On st p slop s th scoot r could toppl ov r. N v r xc d th Maximum Saf Slop in
th T chnical Sp cification Sh t. Always try to avoid crossing a slop . If you hav to cross a
slop , tak gr at car to avoid tipping. N v r mak sharp turns on slop s. N v r driv on slipp ry
or icy slop s. N v r back down a slop as your scoot r could tip ov r backwards. If you ar not
comfortabl with th hill gradi nt, consid r an alt rnativ rout .
Warning ! K rbs Wh r v r possibl try and avoid k rbs and us acc ss ramps. N v r tackl k rbs gr at r than
p rmitt d in th T chnical Sp cification Always tackl k rbs straight on.
Warning ! Sp d Turning at maximum sp d might caus th scoot r to toppl ov r. Always slow down for turns.
Warning ! Pow r Unl ss th r is an m rg ncy, do not switch th pow r off wh n moving. Th scoot r will
stop v ry sudd nly.
Warning ! Stopping If th scoot r stops sudd nly wh n turning, th scoot r might toppl . Try not to brak
wh n turning.
Warning ! L aning Ov r Do not l an sid ways, as this could caus th scoot r to toppl .
Warning ! Escalators N v r driv this scoot r onto an scalator as this could caus toppling and s v r injury.
Warning ! Roads Cross roads at d signat d plac s wh r acc ss and xit is ramp d.
Warning ! Roads Lit way 3 & 4 Plus scoot rs ar not for us on roads, apart from crossing roads at
d signat d plac s.
Warning ! Driving in poor visibility, Scoot rs ar not asily s n. Consid r w aring a high visibility jack t to
warn oth rs of your pr s nc .
Warning ! If th v hicl is l ft out in th sun, surfac s could b com xtr m ly hot. Always try to park th
v hicl in th shad .
Warning ! This v hicl is not suitabl for us as a s at for an occupant wh n in a motor v hicl .
8Lit way 3 & 4 Plus Scoot r Own r’s Manual & S rvic R cord
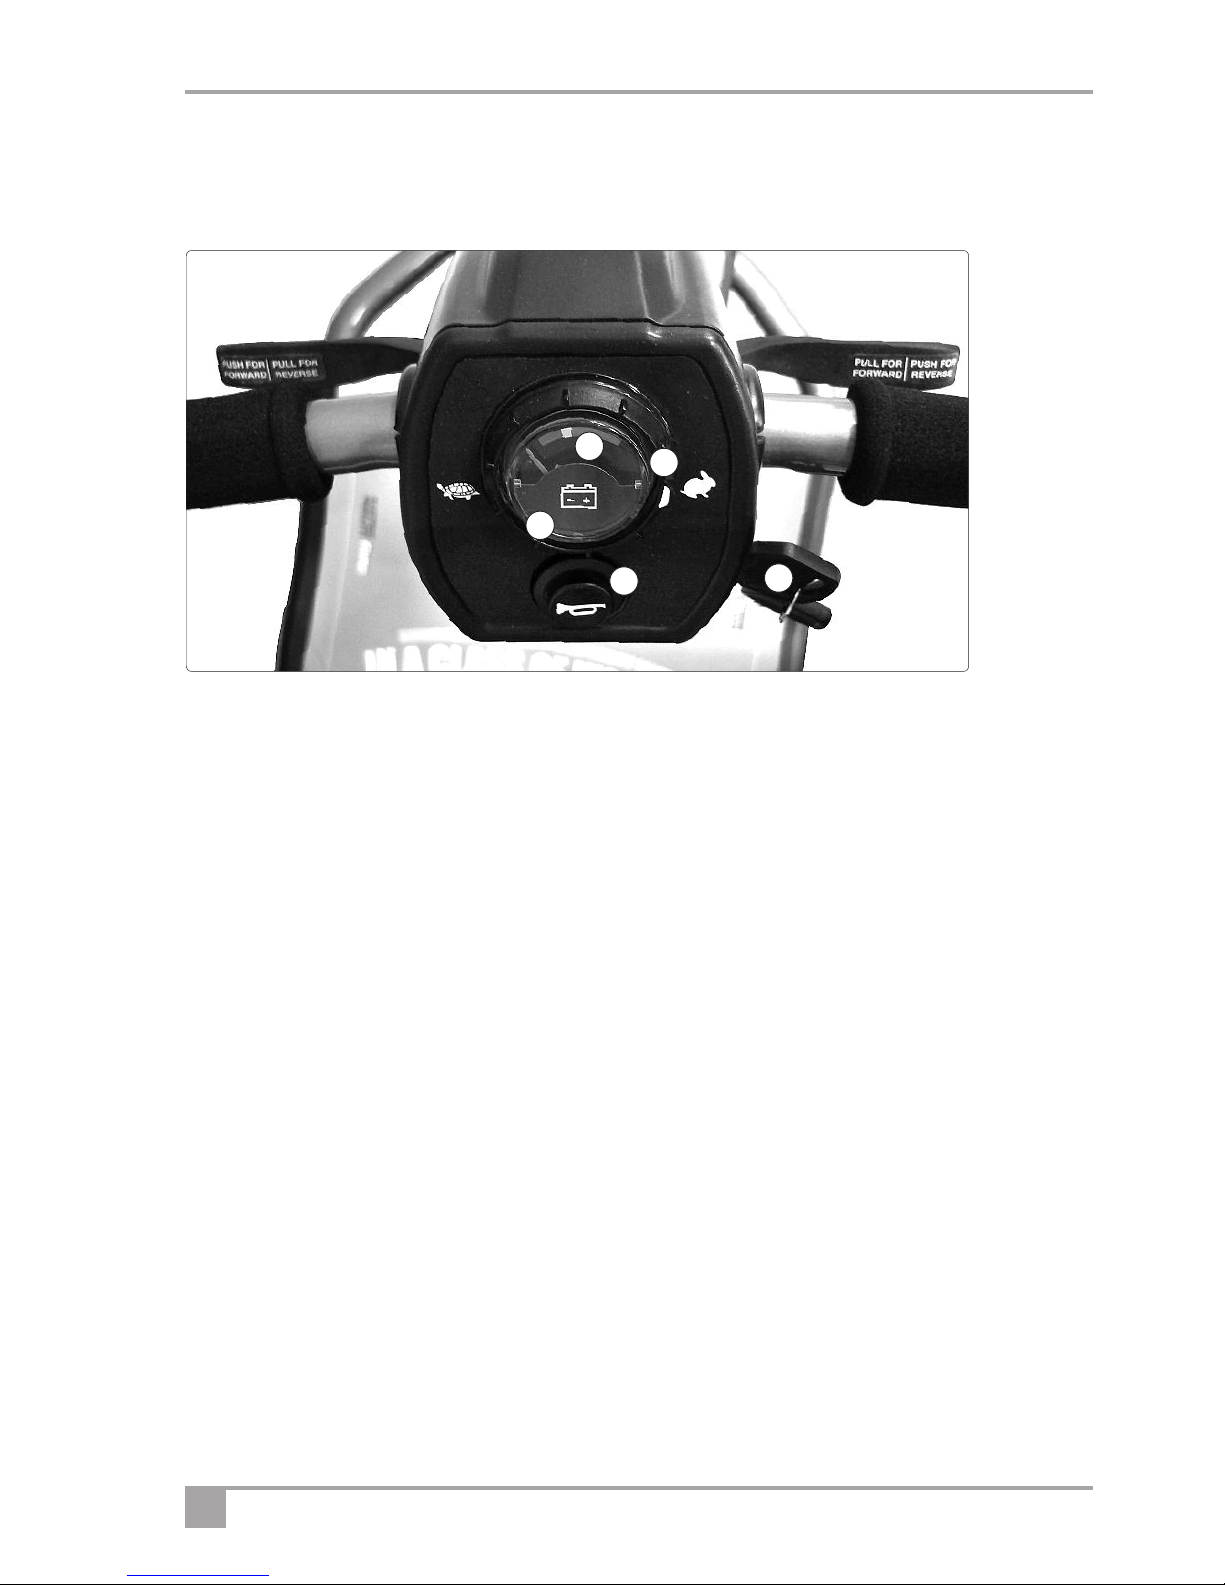
Controls - Dashboard
B for driving your v hicl it is important to familiaris yours lf with th controls. Do not att mpt to driv th
v hicl b for r ading th r st of this Handbook.
Dashboard D scription
1. Batt ry Indicator: This instrum nt shows th l v l of charg in th batt ri s. Wh n in th gr n ar a th
batt ri s ar fully charg d. Wh n in th y llow ar a th batt ri s n d r charging and wh n in th r d ar a
th batt ri s urg ntly n d r charging. Not : Wh n th v hicl is climbing a st p inclin or starting off, th
l v l may drop mom ntarily; this is normal.
2. Sp d Control: This controls th top sp d of your scoot r. Wh n th knob is turn d anticlockwis to th
l ft, this is its slow st sp d, mark d by a tortois . As th knob is turn d to th right th sp d will incr as
to a maximum, mark d by a har . S t th sp d b for you mov off. Do not adjust th sp d control dial
wh n th v hicl is moving.
3. Pow r Indicator Lamp: Th lamp illuminat s wh n th ignition is on. If th r is a fault it will flash – s
diagnostic tabl .
4. Horn: Pr ss th button on th low r l ft hand sid and th horn will sound, if pow r is on. R l as and th
horn will c as .
5. Ignition K y: Th ignition k y has to b push d in b for you can turn th v hicl on or off. R m mb r to
r mov k y wh n not in us . Do not l av th ignition on wh n not in us , sp cially wh n charging th
v hicl .
Charging Point: Th charging point is situat d on th batt ry box ith r at th sid or just b low th handl at
th r ar, d p nding on th typ of batt ry box fitt d. (s Batt ry Charging s ction for furth r instructions).
1
2
3
45

9
Controls – Driving controls/Acc l rator
Fing r control. To op rat , turn on th ignition.
Pull th right hand l v r towards you and th machin mov s forward. Th mor you pull th l v r th fast r
th scoot r go s. To brak , r l as th l v r. Again th fast r th l v r is r l as d th quick r you will stop. To
r v rs , pull th l ft l v r towards you. Do not pull both l v rs at onc . Not . Th controls can b chang d for
custom rs with a l ft-hand bias. Pl as contact your local d al r for information.
Fr wh l D vic
Wh n th v hicl is switch d off th brak s ar automatically
ngag d. This is call d “Failsaf Braking”. Also, if th batt ri s ar
flat, th brak s ar appli d. Th r may b occasions wh r you may
wish to mov th v hicl without pow r. To do this th r is a
Fr wh l D vic fitt d.
Th Fr wh l d vic allows th v hicl to b push d without pow r.
To activat , first locat th l v r. Wh n standing b hind th scoot r, it
is locat d on th right hand sid of th r ar of th v hicl - S Illustration.
• Mak sur th ignition is switch d off.
• Mov th l v r FORWARD Th v hicl can now b push d in Fr wh l.
• Mov th l v r BACK to ngag driv . Th v hicl is now brak d. This is th normal op rating position.
• IF YOU ARE NOT COMPLETELY SURE OF THIS FEATURE CONTACT
YOUR DEALER BEFORE OPERATING THE SCOOTER.
Push th l v r FORWARD to nabl th v hicl to b mov d without pow r. Braking is disabl d. NEVER sit
on th v hicl with th l v r in this position. Pull th l v r BACK to th r arward position. This is th normal
op rating position. Th brak s ar nabl d, and th v hicl can only op rat with th l v r in this position.
Brak s
Th r ar 2 braking syst ms. Th first works with th fing r controls. Wh n th fing r control is r l as d th
scoot r will automatically brak and bring th scoot r to a stop. Wh n th scoot r stops th automatic
handbrak will ngag . This will stop th v hicl rolling forward or backward. Wh n you start th handbrak will
automatically dis ngag . If th batt ry should go flat th brak s automatically ngag . Not that v n wh n
fr wh l is s l ct d, a s condary braking syst m is appli d automatically to limit th maximum sp d. You
may notic this syst m wh n moving th scoot r in fr wh l.
Warning! If th fr wh l d vic is in “fr wh l” th automatic braking is disabl d. N v r s l ct th
fr wh l d vic if th scoot r is on a slop or could b push d onto a slop .
10 Lit way 3 & 4 Plus Scoot r Own r’s Manual & S rvic R cord
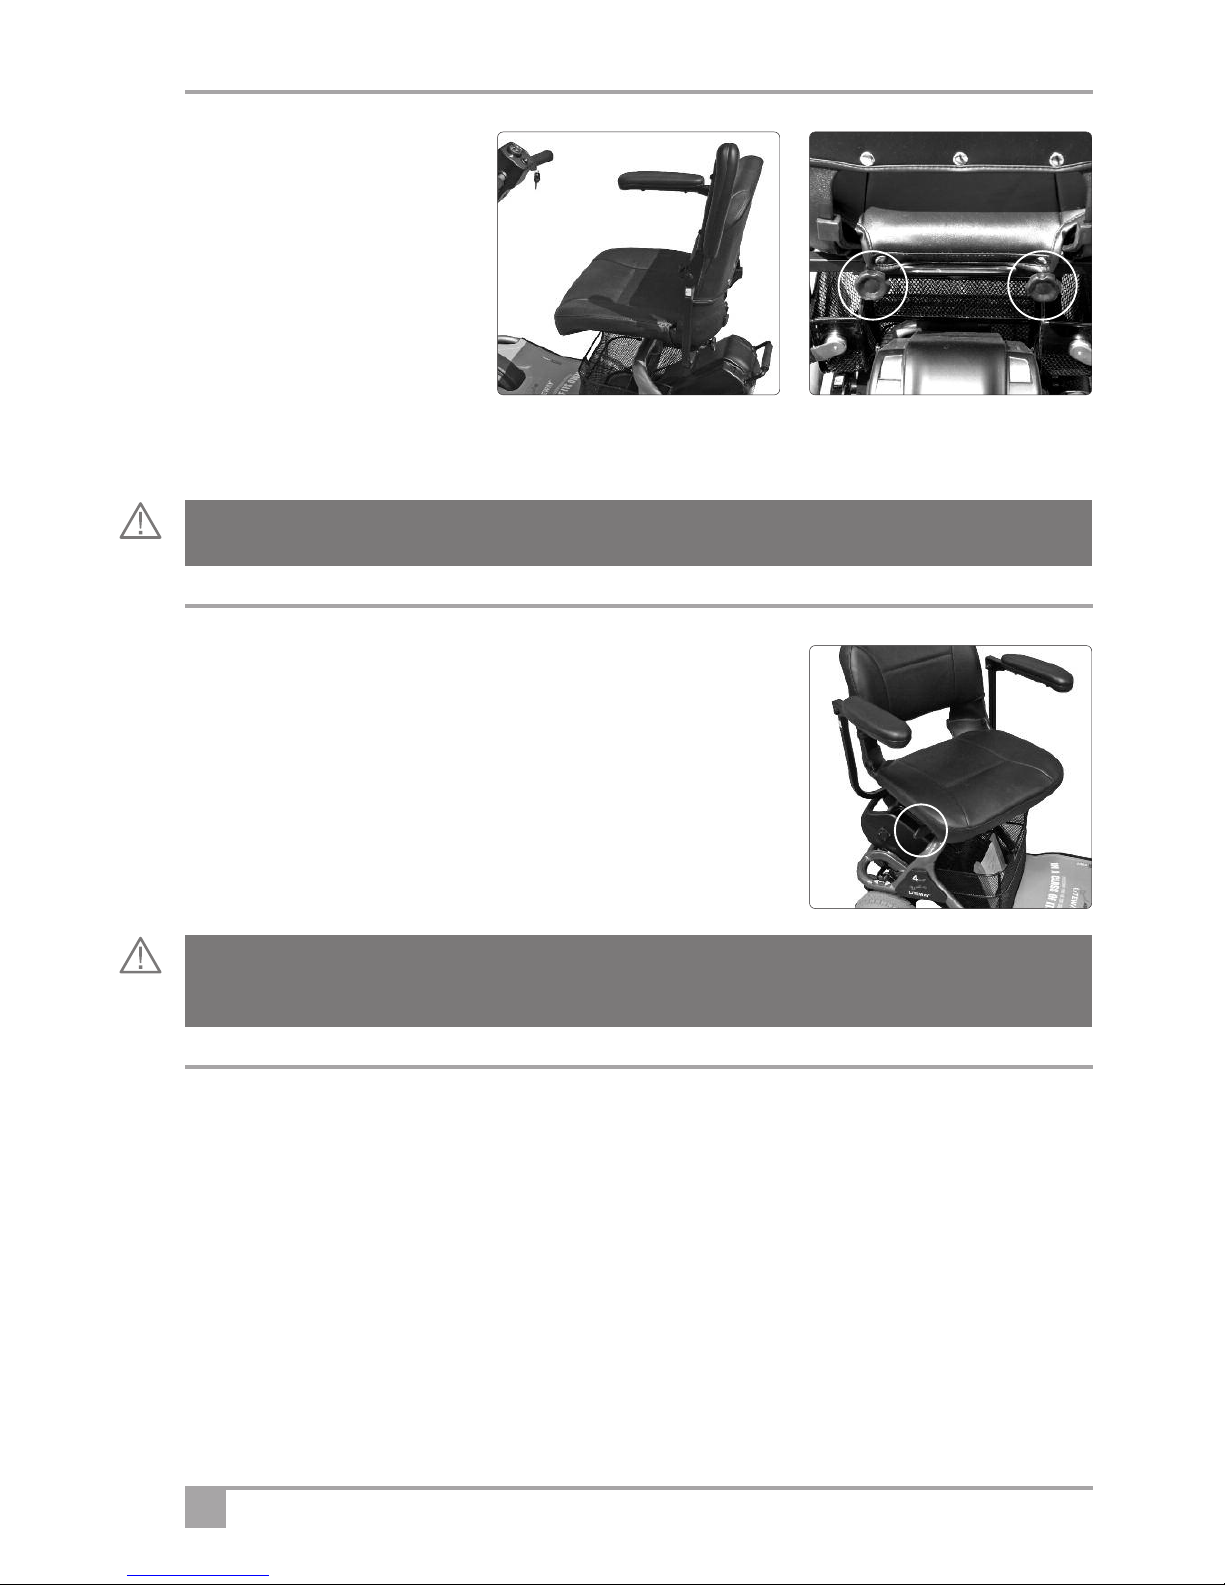
Armr st
adjustm nt
Wh n g tting s at d on th scoot r
lift th armr st up. Wh n riding
always hav th armr st in th down
position. Avoid pinching fing rs as
you low r th armr st.
If you r quir mor room in th width
of th s at undo th knobs at th r ar of th s at. Slid th armr sts in or out to suit. Tight n both knobs to
clamp. To nsur that th us r is sitting c ntrally, th armr sts should always b adjust d to b quidistant from
th c ntr of th s at.
Warning! N v r driv with th armr st up or with th armr st knob loos .
Swiv l s at (optional)
This allows asy acc ss
1. To op rat , locat th r l as l v r und r th s at.
3. Pull th l v r up and th s at will r l as allowing it to rotat .
4. R l as th l v r and th s at should lock automatically, but always
ch ck it has.
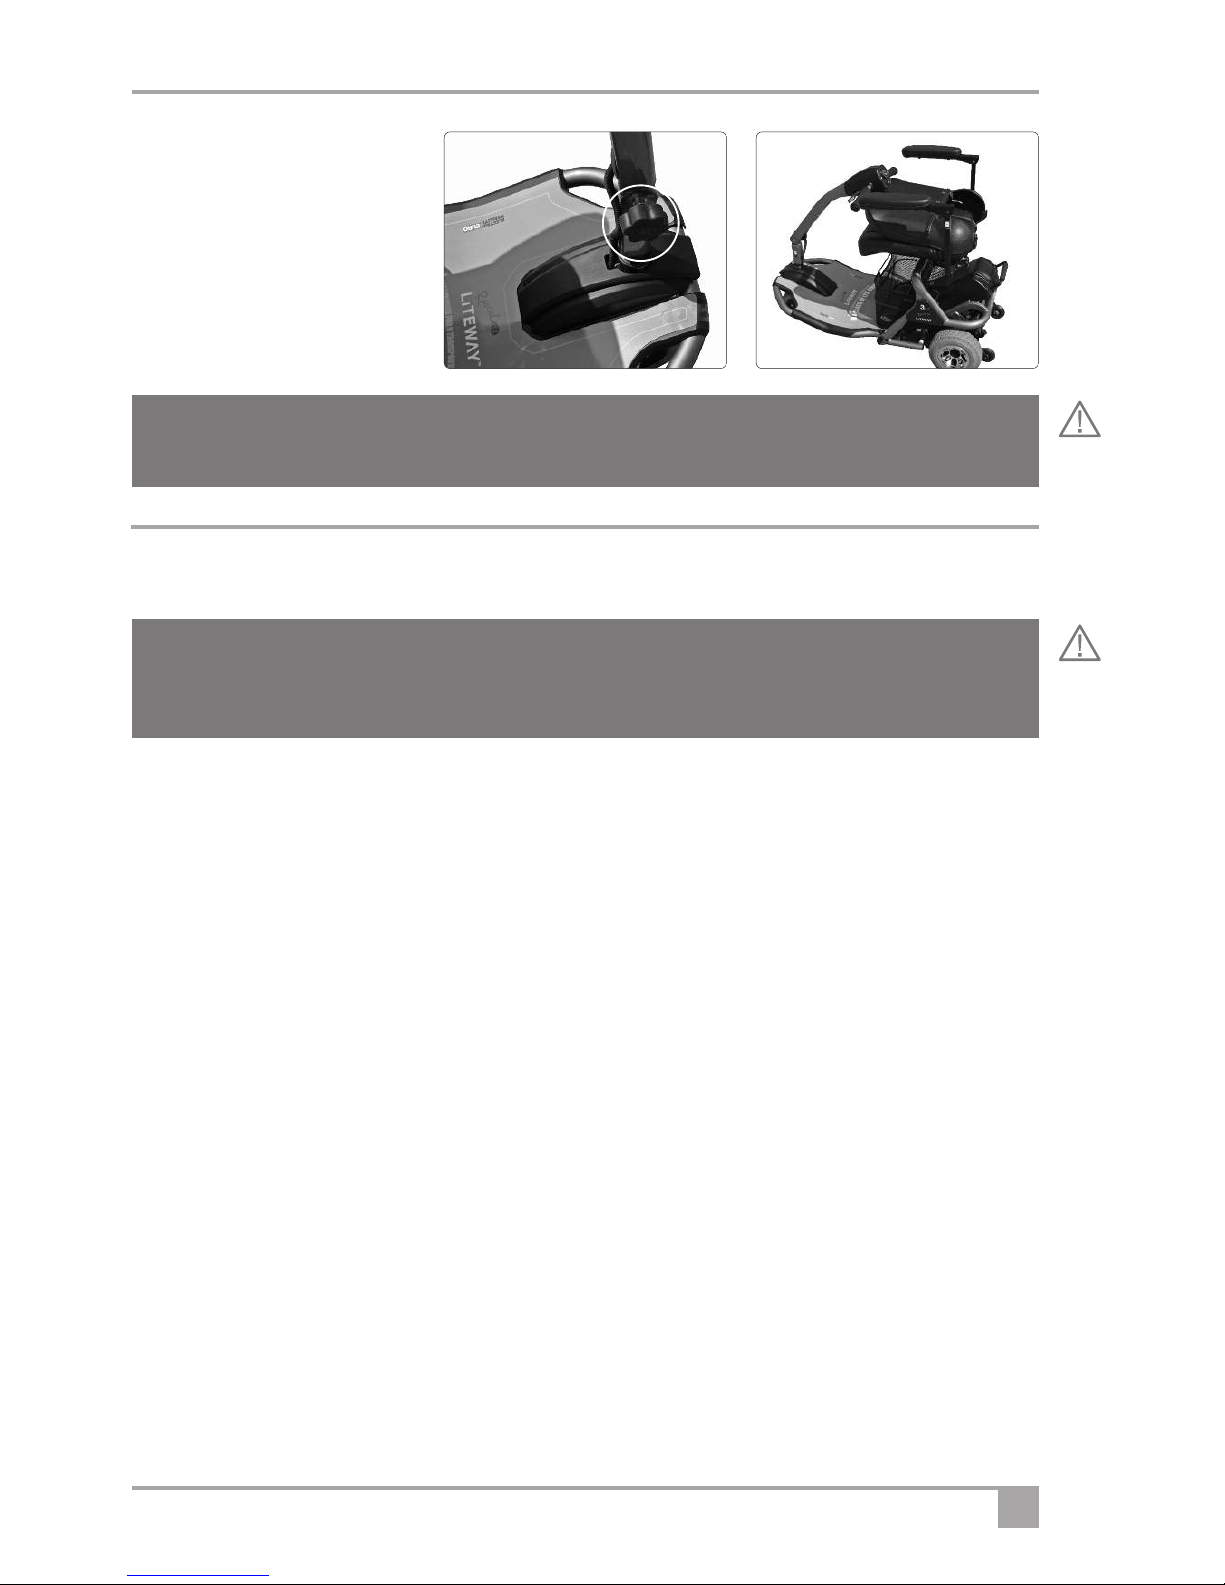
Till r Folding
Th till r can b fold d down for transporting. Tak car wh n low ring th till r not to pinch your fing rs at th
bas of th till r.
• Rotat th knurl d knob anti-clockwis suffici ntly for th r taining s rrations to allow th till r to mov .
• Low r th till r so that it is in its low st position.
• Rotat th knurl d knob clockwis and nsur that it is tight and th r taining s rrations ar fully ngag d.
Th till r can b adjust d to achi v a comfortabl driving position.
• Rotat th knurl d knob anti-clockwis suffici ntly for th r taining
s rrations to allow th till r to mov . Adjust th till r so that your driving position is saf and comfortabl
Warning! Do not us this d vic if th v hicl is on a slop . Always ch ck th s at is lock d in th
forward position b for driving th v hicl .
11
• Rotat th knurl d knob clock-
wis and nsur that it is tight and
th r taining s rrations ar fully
ngag d
• Adjust th till r to suit your
driving position, nsuring th till r is
firmly lock d in plac b for driving
off.
Warning! B for driving, always ch ck that th till r is s cur ly in th upright position. Saf st ring may
b impossibl if you do not !
Driving th V hicl
1. B for you s t out, do ch ck th w ath r for cast. W sugg st that you mak sur you ar w aring
suitabl clothing, wh th r your journ y is long or short.
2. If you ar taking m dication ch ck with your doctor or physician that your ability to control th v hicl
will not b impair d and do not drink alcohol and driv .
3. Only us th v hicl for th purpos its int nd d for. Do not driv through wat r or on slipp ry
surfac s; do not transport mor than on p rson; do not tow oth r v hicl s or carry xc ss w ight.
4. B for g tting onto your scoot r, ch ck th fr wh l l v r is not in th Fr wh l position.
5. Ch ck th batt ry charg r l ad is disconn ct d.
6. Ch ck th two halv s of th chassis ar prop rly ass mbl d. (s ass mbly instructions).
7. Warning ! Armr sts. Do not r st your w ight on th armr sts wh n g tting in or out of your scoot r.
Mak sur th y ar low r d and s cur b for your start off oth rwis you might fall out.
8. Ch ck you hav adjust d th s at as instruct d in this manual, and it is lock d – g t comfortabl .
9. Sp d Control s t th rotary sp d control knob to a low s tting.
10. Mak sur th way ah ad is cl ar.
11. Switch on th v hicl by pushing in th ignition k y and turning it. Ch ck th ignition light illuminat s
st adily and th batt ry l v l indicator is in th gr n ar a.
12. Pull in right hand l v r slowly th v hicl will now mov off. Th mor you pull th l v r in th fast r
th v hicl will go.
13. To brak , r l as th l v r if you b com unsur or f l unsaf r l as th l v r imm diat ly.
14. As you g t accustom d to th pow r you can incr as th sp d.
Warning! R ad this b for driving th v hicl ! Wh th r or not this is your first mobility
v hicl , pl as r ad th s guid lin s as all v hicl s diff r. Failur to do this may caus damag to you, a
third party or th v hicl .

12 Lit way 3 & 4 Plus Scoot r Own r’s Manual & S rvic R cord
Driving th v hicl - hazards
1. G tting on and off th v hicl : Wh n g tting on mak sur that th v hicl is on l v l ground, and not
in fr wh l mod . Ensur that th armr sts ar s cur . Wh n g tting off, park on l v l ground, turn off
th ignition and r mov th k y b for l aving your s at. Mak sur you g t off th v hicl in a saf ar a.
2. Till r Position: Driv with th till r in an upright position that f ls comfortabl with th controls in asy r ach.
3. K rbs and Obstacl s: Try to avoid k rbs and obstacl s. N v r rid up or down k rbs or obstructions high r
than that in th T chnical Sp cification Sh ts. Always tackl obstacl s h ad on. Us ramps wh r v r possibl
and nsur that all wh ls will fit on th ramp. Always try to avoid crossing a slop . If you hav to cross a
slop , tak gr at car to avoid tipping. N v r mak sharp turns on slop s or back down a slop . Not that th
anti-tip roll rs at th r ar of th scoot r may contact th k rb as you d sc nd; this is normal.
4. Hills & Slop s: Going Up Hill. L an forward wh n going up. Mak sur you hav nough sp d to
climb th slop . Do not stop or turn th v hicl around. If you hav to turn whil climbing an inclin ,
k p going until you r ach a l v l ar a. If you hav to start on an inclin , l an forward and apply pow r
slowly – do not start and stop. If you ar not comfortabl about tackling a gradi nt, consid r an
alt rnativ rout . Not : Always ch ck that th batt ry l v l is high; going up hill tak s a lot of n rgy. If th
l v l drops too low th v hicl will cut out l aving you strand d.
5. Hills & Slop s: Going Down Hill. L an back in th s at wh n going down, and turn th sp d
control dial to low. If you ar not comfortabl about tackling a gradi nt, consid r an alt rnativ rout .
Try to avoid crossing slop s – always driv straight up or down th slop .
NEVER BACK DOWN A SLOPE!
6. T rrain: Do not driv your v hicl across d p, soft or slipp ry t rrain ( for xampl , soft dirt, sand, or
loos grav l).You could g t stuck. Also avoid rutt d bumpy ground and k p to w ll pr par d paths.
7. Turning: Always slow down b for a turn; turning at sp d can caus th scoot r to toppl . Look in th
dir ction you ar trav lling – If th r is a blind corn r sound th horn.
8. Turning Circl : Practic mano uvring your scoot r so you can judg th turning circl . This is important
to avoid tipping off k rbs or for n gotiating in tight spac s.
9. Bad W ath r: If it is snowing or icy stay at hom ! R m mb r that ic , snow and slipp ry surfac s such
as manhol cov rs, w t grass and drains could aff ct braking and st ring. Us caution at all tim s.
10. Tyr s: Your v hicl is fitt d with solid tyr s. Should th y b com damag d th y should b r plac d by
your d al r. Do not att mpt to r plac th m yours lf.
11. Pav m nts: It is ill gal to driv at mor than 4 m.p.h. on th pav m nt. Your Lit way Plus is limit d to that
maximum sp d but always slow down in crowd d ar as and tak car not to collid with p d strians.
12. Show r Rooms or Washing: N v r tak your scoot r into a show r or st am room, and n v r hos it
down. Its s nsitiv l ctronics could malfunction if th y g t w t or damp.
Warning! B for driving th scoot r you should b awar that, und r c rtain circumstanc s it could
b com unstabl and tip ov r. Your scoot r has b n d sign d to op rat on pav d, v n surfac s and
should not b us d on rough or rutt d t rrain. Do not xc d th maximum saf slop r cord d in th
Tchnical Sp cifications.
13
Transporting your Scoot r
Warning! Dismantling th scoot r involv s lifting and handling h avy parts. W ights ar giv n in th
T chnical Sp cification; consid r if you n d h lp in handling parts b for you try to lift th m. Th Lit way 3
& 4 Plus hav b n sp cially d sign d to b asily dismantl d and stow d in a car. Contact your d al r for
advic on how b st to transport your scoot r in your particular v hicl
Warning! Pinching or Crushing. B car ful to avoid b ing pinch d or having your hands crush d wh n
lifting or handling parts. W ar glov s wh n v r possibl .
Warning! This v hicl is not suitabl for us as a s at for an occupant in a motor v hicl .
4 65
7911
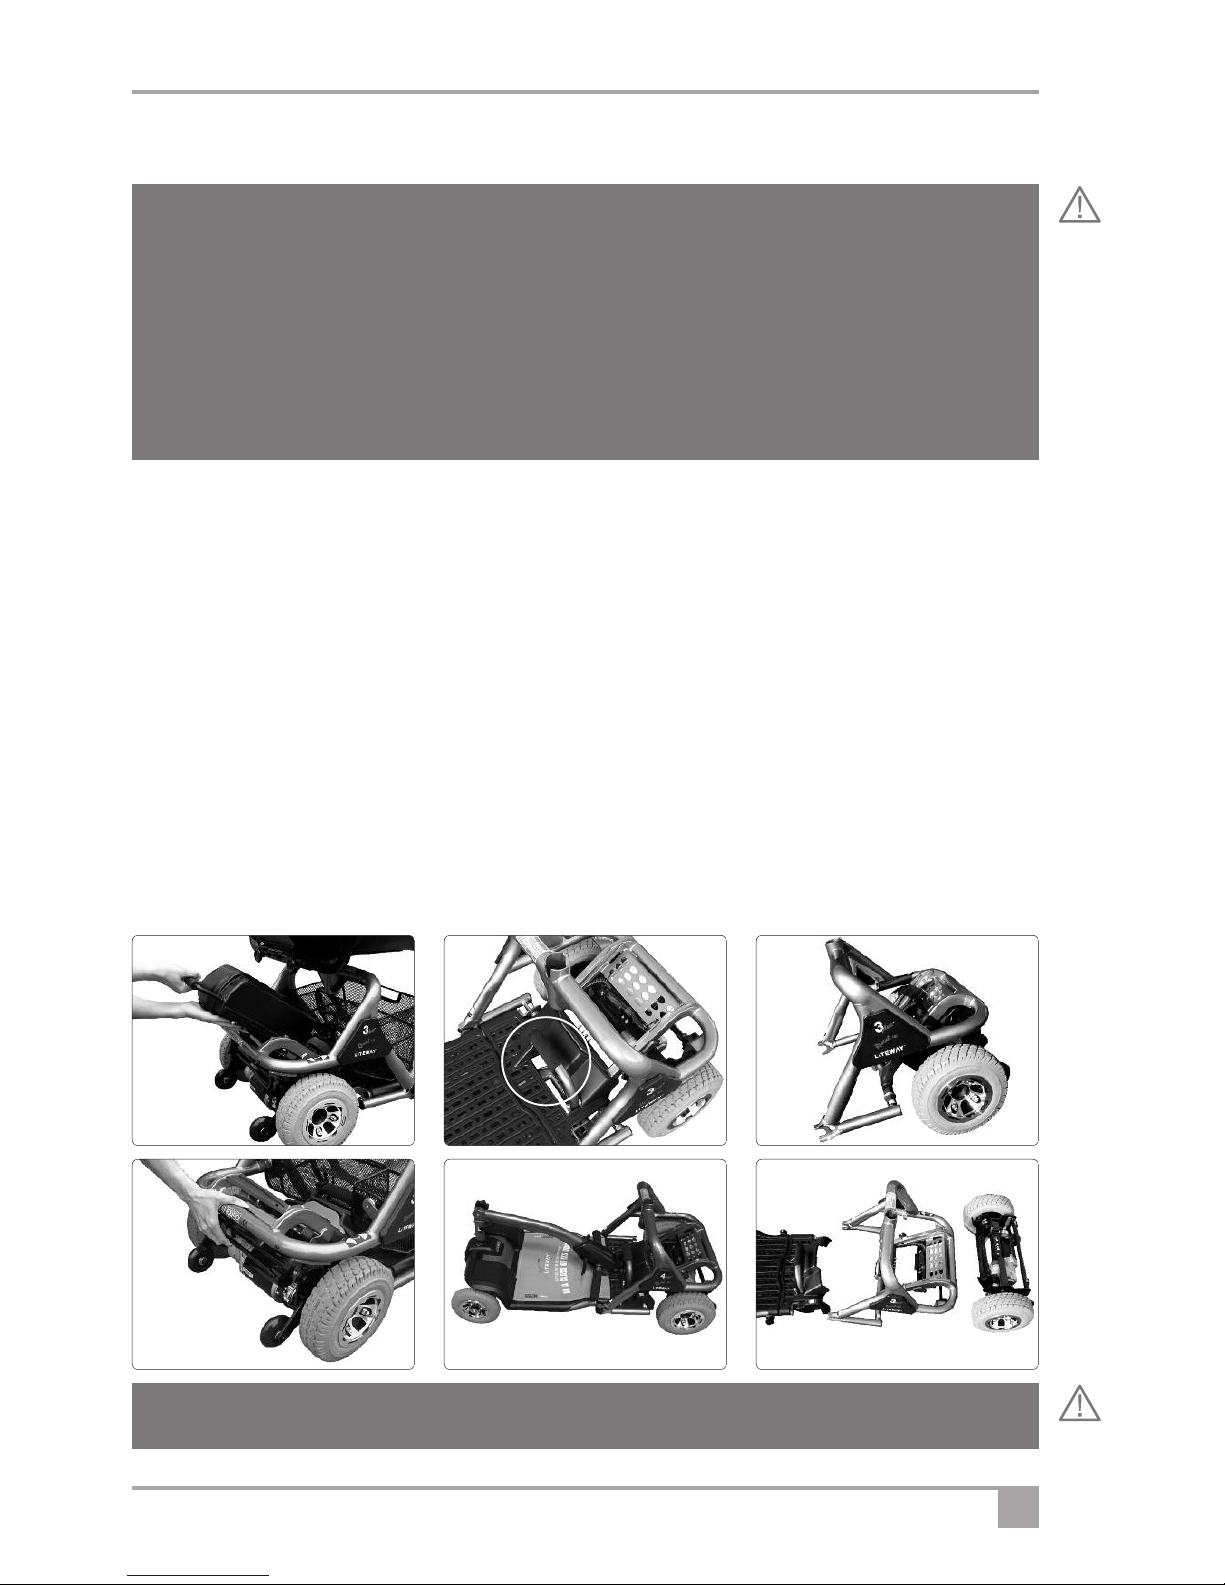
Warning! Do not lift th r ar chassis with th batt ri s and/or transaxl unit still fitt d - back injury may r sult!
To transport your scoot r you will n d to dismantl it. Follow th s instructions. Do not att mpt this unl ss you ar
capabl of lifting th h avi st compon nt w ight applicabl to your mod l (including acc ssori s) as stat d in th
T chnical Sp cification Tabl . You ar advis d to w ar glov s. (Pictur numb rs corr spond to stag s list d b low).
1. Mov till r into th upright position.
2. Lift th s at off th chassis. Tak car this part is h avy.
3. R mov th und r-s at bask t and stow.
4. R mov th batt ry box by sliding it out of th r ar chassis and stow it car fully in th v hicl .
5. Lift th r l as catch b low and in front of th s at post.
6. G ntly s parat th front chassis from th r ar.
7. Disconn ct th Transaxl ass mbly from th R ar Chassis Fram by lifting th r l as bar at th r ar.
8. R l as th till r by loos ning th till r knob.
9. Low r th till r to th horizontal position as shown. (Not - imag shown has front and r ar still conn ct d).
10. S cur th till r by attaching th strap provid d to th handl bars, taking car not to trap fing r control l v r.
11. Stow th chassis front and r ar parts into th boot of th v hicl .
12. Stow s at in th v hicl .
13. Ensur that all parts ar s cur so that th y cannot mov whil driving.

14 Lit way 3 & 4 Plus Scoot r Own r’s Manual & S rvic R cord
Ass mbling your Scoot r following Transportation
Aft r r moving your scoot r from a v hicl and placing it on l v l ground,
ch ck it is undamag d b for starting to ass mbl it as follows:
1. Undo th knurl d knob, r l as strap and rais th till r into th
upright position and s cur by tight ning th knob.
2. Attach th transaxl ass mbly to th r ar chassis by lifting th
r ar chassis, and positioning it ov r th transaxl nsuring that th
front hooks ngag on th r ar chassis spigots.
3. Mano uvr th front part to join th r ar chassis, aligning th hooks so that th y go ov r th r ar
cross bar and th pivot points ar align d.
4. Lock th chassis tog th r by st pping g ntly onto th foot r st until th chassis clicks into plac .
5. R fit th und r-s at bask t, nsuring it is s cur .
6. R fit th batt ry box, sliding it g ntly down th guid s until it is s cur ly in position.
7. Lift th s at and install on th r ar chassis nsuring it is fully ngag d, and do s not rock or rotat .
8. Till r adjustm nt: Adjust till r back into a comfortabl position for driving.
Finally ch ck th scoot r is not damag d and it is prop rly ass mbl d, ch cking that th batt ry indicator shows
th batt ry is charg d, and th fing r controls op rat corr ctly. You ar now r ady to driv th scoot r away.
Warning! Ass mbling th scoot r involv s lifting and handling h avy parts. Th Lit way Plus Scoot rs
hav b n d sign d to b asily ass mbl d. Your d al r should advis you on th b st way to ass mbl
your scoot r.
Warning! Pinching or Crushing. B car ful to avoid b ing pinch d or having your hands crush d wh n
lifting or handling parts. W ar glov s wh n v r possibl .
Warning! N v r unload your scoot r on sloping or un v n ground. It could run down th slop and
injur som on .

Batt ry Charging
Th charging sock t is on th upp r
right hand sid of th batt ry box as
shown or on th r ar of th batt ry
box. Rotat th prot ctiv cov r and
push in th plug. Wh n th v hicl is
charg d r mov th plug, and r fit th
prot ctiv cov r to k p th wat r out.
Th batt ry charg r has a small
indicating lamp. Wh n th charg r is
conn ct d and switch d on th lamp will show gr n. Wh n th batt ry is b ing charg d it shows r d, wh n
th batt ry is fully charg d th lamp will chang to gr n. Always nsur that th lamp shows gr n b for
switching off and disconn cting th charg r at th mains.
Conn ction Instructions
Wh n you r c iv your v hicl th batt ri s ar only partially charg d – always fully charg th m b for us
pr f rably ov r-night. Always fit th full s t of batt ri s b for charging and always us an arth d conn ction.
1. Plac your machin in an ar a that is dry and w ll v ntilat d. Mak sur a pow r point is n arby.
2. Ch ck th v hicl is switch d off and th k y r mov d.
3. Ch ck th mains switch is off. N v r conn ct or disconn ct th charg r with th mains on.
4. Conn ct th charg r to th charging point on th batt ry box as abov . Not that th batt ry can
also b charg d wh n r mov d from th scoot r.
5. Conn ct th mains plug and switch on.
6. Th lamp illuminat s gr n wh n th charg r is pow r d up, th n r d wh n it is charging. Th
charg r lamp chang s to gr n wh n th batt ry is fully charg d.
7. Switch off th mains and r mov th plug from th batt ry wh n fully charg d. Do not l av th
charg r plugg d in with th pow r off. This will gradually discharg your batt ry.
15
Warning! Wh n charging batt ri s NEVER smok , or do this in a plac wh r th r ar nak d flam s
such as gas-fir d h at rs as, und r xc ptional circumstanc s, batt ri s may giv off gas s that could
ignit and xplod . Always mak sur that batt ri s ar not damag d.
Warning! Wh n charging batt ri s NEVER conn ct or disconn ct th charg r whil it is still conn ct d
to th mains. Always us a thr -pin conn ctor with an arth. Charging without corr ct arthing could
r sult in an l ctric shock.
Warning! Batt ri s ar h avy and if you hav to r plac th m, contact your d al r

16 Lit way 3 & 4 Plus Scoot r Own r’s Manual & S rvic R cord
Th batt ri s ar th lif blood of your v hicl . Th ir charact ristics can chang d p nding on charging,
tmp ratur , usag and oth r factors. List d b low ar guid lin s to prolong batt ry lif .
1. Aft r using your v hicl always charg it at th nd of th day v n aft r a short journ y.
2. If you do not us your v hicl for a prolong d p riod, plac it on charg onc a w k, ov rnight.
3. Always us th corr ct charg r with th corr ct batt ri s as r comm nd d by El ctric Mobility (Euro) Ltd
4. If th batt ri s hav b n flat for a long tim (about 2 months) it is r comm nd d you contact your
d al r b for charging
5. Do not charg th v hicl in th op n – it may rain and th batt ry charg r is not wat rproof.
6. K p th v hicl in a w ll-v ntilat d ar a and away from any nak d flam .
7. Do not part charg th batt ri s. Allow th charg r to compl t its cycl for v ry batt ry fitt d.
Not : Avoid storing your scoot r in cold/damp plac s. This will short n batt ry lif and may caus
d t rioration in th structur . Batt ri s ar xp nsiv to r plac – it is wis to look aft r th m. Batt ri s ar
h avy – mak sur you always lift th m corr ctly.
Warning! N v r disconn ct a batt ry or th charg r whil th charg r is conn ct d to th mains
Warning! If on or both batt ri s ar damag d th y could h at up wh n charging and, in an xtr m
cas , xplod .
Notic R turn your uns rvic abl batt ri s to your suppli r or nsur th y ar dispos d of in accordanc
with th nvironm ntal r gulations applicabl at th tim .
Additional Saf ty Information
Carrying W ight on th V hicl
Und r-s at Bask t Th bask t mount d und r th s at has a w ight limit of 10lbs (4.5kgs). Do not
xc d this as it could aff ct handling.
Handl bars Do not carry or attach anything to th handl bars. Anything attach d to th
handl bars will aff ct th control of th v hicl .
Floor Ar a Do not us th floor ar a to carry things apart from in th und r-s at bask t. Th y
might fall off, or obstruct your mov m nt.
Oth r Pr cautions
Modifications Unauthoris d modifications could r sult in injury or p rman nt damag . Such
modifications will invalidat any guarant s.
Oth r It ms Only fit approv d products or acc ssori s.
Child Saf ty
This product is d sign d to b op rat d by adults. Childr n should not b allow d to tamp r with th controls
or play on th v hicl . Do not carry childr n as pass ng rs. Th product is d sign d for singl p rson us
only. K p all packaging w ll away from childr n. Th y could b harm d.

17
Us r Maint nanc
It is important for saf ty that you carry out th following ch cks b for us .
1. Visually ch ck th machin for damag .
2. Visually ch ck th tyr s for damag .
3. Ch ck th st ring mov s fr ly.
4. Ch ck that th till r is s cur and that th till r rotation knob is tight.
5. Ch ck th front chassis is s cur ly attach d to th r ar chassis and to th transaxl .
6. Ch ck that th s at is locat d corr ctly and lock d.
7. Ch ck th armr sts ar s cur
8. Th batt ry should b fully charg d.
9. Ensur th front bask t is s cur (if fitt d).
10. K p your v hicl cl an by using a damp cloth and soapy wat r – n v r us a hos .
Important – Possibl faults
As you g t us d to your v hicl you will g t a f l for how it b hav s. If som thing f ls unusual, for instanc
th v hicl do s not acc l rat or brak smoothly; th brak s ar not holding on a slop or th st ring f ls
diff r nt, contact your d al r imm diat ly and xplain to th ngin r xactly what th probl m is.
Disposal
Contact your d al r for advic b for you consid r disposing of your scoot r. Th y will b awar of th
nvironm ntal r gulations in forc at th tim and will assist you to m t th applicabl nvironm ntal l gislation.
S rvicing and Maint nanc
1. This v hicl is d sign d for minimum maint nanc . How v r it is r comm nd d that your v hicl is
s rvic d at l ast onc a y ar, by an approv d El ctric Mobility D al r. If th v hicl is us d constantly w
r comm nd a twic y arly maint nanc .
2. Ensur th ngin r stamps th S rvic Log (pag 27) on compl tion of all s rvicing. K p all r c ipts
for s rvicing and r pairs with this handbook. This may add valu wh n s lling th v hicl .
3. Wh n th v hicl is du for its annual s rvic mak sur you r port any conc rns you hav ,
pr f rably wh n you book th s rvic (S points to look out for b low).
4. On compl tion of th s rvic , always t st th v hicl b for th ngin r l av s and mak sur you
ar satisfi d with th work carri d out.
Points to look out for:
• Ar th r any strang nois s from th wh ls or do s th fram cr ak wh n going ov r rough ground?
• Is th batt ry charg d up corr ctly – is th “full” charg gr n light on aft r charging?
• Is th st ring tight or is it loos wh n turning? Is th r any play in th st ring?
• Ar th brak s ff ctiv ?
• Is th r any damag to spigots or parts r lat d to disass mbly ?
• Has anything com loos ?
• Do s th v hicl p rform as w ll as it did wh n it was n w?
• Ar th r nois s or rattl s that w r not th r b for ?
• Ar th r any signs of damag , corrosion or cracking?

18 Lit way 3 & 4 Plus Scoot r Own r’s Manual & S rvic R cord
Scoot r Diagnostic Functions
Your Scoot r Controll r provid s diagnostic information in th form of flash-cod s. Th lamp on th batt ry
indicator flash s to indicat a probl m has b n d t ct d. On switching on, th controll r conducts a
diagnostic t st. Whil this t st is in progr ss th lamp will flash and, if no fault is d t ct d it will r main on.
If th r is a fault, th lamp will flash a s qu nc of flash s to indicat what th fault is.
So for instanc if th lamp flash s twic in short succ ssion and th n again twic in short succ ssion, this
indicat s a bad motor conn ction. If th lamp flash s 8 tim s th r is a probl m with th controll r.
Numb r of Flash s Indicat d fault and Corr ctiv Action
1• Batt ry n ds r charging or bad conn ction with batt ri s.
Ch ck conn ctions, and r charg batt ri s.
2• Bad motor conn ction. R qu st assistanc from d al r who will ch ck all
conn ctions b tw n controll r and motor.
3• Short circuit b tw n motor and batt ry conn ction. Contact d al r.
4 & 5 • Not us d
6• Controll r inhibit d from op ration. Disconn ct batt ry charg r and ch ck if
this r solv s th probl m. Oth rwis contact d al r.
7• Throttl fault. Fing r control l v rs must b in n utral (c ntr d) position
b for k y is turn d on. Switch scoot r off, c ntr l v rs, and switch back
on. If fault p rsists, contact d al r.
8• Controll r fault. Inform d al r who will ch ck conn ctions & controll r.
9• Scoot r l ft in fr wh l or has a bad parking brak conn ction. Engag
driv , and switch scoot r of and on. If this fails to cur th probl m, ch ck
parking brak and nsur it stops th v hicl . Inform d al r who will ch ck
brak and motor conn ctions.
10 • Exc ssiv voltag d t ct d at controll r. Ch ck batt ry conn ctions.
If in doubt switch off and switch on – if this do s not cur th fault contact your d al r. Your d al r is th r to
h lp you but th y can only do this if you giv th m as much information as possibl . R m mb r corr ct
information will g t th probl m fix d quick r and sav you mon y. Phon th d al r and xplain xactly what
th probl m is, r counting as much d tail as possibl . T ll th m about th flash cod ; this will h lp th ngin r
to id ntify th probl m b for h calls to fix it. Your d al r is th r to h lp you.
Notic
If th Lamp continu s to flash th n th controll r has nt r d th Sl p mod and n ds to b wok n up.
Turn k y off and th n back to th on position to r s t.

19
Troubl shooting Guid
This tabl is a guid to fault finding. Th fault may b a simpl fix. If you hav any doubts phon your d al r.
Symptom
• Scoot r do s not mov .
wh n pow r is switch d on.
• St ring is loos or wobbly wh n driv n.
• V hicl b hav s rratically wh n driv n.
or judd rs or cuts out ?
• Short Rang
To sav th batt ri s, th scoot r controll r has a sl p mod , which is activat d if th scoot r is not us d but l ft
switch d on for som tim . To r s t, switch th scoot r off and th n on again.
Solution
• Batt ri s flat - ch ck l v l.
• Is th charg r conn ct d?
• Is Fr wh l ngag d?
• Fr wh l has b n s l ct d whil pow r is on
Ensur fr wh l is not s l ct d; switch off and on
NB th pow r indicator may flash indicating that
fr wh l has b n s l ct d..
• Ch ck for tyr damag or punctur s.
• Damag d st ring - contact d al r.
• Loos s at - contact d al r.
• Possibl l ctronic probl ms - contact d al r.
• Ch ck tyr s for damag .
• Ch ck batt ri s ar fully charging.
• Ch ck v hicl mov s asily in Fr wh l

20 Lit way 3 & 4 Plus Scoot r Own r’s Manual & S rvic R cord
Fr qu ntly Ask d Qu stions
I want to transport my vehicle in a car.
Th Lit way scoot rs ar d sign d to b dismantl d to mak it asi r to load th m into a car. Th r ar various
t chniqu s. It d p nds on what typ of v hicl you own and your physical capability. Mak sur your d al r
has d monstrat d th asi st way of doing this.
Can I fit weatherproofing such as a canopy ?
No, th Lit way 3 & 4 scoot rs ar too small to hav canopi s as th y can adv rs ly aff ct stability and handling.
How long will my batteries last ?
This is a difficult qu stion as it d p nds on many factors. Th lif of a batt ry d p nds upon th numb r of
cycl s th batt ry go s through, th p ak loads and on th conditions of us . Som g n ral advic about
batt ry car :
• K p it charg d, and do not l t th batt ry run compl t ly flat.
• Ensur both batt ri s ar fully charg d at th nd of th charging cycl
• Batt ri s may not p rform as w ll in v ry cold w ath r.
• Chang your batt ry if you find it is not p rforming as w ll as n w.
Car can prolong th lif of th batt ri s but r m mb r that, in tim , all batt ri s will fail to p rform to
sp cification.
What range can I expect ?
Th g n rally xp ct d rang is r cord d in th T chnical Sp cification sh t. R m mb r, rang can b
aff ct d by many things such as:
• T mp ratur . Cold w ath r can r duc th output of th batt ri s.
• Typ of t rrain. Obviously climbing hills tak s mor n rgy than driving on th flat.
• W ight of th p rson.
• Th condition and charg of th batt ri s.
• Faulty or old batt ri s or a faulty charg r.
NB. Always us th corr ct charg r with th corr ct batt ri s and nsur all batt ri s ar charg d b for you
start out.
How long should I keep my vehicle before I change it?
It is important that th v hicl you hav suits your n ds and abiliti s. Your scoot r should s rv you w ll for
many y ars but chang it if at any tim you f l it no long r m ts your n ds. Consult your d al r on th
condition of your v hicl and r m mb r v hicl s of any typ b com mor xp nsiv to maintain th old r
th y g t.
Additional Information
Own rs Manual: R plac m nt copi s ar availabl from: El ctric Mobility Euro Ltd. Canal Way, Ilminst r,
Som rs t, TA19 9DL T l phon : 01460 258100.
If you ar visually impair d, pl as contact th Company to discuss your r quir m nts. How v r, you should
not driv a v hicl in a public plac if you cannot s w ll nough to nsur your own, and oth rs saf ty. Each
v hicl com s with a copy of th BHTA Highway Cod . Pl as mak sur you r ad it. T l phon BHTA on
02077 022 141 for a n w copy.
Important not on th BHTA Highway Cod : On pag 3 of th Cod und r “Consid r Inv sting in a mobil
phon ” R ad th s ction of this manual und r “Saf ty Information”. If in doubt contact your d al r. For
Information r garding oth r El ctric Mobility products contact your d al r or log on to th El ctric Mobility
W bsit www. l ctricmobility.co.uk
This manual suits for next models
1
Table of contents
Other Electric Mobility Euro Scooter manuals

Electric Mobility Euro
Electric Mobility Euro Rascal Partner User manual

Electric Mobility Euro
Electric Mobility Euro Liteway 6 User manual

Electric Mobility Euro
Electric Mobility Euro Rascal Vision User manual

Electric Mobility Euro
Electric Mobility Euro Rascal 329LE User manual

Electric Mobility Euro
Electric Mobility Euro Rascal 388XL User manual

Electric Mobility Euro
Electric Mobility Euro 450 User manual


