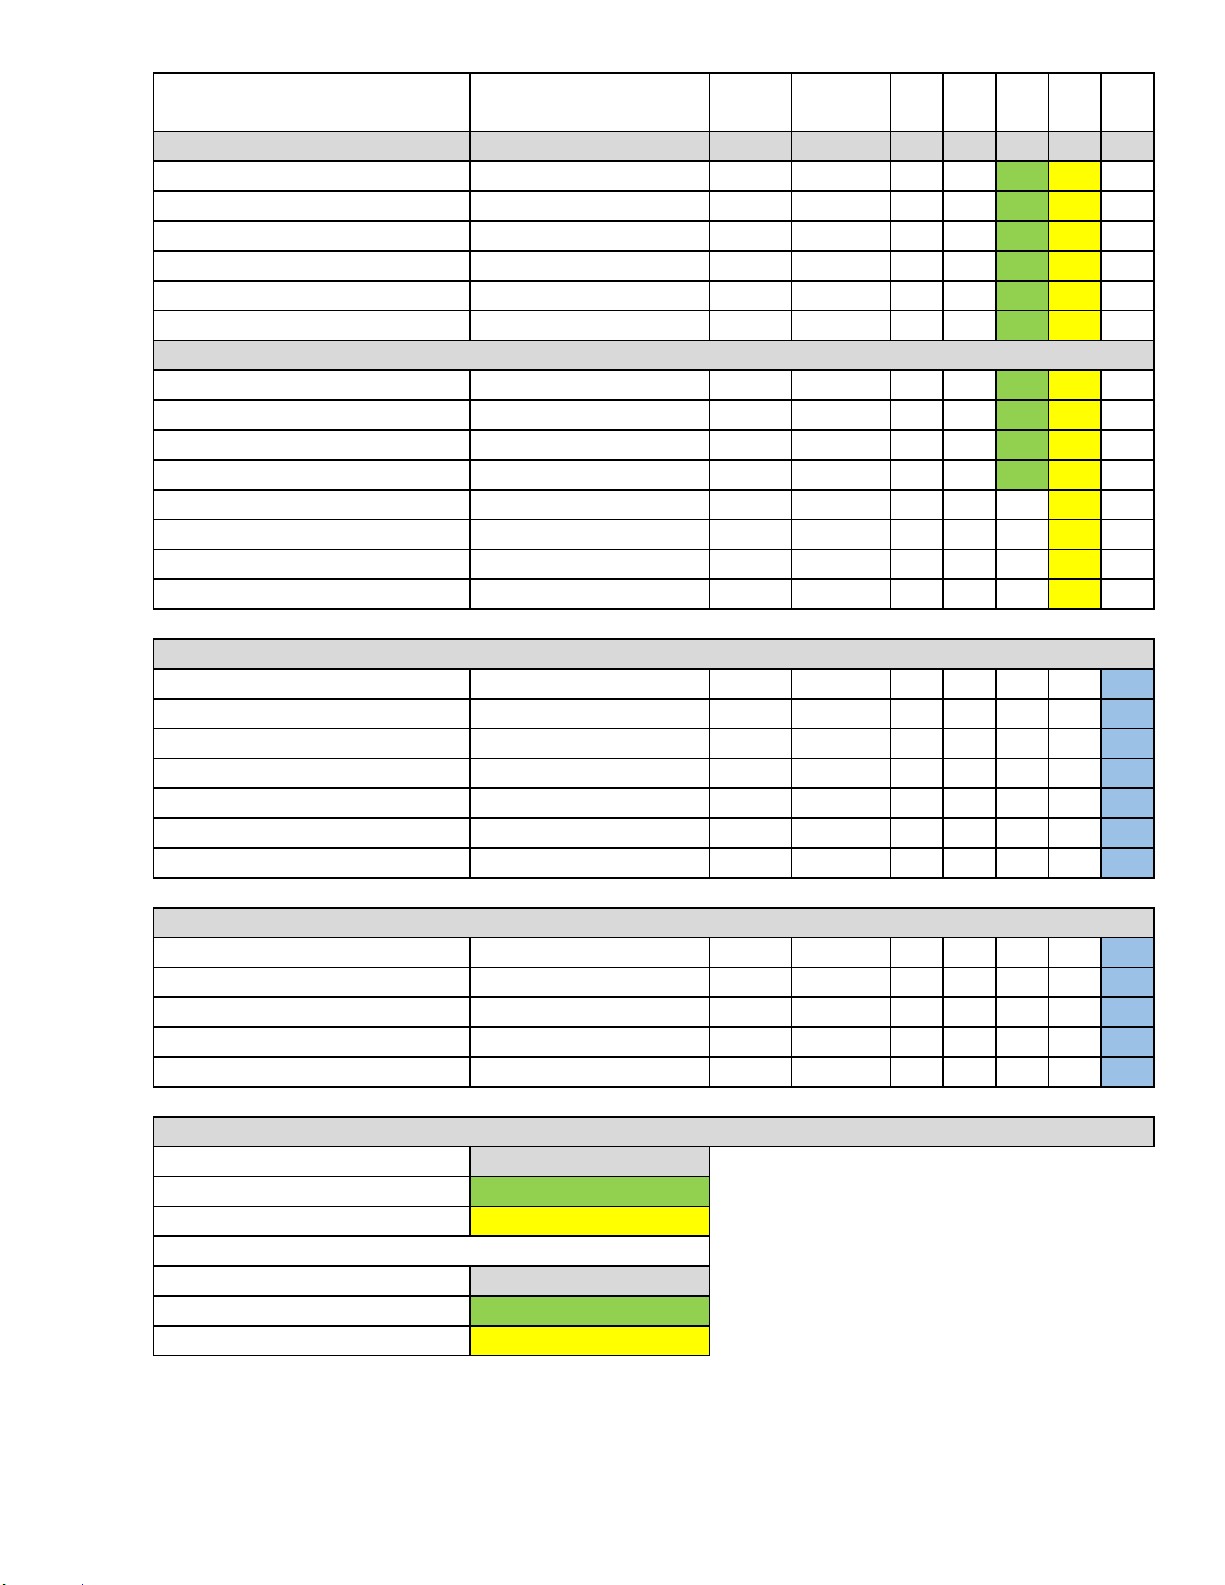
Electrolux Unic Tango Ace Service manual

Install...............................................................3
Adjust Voltage............................................................................4
GrinderAdjustmentandCalibration........................................5
PM Service Schedule.................................................................9
BrewingPistonEvaluation.................................................11-12
Brewing Piston Exchange.........................................................13
Piston Field Rebuild.................................................................17
Turntable Adjustment............................................................33
Turntable Service.....................................................................25
PartsSchematics................................................................34-48
Troubleshooting...................................................................49
Coee Cleaning.......................................................................58
Steam Wand and Milk Cleaning..............................................59
Field Service & PM Guide
ACE-ST
DUO
Tango 0060 5-2021 Parts Town 7-2021


3
Tango 0060 5-2021
Installation
Use the provided shims on
the rear legs if necessary
to level the Tango. Angled
slightly forward is also OK
Power:
NEMA L6-30
30 Amps
Minimum 200 Volts
Maximum 242 Volts
The transformer MUST be ad-
justed to match the incoming
voltage! (See next page)
Water: Minimum Maximum
Pressure 45 PSI 100 PSI
Flow Rate 1 Gallon/ Minute
TDS 50 ppm 125 ppm
Total Hardness 3 GPG 5 GPG
PH 6.5 7.5
Free Chlorine na 0.5 ppm
Total Chlorine na 1 ppm
Drain:
Tango must be installed level
or angled slightly forward!
Install the drain line running
continuously downward so
that no “trap” is formed.
!
Back pressure in the drain
line will cause problems
with the brewing system.
!

4
Tango 0060 5-2021
Voltage Setting
The jumper wire at the rear of the machine must be set to match the incoming voltage.
Incorrect voltage can cause problems with the touchscreen and valves.
!
Move the GREY wire to the terminal that best
matches the incoming voltage
(Red wire stays on 230 volt center terminal)
Move the RED wire to the terminal that best
matches the incoming voltage
(Grey wire stays on 230 volt center terminal)
All 2019 machines and some older machines
Dierent conguration for older machines
200 Volts
230 Volts
240 Volts
10 terminal block
200 Volts
230 Volts
240 Volts
8 terminal block
Sticker on
rear frame
Sticker on
rear frame

5
Tango 0060 5-2021
Adjust Grinder Setting
Fine/Coarse
Re-run and time test drink (Double shot)
18-26 seconds is usually the target time
Adjust grinder ner for longer extraction
Adjust grinder coarser for faster extraction
Repeat test and adjust as needed until extraction is in range
Adjust Grinders for best extraction: Each PM visit
Step 1: Adjust the grinders ne or coarse for best extraction
time. Typically done with the double espresso drink.
Adjust both grinders.
Run a test drink
(Double shot)
Turn counter-clockwise
for ner left (red) grinder.
Turn clockwise
for ner right (green)
grinder.
Adjustments are opposite for each grinder
Step 2: Capture a sample of the dry ground coee.
Weight the sample and enter the amount into the
calibration programming. (2 sample cycles)
Run 2-3 drinks after
each adjustment.
Note coee
ow time Adjust grinder
ne or coarse
as needed

6
Tango 0060 5-2021
Weigh & Calibrate
Grinder Output
Weigh and enter coee amount of
2 sample cycles during calibration
Tools needed:
Scale accurate to 0.1
grams
2 Paper cups
Optional:
Unic magnetic tray
holder and sampling
tray
Select Calibrate Weight
Select Purple (left) or Green (right)
grinder
Enter 9191 - Press OKPress menu Select
Setup
Select
Other
Settings
Select
Grinder
Calibration
9191

7
Tango 0060 5-2021
Tape a 2nd cup in the back of the
drawer about 1” below the top
“0” the scale with an empty
cup
Insert the empty cup into
the taped cup Replace the drawer with
both cups in place
Calibrate Grinder Dose
Select “Calibrate Weight” to start coee weighing process.
(Adjust grind ne or coarse rst, see previous pages)
Follow screen instructions
Remove drawer
Press conrm to start
Grinds Tamps, and Ejects
Remove and weight the cup
with grounds
1st Sample
See next page
for 2nd grind
cycle

8
Tango 0060 5-2021
Weight the grounds from
the 2nd cycle:
Empty and replace the
measuring cup
7
Remove and weight the cup
with grounds from the 1st cycle
Replace the drawer with
both cups in place
Enter the weight
Press conrm to save
Press conrm to start 2nd
grind cycle
Enter the weight
press conrm to save Done!
Press check mark conrm
& save
Repeat the process for the Green (right, decaf ) grinder!
Calibrate Grinder Dose
2nd Sample
Continued from previous page

9
Tango 0060 4-2021
Tango ACE-ST PM Schedule
Mar-21
Tango ACE-ST PM
Unic Parts listing Description from
ACE Parts Manual TG9060 Part # Parts
Manual Page
Quantity
6 Months
Odd
Years
Even
Years
6-Year
Rebuild
Calibration & Adjustments
Calibrate Grinder Average 3 cycles each test N/A
Adjust Turntable Tension 150-180 milliseconds N/A
Test Coffee System Water Flow 200 ml in 20 seconds N/A
Brewing Piston (Not part of PM kits, order separately)
Piston Rebuild Kit N/A FR-1919 425 1
Coffee Brew Piston wo/motor
PISTON ASSEMBLY WITHOUT MO
FR-1010 425 1
Coffee Service Parts
Turntable Rebuild Kit N/A FR-1551 420 1
Coffee Dosing Funnel Assembly FUNNEL MOBILE KIT FR-1006 410 1
Turntable Cover PLASTIC TURNTABLE FR-7000 420 1
4 MONTH Venturi Milk Service Parts (1 step only)
Venturi Milk Foamer O-rings (Not in PM Kit) DV-1617 611 1
Venturi Milk Foamer Assembly LC SET FR-1046 611 1
Gicleur Metering Jets Parts
Copper Gasket for Pipe Fitting N/A CN-618 420 1
Gicleur Filter Screen FILTER 25400 420 1
Gicleur Holder JET HOLDER 23773 420 1
Gicleur Metering Jet (0.7mm) JET DIAM. 0.7 23117 420 1
Gicleur O-ring - 1.78x2.9mm GASKET 1.78 X 2.90 FKM TC-80 420 1
Steam/Water Wands Service
Steam Wand Swivel O-ring O RING - 9.13 X 2.62 PH-78 201;241 1
Copper Spacer Washer N/A AG-14 201;241 1
Wand Spring SPRING PA-43 201;241 1
Wand Spring Holder BRASS END RR-67 201;241 1
Upper O-ring for Steam/Water Wands O RING - 13.95 X 2.62 PH-54 201;241;251 2

Tango ACE-ST PM
Unic Parts listing Description from
ACE Parts Manual TG9060 Part # Parts
Manual Page
Quantity
6 Months
Odd
Years
Even
Years
6-Year
Rebuild
SteamAir Autosteam Service
12 Hole Steam Tip 12 HOLES END PIPE 25909 241 1
O-ring - 2x9.5mm GASKET 2 X 9.5 28134 241 2
O-ring - 8.73x1.78mm GASKET 8.73 X 1.78 CN-436 241 1
O-ring - 9.13x2.62mm O RING - 9.13 X 2.62 PH-78 241 1
Set-screw - M5x8mm POINT END SCREW PC-38 241 1
Spring Inserts THRUST BALL BEARING RO-58 241 2
Other PM Parts
Drip Tray O-ring O RING - 2.62 X 17.13 27845 361 1
Cleaning Cap O-ring GASKET 3.53 X 34.52 EPDM 27907 361 1
Cleaning Cap Flat Seal GASKET 28700 361 1
Vacuum Break Plunger O-ring GASKET 6.07 X 1.78 CN-198 201 1
Complete Vacuum Break Kit VACUUM VALVE KIT 27224 201 1
Steam Boiler Safety Valve LP VALVE 3.5 BARS 27200 340 1
Water Inlet Filter 80 Microns FILTER CARTRIDGE 80 MICRONS CN-96B 620 1
Water Inlet filter Cap O-ring GASKET 3.53 X 29.75 83501 620 1
General Service Parts
Hot Water/Coffee Flow Meter Impeller TURBINE CN-829 251;330 2
Hot Water/Coffee Flow Meter O-ring GASKET - DOSING DEVICE CN-828 251;330 2
High-Level Probe Assembly HIGH LEVEL PROBE 26526 340 1
Low-Level Probe Assembly LOW LEVEL PROBE 26527 340 1
Americano Valve
ELECTROVALVE 2 WAYS 24V D2.3
35500 345 1
Americano Valve O-ring - 2x9.5mm GASKET 2 X 9.5 28134 345 2
Grinder Burrs 64mm GRINDING WHEEL SET 37516 401 2
Heat Exchanger Service Parts
Heat Exchanger O-ring - 1.78x17.17mm O RING 1.78 X 17.17 27716 345 1
Heat Exchanger Teflon Seals PTFE FLAT GASKET 28720T 345 2
Brew Valve Pipe O-ring - 1.78x12.42mm O RING - 1.78 X 12.42 27796 345 2
Americano Valve Banjo O-ring - 2x9.5mm GASKET 2 X 9.5 28134 345 2
Copper Crush Washer 1/2 JOINT CUIVRE RECUIT 1/2 CH-17 345 2
Complete PM Kits
Tango Ace/ST 2 Step 6 Month 250-00365
Tango Ace/ST 2 Step Years 1-3-5 250-00367
Tango Ace/ST 2 Step Years 2 & 4 250-00366
www.unic-usa.com
Tango Ace/ST 1 Step 4 Month 250-00362 www.grindmaster.com
Tango Ace/ST 1 Step Years 1-3-5 250-00364 www.electroluxprofessional.com
Tango Ace/ST 1 Step Years 2 & 4 250-00363

11
Tango 0060 5-2021
Press and Hold YES for 3 seconds
to start the rinsing cycle
Piston Water ow test
180-250 ml = Normal ow
150-200 ml = Slight restriction, run a
cleaning cycle and test again
Less than 150 ml = Piston clogged.
Remove piston to clean or replace.
Remove and replace
grounds drawer to start the rinsing cycle.
Ace / STP:
20 Second Flow
~225 ml rinse
Measure the water ow through the
Piston during the spout rinsing cycle.
Clean or replace the Piston
if the ow is restricted.

12
Tango 0060 5-2021
Piston Friction
Range: 0.8Amps - 2.3 Amps
Piston Information Screen
Insert USB key
Insert USB, Press Cancel Press Single or Double
to run a test cycle
1.4 Amps shown
Insert Technicians USB
Piston information is displayed
while each drink is pouring
with the USB is in place
Tango ACE / ST
Piston Amp draw test
The piston should be replaced if it draws more than 2.3 amps.

13
Tango 0060 5-2021
Coee Line to Spout
10 mm Nut
Drive-shaft coupler
Drive nut & Cover
Piston Movement
Sensor Plug
Piston Bottom Position
Sensor Plug
Turntable drive-shaft
Rear Piston Threaded
Attachment Rod -12 mm
Front Piston Attachment
Allen Screw - 6 mm
Tango UNO/SOLO - ACE/ST
Tools needed:
Flat Blade Screwdriver
10 mm wrench
12 mm wrench
6 mm Allen Wrench
Tango Brewing Piston Exchange

14
Tango 0060 5-2021
Lift aluminum reinforcement
cover from lower coupling
Remove the Inner Panel Relieve tension on Turn-
table shaft by rocking it
with a 10 mm wrench
Slide upper coupling
down
Unplug Machine Remove Grounds Drawer Remove the 4 side
screws from the Inner
panel
Use a at screwdriver to
push coupling down if nec-
essary
Turntable shaft released
Tango Brewing Piston Exchange
!
45
3
2
1
8
7
6

15
Tango 0060 5-2021
Unplug Piston Movement
Sensor Plug
Unscrew rear mounting
post - 12 mm wrench Remove front mounting
bolt - 6 mm Allen
Remove Turntable drive-
shaft Remove line to spout
10 mm compression tting
Unplug Piston lower posi-
tion sensor
Lift nylon drive nut from
lower coupling
Coee output line to
spout
Remove rear mounting
post
Tango Brewing Piston Exchange
14
15
13
12
11
17
16
910

16
Tango 0060 5-2021
Reinstall Piston
Tighten screws, Attach
plugs & Coee Line
Replace Turntable shaft
Slide coupler up
Slide O-ring up to notch
Transfer Motor
Rotate shaft of new Piston
part-way down rst!
Rotate to the right to remove Remove piston halfway
Unplug piston motor wires
Tango Brewing Piston Exchange
Slide piston down
Orient motor at this angle Clamp must be on the left
with the screw facing out
Tighten screw rmly
Reattach motor wires!
Polarized 1/8’ & 1/4” plugs
Turn shaft
partway down
!
New Piston
19
18
22 2321
20
26
25
24 Lubricate
O-ring with
Molykote 111

17
Tango 0060 5-2021
Tango Brewing Piston
Field Service
Brewing Piston Field Service for coee clogs
Limited eld rebuild
Clean areas of coee contact
Replace Seals and O-rings
Replace lter screen Allowed substitute for a piston
change if the lower bearing is OK
and the electronic sensors are in
good condition
Dow Molykote 111 grease
IKV-Fluor
UNIC turntable
grease
FR-1919
Piston rebuild kit
FR-1919

18
Tango 0060 5-2021
Press and Hold YES for 3 seconds
to start the rinsing cycle
Piston Water Flow Test
Tango all versions
180-250 ml = Normal ow
150-200 ml = Slight restriction, run a
cleaning cycle and test again
Less than 150 ml = Piston clogged.
Remove piston to clean or replace.
Measure the water ow through the
Piston during the spout rinsing cycle.
Consider a Field Rebuild if the ow is
restricted.
Remove and replace
grounds drawer to start the rinsing cycle.
Ace / STP:
20 Second Flow
~225 ml rinse

19
Tango 0060 5-2021
Clean
Replace
Clean
Clean
through holes
Wipe clean only!
Clean
Replace
Replace
Replace Clean
Locktite 242
IKV-Fluor grease on spring
Thin coat of Molykote grease
Tango Brewing Piston
Field Service Overview

20
Tango 0060 5-2021
Remove the Bottom
Plate, Threaded Follower,
and Spring
Remove Screen, Seals,
and Spacers Soak the dirty parts in
coee cleaner
Pull the brew chamber o
of the piston Remove outlet nipple
12 mm wrench
Remove the 3 mm Allen
screws from the lower plate
The spring will decompress!
Remove the piston from
the machine
Unscrew the inner piston
from the jack-screw
Left hand threads!
Use a 1/8” drill bit to clear
coee pathways
9
Tango Brewing Piston
Field Service
45
32
1
87
6
This manual suits for next models
5
Table of contents
Other Electrolux Coffee Grinder manuals