ElectroMedic CARE User manual
USER’S
MANUAL
IN ENGLISH
T E N ST E N S
TRANSCUTANEOUS
ELECTRICAL
NERVE STIMULATOR
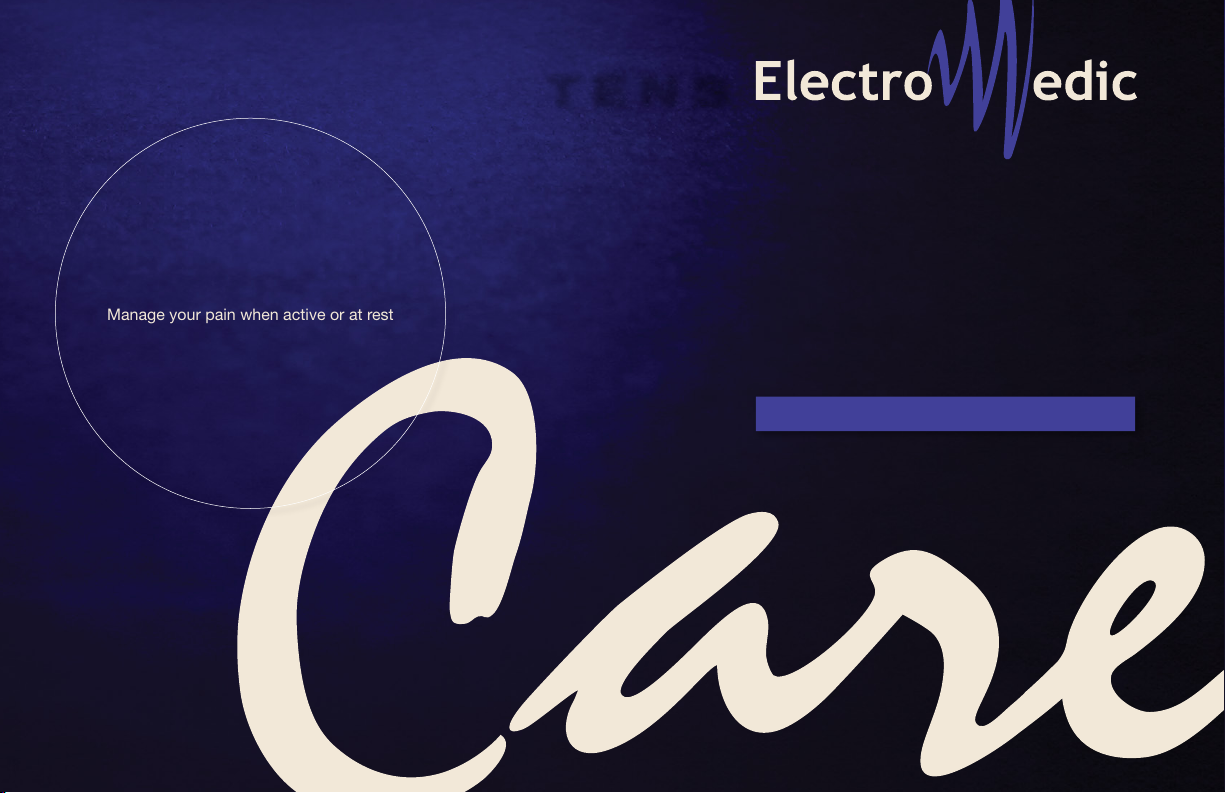
Manage your pain when active or at rest
READ INSTRUCTIONS
OPERATING
BEFORE

2
page
1
1 INTRODUCTION BEFORE USING THE STIMULATOR
1.1 Electro-Medic: A Solid Culture, a Therapeutic Alternative, Devices Conceived from the Finest Technology 3
1.2 Medical context. Usage and Benets of Neurostimulation 4
1.3 Safety measures. Indications, Contraindications, Precautions, Caution 5-7
2 INTRODUCING THE DEVICE
2.1 Equipment and accessories 8
2.2 Electrical Specications and Pre-Programmed Settings 9
2.3 Control Pad 10
2.4 Screen Display 11
3 INSTRUCTIONS
3.1 Electrodes. Connection, installation, use, and start-up 12
3.2 Specic Programs. Changing a Program or its Treatment Time,
Locking/Unlocking a Program 13
3.3 Adjusting and Locking Intensity Level 14
3.4 Halting or Pausing Stimulation 14
3.5 List of Stimulation Modes 15
3.6 Table of Different Programs 15
3.7 Battery. First Charge, Battery Status, Replacement, Battery Charger 16-19
3.8 Troubleshooting 20
4 DEVICE MAINTENANCE AND CLEANING 21
5 WARRANTY 21
6 DOCUMENT HISTORY
22
2
BEFORE USING THE STIMULATOR
A CONCEPT ACCESSIBLE TO ALL
INTRODUCTION
A SOLID CULTURE IN ELECTROTHERAPY conceived
to noticeably reduce acute, chronic, sports-related,
post-operative, and post-traumatic pain and much more.
A therapeutic option that is medically recognized
andapplicable within a clinical environment, at home,
and even, depending on the pain to treat, while
engagingineveryday activities!
Our models are state-of-the-art, light, compact,
anduser-friendly and are developed through
thorough and consistent collaboration with healthcare
providers and their patients to develop a device that
is capable ofserving an expanded range of physical
rehabilitationcare.
Electro-Medic is the proud
Canadian manufacturer of
-TENS-, safe and efcient
neurostimulator devices. They
are compact electrical devices
that are therapeutic and
portable, offering :
1.1
3
page
1

4
page
1. 2
THE
T E N S
MANAGE YOUR PAIN
WHEN ACTIVE OR AT REST
MEDICAL CONTEXT
USING THE TRANSCUTANEOUS ELECTRICAL NERVE STIMULATOR (TENS)
TRANSCUTANEOUS ELECTRICAL NERVE STIMULATION IS SCIENTIFICALLY PROVEN AND
PRESCRIBED BYMEDICAL PROFESSIONALS
Transcutaneous electrical nerve stimulation -TENS- depolarizes peripheral nerve bres and is transmitted through electrodes
placed on the body to reinforce the effectiveness of the natural pain control mechanisms.
TRANSCUTANEOUS ELECTRICAL NERVE STIMULATION APPLIED AT THE SENSORY LEVEL
A tingling sensation is induced to trigger a natural analgesic reaction.
COMPLEMENT OR ALTERNATIVE TO TAKING MEDICATION
Neurostimulation is used for acute postoperative and post-traumatic pain and muscle relaxation and for treating many
othertypes of pain that are not relieved by medication.
ACCESSIBLE TO ALL
The ability to choose the most appropriate TENS program for your type of pain makes TENS one of the most effective
non-surgical and non-drug therapy solutions. Transcutaneous electrical nerve stimulation -TENS- is much more than a simple
compliment to any traditional treatment. TENSallows you to move more and live better.

page
1. 3 SAFETY MEASURES
INDICATIONS, CONTRAINDICATIONS, PRECAUTIONS, CAUTION
Transcutaneous electrical nerve stimulation meets each user’s specic needs. This non-aggressive and drug-free technique is recognized for its lack
of side effects under normal use conditions, moderate cost, the small size of the TENS device, and its ease of use. The -TENS- is compact and can
be slipped into a pocket, making it easier to carry out daily activities.
BENEFICIAL EFFECTS OF TRANSCUTANEOUS ELECTRICAL NERVE STIMULATION - TENS -
Pain management •Return to an active life •Improved mobility •Accelerated recovery after an accident
TENS INDICATIONS FOR PAIN RELIEF • acute, subacute, or chronic pain
• post-traumatic pain
• pre- and postoperative pain
•Sprain
•Acute or chronic neck, back, and lower back pain
•Tendinitis, epicondylitis, bursitis, capsulitis
•Rheumatism (osteoarthritis, arthritis)
•Tension headache
•Diabetic neuropathy
•Shingles
•Fibromyalgia
•Phantom limb
•Complex regional pain syndrome
•Post stroke or spastic pain
•Multiple sclerosis
•Angina pain
•Childbirth
•Dysmenorrhea
•Intermittent claudication
•Perineal pain
•Interstitial cystitis
FUNCTIONAL REHABILITATION: better autonomy in
performing daily activities

6
page
CONTRAINDICATIONS
•Cancer - absolute contraindication: wait until the end of the remission period for metastasis or circulatory cancer (leukemia).
- local contraindication: wait until the end of the remission period for other types of cancer, under interdisciplinary supervision.
•
Cardiac pacemaker: absolute or local contraindication, to be used under interdisciplinary supervision with permission from the attending cardiologist.
LOCAL CONTRAINDICATIONS
DO NOT APPLY TO THESE REGIONS
•Transcranial application: the risks of applying the electrodes in a transcranial application are unknown.
•Anterior neck region, carotid sinus (throat): risk of stimulating the vagus or phrenic nerves, pharyngeal muscles, or carotid sinuses.
•Eyes: the risks of treating this part of the body are unknown.
•All types of infections: risk of spreading the infection.
•Skin impairment: psoriasis, eczema, etc.. Caution in the vicinity of open wounds or healing scars.
•Undiagnosed persistent pain.
LOCAL CONTRAINDICATIONS
USE UNDER MEDICAL OR INTERDISCIPLINARY SUPERVISION
•Transthoracic and anterior application of the cardiac region.
•Electronic implant: risk of interference with the implant’s function.
•Heart disease: risk that the heart will have difculty compensating for the high metabolic demand.
•Pregnancy: abdominal and lumbar region during pregnancy. The -TENS- may be used in the lumbar region during childbirth.
•Skin sensory disorder, loss of sensitivity: risk that the patient does not adequately feel the current, which increases
the risk of skin burns or irritation.
•Genital organs: requires training.
•DVT/active phlebitis/embolism: risk of thrombus displacement in the bloodstream.
•Hemorrhage: risk of increasing bleeding.
•Epilepsy: local contraindication to the head and neck (cervical region). Precaution for the trunk and limbs.
Electrical stimulation could trigger an epileptic seizure.
•
Tuberculosis: electrical stimulation in this area may spread the infection during the active phase.
•Pacemaker: absolute or local contraindication, to be used under interdisciplinary supervision
with authorization from the attending cardiologist.

6
PRECAUTIONS
• Circulatory dysfonction : stimulation increases the metabolic demand, which may exceed the oxygen supply, thus increasing pain.
This may even lead to tissue ischemia or necrosis.
• Skin disease: resistance is decreased, increasing the risk of burns.
• Active epiphyseal plate: risk of impairing bone growth.
• Chest, heart, and lower abdominal area: risk of affecting normal heart function.
• Communication disorder: risk of injury, misunderstanding of use; under interdisciplinary supervision.
CAUTION
• Children: keep out of the reach of children.
• Driving a vehicle: never handle the -TENS- device or move the electrodes while driving.
• Risk of skin damage when using carbon electrodes: always use electrode gel.
WARNING
• Do not adjust or perform maintenance on your Electro-Medic -TENS- device while it is in operation.
• Near other equipment. Do not use the device when it is placed near to or above other equipment. If it is necessary to use it in such a
conguration, make sure that ALL DEVICES ARE working properly under these conditions.
• Do not use the device at the same time as monitoring equipment (e.g. ECG equipment) operating with electrodes. The signals of the device could
interfere with those of the monitoring device.
7
page
2
8
page
INTRODUCING THE DEVICE
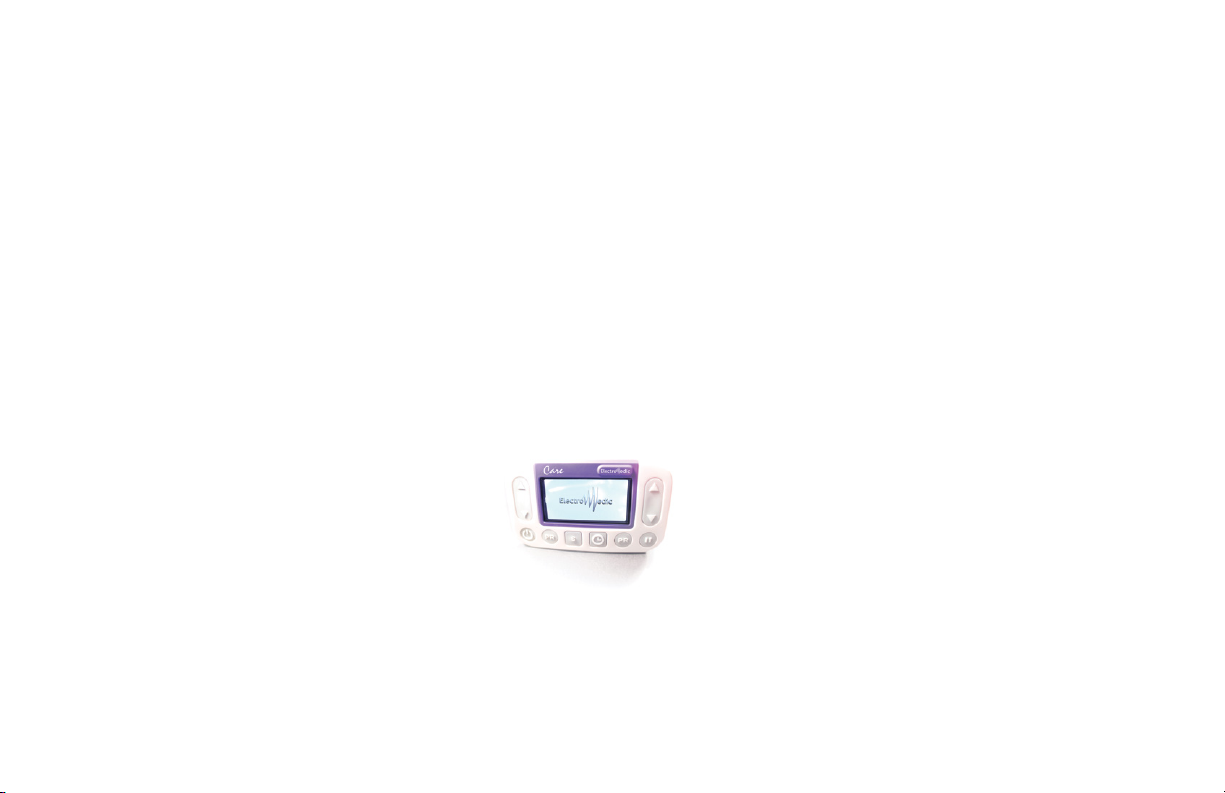
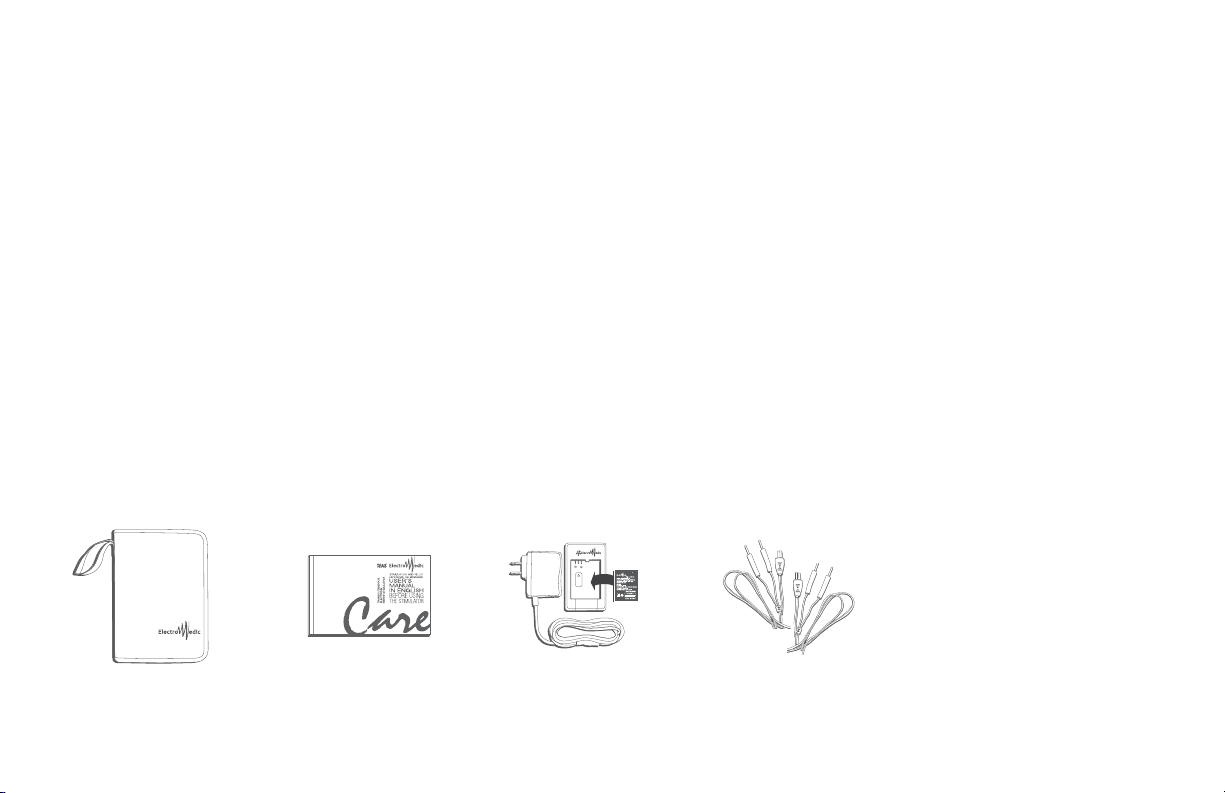
2 .1 EQUIPMENT AND ACCESSORIES |MODEL: CARE
THE ELECTRO-MEDIC - TENS- CARE PORTABLE STIMULATOR IS SUPPLIED WITH THE FOLLOWING ACCESSORIES:
•1 case •1 quick start guide •1 charger and 1 Li-ion battery
•2 wires •1 pack of reusable square self-adhesive electrodes
CAUTION
Carefully read the instructions for use for the electrodes as explained on the packaging.
We recommend that
only accessories
authorized by
Electro-Medic
be used.

2.2
9
page
CHARACTERISTICS
ELECTRICAL SPECIFICATIONS
• 2 totally independent stimulation channels
• Constant current for a load up to 1500 Ohms
(Each program has a maximum output amplitude of 38 V)
• Maximum current of one impulse per channel: 0-60 mA
• Impulse duration: 70-250 Us
• Impulse frequency: 1-80 Hz
• Power supply: 1 rechargeable Li-ion battery
3.7 volts/600 mAh
TENS SAFETY MEASURES
INTERNALLY POWERED EQUIPMENT, TYPE BF APPLIED PARTS NOT SUITABLE FOR:
• Use with: an anaesthetic mixture ammable with air, oxygen, or nitrous oxide
• Continuous use
CHOICE OF PRESET PROGRAMS
1. Conventional
2. Modulated pulse duration
3. Burst
• Weight with battery: 92 g
• Weight without battery: 75 g
• External dimensions: 110 mm (L), 64 mm (W), 11 mm (D)
• Timer: 10-20-30-40-50-60-continuous
• Functional humidity: 5ºC to 40ºC, 15% and 90% R.H.;
700 hPa and 1060 hPa
• Storage and transport humidity: -10ºC to 60ºC, 15% and 75% R.H.;
700 hPa and 1060 hPa
page
2.3
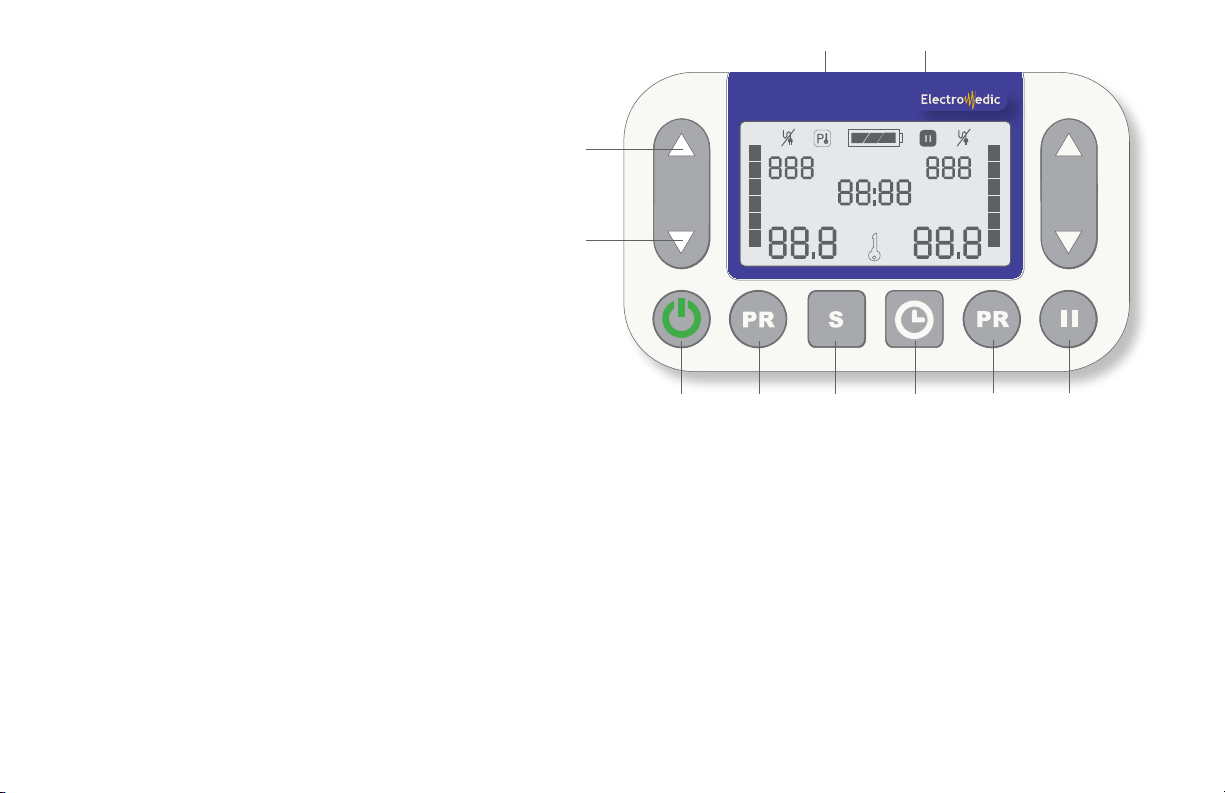
10
1
2
3 4 5 6 7 8
9
10
Care
1 INCREASE
Increases the intensity of the left or right channel.
Increase the intensity with caution and as prescribed.
2 DECREASE
Decreases the intensity of the left or right channel.
Deactivates lockout.
3 ON/OFF BUTTON
Opens and closes the device in addition to halting
stimulation at any time.
4 PROGRAMS
Choice of 3 preset programs for customized, effective,
and safe treatment.
channel 1. See no. 3.5 DIFFERENT POSSIBLE MODULATION MODES
5 SELECTION
Conrm and save the timer selection.
6 TIMER
Activates the timer to allow users to set the treatment duration.
Choose: 60-minute timer by increments of 10 minutes or
in continuous mode Cdepending on medically supervised needs
and recommendations.
7 PROGRAMS
Choice of 3 preset programs for customized, effective,
and safe treatment.
channel 2. See no. 3.5 DIFFERENT POSSIBLE MODULATION MODES
8 PAUSE
Pauses the device and returns the intensity to zero.
The device gradually returns to the previous intensity level
when the pause button is pressed again.
Timer function will also pause when the device is paused.
9 CHANNEL NO. 2 OUTPUT
10 CHANNEL NO. 1 OUTPUT
CONTROL
PAD
1
2 2
9 8
7
3 3
4 4
5
6
5
11
page
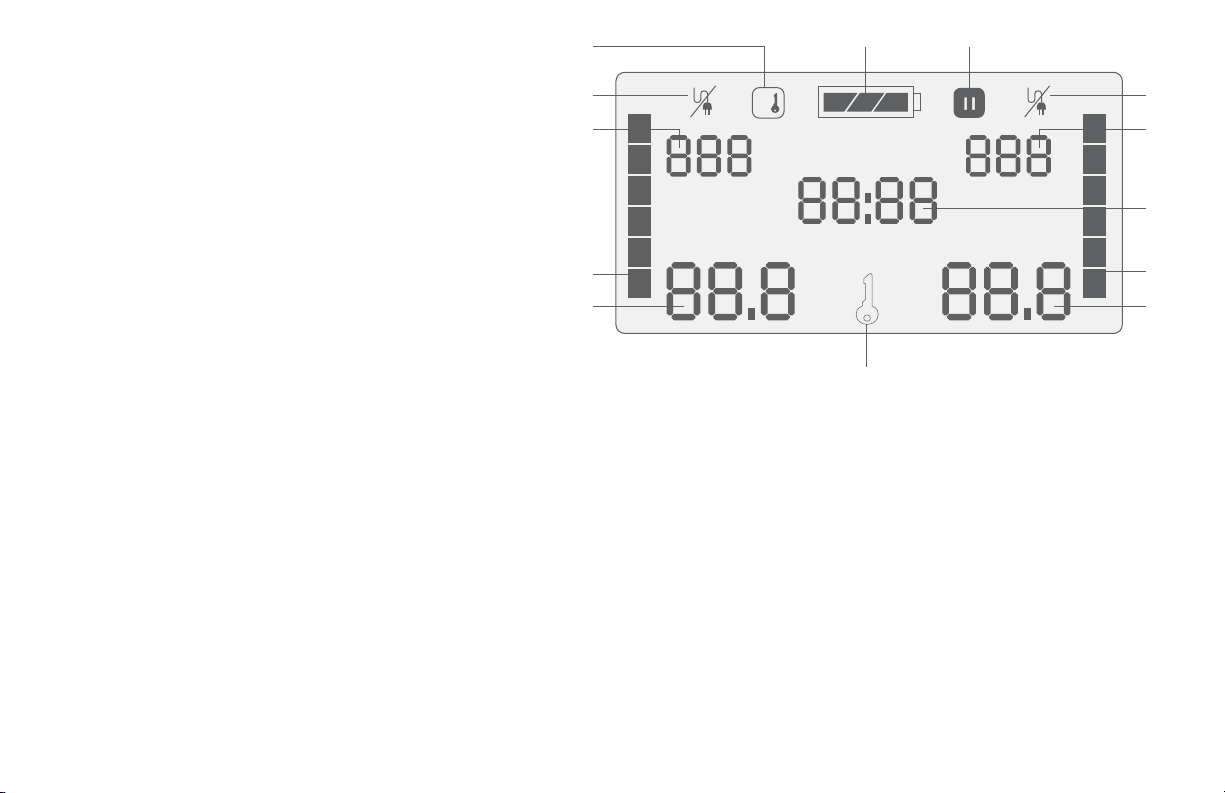
2.4
P
1 PROGRAM LOCKED
Program cannot be changed.
2 OPEN CIRCUIT
Electrode disconnected. Other problem likely.
3 PROGRAM
Displays the selected program.
•The left side displays the channel 1 program number
•The right side displays the channel 2 program number
4 INTENSITY
Channel intensity on a scaled bar.
5 IMPULSE INTENSITY
Channel intensity represented in numbers.
6 LOCKOUT
Indicates if the program is locked.
7 TIMER
Displays time remaining.
8 DEVICE IN PAUSE MODE
Indicates if the device is in pause mode.
9 BATTERY STATUS
Indicates the available current. SCREEN
DISPLAY
Please refer to
Nos. 3.2 to 3.8
INSTRUCTIONS,
for a detailed
explanation of
these functions.
3
D
12
page
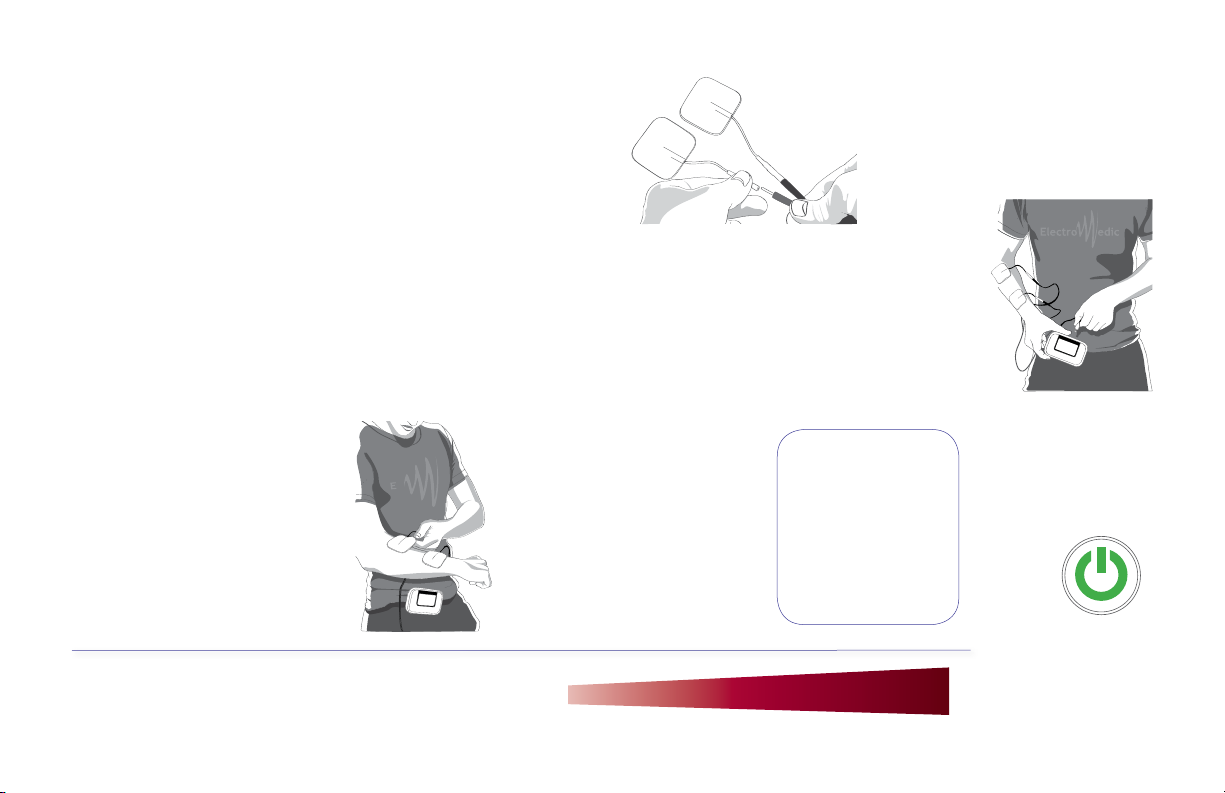
CONNECT THE WIRES TO
THE-TENS- UNIT AT THE
INPUT OF EACH CHANNEL
C
The electrodes used with this device must never be smaller than
2.54cm in diameter. We caution you that the smaller the electrodes,
the greater the stimulation intensity in the area where the electrodes
are placed, which increases the risk of skin irritation in that area. The
risk of skin irritation also occurs when self-adhesive electrodes do not
stick properly to the entire surface due to a lack of adhesion. Replacing
the self-adhesive electrodes after a maximum of 15 to 20uses ensures
superior device performance. Use carbon electrodes with electrode
gel to ensure a proper and effective current ow. Please refer to the
additional instructions provided on the electrode packaging.
on non-irritated skin that has been
washed with water, cleaned, and
dried thoroughly for better electrode
adhesion and optimal performance.
To optimize your results, we recommend that you
evaluate your pain before, during, and after treatment,
using the pain scale
B
3 .1
CONNECTION
CONNECT THE ELECTRODES
TO THE WIRES
A
TURN ON
THEDEVICE
ATTACH ELECTRODES
Do not position the
device where access
to the main source of
the device would make
it difficult to shut the
device down quickly if
necessary.
Pain
Scale
Intensity
Unpleasant aspect of the pain
12345678910
INSTRUCTIONS
For optimal and safe use, use only the
accessories provided by Electro-Medic.
Furthermore, proper adjustment of
the device’s intensity and a gradual
increase in levels will ensure the
comfort, relief, and improvement you
desire. We strongly advise you not to
increase the levels tooquickly.
(Type BF applied part: Electrodes)
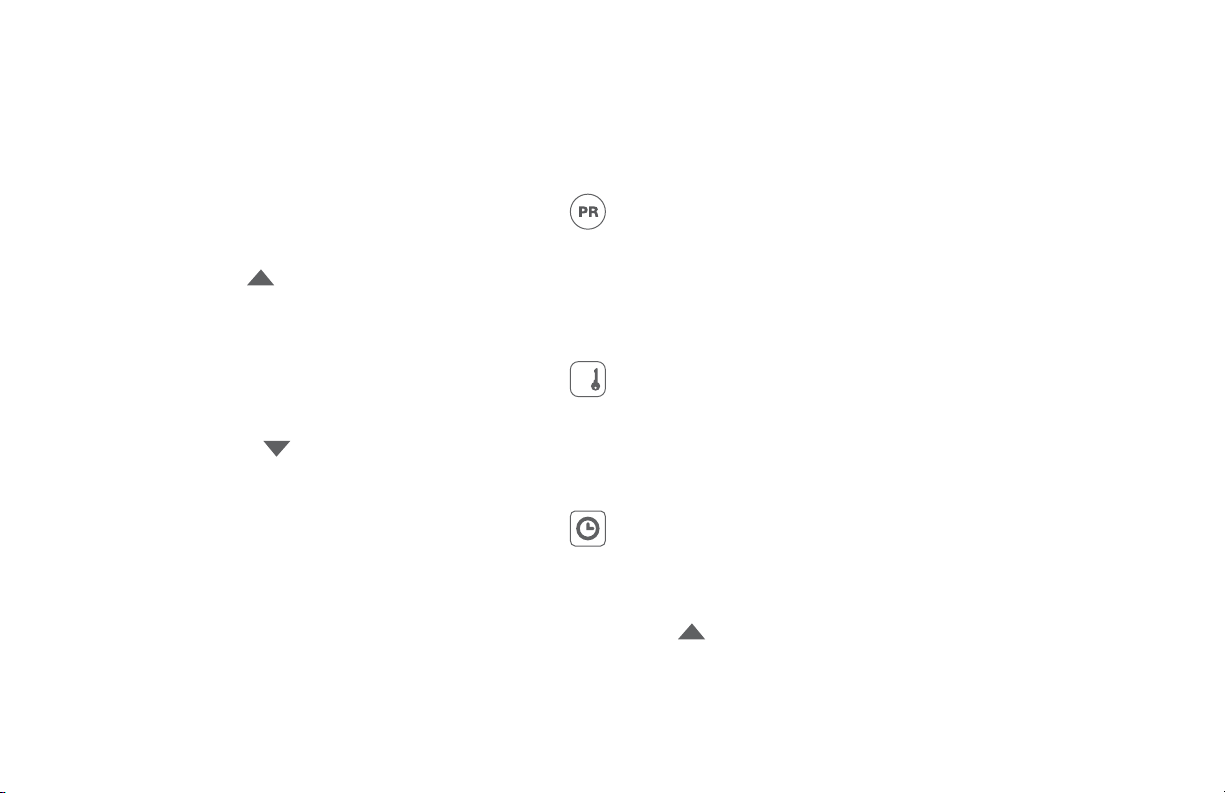
CHANGE A PROGRAM
A competent professional must approve the programmed settings according to your condition.
Press the channel’s PR button to modify the settings until the desired program is displayed in section no. 3 on the screen
or press the up arrow to start the treatment.
•If you wish to use both channels, select a program in the other channel using the other PR button.
•All programs can be used in combination.
•Never change the settings without consulting your therapist.
LOCKING/UNLOCKING A PROGRAM
To lock or unlock a program, press and hold the down arrow on program 2 and the PR button of program 2 simultaneously for 10 seconds.
You will see the lock symbol as pictured above in the left section.
•Use the down arrows to conrm it is working.
•If the lockout symbol appears: program locked, cannot be changed.
•If the lockout symbol does not appear: program not locked, user can change the program.
CHANGING THE TREATMENT TIME 0-60 MINUTES
Press the Timer button, and the timer will ash. •For the six-step, 10 minute each, treatment option, select 10, 20, 30, 40, 50, or 60 minutes.
Thedevice will automatically count down the time and stop when the time runs out
•For the no interruption, continuous treatment option, keep pressing until you receive the Csignal.
You will have to stop the device yourself when you consider the treatment time sufcient.
Conrm the chosen option by pressing the Sbutton to save or press the up arrow to start the treatment.
You can repeat the treatment time as needed to experience the desired benets.
P
3.2
13
page
See (3.5) DIFFERENT
POSSIBLE MODULATION
MODES and
(3.6) PROGRAM
SELECTION TABLE
SPECIFIC PROGRAMS
CHANGING A PROGRAM OR ITS DURATION
LOCKING/UNLOCKING A PROGRAM
14
page
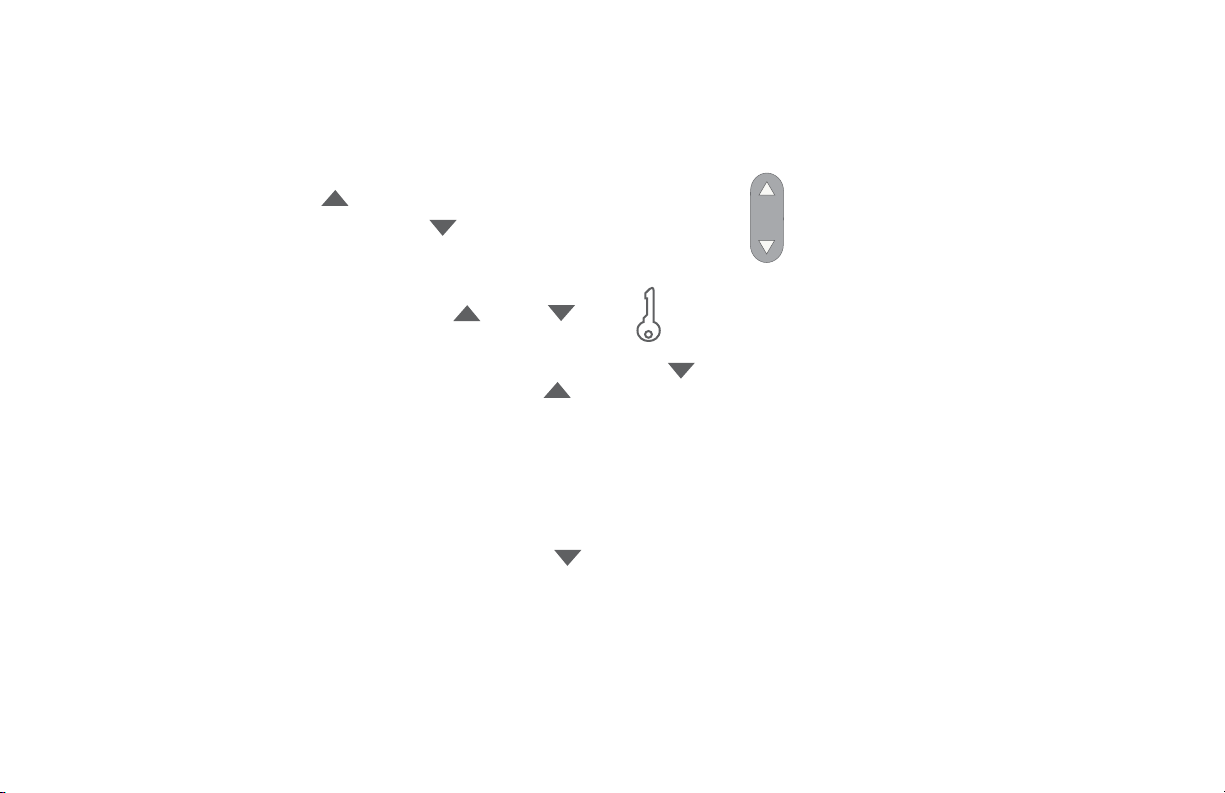
ADJUSTMENT
If you press and hold the up arrow , the intensity level increases faster.
Conversely, if you press and hold the down arrow , the intensity level decreases faster.
Caution: Always increase the intensity level gradually.
LOCKOUT
Depending on the level you want to set, press the up or down arrow.
This security lockout symbol indicates that the keypad has been locked out.
The symbol will appear after 10 seconds, once you have selected the intensity level
Therefore, if you wish to increase the intensity, you must rst press the down arrow to deactivate the safety lockout.
You can then increase the intensity level by pressing the up arrow .
STOP
To stop the stimulation, decrease the intensity with the down arrow
until the intensity returns to 0.00, or press the On/Off button.
PAUSE
You can take a 5-minute break at any time during the treatment.
• If the device is locked, unlock it by pressing the down arrow before pressing Pause
• The timer will stop during the desired pause
• Press Pause again to resume treatment
3.3 INTENSITY LEVEL SETTING
AND LOCKING
3.4 STOPPING OR PAUSING
THE STIMULATION

3.5
3.6
15
page
DIFFERENT POSSIBLE MODULATION MODES
Cconventional STIMULATION
In the conventional stimulation mode, the impulses are continuous with a xed rate and width.
BBURST
In Burst mode, there are two impulse trains per second (2 Hz).
MW Modulated Pulse duration
The impulse duration decreases from 150 Us to 70 Us in 9 equal stages, then returns to the selected value in 9 stages.
The total cycle time is 3 seconds.
TABLE OF DIFFERENT PROGRAMS
PROGRAM PULSE FREQUENCY (Hz) PULSE DURATION (Us) TIMER (MIN) MODE FIXED
P1 Conventional 80 150 30 C yes
P2 Modulated pulse duration 80 70-150 30 MW yes
P3 Burst 2 250 20 B yes
LEXICON Hz:
Us:
Us no. 1:
Us no. 2:
Timer:
Mode:
Fixed:
Pulse frequency setting
Pulse duration setting
no.1 Pulse duration setting
no.2 Pulse duration setting
Timer duration
Program modulation
Indicates if the program parameters are xed or may be changed
16
page
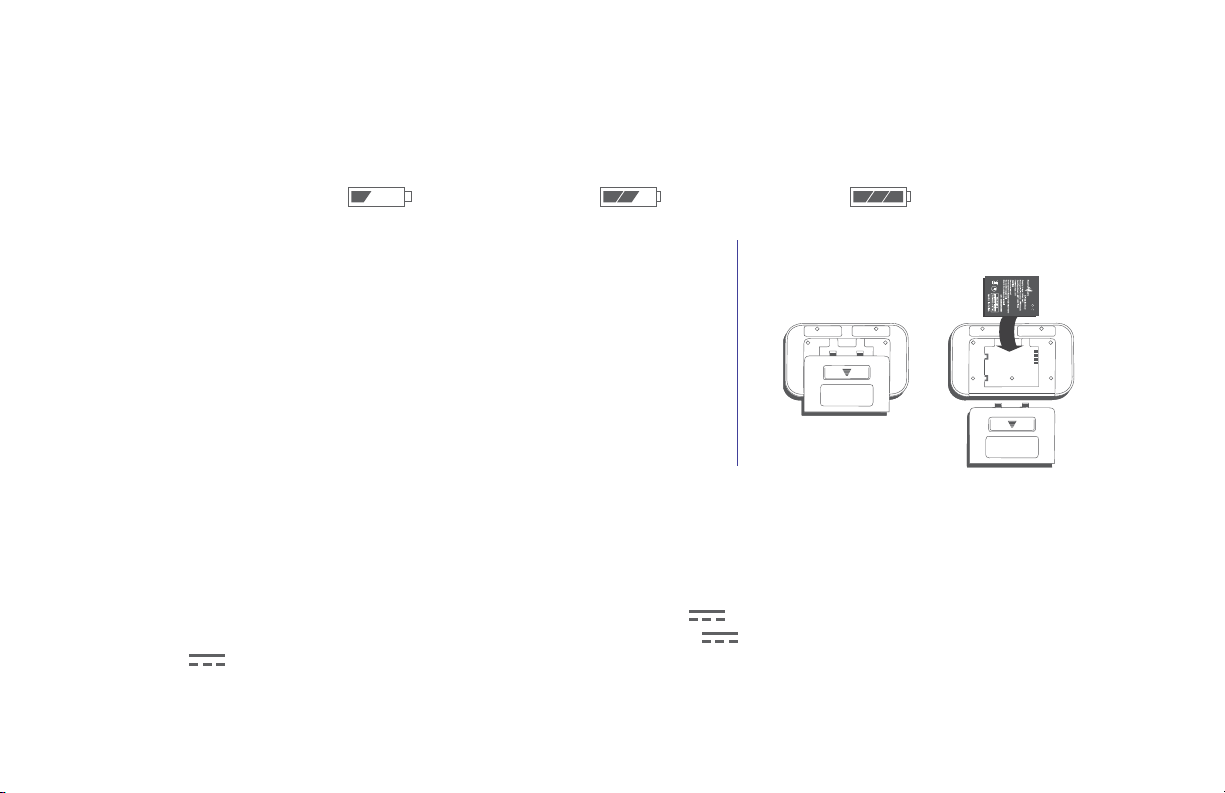
BATTERY
BATTERY STATUS
As displayed: 1/3 of the battery 2/3 of the battery 3/3 of the battery
LI-ION BATTERY CHARGER
LED INDICATOR SPECIFICATIONS
• Adaptor (Model: MDA534627)
• Input: 100 V-240 V~, 50/60 Hz, 150 mA
• Output: 4.2 V , 650 mA
• Red indicator: currently recharging
• Green indicator: no battery or fully charged
CHARGER
• Input: 4.2V
• Output: 4.2V
• Green indicator: fully charged
• Green indicator: device plugged in without battery
SERVICE LIFE
The typical service life of a Li-ion battery is approximately:
•Three (3) years or •300 charging cycles¹
Whichever comes rst.
Expect a service life of three (3) years for batteries that do not complete the charging cycle
process.
¹A charge cycle represents a complete discharge followed by a complete recharge of the battery.
BATTERY REPLACEMENT
3.7
17
page
THE PATIENT IS
THE INTENDED OPERATOR
The patient can operate the buttons and change the Li-ion battery under normal condi-
tions, as well as maintain the device and its accessories according to the user guide
CAUTION!
• Use only Electro-Medic rechargeable Li-ion batteries
• NEVER reverse the (+) and (-) terminals when connecting, and avoid any contact be-
tween the Li-ion batteries and metal objects (necklaces, hairpins, etc.)
• NEVER charge Li-ion batteries for more than 72 hours
• The Li-ion battery charger must comply with IEC 60601-1standards
SAFETY MEASURES
• Do not expose equipment to ame, sunlight, or any other heat source, as this could
result in a risk of burns, explosion, or even the release of toxic gases
• Do not store or transport the device with metal objects
• Do not disassemble or modify the device’s components
• Avoid contact with water or other liquids
INSTRUCTIONS FOR USING THE CHARGER
• Insert a Li-ion battery. Align the (+) and (-) terminals correctly
• Plug the charger into a standard wall outlet
• A red or yellow LED indicator indicates charging
• When charging is complete, the LED indicator turns green.
Unplug the charger and remove the Li-ion battery.
An immediate
response from the
operator isrequired
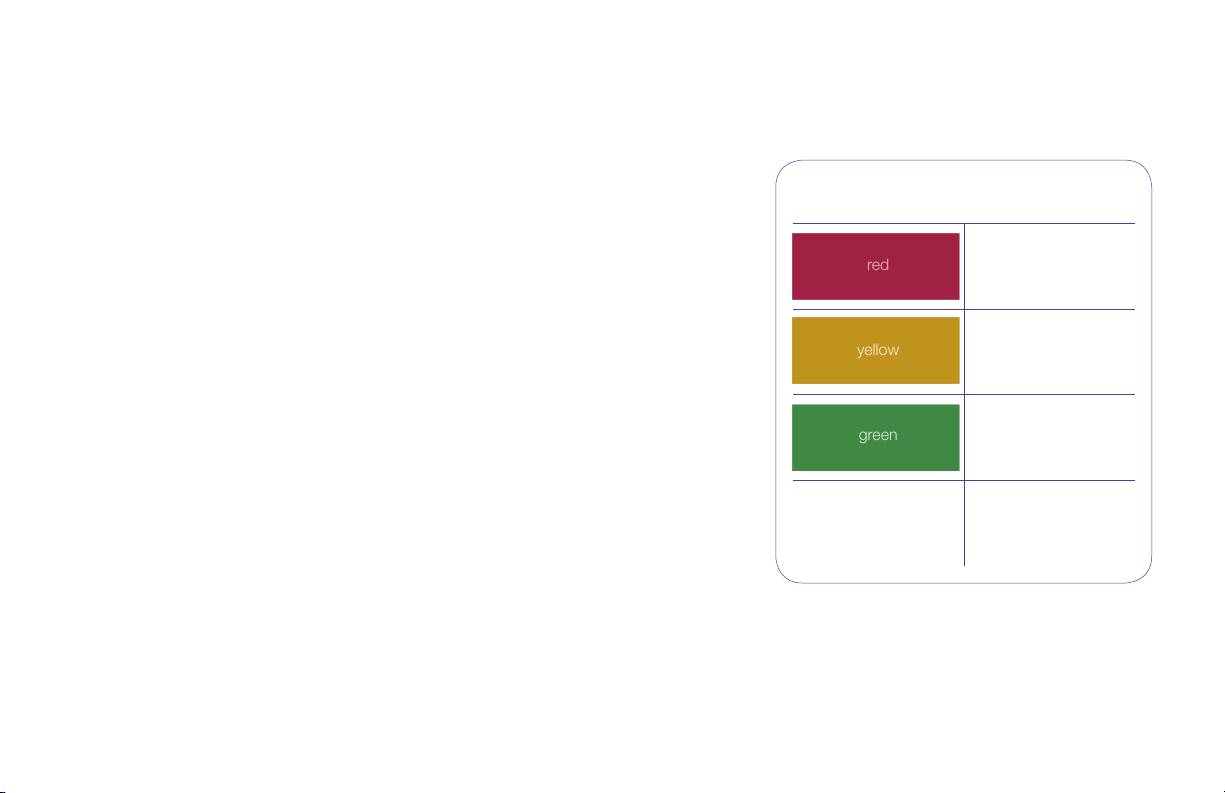
Indicator colours and theirmeaning
A quick response
from the operator is
required
Ready to use
Meaning other
thanthese
green
yellow
Other
red

18
page
Type BF applied part:
Electrodes
IP22
Continuous operation
Electro-Medic device
internal power supply
Applied part
Protection of electrical
equipment against water
or fine particle infiltration
that may have a harmful
effect on the equipment.
Instructions
Note: Not intended to be sterilized.
Do not use the device in an oxygen-rich
environment.
Protection against
electrical overload
SAFETY CLASSIFICATION
OF ELECTRO-MEDIC EQUIPMENT
TIME TO RECHARGE
• A Li-ion battery requires approximately 3.5 hours to recharge.
LI-ION BATTERY
• Voltage limited to 4.2 V
• Rechargeable 3.7 V/600 mAh Li-ion battery
ADAPTOR
• 100-240 V 50-60 Hz, 1.2 A
CAUTION
• This equipment must not be connected with an adaptor other than that supplied
withthe Electro-Medic equipment.
SAFETY MEASURES
• Do not short-circuit the device
• Do not expose the device to high temperatures
• Use only the specically recommended charger
The adaptor is 2MOPP equipment under IEC 60601-1-1.
Equipment approval is valid if used in combination with
theadaptor supplied with this equipment.
Do not position the device where access to
the main source of the device would prevent
the device from being shut down quickly
ifnecessary.

19
page
LI-ION BATTERY
• Voltage limited to 4.2 V
• Rechargeable 3.7 V/600 mAh Li-ion battery
SAFETY MEASURES
• Do not short-circuit the device
• Do not expose the device to high temperatures
• Use only the specically recommended charger
CLASSIFICATIONS
CLASS II DEVICE WITHOUT TYPE BF
APPLIED PARTS NOT SUITABLE FOR:
• usage in the presence of an anaesthetic mixture
ammable with air, oxygen, or nitrous oxide
• continuous operation
ADAPTOR
• 100-240 V 50/60 Hz, 1.2 A
The adaptor is 2MOPP equipment under 60601-1-1
Equipment approval is valid if used in combination
with the adaptor supplied with this equipment.
CAUTION
• This equipment must not be connected with an adaptor otherthan
that supplied with the Electro-Medicequipment
• Plug the charger into a standard wall outlet,
do not use a power bar
TROUBLESHOOTING
PROBLEM SOLUTION ACTION
Broken Screen
Display problem
Replacement part
None Contact your distributor
The device does not turn on at all Is the Li-ion battery inserted correctly? • Try changing the Li-ion battery
• Charge the Li-ion battery
The sign appears, intensity increases,
but no current Check the condition of the wires • Try changing the wire
• Try the other channel with the same wire
The sign appears, intensity remains at 1
and does not increase Check the condition of the wires
• Try changing the wire
• Try the other channel with the same wire
• See if the wire is twisted
• See if the connector is damaged
The sign appears
• Are the electrodes on the skin?
• Are the electrodes at the end of their service life?
• Is contact with the skin good?
• Check the condition of the wires
• Too much resistance between the electrode and the skin
• Try with carbon electrodes
• Change the self-adhesive electrodes
• Perform the test on the other channel
Device opens and closes Check the Li-ion battery or Li-ion battery compartment
• Try changing the Li-ion battery
• See if the Li-ion battery ts properly in thecom-
partment
Current is unstable
• Does the program allow you to feel the current?
• Is the wire knotted?
• Is the electrode well bonded to the skin?
• Perform the test with P1
• Perform the test on the other channel
• Perform the test with carbon electrodes
The stimulation effect is weak
or nonexistent
• Check the Li-ion battery status
• Check the program used
• Perform the test on a healthy muscle
• If the problem persists, consult your healthcare
professional
The stimulation does not produce
the usual sensation
• Check the settings
• Change the position of your electrodes slightly
• If the problem persists, consult your health-
careprofessional
The stimulation causes discomfort
• The skin is irritated
• The contact of the electrode on the skin is not satisfactory
• The self-adhesive electrodes are worn
• There is not enough electrode gel on the carbon electrodes
• The electrode positioning is not optimal
• If the problem persists, consult your health-
careprofessional
NB: To reduce the risk to the patient and to avoid damage to the stimulator, never increase the intensity (amplitude) to more than 20 mA
when testing for possible wire breakage. For more information, do not hesitate to contact your authorized distributor.
20
page
3.8
Table of contents


