Electronic & Electrical Solutions Magic Breed Plus User manual

User Manual

Revision date: 1/8/2019
Electronic & Electrical Solutions Pty Ltd
3/9 Rawlins Circuit
Kunda Park
QLD 4556
Australia
Phone: +61 07 5453 4355
email: admin@eesolutions.net.au
www.eesolutions.net.au
© Copyright 2019 Electronic & Electrical Solutions

Magic Breed Plus User Manual 1
1. Contents
1. Contents ................................................................................... 1
2. Introduction ............................................................................. 2
3. Legal Information .................................................................... 3
4. Principle of Operation ............................................................ 5
5. Getting Started ........................................................................ 6
6. Setting Up ................................................................................. 8
7. Fitting to the Mare ................................................................ 12
8. User Interface ........................................................................ 16
9. Transmitter Pairing ............................................................... 17
10. Operation ............................................................................... 20
11. Range and Testing ................................................................. 25
12. Settings ................................................................................... 26
13. After Use ................................................................................. 27
14. Specifications ......................................................................... 28
15. Warranty ................................................................................. 29

2 Magic Breed Plus User Manual
2. Introduction
Congratulations on your purchase of the Magic Breed Plus
foaling alarm system. Magic Breed has been the leading name
in foaling alarms for over 35 years and with the release of the
Magic Breed Plus now incorporates many electronic
advancements from during that time.
To ensure that you have the best possible experience with
your Magic Breed Plus system, please ensure that you read
through this manual and understand the operation before
use.
This symbol is used to note instructions that must
be followed to prevent damage to the Magic
Breed Plus system.

Magic Breed Plus User Manual 3
3. Legal Information
3.1. Liability Statement
Magic Breed Plus is intended to aid in the foaling process but
there are limitations to the technology which mean that it
cannot be 100% accurate.
While we have every expectation that the Magic Breed Plus will
work well and be very helpful in the majority of situations,
Electronic & Electrical Solutions can unfortunately take no
responsibility or liability of a negative outcome due to the
failure of the Magic Breed Plus system to detect the foaling
event. The only way to achieve 100% reliability is to have an
awake, alert person physically watching the mare.
3.2. Regulatory Compliance
The Magic Breed Plus system has been designed and tested to
comply with Australian regulations regarding Electromagnetic
Compatibility and radio transmissions. Both the transmitter
and receiver comply with the following Australian/New
Zealand standards:
AS/NZS 4268:2017
AS/NZS CISP32:2015
The RCM mark found on the Magic Breed Plus components is
a confirmation that the equipment meets Australian
regulatory requirements. Always look for this mark when
purchasing new electronic equipment:

4 Magic Breed Plus User Manual
By complying with AS/NZS 4268, the Magic Breed Plus system
is classified as a “Low Interference Potential Device”, or LIPD.
An LIPD device can be operated by any person without
requiring a radiocommunications licence, which is important
for equipment like the Magic Breed Plus which is intended for
operation by unlicensed people.
If you require more information regarding EMC and
radiocommunications legislation please consult the Australian
Communications and Media Authority (ACMA) at
www.acma.gov.au or New Zealand Radio Spectrum
Management (RSM) at www.rsm.govt.nz

Magic Breed Plus User Manual 5
4. Principle of Operation
Typically, in the late term of pregnancy, a mare will avoid lying
flat on its side until it enters labour. The Magic Breed Plus
system uses this well documented behaviour.
A transmitter containing a special sensor called an
accelerometer is attached to the mare’s halter. The
accelerometer allows the transmitter to determine the
direction of the ground and therefore it can detect when the
mare has laid on its side.
When the transmitter detects that the mare is in the foaling
position is will begin timing and after a short delay it will alert
the receiver, which will sound an alarm.
Note however that some mares are very active and will even
temporarily lay in the foaling position prior to foaling. This
results in false alarms, so it’s important to be able to easily
and temporarily silence any foaling alarms. The Magic Breed
Plus makes this easy.

6 Magic Breed Plus User Manual
5. Getting Started
The Magic Breed Plus system is comprised of two main
components: the receiver (base station) and transmitter. The
transmitter is attached to the mare and sends wireless signals
to the base station for reporting when it has detected that the
mare is foaling.
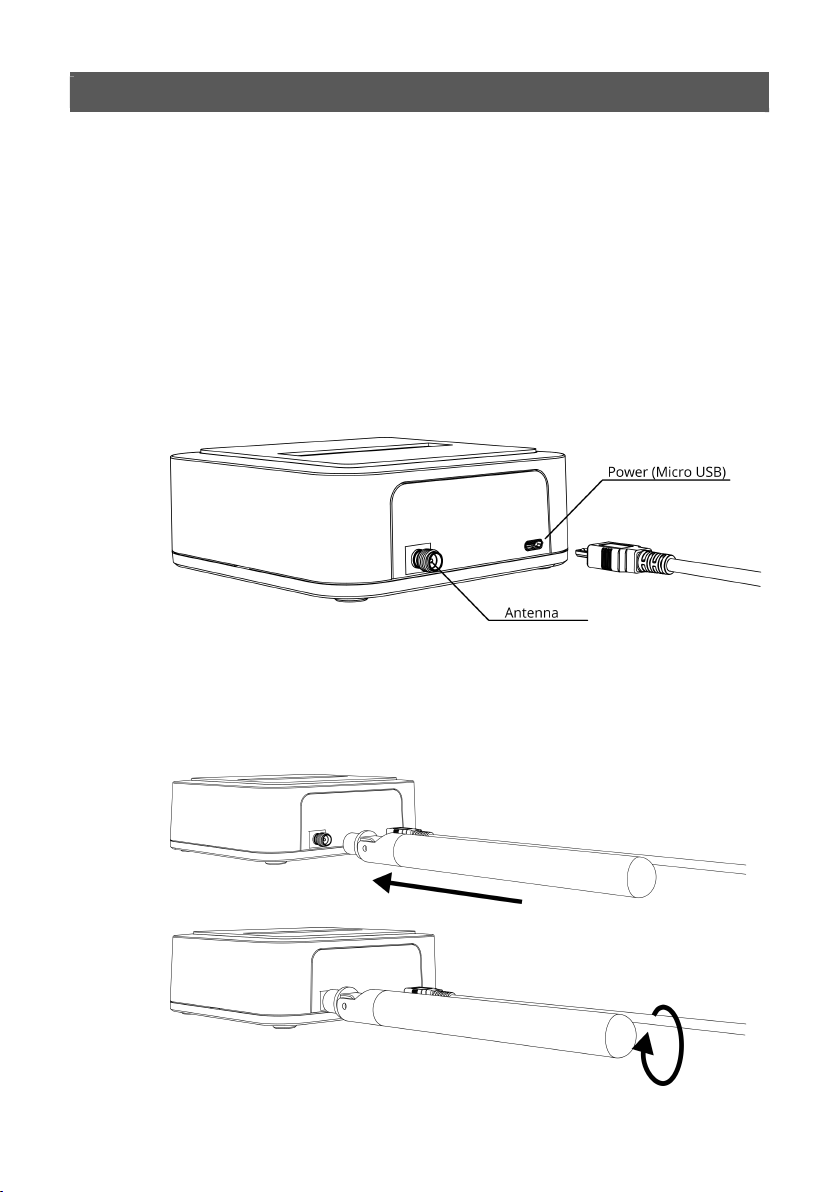
5.1. Receiver
The receiver is a dark grey unit which has a power supply and
antenna connected at the rear. Up to 8 transmitters can be
used with a single receiver.
Magic Breed Plus User Manual 7
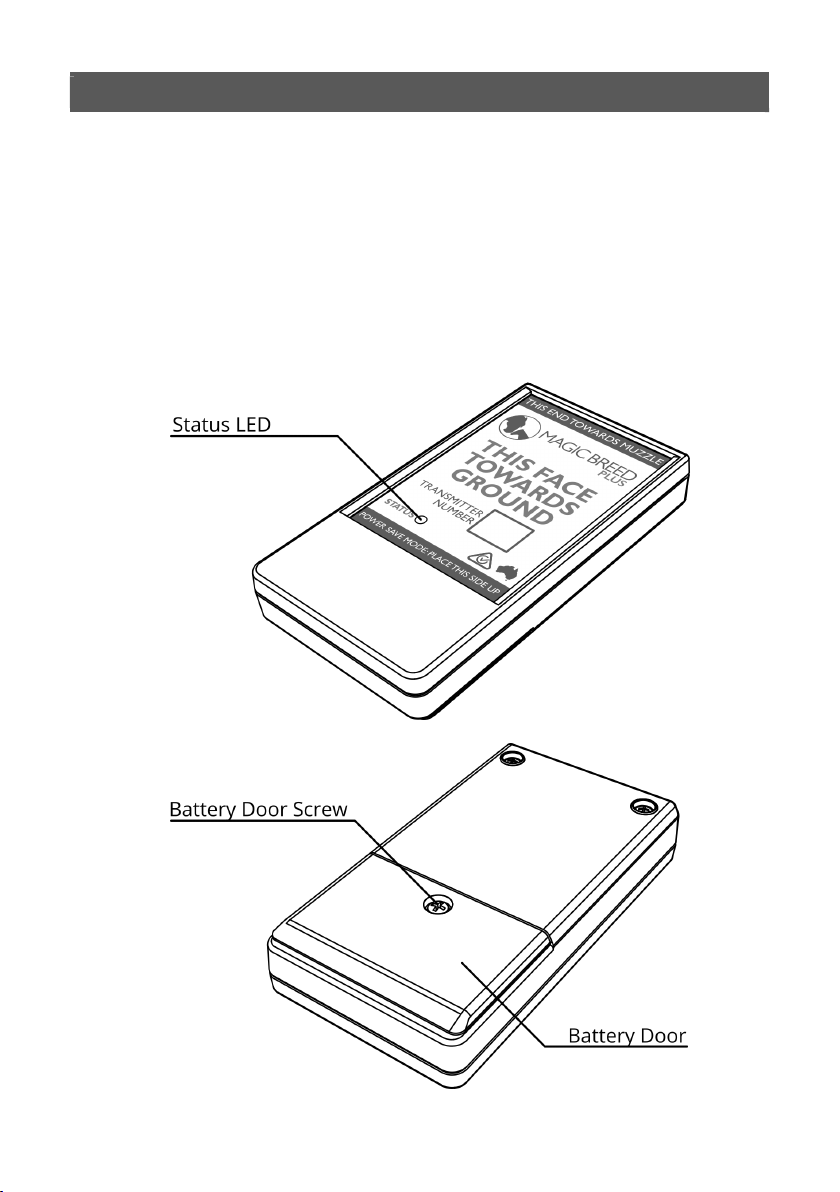
5.2. Transmitter
Magic Breed Plus transmitters are battery powered and
contain an accelerometer which enables it to sense the
orientation of the mare’s head. Detecting when the mare is
laying on its side with its head on the ground is how the
transmitter determines if the mare is in a foaling position.
8 Magic Breed Plus User Manual
6. Setting Up
6.1. Receiver Connections
The receiver is powered by USB, either using the supplied USB
plug pack or an alternative USB power source.
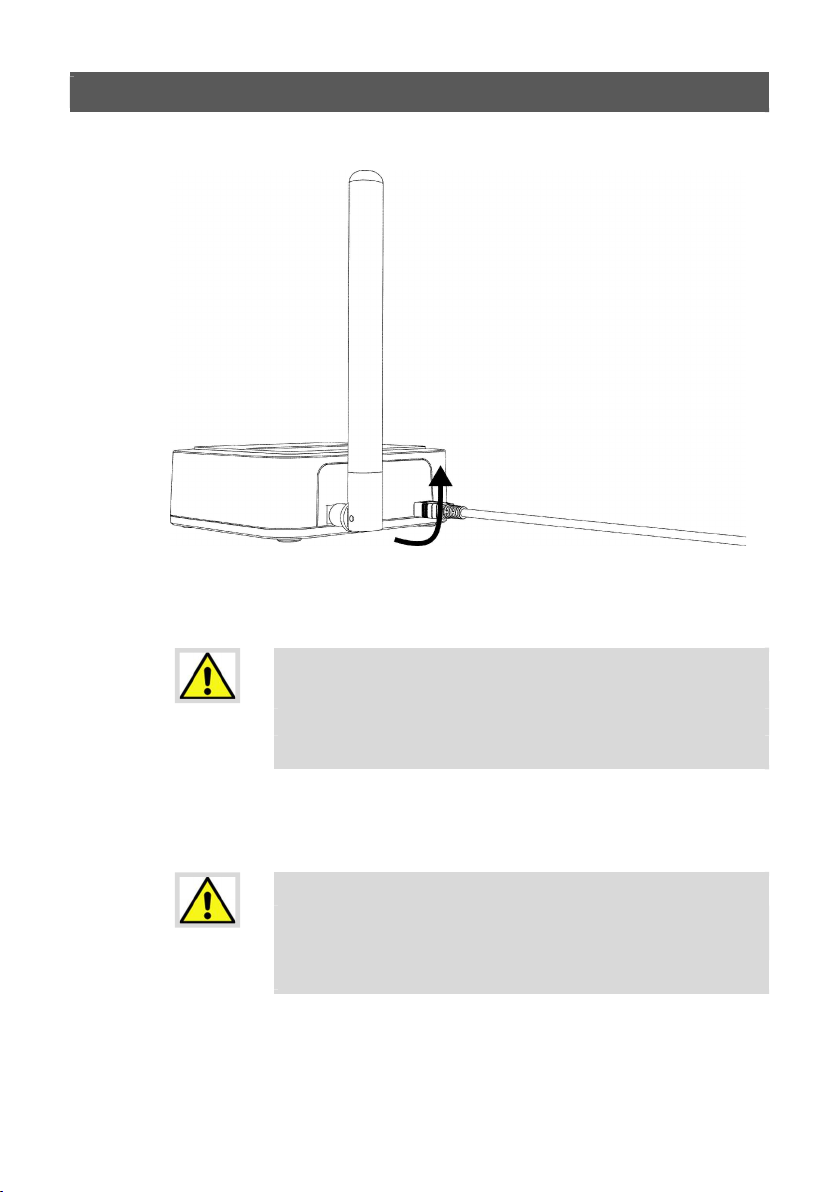
The receiver also needs to have the supplied antenna
connected to the screw in connector on the rear.
Magic Breed Plus User Manual 9
The antenna screw connection should only be tightened to
finger tight (do not use a tool to tighten it further).
The antenna and power connections can be
damaged if treated roughly or dropped. Please
take care with them and place the receiver in a
safe location.
The antenna supplied may differ slightly from the one shown
in the diagrams but operation will be the same.
Do not use any antenna other than that which
was supplied with your unit or otherwise
recommended by Electronic & Electrical
Solutions.

10 Magic Breed Plus User Manual
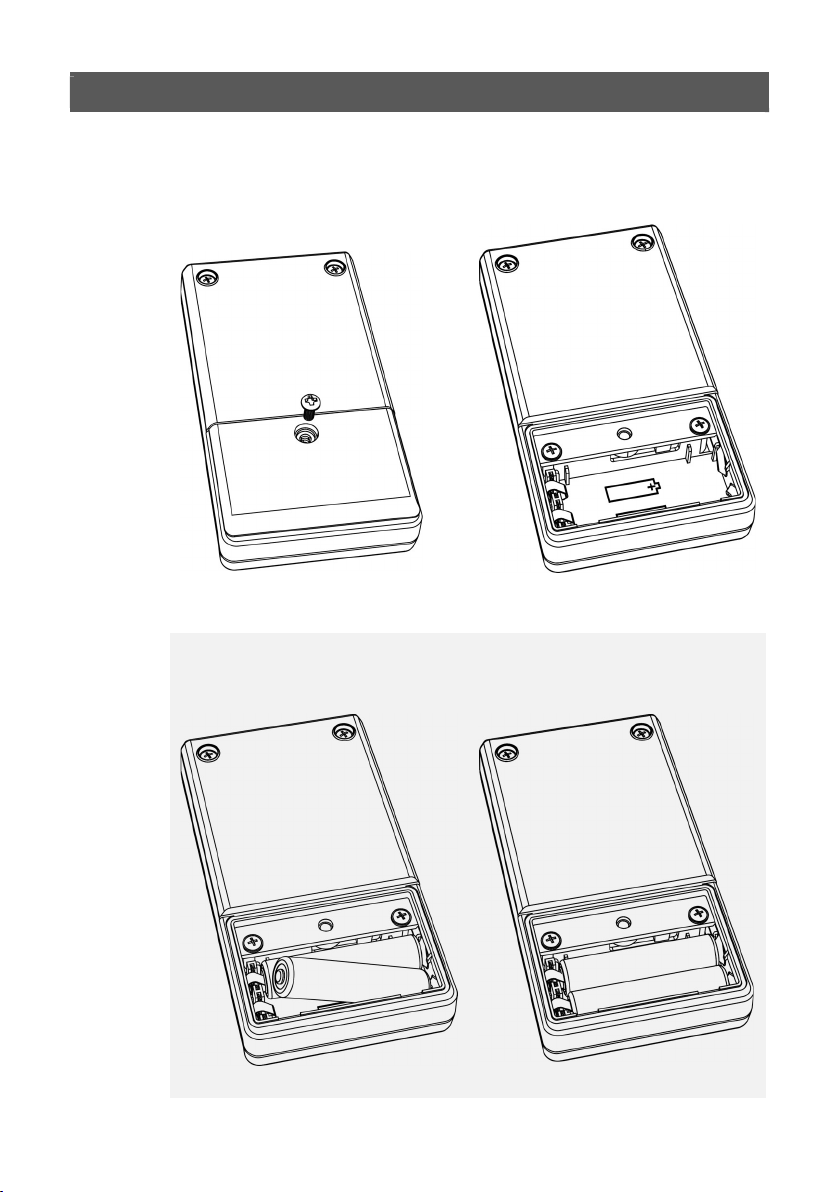
6.2. Transmitter Batteries
Transmitters are powered by a pair or AAA 1.5V alkaline
batteries. Depending on the mare’s level of activity the
batteries in a transmitter can easily last an entire season.
To insert or remove the batteries, the transmitter battery door
must be opened by first removing the battery door screw
using a PH1 philips head screwdriver. When closing the door
don’t forget to reinstall the screw (including the sealing ring).
Note that the batteries must be installed in the correct
orientation, as noted in the bottom of the battery holders:
Do not overtighten the battery door screw as this
may cause damage.
Under typical usage and depending on the movements the
mare makes when not foaling, a single pair of AAA batteries
can last an entire season.
Magic Breed Plus User Manual 11
1. Remove battery door
screw
2. Remove battery door
3. Insert batteries
4. Once batteries are
installed replace battery door
and screw

12 Magic Breed Plus User Manual
7. Fitting to the Mare
The transmitter is secured in place under the mare’s chin
using a halter fitted with a transmitter pouch.

Magic Breed Plus User Manual 13
The pouch is fitted to the halter using the four Velcro straps:
If concerned about the Velcro fasteners coming loose an
optional alternative would be to use cable ties to fasten the
pouch to the halter.
Pouches are manufactured from high quality Weathermax®
canvas and should last many foaling seasons but if required
replacements are available for purchase. The pouch is deigned
to work with both the original Magic Breed and the new Magic
Breed Plus transmitters.
Once the pouch has been fitted to the halter, the transmitter
can then be fitted.

14 Magic Breed Plus User Manual
Insert the transmitter into the pouch in the orientation
indicated in the following diagram:
Note that the transmitter must be inserted into the pouch in
the correct orientation or it WILL NOT WORK. Refer to the
instructions on the transmitter front label for guidance in the
field.
Magic Breed Plus User Manual 15
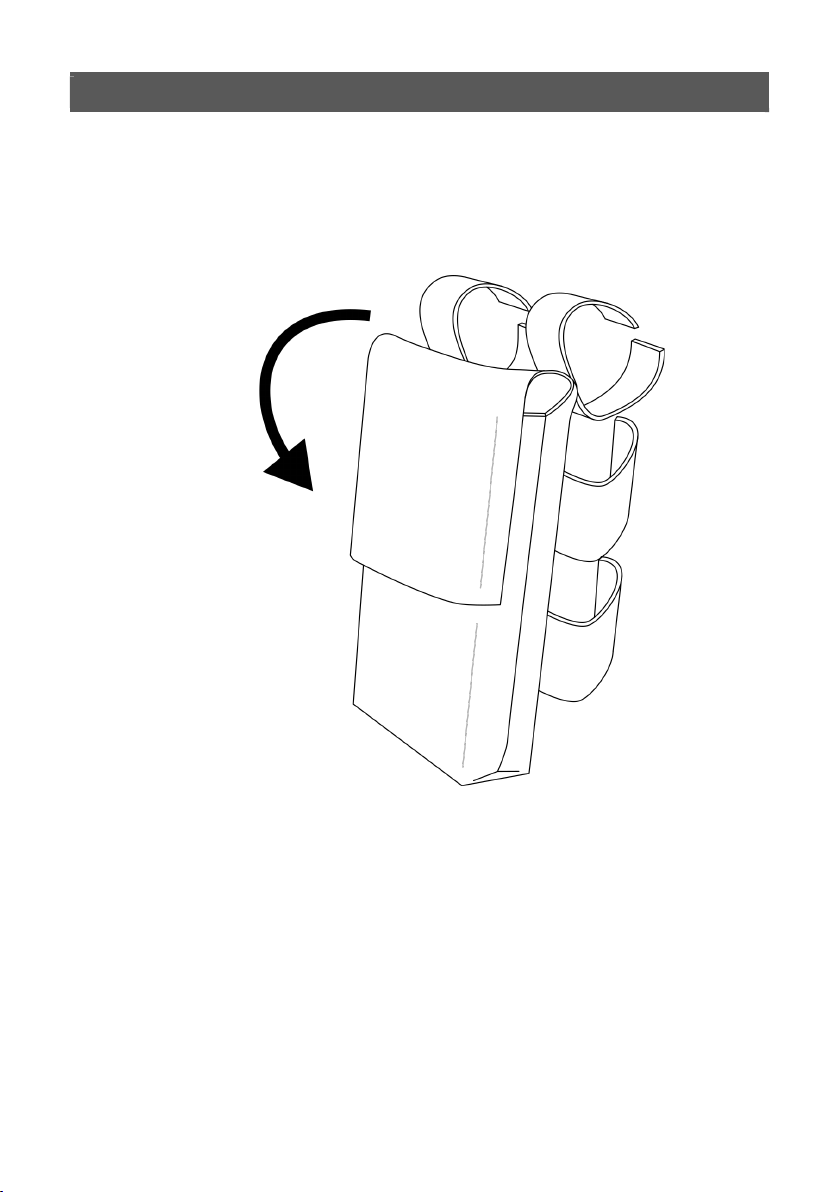
Then pull the flap over and down, sealing the Velcro so that
the transmitter is held tightly. It’s important that the
transmitter is not able to move around inside the pouch.
16 Magic Breed Plus User Manual
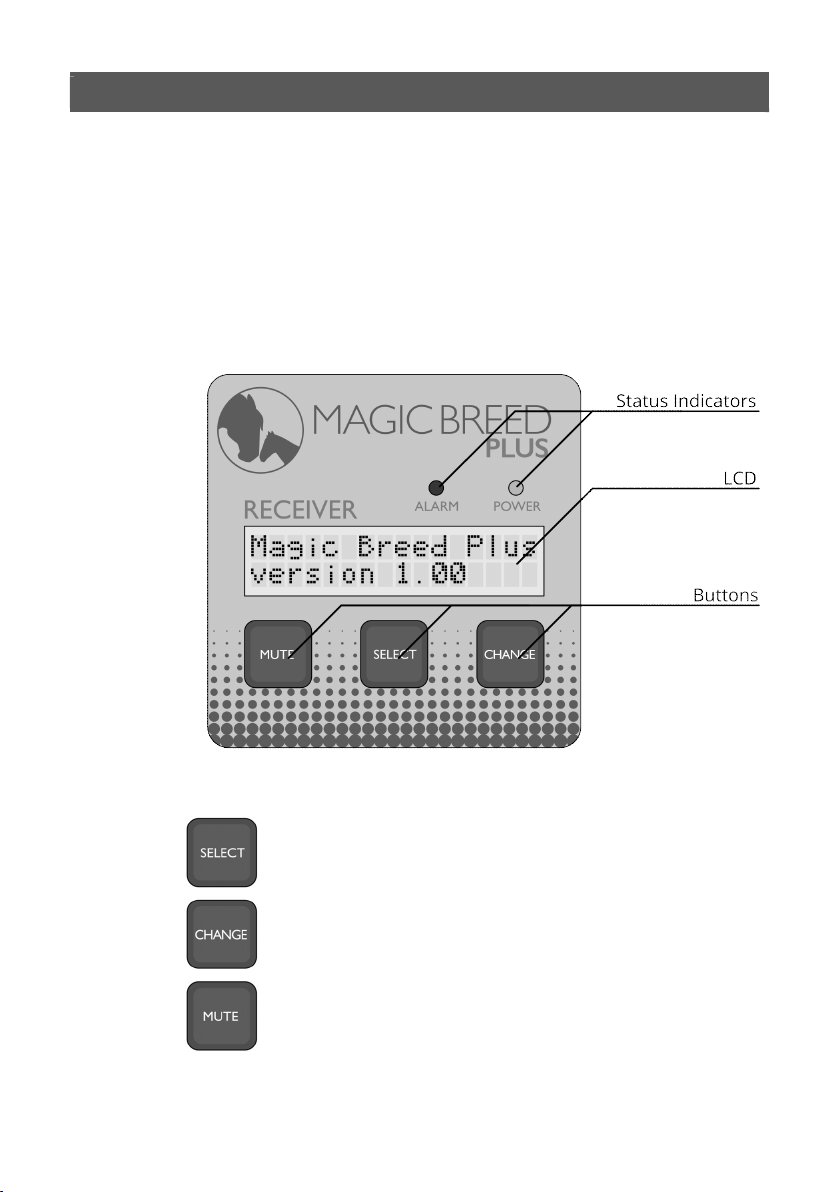
8. User Interface
The Magic Breed Plus receiver features an LCD screen and
three buttons to aid in configuration and user information.
Operation is simple:
Switch between the various menu and status
screens.
Change a setting on the current screen.
Silence the alarm.
Some functions require that the button is pressed and held.

Magic Breed Plus User Manual 17
9. Transmitter Pairing
Before a transmitter can be used it first must be paired with
the receiver. Each transmitter has a unique code that it uses to
identify itself and the pairing process is used to teach the
receiver this code without the user having to enter it.
Up to 8 transmitters can be paired to a single receiver - when
a transmitter is paired the receiver assigns it an identifying
number from 1 to 8.
9.1. Pairing
To perform pairing use the following procedure:
1. Turn the receiver on and place it in learning mode by
pressing SELECT until the option “press CHANGE to pair
a new Tx” is shown:
2. Press CHANGE and the receiver will begin listening for a
new transmitter to learn:
3. Insert the batteries into the transmitter and place it on
its side so that the status indicator is flashing. This
indicates that it is sending an alarm signal.

18 Magic Breed Plus User Manual
4. The receiver should then beep to indicate that it has
paired the new transmitter, and will display the
number that has been assigned to that transmitter:
It is recommended that this number is marked on the
face of the transmitter in the location provided using a
permanent marker:
Note that the pairing must take place while the transmitter
and receiver are in close range of each other – within 10
metres is ideal.
Like all other receiver settings, pairings are retained when the
power is off.
9.2. Unpairing
If for some reason you wish to unpair a transmitter use the
following steps:
Table of contents
Popular Security System manuals by other brands


Pyronix
Pyronix Matrix 6/816 Getting started

Assa Abloy
Assa Abloy Yale SR-A100-PPIR installation manual

Ecco
Ecco EB5200 Installation and operation instruction

BEIRENHUIZHI
BEIRENHUIZHI BR-ZN-W868 user manual

Optex Morse
Optex Morse MDC-16ETX user guide

Detection Systems
Detection Systems 7100 Quick reference guide


