Electronics Line Penta User manual


-2-
Table of Contents
1: Introduction..................................................................................................2
2: Overview.....................................................................................................3
3: System Operation........................................................................................4
3.1: Keypad Layout...............................................................................................4
3.2: Command Codes...........................................................................................5
3.3: Keypad Tones................................................................................................5
3.4: User Codes....................................................................................................5
3.5: Arming/Disarming...........................................................................................6
3.6: Zone Bypassing/Unbypassing........................................................................7
3.7: Distress Keys.................................................................................................7
3.8: Event Logs.....................................................................................................8
3.9: Follow-me.......................................................................................................8
3.10: Additional Operations...................................................................................9
3.11: Testing the System.......................................................................................9
Reference Information...................................................................................10
1: Introduction
Congratulations on purchasing the Penta security system. You have taken a major step
in protecting your home or business. In addition to the explanation you will receive from
your installer, we urge you to read through this manual. This will help you familiarize
yourself with the system, so that you can take advantage of its many advanced
features. This booklet should be kept in an accessible location and the system
reference guide, located in the rear portion of this manual, should be filled out. If you
do not understand any part of this manual, contact your installer.
Note: Remember that no security system can prevent emergencies. This system is
only intended to alert you in case of an emergency and should not take the place
of prudent security practices or life and property insurance.
Publication Information: Catalog Number - ZI0105D (6/00)

-3-
2: Overview
Your security system is made up of a control panel, keypads, and various detection
devices and sensors. The metal cabinet contains the control panel and the stand-by
battery. There is normally no reason for anyone but the installer to have access to the
control panel.
Keypads
Keypads are mounted in areas close to the exit/entrance areas of your home or
business to allow for convenient arming and disarming. The keypad is used to send
commands to the control panel and to display system status.
Zones
The Penta security system comprises four security zones. A zone can be defined as a
protected area in your security system. Each zone can be protected by one or more
detection devices such as motion detectors, magnetic contacts, glassbreak detectors
and shock sensors. When one of these detection devices is activated it “opens” the
zone to which it is connected.
System Monitoring
Your security system can be monitored either by a monitoring service or by using the
Follow-me feature. When using a monitoring service, the Penta sends a message to a
central station when an event occurs within your system. When the Follow-me feature
is programmed, the panel contacts you when an event occurs.
Penta
Control Panel
Central
Station
Or
System Monitoring
Keypads
Siren
1 2 3 4
Zones
Figure 2.1: Security System Setup

-4-
3: System Operation
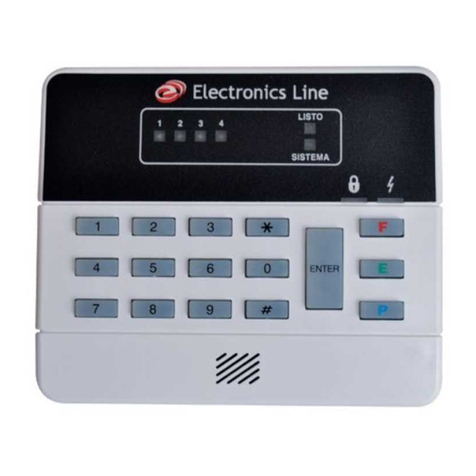
3.1: Keypad Layout
READY
1234
SYSTEM
F
E
P
Figure 3.1: Keypad Layout
LED Display
1 - 4: LEDs 1 - 4 are used to display zone status. The corresponding LED lights up if a
zone is open. If a zone is bypassed the corresponding LED blinks.
READY: The Ready LED lights up to indicate that there are no open zones or tamper
conditions and the system is ready to be armed.
SYSTEM: The System LED blinks to indicate that new events have been recorded in
one of the logs and when displaying additional system information such as bypass
mode.
ARMED: The Armed LED lights to indicate the system is armed or in
programming mode and flashes during the exit delay.
POWER: The Power LED lights up when both AC & battery power are OK, blinks
when the battery is low & AC power is OK, and goes out in the event of AC failure.
Buzzer
System Status
Indicators
meric Keypad
Status
Indicators
Zone Status
Indicators
Distress Keys

-5-
3.2: Command Codes
The Penta security system is operated by entering command codes on the numeric
keypad. A command is executed by pressing the ‘Q‘ button followed by the
corresponding command number. In some cases, a valid user code is also required.
The following is a summary of the command codes used in system operation.
Q0Quick Arm Q5+ (User Code 1) Program User Codes
Q1+ (User Code) Bypass Mode Q6Zone Chime
Q2Emergency/Trouble
Event Log Q8+ (User Code) Forced Arming
Q3Zone Alarm
Event Log Q9+ (User Code) Stay Arming
Q41
Q42 + (User Code 1) Bell/LED Test
Walk Test ENTER 1 + (User Code 1) Stop Communications
3.3: Keypad Tones
The keypad sounds various tones to indicate the following:
•Short Beep – Confirmation of each keystroke
•Half Second Beep – Acknowledgement of a successful command entry
•Low Beep – Rejection of an illegal command entry
•Continuous Beeps – Entry/Exit Delay in progress
3.4: User Codes
User codes are the codes that grant you access to various system operations, such as
arming and disarming. Each user code is four digits long. Of the four user codes, only
User Code 1 has the authorization to program other user codes. The default code for
User 1 is ‘1111’. This default value must be changed immediately to prevent
unauthorized access to your system.
To program user codes 1-4:
1. Press Q, 5.
2. Enter User Code 1; the Armed and System LEDs flash and the zone LEDs indicate
the programming status of each user code as follows:
OFF: NOT PROGRAMMED
ON: PROGRAMMED
FLASHING: CURRENTLY BEING PROGRAMMED
3. Enter the number of the code to be changed (1-4); the requested zone LED flashes.
4. Enter the new user code; the LED stops flashing.
Note: If the new code is identical to an existing user code, an error tone will be
sounded and the new code will not be accepted.
To erase a user code:
1. Press Q, 5.
2. Enter User Code 1.
3. Enter the number of the code to be erased (1-4); the requested zone LED flashes.
4. Enter Q, Q, Q, Q; the LED stops flashing and the code is erased.
Note: Do not erase User Code 1! Erasing this code denies the user the ability to
program user codes. If User Code 1 is accidentally erased,contact your installer.

-6-
Duress Code
In the event that you are forced to disarm the system, entering the duress code disarms
the system and sends a silent alarm to the central station.
To program the duress code:
1. Press Q, 5.
2. Enter User Code 1.
3. Press 5; the Ready LED flashes.
4. Enter a new duress code or Q, Q, Q, Qto erase the existing code.
3.5: Arming/Disarming
The following section explains the various arming and disarming methods.
Arming
To arm the system:
1. Check that all zones are closed; the Ready LED lights up to indicate that the
system is ready to be armed.
2. Enter a valid user code; the keypad beeps until the end of the exit delay.
Forced Arming
Forced arming enables you to arm the system even if zones are not secured.
Electronics Line recommends waiting until all of the zones are secured and the system
can be armed normally.
Note: If zones are still not secured after the exit delay has ended, an alarm will be
generated.
To force arm the system:
1. Press Q, 8.
2. Enter a valid user code; the keypad beeps until the end of the exit delay.
Quick Arming
This feature allows you to arm the Penta without entering a valid user code.
To “Quick” arm the system:
1. Check that all zones are closed; the Ready LED lights up to indicate that the
system is ready to be armed.
2. Press Q, 0; the keypad beeps until the end of the exit delay.
Stay Arming
This feature only arms perimeter zones, allowing you to stay within the protected area while
the system is armed.
To “Stay” arm the system:
1. Check that all zones are closed apart from the interior zones; the Ready LED lights
up to indicate that the system is ready to be armed.
2. Press Q, 9.
3. Enter a valid user code; the keypad beeps until the end of the exit delay.
Immediate Arming
The system can be operated without an entry/exit delay. Pressing Qduring the exit
delay or when the system is armed cancels both the exit and entry delay times.

-7-
Disarming
The Penta can be disarmed by entering a valid user code during the entry delay. If an
error is made entering the code, press ‘#’ and enter the code again. When the code is
accepted the Armed LED and the pulsed delay tone are turned off. If the correct code is
not entered by the end of the delay time, an alarm will be generated.
Keyswitch Arming/Disarming
The system can be armed and disarmed using an ON/OFF keyswitch. The keyswitch
has two operation modes.
•Latching - closing the keyswitch arms the system, opening disarms the system.
•Momentary - opening and closing the keyswitch either arms or disarms the system.
3.6: Zone Bypassing/Unbypassing
When a zone is bypassed, it is ignored by the system and will not generate an alarm
when tripped.
To bypass a zone:
1. Press Q, 1.
2. Enter a valid user code; the System LED flashes and the LEDs of any currently
bypassed zones light up.
3. Enter the number of the zone to be bypassed; the corresponding zone LED lights
up.
4. Press #to exit bypass mode; the bypassed zones flash.
To unbypass a zone:
1. Press Q, 1.
2. Enter a valid user code; the System LED flashes and the LEDs of any currently
bypassed zones light up.
3. Enter the number of the zone to be unbypassed; the corresponding zone LED turns
off.
4. Press #to exit bypass mode.
Note: Disarming the system automatically unbypasses all bypassed zones.
3.7: Distress Keys
In the case of an emergency, 3 types of alarms can be generated by pressing and
holding down the desired distress key for more than 2 seconds. These alarms will send
the relevant distress message to the central station. The distress keys are as follows:
F
E
P
FIRE: Sounds the fire bell, sends the ‘Fire’ event code to the central
station and registers in the Emergency/Trouble event log.
EMERGENCY: Sends the ‘Emergency’ event code to the central station
sounds the siren (if programmed to do so) and registers in the
Emergency/Trouble event log.
POLICE: Sends the ‘Police’ event code to the central station, sounds the
siren (if programmed to do so) and registers in the Emergency/Trouble
event log.

-8-
3.8: Event Logs
The event logs record events that the system has undergone since the last arming. If
any events have been recorded in either event log, the System LED flashes until the
relevant event log has been viewed. In the event that a trouble condition still exists, the
System LED continues to flash until the condition has been remedied.
Emergency/Trouble Event Log
Zone tamper, bell trouble, keypad trouble, keypad tamper or any of the three distress
key alarms are registered in the Emergency/Trouble event log. If atroube event occurs,
contact your installer.
To view the Emergency/Trouble event log:
1. Press Q, 2; the various trouble conditions are indicated by the zone LEDs.
The following is a summary of the trouble condition that each LED indicates:
1– System Trouble 2 - Alarm from P key
3- Alarm from F key 4- Alarm from E key
2. Press #to exit the event log. Note: In the event of system trouble, contact your
installer.
Zone Alarm Event Log
The Zone Alarm event log displays the zones from which an alarm was generated since
the system was last armed.
To view the Zone Alarm event log:
1. Press Q, 3; an alarm from a specific zone is indicated by the corresponding zone
LED.
2. Press #to exit the event log.
Both logs are automatically reset when the system is next armed.
3.9: Follow-me
If your system is not monitored by a central station, either the ‘Follow-me’ or ‘Voice
message’ feature is used to inform you that an alarm has occurred.
When using Follow-me, the Penta dials the telephone number programmed by the
installer and sounds two beeps. After hearing the two beeps, pressing 3, 6, 9 or # on
the telephone sounds a number of tones to indicate exactly which type of alarm has
occurred. The number of tones indicates the type of alarm generated.
1 tone Alarm from zone 1 1 long F key alarm
2 tones Alarm from zone 2 Tone
3 tones Alarm from zone 3 2 long E or P key alarms
4 tones Alarm from zone 4 Tones or system trouble
After the alarm tones have been sounded, pressing 3, 6, 9 or # on the telephone either
causes the panel to hang up or, if additional alarms have occurred, sound another set
of alarm tones. Note: In the event of system trouble, contact your installer.
Alternatively, the Voice message feature plays a recorded message to announce that
an alarm has occurred. Press 3, 6, 9 or # on the telephone to acknowledge that you
have received the message.

-9-
3.10: Additional Operations
Bell Cancel
To cancel the bell:
•Enter a valid user code or turn the keyswitch as if disarming the system.
Stop Communications
To stop the panel from sending a message to the central station:
1. Press ENTER, 1.
2. Enter User Code 1; all communications stop immediately and all unsent messages
are cancelled.
Zone Chime On/Off
The keypad can be set to chime when perimeter zones are opened or closed when the
system is disarmed.
To toggle the zone chime On or Off:
•Press Q, 6 while the system is disarmed.
The keypad will sound a continuous tone to indicate “Zone Chime ON” or a series of
short beeps to indicate “ Zone Chime OFF”.
Keypad Backlight On/Off
To toggle the backlight of any keypad On or Off:
•Press and hold down #for more than 2 seconds.
3.11: Testing the System
Electronics Line recommends that you test your system at least once a week.
Walk Test
Walk test mode enables you to test peripheral detection devices, such as PIR detectors
and magnetic door contacts. In this mode, when a zone is opened , the keypad chimes.
To perform a walk test:
1. Press Q, 4,2.
2. Enter User Code 1; the Ready, System, Power and Armed LEDs flash to indicate
that the system is in Walk Test mode. To end Walk Test mode, press #. This mode
is automatically terminated after 4 minutes.
Bell/LED Test
To perform a bell/LED test:
•Press Q, 4; the siren is sounded and all LEDs on the keypad are lit for a period of
two seconds.

-10-
Reference Information
To be filled out by the installer:
Installer: _______________________________________ Tel: _____________
Address: _________________________________ Date Installed: __________
Central Station:____________________________________ Tel: _____________
Zone 1: __________________________________ Silent qAudible q
Zone 2: __________________________________ Silent qAudible q
Zone 3: _________________________________ Silent qAudible q
Zone 4: __________________________________ Silent qAudible q
P Key: Silent qAudible qE Key: Silent qAudible q
Exit Delay: ____ secs Entry Delay: ____ secs Bell Cutoff: ____ secs
NOTES
____________________________________________________
____________________________________________________
____________________________________________________
____________________________________________________
____________________________________________________
____________________________________________________
____________________________________________________
____________________________________________________
____________________________________________________
____________________________________________________
____________________________________________________
____________________________________________________
____________________________________________________
____________________________________________________
____________________________________________________
____________________________________________________
____________________________________________________
Other manuals for Penta
1
Table of contents
Other Electronics Line Control Panel manuals

Electronics Line
Electronics Line Prime Instruction Manual

Electronics Line
Electronics Line Prime Instruction manual

Electronics Line
Electronics Line Prime Instruction manual

Electronics Line
Electronics Line infiniti User manual

Electronics Line
Electronics Line Commpact Instruction Manual

Electronics Line
Electronics Line Penta User manual

Electronics Line
Electronics Line Summit 3208GLD Owner's manual