EleMake MKS Series User manual

Stainless Steel Mechanical
Keyless Entry Lock
Series MKS
www.elemakelocks.com

Elemake keeps on working hard to provide customers top-grade
quality hardware at affordable price. Grace customer's door with the
stylish design and excellent craftwork since 1976. Elemake are
always beside you to make your life more safe and stylish.
Series-MKS is aproducts family of the high grade stainless steel
mechanical keyless door lock. It’s ideal for residential homes,
apartment buildings, offices, schools, hospitals, and other
applications where the need to restrict access to an area.
All of ElemakeMKS series keylesslockproducts come with a Lifetime
Mechanical Warranty.
(This manual is applicable for both left and right handle locks)

Content:
1. Structure and dimension
1.1 Component List
1.2 Assembly Drawing
1.3 Drilling Holes Dimension
2. Installation Instruction
2.1 Step 1: Change the user code(Optional)
2.2 Step 2: Prepare the door for installation with the drilling template
2.3 Step 3: Install the latch/front cover/back cover/cover plate
3. How to operate the lock
3.1 Open the door from exterior when locked
3.2 Open the door from interior when locked
3.3 Lock the door
3.4 When input the incorrect combination
3.5 The lock will stay unlocked
3.6 Initial Combination
3.7 Change the combination(User’s code)
4. Quality Policy

1. Structure and dimension
1.1 Components List
Item#
Component Name
Quantity
1
Front Cover
1
2
Back Cover
1
3
Latch 2-3/4"
1
4
Latch 2-3/8"
1
5
Cover Plate
1
6
Combination Tumblers
4
7
Non-Combination Tumblers
4
8
Spindle
1
9
Strike Plate
1
10
Striker
1
11
Machine Screw M4*50
1
12
Machine Screw M4*50
1
13
Wood Screw
1
14
Threaded Tube
1
15
Allan Wrench
1
16
User's Manual
1
17
Set Screw
4
18
Tweezer
1
Note:
When customer received the lock, to prevent the installation mistake
from happening, 2 threaded tubes and the spindle were already
installed on thefront cover. Please don’t take them apart without
instruction.
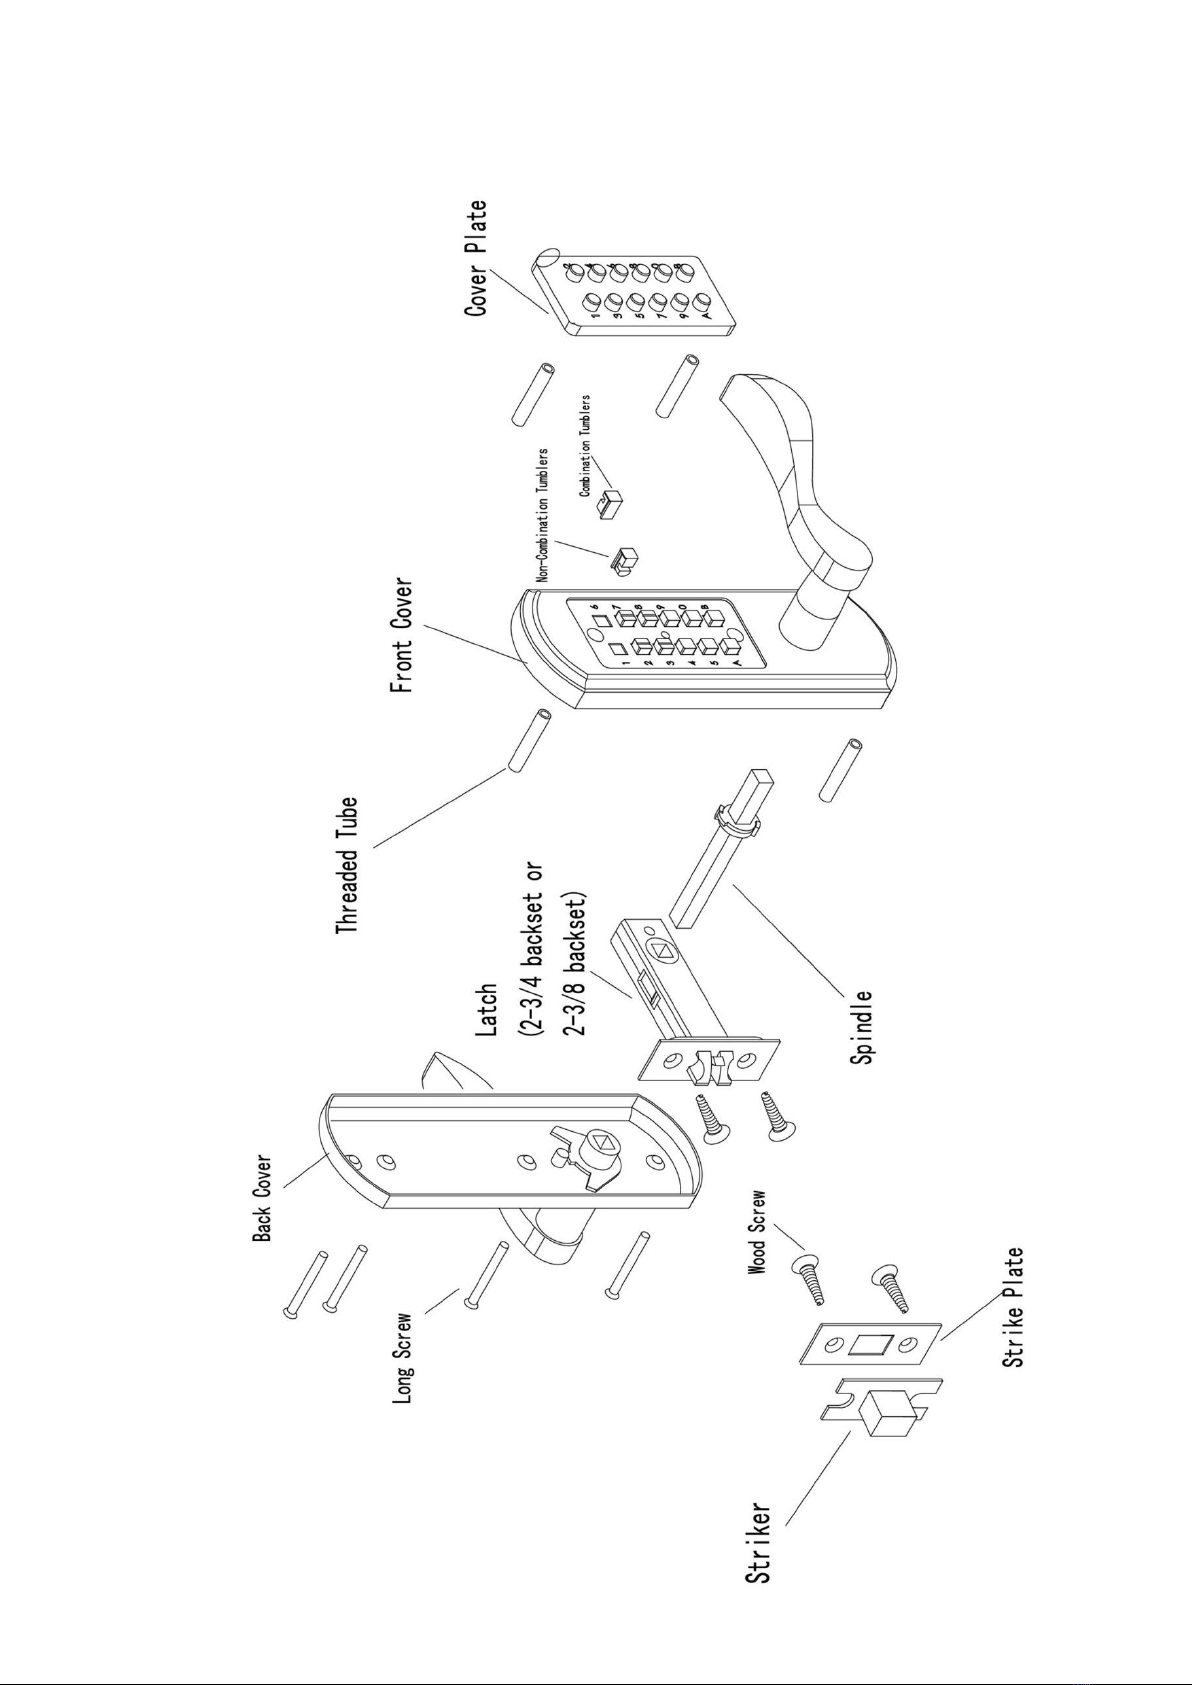
1.2Assembly drawing
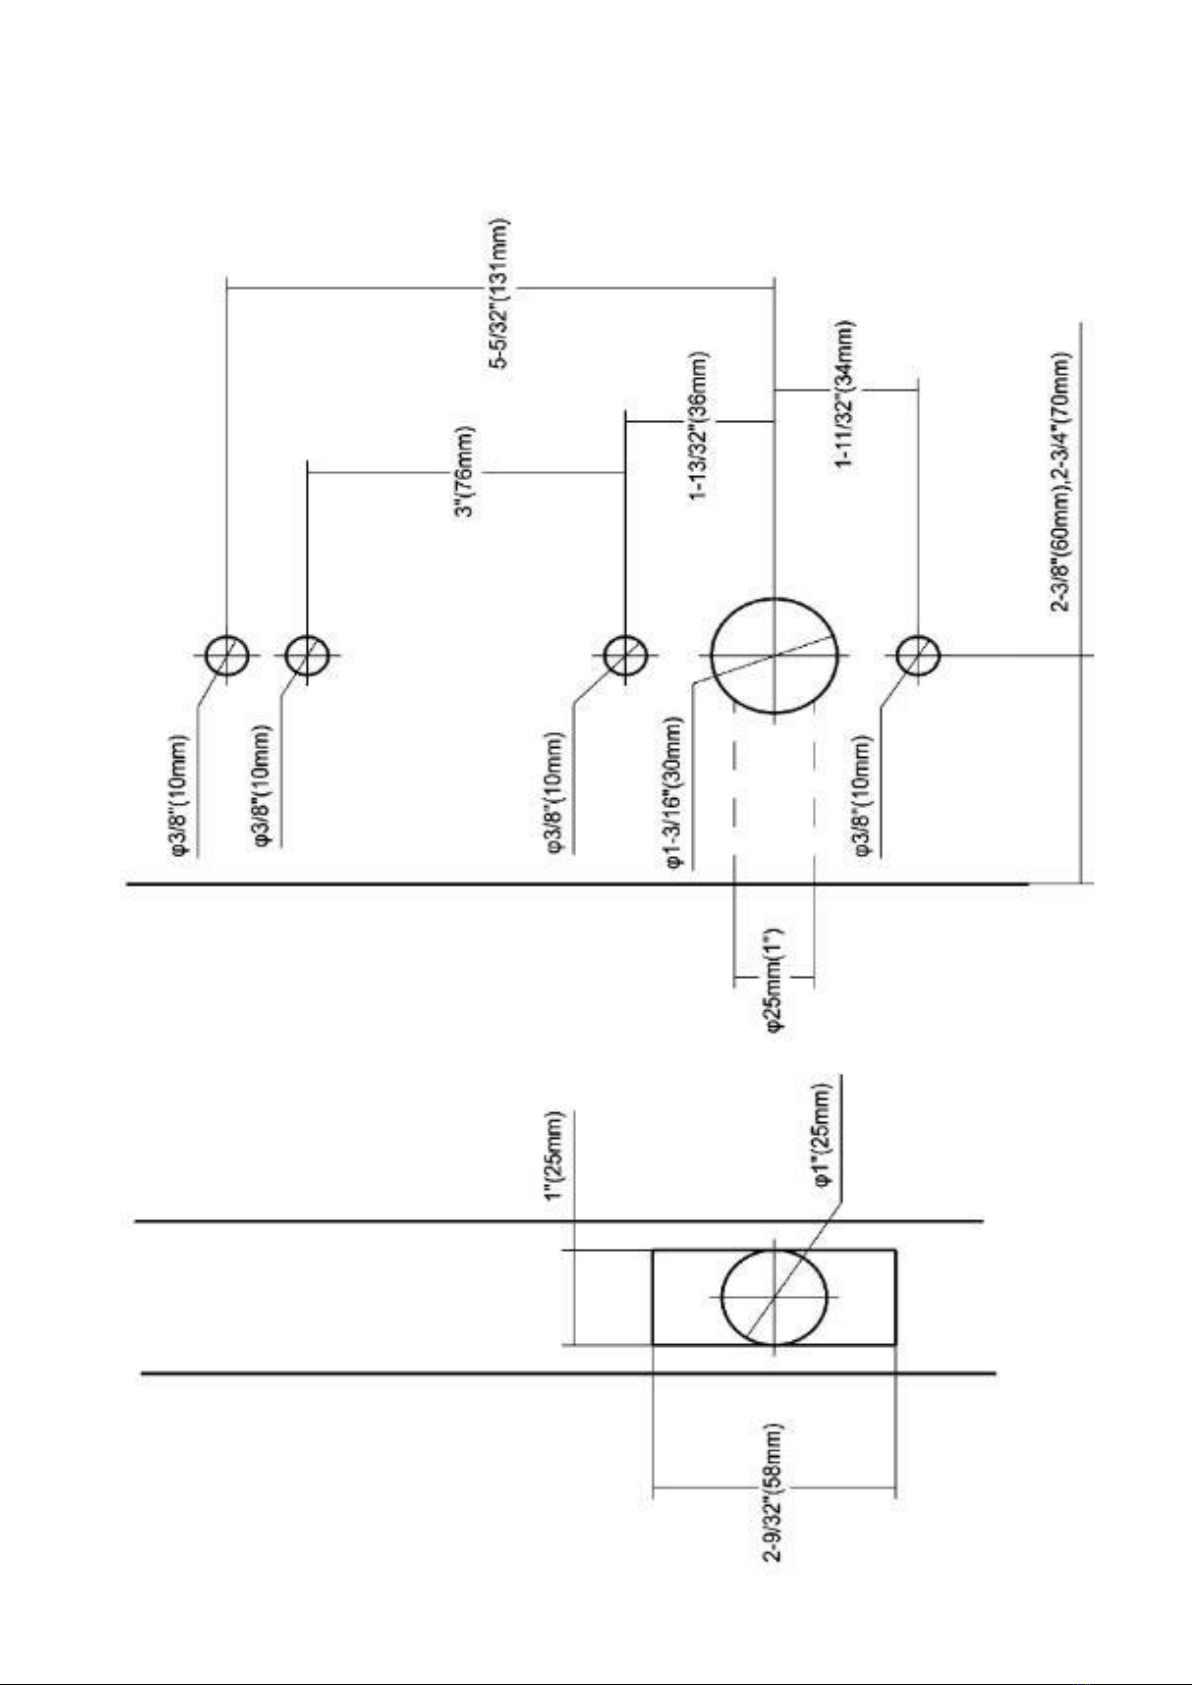
1.3Drilling Holes Dimension
2. Installation Instruction
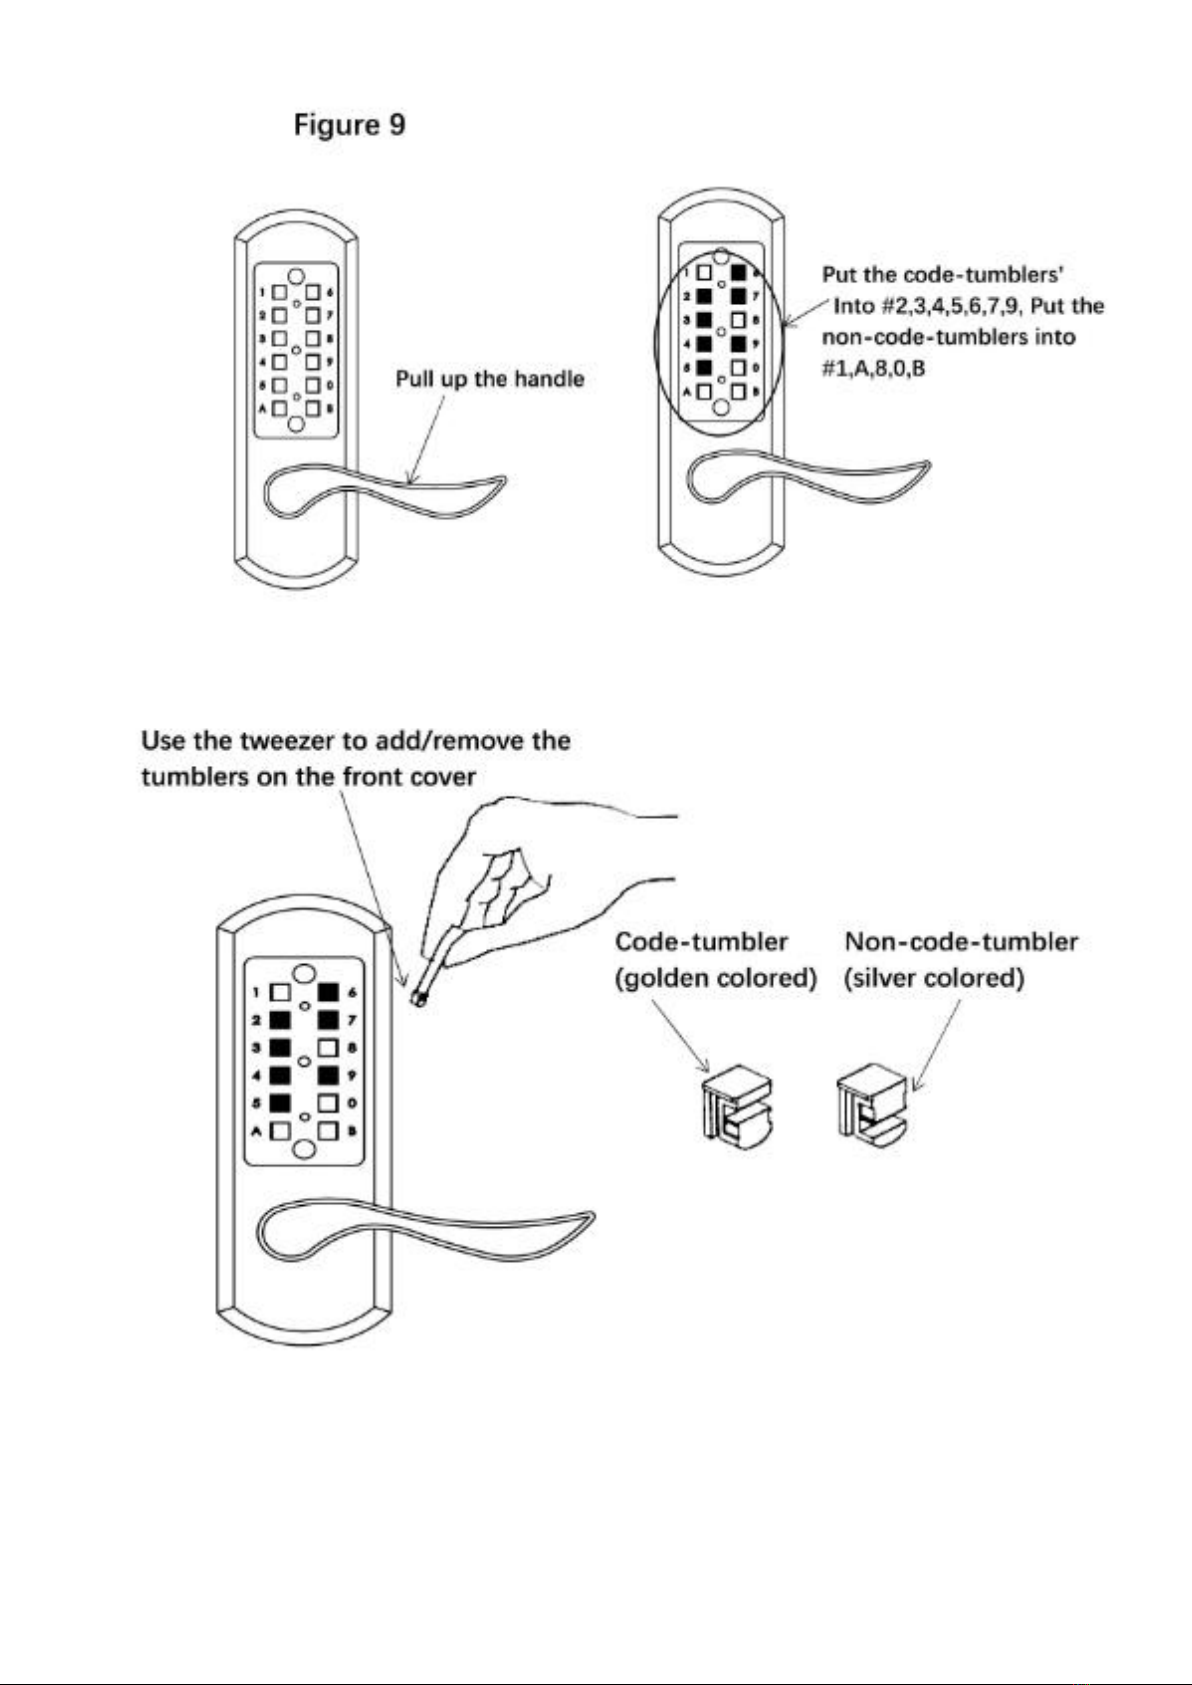
2.1 Step 1: Change the user code(Optional)
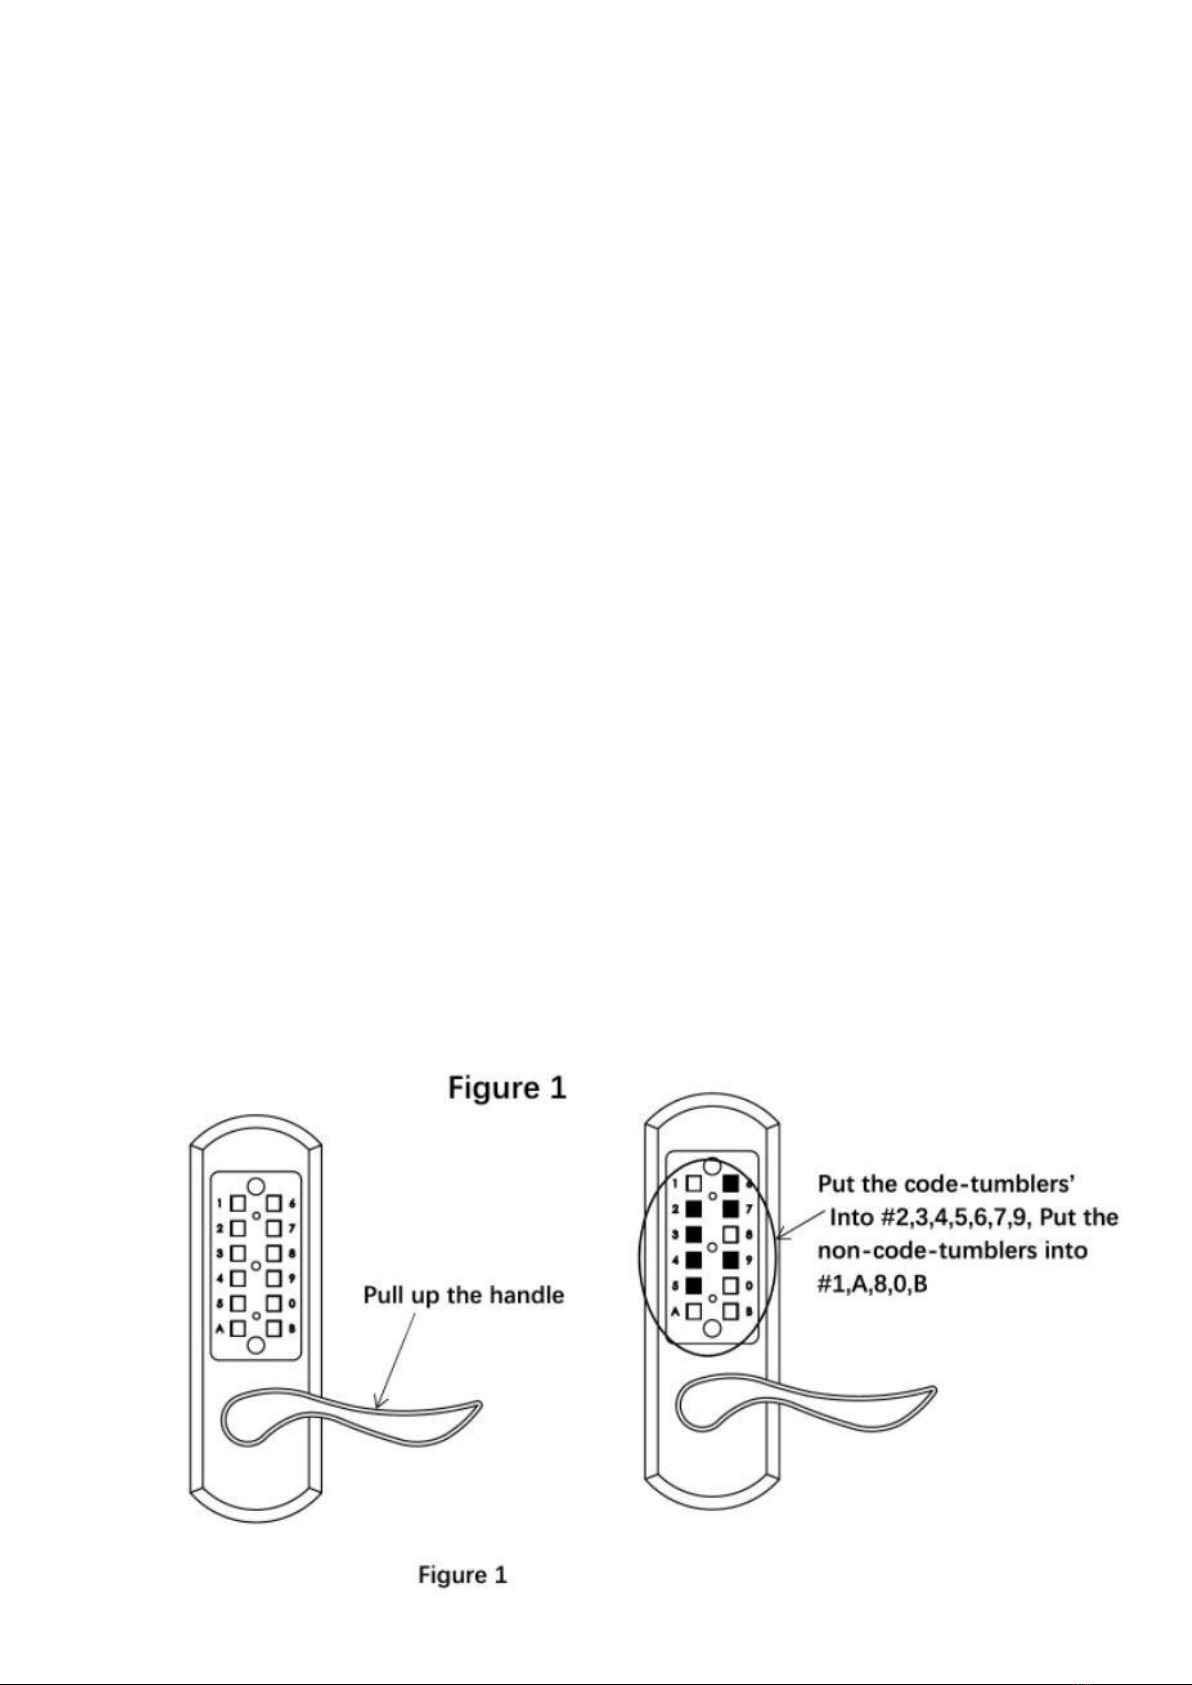
If you wish to change your code, see below instructions-----
1) Pull up the front cover handle to make the tumblers to protrudefrom
tumbler cavities on front cover.
2) Initial combination is “123678”
3) To change the combination, please put the code-tumblers(golden
colored)into the expected digit’s cavities, and put the
non-code-tumblers(silver colored)into the leftover cavities.
For example, if you want to set up combination 9763254. Just to put
thecode-tumblers(golden colored) into cavities#9, 7, 6, 3, 2, 5, 4, and
putthenon-code-tumblers(silver colored) into cavities #1, 8, A, B,
0.(see figure 1)
Please note that maximum 8 digits combination and no repeat code.

2.2 Step 2: Prepare the door for installation with the drilling template
1) Place template (supplied) on door and fold along door’s edge.
2) Drill holes as instructed.(see Figure 2)
NOTE: For Pre-Prepped 2 1/8” doors, you only need to drill the 3/8”
holes.
Figure 2
Use the tweezer to add/remove the
tumblers on the front cover

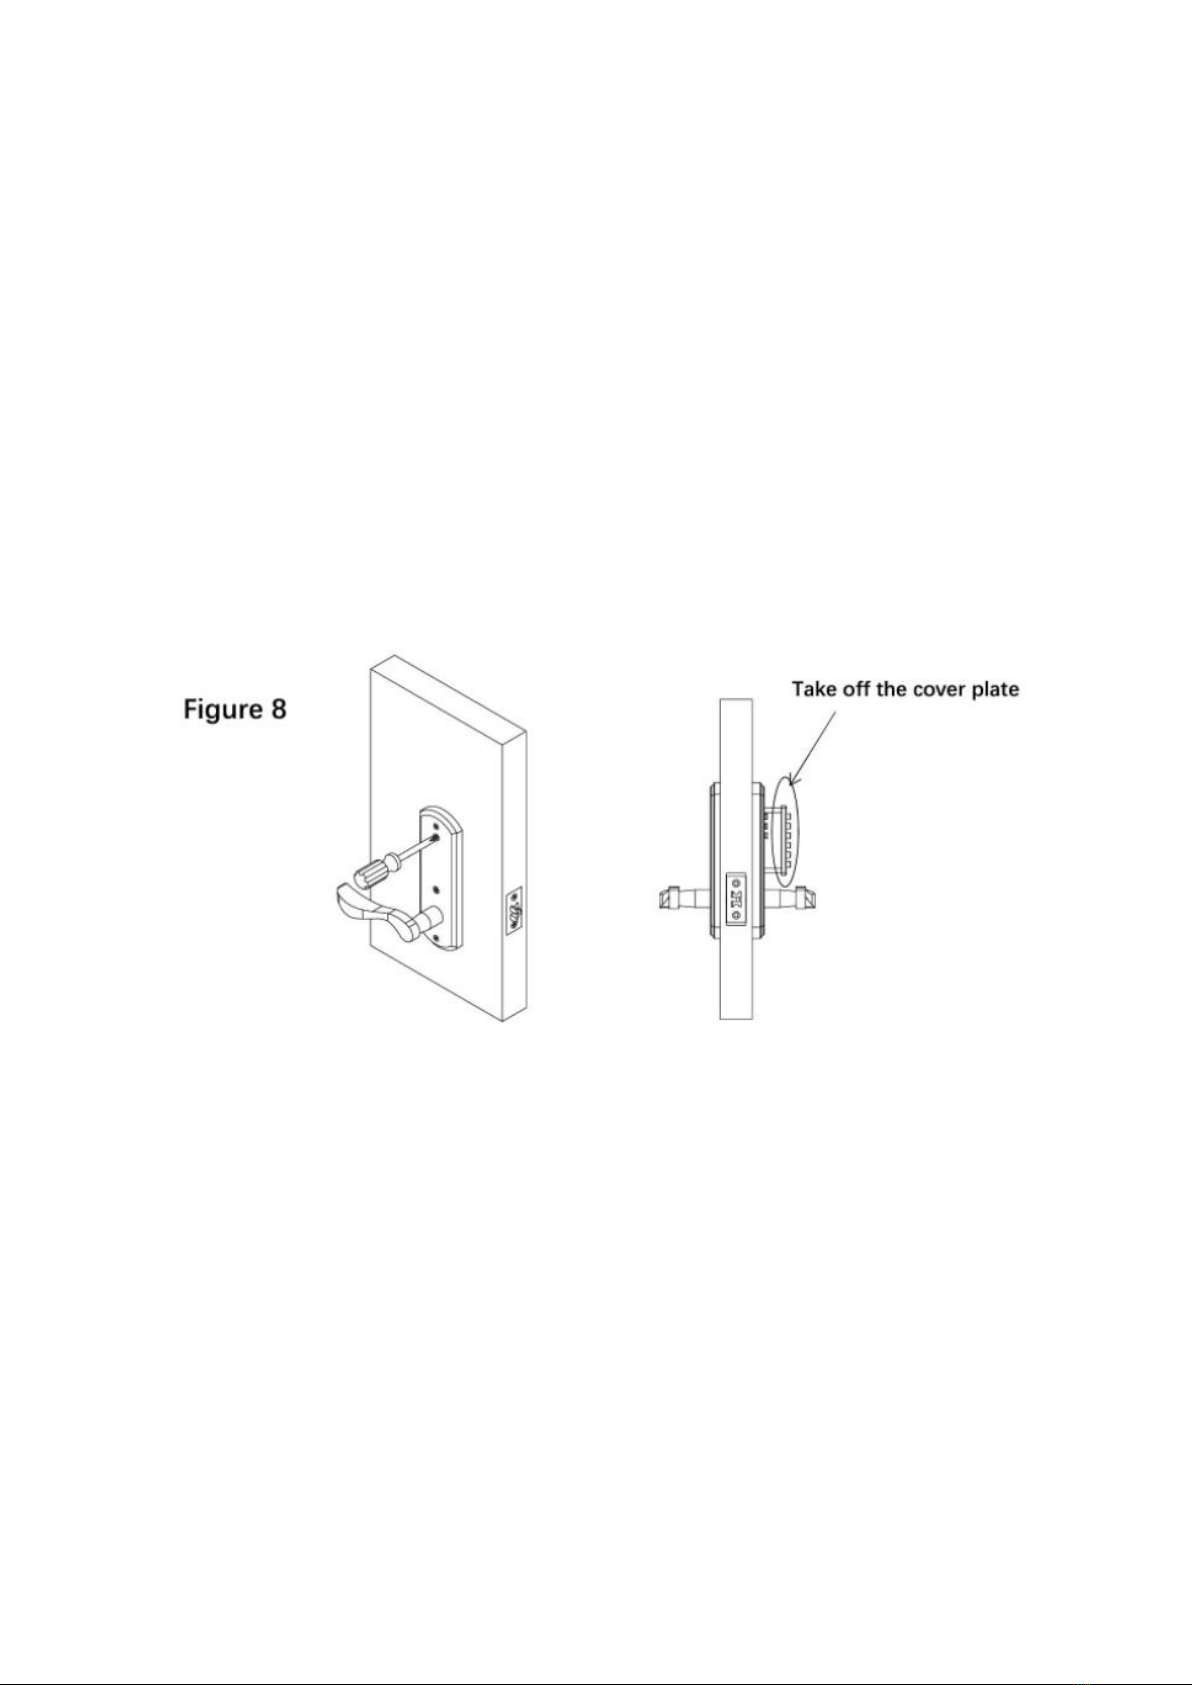
2.3 Step 3: Install the latch/front cover/back cover/cover plate
1) Install the latch onto the door. Using a screwdriver, secure the latch
to the door with the wood screws.(See Figure 3)
2) Align the colored mark on the top of the square hole of latch.
3) Install the front cover, put the spindle through the square hole of the
latch, prior to it, the spindle’s facet A(the facet with the black font)should
stay upward. (See Figure 4)
Figure 3
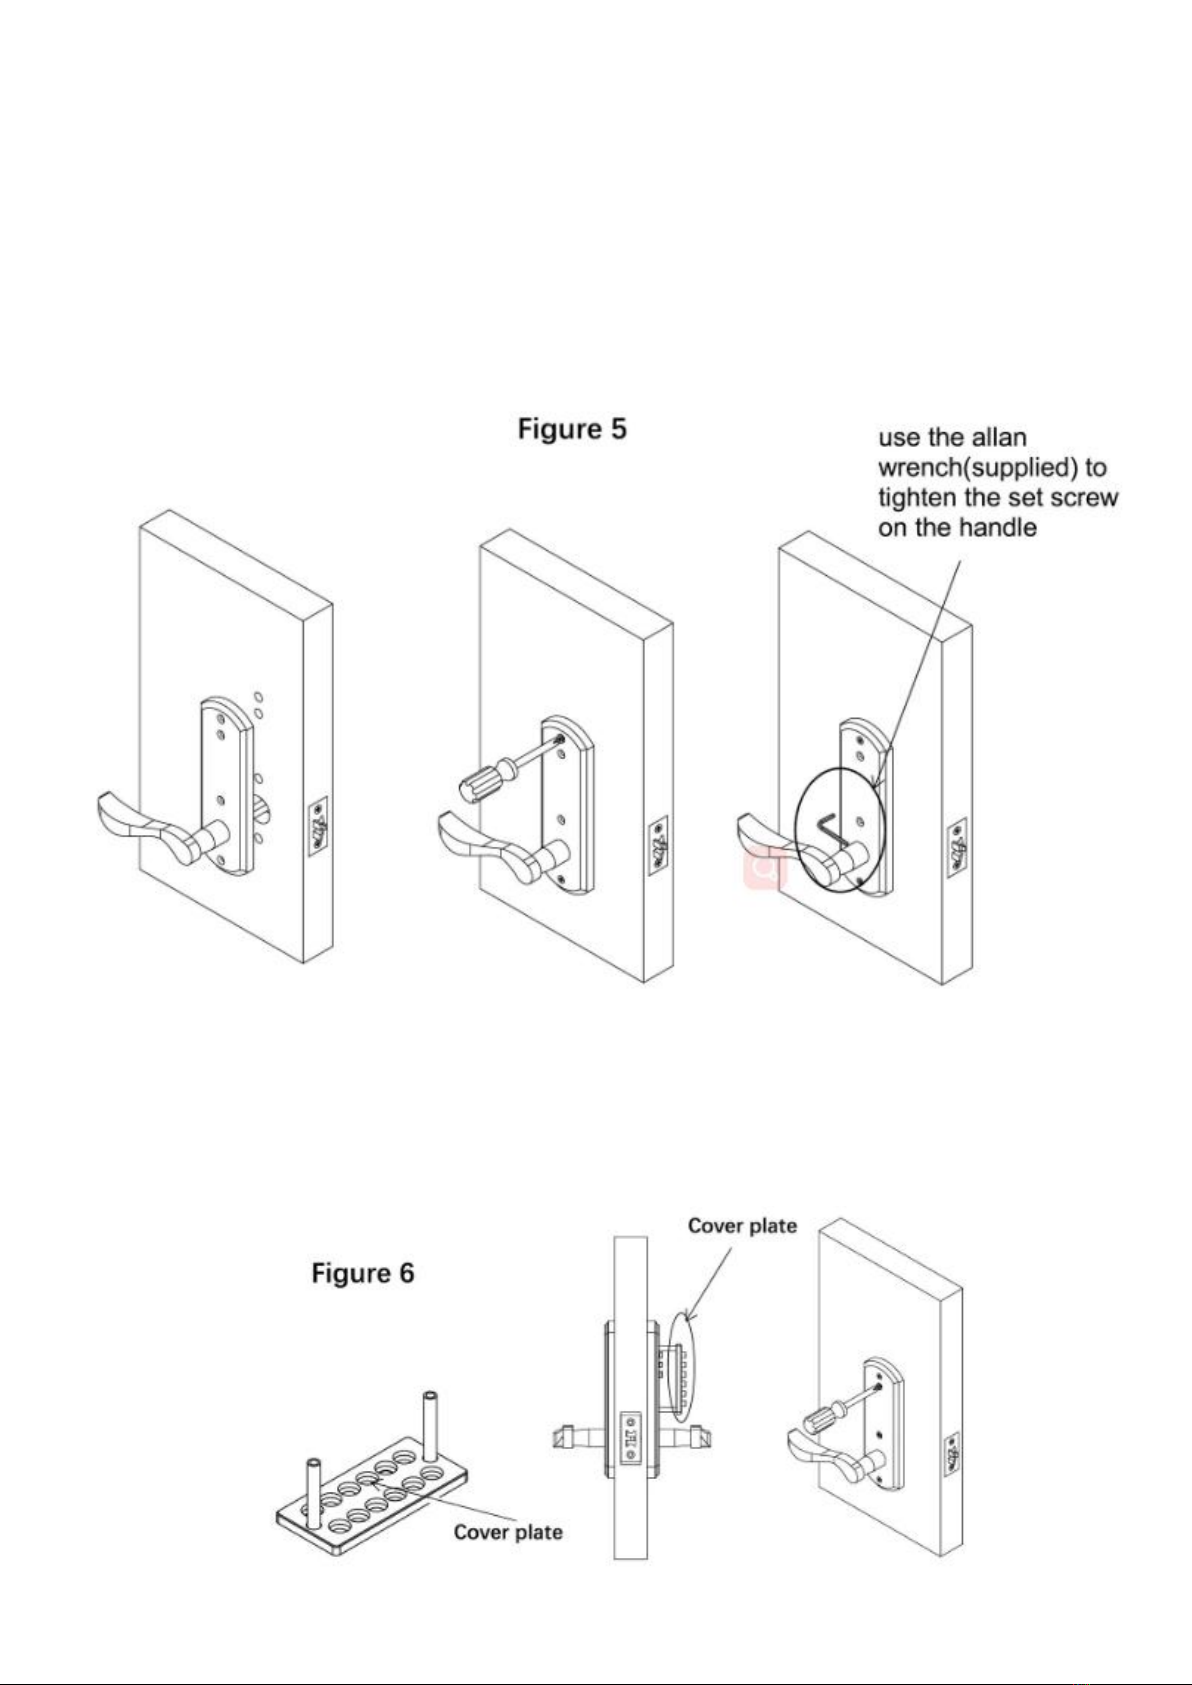
4) Then,install the back cover from interior of the door, put the long machine
screws on the position 1st n and 4th on back cover, and use the screw driver to
tighten them, and use the allan wrench(supplied) to tighten the set screw on the
handle.(See Figure 5)
5) Install the cover plate, tighten it with the long machine screw on 2nd and 3rd
position. (See Figure 6)

6) Test the combination and function(prior to finish this step, don’tclose the door)
A. Pull up the handle, then press the handle from exterior, if cannot be
pressed down, it’s good, then move to next step.
B. Press the handle from interior, the latch can be moved back, it’s good,
move to next step.
C.Pull up the handle from interior once, then input the correct combination,
press the exterior handle down, if can press the handle down and latch can
be moved back. The combination works.
If passed all above 3 steps, everything is good,
congratulations! the installation is DONE
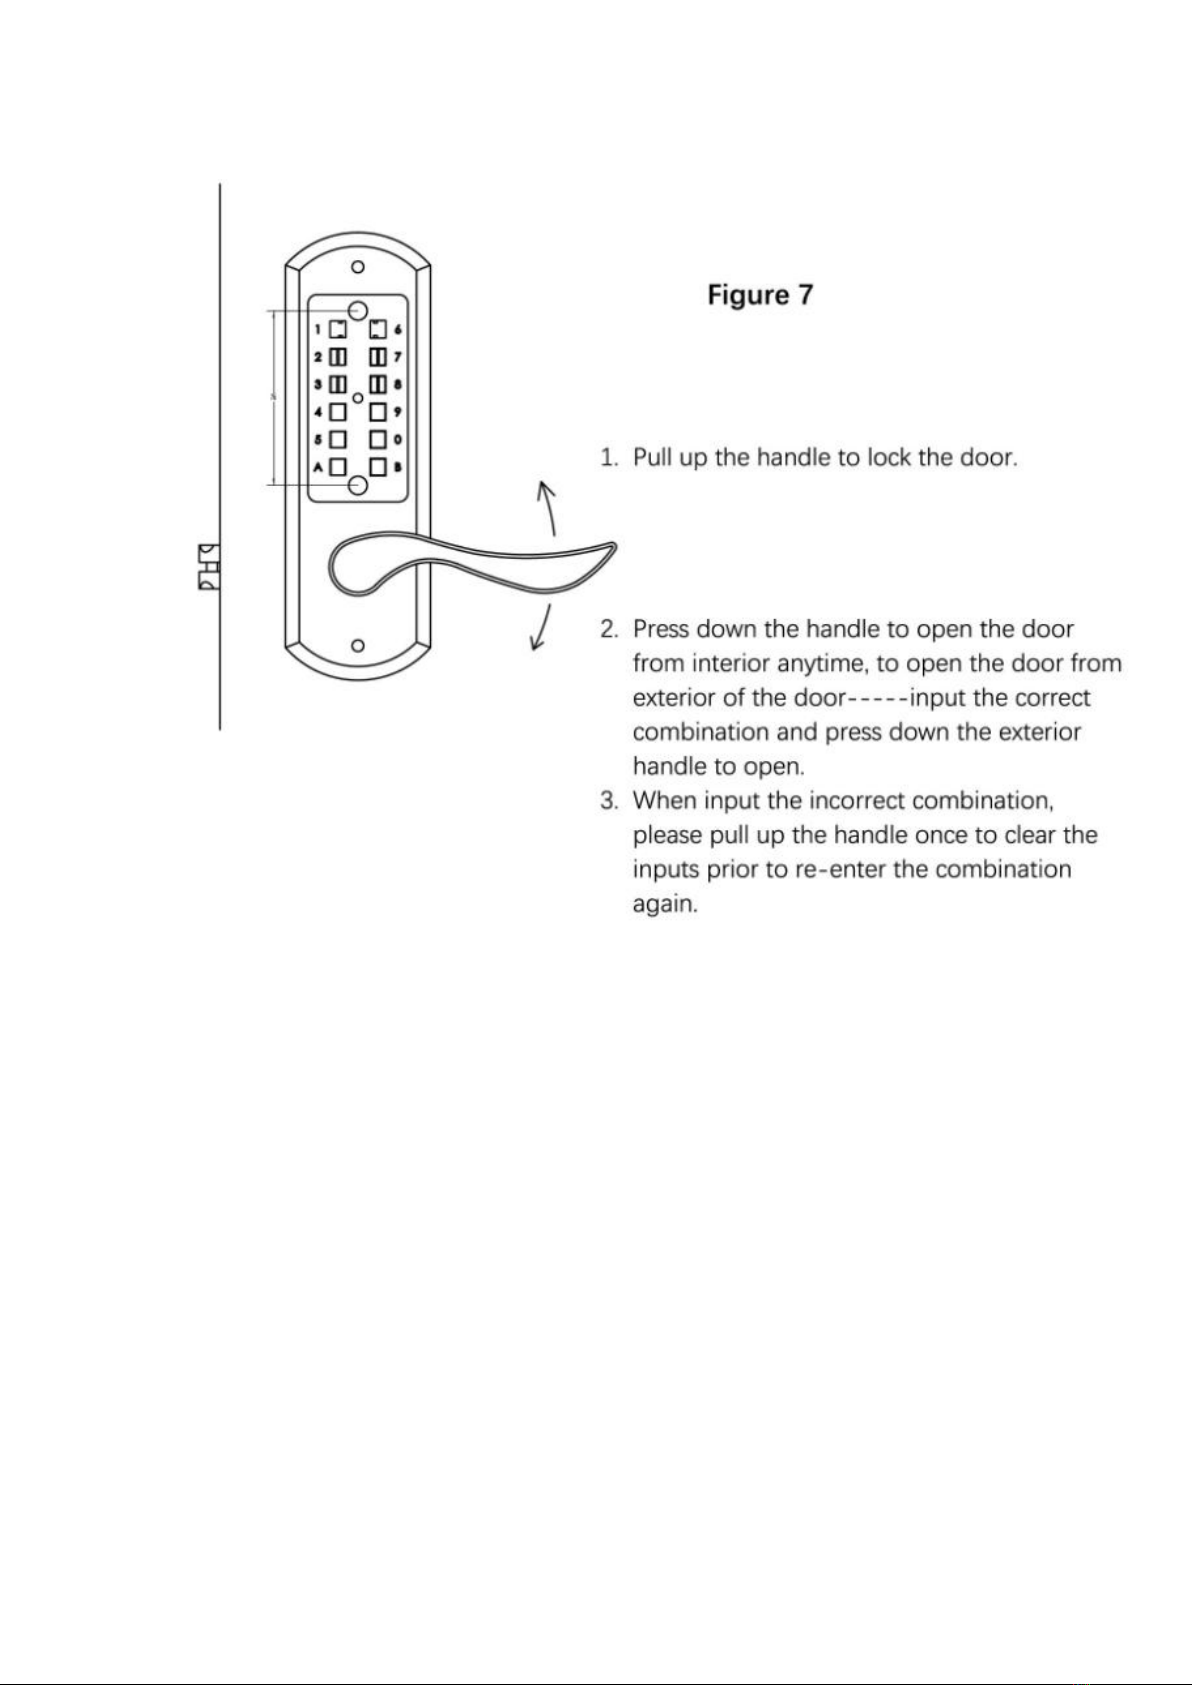
3. How to operate the lock. (Figure 7)
3.1 Open the door from exteriorwhen locked---Input the correct
combination, then user will be able to press down the handle, it will be
unlocked. If input the incorrect combination, the handle will not be able
to be pressed down, it will stay locked. If want to try it again, pull up the
handle once, them input the combination again and press down the
handle.
3.2 Open the door from interior when locked---press down the
handlefrom interior, it will be opened anytime.
3.3 Lock the door---Lift the handle(either from exterior handle or interior
handle), it will be locked, user will not be able to press down the handle,
3.4 When input the incorrect combination---Lift the handle to reset, then
input the correct combination, then the handle can be pressed down to
unlock
3.5 The lock will stay unlockeduntil the handle is lifted.
3.6 Initial Combination
3.7 For all the new lock, the pre-set initial combination is “123678”
3.8 Change the combination(User’s code)-----
If the user want to change the combination.
1) Untighten the #2, #3 screws on back cover, take the cover plate off. (See
Figure
2) Pull up the front cover handle to make the tumblers to protrudefrom
front cover.
3) Initial Combination is “123678”
4) To change the combination, please put the code-tumblers (golden
colored)into the expected digit’s cavities, please put the
non-code-tumblers(silver colored)into the leftover cavities.
For example, if you want to set up combination 9763254. Just to put the
code-tumblers(golden colored) into cavities#9, 7, 6, 3, 2, 5, 4, and put the
non-code-tumblers(silver colored) into cavities #1, 8, A, B, 0.(See Figure 9)

4. Quality Policy
We provide lifetime warranty for all of our Keyless door lock products
since the purchasing day.
Return/replacement Policy
4.1 If you want to return/replace the goods for any reason. Please contact us
directly for returning/replacement, In this way, EleMake will be able to pay for
the returning shipping cost to avoid loss to any customers.
4.2 What if out of return/replacement window, or out of warranty time?
In most case, we will continuously to provide the return/replacement service or
other support to customer even if out of return/replacement window or out of
warranty time, customers need to contact us directly too.
4.3 Any technical/quality question, please send question to below contacts directly.
The dedicatedtechnical support will help you on these issues.
All questions will be answered and handled in 1 working day.

www.elemakelocks.com
EleMake Lock Products.
Online customer service----
Facebook #:cs[email protected]om
Skype #: customerservice@products
Email-address: customerservice@elemakelocks.com
Customer service center address:
Eastern: 25752 W.143rd,St,Plainfield,IL,US,60544
Table of contents
Other EleMake Door Lock manuals


