Elesta RTU300B User manual
*2701619_Rev.2*
Appareil conforme aux exigences des directives
R&TTE 1999/5/CE
En raison de l'évolution des normes et du matériel, les caractéristiques indiquées par le texte
et les images de ce document ne nous engagent qu'après confirmation par nos services.
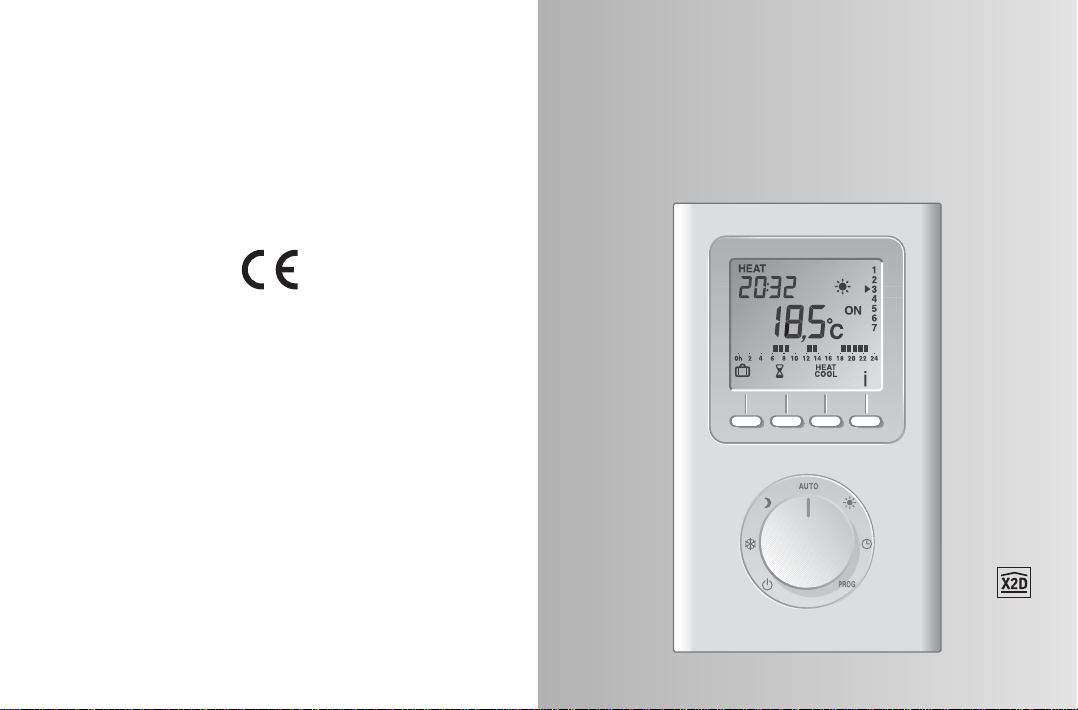
Thermostat programmable radio
pour chauffage et climatisation
Radio-controlled programmable thermostat
for heating and air-conditioning
Device complying with the requirements of directives
R&TTE 1999/5/CE
Because of changes in standards and equipment, the characteristics given in the text and
the illustrations of this document are not binding unless confirmed by our services.
Description
- 2 - - 3 -
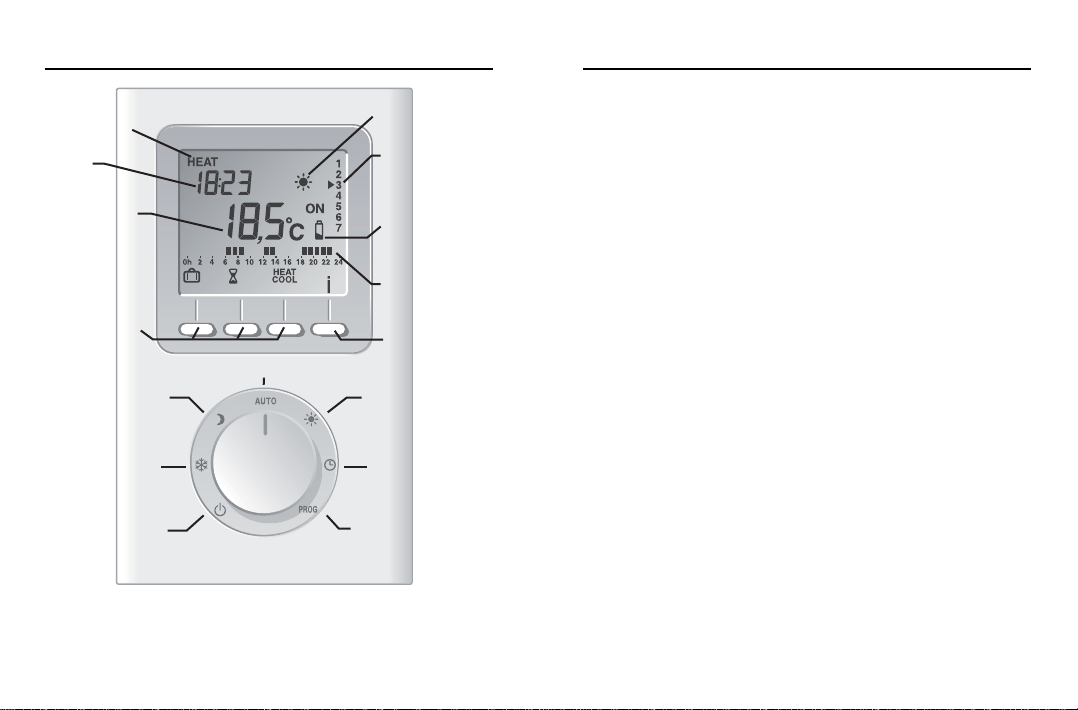
Mode en cours
(HEAT ouCOOL) Allure en cours
(ex : confort)
Jour en cours
Témoin d’usure
despiles
Profil du
programme
Touche
information
Heure
Température
(consigne ou
mesurée)
Touchesde
choix dumode
et de réglage
Mode automatique
Confort
Réglage
de l’heure
Programmation
Economie
Horsgel
Arrêt
Sommaire
Ce système est incompatible avec les produits radio fonctionnant
sur la même bande de fréquence (868 MHz), utilisant un mode
d’émission permanente (casques, enceintes sans fil...).
INSTALLATION
Emplacement . . . . . . . . . . . . . . . . . . . . . . . . . . 4
Fixation . . . . . . . . . . . . . . . . . . . . . . . . . . . . . . . 5
Mise en service . . . . . . . . . . . . . . . . . . . . . . . . . 6
Retour aux réglages initiaux . . . . . . . . . . . . . 13
UTILISATION
Mise à l’heure . . . . . . . . . . . . . . . . . . . . . . . . . 14
Changement mode chaud/froid . . . . . . . . . . . 14
Réglage des températures . . . . . . . . . . . . . . . 14
Programmation . . . . . . . . . . . . . . . . . . . . . . . . 16
Mode automatique . . . . . . . . . . . . . . . . . . . . . 17
Mode absence . . . . . . . . . . . . . . . . . . . . . . . . . 18
Mode manuel . . . . . . . . . . . . . . . . . . . . . . . . . . 19
Mode arrêt . . . . . . . . . . . . . . . . . . . . . . . . . . . . 20
Changer les piles . . . . . . . . . . . . . . . . . . . . . . 20
Caractéristiques . . . . . . . . . . . . . . . . . . . . . . . 21
Aide . . . . . . . . . . . . . . . . . . . . . . . . . . . . . . . . . 22
ENGLISH . . . . . . . . . . . . . . . . . . . . . . . . . . . . . . . 23

- 4 - - 5 -
Soulevez le capot à l’aide d’un
tournevis.
Avec le tournevis, enlevez les
piles livrées avec l’appareil
(fixation murale) ou enlevez la
languette de protection des piles
(fixation sur socle).
Fixation murale
Fixez le thermostat à l’aide de vis et de
chevilles ou sur une boîte d’encastre-
ment (➊, entraxe 60 mm).
Remettez les piles en
place en respectant leur
polarité (sens).
Fixation sur socle
En utilisant le support fourni, vous
pouvez poser l’émetteur sur un meuble
(voir § Emplacement).
Fixation
AUTO
PROG
2
3
AUTO
PROG
PRO
Pour réguler le chauffage, le thermostat doit mesurer la
température ambiante la plus représentative possible
de votre habitat. La sonde de mesure de la température
étant dans le boîtier de l’émetteur, vous devez placer
celui-ci :
- dans la pièce principale (ex. salon/salle à manger)
ou au centre de votre habitation,
- fixé sur un mur, posé sur une étagère ou un meuble
accessible à une hauteur de 1,50 m,
- à l’abri des sources de chaleur (cheminée, influence
du soleil) et des courants d’air (fenêtre, porte).
IMPORTANT : Ne pas installer le thermostat sur un
mur en contact avec l’extérieur ou avec une pièce non
chauffée (ex : garage...).
Emplacement
Mini 20 cm

- 6 - - 7 -
Tournez le bouton sur Arrêt et
appuyez 5 secondes sur la touche
de droite jusqu’à afficher C201
x:xx (menu de maintenance
réservé à l’installateur).
Appuyez sur OK.
L’écran affiche CF01.
Mise en service
5 sec.
CF01 - Correction de la mesure de la
température ambiante
S’il existe un écart entre la
température constatée
(thermomètre) et la température
mesurée et affichée par l’appareil,
ce menu permet d’agir sur la
mesure de la sonde de façon à
compenser cet écart (de -4°C à
+4°C par pas de 0,1°C).
Appuyez sur +ou -pour effectuer votre choix, sur OK
pour valider et passer au menu suivant.
CF02 - Choix de l’affichage
de la température en mode
AUTO
Appuyez sur +ou -pour effectuer votre choix, sur OK
pour valider et passer au menu suivant.
Affichage permanent de la consigne
Température affichée
Affichage permanent de la
température ambiante
Accès rapide aux menus radio (association, test) :
tournez le bouton sur Arrêt et appuyez sur la 2ème
touche (en partant de la gauche) pendant 5 secondes,
jusqu’à afficher CF09.
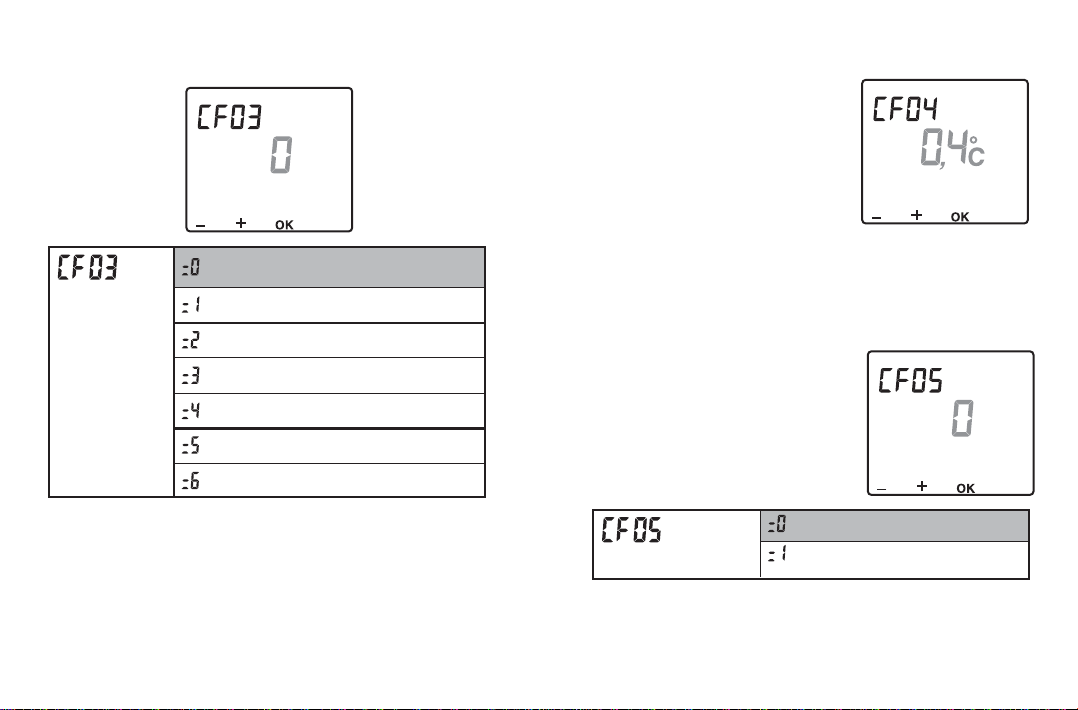
CF03 - Choix du type de régulation
Appuyez sur +ou -pour effectuer votre choix, sur OK
pour valider et passer au menu suivant.
Tout ou rien
Choix du type de
régulation P.I. Application radiateur 15 min.
P.I. Application radiateur 30 min.
P.I. Application radiateur 45 min.
P.I. Application radiateur 60 min.
P.I. Plancher 30 min.
P.I. Plancher 60 min.
P.I. : Proportionnelle intégrale
CF04 - Hystérésis de la régulation
Ce menu n’est accessible que si
CF03= 0
Réglage de 0,2°C à 2°C par pas
de 0,1°C.
Le décalage est symétrique.
Exemple : Réglage = 0,4°C.
Décalage = -0,2°C/+0,2°C.
Appuyez sur +ou -pour effectuer votre choix, sur OK
pour valider et passer au menu suivant.
CF05 - Fonctionnement
ECO en mode Froid (COOL)
Appuyez sur +ou -pour effectuer votre choix, sur OK
pour valider et passer au menu suivant.
Arrêt
Fonctionnement ECO
en mode froid Régulation par le thermostat
- 8 - - 9 -

CF06 - Choix du sens
d’ouverture du relais change-over
Appuyez sur +ou -pour effectuer
votre choix, sur OK pour valider et
passer au menu suivant.
CF07 - Commande de l’entrée change-over
de la PAC
Appuyez sur +ou -pour effectuer
votre choix, sur OK pour valider et
passer au menu suivant.
- 11 -
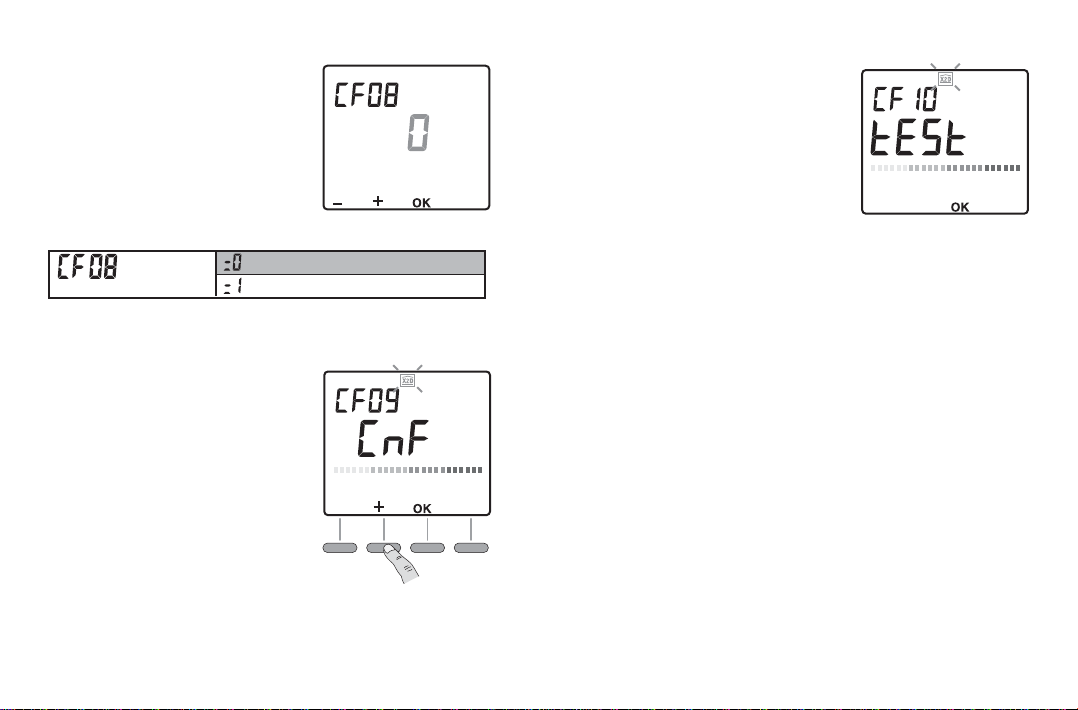
CF08 - Mode cyclique
Si le récepteur est associé à d'autres produits domoti-
ques X2D (transmetteurs, télécommandes, centrale
d'alarme,... sauf détecteurs d'ouver-
ture), il est obligatoire de rendre
inactif le mode cyclique.
Appuyez sur +ou -pour effectuer
votre choix, sur OK pour valider et
passer au menu suivant.
CF09 - Association au(x) récepteur(s)
Sur le récepteur, appuyez sur la
touche jusqu’à ce que le voyant
clignote.
Sur l’émetteur, à partir du menu
CF09, appuyez sur la touche +.
L’émetteur envoie une trame vers
le récepteur. Le symbole X2D
apparaît momentanément.
Vérifiez que le voyant du récep-
teur ne clignote plus.
Le récepteur est associé à l’émet-
teur.
Appuyez sur OK pour passer au menu suivant.
Non
Le thermostat commande
le change-over de la PAC Oui
Actif (sans produits domotiques)
Mode cyclique Inactif (avec produits domotiques)
- 10 -
Fermé en mode Chaud (HEAT)
Sens d’ouverture du
relais change-over Ouvert en mode Chaud (HEAT)

- 13 -
Vous pouvez faire une initialisation générale pour
revenir aux paramètres réglés en usine :
- les réglages installateur (en grisé dans les menus
de mise en service)
- les températures de consigne,
- la programmation par défaut.
Tournez le bouton sur Arrêt et
appuyez 10 secondes sur la touche
de gauche jusqu’à afficher init.
Appuyez sur OK pour valider ou
sur Cpour annuler.
Retour à l’affichage du mode arrêt.
10 sec.
Retour aux réglages initiaux
- 12 -
CF10 - Test radio
L’émetteur envoie une trame
vers le récepteur toutes les 3
secondes. Le symbole X2D
apparaît momentanément.
Vérifiez que le voyant du récepteur
clignote à chaque réception.
Pour sortir du mode configuration, tournez le bouton.
- 15 -
Mode Froid :
• Si le thermostat commande la PAC (voir mise en
service, CF07), la demande de Hors gel bascule
automatiquement le thermostat et la PAC en mode
Chaud et régule selon la consigne Hors gel.
• Si le thermostat ne commande pas la PAC, la
demande de Hors gel se traduit par de l’arrêt.
Basculez manuellement le thermostat et la PAC
en mode Chaud.
Tournez le bouton pour sortir du mode de réglage.
Réglage Economie ( )
Tournez le bouton sur :
Mode Chaud : réglage de 10 à 30°C (16°C par défaut)
Mode Froid : réglage de 18 à 35°C (28°C par défaut)
Appuyez sur +ou -pour effectuer votre choix.
Tournez le bouton pour sortir du mode de réglage.
Réglage Confort ( )
Tournez le bouton sur :
Mode Chaud : réglage de 10 à 30°C (20°C par défaut)
Mode Froid : réglage de 18 à 35°C (24°C par défaut)
Appuyez sur +ou -pour effectuer votre choix.
Tournez le bouton pour sortir du mode de réglage.
Le réglage de la consigne Economie en mode Froid
n’est accessible que si CF05=1, voir menu “Mise en
service”. Si CF05=0, l’écran affiche “- - - -”.
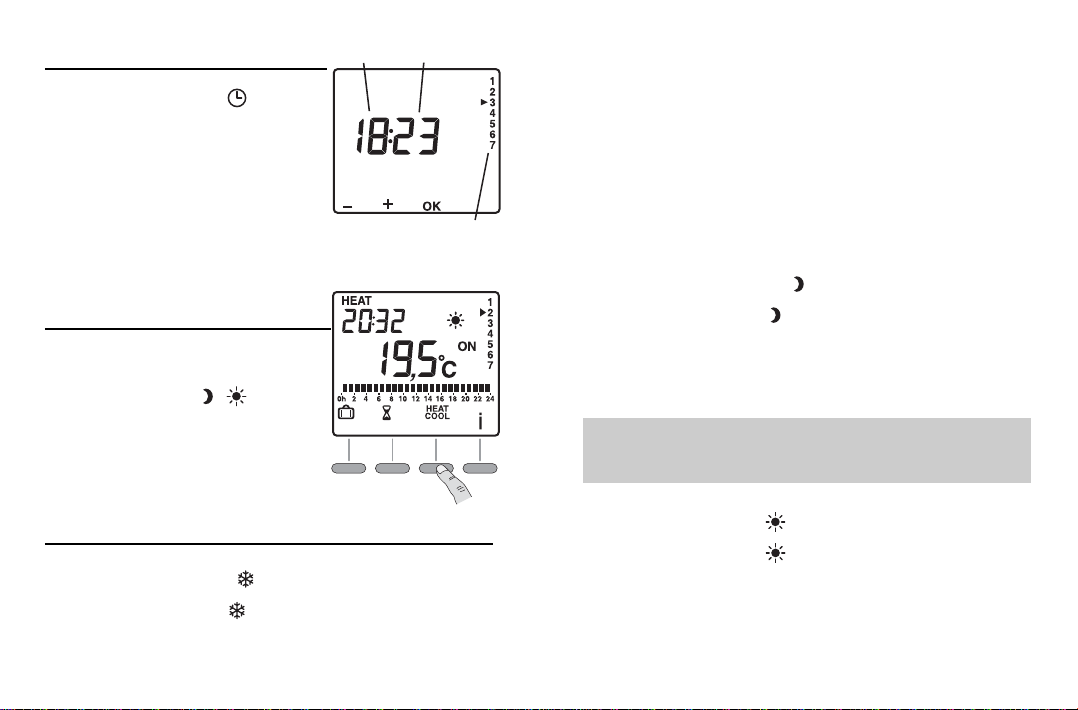
- 14 -
Tournez le bouton sur .
Les jours clignotent.
Appuyez sur +ou -pour
effectuer votre choix, sur OK pour
valider et passer au réglage suivant.
Recommencez les opérations pour
régler les heures et les minutes.
Tournez le bouton pour sortir du mode de réglage.
Pour basculer du mode Chaud
(HEAT) au mode Froid (COOL),
à partir des modes , ou AUTO,
appuyez 3secondes sur
la touche HEAT/COOL.
Si le thermostat ne commande pas
la PAC, basculez-la manuellement.
Réglage Hors-gel ( )
Tournez le bouton sur .
Mode Chaud : réglage de 5°C à 15°C (7°C par défaut)
Changement mode
chaud/froid
Réglage des températures (consignes)
Mise à l’heure
Jour
HeuresMinutes

- 17 -
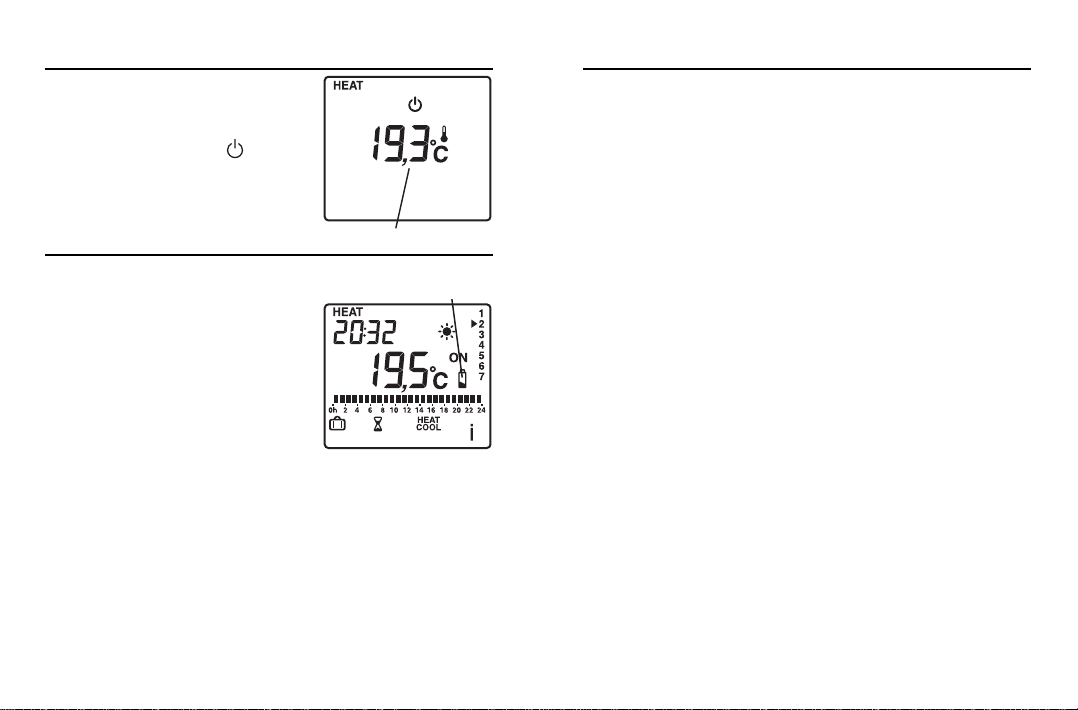
Tournez le bouton sur AUTO.
A la mise en service, la température de consigne
s’affiche.
Appuyez sur la touche ipour afficher la température
mesurée par le thermostat (le symbole apparaît
au-dessus du °C).
• Il est possible d’inverser l’affichage de la température
(menu CF02 de la mise en service) :
- mode automatique : température mesurée
- appui sur la touche i: température de consigne
• Si vous ne souhaitez pas suivre un programme, vous
pouvez passer en Economie permanent (bouton sur ),
Confort permanent ( ) ou Hors-gel permanent ( ).
Mode automatique
Mode
absence
Mode manuel température
(de 30 minutesà 72 heures)Choix dumode Chaud/Froid
(appui 3 secondes)
Heure
Consigne en
cours(ex : confort)
Jour
Demande de
chaud oude froid
Température
de consigne
- 16 -
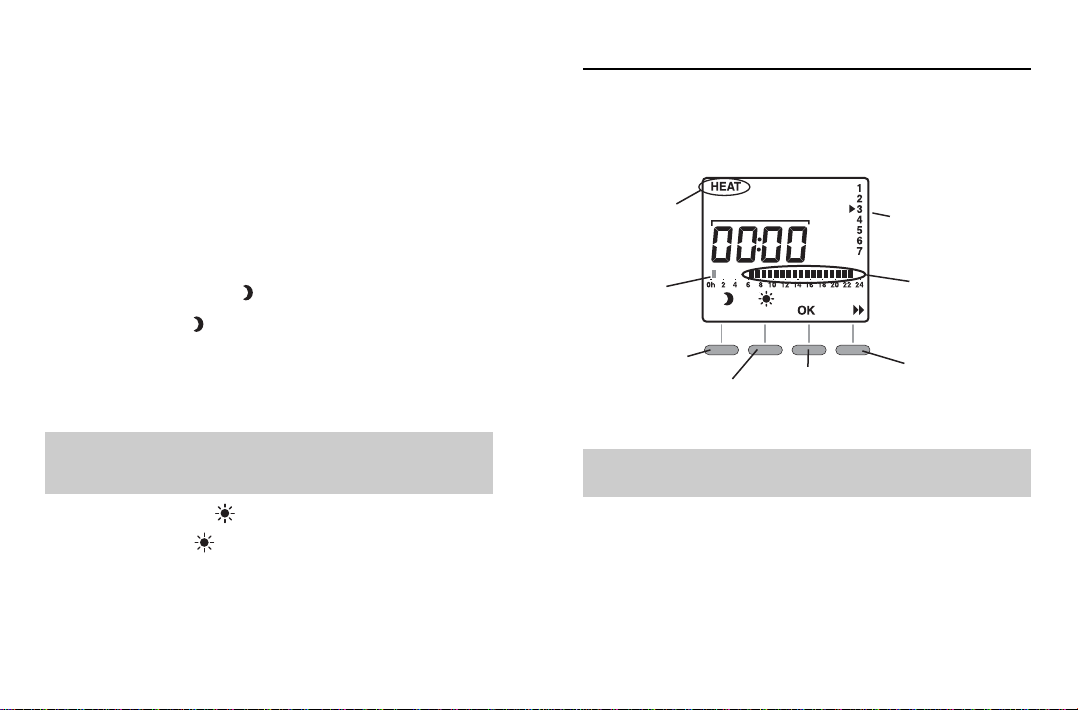
A la mise en service, le programme “Confort de 6h à
23h” est appliqué à tous les jours de la semaine.
Pour modifier la programmation, tournez le bouton sur
PROG.
Le 1er créneau horaire clignote.
Programmation rapide :
Pour appliquer le même programme au jour suivant,
maintenez appuyée la touche OK environ 3secondes
jusqu’à afficher le programme du jour suivant.
Tournez le bouton pour sortir du mode de programmation.
Programmation
1h
d'économie 1h
de confort Aller au prochain
changement
duprogramme
Validation
et passage
au jour suivant
1er
créneau
horaire
Heure du
créneau consulté Jour
Ex :
Mode chaud
Profil du
programme
A la fin de la programmation du mode Chaud,
vous accédez à la programmation du mode Froid.
- 19 -
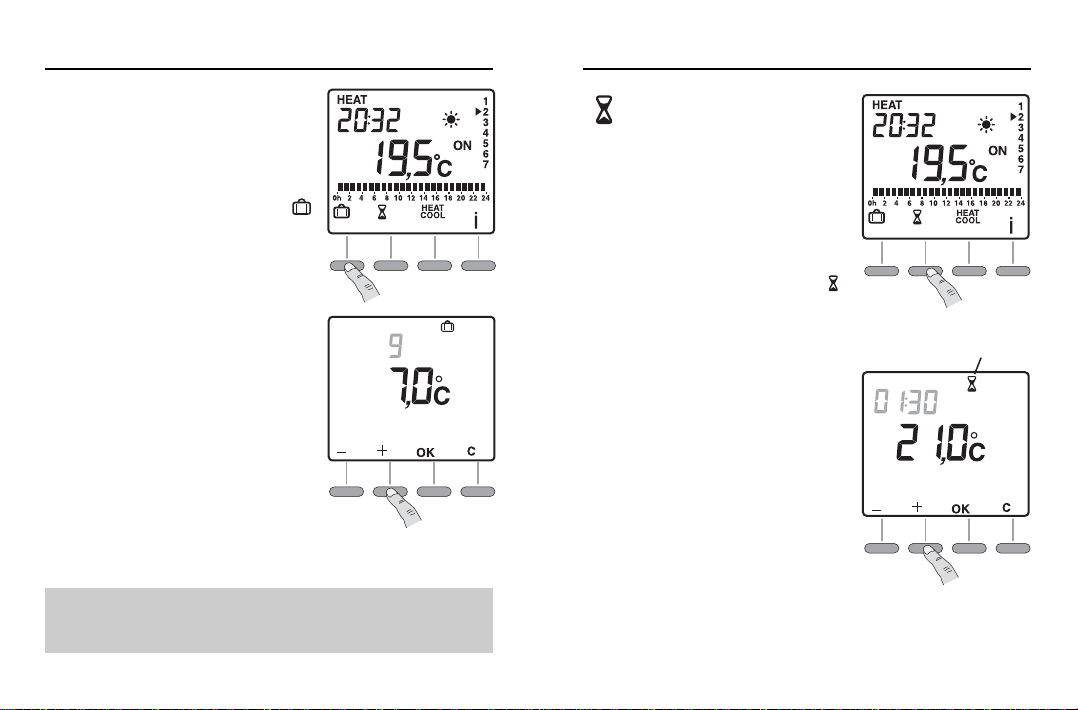
( ) Pour une durée réglable
de 30 minutes à 72 heures
Ce mode permet de régler une
température de consigne pour
une durée donnée.
A partir du mode automatique
(AUTO), appuyez sur la touche .
La durée du mode manuel clignote.
Appuyez sur +ou -pour régler la
durée souhaitée (ex : 1h30).
Validez par OK.
La température clignote.
Appuyez sur +ou -pour régler la
température.
Validez par OK.
Pour annuler le mode manuel,
appuyez sur la touche Cou tournez le bouton.
Mode manuel
Mode manuel
en cours
- 18 -
Mode absence
Ce mode permet de régler une
température (de 5 à 15°C) pour une
durée réglable de 1 à 365 jours.
A partir du mode automatique
(AUTO), appuyez sur la touche .
Le nombre de jours clignote.
Appuyez sur +ou -pour régler le
nombre de jours.
Exemple :
départ le 10 Janvier,
retour le 19 Janvier, indiquez 9
jours.
Le fonctionnement automatique
reprendra le 19 Janvier à 00h00.
Validez par OK.
La température clignote.
Appuyez sur +ou -pour régler la
température.Validez par OK.
Pour annuler le mode absence (exemple : retour anti-
cipé), appuyez sur la touche Cou tournez le bouton.
En mode Froid (COOL), le mode absence met la PAC
en arrêt. Pas de réglage de consigne possible.
L’écran affiche “- - - -”.
- 21 -
• Alimentation par 2 piles alcalines 1,5, type LR03ou
AAA (fournies), autonomie supérieure à 2 ans en
utilisation normale,
• Isolement classe III
• Diverses régulations possibles dont régulation de
type tout ou rien,
• Fréquence d’émission 868 MHz, classe I (Norme
EN 300 220)
• Dispositif de télécommande radio
• Portée radio de 100 à 300 mètres en champ libre,
variable en fonction des équipements associés
(portée pouvant être altérée en fonction des conditions
d’installation et de l’environnement électromagnétique)
• Dimensions : 135 x 81 x 22 mm
• Indice de protection : IP 30
• Fixation murale ou sur boîte d’encastrement
• Installation en milieu normalement pollué
• Température de stockage : -10°C à +70°C
• Température de fonctionnement : 0°C à +40°C
Caractéristiques
- 20 -
Pour mettre en arrêt le chauffage
(en été, par exemple).
Tournez le bouton sur .
Le thermostat affiche la
température ambiante mesurée.
A partir du moment où le symbole
d’usure des piles apparaît, vous
disposez d’environ 3mois pour
changer celles-ci (2 piles alcalines
1,5V de type LR03ou AAA).
Des précautions sont à prendre :
- respecter les polarités +/- lors
de la mise en place dans
l’appareil,
- ne pas jeter les piles usées n’importe où (dans un
souci de respect de l’environnement, vous devez
rapporter les piles usées dans un lieu de collecte),
- ne pas les recharger,
- vous avez environ 45 secondes pour changer les
piles avant que le réglage de l’heure ne soit remis à
zéro (dans ce cas, refaire le réglage de l’heure et
du jour).
Changer les piles
Symbole d'usure
despiles
Température mesurée
Mode arrêt

- 23 -
Description
Current mode
(HEAT or COOL) Current mode
(e.g. comfort)
Current day
Battery level
indicator
Program
profile
Adjustment
buttons
Time
Temperature
(set or measured)
Automatic mode
Comfort
Time
setting
Programming
Economy
Frost
Protection
Shutdown
Information
button
The system is not compatible with radio equipment operating on
the same bandwidth (868 MHz) that uses a continuous transmission
mode (headset, wireless loud speakers, etc.)..
L’objectif de ce chapitre est de vous aider à résoudre
rapidement les problèmes les plus courants que vous pourriez
rencontrer sur votre produit lors de l’utilisation.
En cas de doute, si le problème persiste ou s’il ne se trouve
pas dans cette liste, contactez votre installateur.
Rien n’apparaît sur l’écran du boîtier d’ambiance.
Il n’y a pas d’alimentation.
Vérifiez les piles (et leur sens).
La température affichée ne correspond pas à la
température mesurée dans la pièce (thermomètre).
Reportez-vous au menu CF01 de la mise en service.
Votre système de chauffage/clim est en arrêt.
La molette est restée sur , PROG ou . Mettre la molette
sur une autre position.
L’écran affiche 4 tirets“- - - -”. L’appareil est en arrêt.
3 possibilités :
- vous êtes en absence en mode Froid (COOL),
- la température Economie n’est pas régulée en mode
COOL (menu CF05, mise en service)
- vous êtes en Hors-gel et l’entrée change-over de la PAC
n’est pas pilotée par le thermostat (menu CF07, mise en
service).
Le récepteur ne prend pas en compte les ordres de
l’émetteur.
Refaites un test radio, déplacez votre émetteur ou associez à
nouveau vos appareils.
Aide
- 22 -

- 25 -
To control the heating, the thermostat must measure
the most representative room temperature in your
home. As the temperature measurement probe is
in the transmitter unit, you must place the unit:
- in the main room (e.g. living/dining room) or in
the middle of your home,
- wall-mounted or placed on a shelf or accessible
furniture at a height of 1.50 m,
- away from heat sources (fireplaces, sunlight) and
draughts (windows, doors).
IMPORTANT: Do not install the thermostat on a wall
in contact with the outside or in an unheated room
(e.g. garage, etc.)..
Location
min. 20 cm
wall-mounted
approx.
height
1.50 m
placed
on furniture
- 24 -
Contents
INSTALLATION
Location . . . . . . . . . . . . . . . . . . . . . . . . . . . . . . . . 25
Mountings . . . . . . . . . . . . . . . . . . . . . . . . . . . . . . 26
Starting up . . . . . . . . . . . . . . . . . . . . . . . . . . . . . . 27
Return to the initial settings . . . . . . . . . . . . . . . 34
USE
Time Setting . . . . . . . . . . . . . . . . . . . . . . . . . . . . 35
Changing the operating mode
Heating/Cooling . . . . . . . . . . . . . . . . . . . . . . . . . 35
Setting the temperatures . . . . . . . . . . . . . . . . . . 35
Programming . . . . . . . . . . . . . . . . . . . . . . . . . . . 37
Automatic mode . . . . . . . . . . . . . . . . . . . . . . . . . 38
Absence mode . . . . . . . . . . . . . . . . . . . . . . . . . . 39
Manual mode . . . . . . . . . . . . . . . . . . . . . . . . . . . . 39
Shutdown mode . . . . . . . . . . . . . . . . . . . . . . . . . 41
Changing the batteries . . . . . . . . . . . . . . . . . . . . 41
Characteristics . . . . . . . . . . . . . . . . . . . . . . . . . . 42
Help . . . . . . . . . . . . . . . . . . . . . . . . . . . . . . . . . . . 43

- 27 -
Turn the knob to Shutdown and
press the right-hand button for
5 seconds until C201 x:xx is
displayed (maintenance menu
reserved for the installer).
Press OK.
The screen displays CF01.
Starting up
5 sec.
Quick access to the radio menus (association, test):
turn the button to Shutdown and press the 2nd button (star-
ting from the left) for 5 seconds until CF09 is displayed.
- 26 -
Lift off the cover by using
a screwdriver.
Use the screwdriver to remove
the batteries supplied from the
unit (wall mounted) or remove
the battery cover (fitted on base).
Wall mounting
Secure the thermostat using the screws
and pegs or fit onto a flush-mounted box
(➊, distance between
centres 60 mm).
Fit the batteries back,
ensuring that they are
correctly fitted.
Fitted on base
Using the support provided, you can
place the transmitter on an item of
furniture (see § Location).
Mountings
AUTO
PROG
2
3
AUTO
PROG
PRO

CF01 - Correction of room temperature
measurement
If there is a difference between
the temperature noted (thermo-
meter) and the temperature
measured and displayed by
the unit, the menu acts on the
measurement of the probe so as
to compensate for this difference
(from -4°C to +4°C in steps of
0.1°C).
Press +or -to make your choice, OK to confirm it and
go to the next menu.
CF02 - AUTO mode
temperature display option
Press +or -to make your choice,
OK to confirm it and go to the
next menu.
Continuous display of the set-point
Temperature displayed
Continuous room temperature
display
CF03 - Choosing the operating mode
Press +or -to make your choice, OK to confirm it and
go to the next menu.
On / Off regulation
Choosing the
operating mode P.I. application radiator 15 min.
P.I. application radiator 30 min.
P.I. application radiator 45 min.
P.I. application radiator 60 min.
P.I. Floor 30 min.
P.I. Floor 60 min.
P.I. : Proportionnal-integral
- 29 -- 28 -

- 31 -
CF06 - Selection of the opening direction of
the change-over relay
Press +or -to make your choice,
OK to confirm it and go to the
next menu.
CF07 - Control of the change-over input of
the heat pump
Press +or -to make your choice,
OK to confirm it and go to the
next menu.
Closed in HEAT mode
Opening direction of the
change-over relay Open in HEAT mode
- 30 -
CF04 - Control hysteresis
You can only access this menu if
CF03= 0
Adjustable from 0.2°C to 2°C by
increments of 0.1°C
The shift is symmetrical.
Example: Setting = 0.4°C.
Shift = -0.2°C/+0.2°C.
Press +or -to make your choice, OK to confirm it and
go to the next menu.
CF05 - ECO operation in COOL mode
Press +or -to make your choice,
OK to confirm it and go to the
next menu.
Shutdown
ECO operation in
COOL mode Control by the thermostat No
The thermostat controls
the change-over of the
heat pump Yes
- 33 -
CF10 - Radio test
The transmitter sends a frame to
the receiver every 3seconds.The
X2D symbol is displayed briefly.
Check that the receiver LED
flashes each time it receives the
frames.
To cancel the manual mode, press the Cbutton or turn
the knob.
- 32 -
CF08 - Cyclic mode
If the receiver is associated with
other X2D domotics products
(transmitters, remote controls,
alarm control unit, etc. excluding
door/window magnetic contacts),
the cyclic mode must be disabled.
Press +or -to make your choice,
OK to confirm it and go to the next menu.
CF09 - Association with receiver(s)
On the receiver, press the button
until the LED flashes.
On the transmitter, press +from
the CF06 menu.
The transmitter sends a frame to
the receiver.The X2D symbol is
displayed briefly.
Check that the receiver’s LED is
no longer flashing.
The receiver is associated with the transmitter.
Press OK to go to the next menu.
Enabled (without domotics products)
Cyclic mode Disabled (with domotics products)

- 35 -
Turn the knob to .
The days flash.
Press +or -to make your choice,
OK to confirm it and go to the
next setting.
Repeat the operations to set
the hours and minutes.
Turn the knob to exit the setting
mode.
To switch from HEAT mode to
(COOL) mode,from the , or
AUTO modes, press the
HEAT/COOL button for 3seconds
If the thermostat does not control
the heat pump, switch it over
manually.
Frost Protection setting ( )
Turn the knob to ( ).
Heat mode: setting from 5°C to 15°C (7°C by default)
Changing the operating
mode Heating/Cooling
Time Setting
Day
HoursMinutes
Setting the temperatures (set-points)
- 34-
You can carry out a general reset toreturn to the factory
settings:
- the installer settings (grayed out on the start up
menus)
- set-point temperatures,
- default program.
Turn the knob to Shutdown then
press the left-hand button for
10 seconds until init is displayed.
Press OK to confirm or Cto
cancel.
Return to the shutdown mode
display.
10 sec.
Return to the initial settings
- 37 -
When starting up, the “Comfort mode from 6am to
11pm” program is applied to all the days of the week.
To change the programming, turn the knob to PROG.
The 1st time slot flashes on and off.
Quick programming:
To apply the same program to the following day, press
and hold the OK button for approximately 3seconds
until the program of the following day is displayed.
Turn the knob to exit the programming mode.
Programming
Economy mode
for 1 hourComfort
for 1 hour
Go to the next
program change
Confirm and go to
the next day
1sttime
slot
Day
Ex :
Heat mode
Program
profile
Time slot
consulted
At the end of the Heat mode programming,
you access the Cold mode programming.
- 36 -
Cool mode:
• If the thermostat controls the heat pump (see star-
ting up, CF07), the frost protection request automa-
tically switches the thermostat and heat pump to
Heat mode and controls the system according to
the Frost Protection setting.
• If the thermostat does not control the heat pump,
the Frost Protection request shuts down the system.
Manually switch the thermostat and heat pump
to Heat mode.
Turn the knob to exit the setting mode.
Economy setting ( )
Turn the knob to :
Heat mode: setting from 10°C to 30°C (16°C by default)
Cool mode: setting from 18°C to 35°C (28°C by default)
Press + or - to make your choice.
Turn the knob to exit the setting mode.
Comfort setting ( )
Turn the knob to :
Heat mode:setting from 10°C to 30°C (20°C by default)
Cool mode:setting from 18°C to 35°C (24°C by default)
Press + or - to make your choice.
Turn the knob to exit the setting mode.
The setting of the Economy set-point in Cool mode
can only be accessed if CF05=1, see “Starting up”
menu. If CF05=0, the screen displays “- - - -”.

- 39 -
Absence mode
This mode is used to set a tempe-
rature (5 to 15°C) for a period that
can be set from 1 to 365 days.
From the automatic mode (AUTO),
press the button.
The number of days flash on and
off.
Press +or -to set the number of
days.
Example:
leaving on 10 January,
returning on 19 January, indicate 9
days.
Automatic operation will restart on
19 January at 00.00 h.
Press OK to confirm.
The temperature flashes onand off.
Press +or -to set the temperature.
Press OK to confirm.
To cancel the absence mode (e.g. when returning
early), press the Cbutton or turn the knob.
In COOL mode, the absence mode shuts down the
heat pump. No set-point setting possible.
The screen displays “- - - -”.
- 38 -
Turn the knob to AUTO.
When starting up, the set-point temperature is displayed.
Press the ibutton to display the temperature measured
by the thermostat (the symbol is displayed above
the °C).
• The temperature display can be reversed (CF02 start
up menu):
- automatic mode : measured temperature
- press i : set-point temperature
• If you do not want to use a program, you can go to
continuous Economy mode (knob turned to ),
continuous Comfort mode ( ) or continuous Frost
Protection mode ( ).
Automatic mode
Absence
mode
Comfort or economy manual mode
(up to program change) Selection of the Heat/Cold
mode (press for 3 seconds)
Time
Current setting
(e.g. comfort)
Day
Request for
heat or cold
Measured
temperature
Table of contents
Languages:
Other Elesta Thermostat manuals


Popular Thermostat manuals by other brands


Honeywell Home
Honeywell Home TH8110R1008/U manual

Honeywell
Honeywell t7100f installation instructions

ICM Controls
ICM Controls SC2311L Installation, operation & application guide

Dornbracht
Dornbracht Xtool 35 524 970 90 installation instructions

Fandis
Fandis TRT Series Installation

Kemo
Kemo M169A Connection Example


