ELEVATE CC-1223 User manual

Page 1Rev. 031720 1-888-651-3431
General Guidelines
• It is the user’s responsibility to read and follow all instructions.
• Keep these instructions with the product at all times and review before each use.
• It is the responsibility of this product’s owner to furnish the instructions to any person that borrows or purchases the
product.
• Inspect the product before use to ensure it is assembled properly and all parts are in safe working order and free of
defects.
• Never modify this product in any way.
• All circumstances cannot be addressed in these instructions. Please use common sense and practice general safety
measures when using this product.
• Parts and/or instructions are subject to change without notice.
Safety
• Never exceed the 500 lb. capacity.
• For use with 2” Class III and IV hitch receivers. If installed on a Class II receiver, total weight, including carrier, is limit-
ed by the hitch tongue weight rating.
• Never exceed the maximum trailer hitch tongue weight rating of your trailer hitch.
• Make sure the carrier is properly secured on the trailer hitch mount and all cargo is properly secured.
• Always check local DOT ordinances regarding the use of hitch carriers. In some regions it may be illegal to cover or
obscure the license plate and tail lights. Always follow local trac rules.
• Always inspect your hitch carrier for loose bolts, damage, or rusting before use. DO NOT USE carrier if damaged.
Replace or repair damaged or worn parts immediately.
• This carrier is designed for temporary use only. Remove when not in use or before going through a car wash.
• Never block or impede vehicle exhaust. Do not use if vehicle exhaust is pointing towards the carrier. This can be a re
hazard and damage personal property and the vehicle.
• Distribute loads evenly and secure with tie down straps or bungee cords (sold separately). Uneven loads may cause
tipping, resulting in damage and injury.
• This carrier is not to be used for carrying people or animals.
• Never place items directly on top of the fencing, as this could result in damage to the cargo carrier or your items.
• Be aware of dynamic loading. Sudden dropping or bouncing a load can create an excess load which can result in dam-
age to the product or personal injury.
• Do not exceed 65 MPH while the carrier is attached. Avoid excessive speed, sharp turns, and sudden braking when
using the carrier.
• Periodically recheck the carrier and load during travel, especially during bad weather, heavy trac, or when driving at
high speeds.
• DO NOT use on tow-behind trailers or RVs, including 5th wheel and camping trailers.
• NOT recommended for hitches less than 12" from the ground to the bottom of the hitch without the use of a riser
adapter.
• Keep children and bystanders away while assembling, installing, or removing the carrier. Keep the work area clean,
free of clutter, and well lit. When not in use, store in a safe, clean location out of the reach of children.
• Failure to follow these instructions can lead to serious injury and property damage and will void the warranty.
Cargo Hauler with Basket
Instructions for Part # CC-1223

Page 2Rev. 031720 1-888-651-3431
Diagram and Parts List
Recommended Tools: 17mm wrench
Part # Description Qty
1 Supporting Frame 2
2 Connecting Piece 2
3 M10x20 Carriage Bolt 8
4 M10 Lock Nut 14
5 Support Bridge 2
650 Square Tube 1
7 Tie Plate 1
Part # Description Qty
8 M10x75 Carriage Bolt 2
9Stiener 2
10 Left and Right Side Fencing 2
11 Front/Back Left Fencing 2
12 Front/Back Right Fencing 2
13 Pin and Clip 4
14 M10x25 Carriage Bolt 4

Page 3Rev. 031720 1-888-651-3431
Assembly
It is important that you read the entire manual to become familiar with the product BEFORE you assemble and
use the cargo carrier. Before assembling and operating the cargo carrier, be sure that you have all parts de-
scribed in the parts list and assembly diagram.
Step 1. Connect the two supporting frames (1) with the connecting piece (2). Line up the corresponding square
holes and secure with four M10x20 carriage bolts (3) and four M10 lock nuts (4). Repeat with the other con-
necting piece (2) on the other side. Do not tighten completely yet. See Fig. 1.
Step 2. Place the tie plate (7) on the middle of the assembled supporting frame (1), then place the frame (1)
over the tube assembly (6) and two support braces (5). Secure using two M10x75 bolts and two M10 lock nuts
(4). Do not tighten completely yet. See Fig. 2.
Page 4Rev. 031720 1-888-651-3431
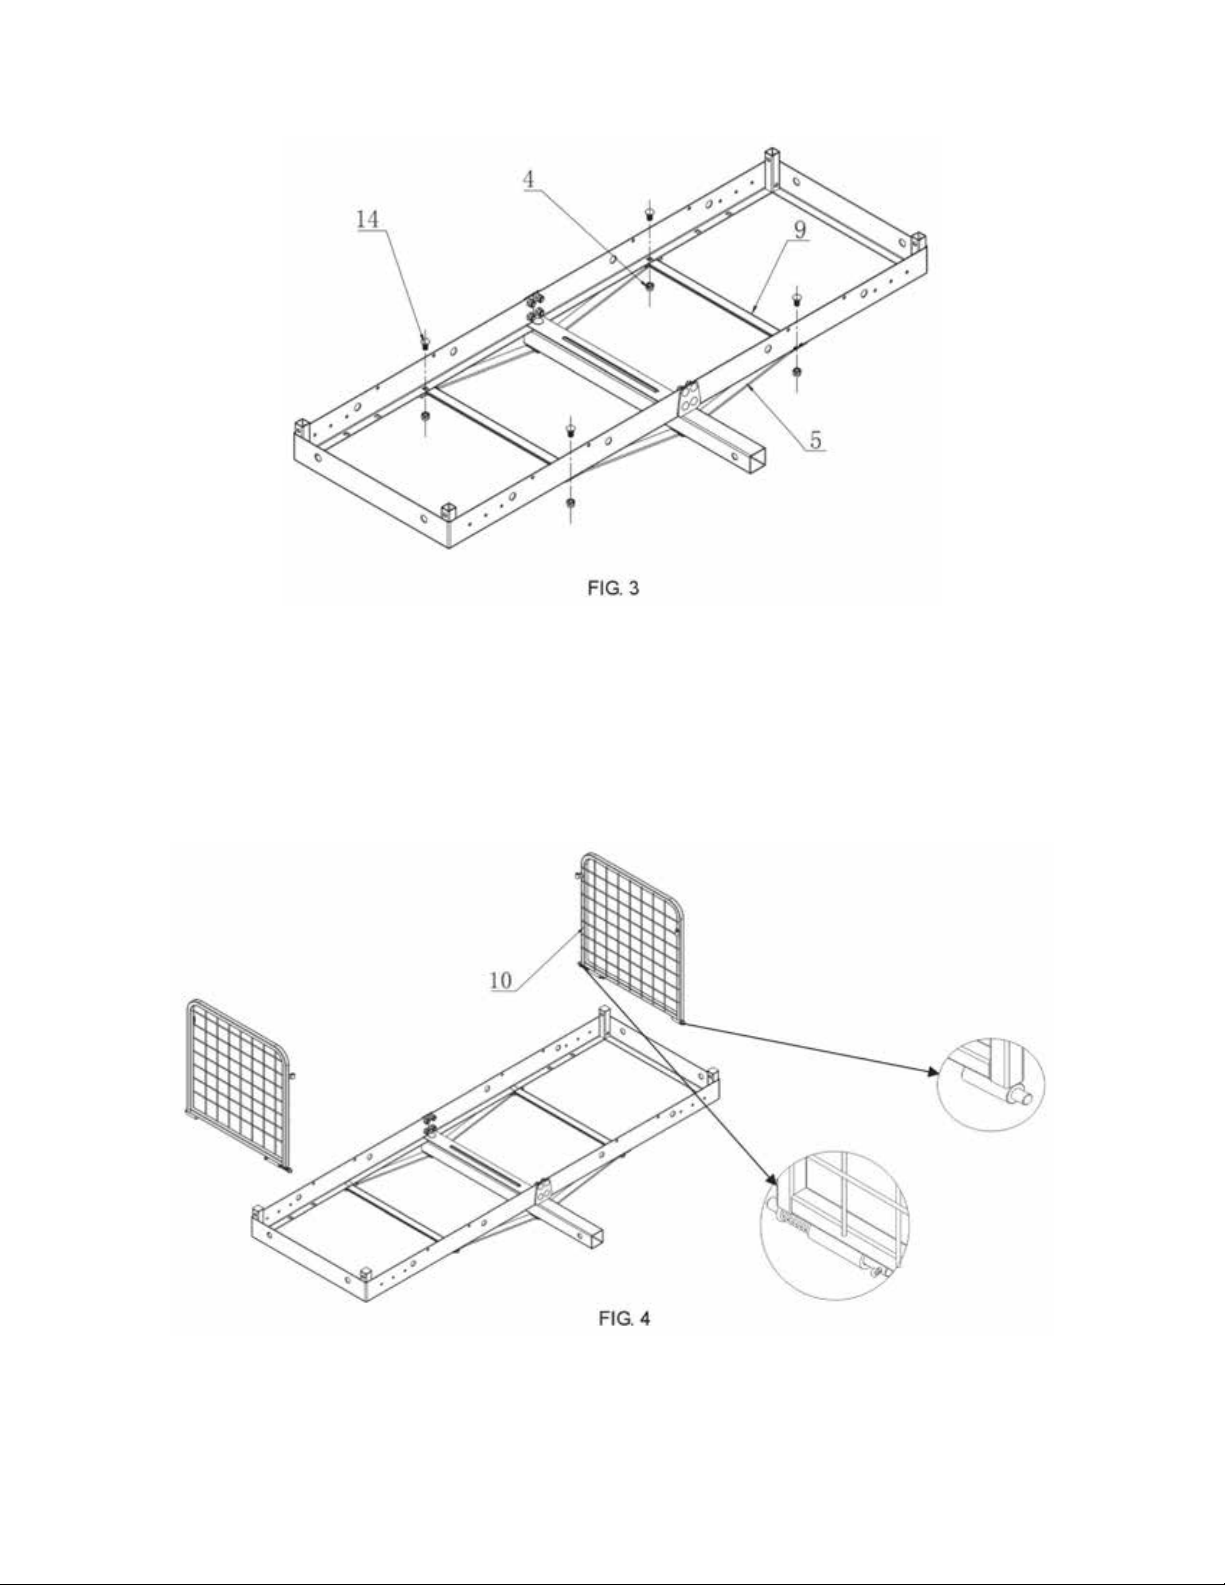
Step 3. Secure both sides of the two support braces (5) and the two stieners (9) to the frame (1) with four
M10x25 carriage bolts (14) and four M10 lock nuts (4). Do not tighten completely yet. See Fig. 3.
Step 4. Check that the two frame sides align horizontally, then tighten all bolts and nuts.
Step 5. Insert the cylindrical pin with spring on the bottom of the side fences (10) into the side hole on the cor-
ner xtures of the supporting frames (1). For ease of assembly, place with the fencing inside. See Fig. 4.
Page 5Rev. 031720 1-888-651-3431
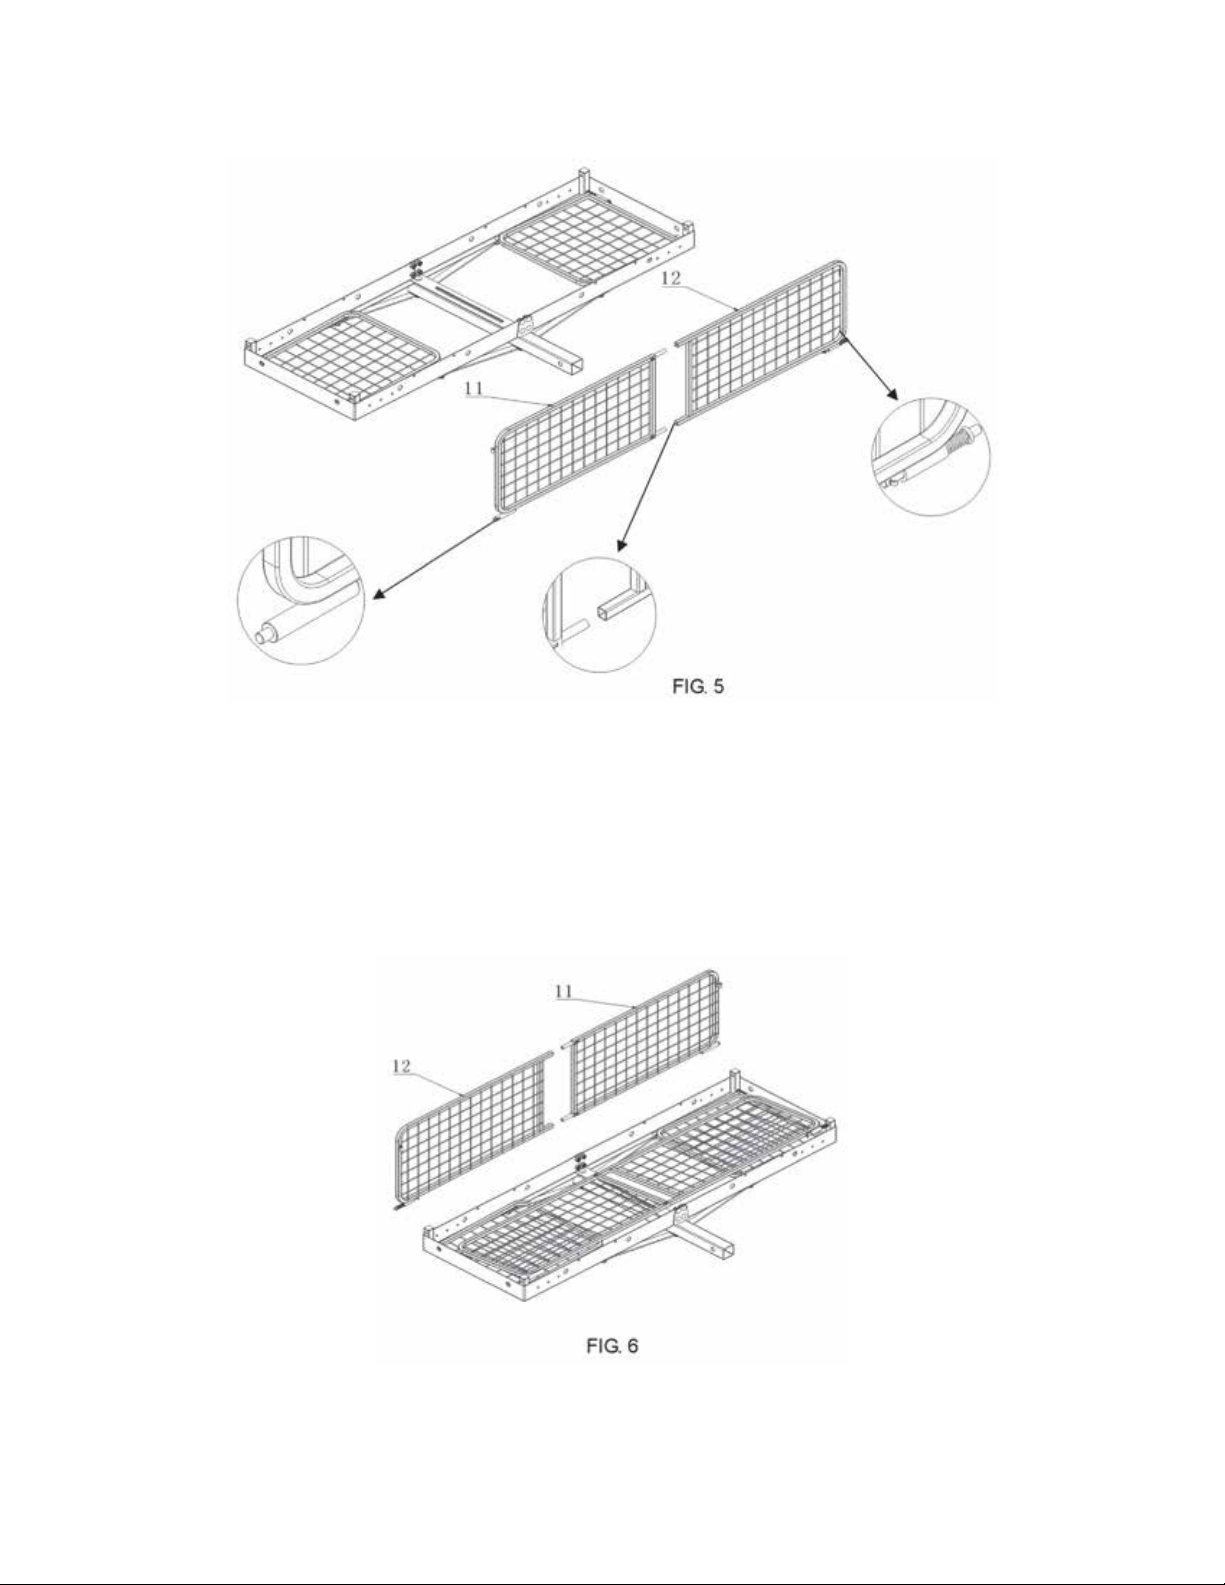
Step 6. Insert the front left and right fences (11, 12) together, and assemble them on the corner xtures of the
supporting frames (1). For ease of assembly, place with the fencing inside. See Fig. 5.
Step 7. Insert the back left and right fences (11, 12) together, and assemble them on the corner xtures of the
supporting frames (1). For ease of assembly, place with the fencing inside. See Fig. 6.
Page 6Rev. 031720 1-888-651-3431
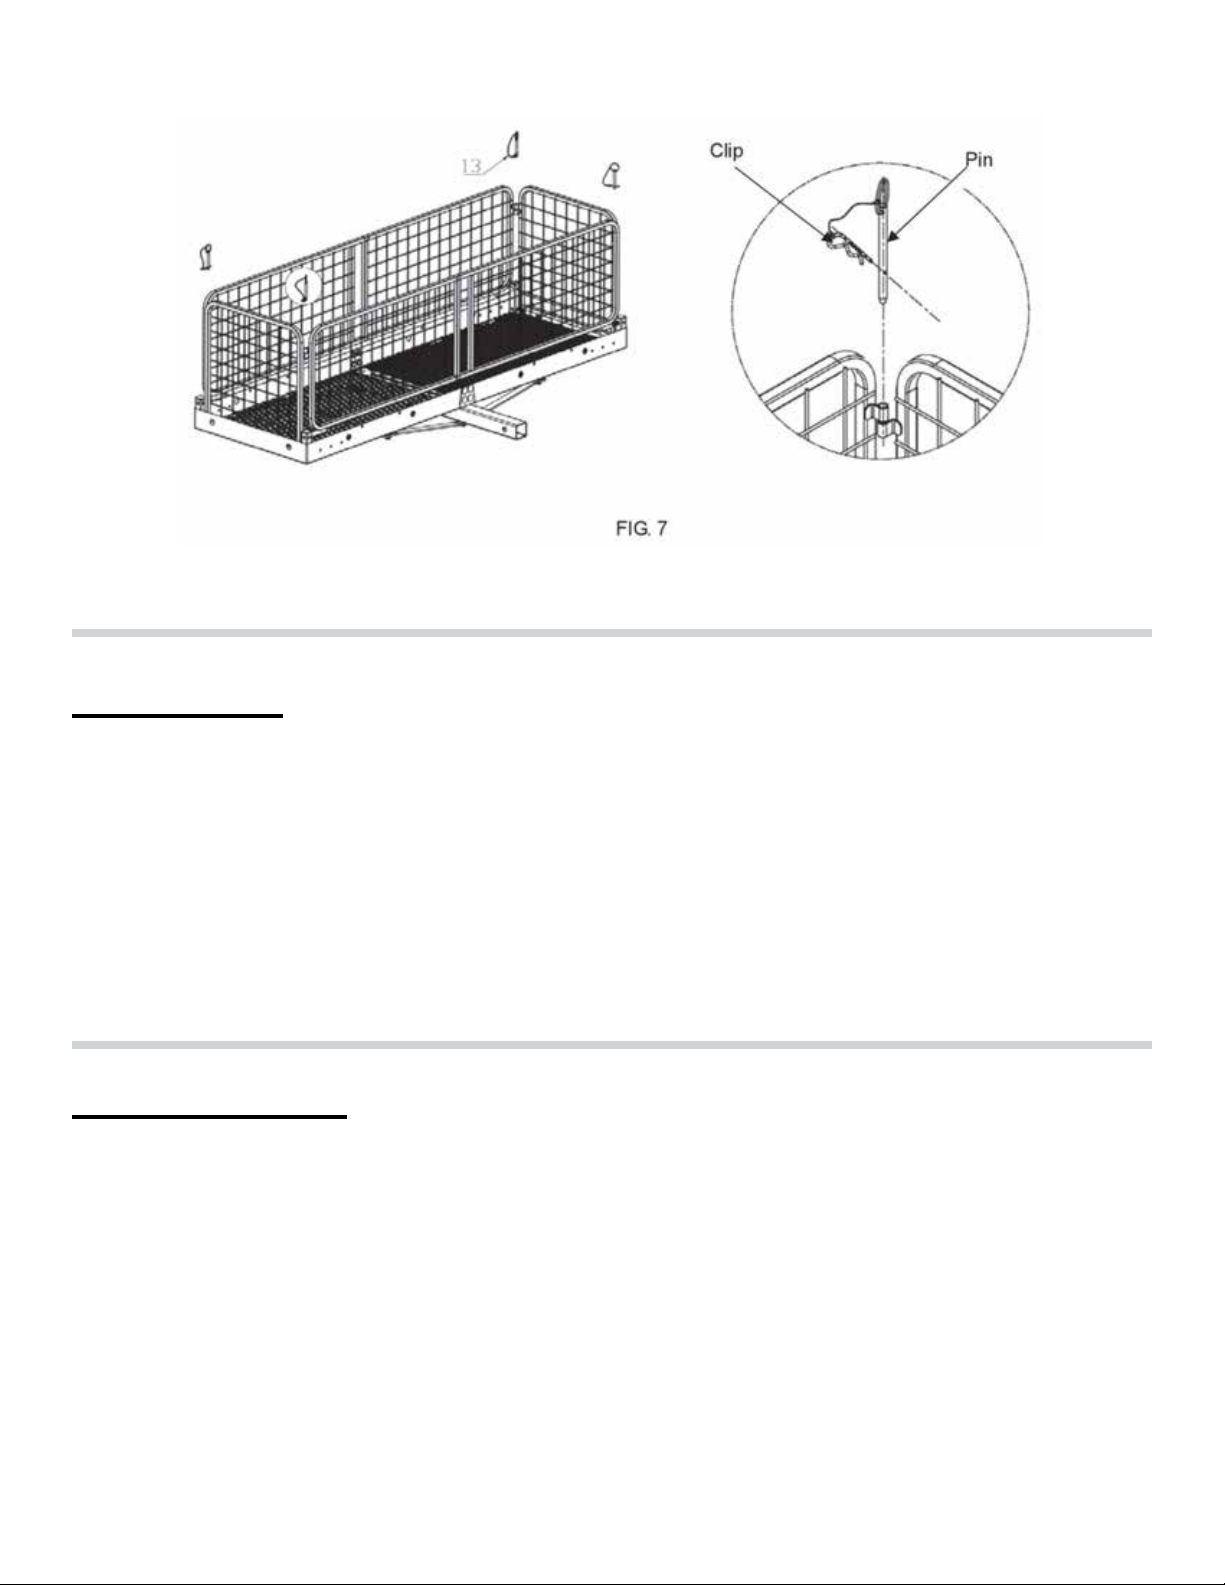
Step 8. Align the holes on all hinges, then insert the pin (13) and secure with the clip (13). See Fig. 7.
Operation
Maintenance
WARNING: The load weight must be centered or evenly distributed across the carrier platform. Always use
appropriate tie-down restraints to securely attach any cargo loaded onto the cargo carrier before moving the
vehicle any distance. Do not leave loose items on the platform while operating the vehicle.
The cargo carrier can be loaded with up to 500 lbs. of evenly distributed cargo if an appropriately rated hitch
is used. Never exceed the maximum trailer hitch tongue weight rating of your trailer hitch. The weight of the
carrier should be included in the total weight placed on the hitch.
Always use reectors. Make certain to use the appropriate red ags when moving a load. Check with your local
trac enforcement agency to make certain that you are correctly following all local laws.
Maintain your cargo carrier regularly. It is recommended that the general condition of the carrier be examined
before each use. Check all nuts and bolts on a regular basis to make sure they are tightened. If you hear any
abnormal vibrations or noise, have the problem corrected before further use.

Page 7Rev. 031720 1-888-651-3431
Product Warranty and Liability
GENERAL PRODUCT WARRANTY: Products purchased from the Authorized Dealer (original place of pur-
chase) or Merchant (“Dealer”) will be free of defects in material and workmanship at the time of receipt, and will
meet the specications stated at the place of purchase transaction or online at the Dealer’s website, under nor-
mal use and service when correctly installed, operated and maintained. This product warranty is eective for
the period of time stated below, unless otherwise stated in the product instructions or depicted in the product
advertisement. All Authorized Dealer warranties are NON-TRANSFERABLE and cover only the original end
purchaser. This limited warranty does not cover products purchased through non-authorized dealers. Non-au-
thorized dealer receipts are not accepted for warranty verication.
***Warranty claims must be made directly to the original place of purchase.***
WARRANTY PERIOD: This warranty remains in force for one year from the date of the product’s accepted
delivery. The Authorized Dealer oers a one year manufacturer’s warranty for most products unless otherwise
specied on the product advertisement.
WARRANTY SERVICE: The Authorized Dealer will replace any defective or malfunctioning part at no charge,
including payment of the shipping costs of parts or replacement product to and from the manufacturer. The
purchaser is responsible for labor charges. If the product does not meet specications as depicted in the ad-
vertisement, the Authorized Dealer will refund the full purchase price of the product.
Questions regarding the warranty on a specic product and warranty claims should be directed to the Autho-
rized Dealer with whom the purchase transaction was made.
WARRANTY LIMITATIONS: The above warranty does not apply to products that are repaired, modied or
altered by any party other than the Authorized Dealer; are subjected to unusual physical stress or conditions
(such as overloaded ramps or corrosion), natural disaster, governmental actions, wars, strikes, labor disputes,
riots, theft, vandalism, terrorism or any reason beyond reasonable control; are damaged due to improper
installation, misuse, abuse, accident or negligence in use, storage, transportation or handling, or tampering; or
to products that are considered consumable items or items requiring repair or replacement due to normal wear
and tear.
Product should be inspected prior to signing for delivery. Product damage incurred during shipping, unless
noted on the Bill of Lading at the time of delivery, renders this warranty void.
LIMITED LIABILITY: In no event shall THE AUTHORIZED DEALER be liable to the purchaser or any third
party for any indirect, incidental, consequential, special, exemplary or punitive damages arising out of the use
of the product, including, without limitation, property damage, loss of value of the product or any third party
products that are used in or with the product, or loss of use of the product or any third party products that are
used in or with the product.
Table of contents
Other ELEVATE Automobile Accessories manuals


