Elicom Electronic S200 User manual
USER MANUAL
PRICE COMPUTING SCALE
S200
Rev.1.3

2
CONTENTS
1. INTRODUCTION.................................................................................................................................................................. 3
1.1 PRECAUTIONS..................................................................................................................................................................... 3
2. INSTALLATION ................................................................................................................................................................... 3
2.1 PACKAGE CONTENTS.......................................................................................................................................................... 3
2.2 METAL PAN ASSEMBLY........................................................................................................................................................ 4
2.3 PLACING AND LEVELLING THE SCALE................................................................................................................................. 4
2.4 POWER CONNECTION ......................................................................................................................................................... 4
2.5 RECHARGEABLE BATTERY .................................................................................................................................................. 5
2.5.1 Fitment............................................................................................................................................................................. 5
2.5.2 Charging.......................................................................................................................................................................... 5
3. OVERVIEW .......................................................................................................................................................................... 6
3.1 DIMENSIONS........................................................................................................................................................................ 6
3.2 DISPLAY............................................................................................................................................................................... 7
3.3 KEYBOARD .......................................................................................................................................................................... 7
3.4 VIEW FROM BELOW ............................................................................................................................................................. 8
3.5 CONNECTIONS..................................................................................................................................................................... 8
3.5.1 RS232 interface port...................................................................................................................................................... 8
3.5.2 Scale to PC interface cable.......................................................................................................................................... 8
4. OPERATION ........................................................................................................................................................................ 9
5. USER SETTINGS.............................................................................................................................................................. 14
5.1 MENU NAVIGATION............................................................................................................................................................ 14
5.2 USER SETTINGS MENU -OVERVIEW ................................................................................................................................ 14
6. TECHNICAL DATA............................................................................................................................................................ 17

3
1. INTRODUCTION
This document contains information about how to install and operate your S200 price computing
scale. Please read carefully the manual before using the device.
1.1 Precautions
•Use the manufacturer approved power adapter provided with the scale. The use of
improper type of adapter could damage the device.
•Do not place loads heavier than the maximum weight limits specified in this document.
•Place loads carefully on the weighing pan.
•Do not immerse the scale in water or any other liquids.
•Do not use the scale in hazardous environments.
•The scale should be used in environments free from dust, high humidity, corrosives,
vibrations, extreme temperature fluctuations and excessive air movements.
•Do not place the scale on unstable surfaces.
•Avoid placing the scale near heaters or in direct sunlight.
•Switch off and disconnect the scale from the power supply before cleaning or servicing.
•Always grab the scale from the bottom when moving, do not grab the weighing pan.
•Disposal of this product and its accessories should be in accordance with your local
regulations.
2. INSTALLATION
2.1 Package Contents
Inside the package you should find:
✓Scale
✓User manual
✓Metal pan
✓Rechargeable Li-on battery 3.7V (optional)
✓Power adapter (AC 5V/500mA)
✓RS232 interface cable (optional)

4
2.2 Metal Pan Assembly
Place the metal pan on top of the scale as shown in the image below and push gently
downwards.
Fig. 2.1 –Fitting metal pan
2.3 Placing and Levelling the Scale
Ensure the scale is placed on a levelled and stable surface free from vibrations and away from
direct sunlight.
Once you have located the scale, level it by adjusting the four rotational regulation feet at the
bottom of the device so the bubble in the level indicator positioned under the front display is fully
centered.
Fig. 2.2 –Levelling indicator
2.4 Power Connection
S200 is powered through the manufacturer approvedAC power adapter. First connect the
adapter cord to the scale’s power input jack and then plug the adapter to the power outlet.
Fig. 2.4 –Power adapter cord connection
5
2.5 Rechargeable Battery
S200 has the option to be fitted with a rechargeable 3.7V Li-on battery which allows the scale to
operate independently from an external power supply making it perfect for outdoors usage.
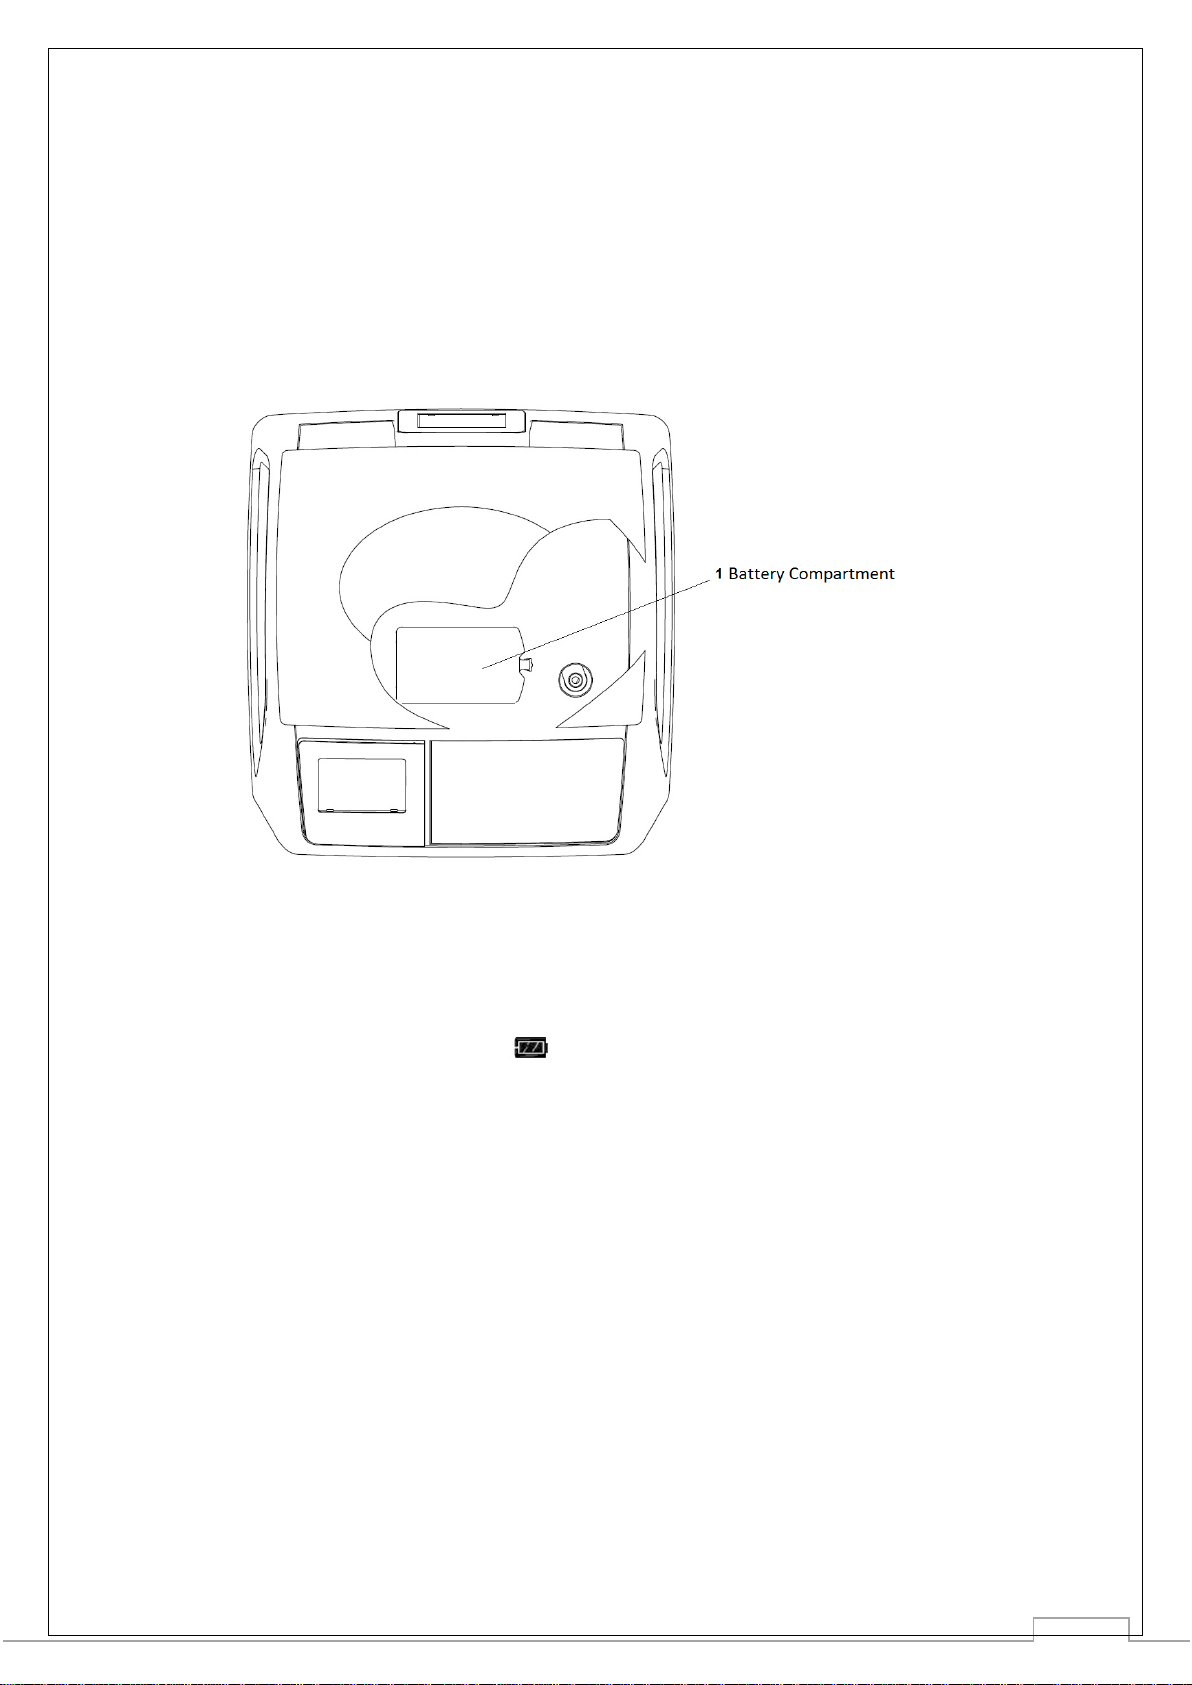
2.5.1 Fitment
Before placing the battery, you must ensure the scale is switched off and disconnected from the
power adapter cord. Remove the metal pan and then open the dedicated battery compartment as
illustrated in the image below. Connect your battery, make sure the compartment is fully closed
and finally place the metal pan back.
Fig. 2.3 –Battery Compartment
2.5.2 Charging
The battery is automatically charged once the power adapter is connected and the scale. The
battery charge level is indicated with the symbol provided in the front display. Once the
charge is critically low, the indicator will be fully empty and will start flashing. Please note the
scale will automatically switch off, once the battery is too low in order to protect it from damaging.

6
3. OVERVIEW
3.1 Dimensions
Fig. 3.1 - Model S200B Dimensions
Fig. 3.2 - Model S200L Dimensions

7
3.2 Display
Main Information shown on front display:
1.
Weight
2.
Unit price
3.
Total amount
4.
Metrological characteristics
5.
Level indicator
6.
Stability indicator
Table 3.1 –Main display information
Fig. 3.3 –Front Display
Additional Information shown on front display:
-0-
Gross weight is zero
Net
Net weight
T
Tare is displayed
PT
Preset Tare is active
X
Scale is in by-count mode
FIX
Unit price and/or tare is fixed
100g
100 g pricing is activated
Battery level indication
Table 3.2 –Additional information on front
3.3 Keyboard
S200 has a light touch waterproof membrane keyboard with 20 functional keys and 12 hot
keys for PLU commands.
Keyboard Functional Zones
1.
PLU preset keys
2.
Advanced function keys
3.
Numeric keys
4.
Basic functions
Table 3.3 –Keyboard
Information
Fig. 3.4 –Keyboard Layout
Further information about the keys functionality is provided in the following ‘Operation’ section.
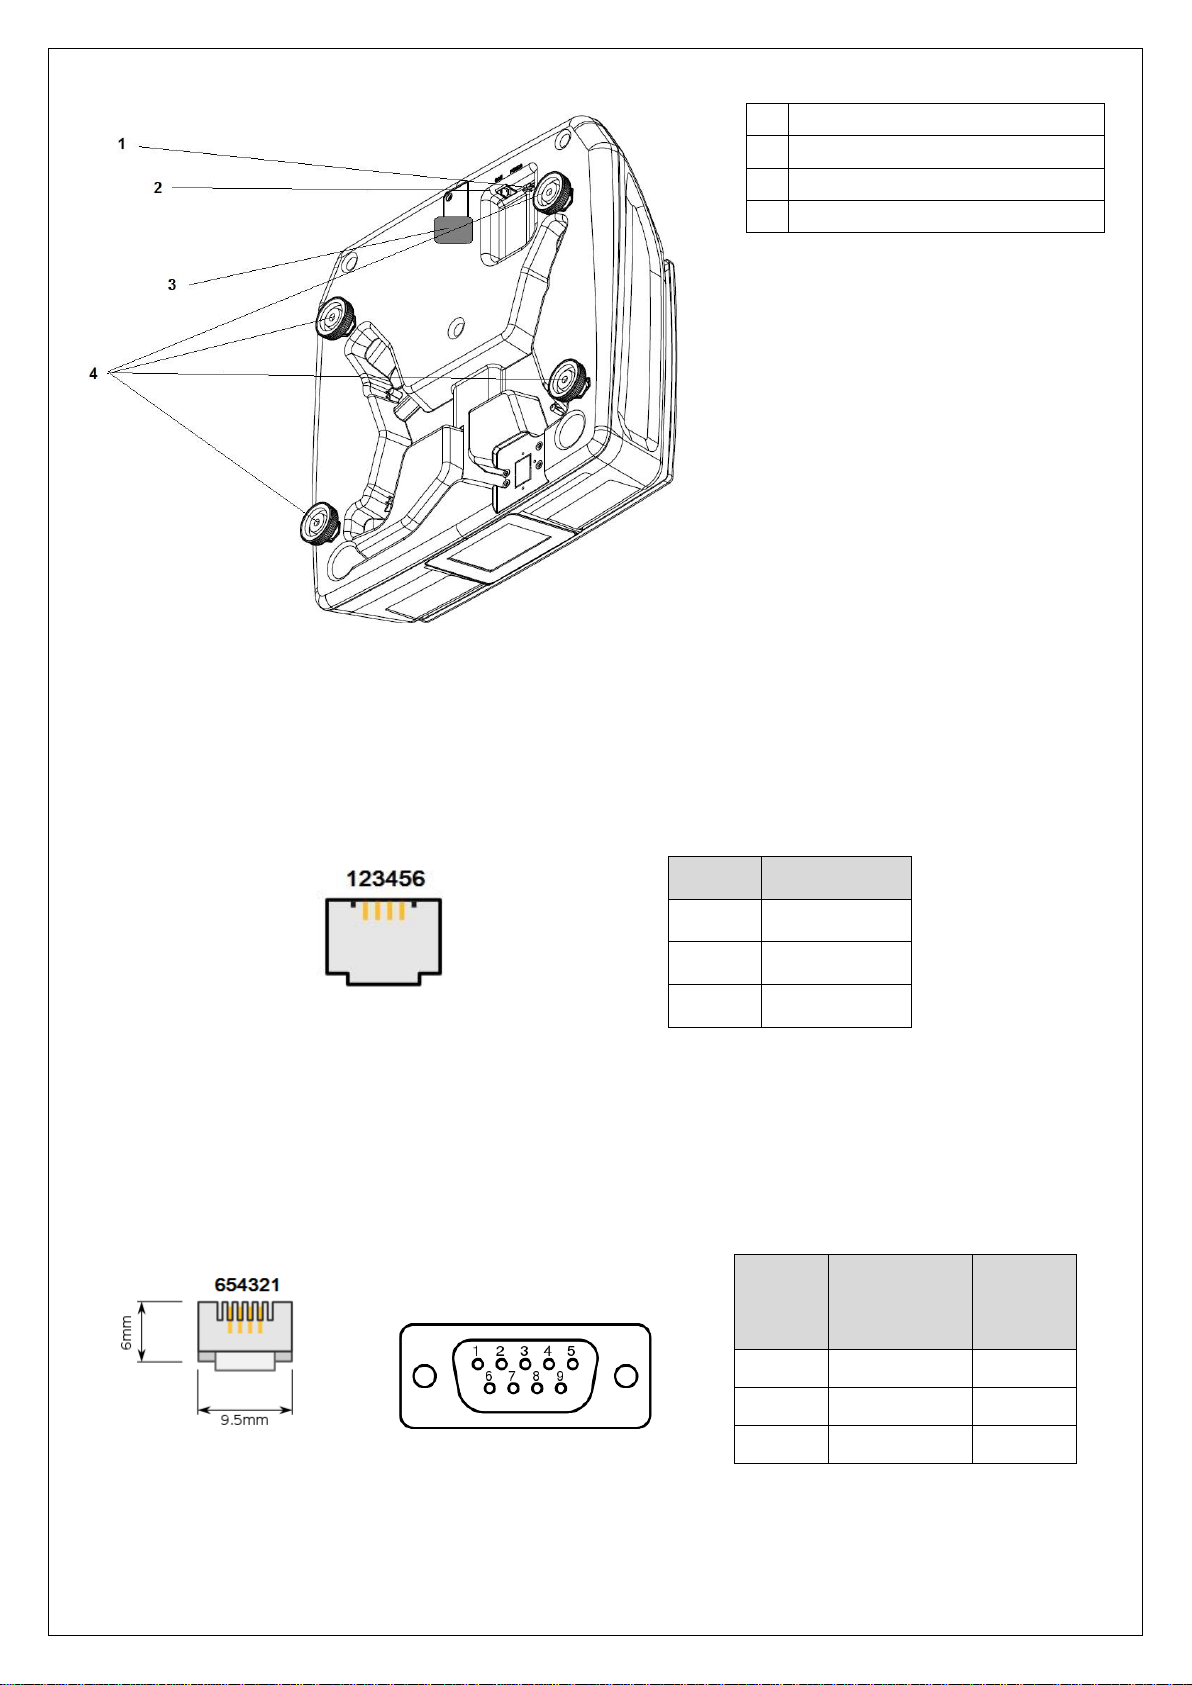
3.4 View from below
Fig. 3.5 –View from below
1.
Power supply connection
2.
RS232 interface connection
3.
Calibration seal
4.
Adjustable feet
Table 3.4 –View from below
information
3.5 Connections
3.5.1 RS232 interface port
Fig. 3.6 –RS232 port
Signal
RS232 Port
TXD
5
RXD
4
GND
3
3.5.2 Scale to PC interface cable
Scale Connector PC Connector
RJ11 6P4C DB9 Female
Fig. 3.7 –Scale to PC cable connectors
Signal
SCALE
Male
RJ11 6C4P
PC
Female
DB9
TXD
5
2
RXD
4
3
GND
3
5
4. OPERATION
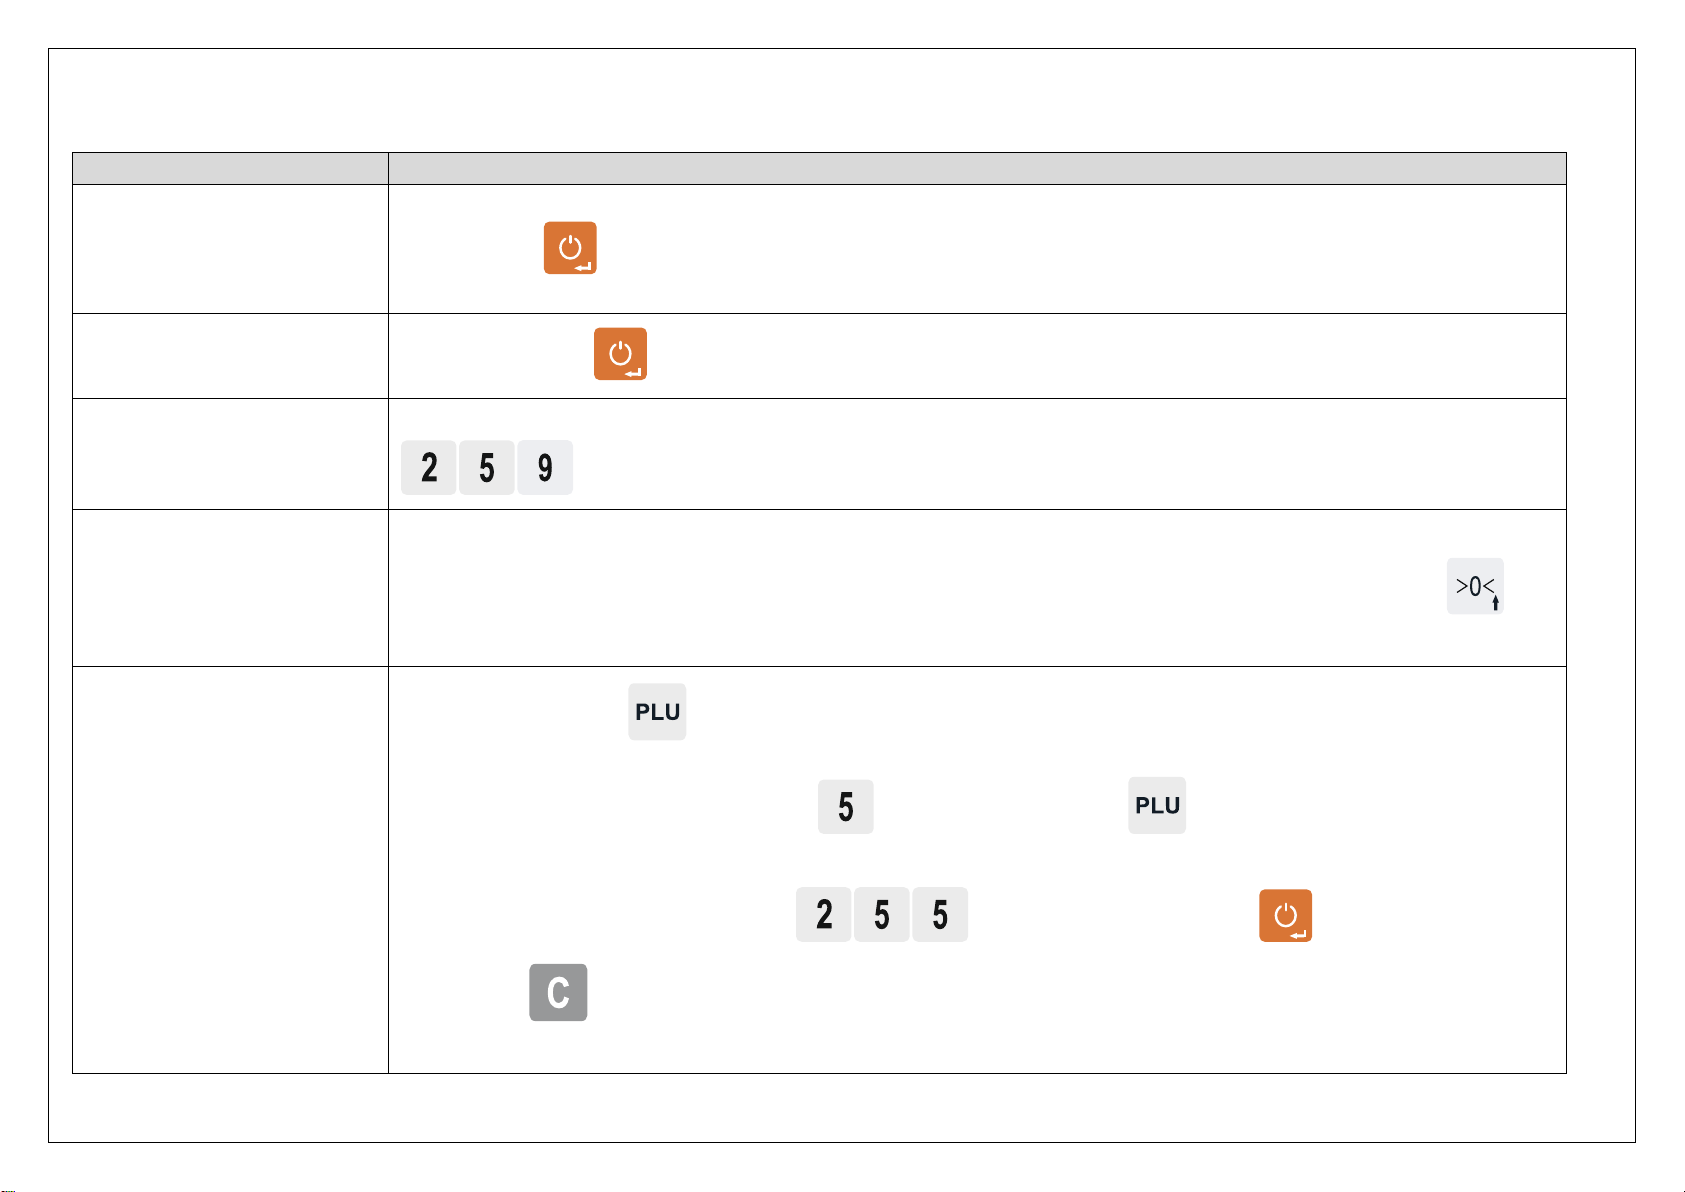
Operation
Description
4.1 Turning the Scale ON
Press the key key. At start up the scale runs a short display test procedure. All display segments light up briefly
and the software version is displayed in the price to pay line. The scale is ready to use once the weight display appears.
4.2 Turning the Scale OFF
Press and hold the key until you hear a beep.
4.3 Free price/kg input sale
If you would like to sell a product and enter a specific unit price e.g 2.59 €/kg, place the item on the scale and then enter
. This will automatically calculate the price for the item you are weighing.
4.4 Zeroing
Due to residues on the weighing pan or external influences, it is possible that the weight display of an unloaded weighing
pan to show a value different from 0.000kg. In such cases the scale can be rest back to zero by pressing the key.
Please note the maximum allowed deviation to be compensated by zeroing is +/- 2 % of the maximum scale capacity.
4.5 Creating a PLU
1. Press and hold the key for 2 seconds.
2. Enter a PLU number of your choice (e.g ) and store it by pressing . Please note the PLU number can be
between 1 and 70.
3. Enter a €/kg price of your choice (e.g ) and store it by pressing the key.
4. Press the key to exit the PLU mode.

Operation
Description
4.6 Storing a PLU to Hot keys
You can assign a hot key to the most frequently used PLUs as follows:
1. Enter a price/kg of your choice e.g. 2.55 €/kg .
2. Press and hold the hot key you have chosen (e.g. ) until you hear a long beep.
4.7 Calling PLU by keyboard
1. Place your item on the scale
2. Input PLU number (e.g. )
3. Press key and unit price as well as price to pay will be displayed.
4.8 Calling PLU by Hot keys
1. Place your item on the scale.
2. Press a hot key of your choice (e.g. ) and unit price as well as price to pay will be displayed.
Please note if 2 PLUs per hot key function is activated, double pressing the hot key will show the second saved price.
4.9 Calling PLU automatically
1. Auto PLU function needs to be activated in the user menu.
2. Place your item on the scale.
3. Input PLU number (e.g. ) and unit price as well as price to pay will be automatically displayed.
4.10 Working with TARE
1. Place Tare weight on the scale
2. Press key. The weight will be stored and the scale will show 0.000kg with the NET symbol being present.
3. Place your item. Now the scale will show only the NET weight of the weighted item.

Operation
Description
4.11 Manual TARE
When the exact TARE weight is known, you can manually set it:
1. Input known tare weight in grams and press
2. Place item to be weighed and input price to pay
Please note: - Manual Tare is indicated by the PT icon
- This function is not activated in legal for trade version
4.12 By-count operation
The by-count operation can be used when the scale is used to sell non-weighed items.
1. Enter price per unit
2. Press the key and enter quantity. Icon X is shown on the display.
3. Press the to exit by-count operation
4.13 Accumulating
This function is not activated in legal for trade version
1. Place your item on the scale.
2. Enter unit price and confirm by pressing the key.
The display will show:
- Number of sales on unit price line
- Total accumulation of price to pay
3. To exit accumulation and proceed with next weighed item press
4. To clear current accumulation press the key
Pointing Arrow on right side of the display is indication that there is current accumulation
To see current accumulation press Enter
Operation
Description
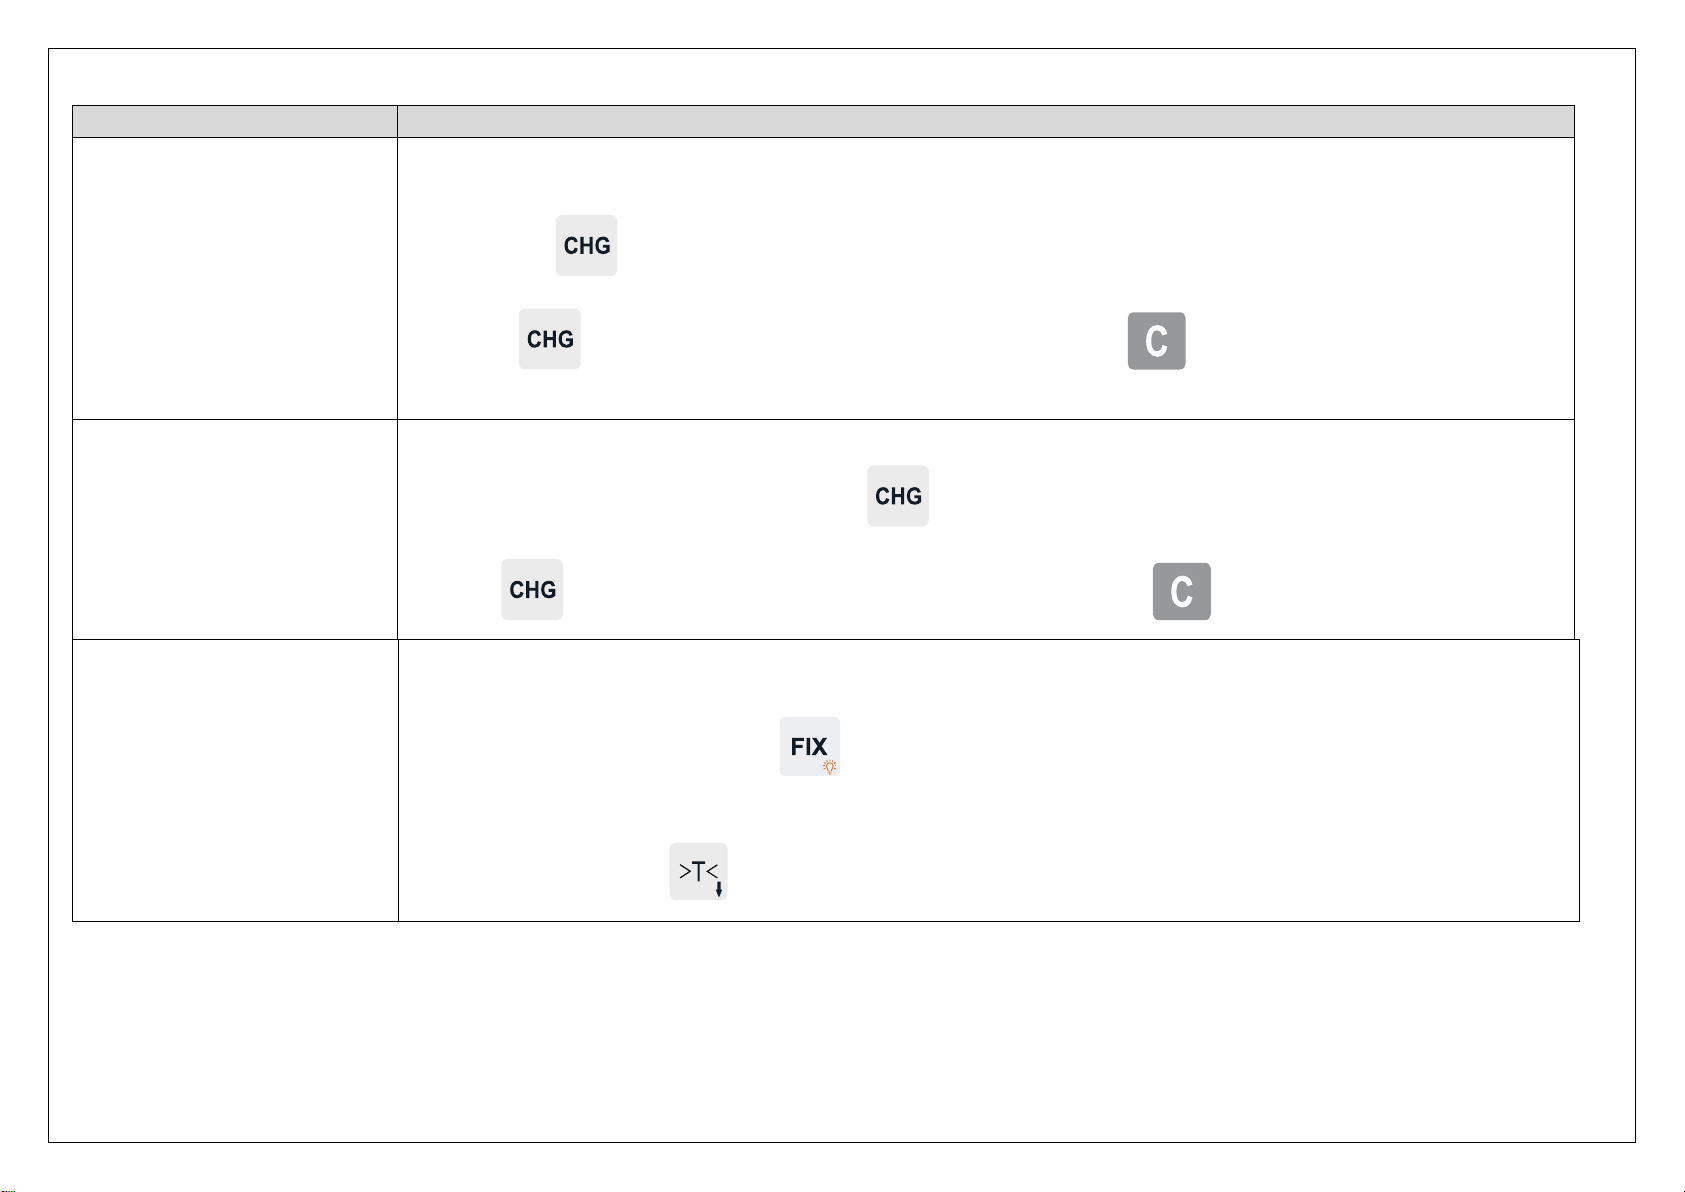
4.14 Change function (single
item)
1. Ensure the change function is activated in the user menu.
2. Place your item on the scale and enter the unit price.
3. Press the key and enter the amount that has been paid.
4. Press and change amount will appear in the €/kg line. Press to exit.
4.15 Change function
(multiple items)
1. Use the accumulation function as described.
2. When total accumulation is displayed press and enter the amount which has been paid.
3. Press and the change amount will appear in the €/kg field. Press to exit.
4.16 Fix unit price and/or tare
In normal mode, unit price and tare are cleared each time the scale is unloaded. If you would like to lock the unit price
and tare values, you can use the FIX function.
1. To activate the FIX mode, hold the key until “FIX” icon appears.
2. Unit price can be changed by simply entering a new value.
3. To clear the tare, press key after the scale is unloaded.

Table 4.1 –Operation
Operation
Description
4.17 100g function
100g pricing mode is used in areas were unit price is carried out by 100g instead of by 1kg.
1. Place your item on the scale.
2. Hold the key until “100g” icon is displayed.
3. Input unit price per 100g and price to pay will be automatically displayed.
4. To exit the 100g mode, hold key until the icon disappears.
4.18 Backlight function
In dim conditions you can activate the display backlight to get a clear reading from the display.
- To switch the display backlight ON/OFF hold the key until the scale beeps.
- This function will only work when there is no weight loaded on the scale.
- Backlight brightness and time duration can be set from the menu.
4.19 Battery voltage check

5. USER SETTINGS
5.1 Menu Navigation
In order to access the user settings menu and navigate through its content use the following
commands:
1. Enter user settings menu by pressing and holding the key for 2.5 seconds.
2. Use the arrows and to go up and down.
3. Use and to save and change new settings.
4. To exit the menu press .
5.2 User Settings Menu - Overview
Table 5.1 presents the menu content as it appears in the scale’s main display and provides
information about how the various functions supported by S200 can be configured.
Menu Content
Description
1. Backlight
−−−
Switch backlight illumination ON/OFF.
>
2. Beeper
−−−
Switch beep sound ON/OFF.
>
3. Auto Power off
−−−
Auto Power Off adjustment. Setting is
in minutes from 0-60. When set to 0,
mode is OFF (Default setting is OFF)
−
4. Auto Sleep
mode
−−−
Auto Sleep adjustment. Settings from 0
to 200 seconds possible. When set to
0, mode is OFF (Default setting is OFF)

15
5. Tare Clearing
−−−
Switch ON/OFF Auto Tare Clearing.
−
>
6. Fix function
−−−
Switch ON/OFF Fix function.
>
7. Auto PLU call
−−−
Switch ON/OFF Auto PLU call mode.
−
>
8. PLU price
storing
−−−
Switch ON/OFF PLU storing function.
>
9. 2 PLUs per hot
key
−−−
Switch ON/OFF the function allowing
you to store 2 PLUs to the same hot
key.
>
10. By-count
operation
−−−
Switch ON/OFF By-count operation.
−
>
11. RS232
communication
speed
−−−
RS232 speed setting. Possible
settings:
1 - 4800 bps
2 - 9600 bps
12.
Communication
protocol format
−−−
Possible protocol formats:
0. 7 data bits, parity even, 1 stop bit
1. 7 data bits, parity odd, 1 stop bit
2. 7 data bits, no parity, 1 stop bit
3. 8 data bits, no parity, 1 stop bit
4. 7 data bits, parity even, 2 stop bits
5. 7 data bits, parity odd, 2 stop bits
6. 7 data bits, no parity, 2 stop bits
7. 8 data bits, no parity, 2 stop bits
16
13. Protocol type
−−−
Possible protocol types:
0. CAS
1. ELICOM
2. DIBAL
3. METTLER
4. DELMAC
14. Weighing
sensitivity filter
−−−
Possible settings:
0. Low digital filtering
1. Medium digital filtering
2. High digital filtering
15. Factory
settings reset
−−−
Possible settings:
ON: Reset user setup to factory
settings
OFF: Do not reset user setup
>
16. Backlight time
duration
−−−
Set up backlight ON period. Possible
settings from 0 to 200 seconds.
(Default setting: 5 seconds)
17. Blacklight
brightness
−−−
Set up backlight brightness. Possible
settings: from 0 to 7. (Default setting: 7)
18. Change
function
−−−
Switch ON/OFF Change function.
>
Table 5.1 –Menu Content and Settings

17
6. TECHNICAL DATA
Table 6.1 –S200 Technical data
Display: 3 line LCD display with backlight
Keyboard: Light touch waterproof membrane keyboard, 20 functional keys and 12hot keys for PLU
PLU Memory: 70 PLU
Functions: Price computing, Semiautomatic Tare, Manual Tare, Zeroing, Sales by 100g,
Totalization, Quick PLU storing, Change function, Price and Tare FIX function
Power saving functions: Auto OFF function timer, Sleep mode timer (wake up by pressing any
key), Backlight brightness adjustment, Backlight time adjustment
Interface: RS232
Communication protocols: multi communication protocols available
Power supply: Adaptor AC 5V/500mA, Rechargeable Li-on battery 3.7V
Battery life: up to 30 days with sleep mode
Working temperature: -10C to 40C
Humidity: 15% to 85% RH
Model
Display type
Weighing Range
Max capacity
(e)
Platform
S200B 3 / 6
Flat
Multi interval
3 / 6 kg
1 / 2 g
290mm x 221mm
S200B 6 / 15
Flat
Multi interval
6 / 15 kg
2 / 5 g
290mm x 221mm
S200B 15 / 30
Flat
Multi interval
15 / 30 kg
5 / 10 g
290mm x 221mm
S200B 6
Flat
Single interval
6 kg
2 g
290mm x 221mm
S200B 15
Flat
Single interval
15 kg
5 g
290mm x 221mm
S200B 30
Flat
Single interval
30 kg
10 g
290mm x 221mm
S200L 3 / 6
Pole display
Multi interval
3 / 6 kg
1 / 2 g
290mm x 221mm
S200L 6 / 15
Pole display
Multi interval
6 / 15 kg
2 / 5 g
290mm x 221mm
S200L 15 / 30
Pole display
Multi interval
15 / 30 kg
5 / 10 g
290mm x 221mm
S200L 6
Pole display
Single interval
6 kg
2 g
290mm x 221mm
S200L 15
Pole display
Single interval
15 kg
5 g
290mm x 221mm
S200L 30
Pole display
Single interval
30 kg
10 g
290mm x 221mm

18
Main office and manufacturing
pl. Saedinenie 5
Silistra 7500
BULGARIA
Tel.: +359 86 820 200, 882 255
fax: +359 86 820 555
www.elicom.bg
Table of contents
Other Elicom Electronic Scale manuals


