Elinchrom EL-Skyport 19351 User manual
Transmitter
Instructions for use
Istruzioni per l’uso
Инструкция по эксплуатации
Instrucciones para el uso

EL-Skyport
Transmitter
19351
C o n t e n t s :
Features 2
Battery Installation 3
Hot-shoe connector 3
Operating Instructions 3
Frequency Channel 4
Trigger Modes 5
Integrated SYNC Socket 5
Elinchrom RX Features 5
EL-Skyport Modules 6
Troubleshooting 7
CE Statements 7
FCC Compliance and
Advisory Statement 8
Disposal and recycling 8
English 1 - 8
Français 9 - 16
Deutsch 17 - 24
Italiano 25 - 32
Русский 33 - 40
Español 41 - 48
Gurantee 49 - 50
English
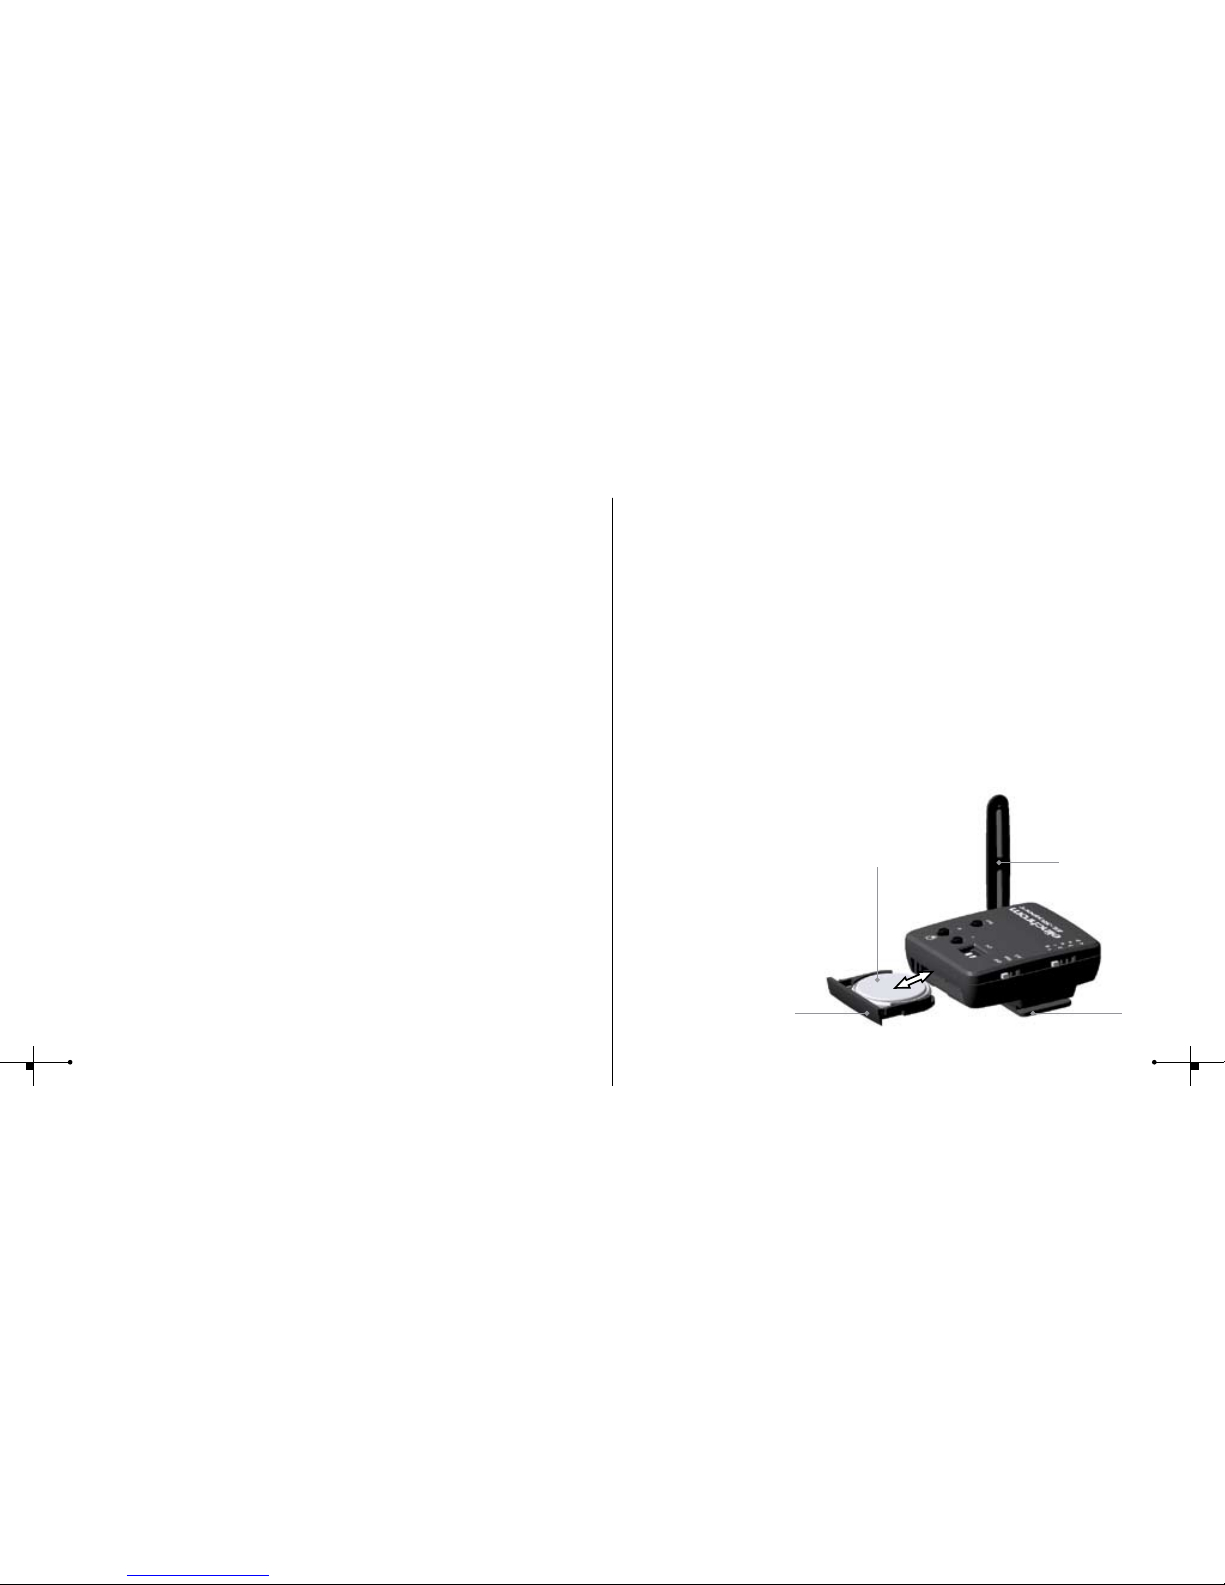
Hot-shoe with
SYNC socket
Battery drawer
(19373)
Battery (19373)
Minus pole on top Flexible swivel
Antenna 360
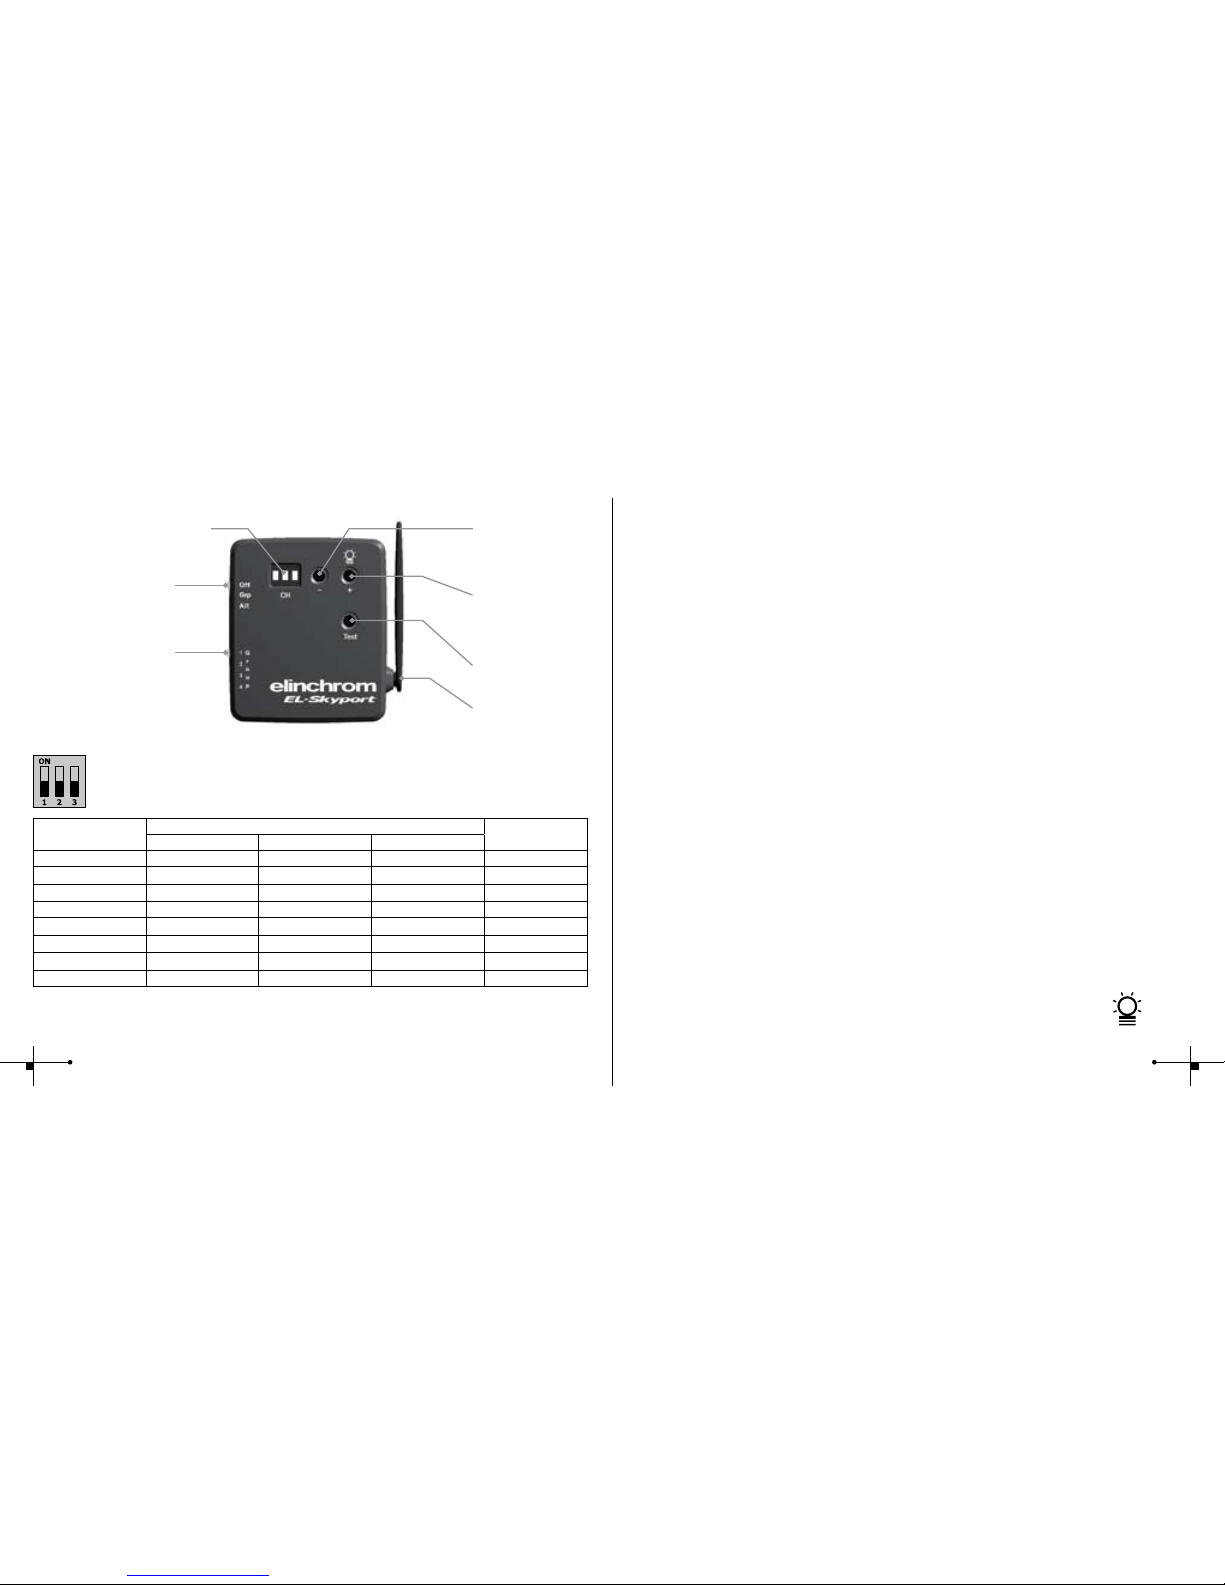
Fig. 1
Battery Installation
1. Pull the battery drawer out carefully
2. Place the Lithium battery, see Fig. 1 for polarity
3. Close the battery drawer
! CAUTION:
• Ensure correct polarity / minus pole on top
• Use original Elinchrom Lithium Battery only (CR2430 3.0V 19372)
• Remove battery if the EL-Skyport Transmitter is not to be used for some time
• Never short-circuit battery poles
Hot-shoe connector
The standard Hot-shoe connector with middle contact synchronisation is designed for all
digital and analogue cameras with maximum sync output of 3V
(The middle contact is the positive pole).
Operating Instructions
EL-Skyport
Transmitter
19351
Operating instructions :
2.4 GHz digital wireless
Flash Trigger Transmitter
Features
EL-Skyport ash trigger is designed with the latest 2.4 GHz Digital Wireless Technology.
• Up to 1/1000s shutter speed
• 5 selectable trigger modes
• 8 frequency channels
• 40 Bit security encryption
• Up to 50 m range indoors
• Up to 120 m range outdoors
• Battery life up to 3 Months
• RX-feature buttons (Remote Control)
• Test trigger button
• Integrated Hot-shoe (middle contact)
• SYNC-socket for direct connection
You will appreciate the convenience of this professional, and powerful wireless device.
Note:
Shutter speed and distance range is inuenced by reections (from ceilings, walls, oor, furniture and
other equipment) and interference from other 2.4 GHz electronic equipment. For best performance the
Transmitter and Receiver antenna should have direct sight, without any walls or objects in between.
23

Trigger Modes
The EL-Skyport Transmitter can trigger EL-Skyport Receiver modules
in the following modes:
1. Off èUnit is OFF
2. Select Grp - Group(1 to 4)
èSet switch to Grp. and select Group 1 to 4
èAll corresponding EL-Skyport Receivers with the
same selected Group (1 to 4) are triggered
3. ALL
èMode switch is set to ALL
èAll corresponding EL-Skyport Receivers are triggered regardless of which Group is selected.
Integrated SYNC Socket
The integrated 2.5mm Mono Jack socket is for direct connection to the camera or lens
Elinchrom RX Features
If the EL-Skyport Transmitter is used with the latest EL-Skyport Transceivers RX, the
following EXTRA features are available:
Depending upon which Group is selected, The following RX-unit settings can be applied:
1. Power increase in 1/10 f-stops
èpress push button +to increase the power of selected Group (or ALL) RX-units
in 1/10 f-stops
2. Power decrease in 1/10 f-stops
è press push button - to reduce the power of selected Group of (or ALL) RX-units
in 1/10 f-stops
3. Modelling lamp toggle
è press and hold the push button + longer than 2 seconds before release,
to toggle modelling lamp of the selected Group of (or ALL) RX-units.
Frequency Channel
Note:
Transmitter and the corresponding Transceivers RX or Universal Receivers must have
the same frequency channel setting !
Fig. 2
Flexible swivel
Antenna 360
Flash Test
RX feature button
Power increase
OR modelling lamp
toggle
RX feature button
Power decrease
Frequency
channel selector
MODE switch
GROUP switch
Frequency
Channel
Slide Button conguration Frequency
/ Mhz
123
1 (default) Off Off Off 2456
2On Off Off 2458
3Off On Off 2460
4On On Off 2462
5Off Off On 2469
6On Off On 2471
7Off On On 2473
8On On On 2475
No te :
After setting, switch Transmitter OFF and ON again to activate the new frequency channel change.
45
Troubleshooting
Should an error occur, rst check the following points:
Having this problem? Check the following points:
No Flash unit is triggered by the
Transmitter
Mode “All” is selected
ØCheck if the Transmitter is switched ON
ØCheck battery polarity
ØCheck if the Receiver module is connected correctly to the unit
ØCheck if the frequency selector switch is set to the same
channel
Some Flash units are not trig-
gered by the Transmitter
Mode “Grp” is selected
ØCheck if the Channel selector switch is set to the same Group
ØReduce distance to any “not working” units
TEST ash works, but the camera
will not trigger Flash unit
ØCheck hot-shoe tting
ØChoose SYNC cable instead of hot-shoe connection
Distance range is too small ØReposition the unit
ØIncrease the distance to walls and ceilings
ØPosition the antenna of Transmitter and Receiver
ØUse an RX extension cable to reduce the distance between
modules
CE Statements
This device has been tested and found to comply with the requirements set
up in the council directive on the approximation of the law of member states
relating to EMC Directive 89/336/EEC, Low Voltage Directive 73/23/EEC and
R&TTE Directive 99/5/EC
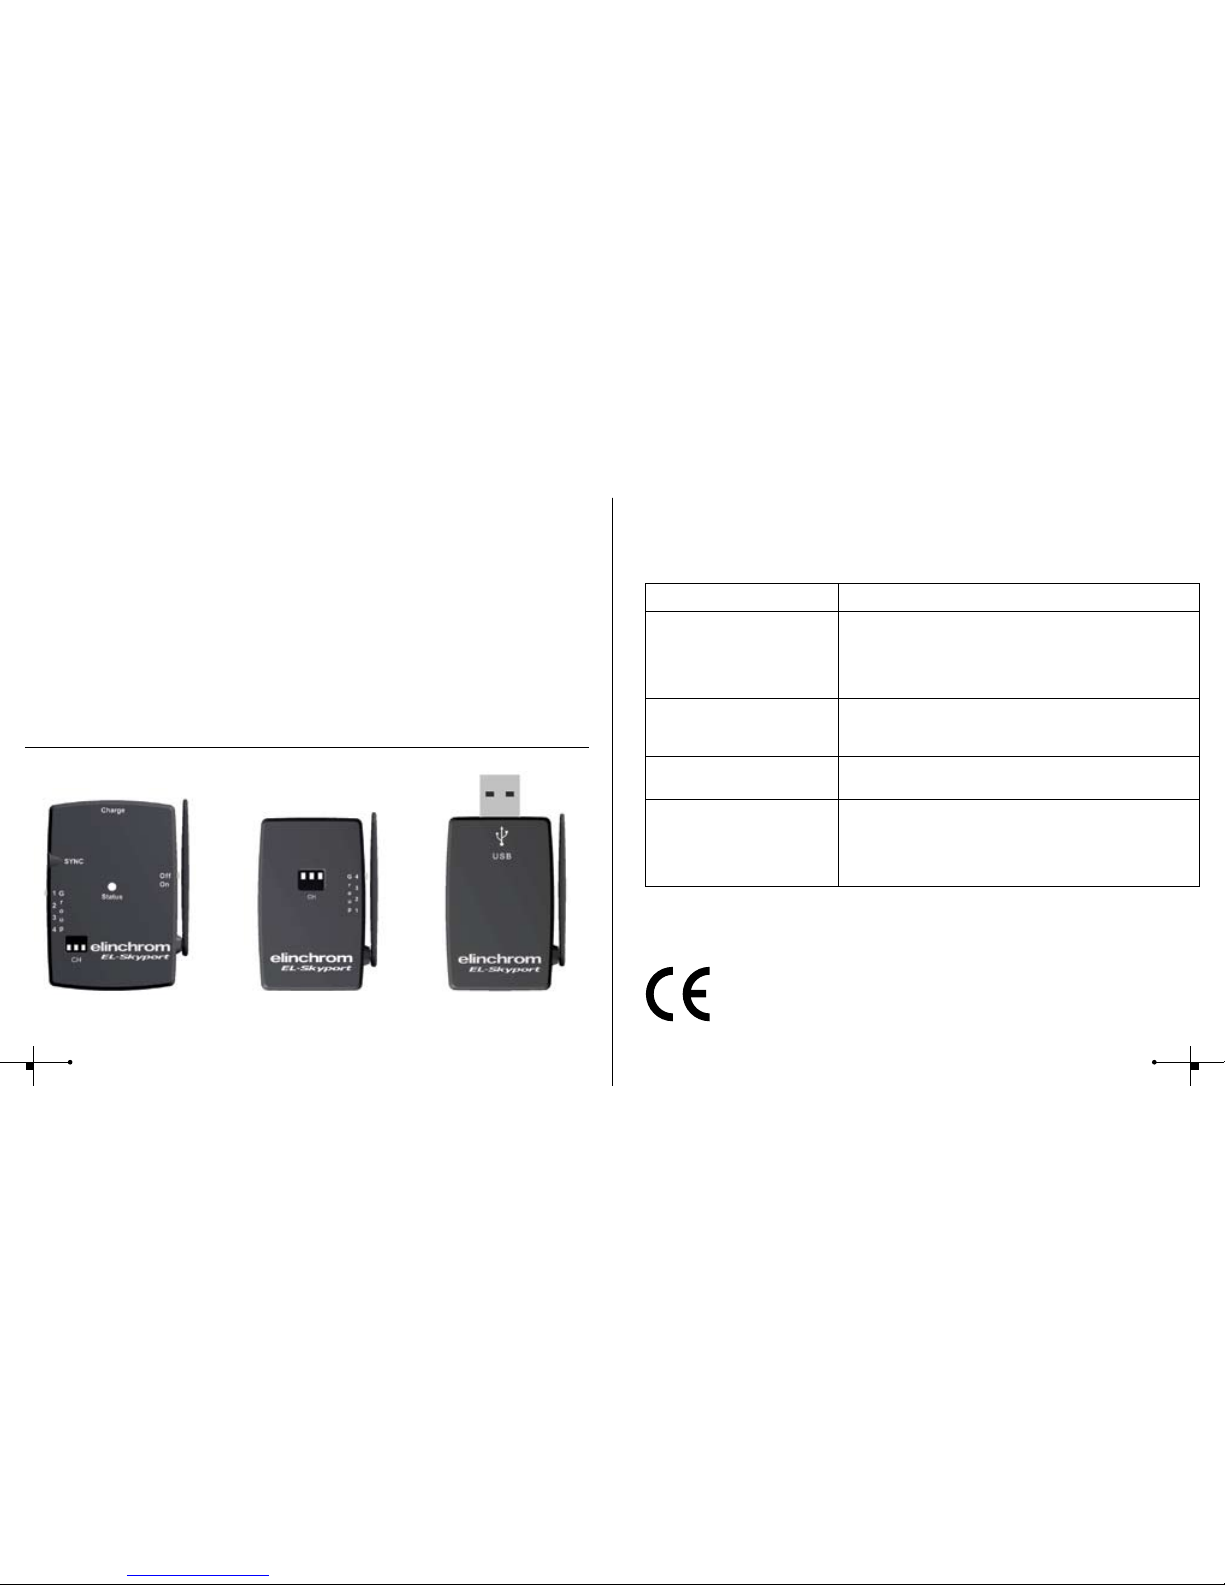
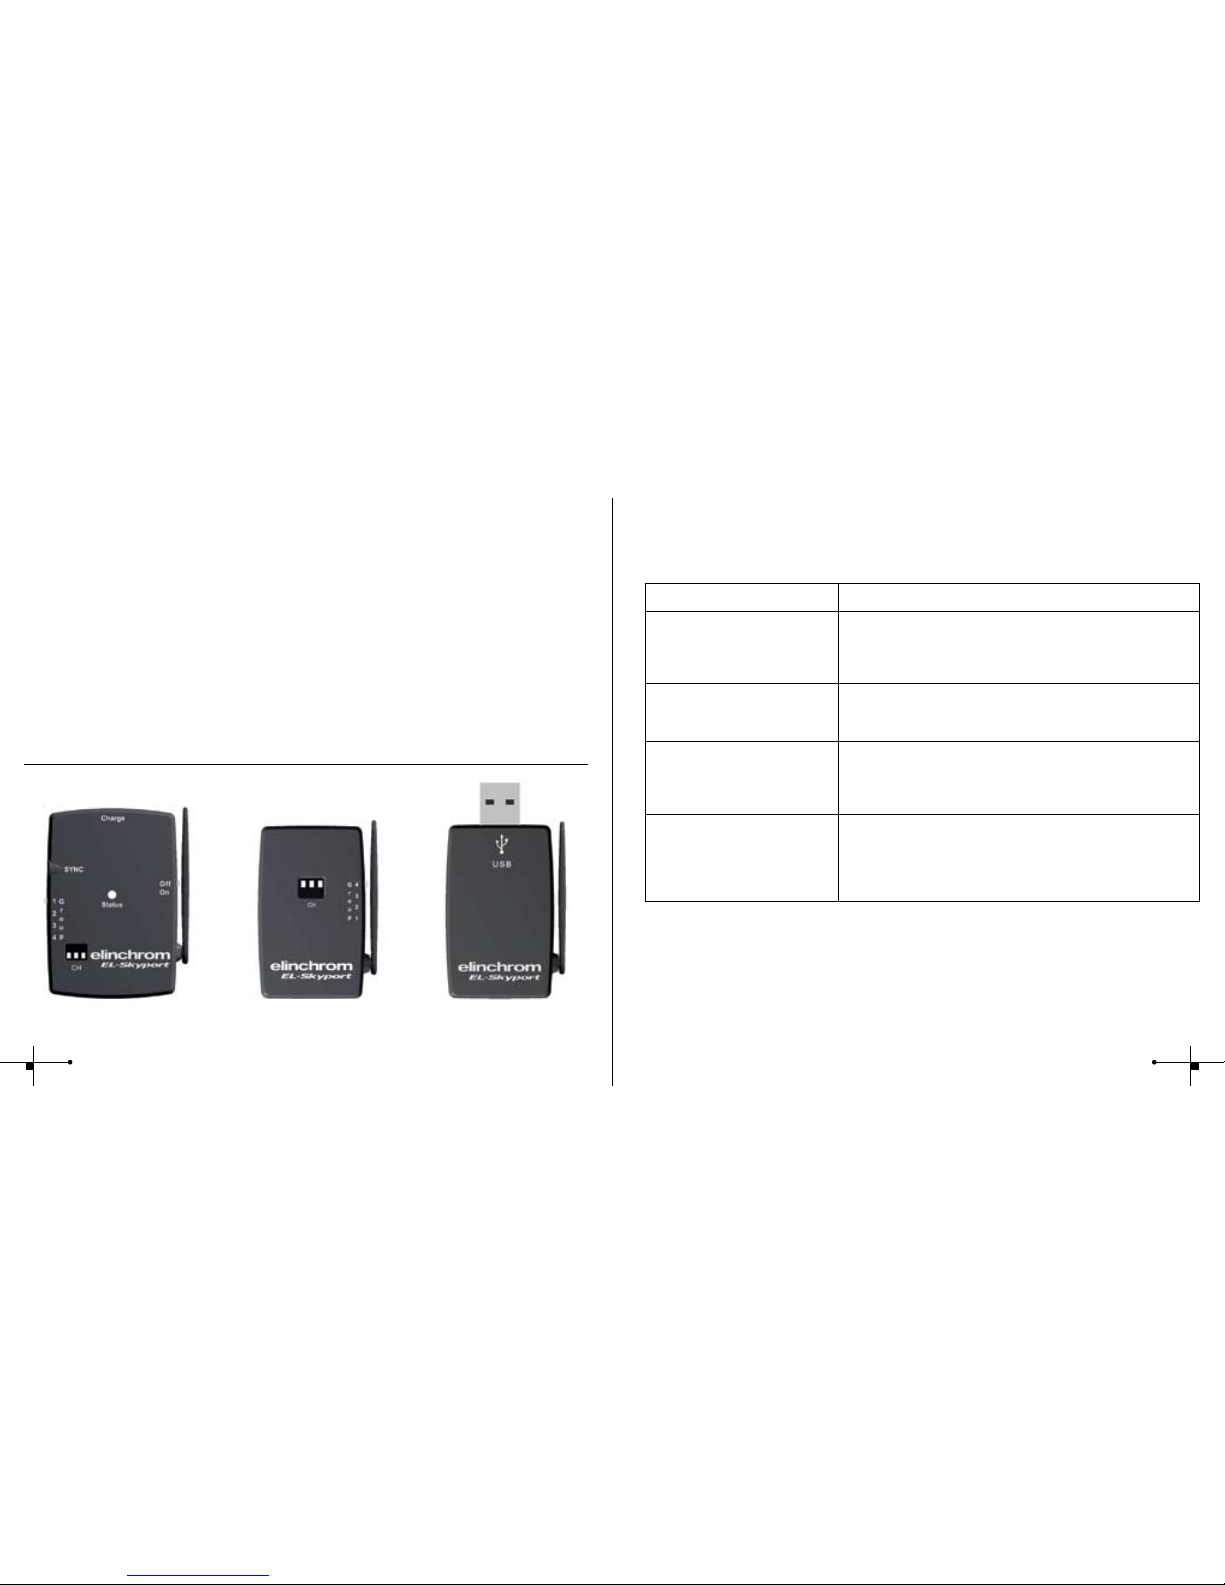
EL-Skyport Modules
EL-Skyport Universal 19352
• Universal Receiver for all makes of Flash having a SYNC socket!
EL-Skyport Transceiver RX 19353
• This Transceiver is only for Elinchrom RX units. The module operates all RX
features with the EL-Skyport / ERS- software and triggers the ash
EL-Skyport USB RX 19354
• To operate RX ash units via computer the USB module should be used in
conjunction with the EL-Skyport Transceivers RX and the ERS- software
Universal
19352
Transceiver RX
19353
USB RX
19354
67
FCC Compliance and Advisory Statement
This device complies with Part 15 of the FCC rules. Operation is subject of the following two
conditions: 1. this device may not cause harmful interference, and 2. this device must accept
any interference received, including interferences that may cause undesired operation.
The equipment has been certied to comply with the limits for a Class B computing device
pursuant to Part 15 of the FCC Rules. These limits are designed to provide reasonable pro-
tection against harmful interference in a residential installation. This equipment generates,
uses, and can radiate radio frequency energy and, if not installed or used in accordance with
the instructions, may cause harmful interference to radio communications. However, there
is no guarantee that interference will not occur in a particular installation. If this equipment
does cause harmful interference to radio or television reception, which can be determined
by switching the equipment off and on. The user can try to correct the interference by the
following measures:
1. Reorient or relocate the receiving antenna
2. Increase the separation between the equipment and receiver
3. Connect the equipment to an outlet on a circuit different from that to which the
receiver is connected.
4. Consult the dealer or an experience radio/TV technician for help Changes or modication
not expressly approved by the party responsible for compliance could avoid the user’s
authority to operate the equipment.
Disposal and recycling
This device has been manufactured to the highest possible degree from materials
which can be recycled or disposed of in a manner that is not environmentally
damaging. The device may be taken back after use to be recycled, provided that
it is returned in a condition that is the result of normal use. Any components not
reclaimed will be disposed of in an environmentally acceptable manner.
If you have any question on disposal, please contact your local ofce or your local
ELINCHROM agent (check our website for a list of all ELINCRHOM agents world wide).
EL-Skyport
Transmitter
19351
Sommaire :
Caractéristiques 10
Mise en place de la pile 11
Sabot pour glissière ash 11
Mode d’emploi 11
Fréquence du canal radio 12
Modes d’utilisation du
groupe de déclenchement 13
Prise de synchronisation
intégrée 13
Fonctions de réglage
des ashes RX 13
Autres modules “EL-Skyport” 14
Dépannage 15
Déclaration de
conformité CE 16
Mise au rebut et recyclage 16
8

Sabot ash avec
prise jack 2,5mm
pour câble Synchro.
Tiroir de pile
(19373)
Pile (19372)
Pôle négatif
(-) en haut Antenne exible est
pivotante sur 360°
Fi g. 1
Mise en place de la pile
1. Ouvrez délicatement le tiroir de pile.
2. Mettez en place la pile au lithium, selon Fig. 1.
3. Refermez avec soin le tiroir de pile.
ATTENTION:
• Placez la pile avec le pôle négatif (-) en haut.
• Utilisez exclusivement la pile lithium fournie par Elinchrom (CR2430 3.0V 19372).
• En cas d’inutilisation prolongée retirez la pile.
• Ne court-circuitez jamais les deux pôles de la pile.
Sabot pour glissière ash
Le sabot pour ash possède un contact central pour une liaison directe avec la synchronisa-
tion de l’appareil photo, qu’il soit numérique ou argentique. La tension de sortie de synchro-
nisation est de 3V, le contact central est connecté au pôle positif (+).
Mode d’emploi
EL-Skyport
Transmitter
19351
Guide de l’utilisateur :
Dispositif de déclenchement sans l, basé sur l’utilisation
d’ondes radio HF de la bande de fréquences 2,4GHz.
Caractéristiques:
Ce déclencheur de ash exploite la plus récente technologie en matière de communication
radio numérique sans l (wireless).
• Vitesse d’obturation supérieure au 1/1000s
• 5 modes de déclenchement à choix
• 8 canaux de fréquence à choix
• Codage de sécurité sur 40 bits
• Portée supérieure à 50m à l’intérieur
• Portée supérieure à 120m à l’extérieur
• Durée de vie de la pile plus de trois mois
• Touche de fonctions (RX) complémentaires
• Touche de contrôle de déclenchement (Test)
• Sabot pour glissière ash (avec contact central)
• Prise synchro pour connexion par câble
Vous apprécierez la simplicité et la facilité d’utilisation de ce système de communication
professionnel sans l.
Remarque :
La portée de transmission et la vitesse de l’obturateur dépendront de la conguration et de la
géographie des lieux. Les réexions sur le plafond, sur les murs, ou sur des obstacles comme des
meubles, des étagères, ou des interférences avec d’autres systèmes radio utilisant la même fréquence de
communication, peut en limiter les performances. Vous obtiendrez un fonctionnement optimal de ce maté-
riel, en dirigeant et en orientant les antennes en regard l’une de l’autre.
10 11
Modes d’utilisation du groupe de déclenchement
L’émetteur “EL-Skyport” (transmitter) peut déclencher les récepteurs “EL-Skyport”
(Receiver) dans les modes suivants:
1. Off è le ash est arrêté, pas de déclenchement
2. Grp sélectionné – groupe les ashes (1 à 4)
èChoisir Grp : pour contrôler les différents (groupes 1 à 4)
è Tous les récepteurs, ayant la même conguration de groupe (1 à 4) seront déclenchés.
3. ALL (tous)
èLe commutateur est mis sur le choix (ALL) tous.
èTous les récepteurs en service sont déclenchés. indépendament du goupe de fréquence
sélectionnée (1 à 4).
Prise de synchronisation intégrée
Une prise jack femelle (unipolaire) de 2.5mm, est intégrée au sabot pour la connexion avec
l’appareil photo ou l’objectif.
Fonctions de réglage des ashes RX
Si l’émetteur “EL-Skyport” (transmitter) est utilisé conjointement avec le récepteur (transceivers
RX), les options suivantes de réglage sont disponibles:
Fonctions disponibles et applicables à tous les ashes (All), ou uniquement à tous les
ashes du même groupe (Grp):
1. Augmentation de puissance
è presser sur + pour augmenter tous les ashes de 1/10.
2. Diminution de puissance
è presser sur – pour diminuer tous les ashes de 1/10
3. Allumage ou extinction de la pilote (bascule)
è presser sur la touche + et la maintenir plus de 2 secondes avant de la
relâcher. La fonction sera inversée à la prochaine pression.
Fréquence du canal radio
Remarque:
Pour communiquer entre eux, l’émetteur et l’émetteur/récepteur (transceiver) RX ou le
récepteur universel RX, doivent avoir la même fréquence de communication.
Fig. 2
Antenne exible et
pivotante sur 360°
Touche de
déclenchement
manuel d’un ash.
Touche de fonctions
(RX) Diminution de
puissance
Sélecteur d’une des
8 fréquences radio
(choix d’un canal)
Sélecteur du mode
de déclenchement
(1 groupe ou tous)
Sélecteur du groupe
Fréquence du
canal
Conguration des intérrupteurs Fréquence
en Mhz
1 2 3
1 (par défaut) Off Off Off 2456
2On Off Off 2458
3Off On Off 2460
4On On Off 2462
5Off Off On 2469
6On Off On 2471
7Off On On 2473
8On On On 2475
Remarque:
Après une modication de numéro de canal, il faut éteindre et réallumer l’émetteur RX (transmitter RX)
pour activer le dernier choix.
Touche de fonctions
(RX) Augmentation
de la puissance ou
(bascule) allumage et
extinction de la pilote.
12 13
Dépannage
En cas de problèmes, vériez les points suivants:
Problèmes? Vériez les points suivants:
Le récepteur Universel n’est pas
déclenché par l’émetteur.
Le mode “ALL” (tous)
est sélectionné.
ØVériez que l’émetteur est sur ON (actif).
ØQue de la pile est mise dans le bon sens, le – en haut.
ØQue le récepteur est correctement branché.
ØQue les fréquences utilisées sont identiques.
Certains ashes ne sont pas
déclenchés par le émetteur.
Le mode “Grp” est sélectionné.
Ø Qu’ils aient le même N° de groupe (1-4).
Ø Rapprochez les ashes qui ne déclenchent pas.
Le ash fonctionne avec la tou-
che test, mais l’appareil photo ne
déclenche pas le ash.
ØVériez que l’émetteur est correctement xé sur la
glissière pour ash.
ØQue le cordon synchro est correctement enché sur le
socle pour ash.
La distance est insufsante. le
système ne fonctionne pas cor-
rectement.
ØÉloignez le ou les ashes de l’émetteur.
ØEloignez-vous des murs.
ØRéorientez les antennes de l’émetteur et du récepteur.
ØEmployez un cordon prolongateur RX pour réduire la
distance entre des modules.
Autres modules “EL-Skyport”
EL-Skyport récepteur universel (19352)
• Récepteur universel, utilisable sur tous les ashes munis d’une prise de synchronisation.
EL-Skyport émetteur/récepteur RX (19353)
• Module de déclenchement et de communication, il est destiné uniquement aux ashes
RX. Ce module, supporte toutes les fonctionnalités avancées du système de
communication “EL-Skyport” avec un ordinateur PC ou Mac.
EL-Skyport USB RX (19354)
• Ce module est indispensable pour communiquer et piloter les ashes depuis un
ordinateur, il est à utiliser conjointement avec le logiciel “ERS-Software” et l’émetteur/récepteur
(tranceiver) 19353.
Universal
19352
Transceiver RX
19353
USB RX
19354
14 15

EL-Skyport
Transmitter
19351
Inhaltsverzeichnis :
Funktionen 18
Batterie Installation 19
Hot-shoe Adapter 19
Betriebsanleitung 19
Frequenzkanäle 20
Blitzauslösung 21
Integrierte SYNCHRON Buchse 21
Elinchrom RX Funktionen 21
EL-Skyport Module 22
Fehlerbehandlung 23
CE-Kennzeichnung 24
Entsorgung und Recycling 24
Deutsch
Déclaration de conformité CE
Cet équipement a été testé et déclaré conforme aux directives européennes
ci-après : EMC Directive 89/336/EEC, basse tension Directive 73/23/EEC et
R&TTE Directive 99/5/EC.
Mise au rebut et recyclage
Ce symbole, apposé sur ce produit ou sur son emballage, indique que si un
jour ce produit devait être éliminé, il ne devrait pas être traité avec les déchets
ménagers. Il devrait être remis à un point de collecte, approprié pour le recyclage
des équipements électroniques. En respectant ces conseils vous aiderez à préve-
nir les conséquences potentiellement négatives pour l’environnement et la santé humaine. Le
recyclage des matériaux aidera à préserver les ressources naturelles. Pour toute information
supplémentaire vous pouvez contacter déchetterie ou l’agent Elinchrom de votre pays. La liste
des agents est disponible sur notre site : www.elinchrom.com
16

EL-Skyport
Transmitter / Sender
19351
Betriebsanleitung :
2.4 GHz digital wireless
Flash Trigger Transmitter
Funktionen
EL-Skyport Flash Trigger ist mit der neuesten 2.4 GHz Digital Wireless Technologie
ausgestattet.
• Verschlusszeit bis zu 1/1000 s.
• 5 wählbare Auslösemöglichkeiten
• 8 Frequenzkanäle
• 40 Bit Sicherheitsverschlüsselung
• Bis zu 50 m Reichweite im geschl. Raum
• Bis zu 120 m Reichweite im Freien
• Bis zu 3 Monate Batterielebensdauer
• RX- Funktionsknöpfe (Fernbedienung)
• Test Auslöseknopf
• Integrierter Hot-shoe (Mittelkontakt)
• SYNC-Buchse für direkten Kameraanschluss
Testen Sie die professionellen und leistungsstarken Funktionen von EL-Skyport System.
Anmerkung:
Auslösezeit und Reichweite werden durch Reektionen (Decken, Wände, Einrichtung und Equipment) und
Interferenzen durch andere 2.4GHz Systeme beeinusst. Für optimale Funktion, sollten sich zwischen
Sender und Empfänger keine Objekte benden und eine direkte Sicht zwischen den Modulen erhöht die
Reichweite und Zuverlässigkeit.
Hot-shoe mit
SYNC Buchse
Batteriefach
(19373)
Li-Batterie (19372)
Minuspol oben Flexible
Antenne 360°
Bild. 1
Batterie Installation
1. Ziehen Sie vorsichtig das Batteriefach heraus
2. Legen Sie die Li-Batterie lt. Bild. 1 polaritätsrichtig ein.
3. Schließen Sie das Batteriefach
! ACHTUNG:
• Achten Sie auf richtige Polarität / Minuspol oben
• Verwenden Sie nur original Elinchrom Li-Batterien (CR2430 3.0V 19372)
• Entfernen Sie die Batterie, falls Sie den EL-Skyport Sender längere Zeit nicht verwenden.
• Niemals die Batteriepole kurzschließen
Hot-shoe Adapter
Der Standard Hot-shoe Adapteranschluss mit Mittelkontakt ist für die meisten Analog- bzw.
Digitalkameras konzipiert. (Der Mittelkontakt ist der Pluspol).
Betriebsanleitung
18 19

Frequenzkanäle
Anmerkung:
Sender und Empfänger müssen in der gleichen Frequenzkanaleinstellung betreiben werden!
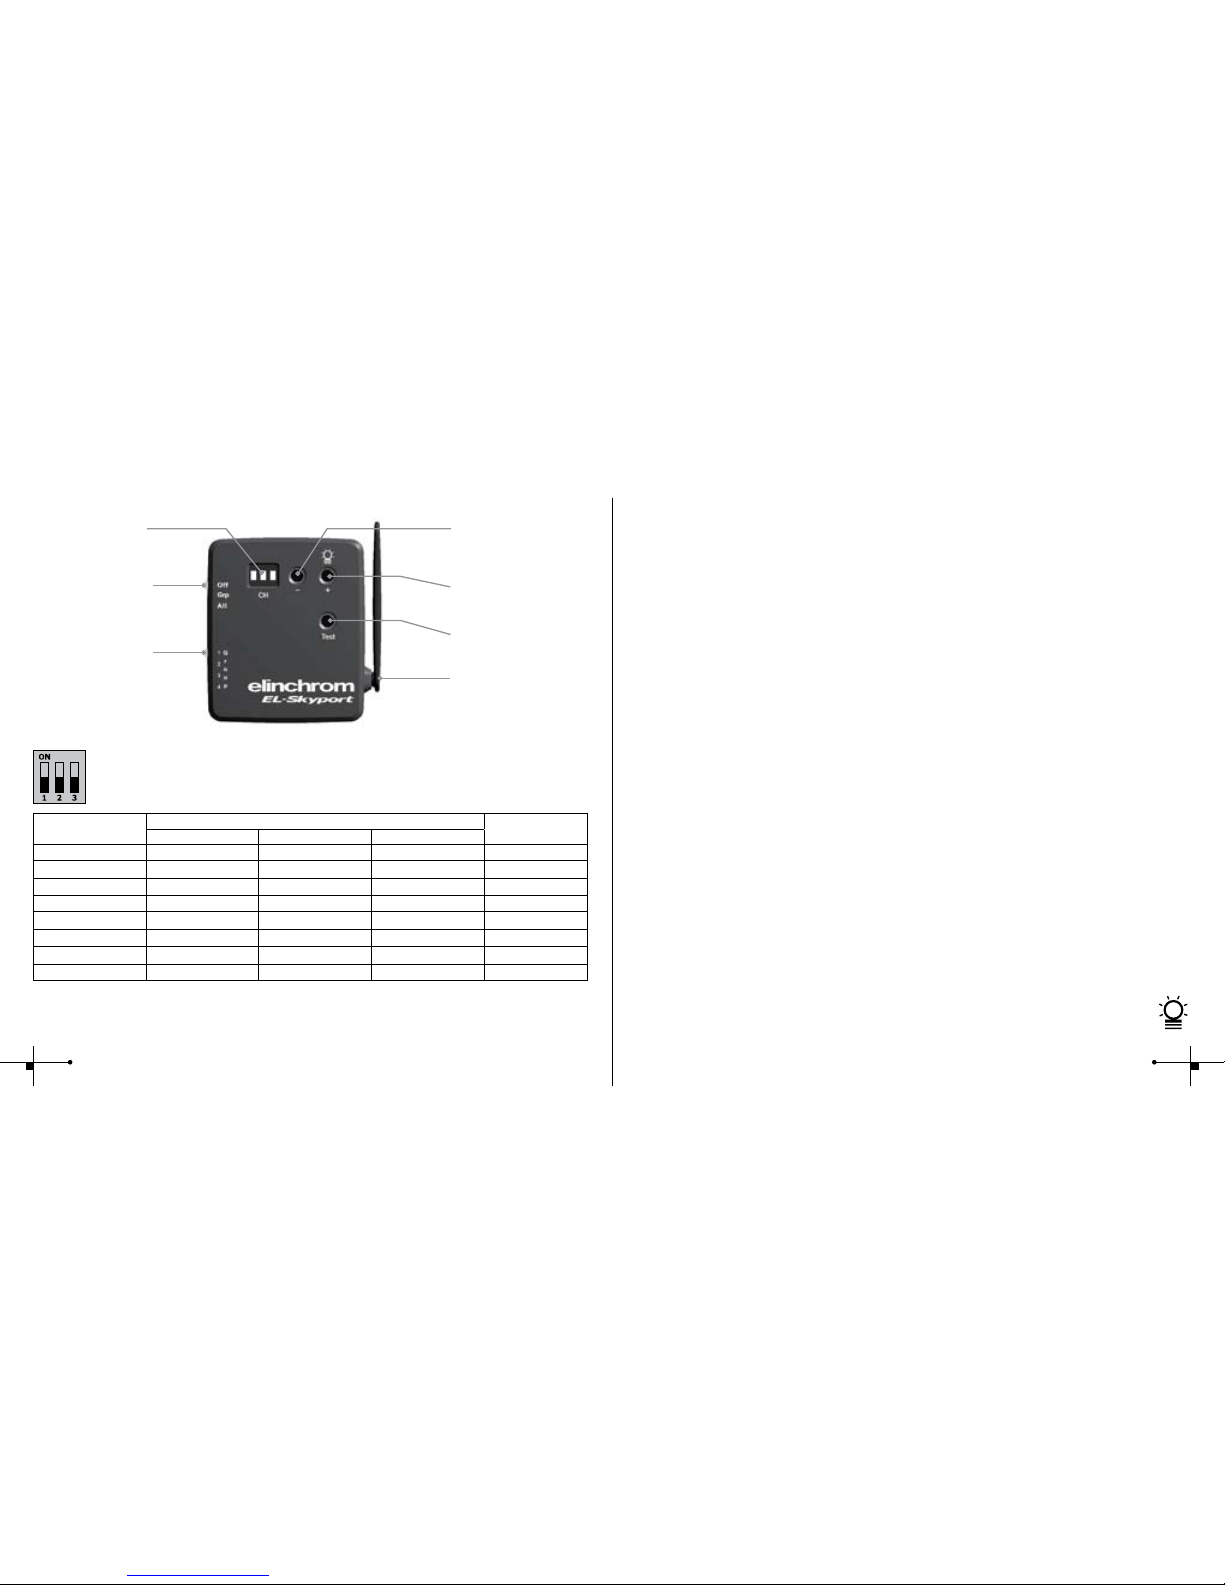
Bild. 2
Flexible
Antenne 360°
Testknopf
RX Funktionsknopf
Leistungserhöhung
oder
Pilotlicht Schalter
RX Funktionsknopf
Leistungsreduzierung
Frequenz
Kanal Schalter
MODE Schalter
GROUP Schalter
Frequenz
Channel
Schiebeschaltereinstellung Frequenz
/ Mhz
123
1 (normal) Off Off Off 2456
2On Off Off 2458
3Off On Off 2460
4On On Off 2462
5Off Off On 2469
6On Off On 2471
7Off On On 2473
8On On On 2475
Anmerkung:
Die Frequenzeinstellung wird erst nach erneutem Einschalten aktiviert.
Blitzauslösung
Der EL-Skyport Sender kann in folgende Auslöse Betriebsarten konguriert werden
1. Off èSender ist Aus
2. Grp - Gruppen(1 to 4)
è Wählen Sie Grp. und selektieren Sie die Gruppe 1 to 4
èAlle zugehörigen EL-Skyport Empfänger mit der gleichen Gruppe (1..4) werden ausgelöst
3. ALL
è Wählen Sie ALL
è Alle zugehögen EL-Skyport Empfänger werden ausgelöst, egal welche Gruppe selektiert ist.
Integrierte SYNCHRON Buchse
Die integrierte 2.5mm Mono Buchse ist für eine direkte Verbindung mit dem Kameraobjektiv
Elinchrom RX Funktionen
Wenn der EL-Skyport Sender mit den neuesten EL-Skyport Transceivers RX betrieben wird,
stehen noch folgende EXTRA Funktionen zur Verfügung:
Je nachdem welche Gruppe selektiert ist, können folgende RX Funktionen eingestellt werden:
1. Leistungserhöhung in 1/10 f-stop
èMit der Taste + kann die Leistungseinstellung der selektierten Gruppe (oder aller) RX-
Geräte um 1/10 Blendenwerte erhöht werden
2. Leistungsreduzierung in 1/10 f-stop
è Mit der Taste - kann die Leistungseinstellung der selektierten Gruppe (oder aller) RX-
Geräte um 1/10 Blendenwerte reduziert werden.
3. Pilotlichteinstellungen
è wird die Taste + länger als 2 Sekunden gedrückt und losgelassen, wird das
Einstelllicht ein- bzw. ausgeschaltet.
20 21

EL-Skyport Module
EL-Skyport Universal 19352
• Universal Receiver ist ein universeller Empfänger für alle Blitzgeräte mit
SYNCHRON Buchse.
EL-Skyport Transceiver RX 19353
• Dieser Transceiver ist nur für Elinchrom RX Geräte. Alle Einstellungen können mit
der EL-Skyport/ ERS- Software fernbedient werden. Zusätzlich kann mit dem
Transmitter (Sender) der Blitz ausgelöst werden.
EL-Skyport USB RX 19354
• Erlaubt die Fernbedienung aller Elinchrom RX Geräte per Computer in Verbindung mit
Transceiver RX Modul.
Fehlerbehandlung
Prüfen Sie beim Auftreten von Problem folgende Punkte:
Haben Sie dieses Problem? Bitte prüfen Sie genannte Punkte:
Keine Blitzauslösung aller Geräte
durch den Transmitter
Mode “All” ist selektiert
ØIst der Transmitter eingeschaltet
ØPrüfen Sie die Polarität der Batterie
ØPrüfen Sie den korrekten Anschluss des Empfängers
ØPrüfen Sie die korrekte Frequenzkanaleinstellung
Einige Blitzgeräte werden nicht
ausgelöst
Mode “Grp” ist selektiert
Ø Prüfen Sie die korrekte Gruppenkanaleinstellung
Ø Verringern Sie den Abstand
TEST Auslösung geht, aber keine
Auslösung durch die Kamera
ØKorrekte Verbindung zum Hot-shoe prüfen
ØVerwenden Sie ein SYNC Kabel anstelle der Hot-shoe
Verbindung
Reichweite zu gering ØPlazieren Sie Ihr Blitzlichtgerät anders
ØGrößerer Abstand zu Wänden und Decke
ØÄndern Sie die Ausrichtung der Antenne von Transmitter und
Receiver/Transceiver
ØBenutzen Sie ein RX Verlängerungskabel um die Distanz
zu verringern
Universal
19352
Transceiver RX
19353
USB RX
19354
22 23

CE-Kennzeichnung
Dieses Gerät erfüllt in der ausgelieferten Ausführung die Anforderungen der EG
Richtlinie 89/336/EWG „Elektromagnetische Verträglichkeit“ und 73/23/EWG
“Niederspannungsrichtlinie” und die Richtlinie nach R&TTE 99/5/EC
Entsorgung und Recycling
Dieses Gerät wurde weitestgehend aus Materialien hergestellt, die
umweltschonend entsorgt und einem fachgerechten Recycling zugeführt werden
können. Nach seinem Gebrauch wird das Gerät zurückgenommen, um es einer
Wiederverwertung bzw. wertstofichen Verwertung zuzuführen, soweit es in
bestimmungsgemäßen Gebrauch entspricht. Nicht verwertbare
Geräteteile werden sachgemäß entsorgt. Bei Fragen zur Entsorgung wenden Sie sich bitte and
Ihre Verkaufsstelle. Eine Liste aller Verkaufsstellen in Ihrer Nähe nden Sie auf unserer
Homepage www.elinchrom.com.
EL-Skyport
Transmitter
19351
Indice :
Caratteristiche 26
Installazione della batteria 27
Connettore a contatto caldo 27
Istruzioni di funzionamento 27
Canale diFrequenza 28
Modalità di innesco 29
Spina sincro integrata 29
Caratteristiche Elinchrom RX 29
Moduli EL-Skyport 30
Soluzione guasti 31
Dichiarazioni CE 32
Smaltimento e riciclo 32
Italiano
24

EL-Skyport
Transmitter
19351
Istruzioni di funzionamento :
Trasmettitore innesco ash con tecnologia
digitale senza li a 2.4 GHz
Caratteristiche
L’innesco ash EL-Skyport è progettato con la più recente tecnologia digitale
senza li a 2.4 GHz .
• Fino a 1/1000s di tempo di otturazione
• 5 modalità di innesco selezionabili
• 8 canali di frequenza
• Criptaggio di sicurezza da 40 Bit
• Campo di applicazione no a 50 m in interno
• Campo di applicazione no a 120 m in esterno
• Durata della batteria no a 3 mesi
• Pulsanti caratteristiche RX (Controllo Remoto)
• Pulsante prova innesco
• Contatto caldo integrato (contatto intermedio)
• Presa sincro per collegamento diretto
Apprezzerete la praticità di questo apparecchio senza li professionale ed efcace.
Nota:
La gamma di tempi di otturazione e distanze è inuenzata dal riesso (da softti, pareti, pavimento, mobili
e altre apparecchiature) e dall’interferenza di altre apparecchiature elettroniche da 2.4 GHz. Per ottenere
le prestazioni migliori, le antenne del trasmettitore e del ricevitore dovrebbero avere percezione diretta
senza pareti od oggetti frapposti fra loro.
Contatto caldo con
presa di sincronizzazione
Vano batteria
(19373)
Batteria
(19372) polo meno in alto Antenna essibile
ruotabile di 360°
Fi g. 1
Installazione della batteria
1. Estrarre attentamente il vano batteria
2. Inserire la batteria al litio, cfr. Fig. 1 per la polarità
3. Chiudere il vano batteria
! ATTENZIONE:
• Assicurarsi che la polarità sia corretta / tenere il meno verso l’alto
• Usare unicamente la batteria al litio originale Elinchrom (CR2430 3.0V 19372)
• Togliere la batteria se il trasmettitore EL-Skyport non deve essere usato per un po’ di tempo
• Non mandare in corto circuito i poli della batteria
Connettore a contatto caldo
Il connettore standard a contatto caldo con sincronizzazione a contatto intermedio è progettato
per tutti gli apparecchi fotograci digitali ed analogici con massima uscita di sincronizzazione di
3V (Il contatto intermedio è il polo positivo).
Istruzioni di funzionamento
26 27
Canale diFrequenza
No ta :
Il trasmettitore e i corrispondenti Transceiver o Ricevitori Universali RX devono avere
le stesse impostazioni per il canale di frequenza!
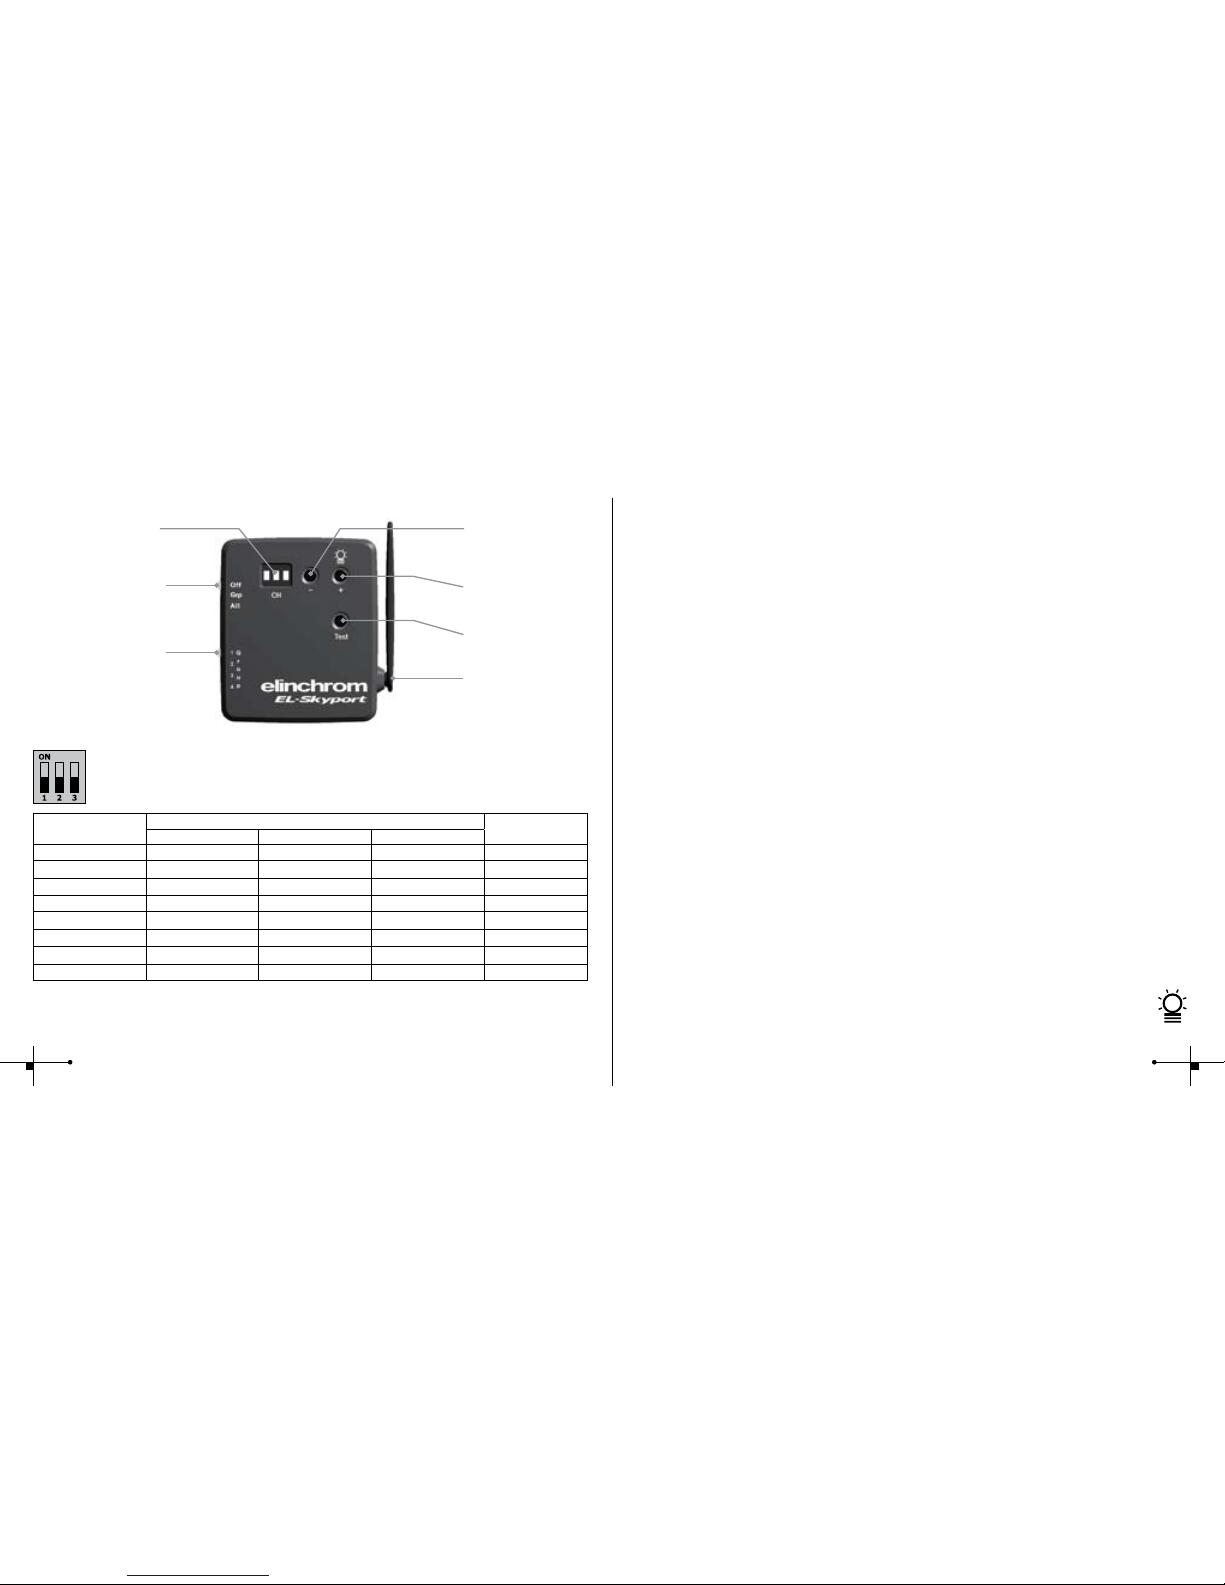
Fig. 2
Flexible swivel
Antenna 360°
Flash di prova
Pulsante caratteristica RX
Aumento di potenza
O scatto per lamapada
di effetto
Pulsante caratteristica RX
Diminuzione di potenza
Selettore
canale di frequenza
Interruttore
MODALITA’
Interruttore
GRUPPO
Canale di
frequenza
Congurazione pulsante di scorrimento Frequenza
/ Mhz
1 2 3
1 (predenito) Off Off Off 2456
2On Off Off 2458
3Off On Off 2460
4On On Off 2462
5Off Off On 2469
6On Off On 2471
7Off On On 2473
8On On On 2475
No ta :
Dopo l’impostazione, spegnere ed accendere di nuovo il trasmettitore per attivare la nuova frequenza/il
cambio di canale.
Modalità di innesco
Il trasmettitore EL-Skyport può dare impulso ai moduli di ricezione EL-Skyport nei
seguenti modi:
1. Spento èl’unità è SPENTA
2. Seleziona gruppo – Gruppi (da 1 a 4)
èImposta l’interruttore su Gruppi e seleziona i gruppi da 1 a 4
è Vengono resi attivi tutti i ricevitori EL-Skyport corrispondenti che hanno gruppo uguale a
quello selezionato (da 1 a 4)
3. TUTTI
èL’interruttore MODALITA’ è impostato su TUTTI
è Vengono attivati tutti i ricevitori EL-Skyport corrispondenti indifferentemente da quale
Gruppo è stato selezionato.
Spina sincro integrata
La spina a jack mono integrata da 2.5mm serve per il collegamento diretto all’apparecchio
fotograco o all’obiettivo
Caratteristiche Elinchrom RX
Se il trasmettitore EL-Skyport è utilizzato con i Transceiver RX EL-Skyport di ultima
generazione, sono disponibili le seguenti caratteristiche EXTRA:
A seconda di quale gruppo venga scelto possono trovare applicazione le seguenti impostazioni
per l’unità RX:
1. Aumento di potenza in1/10 aperture diaframma f
èPremere pulsante + per aumentare la potenza del Gruppo selezionato (o di TUTTI) di
unità RX in 1/10 di aperture diaframma f
2. Diminuzione di potenza in 1/10 aperture diaframma f
è Premere il pulsante – per ridurre la potenza del Gruppo selezionato (o TUTTI) di unità
RX in 1/10 di aperture diaframma f
3. Scatto dellla lampada di effetti
è premere e mantenere premuto il pulsante + per più di 2 secondi prima di rilasciare
per innescare la lampada di effetti del Gruppo scelto (o di TUTTI) di unità RX.
28 29

Moduli EL-Skyport
Ricevitore universale EL-Skyport 19352
• Ricevitore universale per tutti i tipi di ash con presa sincro
Transceiver EL-Skyport RX 19353
• Questo Transceiver è solo per unità RX Elinchrom. Il modulo fa funzionare tutte le
caratteristiche RX ed innesca il ash con il software EL-Skyport/ ERS
USB EL-Skyport RX 19354
• Per far funzionare dei ash RX attraverso un pc il modulo USB dovrebbe essere
utilizzato insieme ai Transceiver RX EL- Skyport e al software ERS
Soluzione guasti
Se si dovesse vericare un errore, dapprima controllare i punti seguenti:
C’è questo problema? Controllare i punti seguenti:
Il trasmettitore non fa scattare
nessun ash
E’ selezionata la modalità “Tutti”.
ØControllare se il trasmettitore è acceso
ØControllare la polarità della batteria
ØControllare se il modulo del ricevitore è collegato
correttamente con l’unità
ØControllare se il selettore di frequenza è impostato sullo
stesso canale
Alcuni ash non sono fatti scat-
tare dal trasmettitore. E’ selezio-
nata la modalità “Gruppi”
ØControllare se il selettore di canale è impostato sullo
stesso gruppo
ØRidurre la distanza con le unità “non in funzionamento”
Il ash di PROVA funziona, ma
la macchina fotograca non fa
scattare il ash
ØControllare il caricamento del contatto caldo
ØScegliere il cavo sicro invece della connessione tramite con
tatto caldo
La distanza è troppo ridotta ØRiposizionare il ash
ØAumentare la distanza da pareti e softti
ØRiposizionare le antenne di trasmettitore e ricevitore
ØUsare una prolunga RX per ridurre la distanza tra moduli
Universal
19352
Transceiver RX
19353
USB RX
19354
30 31

Dichiarazioni CE
Questa apparecchiatura è stata testata e rinvenuta conforme alle richieste
espresse nella direttiva conciliare sulla assimilazione nel diritto degli stati
membri della direttiva CEE n. 89/336 sulla compatibilità elettromagnetica, della
direttiva CEE n. 73/23 sul basso voltaggio e della direttiva CEE n. 99/5 sulle ap-
parecchiature per terminali radio televisivi.
Smaltimento e riciclo
Questo apparecchio è stato prodotto in massimo grado con materiali che
possono essere riciclati o di cui si possa disporre in modo non dannoso per
l’ambiente. L’apparecchio può essere ritirato dopo l’uso per essere riciclato se
viene restituito in una condizione che sia il risultato del normale utilizzo.
Di tutti i componenti non recuperati si farà un uso accettabile per l’ambiente.
Per qualsiasi domanda sullo smaltimento si prega di contattare la sede locale o l’agente
ELINCHROM della propria località di residenza (controllare il nostro sito web per l’elenco di
tutti gli agenti ELINCRHOM nel mondo).
EL-Skyport
Transmitter
19351
Возможности 34
Установка батарей 35
Разъем Hot-shoe
(«горячий башмак») 35
Инструкция по эксплуатации 35
Частотный канал 36
Режимы срабатывания 37
Встроенный разъем SYNC 37
Возможности Elinchrom RX 37
Модули EL-Skyport 38
Возможные неисправности 39
Заявление CE 40
Утилизация и переработка 40
:
Русский
32

EL-Skyport
Transmitter
19351
Инструкция по эксплуатации :
Цифровой беспроводной передатчик
светосинхронизатора с рабочей частотой 2,4 ГГц
Возможности
Светосинхронизатор EL-Skyport разработан по новейшей цифровой беспроводной
технологии 2,4 ГГц.
• Выдержка до 1/1000 с
• 5 выбираемых режимов срабатывания
• 8 частотных каналов
• 40-битное кодирование
• Радиус действия в помещении до 50 м
• Радиус действия до 120 м на открытых пространствах
• Ресурс батарей до 3 месяцев
• Клавиши RX (удаленное управление)
• Кнопка тестирования срабатывания вспышки
• Встроенный Hot-shoe («горячий башмак» - средний контакт)
• Разъем SYNC для прямого подключения
Вы обязательно оцените все удобства использования этого профессионального и
мощного беспроводного устройства.
Примечания:
На выдержку и радиус действия оказывают влияние отражения (от потолков, стен, пола, мебели
и др.) и воздействия других устройств, работающих на частоте 2,4 ГГц. Для лучшего результата
антенны передатчика и приемника должны находиться в прямой видимости без препятствий в виде
стен или каких-либо объектов. Hot-shoe с
разъемом SYNC
Держатель
батареи (19373)
Батарея
(19372) Знаком
«минус» кверху Гибкая шарнирная
антенна с
возможностью
вращения на 360°
Рис. 1
Установка батарей
1. Осторожно извлеките держатель батареи
2. Вставьте литиевую батарею, полярность см. на Рис. 1
3. Закройте держатель батареи
! ВНИМАНИЕ:
• Соблюдайте полярность/минусом кверху
• Используйте только литиевую батарею Elinchrom (CR2430 3.0V 19372)
• Если передатчиком EL-Skyport какое-то время не будут пользоваться, извлеките батарею
• Никогда не допускайте короткого замыкания батареи
Разъем Hot-shoe («горячий башмак»)
Стандартный разъем Hot-shoe с синхронизацией по среднему контакту разработан для всех
цифровых и аналоговых камер с максимальным выходным напряжением синхронизации в 3
В. (Средний контакт «+»).
Инструкция по эксплуатации
34 35
Частотный канал
Примечание:
Передатчик и соответствующие RX-трансиверы или универсальные приемники должны
иметь одинаковые настройки частотного канала! ON – ВКЛ., OFF – ВЫКЛ.
Рис. 2
Гибкая шарнирная
антенна с
возможностью
вращения на 360°
Тест вспышки
Кнопка RX
Увеличение мощности
ИЛИ включение
моделирующей лампы
Кнопка RX
Снижение мощности
Селектор
частотных каналов
Переключатель
РЕЖИМОВ
Переключатель
ГРУПП
Частотный
канал
Положение кнопок Частота
/ МГц
1 2 3
1 (умолч.) Выкл. Выкл. Выкл. 2456
2Вкл. Выкл. Выкл. 2458
3Выкл. Вкл. Выкл. 2460
4Вкл. Вкл. Выкл. 2462
5Выкл. Выкл. Вкл. 2469
6Вкл. Выкл. Вкл. 2471
7Выкл. Вкл. Вкл. 2473
8Вкл. Вкл. Вкл. 2475
Примечание:
После настройки выключите и включите трансивер RX снова для активизации нового изменения
частоты/канала.
Режимы срабатывания
Передатчик EL-Skyport может приводить в действие приемники EL-Skyport в
следующих режимах:
1. Off (Выкл.) è Блок выключен
2. Select Grp (выбор группы) - Группы (от 1 до 4)
è Установите переключатель на Grp. и выберите группу от 1 до 4
è Срабатывают все соответствующие приемники EL-Skyport с той же выбранной
группой (от 1 до 4)
3. ALL (Все)
è Переключатель режима в положении ALL (Все)
è Срабатывают все соответствующие приемники EL-Skyport вне зависимости от
выбранной группы.
Встроенный разъем SYNC
Встроенный 2.5-миллиметровый разъем Mono Jack предназначен для прямого соединения
с камерой или линзой
Возможности Elinchrom RX
При использовании передатчика EL-Skyport с последними трансиверами EL-Skyport RX,
существуют следующие ДОПОЛНИТЕЛЬНЫЕ возможности:
В зависимости от выбранной группы можно применить следующие настройки RX-блоков:
1. Увеличение мощности с шагом диафрагмы 1/10
è Нажмите кнопку «+» для увеличения мощности выбранной группы (или всех)
RX-блоков с шагом диафрагмы 1/10
2. Снижение мощности с шагом диафрагмы 1/10
è Нажмите кнопку «-» для снижения мощности выбранной группы (или всех) RX-
блоков с шагом 1/10 диафрагмы
3. Переключение лампы моделирования
è нажмите и удерживайте кнопку «+» дольше 2 секунд для переключения
лампы моделирования выбранной группы или всех (ALL) RX-блоков.
36 37
Table of contents
Languages:
Other Elinchrom Transmitter manuals


Popular Transmitter manuals by other brands

Brähler Systems
Brähler Systems INFRACOM ICen IV operating instructions

Camille Bauer
Camille Bauer SINEAX B 812 operating instructions

MTT
MTT MS3720-01 user manual

Technical Materiel Corporation
Technical Materiel Corporation SBT-1K Technical manual

NIVELCO
NIVELCO EchoTREK SG-300 series Installation and programming manual

Kramer
Kramer TP-114 user manual


