Elite Fitness Vanquish User manual

Record serial number
Elite Vanquish Rowing Machine

2
CONTENTS
Important Safety Instruc ons 3
Product Specifi ca ons 4
Console 5
Assembly Instruc ons 8
Care and Maintenance 16
Maintenance Log 17
Limited Warranty 18
Warm-Up Exercise 19
Rowing Techniques 20
Training Stages 21
Parts List 22
Exploded Drawing 24
Thank you for purchasing the Elite Vanquish Rowing Machine.
For over 20 years, Elite Fitness™ has been New Zealand’s largest supplier of fi tness equipment. Our
aim and vision is to provide you Elite™ branded products, tested to the highest standard for quality
and biomechanics at the best possible price.
Please read through this manual to familiarise yourself with the opera on of your new Elite
Vanquish Rowing Machine Doing so will help to insure that you get the most out of your machine,
enjoying a safe and eff ec ve workouts ahead.
Even though we go to great eff orts to ensure the quality of each product we produce, occasional
errors and or omissions do occur. In any event should you fi nd this product to have either a defect
or a missing part, please contact us for a replacement.
ELITE FITNESS HQ
11 George Bourke Drive
Mt Wellington
Auckland, New Zealand
info@elitefi tness.co.nz
0800 243 834
h p://www.elitefi tness.co.nz/

3VANQUISH ROWING MACHINE ASSEMBLY MANUAL
The following defi ni on applied to the word “WARNING” when used in this manual:
Used to call a en on to POTENTIAL hazards that could
result in personal injury or loss of life.
READ ALL INSTRUCTIONS BEFORE USING THE MACHINE
This product has been designed for home use only. Product liability and warranty condi ons will
not be applicable to products being subjected to professional use or products being used in a
commercial environment. e.g Gym Centre
This exercise machine is built for op mum safety. However, certain precau ons apply whenever
you operate a piece of exercise equipment. Be sure read the en re manual before you assemble or
operate your machine. In par cular, note the following safety precau ons.
— Read all instruc ons in this manual before using this equipment.
— Use the machine only for its intended use as described in this Manual.
— Keeps hands away from moving parts.
— Keep children and pets away from the machine at all me. DO NOT leave children una ended
in the same room with the machine.
— Before using the machine to exercise, always do stretching exercises to properly warm up.
— Inspect the machine before each use; make sure all of the connec ons are ghtly secured.
— Only one person at a me should use the machine.
— If the user experiences dizziness, nausea, chest pain, or any other abnormal symptoms, STOP
the workout at once. CONSULT A PHYSICIAN IMMEDIATELY.
— Posi on the machine on a clear, levelled surface. DO NOT use the machine near water or
outdoors.
— Always wear appropriate workout clothing when exercising. DO NOT wear robes or other
clothing that could become caught in the machine. Spor ng shoes are recommended when
using the machine.
— Do not place any sharp object around the machine.
— Disabled persons should not use the machine without a qualifi ed person or physician in
a endance.
— Never operate the machine if the machine is not func oning properly.
— Only carry out training work on the equipment when it is in perfect working order. Only use
original spare parts in the event of a repair.
— Do not use strong solvents for cleaning, and only use the tools supplied, or suitable ones of
your own, for any repairs that may be required. Please dispose of the packaging and any parts
that have to be replaced subsequently (all parts for the unit) at suitable collec ng points or
containers with a view to saving the environment.
— Not for therapeu c use.
IMPORTANT SAFETY INSTRUCTIONS

4
WARNING: Before beginning any exercise program, consult your physician. This is especially
important for persons with pre-exis ng health problems. The seller assumes no responsibility for
personal injury or property damage sustained by or through the use of this product.
SERVICE HINTS: The high quality standard of this product only will be kept if you on a regular
basis check all screw-connec ons and moving parts on proper fi ng. Damaged parts have to be
changed immediately. During the me of repair the product must not be used by anybody.
IMPORTANT HINTS:
A) This product has been tested in accordance with the requirements of EN 957-1/A1, EN 957-5,
standard, Class HA (HOME USE).
B) Parents should be aware of the risk factor of young children playing on fi tness equipment
una ended. Make sure that the children are instructed properly in the use of the product
and in the controlled execu on of the diff erent exercise. Misuse of the product could result in
serious injury
PRODUCT SPECIFICATIONS
User Weight Capacity: 120 KGS
Dimensions: 230x54x107CM
Shipping Weight: 40.20KG
Net Weight: 34.50KG
Power Requirements: 2PCS AA ba eries

5VANQUISH ROWING MACHINE ASSEMBLY MANUAL
CONSOLE
FUNCTION BUTTONS
—UP/ DOWN: To press these two bu ons through available selec on. To adjust the func on value
upward and downward.
—ENTER: To confi rm your selec on. During training, press the bu on to scan each display
func on.
—START/ STOP: To start and stop your selected workout program.
—RESET: To reset the computer back to the main menu.
—RECOVERY: To ac vate the RECOVERY PROGRAM that will automa cally evaluate your fi tness
immediately a er your work out.
DISPLAY FUNCTIONS:
TIME: Preset target me by pressing UP and DOWN bu ons (1min ~ 99 min), increase or decrease
se ng is 1 minute.
TIME/ 500M: Your average 500 metre me will automa cally be displayed and con nuously
updated.
SPM: Strokes per minute.
DISTANCE: Preset target value by pressing UP and DOWN bu ons ( 0 ~ 99900meters),
increase or decrease se ng is 100 metres.
STROKES: Preset target value by pressing UP and DOWN bu ons (0~9990 strokes), increase or
decrease se ng is 10.
TOTAL STROKES: Accumulates total strokes from 0 up to 9999.
CALORIES: Preset target CALORIES by pressing UP or DOWN bu ons (5Cal ~9990Cal), increase or
decrease se ng is 5Cal.
PULSE: To preset target value by pressing up/down/mode from 30 to 240, each increase/decrease
se ng is 1. The monitor will display user’s heart rate during training. The pulse measurement
func on is only used by chest belt system;
CALENDER: Displaying year, month, and day when monitor is in sleep mode.
TEMPERATURE: Displaying current room temperature when the monitor is in sleep mode.
CLOCK: Displaying current clock when the monitor is in sleep mode.

6
OPERATION:
1. Install 2PCS AA ba eries→one long beep for 2 seconds →in the meanwhile, segment test for 2
seconds (Fig.1). Then, the monitor enters into the CLOCK & CALENDAR MODE.(Fig.2).
2. Firstly, you may enter into the CLOCK fi eld to set YEAR (in the area of STROKES); MONTH (in the
area of CALORIES); DAY (in the area of PULSE). A er you confi rm it, the ALARM will blink. Press
UP KEY to set the ON/OFF which is the sign of the ALARM. If the sign don’t display, you can press
ENTER bu on to jump to the next one .When the sign of ALARM display “ON”, you can press
the ENTER bu on to set the me of the ALARM (the same way of the CLOCK se ng). A er the
se ng, you can slip into the picture of the SPORT (Fig.3).
Fig.1 Fig.2
Fig.3 Fig.4
3. When you enter into the picture of the SPORT, the MANUAL & RACE will blink to be selected.
Press UP or DOWN to select it, then press ENTER and confi rm all you have selected.
(1) MANUAL(Fig.4):
A. Enter into the MANUAL mode, press UP to set the fl ickering fi gure of the TIME .Press ENTER
to confi rm it. Then, you can press UP to set DISTANCE→STROKES→CALORIES→PULSE→TIME
immediately.(If you have set the target value for Time then DISTANCE can’t be set, vice versa.)
B. Press START KEY to START, the STOP icon will disappear. Press UP or DOWN to select func ons.
C. When the func on you have selected count backwards to ZERO or you have pressed the STOP
KEY, the monitor will STOP and display the average fi gure.

7VANQUISH ROWING MACHINE ASSEMBLY MANUAL
(2) RACE (Fig.5):
A. Enter into the RACE mode and L1 will gli er, the TIME/500M may display with 8:00.Then, you
can press UP or DOWN to set L1 ~ L15 immediately, press ENTER to confi rm. Where a er, you
can set the distance of the race(500M~10000M)while the fi gure of the DISTANCE is blinking.
Press ENTER and the picture of the race will display clearly on the screen.
The fi gure of the TIME/500M are as follows:
Fig.5 Fig.6
B. Press START KEY to START and STOP will disappear. The USER & PC will display in the matrix.
(Fig.6).the monitor will STOP when one have reached the distance of race which has been set
before, then the matrix displays “PC WIN or USER WIN”(Fig.7) and may display the state of the
energy a er 6 seconds.
Fig.7
RECOVERY:
A er exercising for a period of me, keep wearing chest strap and press “RECOVERY” bu on. All
func on display will stop except “TIME” starts coun ng down from 00:60 to 00:00. Screen will
display your heart rate recovery status with the F1,F2….to F6. F1 is the best, F6 is the worst. User
may keep exercising to improve the heart rate recovery status.
(Press the RECOVERY bu on again to return the main display.)
C. When the race is over, you can press the START to have a race once again. Press RESET to
leave the picture of the race

8
ASSEMBLY INSTRUCTIONS
STEP 1
— Remove plas c package Stabiliser (A) from the Main frame (25).
— Fix the Front Stabiliser (34) to the Main frame (25) with Inner hex pan head bolt (30), Spring
washer (52) and Washer (17 that just removed from the plas c package .

9VANQUISH ROWING MACHINE ASSEMBLY MANUAL
STEP 2
— Fix the Foot rest support (21L/R) to the Main frame (25) with Hex bolt (14).
10
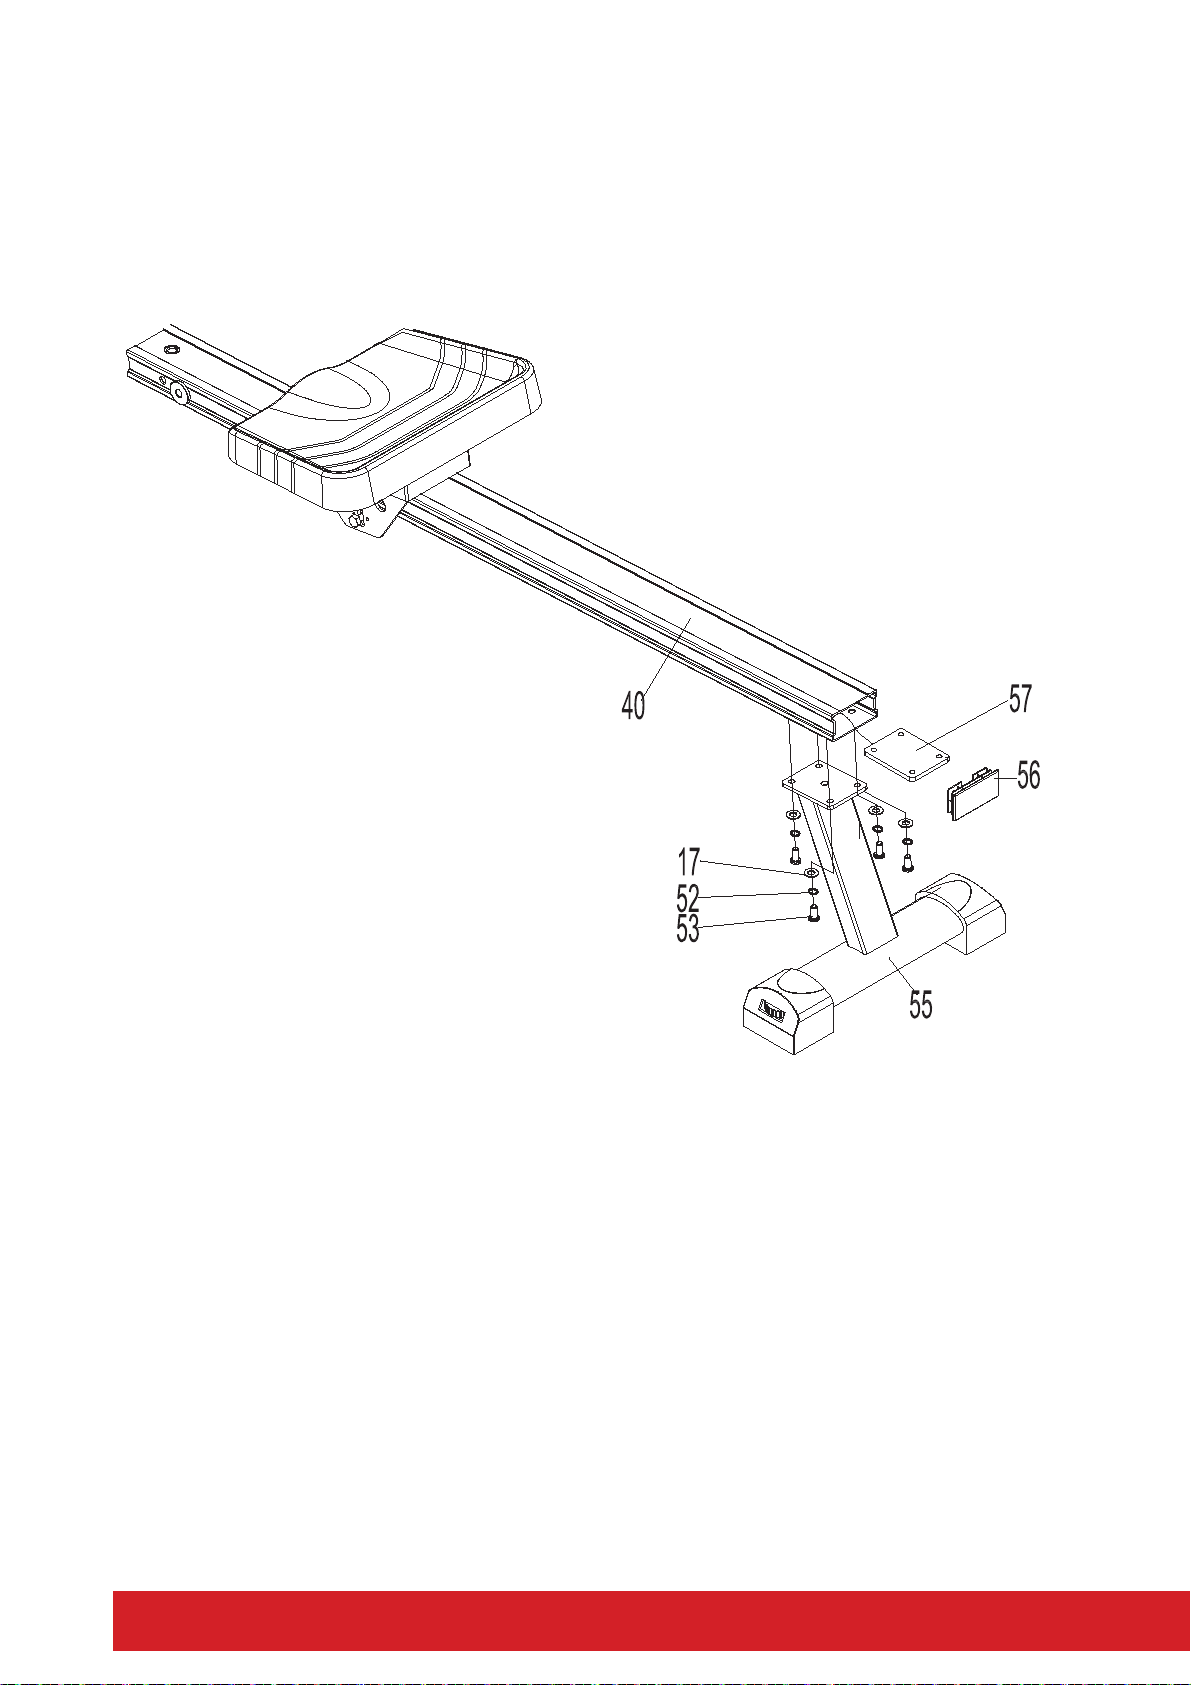
STEP 3
— Put the Nut plate (57) into the inner side of the Aluminium guide rail (40) fi rst.
— Fix the Rear Stabiliser (55) to the nut plate (57) with Inner hex pan head bolt (53), Spring
washer (52) and Washer (17).
— Press Aluminium guide rail end cap (56) to the end of the rail.

11VANQUISH ROWING MACHINE ASSEMBLY MANUAL
STEP 4
— Connect wire (45a) and Trunk wire (27) fi rst, and then insert the wire into the Aluminium guide
rail (40).
— Insert the Aluminium guide rail (40) into the Main frame (25) fi rst, and then fi x it with Hex nut
(28), Washer (24) and Nylon nut (23). and the press the Sphere end cap (22).
— At last fi x the Aluminium guide rail (40) to the Main frame (25) with Knob (36) and Washer (37).

12
STEP 5
— Connect the Display support (7) to the Main frame (25) with Step bolt (1), Nylon nut (4) and
Washer (3).
— Fix the display (8) to the Display support (7) with Cross pan head screw (5).
— Connect Display wire (8a) with Trunk wire 2 (27), (8b) with Sensor wire (39).

13VANQUISH ROWING MACHINE ASSEMBLY MANUAL
CONGRATULATIONS
Assembly of your Elite Vanquish Rowing Machine is now complete! Be sure to fully inspect your
machine before using it for the fi rst me.
Failure to visually check and test and tech the assembly before use can cause damage to
the Elite Vanquish Rowing Machine and serious injury to users and bystanders and can also
compromise the eff ec veness of your exercise program.

14
STEPS
— First please screw out the Knob (36) and Washer (37).
— Then hold the Aluminium guide rail (40) to the ver cal posi on.
— At last insert the Knob (77) and Washer (68) into the fi xa on hole. please see the picture as
following.
ATTENTION: PLEASE TAKE CARE WHILST FOLDING THE RAIL. ENSURE THE SEAT IS POSITIONED
TOWARDS THE FRONT OF THE RAIL.
STORAGE - FOLD UP DESIGN
15VANQUISH ROWING MACHINE ASSEMBLY MANUAL

16
At least once a year, the cover on your rowing machine should be removed and any dust or debris
vacuumed up to maintain the smooth opera on of the drive system. Contact the Elite Fitness
Service Department for further informa on on servicing your rowing machine.
Prolong the life of your rower by performing periodic maintenance checks. Not only does this
ensure your machine is in full working order to ensure they con nue to run smoothly and reliably,
but it will save you service costs in the long run.
Cleaning
General cleaning of the unit a er use will protect the rowers powder-coated framework and
prevent unnecessary corrosion stains and damage to the structural components from sweat and
perspira on. During this me check for any cracks and damage.
Guide Rail:
This area needs a en on every week. It needs to be kept free of dust and debris. If the wheels roll
over dust and debris it ingrains itself in either the wheel or the rail itself. Over me this will pit the
wheels or guide rail making for a bumpy workout.
Chain:
If you have a chain a ached to your rowing handle once every 6 months you should give it a light
oiling. The chain should be free of build-up before re-greasing if it is dirty use an automo ve
degreaser and paper towel to remove the build-up.
To oil the chain; pull the chain to its full extent and while holding the handle use a clean paper
towel to rub lubricant along the length of the chain. 3 in 1 oil or 20W motor oil are recommended.
About 1 teaspoon of lubricant is plenty.
Adjust the End cap & How to fold the unit
To fold the aluminium rail, pull out the lock pin from the joint. Secure the rail by the lock pin.
Correct Exercising Position
When exercising, hold the handlebar ghtly and relax your back. Try and use the product in a
rhythmical and smooth mo on. If you fi nd yourself feeling uncomfortable, or experiencing a
surging type feeling, adjust the tension down to a more comfortable se ng.
CARE AND MAINTENANCE

17VANQUISH ROWING MACHINE ASSEMBLY MANUAL
eg:
MAINTENANCE LOG
Prolong the life of your rowing machine by performing periodic maintenance checks. Not only does
this ensure your machine is in full working order, but it will save you service costs in the long run.
Every me you perform maintenance, record the date and if applicable, the distance and hours
operated.
DATE GENERAL FRAME SERVICE
COMMENTS
Lubricated Tighten Cleaned Joints Guide Rail
01/06 √√√ none

18
Warranty Registration
It is recommended you register your warranty online at www.elitefi tness.co.nz/service/online-
forms/warranty to ensure you receive the correct user maintenance informa on for your
product before use. This will enable you to receive any addi onal or helpful informa on from the
manufacturer or Elite Fitness Equipment about your product.
Warranty Range
Damage in correct maintenance and normal opera ons (not fac ous factors). Warranty card to
the original purchaser, shall not be transferred.
Warranty Time
HOME USE
— 1 Year Parts and Labour
The following conditions are not under warranty range:
A) As a result of abuse, neglect, accident, or unauthorized modifi ca on;
B) The damage due to incorrect adjustment of the machine;
Repair and Maintenance Service
Please contact our Elite Fitness Service Department at eliteservice@elitefi tness.co.nz or visit
www.elitefi tness.co.nz for any service related issues or advice on preventa ve maintenance
servicing procedures.
LIMITED WARRANTY
19VANQUISH ROWING MACHINE ASSEMBLY MANUAL
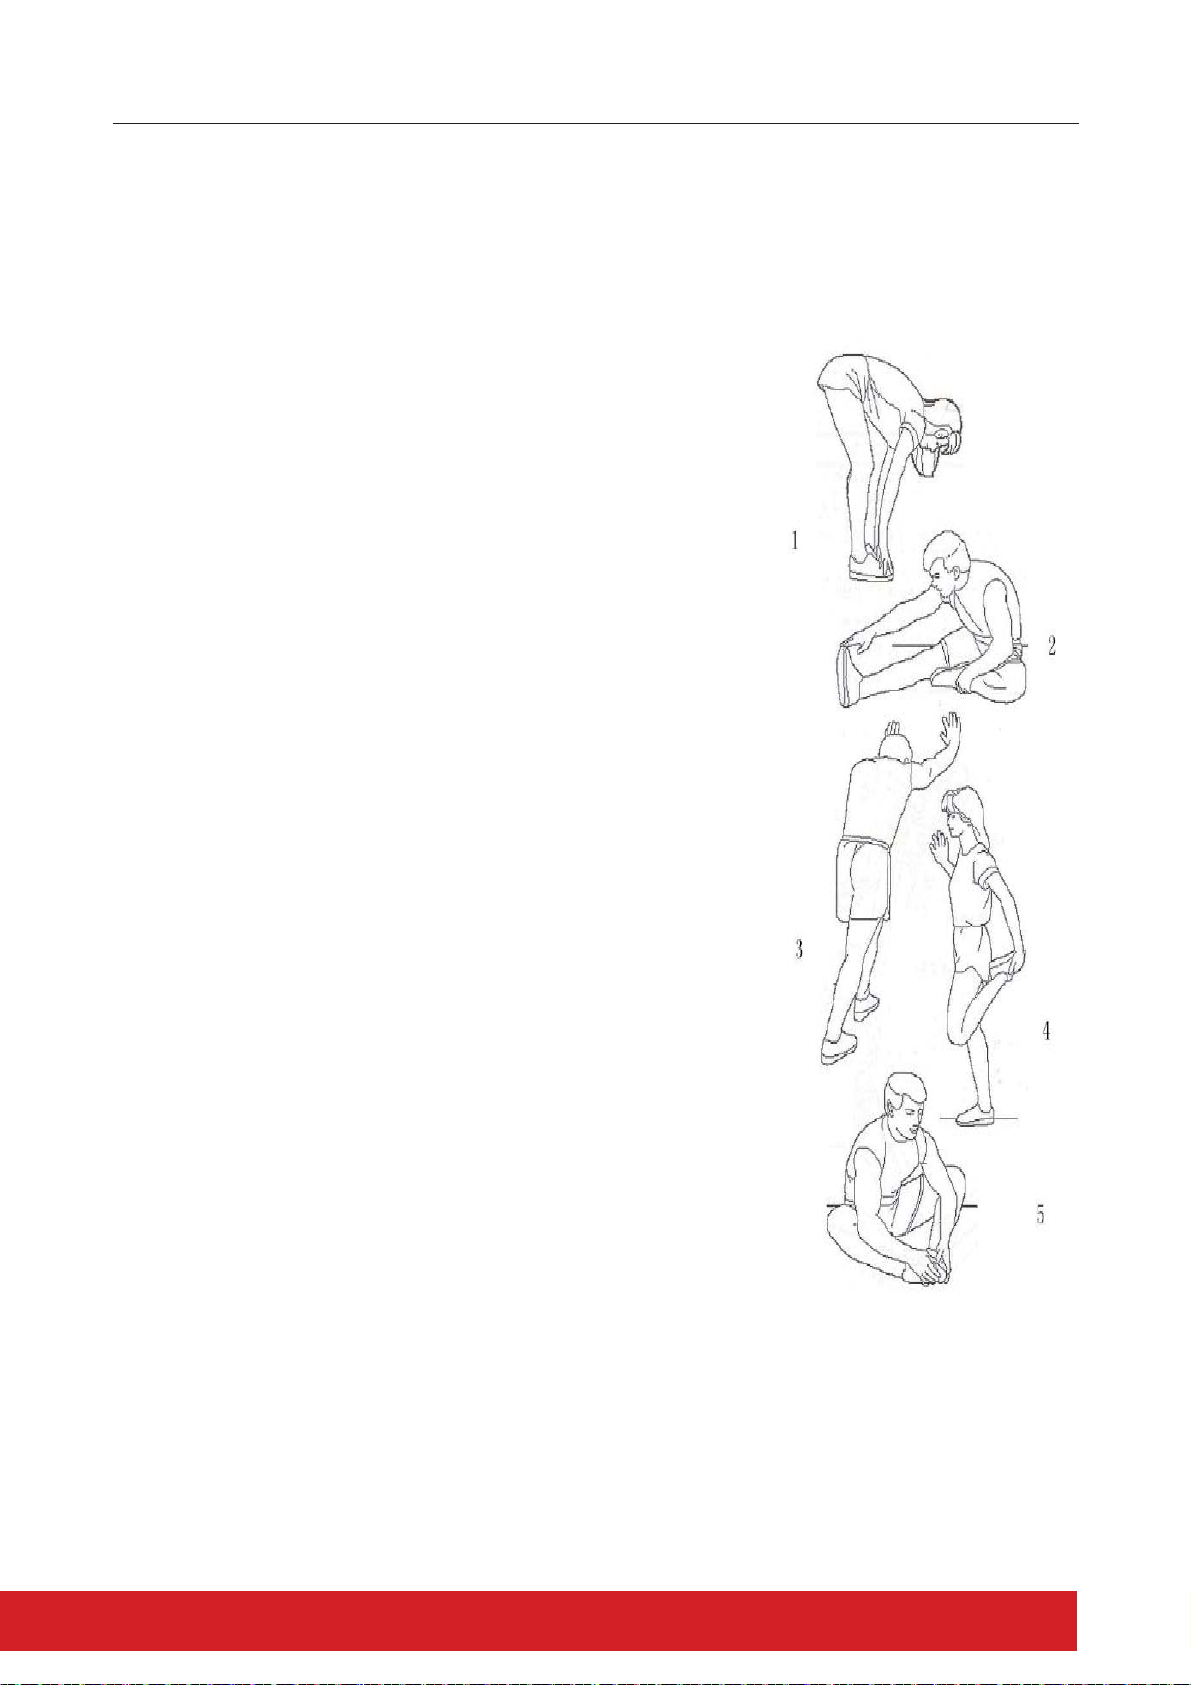
Warm up exercise is important in preparing the muscles for ac vity whilst minimising the risk
of injury. You may choose to warm up with a light/brisk walking pace for 5-10 minutes before
stopping and performing some simple stretches. (As shown in the pictures below)
— Hamstring Stretch (Standing) Keep your knees slightly bent and slowly lean forward, back
and shoulders relaxed, reaching towards your toes. You should feel the tension and slight
discomfort in your hamstring muscles. Hold for 15-20 seconds.
Repeat 2-3 mes.
— Hamstrings Stretches (Seated) Si ng on the fl oor preferably on
a mat, put one leg straight, the other inward and close to the
inside of the straight leg. Lean forward from the hips, reaching
towards your toes. Hold for 10-15 seconds, and relax. Repeat 3
mes for each leg (See picture 2).
— Crus and Feet Tendon Stretches Standing with two hands on
the wall or tree, one leg behind. Keeping your legs straight and
the heel on the ground, lean forward towards the wall or tree.
Hold for 10-15 seconds, and relax. Repeat 3 mes for each leg
(See picture 3).
— Quadriceps Stretches Keeping your balance with your le hand
holding onto a wall or sta onery fi xture, grasp your right foot
with your right hand and stretch your right heel toward your
bu ocks slowly, un l you feel the stretch in the front of your
thigh. Hold for 10-15 seconds, and relax. Repeat 3 mes for
each leg (See picture 4).
— Sartorius (Inner Muscles of the Thigh) Muscle
— Stretches Si ng down with the soles of your feet or shoes
together and your knees posi oned outward. Pull your feet
towards your groin un l you can feel the stretch. Hold for 10-15
seconds, and relax. Repeat 3 mes (See picture 5).
WARM-UP EXERCISE
20
ROWING TECHNIQUES
The Rowing Ac on uses 84% of your muscle mass; from the ps of the fi ngers holding the handle,
to the balls of the feet connected to the footboard, all the muscles between these 2 points
contribute to the Rowing Ac on.
The Rowing Ac on is comprised of both fast (drive phase) and slow (recovery phase) movements.
It is important to combine these 2 movements into a rhythm in order to create a smooth, fl owing,
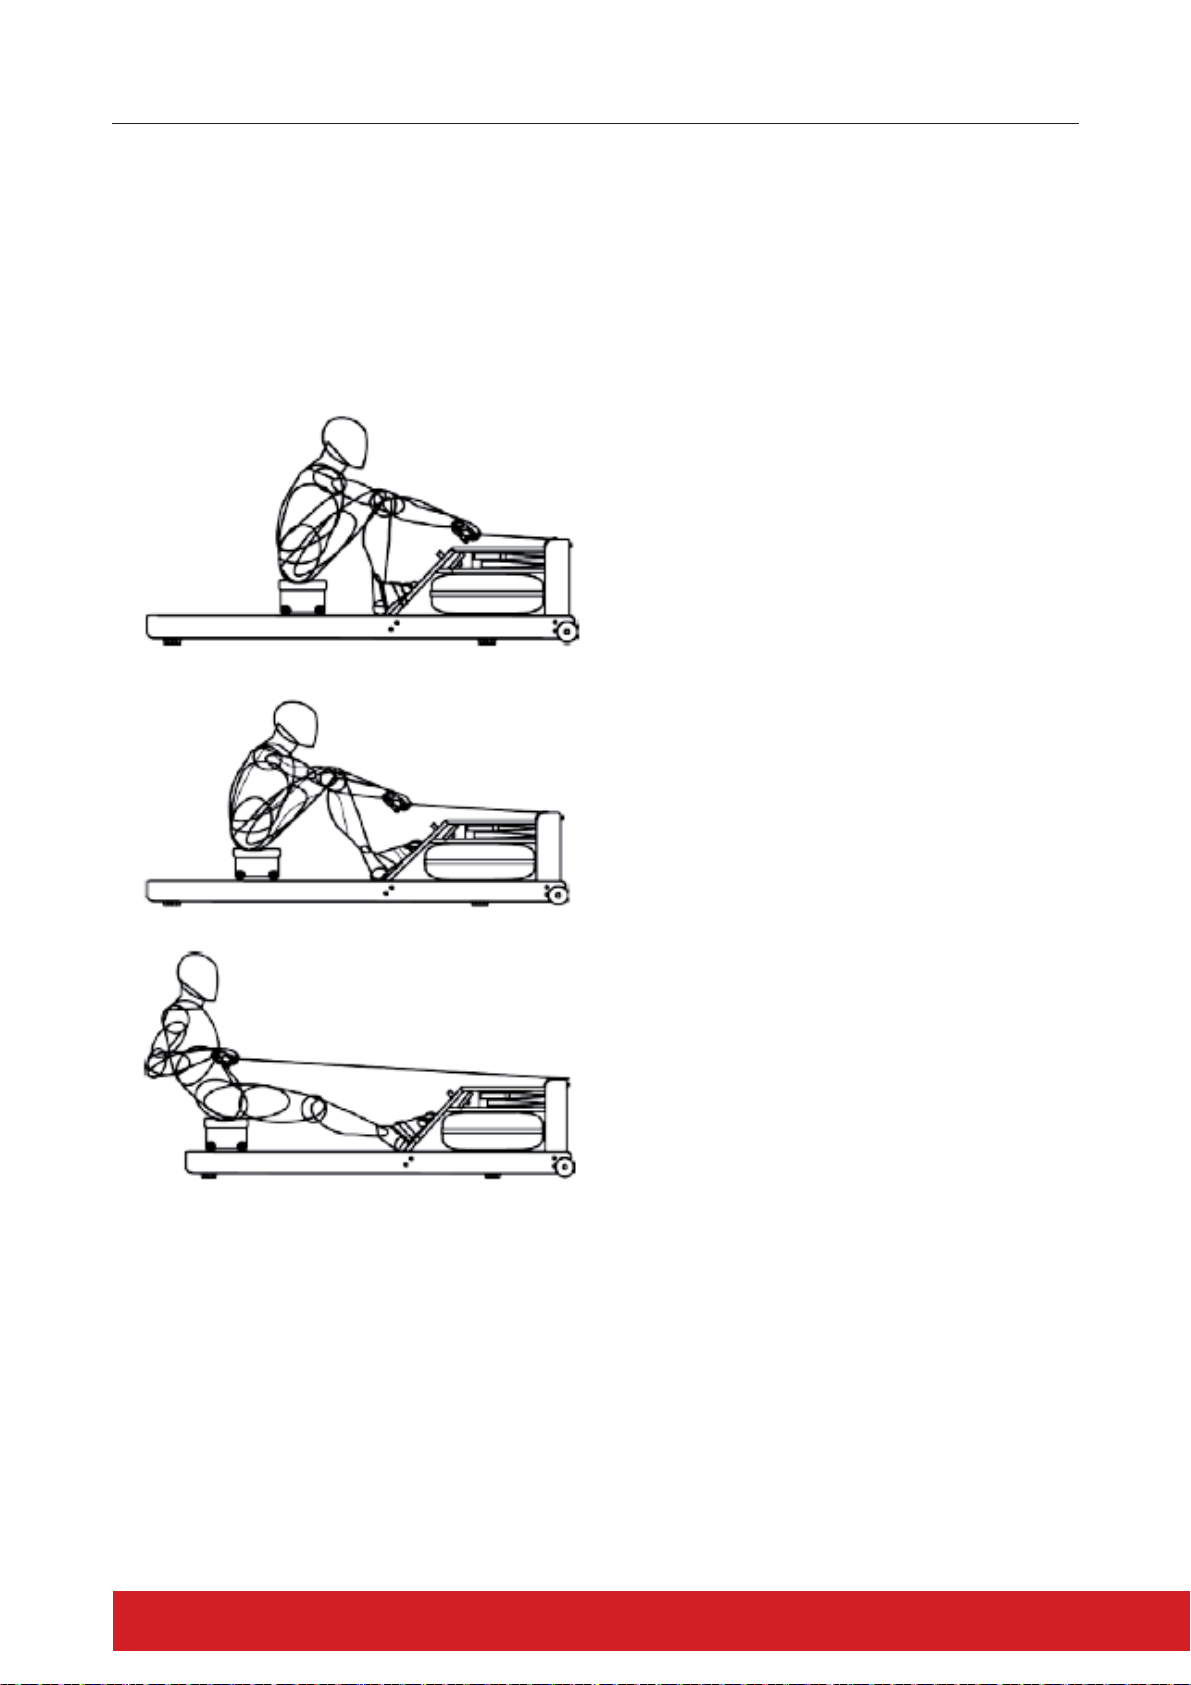
unhurried Rowing Ac on. The diagrams below show 3 basic movements of the rowing ac on.
CATCH POSITION
Si ng tall, arms straight reaching forward,
shoulders relaxed, head up, eyes looking
forward, legs compressed and shins ver cal.
DRIVE PHASE
Drive back with the legs, arms hang off the
handle and only begin to bend once handle
is above the knees, torso is strong with good
posture and body angle opens up slowly as
you drive the legs.
RELEASE POSITION
Legs straight, handle drawn to chest, si ng
back just past the ver cal, torso fi rm,
shoulders relaxed, head up and eyes looking
forward.
Allow yourself the fi rst few rowing sessions to prac ce the correct posi ons and phases as well as
the correct ra o and rhythm of the rowing ac on. With regular rowing, the technique will become
easier and you will soon experience the physiological benefi ts of rowing.
Table of contents
Other Elite Fitness Home Gym manuals

Elite Fitness
Elite Fitness WARRIOR User manual

Elite Fitness
Elite Fitness CONQUEST User manual

Elite Fitness
Elite Fitness RAZOR R7 User manual

Elite Fitness
Elite Fitness ITM 4600-E User manual

Elite Fitness
Elite Fitness Stamina X User manual

Elite Fitness
Elite Fitness RAZOR R11 User manual

Elite Fitness
Elite Fitness IT 9300-E User manual


