Elite Screens Light-On CLR 3 Series User manual

Rev.09072021-JA www.elitescreens.com 1
Light-On CLR® 3 Series
Tripod Tab-Tension model # TT55V-CLR3
Indoor Ceiling Ambient Light Rejecting Portable Screen
For tabletop mounted ultra/short-throw projectors
User’s Guide –Z Type
_____________________________________________________________________________________________
Thank you for choosing the Light-On CLR®3 Tripod Tab-Tension model. This product is a portable tripod projection
screen with ceiling ambient light rejecting technology for portable projector presentations on the go.
The screen material included is our CLR® 3, which is an optical lens front projection material precisely formulated for
environments with minimal control over room lighting. It was designed to filter and absorb overhead light while
directing tabletop mounted projectors. It best for family rooms, educational facilities, conference rooms or any
applications in which incident light is a factor.
Screen maintenance
Dust, dirt, and scratches on the projection screen surface will affect the quality and performance of the projection
image. Follow the instructions below to properly maintain the screen.
1) The screen surface has a horizontal linear structure. DO NOT wipe the screen up and down or in a circular
motion. Wipe gently from left to right only.
2) Clean the dust on the screen surface with a soft brush or microfiber cloth. A rough/coarse towel or cloth may
damage the screen’s surface.
3) Gently wipe the screen with a lightly moistened white lint free cloth with water or with a neutral detergent
(1mL/0.33 oz) mixed with water (1000 mL/33.8 oz).
4) Avoid putting pressure on the screen material when wiping the screen. If dust or other debris is on the surface,
we recommend using an air sprayer to blow them away.
Notes: The following precautions should always be followed to avoid damaging the material, which is not covered
under warranty.
•Don’t touch the screen material to avoid leaving fingerprints.
•Use gloves when handling the material.
•Don’t scratch the material, as it will leave permanent markings on the screen’s surface.
•Don’t point to the screen material with a fingertip or other sharp objects to prevent damage to the material.
•Don’t use acetone, benzene, alcohol and any other organic solvents to clean the screen material. Using such
chemicals will permanently damage the screen.
CAUTION!
THE PROJECTION FABRIC IS A DELICATE OPTICAL/LENTICULAR SCREEN MATERIAL AND SHOULD NOT BE
FOLDED, BENT, OR CREASED. ALWAYS MAINTAIN SCREEN MATERIAL FLAT AND TAUT DURING SETUP AND
DISASSEMBLY. IT IS VERY IMPORTANT ALL INSTRUCTIONS ARE FOLLOWED TO AVOID DAMAGING THE
MATERIAL. ANY DAMAGES RESULTING FROM NEGLIGANCE OR MISHANDLING WILL VOID YOUR WARRANTY.

Rev.09072021-JA www.elitescreens.com 2
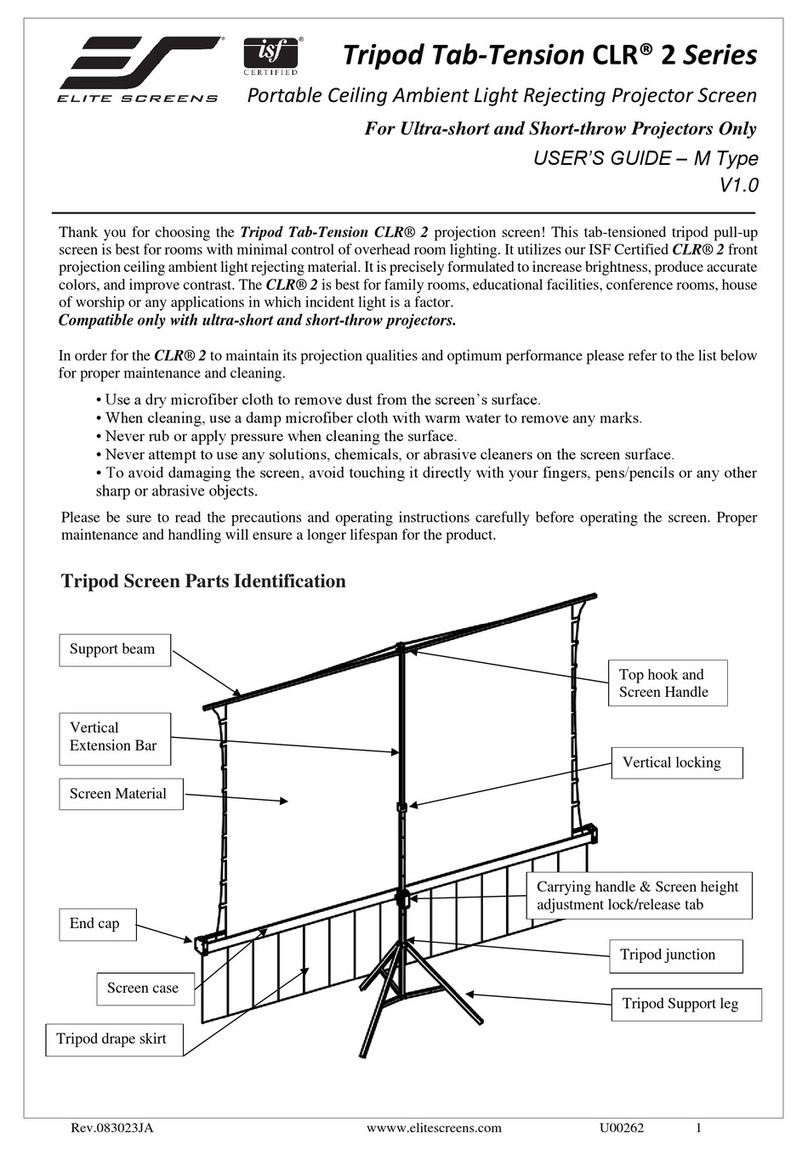
Tripod Screen Parts Identification
A. Tripod Screen Setup
Follow the steps below and Fig. 1 & 2.
1. Place the screen in an upright position (Fig.1)with the legs toward the ground.
2. Deploy the Tripod Support legs by pushing downon the Tripod Junction.
3. Turn the tripod’s screen case in a 90-degree horizontal position so that the screen casing is now parallel to the
ground with the screen handle facingthe bottom of the top hook.
4. Completely extend the legs as much as possible so they are stable and position them away from objects that may
interfere with their balance. DO NOT stand the tripod on an unstable platform to avoid an injury should the tripod
screen collapse.
Tripod drape skirt
1
Fig.1

Rev.09072021-JA www.elitescreens.com 3
B. Preparing the tripod screen forprojection:
Follow the steps below and Fig. 3.
1.
Pull the screen handle up vertically and hook the screen handle on the Top Hook.
NEVER PULL THE SCREEN MATERIAL TO RAISE IT.
2.
Push/press the Vertical Locking Tab to unlock the current
position of the Vertical Extension Bar and raise it with another hand.
Remain pushing on the button until you reach the desired height and
let go until you hear a click sound which indicates it islocked in place.
3.
Push/press the Screen Height Adjustment Lock/Release located
just above the Carrying Handle to raise or lower the bottom ofthe
screen. Once the desired height has been set, let go of the tab to lock
the position in place.
C. Tripod Skirt Installation
4. Unfold the tripod skirt in a clean area. Use the magnetic bars to attach it to the tripod case.
Fig. 3
1
2
3
Note: Use the Keystone Eliminator to prevent “Keystone Effect”
from occurring. Keystone Effect is caused when a projector
presents its image at a downward angle causing a trapezoid-shaped
image to appear on the screen. The Keystone Eliminator is
designed to eliminate that effect by sloping the screen forward.

Rev.09072021-JA www.elitescreens.com 4
Notice to Installer:
PROPER PROJECTOR PLACEMENT
The CLR®3 is exclusively for tabletop mounted ultra-short throw projectors.
See illustrations for limits and criteria.
1) Tabletop mounted Ultra-short
throw projection illustration
IMPROPER PROJECTOR PLACEMENT
Overhead placement or a standard projector
will make the image very dark, on account of
the screen’s absorbent layer deflecting light
that is not aligned with its reflective angle
1) Ceiling Mounted Ultra-Short Throw
Projector Illustration
2) Ceiling Mounted Short and Standard-
Throw Projector Illustration
CLR®3 Material
CLR®3 Material
CLR 3 Material

Rev.09072021-JA www.elitescreens.com 5
1
3
4
B.
Collapsing thescreen:
Follow the steps below and Fig. 4.
1.
Push/press the Screen Height Adjustment Lock/Release to unlock and
slowly slide the handle all the way up to slowly retract the screen into its case.
2.
Unhook the screen material from the Top Hook and slowly retract the
screen back into the case.
3.
Once the material is in its case, Push/press the Screen Height
Adjustment Lock/Release to unlock and slowly slide the handle all the way
down to bring down the position of the screen’s case.
4.
Hold the Extension Bar and Push/press the Vertical Locking tab to
unlock and releasethe position of the extension bar. Bring the extension bar
all the way down.
5.
Turn the screen’s case vertically clockwise and insert the TopHook’s
bottom pin to lock into the screen’s end cap hole.
6.
Close the tripod legs by pushing them in.
Note:
•To ensure the screen is stable, extend the tripod’s legs as muchas possible.
•Do not fold the screen or allow any sharp objects to touch the screen’ssurface.
•Clean the screen surface often whenneeded.
•Careful use will extend the lifetime of thisproduct.
For more information, technical support or your local Elite Screenscontact,
please visit www.elitescreens.com
Fig. 4
2
Note: It is very important to remember to hold the extension bar first and then
unlock the adjustment tab to prevent the extension bar from slamming and
causing injury or damaging the screen.
This manual suits for next models
1
Table of contents
Other Elite Screens Camera Accessories manuals
Popular Camera Accessories manuals by other brands

Kaiser Fototechnik
Kaiser Fototechnik FilmCopy dia MF operating instructions
SLIK
SLIK PRO 700DX operating instructions
Gates
Gates CX700 Setup, use and care guide
Videotec
Videotec MAXIMUS MPX instruction manual
Livestream
Livestream Broadcaster Pro user manual
Bioenno Power
Bioenno Power BLF-2450AS quick start guide
