Elite Voltario T60 User manual

1
Esprit Tech Date: 11.12.2020 (1) 321.729.4287
P.O. Box 360815 Version: 1.03 Support@EspritTech.com
Melbourne, FL https://www.EspritTech.com
32936, USA
USER MANUAL
FEATURES
The Voltario T60 is a high performance digital dual battery backer with advanced telemetry features. It contains a
charging circuit and touch switch functionality. The device is ideal for mid-size models where high-voltage servos are
used without voltage stabilization.
Voltario T60 is suitable for models equipped either with dual receiver batteries, or with ESC battery eliminator
circuit (BEC) used as a primary power source, combined with a small backup battery. The device prefers its primary
battery input, while in case of voltage drop it automatically switches to the secondary input. The charging circuit may
be optionally enabled to charge the secondary battery from the primary input/BEC.
Voltario T60 is designed to turn on/off the electronics in your model, it can replace a mechanical switch as well. The
device remembers its last operating state, and if the battery is accidentally disconnected, the Voltario will
automatically boot up again as soon as the battery is connected again.
Intelligent dual battery backer/multiplexer with configurable voltage switchover threshold.
Touch switch function.
Duplex EX, Futaba S.Bus2, Multiplex MSB, Graupner Hott telemetry support (current, voltage, capacity of both
battery inputs).
Optional charging of the secondary battery.
Remembers the last operating state.
Voltario T60-C
Voltario T60 JR
Dimensions
36x19x6mm
36x19x6mm
Weight incl. cables
23g
17g
Cables
1mm2(17AWG)
0.5mm2 (20AWG)
Connectors
-
Standard JR
Continuous current
15A
Peak current (2s)
30A
Standby current
50 µA
Operating current
40mA
Charging current for Batt.2
up to 200mA
Operating temperature
-20 to 85°C
Supply Voltage
4 –12.6V
Recommended Supply Voltage
5-8.4V
Telemetry
Duplex EX, Multiplex MSB, Graupner Hott, Futaba S.Bus2
Touch switch support
Yes
BEC
No
Selectable touch / mechanical switch/ RC switch
Yes
Status LED´s
Yes
INSTALLATION
Plug the device between receiver and a primary battery/BEC. Connect the secondary battery to the B2 input.
Dual battery installation (without BEC):
T60-JR
T60-C

2
Installation with ESC BEC and a backup battery:
T60-JR
Optional mechanical/electronic switch connection:
T60-JR
T60-C
BATTERY BACKUP FUNCTION
The Voltario T60 generally uses its primary battery input B1 as a main power source. If the B1 voltage drops below
the configured Voltage threshold value, it can switch to the B2 input. In such case the source with higher voltage will
be used. As soon as the B1 voltage returns back above the threshold value (+ additional hysteresis), the T60 switches
automatically back to B1, no matter the voltage of B2 input. There are several applications where the user can benefit
from the T60:
ESC-Battery combination: Set the Voltage threshold value below the voltage of the battery eliminator circuit
(BEC). In this case, the BEC output will be used exclusively while the secondary input (B2) will act just as a
backup battery. Please note that both the ESC BEC and the backup battery must handle the full load of the
attached servos.
Equal dual battery discharging: Set the Voltage threshold value above the maximum battery voltage. Both
batteries will be discharged equally keeping equal voltage. The batteries have to be of the same chemistry,
number of cells and similar capacity. Set the Voltage hysteresis value to correspond the battery properties
(LiPol/LiIon –high or medium, LiFe –medium or low).
The T60 always drains power from a single battery input. This solution is robust against a spontaneous battery
shortcut. The active battery input is marked with a red LED.
BATTERY CHARGING CIRCUIT
The Voltario T60 contains a simple battery charging circuit designed for 2S Li-XXX without balancing. The charging
may be optionally enabled to keep the backup battery (B2) always ready without the need to remove it from the
model (however, we recommend to charge the battery with a balancer at least once in a month). Several safety
conditions are used during the charging:
The B1 voltage must be higher than the B2 voltage and the B1 must be selected/indicated by the LED.
The B2 voltage must be within the specified limits (5.5V - 8.3V for LiPol/LiIon; 5.0V –7.1V for LiFe). The T60
never charges to a full capacity.
The voltage difference must be lower than 5V.
The temperature must be below 70°C.
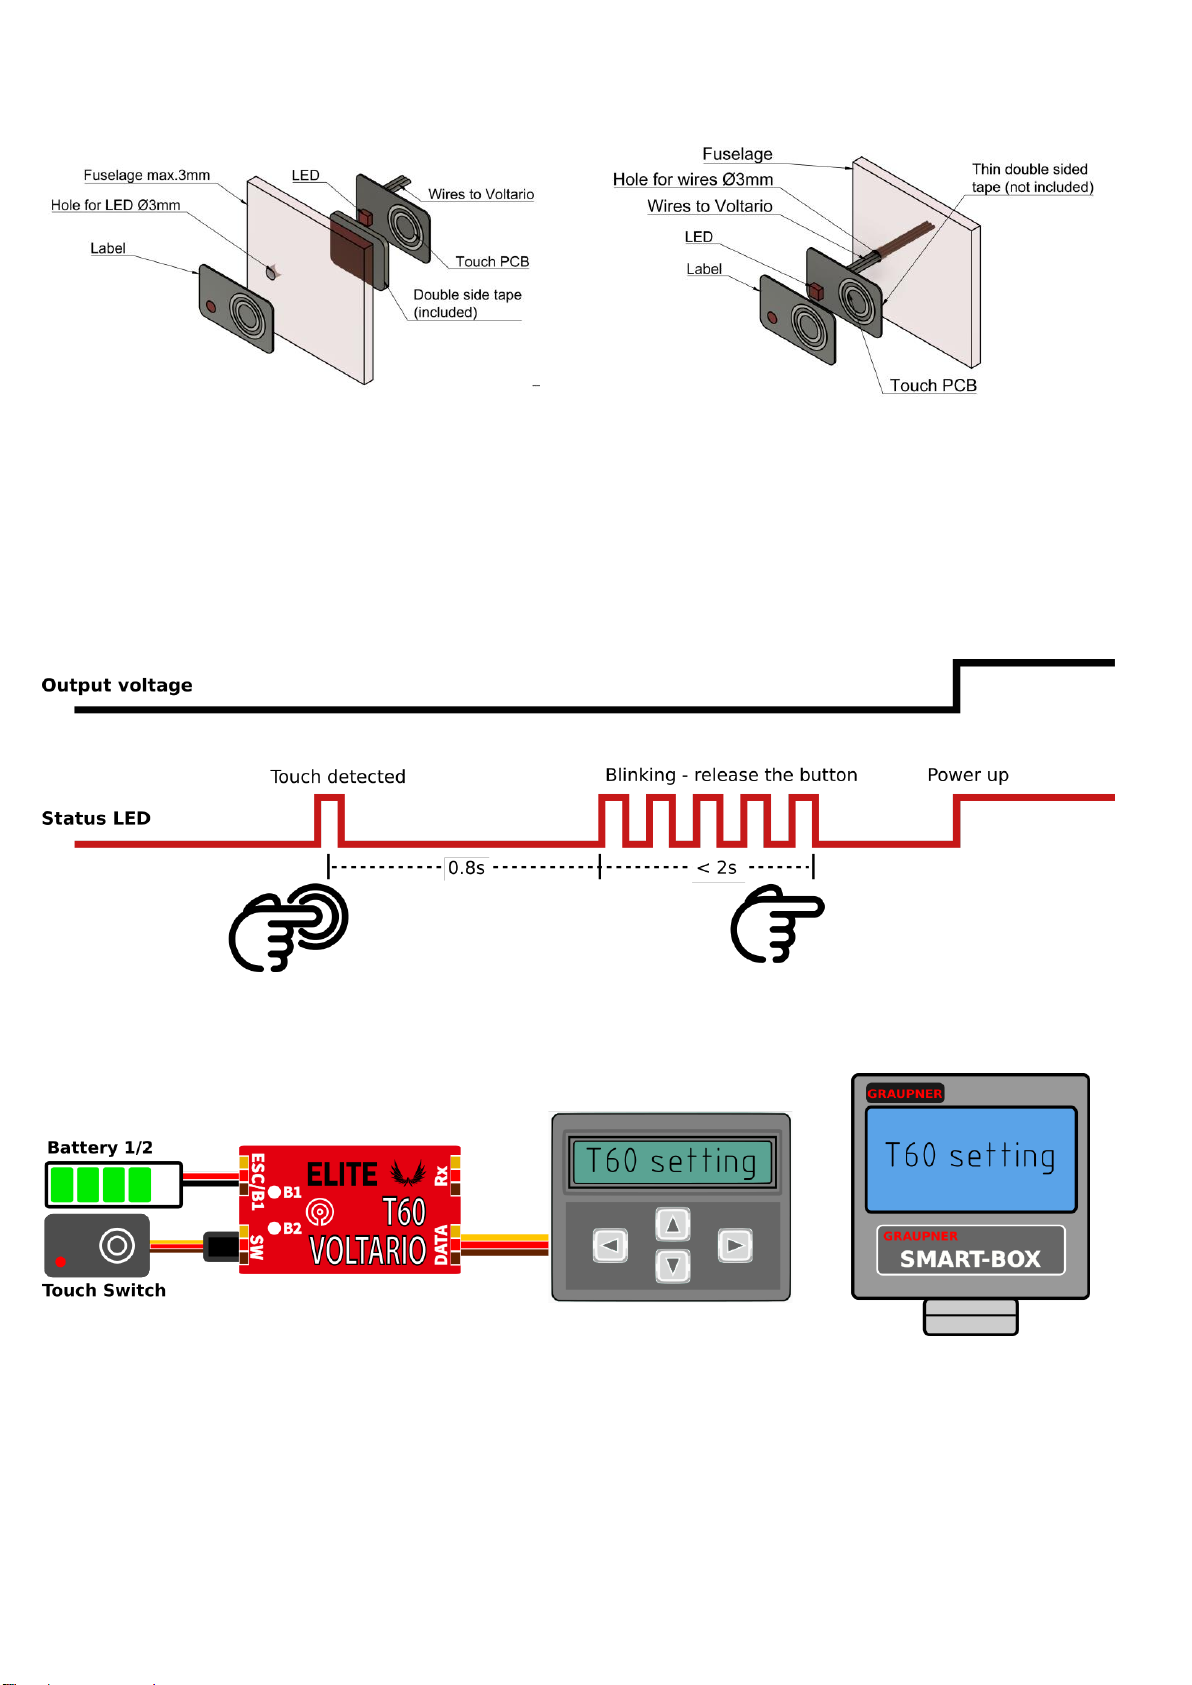
If using with R3/RSW Wireless Switch you
have to change setting of the Voltario T60
from "Touch" to "Electronic" setting.
For long term storage backup battery has
to be disconnected due to constant load of
the R3/RSW Wireless Switch.

3
TOUCH SWITCH
Installation inside the fuselage.
Installation on top of the fuselage.
Touch switch behavior
Place the touch button anywhere on your model on the surface made of nonconductive material. You can
place the touch button also inside the fuselage with maximum thickness up to 3mm.
Make the status LED visible from outside the fuselage and put the “touch” sticker on top of the touch surface.
Connect the receiver battery to the Voltario and briefly touch the button. Status LED should blink once. If not,
please increase the touch sensitivity parameter in the configuration.
Touch and hold the button for about 2 seconds. After the initial blink, the LED will start blinking again. At this
moment, release the button. The main output will be activated:
TELEMETRY AND SETTINGS
The device is compatible with JETIBOX/SMART-BOX and you can use it for programming. The JETIBOX menu is
divided into three sections:
Actual values –displays the latest telemetry values (current, voltage, capacity, temperature) together with
minimums and maximums.
oThe main screen shows device temperature together with voltage and current of the active battery. If
the charging is enabled and active, the „CHG“ status is displayed.
oIn the Capacity screen, you can press left+right buttons together to reset the measured capacity. The
asterisk marks the active battery input.
oThe “Time” screen shows a cumulative time of the primary and secondary battery input, meaning how
long each source has been used to power the device.
oReset Min/Max - press left+right buttons together to reset all minimums and maximums.

4
Settings –basic settings of the sensor
oLanguage –you can choose the language of the JETIBOX screen.
oSwitch type (Touch/Electronic/Mechanical). You can specify which type of switch will be used to turn
the device on and off. If you choose the Electronic option, you can connect any electronic switch with
voltage output (e.g. magnetic switch or radio controlled switch).
oTouch sensitivity –if the integrated touch switch is used, you can increase its sensitivity by editing
this value. Please note that increasing the sensitivity will allow you to install the Voltario directly
inside thicker fuselages. On the other hand, this will also make the touch sensor more vulnerable to
erroneous inputs.
oVoltage threshold –specifies the switchover voltage for B1and B2 inputs, see the Battery Backup
Function chapter.
oVoltage hysteresis (V1.03 and newer) –this parameter is taken into account in case of switching
supply from one battery to the other and back. It is important to keep the hysteresis low to enable
equal discharging of batteries. On the other hand, it must be high enough to prevent fast battery
switching under load. There are three possible options:
High hysteresis (LiPol) –approx. 1.2V. This is a default and recommended option for
LiPol(LiIon) - LiPol(LiIon) or ESC - LiPol(LiIon) combination. This option can be used together
with batteries of high internal resistance.
Medium –approx 0.5V. This option can be used for equal discharging of low-resistance
LiPol(LiIon) batteries.
Low (LiFe) –approx. 0.3V. Use this option together with low-resistance LiFe batteries.
oCapacity reset –Setting up this parameter will specify at which moment the capacity is reset to zero.
Available options:
Power-On (default) –capacity is reset every time after connecting the battery.
Voltage-Change –capacity is reset after connecting the battery with different voltage (by 15%
or more). This way the sensor may distinguish between charged and discharged battery.
Manual –capacity is never reset automatically.
oCharging –you can enable the charging function for 2SLi-Ion/Li-Pol or 2S LiFe secondary battery
(B2).
Service –In this menu you can view the device version and reset it to the default factory configuration.
JETIBOX menu structure
Graupner Hott Menu Structure
The Voltario T60 offers telemetry as an “Electric
Air Module”.

5
Futaba and Multiplex connection
Futaba and Multiplex systems do not offer wireless device configuration. The telemetry transmission is possible with
the following fixed sensor slots:
Futaba S.Bus2
Multiplex MSB
Current 1
2
3
Voltage 1
3
2
Capacity 1
4
4
Current 2
5
6
Voltage 2
6
5
Capacity 2
7
7
Note
Manual detection in the menu Linkage –Sensor. Choose
S1678 current sensor on slot 2 and 5.
Automatically detected by the transmitter.
SAFETY INFORMATION
Operate the Voltario T60 always in dry environment and within the device limits stated in this guide. Never
expose the device to excessive heat or cold.
Do not remove the heat shrink tube from the device and do not try to implement any changes or
modifications. This can lead to a total destruction and to the denial of any warranty claims.
Always check the polarity of the cables. Never inverse the polarity –this could lead to total destruction.
Always use a sufficient power source according to the consumption of the attached servos. Never exceed the
maximum allowed operating voltage of the attached servos.
FIRMWARE UPDATE
Firmware updates for the Voltario T60 are transferred from a PC via the USB interface. The required programs and
files are available at www.esprittech.com
Install the MAV Manager software and the USB drivers on your computer. Check the system requirements.
1) Disconnect all devices attached to the Voltario T60.
2) Connect the USB interface to your PC, run MAV Manager and select the correct COM Port.
3) Connect the T60 according to the picture below.
4) Apply external power to the T60 via B1 or B2 battery inputs.
5) Select the appropriate *.BIN file and press the Update button.
WARRANTY
We grant a warranty of 24 months from the day of purchase under the assumption that they have been operated in
conformity with these instructions at recommended voltages and that they were not damaged mechanically.
Warranty and post warranty service is provided by the manufacturer.
This manual suits for next models
2
Table of contents
Other Elite Control Unit manuals