manuals.online logo
Brands
  1. Home
  2. •
  3. Brands
  4. •
  5. Elko
  6. •
  7. Remote Control
  8. •
  9. Elko iNELS RF KEY-40 Instruction manual

Elko iNELS RF KEY-40 Instruction manual

02-9/2021 Rev.0
RF KEY - 40/60
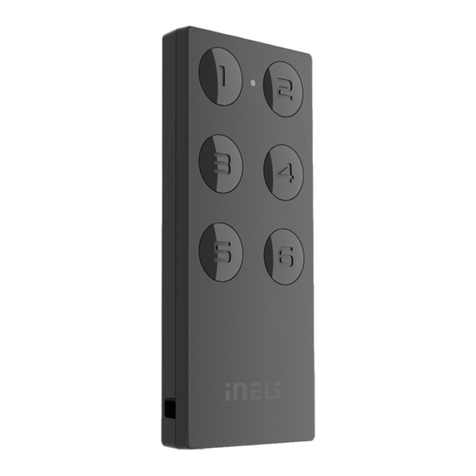
4/6 button controller - keychain
EN
Made in Czech Republic
RF controlers can control:
• switches
RFSA-11B, RFSA-61B, RFSA-62B, RFSA-61M, RFSA-66M, RFSAI-61B, RFSAI-62B, RFSC-11, RFSC-61,
RFUS-11, RFUS-61, RFJA-12B
• dimmers
RFDA-73/RGB, RFDA-11B, RFDA-71B, RFDEL-71B, RFDEL-71M, RFDSC-11, RFDSC-71, RFDAC-71B
• lighting
RF-RGB-LED-550, RF-White-LED-675
Characteristics /
Control options /
Indicators, settings /
1/2
Radio frequency signal penetration through various construction materials /
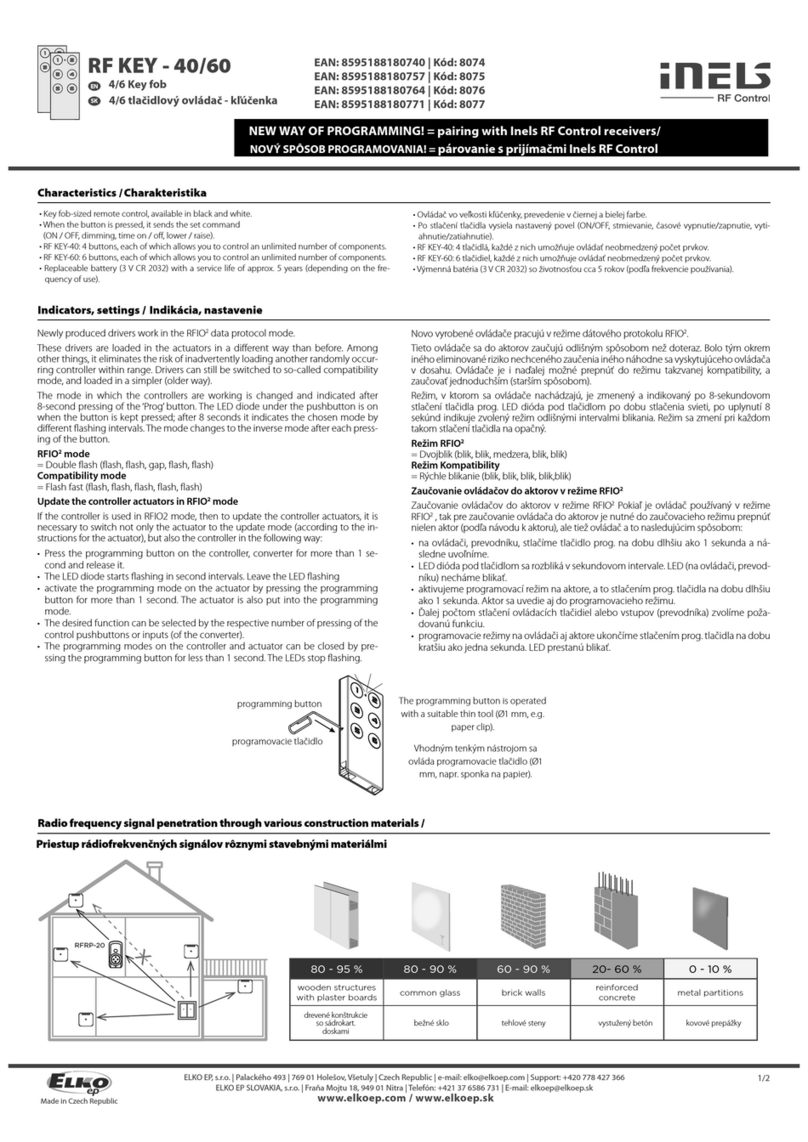
80 - 95 % 80 - 90 % 60 - 90 % 20- 60 % 0 - 10 %
wooden structures
with plaster boards common glass brick walls reinforced
concrete metal partitions
x
RFRP-20
After inserting the battery, the red LED lights up continuously for 3 seconds and then for 5
seconds, the selected controller function is indicated by flashing LED.
• double flash - standard RFIO2operating mode
• rapid flashing - mode of compatibility with older actuators
If you do not want to change the function of the controller, you must not press any buttons
during this time
To switch between RFIO2mode and compatibility mode:
If you need to change the operating mode of the controller, after inserting the battery, when
the LED is constantly lit. press buttons 1 and 3 simultaneously and hold until the LED starts to
signal the changed mode (double flash or rapid flash).
Then the buttons must be released. The selected function mode is stored in memory and after
replacing the battery, the controller continues to operate in the same mode.
If the controller is used in RFIO2mode, then it is necessary to instruct the controller and link to
the actuators switch to learn mode not only the actuator (according to the instructions for the
actuator), but also the controller in the following way: Remove the battery from the remote
control, press one of the buttons several times to discharge the device, and insert the battery
again. When the LED lights up, press button 1 and keep it pressed until the controller starts
signaling the learning mode with short flashing LEDs. Then release the button and the button
now works in RFIO2learning mode. To end the learning mode, remove the battery, press some
of the buttons several times. and then replace the battery. Now we press any button and the
controller will start again in RFIO2operating mode.
The RF controllers can control all switching and dimming components of the RF Control system,
which are marked with the RFIO and RFIO2communication protocols.
• Key fob-sized remote control, available in black and white.
• When the button is pressed, it sends the set command
(ON / OFF, dimming, time on / off, lower / raise).
• RF KEY-40: 4 buttons, each of which allows you to control an unlimited number of components.
• RF KEY-60: 6 buttons, each of which allows you to control an unlimited number of components.
• Replaceable battery (3 V CR 2032) with a service life of approx. 5 years (depending on the fre-
quency of use).
4/6 przyciskowy pilot - brelok
PL
www.elkoep.com / www.elkoep.pl
ELKO EP, s.r.o. | Palackého 493 | 769 01 Holešov, Všetuly | Czech Republic | e-mail: [email protected] | Support: +420 778 427 366
ELKO EP Poland, sp. z o. o. | ul. Motelowa 21 | 43-400 Cieszyn | Polska | e-mail: [email protected] | GSM: +48 785 431 024
ściana z cegły
konstrukcje drewniane
z płytami gipsowo-
kartonowymi
ściana
żelbetowa
ścianki
metalowe
zwykłe szkło
Urządzenia RF pozwalają na sterowanie:
• włączniki
RFSA-11B, RFSA-61B, RFSA-62B, RFSA-61M, RFSA-66M, RFSAI-61B, RFSAI-62B, RFSC-11, RFSC-61,
RFUS-11, RFUS-61, RFJA-12B
• ściemniacze
RFDA-73/RGB, RFDA-11B, RFDA-71B, RFDEL-71B, RFDEL-71M, RFDSC-11, RFDSC-71, RFDAC-71B
• oświetlenie
RF-RGB-LED-550, RF-White-LED-675
Charakterystyka
Możliwości sterowania
Przenikanie fal radiowych przez różnego rodzaju materiały budowlane
Sygnalizacja, ustawienia
Po włożeniu baterii przez 3 sekundy świeci czerwona dioda LED, później przez 5 sekund
miganie diody LED sygnalizuje wybraną funkcję sterownika.
• dwukrotne mignięcie – standardowy tryb pracy RFIO2
• szybkie miganie – tryb zgodności ze starszymi aktorami
Jeżeli nie chcesz zmieniać funkcji sterownika, to nie możesz w tym czasie naciskać żadnych
przycisków.
Przełączenie pomiędzy trybem RFIO2i trybem zgodności: Jeżeli zajdzie potrzeba zmiany trybu
pracy sterownika, to po włożeniu baterii, gdy dioda świeci, równocześnie naciśnij przyciski 1 i
3, i przytrzymaj je do momentu, kiedy dioda zacznie sygnalizować zmianę trybu (dwukrotne
mignięcie lub szybkie miganie).
Następnie należy zwolnić przyciski. Wybrany tryb funkcji zostaje zapisany w pamięci, po
wymianie baterii sterownik kontynuuje pracę w tym samym trybie.
Jeżeli sterownik pracuje w trybie RFIO2, to w celu przypisania sterownika do aktorów,
koniecznie należy wprowadzić w tryb nauki nie tylko aktor (zgodnie z instrukcją aktora),
ale również sterownik w następujący sposób: Wyjmij baterię z pilota, w celu rozładowania
urządzenia naciśnij kilka razy jeden z przycisków, s następnie włóż ponownie baterię. Gdy
dioda LED się zaświeci, naciśnij przycisk 1 i przytrzymaj go naciśnięty, dopóki sterownik nie
zacznie sygnalizować krótkim miganiem diody LED trybu nauki. Następnie zwolnisz przycisk,
sterownik rozpoczyna pracę w trybie nauki RFIO2. W celu zakończenia trybu nauki, wyjmij
baterię, kilkukrotnie naciśnij dowolny przycisk, następnie załóż z powrotem baterię. Po czym nie
naciskasz żadnych przycisków, sterownik rozpocznie ponownie tryb pracy RFIO2.
• Pilot wielkości breloka do kluczy, dostępny w czarnym i białym kolorze.
• Po naciśnięciu przycisku nadaje ustawione polecenie (ON/OFF, ściemnianie, opóźnione wyłącze-
nie/włączenie, wyciągnięcie/opuszczenie).
• RF KEY-40: 4 przyciski, z których każdy umożliwia sterowanie nieograniczoną ilością urządzeń.
• RF KEY-60: 6 przycisków, z których każdy umożliwia sterowanie nieograniczoną ilością urządzeń.
• Wymienna bateria (3V CR 2032) o żywotności ok. 5 lat (w zależności od częstotliwości użytko-
wania).
Pilot RF pozwala na sterowanie wszystkimi urządzeniami załączającymi oraz ściemniającymi w
ramach systemu RF Control, które są oznaczone protokołami komunikacyjnymi RFIO i RFIO2.
1
02-9/2021 Rev.0
RF KEY - 40/60
4/6 button controller - keychain
EN
Made in Czech Republic
Warning
Instruction manual is designated for mounting and also for user of the device. It is always a part of its packing. Instal-
lation and connection can be carried out only by a person with adequate professional qualification upon under-
standing this instruction manual and functions of the device, and while observing all valid regulations. Trouble-free
function of the device also depends on transportation, storing and handling. In case you notice any sign of damage,
deformation, malfunction or missing part, do not install this device and return it to its seller. It is necessary to treat
this product and its parts as electronic waste after its lifetime is terminated. Before starting installation, make sure
that all wires, connected parts or terminals are de-energized. While mounting and servicing observe safety regula-
tions, norms, directives and professional, and export regulations for working with electrical devices. Do not touch
parts of the device that are energized – life threat. Due to transmissivity of RF signal, observe correct location of
RF components in a building where the installation is taking place. RF Control is designated only for mounting in
interiors. Devices are not designated for installation into exteriors and humid spaces. The must not be installed into
metal switchboards and into plastic switchboards with metal door – transmissivity of RF signal is then impossible.
RF Control is not recommended for pulleys etc. – radiofrequency signal can be shielded by an obstruction, inter-
fered, battery of the transceiver can get flat etc. and thus disable remote control.
Technical parameters /
Attention:
When you instal iNELS RF Control system, you have to keep minimal distance 1 cm between each units.
Between the individual commands must be an interval of at least 1s.
2/2
RF KEY-40 RF KEY-60
Slide the CR2032 battery into
the battery holder. Observe
the polarity.
3
+
CR2032
+
Insertion and replacement of a battery /
Button 1
Button 3
Supply voltage:
Battery life:
Transmission indication:
Number of buttons:
Communication Protocal:
Frequence:
Signal transmission method:
Range:
Other data
Operating temperature:
Operating position:
Colour design:
Protection:
Pollution degree:
Dimensions:
Weight:
Related standards:
When handling a device unboxed it is important to avoid contact with liquids.
Never place the device on the conductive pads or objects, avoid unnecessary
contact with the components of the device.
Safe handling /
2
+
CR2032
+
Use a coin to open the key
fob and remove the front
cover. Carefully tap the de-
vice out of the bottom cover.
Insert the device into the
bottom cover. Attach the
front of the cover and click.
ELKO EP declares that the RF KEY type of radio equipment complies with Directive 2014/53 / EU.
The full EU Declaration of Conformity is available at:
www.elkoep.com/4-channel-controller---keychain-white
ELKO EP, s.r.o., Palackého 493, 769 01 Holešov, Všetuly, Czech Republic
Tel.: +420 573 514 211, e-mail: [email protected], www.elkoep.com
4/6 przyciskowy pilot - brelok
PL
www.elkoep.com / www.elkoep.pl
ELKO EP, s.r.o. | Palackého 493 | 769 01 Holešov, Všetuly | Czech Republic | e-mail: [email protected] | Support: +420 778 427 366
ELKO EP Poland, sp. z o. o. | ul. Motelowa 21 | 43-400 Cieszyn | Polska | e-mail: [email protected] | GSM: +48 785 431 024
Instrukcja obsługi służy do celów montażu oraz dla użytkowników urządzeń. Instrukcja obsługi zawsze wchodzi w skład opa-
kowania urządzenia. Montaż oraz podłączenie mogą wykonywać wyłącznie osoby z odpowiednimi kwalifikacjami zawodo-
wymi, zgodnie z obowiązującymi przepisami, które w odpowiedni sposób zapoznały się z instrukcją obsługi oraz działaniem
urządzeń. Bezproblemowe działanie urządzeń jest również zależne od wcześniejszego sposobu transportu, magazynowania
oraz manipulacji. W przypadku wykrycia jakichkolwiek oznak uszkodzenia, odkształcenia, awarii lub brakujących elementów,
prosimy o nieinstalowanie urządzenia oraz zwrócenie się do sprzedawcy. Urządzenie lub jego części muszą być potrakto-
wane po końcu okresu używania jako odpad elektroniczny. Przed rozpoczęciem instalacji należy upewnić się, że wszystkie
przewody, podłączone części lub terminale nie są pod napięciem. W trakcie montażu lub konserwacji koniecznym jest
dotrzymanie przepisów bezpieczeństwa, norm, dyrektyw oraz przepisów branżowych, dotyczących pracy z urządzeniami
elektrycznymi. Nie należy dotykać części urządzeń pod napięciem - ryzyko zagrożenia życia. Ze względu na właściwe przeni-
kanie fal radiowych RF, pamiętaj o właściwym umieszczeniu urządzeń w budynku, w którym są instalowane. Urządzenia RF
Control są przeznaczone wyłącznie do montażu wewnątrz budynków. Urządzenia nie mogą być instalowane na zewnątrz
lub w pomieszczeniach wilgotnych, dalej nie mogą być instalowane w metalowych szafach rozdzielczych lub plastikowych
szafach rozdzielczych z metalowymi drzwiami - uniemożliwi prawidłowe przenikanie fal radiowych. Urządzeń RF Control
nie należy używać do sterowania urządzeniami o podwyższonym ryzyku, takimi jak pompy, el. urządzenia grzewcze bez
termostatu, windy, dźwigi, itp. - przepływ fal radiowych może być przerwany, naruszony przez przeszkodę, bateria nadajnika
może być rozładowana itp. Z wyżej wymienionych powodów może dojść do zakłócenia lub uniemożliwienia sterowania.
Ostrzeżenie
Dane techniczne
Uwaga:
Podczas instalacji systemu iNELS RF Control koniecznym jest dotrzymanie minimalnej odległości
1 cm pomiędzy elementami.
Wymagany jest odstęp min. 1s pomiędzy kolejnymi poleceniami.
Za pomocą śrubokręta krzy-
żakowego odkręć śrubkę i
zdejmij tylną pokrywę.
Załóż baterię CR2032 do
uchwytu. Zwróć uwagę na
polaryzację!
Włóż urządzenie do obudo-
wy tak, aby się w niej zatrza-
snęło.
Instalacja oraz wymiana baterii
Napięcie zasilania:
Trwałość baterii:
Sygnalizacjanadawania poleceń:
Ilość przycisków:
Protokół komunikacyjny:
Częstotliwość:
Typ transmisji sygnału:
Zasięg:
Pozostałe dane
Temperatura robocza:
Pozycja robocza:
Kolorystyka:
Klasa szczelności:
Stopień zanieczyszczenia:
Wymiary:
Waga:
Normy:
3 Vbattery / bateria CR 2032
about 5 years depending on the frequency of use / 5 lata w zależności od częstotliwości używania
red / czerwona LED
4 6
RFIO2
866–922 MHz
one-way addressed message / jednokierunkowo skierowane polecenie
in the open up to 200 m / w wolnej przestrzeni do 200 m
-10 ... +50 °C
any / dowolna
white, black / biały, czarny
IP20
2
71 x 31 x 8 mm
17 g
EN 60669, EN 300220, EN 301489 R&TTE Directive, Order. No 426/2000 Coll. (Directive 1999/EC
) /
EN 60669, EN 300 220, EN 301 489 dyrektywa RTTE, NVč.426/2000Sb (dyrektywa 1999/ES)
Nie pozwól na kontakt z cieczami w trakcie korzystania z urządzenia bez obudowy. Nie należy umiesz-
czać urządzenia na powierzchniach przewodnych. Nie dotykaj części wewnątrz urządzenia.
Bezpieczna manipulacja urządzeniem
Przycisk 1
Przycisk 3
ELKO EP, Ltd. oświadcza niniejszym, że typ urządzenia radiowego typu RF Key jest zgodny z dyrektywą 2014/53 / UE.
Pełna deklaracja zgodności UE jest dostępna pod adresem:
www.elkoep.com/4-channel-controller---keychain-white
ELKO EP POLAND Sp. z o.o., ul. Motelowa 21, 43-400 Cieszyn, Polska
GSM: +48 785 431 024, e-mail: elko@elkoep.pl, www.elkoep.pl

This manual suits for next models

5

Other Elko Remote Control manuals

Elko iNELS RF KEY-40 User manual

Elko

Elko iNELS RF KEY-40 User manual

Elko iNELS Air AirKey/W User manual

Elko

Elko iNELS Air AirKey/W User manual

Elko iNELS RF KEY-40 User manual

Elko

Elko iNELS RF KEY-40 User manual

Elko RF Pilot User manual

Elko

Elko RF Pilot User manual

Elko iNELS RF KEY-40 User manual

Elko

Elko iNELS RF KEY-40 User manual

Elko iNELS RF KEY User manual

Elko

Elko iNELS RF KEY User manual

Elko RF Pilot User manual

Elko

Elko RF Pilot User manual

Elko iNELS RF KEY-40 Instruction manual

Elko

Elko iNELS RF KEY-40 Instruction manual

Elko iNELS RF KEY-40 Instruction manual

Elko

Elko iNELS RF KEY-40 Instruction manual

Elko iNELS RF KEY-40 Instruction manual

Elko

Elko iNELS RF KEY-40 Instruction manual

Popular Remote Control manuals by other brands

Maxview URC6D Programming & operating instructions

Maxview

Maxview URC6D Programming & operating instructions

Dish Network Solo 301 Setting up

Dish Network

Dish Network Solo 301 Setting up

FMS F-4 user manual

FMS

FMS F-4 user manual

Universal Remote Control MX-500TM operating manual

Universal Remote Control

Universal Remote Control MX-500TM operating manual

MTHTrains DCS Operator's manual

MTHTrains

MTHTrains DCS Operator's manual

WAREMA WMS Hand-held transmitter plus Operating and installation instructions

WAREMA

WAREMA WMS Hand-held transmitter plus Operating and installation instructions

ESYLUX Mobil-PDi/MDi Series manual

ESYLUX

ESYLUX Mobil-PDi/MDi Series manual

Carrier RG67N/BGEF owner's manual

Carrier

Carrier RG67N/BGEF owner's manual

Siemens Remote Control user manual

Siemens

Siemens Remote Control user manual

Rayrun T122 manual

Rayrun

Rayrun T122 manual

Miscea Remote Control instruction manual

Miscea

Miscea Remote Control instruction manual

Layer3 TV URC9700 user manual

Layer3 TV

Layer3 TV URC9700 user manual

oticon ConnectLine App user guide

oticon

oticon ConnectLine App user guide

Irritrol CMR-KIT user guide

Irritrol

Irritrol CMR-KIT user guide

Cervis SmaRT 206 user manual

Cervis

Cervis SmaRT 206 user manual

Nikko NANO VAPORIZR 2 owner's manual

Nikko

Nikko NANO VAPORIZR 2 owner's manual

GDI GDRC-400T user manual

GDI

GDI GDRC-400T user manual

Sony RM-VL1400T operating instructions

Sony

Sony RM-VL1400T operating instructions

manuals.online logo
manuals.online logoBrands
  • About & Mission
  • Contact us
  • Privacy Policy
  • Terms and Conditions

Copyright 2025 Manuals.Online. All Rights Reserved.