ellos 1675332-01-0 Operation and maintenance manual

1 of 15
Infrared Patio Heater
Safety Instructions and Operation Manual
1675332-01-0
1. This appliance can be used by children aged
from 8 years and above and persons with
reduced physical, sensory or mental
capabilities or lack of experience and
knowledge if they have been given
supervision or instruction concerning use of
the appliance in a safe way and understand
the hazards involved. Children shall not play
with the appliance. Cleaning and user
maintenance shall not be made by children
without supervision.
2. If the supply cord is damaged, it must be
replaced by the manufacturer, its service

2 of 15
agent or similarly qualified persons in order
to avoid a hazard.
3. Children of less than 3 years should be kept away
unless continuously supervised.
4. Children aged from 3 years and less than 8 years
shall only switch on/off the appliance provided that
it has been placed or installed in its intended
normal operating position and they have been
given supervision or instruction concerning use of
the appliance in a safe way and understand the
hazards involved. Children aged from 3 years and
less than 8 years shall not plug in, regulate and
clean the appliance or perform user maintenance.
5. CAUTION — Some parts of this product can become
very hot and cause burns. Particular attention has

3 of 15
to be given where children and vulnerable people
are present.
6. The heater must not be located immediately
below a socket-outlet.
7. The Installation of the heater should not be
close to curtains and other combustibble
materials
8. Do not use this heater with a programmer,
timer, separate remote-control system or any
other device that switches the heater on
automatically, since a fire risk exists if the
heater is covered or positioned incorrectly.
9. Do not use this heater in the immediate
surroundings of a bath, a shower or a
swimming pool.

4 of 15
Brief Introduction
This product is infrared radiant heater with remote control and
IP 65 approved .It is almost unlimited used in outdoor ,such as
open bars, courtyard, plaza, station in winter etc. This patio
heater is energy-efficient, convenient, environmentally friendly
and for better life etc.
Important Safety Instructions
When using electrical appliances, basic safety precautions
should always be followed to reduce the risk of fire, electric
shock, or injury to persons, including the following:.
Read all instructions before using this heater
This heater is hot when in use .To avoid burns,do not let bare
skin touch hot surfaces.If provided ,use handles when moving
this heater.Keep combustible materials,such as furniture,
pillows ,bedding ,papers,clothes and curtains at least 0.9m
from the front of the heater.
Extreme caution is necessary when any heater is used by or
near children or invalids and whenever the heater is left
operating and unattended.
Always unplug heater when not in use
Do not run cord under carpeting. Do not cover cord with
throw rugs, runners, or similar coverings. Do not route cord
under furniture or appliances. Arrange cord away from

5 of 15
traffic area and where it will not be tripped over.
Connect to properly grounded outlets only.
To disconnect heater, turn controls off, then remove plug
from outlet.
Do not insert or allow foreign objects to enter any
ventilation or exhaust opening as this may cause an electric
shock or fire, or damage the heater.
To prevent a possible fire, do not block air intakes or
exhaust in any manner(such as newspapers, table-cloths,
curtains, etc.).Do not use on soft surfaces, like a bed,
where openings may become blocked.
No naked flame sources, such as lighted candles, should
be placed on the apparatus.
A heater has hot and arcing or sparking parts inside. Do not
use it in areas where gasoline, paint, or flammable liquids
are used or stored.
Use this heater only as described in this manual. Any other
use not recommended by the manufacturer may cause fire,
electric shock, or injury to persons.
Always plug heaters directly into a MAINS socket outlet
with a protective earthing connection. Never use with an
extension cord or relocatable power tap (outlet/power
strip).
Check if the voltage indicated on the nameplate of the
appliance corresponds to the local mains voltage before
you connect the appliance.
The appliance is not located immediately below a wall
socket-outlet.

6 of 15
The casing and the front cover of the appliance become
extremely hot during operation. Pay attention that, no
combustible material due to wind or other environmental
influences covers or obstructs the appliance, such as
curtains, marquees, flags, plastic foil etc. Do not touch the
appliance. Caution! Risk of scald injury!
In case of improper use, there is a risk of electrical shock
and/or fire hazard. Operation of the appliance must be
discontinued and remove the mains plug immediately. Do
not try to repair the appliance by your-self. Please contact
with the service agent or a suitably qualified electrician for
maintenance.
Remove the plug from the power outlet and wait until the
appliance is sufficiently cooled off before cleaning.
The appliance must only be mounted by an authorized
specialist, paying attention to the relevant regulations of
the power supply companies and the regional construction
regulations.
Note:This product is strictly prohibited to cover.
Save These Instructions
Specifications
Specification □LDHR016-250KB

7 of 15
Voltage (V) □ 220-240V~50/60Hz
Power consumption (W) □2500W
IP code □IP65
Remote control mode □BLE、433Mhz Wireless
Bluetooth receiver
distance
□ ≤20M
Action angle of tilt switch □ 50°±10°(360°)
BLUETOOTH OPERATION
The 'Sunkare Heater' App will allow you to connect remotely
to many heaters and control them independently. Control
functions include:
On/Off
Variable heat output from 0 to 100%
Timer with auto shut off
Password connection to heaters
Individual heater identification and control
To download,search for 'Sunkare 'in your App store and add
to your device.
Function Instruction

8 of 15
Button
Graphic
Feature
Up Arrow
Up one heating level
Max
The heater goes directly to the
highest heating level.
Down Arrow
Down one heating level
On
To switch the heater on:
Press ON. The patio heater has a
soft start function of 33% power.
4 seconds after the heater has
been turned on, it will
automatically switch to the last
heating level used. In case of the
first-time use, after 4seconds
Remark Name Function
A Heating
module
Heating
B Heater stand Fixed heating module
C Plug Connecting the power
D Switch On/off
E Reset button
1、Turn on position,Press the reset button
more than 5 seconds.then the Bluetooth
password will be resetted.
2、Standby position,Press the reset button
more than 5 seconds.then press any buttons
on remote control, heater and remote cotrol
will be matching.

9 of 15
the heater will automatically
switch to 100% power.
Off
To switch the heater off:
Press OFF. The heater will switch
to standby mode(the receiver
indicator will light up).
Notice
:
Use 2 pieces AAA size 1.5V batteries in the remote control. Remove the battery when not use
for long time, thus the lifespan of remote control can be extended.
Choose the same specification battery when replacing the battery inside, otherwise it may
cause remote control not work , thereby affect the normal use of the heater.
Please contact service agent for further help if you need the function.
The remote control function may be out of work if there is a barrier between the remote
control and heater .
Replacing the batteries duly so as not to affect the normal use of heater and remote control.
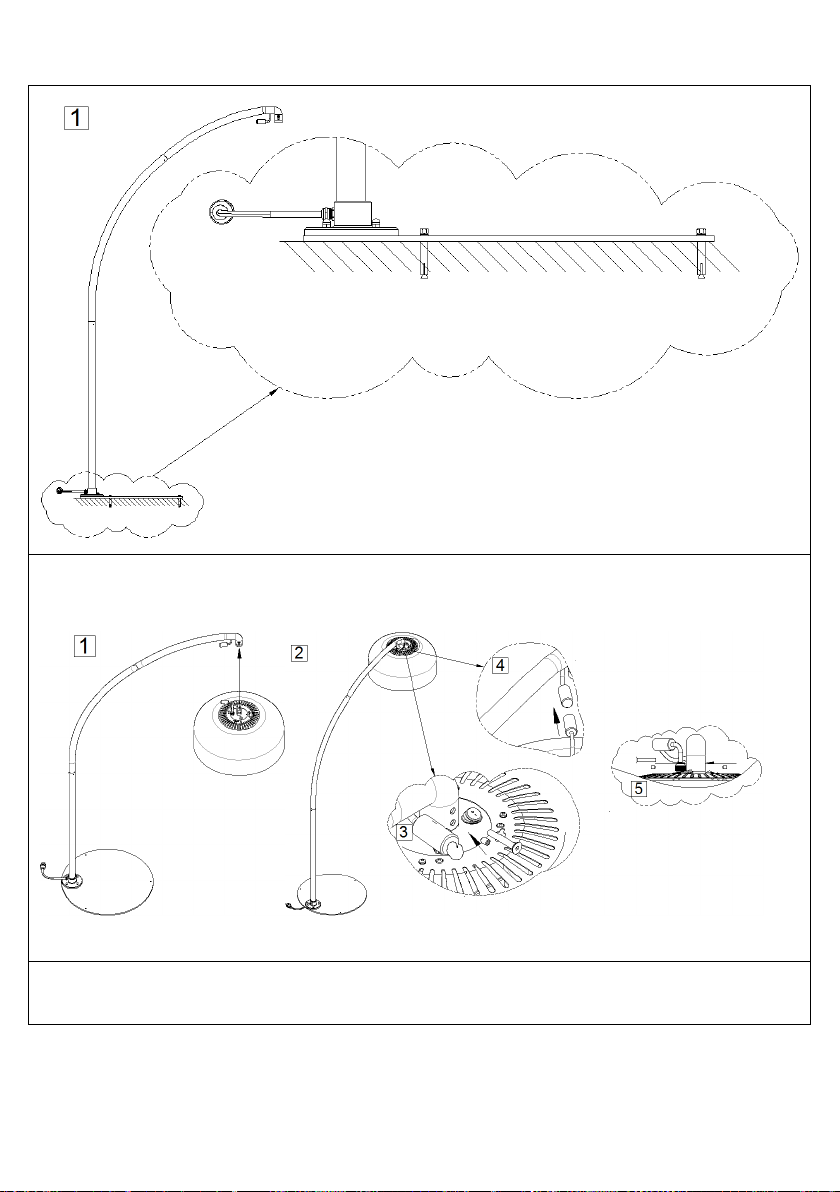
Operation Instruction
Install the heater according to the following steps.
1,Open the outer carton,remove all the packing
materials(including heating lamp shaking protection
packing ),then check if everything is OK for the heating
mould,heater stand mould,wire cable and plug.
2,Take out of the heating mould,heater stand mould,heater
stand base,screws and assembling tools.
3,Connect the two curved poles.see Fig.1.then put 3pcs
M6X8 in the corresponding holes,tight them by tools.Please
pay attention that Do not damage the wire cable during the

10 of 15
assembling.
4,Connect the curved pole to the straight pole.see Fig.2
then put 3pcs M6X8 in the corresponding holes,tight them by
tools.Please pay attention that Do not damage the wire cable
during the assembling.
5,Connect the whole poles to the round base with 4pcs
M8x8 screws. See Fig.3
6,Connect the round based to the ground by expansion
screws.see Fig.4
7,Connect the heating mould to the heater stand mould by
M8X50 and 2pcs M8X10 screws.Connect the easy fitting plug
devices between the heating mould and heater stand
mould.and tight them.see Fig.5
8,Turn on the switch and connect the power,to check if the
heater can work well.
9,Don’t move,cover or climb the heater while it is working.
See Fig.6
Pay attention to the mounting place and all mounting
material(dowels, screws). Ensure they are suitable and
stable enough for mounting and lastingly holding of the
appliance.
Pay attention that, the installation of the appliance must
not add excessive wind load.
Adjust the desired angle of radiation and fest screw all
screws. Check regularly the screw's connection. Mechanical
bearing pressure and oscillation due to wind or rain could
lead to loose.

11 of 15
Plug in the power source and operate the remote control.
Then observe, whether during the first 10-15 minutes the
appliance works trouble-free.
If you do not use,please remove battery socket.
Figure1
Figure2

12 of 15
Figure3
Figure4
13 of 15
Figure5
Figure6

14 of 15
Cleaning and Maintenance
This appliance is consist of a robust and maintenance-free
aluminum casing with a protection cover. No user
serviceable parts inside.
Before cleaning,remove the plug from the power outlet and
wait until the appliance is sufficiently cooled off.
Wipe the appliance only with clean and lint-free cloth or a
soft brush.
Never use abrasive cleaners, scrubbing brushes and
chemical cleaners for cleaning!
Can use alcohol to clean the appliance.
To protect against electrical shock and danger of life, do not
immerse cord, plug, or any part of the appliance in water or
other liquid.
For heating element replacement, please contact the
manufacturer or its service agent or a similarly qualified
person.
Any other service, please contact with the service agent or
15 of 15
a suitably qualified electrician.
Storage
Do not route cord when heater storage, or heater is not in
use.
Disposal
This marking indicates that this product should not be
disposed with other household wastes throughout the
EU. To prevent possible harm to the environment or
human health from uncontrolled waste disposal,
recycle it responsibly to promote the sustainable reuse
of material resources. To return your used device,
please use the return and collection systems or contact
the retailer where the product was purchased. They can
take this product for environmental safe recycling.
Customer Service
Repairs must be carried out by authorized specialists, thus
ensuring electrical safety.
Please contact with the service agent or a suitably qualified
electrician.
Improper repairs could lead to danger to the user.
This warranty does not cover damage of failure which
results from alteration, accident, misuse, abuse, neglect,
commercial use or improper maintenance.
In line with our policy of continuous product development
we reserve the right to change the product and

16 of 15
documentation specifications without notice.
Table of contents
Popular Patio Heater manuals by other brands

Dimplex
Dimplex OPH 1300 Installation and operating instructions

CROWN VERITY
CROWN VERITY FLAME PATIO owner's manual

Endless Summer
Endless Summer EWT700SP owner's manual

CROWN VERITY
CROWN VERITY ZCV-2670-SS owner's manual

Outdoor Leisure
Outdoor Leisure Heat-N-Glo TD120A owner's manual

LUX
LUX 547705 instruction manual


dobar
dobar Cozy Column instruction manual

Qlima
Qlima PGU 2013 operating manual

Sunred
Sunred RD-SILVER-2000W Translation of the original instructions

Garden Treasures
Garden Treasures PG167H-A user manual

BEHA
BEHA TV2000IN operating instructions

SunGlo
SunGlo A270 Installation, operation and maintenance instructions