manuals.online logo
Brands
  1. Home
  2. •
  3. Brands
  4. •
  5. Elonex
  6. •
  7. Tablet
  8. •
  9. Elonex eTouch 1000ET User manual

Elonex eTouch 1000ET User manual

Program Menu
On the right hand side of your home screen is the Program menu icon. Tap
the square icon in the centre to open a menu of your installed apps. To open
an app just tap it once and it will launch.
To change the shortcuts above and below the square program menu icon
simply tap and hold and icon you've already placed on the home screen,
then drag it onto the existing icon to replace it.
Connecting to Wi-Fi
Follow the instructions below to connect to a b/g Wi-Fi Connection:
:: From the home screen tap Settings, then Wireless and networks.
:: Then tap Wi-Fi to turn on the eTouch™’s Wi-Fi module
(please note that this will use your battery life faster).
:: Tap Wi-Fi Settings, then Add Wi-Fi Network. The eTouch™ will then
automatically scan for available Wi-Fi hotspots.
:: Select the desired Wi-Fi hotspot from the list.
:: If the hotspot doesn't have a password it will automatically connect,
however if it‘secure’, a password window will pop up letting you enter the
correct password. For password details refer to your ISP or the sta at the
internet cafe/coee shop etc.
Menu Icons
In the top right corner of your screen are the Menu icons. These give you
important information about the status of the eTouch™ as well as options and
shortcuts.
You can quickly see whether you are connected to Wi-Fi (the number of Wi-Fi
bars increase or decrease depending on the signal strength), the amount of
charge in your battery, or increase or decrease the volume. Tap the Back
button (and also the physical button on the front of the eTouch™) to go Back to
the previous screen.
Tap the Menu Icon at any time to bring up a menu of options relevant to
the screen you have open. For example on the home screen, tapping the menu
icon brings up ways to change your homescreen, and if you have the eMail app
open the menu icon brings up options to do with your eMail.
Pressing the Home icon will take you straight back to your main home screen.
When viewing your home screen, press and hold the physical‘Back’ button on
the front of your eTouch™ to bring up an overview of your home screens. You can
tap one to quickly zoom to that home screen.
To increase or decrease the number of home screens tap the menu icon and tap
‘Edit’. Here you can add more home screens by pressing the + icon or delete
home screens by swiping across to the relevant screen and tapping - buttons.
Program Menu
Click to show a list of programs
Home Screen
Swipe left / right to view your
5 home screens
Widgets & Shortcuts
Menu Icons
See right for details
Google Search
Search the internet
Notication Bar
Swipe ‘Down’to open
Option Menu
Wi-Fi Signal Strength
Battery Charge
Volume Down
Volume Up
Back
Menu
Return to Homescreen
Program Menu
Menu Icons
Telephony / 3G
(included for future use)
Files and Folders
To browse your les and folders tap the OI File Manager which has an icon
like a folder. First time you use it you need to agree to the EULA conditions by
pressing Accept. You will then be presented a list of folders;
:: SD Card - if you have a micro SD Card inserted
:: uDisk - if you have a USB Flash Device connected to the USB port
:: NAND - which is the eTouch™’s on-board storage
To create a new sub-folder open the SD Card/uDisk/NAND folder and press
the Menu icon, then New Folder. Enter the name to create a new folder and
press OK to conrm
To copy and paste les from one folder to another, tap and hold the original
le for about 1 second. A menu will pop up with options to Send (via eMail),
Move, Copy, Rename, Delete, plus various other le specic options. Tap Copy
(to create a duplicate of the le) or Move.You can then navigate to the
destination folder where you want to copy the le and then tap the “Copy
Here”or “Move here”button to transfer the le.
0871 222 3456
(Mon- Fri naonal rate)
[email protected]
www.elonex.com/support
Introduction
Please read this quick start guide
carefully to help you get the
most out of your eTouch™.
Your new eTouch™ is a great new way
to experience the web, using the
new Google™ Android™ OS and a
touchscreen interface.
Package Contents
Before using your eTouch™, please check your package contents to ensure
there aren’t any items missing. If any of the listed items are missing or
damaged, please contact your point of purchase for assistance.
The package includes:
1. 10” eTouch™ Tablet
2. Mains Power Adaptor (230V)
3. Quick Start Guide
4. Guarantee Card
Help & Support
To help you get the best out of your product we provide you with a limited 1 year Return
to Base Warranty and Support Helpdesk. For all technical support please contact our
helpdesk using the details below:
If you have any problems or questions please
DO NOT take your eTouch™ back to the store.
Please contact us for some helpful advice.
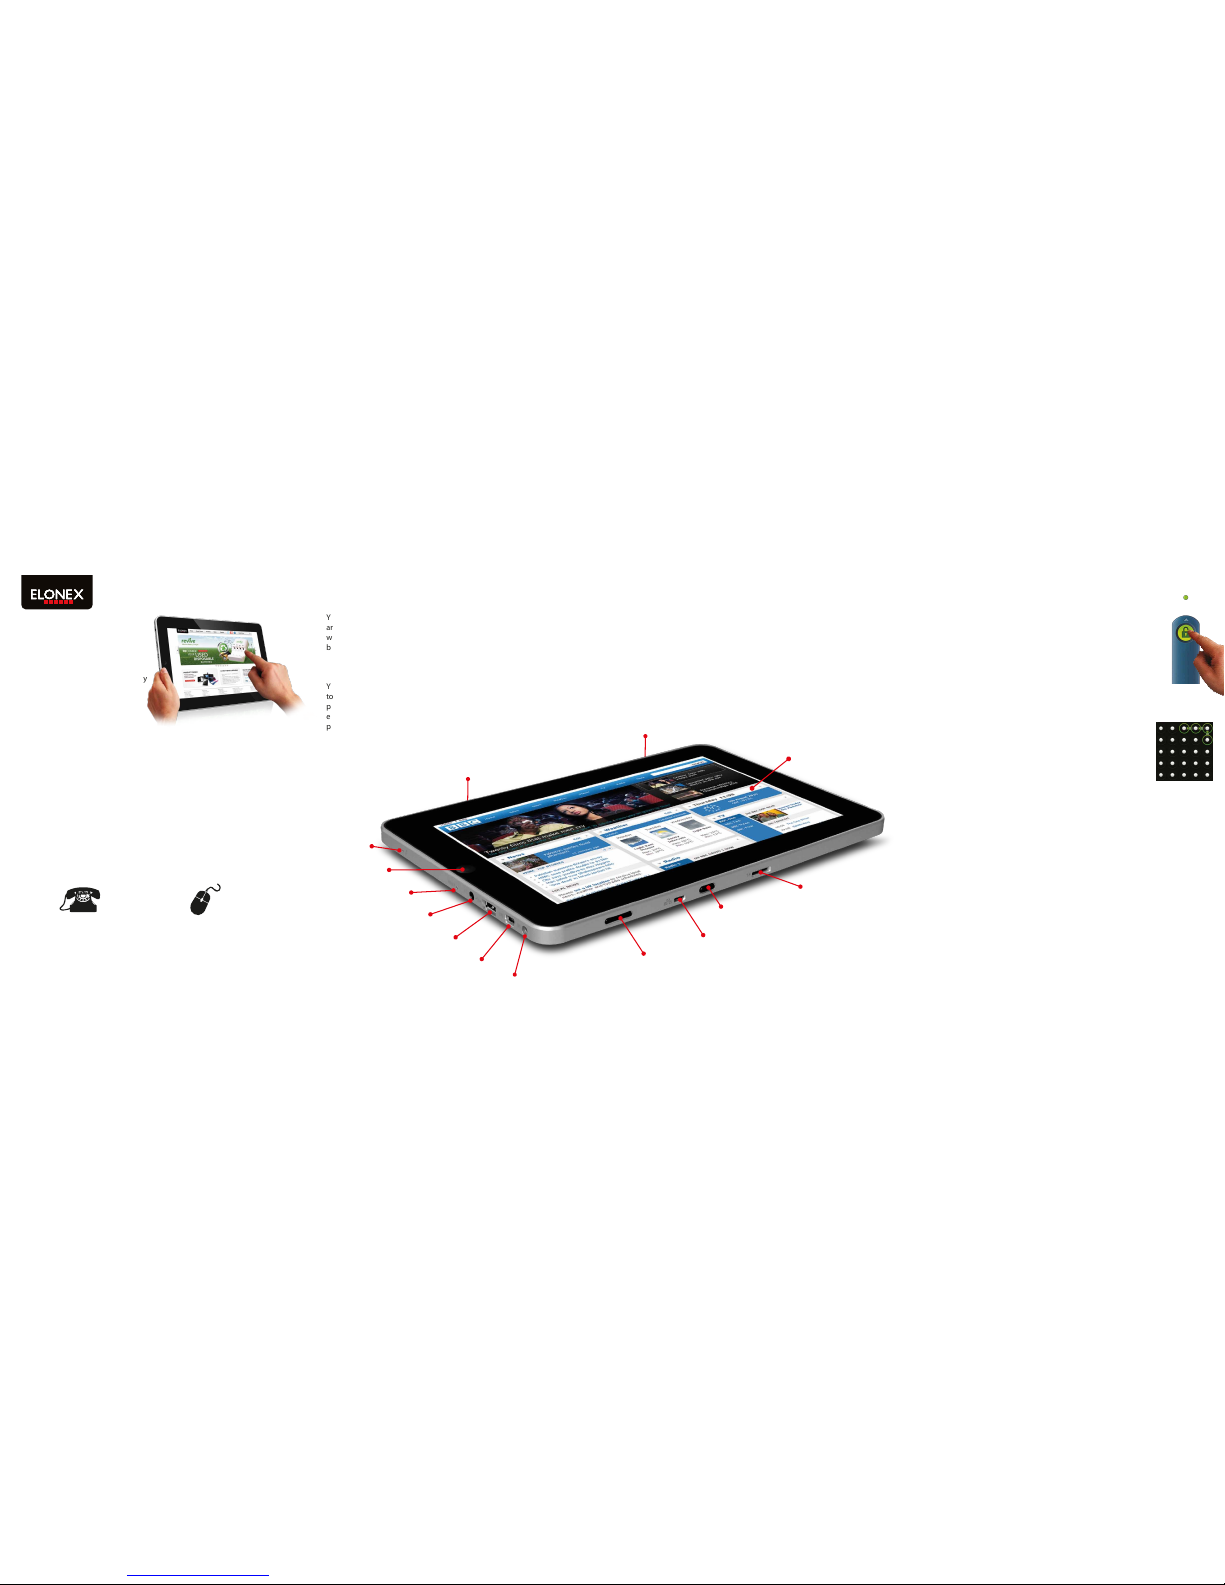
About your eTouch™
With its amazing LED backlit touchscreen navigating around the eTouch™ is as
easy as a quick swipe of your ngertips. The Android™ OS is specically
designed with large buttons and icons which suit the size of your ngers,
although you can use a USB mouse if you prefer. You can touch, tap and swipe
the screen, just like you’d use a mouse, but please dont use sharp or pointed
instruments as you may damage the screen.
The eTouch™ has a built in G-sensor which ips the screen into any orientation,
letting you use it landscape, portrait or even ip it over to show a friend.
Back / Forward (when using the internet)
Network 10/100Mbps Port
(Adaptor not included)
Power Button
TF Memory Card Reader
(Micro SD)
Power Input
DC 9V, 2100mA
Microphone
Reset Button
OTG Port (mini USB)
for rmware updates / syncing
3.5mm Earphone Port
USB 2.0 Port
Speaker
Speaker
10” LCD Touchscreen
LED Backlit, Resistive Touch
Back Button
Battery Charging
Your eTouch™ has a built in rechargeable lithium battery which provides
around 3 Hours battery life (depending on usage). The eTouch™ is supplied
with no charge in the battery and we recommend that you charge the
battery for around 8 Hours for its rst charge, to achieve the best battery life.
Memory & Expansion
Your eTouch™ comes with 2GB of internal memory and will also support up
to a huge 32GB Micro SD card to store your favourite music, movies and
photos. Insert the card with the metallic connectors facing the rear of the
eTouch™ until you feel a tap which will lock the card into place. To remove,
push the card gently inwards until you hear a tap and then it will pop out.
Turning your eTouch™ on
Once you’ve charged the battery you can turn the eTouch™
ON by pressing the power button and the Android™ OS will
load. To unlock the screen (its locked to avoid accidentally
pressing buttons when not being used) slide the padlock
icon until it covers the green dot. The eTouch™ will then load
you home screen for you to start navigating to your chosen
function. The screen will automatically lock after a period of
non-use (you can change the length of this time period in
the Settings menu)
Security
You can increase the security settings to protect your
eTouch™ by using a unique unlock pattern. Tap to Settings
> Location and Security > Set Unlock Pattern and follow
the on-screen instructions. Please note that your unlock
pattern should use at least 4 dots and the eTouch™ will be
more secure with a greater number of dots included in the
pattern.
About your Home Screen
The eTouch™ has 5 home screens where you can add shortcuts to places and
programs as well as adding widgets (apps that reside on your home screen such
as a clock/calendar).
To add a widget or shortcut just ‘tap and hold’some blank space on your
home screen. A pop-up menu will appear so you can choose your widget which
will appear on the home screen. To move it around the home screen tap and
hold the icon until it becomes larger, then drag it to where you want it.
To delete a widget or shortcut, tap and hold the icon then drag it to the
recycle bin. The recycle bin icon appears in your program menu on the left hand
side of the screen.
Setting the date and time
Some of the eTouch™’s software and widgets require the date and time to be
correct to function correctly. To set the time and date go to Settings > Date &
time. Uncheck the Automatic setting then click Set Date, use the + and -
buttons to change the date and then press Set. Click Set Time, use the + and -
buttons to change the date and then press Set. Please Note: If you run out of
battery life you will lose your time and date settings.
Android is a trademark of Google Inc. Use of this trademark is subject to Google Permissions

Other Elonex Tablet manuals

Elonex eTouch 765ET User manual

Elonex

Elonex eTouch 765ET User manual

Elonex eTouch User manual

Elonex

Elonex eTouch User manual

Elonex eTouch 702ET V2 User manual

Elonex

Elonex eTouch 702ET V2 User manual

Elonex eTouch 1012ET User manual

Elonex

Elonex eTouch 1012ET User manual

Elonex eTouch 10" Wi-Fi Android Tablet | 1000ET User manual

Elonex

Elonex eTouch 10" Wi-Fi Android Tablet | 1000ET User manual

Elonex eTouch 765ET Version 2 Technical manual

Elonex

Elonex eTouch 765ET Version 2 Technical manual

Elonex eTouch 1012ET V2 User manual

Elonex

Elonex eTouch 1012ET V2 User manual

Elonex eTouch User manual

Elonex

Elonex eTouch User manual

Popular Tablet manuals by other brands

LXE MX3-CE reference guide

LXE

LXE MX3-CE reference guide

Panasonic FZ-Q2 series operating instructions

Panasonic

Panasonic FZ-Q2 series operating instructions

Archos A101G4 user manual

Archos

Archos A101G4 user manual

Prestigio MultiPad PMP7070C3G user manual

Prestigio

Prestigio MultiPad PMP7070C3G user manual

iBall Slide WQ149R manual

iBall

iBall Slide WQ149R manual

Trevi kidTab 7 S04 user manual

Trevi

Trevi kidTab 7 S04 user manual

Prestigio MULTIPAD GRACE 4991 4G user manual

Prestigio

Prestigio MULTIPAD GRACE 4991 4G user manual

Denver TAQ-70302 user manual

Denver

Denver TAQ-70302 user manual

Jolla JT-1501 user manual

Jolla

Jolla JT-1501 user manual

Lynx 10,4" Quick setup guide

Lynx

Lynx 10,4" Quick setup guide

Asus Fonepad ME560CG user manual

Asus

Asus Fonepad ME560CG user manual

Coby MID7055 Series quick start guide

Coby

Coby MID7055 Series quick start guide

Motorola MC75 - Worldwide Enterprise Digital... White paper

Motorola

Motorola MC75 - Worldwide Enterprise Digital... White paper

HP Slate 2 Specifications

HP

HP Slate 2 Specifications

iCraig CMP801SP-16OD owner's manual

iCraig

iCraig CMP801SP-16OD owner's manual

Overmax SteelCore 10 Gear user manual

Overmax

Overmax SteelCore 10 Gear user manual

Archos Arnova 7c G2 manual

Archos

Archos Arnova 7c G2 manual

AT&T TREK 2 HD user guide

AT&T

AT&T TREK 2 HD user guide

manuals.online logo
manuals.online logoBrands
  • About & Mission
  • Contact us
  • Privacy Policy
  • Terms and Conditions

Copyright 2025 Manuals.Online. All Rights Reserved.