manuals.online logo
Brands
  1. Home
  2. •
  3. Brands
  4. •
  5. Elonex
  6. •
  7. Tablet
  8. •
  9. Elonex eTouch 702ET V2 User manual

Elonex eTouch 702ET V2 User manual

Using Apps
System Panel
Your eTouch ‘multi-tasks’so programs are never shut down until you
turn the tablet o. With too many programs open you may notice a drop in
performance so its best to periodically close some down. To do this, open the
System App (on rst use press OK), tap the app you wish to close, then tap
End Task to close the selected apps.
Security
You can increase the security
settings to protect your eTouch™ by
using a unique unlock pattern. Tap
to Settings > Location and Security
> Setup Screen Lock, choose the
lock type and follow the on-screen
instructions.
Please note that
your unlock
pattern should
use at least 4
dots and the
eTouch™ will be
more secure with a greater number
of dots included in the pattern.
Program Menu
On the top right hand side of your home screen is the Apps menu icon. Tap
the square icon open a menu of your installed apps. To open an app just tap it
once and it will launch.
Menu Icons
At the top of your screen are the Menu icons.These give you important
information about the status of the eTouch™ as well as options and shortcuts.
You can quickly see whether you are connected to Wi-Fi (the number of Wi-Fi
bars increase or decrease depending on the signal strength), the amount of
charge in your battery. Tap the Back button to go back to the previous
screen.
In addition tapping the time displays app status messages. Tapping the
settings icon gives access to changing further options such as brightness and
access to the full settings screen
Android is a trademark of Google Inc. Use of this
trademark is subject to Google Permissions
QUICK
START
GUIDE
Wi-Fi Signal Strength
Battery Charge
Volume Down
Volume Up
Back
Menu
Return to Homescreen
Program Menu
Telephony / 3G
(included for future use)
Connecting to
Wi-Fi
Follow the instructions below to
connect to a Wi-Fi Connection:
:: From the home screen tap
Settings, then Wireless and
networks.
:: Then tap Wi-Fi to turn on the
eTouch™’s Wi-Fi module
(please note that this will use your
battery life faster).
:: Tap Wi-Fi Settings, then Add
Wi-Fi Network. The eTouch™ will
then automatically scan for
available Wi-Fi hotspots.
:: Select the desired Wi-Fi hotspot
from the list.
:: If the hotspot doesn't have a
password it will automatically
connect, however if it ‘secure’, a
password window will pop up
letting you enter the correct
password. For password details
refer to your ISP or the sta at the
internet cafe/coee shop etc.
:: You should now be connected and
can surf the Internet by tapping
the Browser icon. To view a web
page tap the white bar at the top
of the screen to enter a web
address, or tap the Google search
bar to enter a search term.
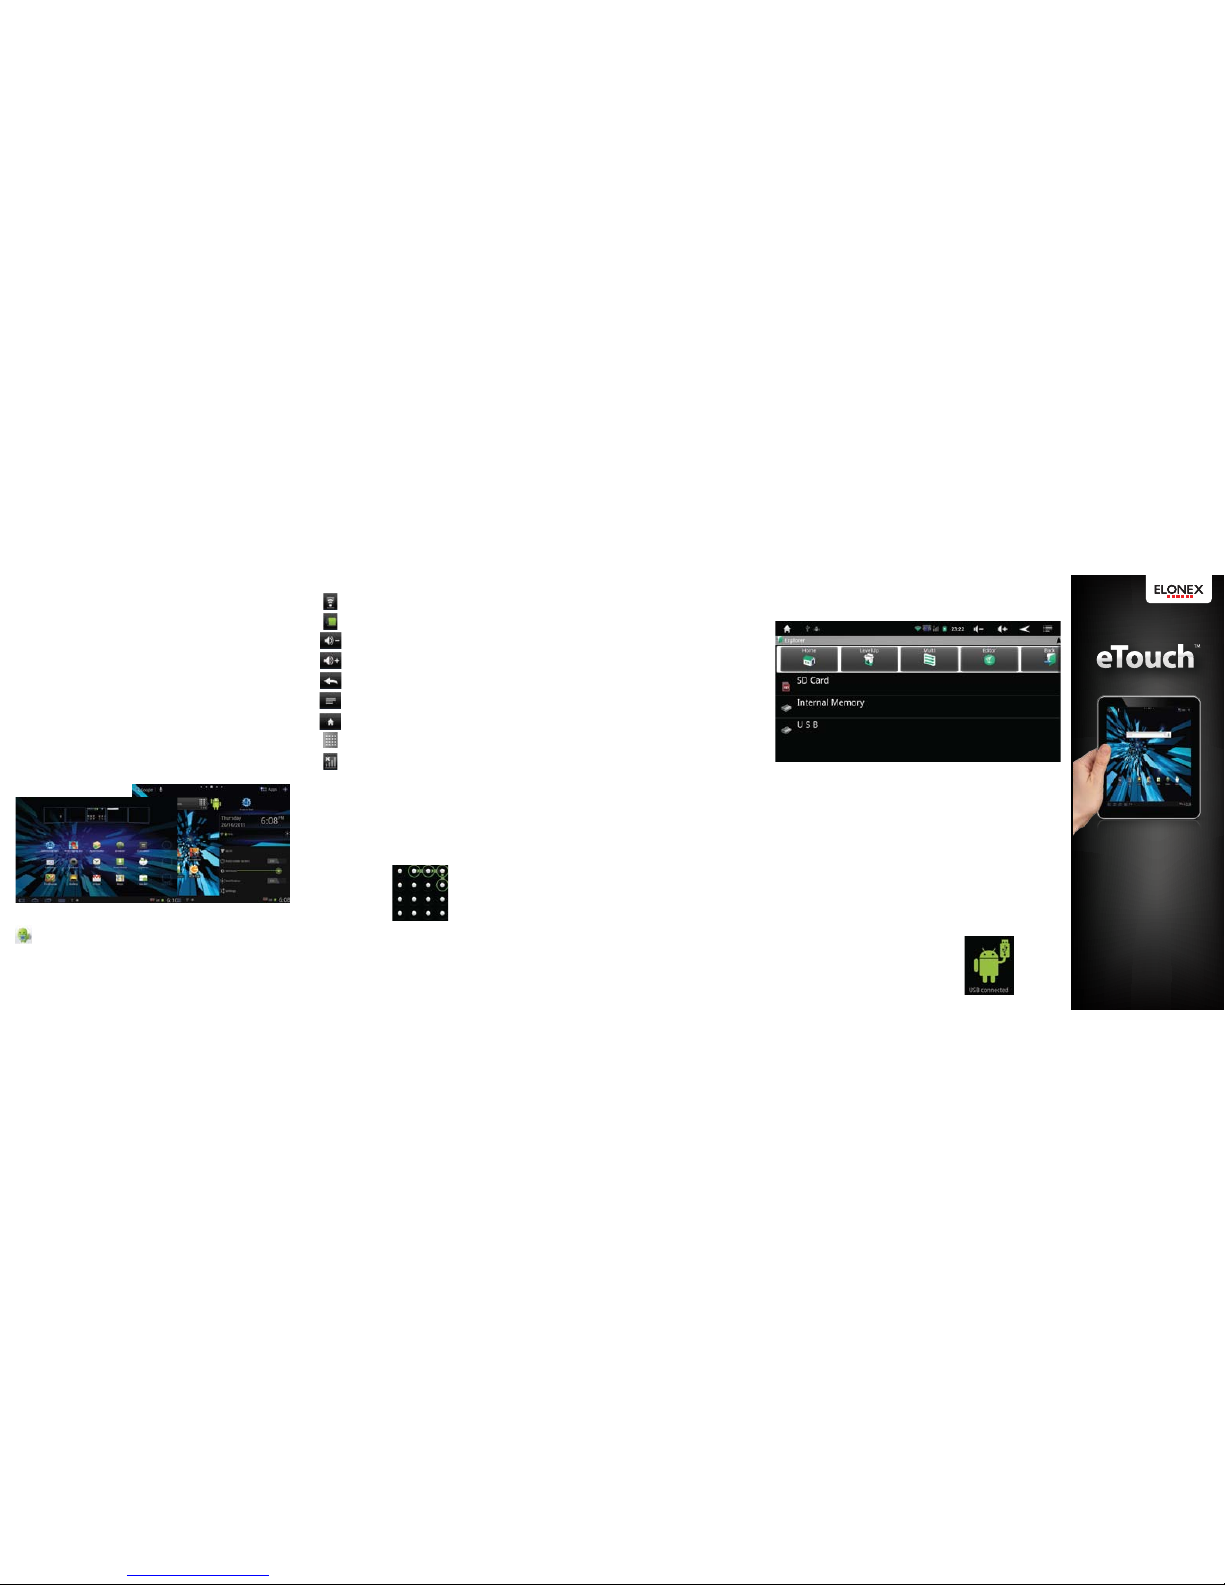
Files and Folders
To browse your les and folders tap the Explorer.
To copy and paste les from one folder to another, tap and hold the original
le for about 1 second. A menu will pop up with options to Copy, Delete,
Rename. Tap Copy (to create a duplicate of the le) or Move (to move the
existing le). You can then navigate to the destination folder where you want to
copy the le and press the clipboard icon at the bottom of the screen. Then tap
the le once more and tap Paste.
Connecting to a PC
The easiest way of transferring les to and from your tablet is using a Micro SD
Card. However, you can connect the tablet to a PC or laptop using a mini USB
cable. With the eTouch turned ON, connect the cable between the Micro USB
port on the top of your eTouch to the USB port on your PC or laptop. Tap the
time at the bottom to show a notication“USB Connected, Select to copy
les to/from your computer”. Tap this and then “Turn on USB Storage” to
enable data transfer.
On your PC or laptop the tablet will show up as
“Removable Device”(just like a normal USB stick)
and you can drag and drop, or copy and paste les
to and from the eTouch’s folder.
Wi-Fi Connection
Troubleshooting
If you have trouble connecting to
your Wi-Fi please check the
following:
:: Check you have included any
CaPiTaL letters as most passwords
are case sensitive
:: Check you haven’t got CAPS lock
toggled ON.
:: Check you have the correct
password for the hotspot and it
hasn’t been changed.
If you still can’t connect there may
be a temporary conict with your
router’s security authentication.
Please contact your Internet Service
Provider, requesting to temporarily
lower the router’s security
encryption to WEP which will allow
the Tablet to connect to the
internet.
Once connected, you should have
no further problems with getting
online you can request that the ISP
return the encryption to its former
status. This can all be done over the
phone in a couple of minutes.
Tech Support
If you have any diculties
connecting to the internet please
contact our support helpdesk on
0871 222 3456
(Mon- Fri, - 5p/min from a BT landline, other
networks and mobile will be considerably more
expensive).
0871 222 3456
(Mon- Fri national rate)
eMail Questions
[email protected]
Introduction
Please read this quick start guide
carefully to help you get the most
out of your eTouch™.
Package Contents
Before using your eTouch™, please
check your package contents to
ensure there aren’t any items
missing. If any of the listed items are
missing or damaged, please contact
your point of purchase for
assistance.
The package includes:
1. 7” eTouch™ Tablet
2. Mains USB Power Adaptor
3. Quick Start Guide
& Warranty Card
Setting up
Your tablet has a screen protector (a
thin lm to protect the screen
during transit). Please use the tab to
slowly and very carefully remove
this from the screen as it will reduce
the quality of the screen image.
Software Lock-Up
If software becomes unresponsive,
connect the power cable.
If your eTouch still doesn’t respond,
Hold down the power button for 10
seconds to hard reset the device,
your user data will not be lost.
Battery Charging
Your eTouch™ has a built in
3000mAh rechargeable lithium
battery which provides around 5
Hours battery life (depending on
usage).
The eTouch™ is supplied with no
charge in the battery and we
recommend that you charge the
battery for around 8 Hours for its
rst charge, to achieve the best
battery life.
Memory &
Expansion
Your eTouch™ comes with built in
storage, with 2.6GB available for
media les, but will also support up
to a huge 32GB Micro SD card to
store your favourite music, movies
and photos.
To insert a micro SD Card
Insert the card with the metallic
connectors facing downward until
you feel a click which will lock the
card into place.
To remove an SD Card
Go to Settings > Storeage, then tap
‘Unmount SD Card’to allow you to
safely disconnect the card from the
Tablet. Push the card gently
inwards until you hear a click and
then it will pop out.
Turning your eTouch™ on
Once you’ve charged the battery you can turn the eTouch™ ON by pressing
the power button and the Android™ OS will load. To unlock the screen
(its locked to avoid accidentally pressing buttons when not being used) tap
and hold the padlock icon then slide it to the edge of the circle. The eTouch™
will then load you home screen for you to start navigating
to your chosen function. The screen will automatically
lock after a period of non-use (you can change the length of
this time period in the Settings menu)
To turn your Tablet OFF simply press and hold the Power
button for about 2 second and the‘power o screen’ will
appear. Tap Power O then OK and the eTouch will power o.
Program Menu
On the top right hand side of your home screen is the Apps menu icon. Tap
the square icon open a menu of your installed apps. To open an app just tap it
once and it will launch.
About your Home Screen
Your Tablet’s home screens let you personalise your working environment to
suit your lifestyle. For example you can set up one screen with your favourite
apps on it, another screen with widgets to your favourite social networking
sites and another page with shortcuts to your work les.
To access your other home screens you can simply touch the screen and swipe
it left or right.
To add a widget or shortcut just‘tap and hold’ some blank space on your
home screen. A pop-up menu will appear so you can choose your widget
which will appear on the home screen. To move it around the home screen tap
and hold the icon until it becomes larger, then drag it to where you want it.
To delete a widget or shortcut, tap and hold the icon then drag it to the
recycle bin. The recycle bin icon appears in your program menu on the top of
the screen.
You can also add apps to any home screen by pressing the + icon top right. A
preview of all screens will display just tap and hold an app and drag to the
home screen required.
Volume + / -
3.5mm
Audio Port
Back Button
micro SD Card slot
Speaker
5V-DC Power
Input
miniUSB A (PC Link only)
7” LCD Touchscreen
LED Backlit, Capacitive Touch
Power Button (Standby)
Press for 10 seconds for hard reset
(Does not harm user data)
Microphone
Menu Button (Click once)
Click to go to open the menu
Keyboard Button (Click & Hold)
Hold to view the keyboard
miniUSB B (Keyboard,
Mouse, USB Storage)
Home Button (Click once)
Click to go to your homescreen
Recent Button (Click & Hold)
Hold to view your recently used apps
Camera
About your
eTouch™
With its amazing LED backlit
touchscreen navigating around the
eTouch™ is as easy as a quick swipe
of your ngertips. The Android™ OS
is specically designed with large
buttons and icons which suit the
size of your ngers. You can touch,
tap and swipe the screen, just like
you’d use a mouse, but please don't
use sharp or pointed instruments as
you may damage the screen.
The eTouch™ has a built in
G-sensor which ips the screen
into any orientation, letting
you use it for games, in
landscape, portrait or even
ip it over to show a friend.
Help & Support
To help you get the best out of your
product we provide you with a
limited 1 year Return to Base
Warranty and Support Helpdesk
(see www.elonex.com for more
details).
For all technical support please
contact our helpdesk using the
details below:
FAQ’s and Updates
www.elonex.com/support
If you have any problems or
questions please
DO NOT take your eTouch™
back to the store.
Please contact us for some
helpful advice.
(this does not aect your Statutory Rights)
Setting the Time
& Date
Some of the eTouch™’s software
and widgets require the date and
time to be correct to function
correctly. To set the time and date
go to Settings > Date & time.
Uncheck the Automatic setting
then click Set Date, use the + and -
buttons to change the date and
then press Set. Click Set Time, use
the + and - buttons to change the
date and then press Set.
Please Note: If you run out of
battery life you will lose your time
and date settings.

Other Elonex Tablet manuals

Elonex eTouch 1012ET V2 User manual

Elonex

Elonex eTouch 1012ET V2 User manual

Elonex eTouch User manual

Elonex

Elonex eTouch User manual

Elonex eTouch User manual

Elonex

Elonex eTouch User manual

Elonex eTouch 765ET Version 2 Technical manual

Elonex

Elonex eTouch 765ET Version 2 Technical manual

Elonex eTouch 10" Wi-Fi Android Tablet | 1000ET User manual

Elonex

Elonex eTouch 10" Wi-Fi Android Tablet | 1000ET User manual

Elonex eTouch 765ET User manual

Elonex

Elonex eTouch 765ET User manual

Elonex eTouch 1012ET User manual

Elonex

Elonex eTouch 1012ET User manual

Elonex eTouch 1000ET User manual

Elonex

Elonex eTouch 1000ET User manual

Popular Tablet manuals by other brands

Huawei AGS2-L09 quick start guide

Huawei

Huawei AGS2-L09 quick start guide

Win Accord PTT-9726D manual

Win Accord

Win Accord PTT-9726D manual

Denver TAQ-70272 Faq

Denver

Denver TAQ-70272 Faq

iBall Slide i701 manual

iBall

iBall Slide i701 manual

ViewSonic VS14905 quick start guide

ViewSonic

ViewSonic VS14905 quick start guide

Sony SGPT211NL/S Important information

Sony

Sony SGPT211NL/S Important information

Lenovo TAB 2 A10-30 quick start guide

Lenovo

Lenovo TAB 2 A10-30 quick start guide

Thunderbook COLOSSUS W103 Quick user guide

Thunderbook

Thunderbook COLOSSUS W103 Quick user guide

bq Edison 3G quick start guide

bq

bq Edison 3G quick start guide

DT Research DT302RP Basic operation guide

DT Research

DT Research DT302RP Basic operation guide

Datawind 7c+ EDGE Service manual

Datawind

Datawind 7c+ EDGE Service manual

Laser MID-740KID Quick operation guide

Laser

Laser MID-740KID Quick operation guide

Motion Computing Motion CL910 user guide

Motion Computing

Motion Computing Motion CL910 user guide

Acer A510 Product and safety information

Acer

Acer A510 Product and safety information

Samsung SM-T590 user manual

Samsung

Samsung SM-T590 user manual

aqprox! Cheesecake XL 2 user guide

aqprox!

aqprox! Cheesecake XL 2 user guide

Wetif R10ID8M-RTXX user manual

Wetif

Wetif R10ID8M-RTXX user manual

Aluratek CINEPAD AT007F quick start guide

Aluratek

Aluratek CINEPAD AT007F quick start guide

manuals.online logo
manuals.online logoBrands
  • About & Mission
  • Contact us
  • Privacy Policy
  • Terms and Conditions

Copyright 2025 Manuals.Online. All Rights Reserved.