manuals.online logo
Brands
  1. Home
  2. •
  3. Brands
  4. •
  5. Elvox
  6. •
  7. Door Opening System
  8. •
  9. Elvox 884G/S Assembly instructions

Elvox 884G/S Assembly instructions

Manuale installatore - Installer guide - Manuel installateur
Technisches Handbuch - Instrucciones instalador - Manual do instalador
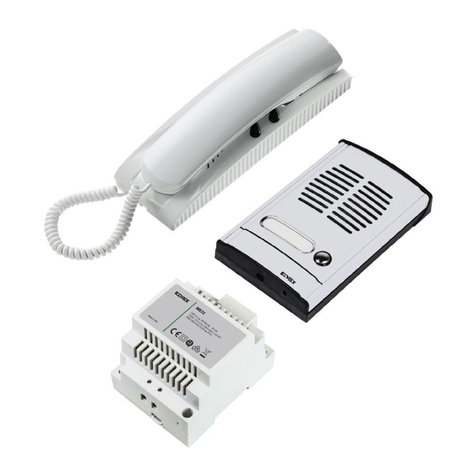
884G/S - 884H/S
Portiere elettrico unifamiliare con collegamento sem pli  ca to a 2 li
Electric door-opener system for single residence with 2-wire simplied connection
Portier électrique pour villa avec connexion sempliée à deux ls
Türsprechanlage für Einfamilienhaus mit Simpliziertem 2-Adernanschluss
Portero eléctrico unifamiliar con conexionado semplicado a 2 hilos
Porteiro eléctrico unifamiliar com ligação semplicada com 2 condutores
Il manuale istruzioni è scaricabile dal sito www.
vimar.com
Regole di installazione
L’installazione deve essere effettuata da personale
qualificato con l’osservanza delle disposizioni
regolanti l’installazione del materiale elettrico in
vigore nel paese dove i prodotti sono installati.
Conformità normativa
Direttiva EMC
Norme EN 61000-6-1 e EN 61000-6-3.
The instruction manual is downloadable from the
site www.vimar.com
Installation rules
Installation should be carried out by qualified
personnel in compliance with the current regulations
regarding the installation of electrical equipment in the
country where the products are installed.
Conformity
EMC directive
Standards EN 61000-6-1 and EN 61000-6-3.
Télécharger le manuel d’instructions sur le site
www.vimar.com
Règles d’installation
L’installation doit etre confiee a des personnel
qualies et executee conformement aux dispositions
qui regissent l’installation du materiel electrique en
vigueur dans le pays concerne.
Conformité aux normes
Directive EMC
Normes EN 61000-6-1 et EN 61000-6-3.
Die Bedienungsanleitung ist auf der Website
www.vimar.com zum Download verfügbar
Installationsvorschriften
Die Installation muss durch Fachpersonal gema.
den im Anwendungsland des Gerats geltenden
Vorschriften zur Installation elektrischen Materials
erfolgen.
Normkonformität
EMC-Richtlinie
Normen DIN EN 61000-6-1 und EN 61000-6-3.
El manual de instrucciones se puede descargar
en la página web www.vimar.com
Normas de instalación
La instalacion debe ser realizada por personal
cualicado cumpliendo con las disposiciones en vigor
que regulan el montaje del material electrico en el
pais donde se instalen los productos.
Conformidad normativa
Directiva EMC
Normas EN 61000-6-1 y EN 61000-6-3.
É possível descarregar o manual de instruções
no site www.vimar.com
Regras de instalação
A instalação deve ser efetuada por pessoal
qualificado de acordo com as disposições que
regulam a instalação de material elétrico, vigentes no
País em que os produtos são instalados.
Cumprimento de regulamentação
Directiva EMC
Normas EN 61000-6-1 e EN 61000-6-3.
RAEE - Informazione agli
utilizzatori
Il simbolo del cassonetto barrato riportato
sull’apparecchiatura o sulla sua confezione
indica che il prodotto alla ne della propria vita
utile deve essere raccolto separatamente dagli
altri riuti. L’utente dovrà, pertanto, conferire
l’apparecchiatura giunta a ne vita agli idonei
centri comunali di raccolta differenziata dei riuti
elettrotecnici ed elettronici. In alternativa alla
gestione autonoma, è possibile consegnare
gratuitamente l’apparecchiatura che si desidera
smaltire al distributore, al momento dell’acquisto
di una nuova apparecchiatura di tipo equivalente.
Presso i distributori di prodotti elettronici con
supercie di vendita di almeno 400 m2è inoltre
possibile consegnare gratuitamente, senza
obbligo di acquisto, i prodotti elettronici da smaltire
con dimensioni inferiori a 25 cm. L’adeguata
raccolta differenziata per l’avvio successivo
dell’apparecchiatura dismessa al riciclaggio, al
trattamento e allo smaltimento ambientalmente
compatibile contribuisce ad evitare possibili effetti
negativi sull’ambiente e sulla salute e favorisce il
reimpiego e/o riciclo dei materiali di cui è composta
l’apparecchiatura.
WEEE - Information for users
If the crossed-out bin symbol appears
on the equipment or packaging, this
means the product must not be included
with other general waste at the end of its
working life. The user must take the worn product
to a sorted waste center, or return it to the retailer
when purchasing a new one. Products for disposal
can be consigned free of charge (without any
new purchase obligation) to retailers with a sales
area of at least 400m2, if they measure less than
25cm. An efcient sorted waste collection for
the environmentally friendly disposal of the used
device, or its subsequent recycling, helps avoid the
potential negative effects on the environment and
people’s health, and encourages the re-use and/or
recycling of the construction materials.
DEEE - Informations pour les
utilisateurs
Le symbole du caisson barré, là où il est
reporté sur l’appareil ou l’emballage,
indique que le produit en n de vie doit être
collecté séparément des autres déchets. Au terme
de la durée de vie du produit, l’utilisateur devra
se charger de le remettre à un centre de collecte
séparée ou bien au revendeur lors de l’achat
d’un nouveau produit. Il est possible de remettre
gratuitement, sans obligation d’achat, les produits
à éliminer de dimensions inférieures à 25 cm aux
revendeurs dont la surface de vente est d’au moins
400 m2. La collecte séparée appropriée pour l’envoi
successif de l’appareil en n de vie au recyclage,
au traitement et à l’élimination dans le respect de
l’environnement contribue à éviter les effets négatifs
sur l’environnement et sur la santé et favorise le
réemploi et/ou le recyclage des matériaux dont
l’appareil est composé.
Elektro- und Elektronik-
Altgeräte - Informationen für
die Nutzer
Das Symbol der durchgestrichenen
Mülltonne auf dem Gerät oder seiner Verpackung
weist darauf hin, dass das Produkt am Ende
seiner Nutzungsdauer getrennt von den
anderen Abfällen zu entsorgen ist. Nach Ende
der Nutzungsdauer obliegt es dem Nutzer, das
Produkt in einer geeigneten Sammelstelle für
getrennte Müllentsorgung zu deponieren oder es
dem Händler bei Ankauf eines neuen Produkts zu
übergeben. Bei Händlern mit einer Verkaufsäche
von mindestens 400 m2können zu entsorgende
Produkte mit Abmessungen unter 25 cm kostenlos
und ohne Kaufzwang abgegeben werden. Die
angemessene Mülltrennung für das dem Recycling,
der Behandlung und der umweltverträglichen
Entsorgung zugeführten Gerätes trägt dazu bei,
mögliche negative Auswirkungen auf die Umwelt
und die Gesundheit zu vermeiden und begünstigt
den Wiedereinsatz und/oder das Recyceln der
Materialien, aus denen das Gerat besteht.
RAEE - Información para los
usuarios
El símbolo del contenedor tachado, cuando
se indica en el aparato o en el envase,
indica que el producto, al nal de su vida útil, se
debe recoger separado de los demás residuos.
Al nal del uso, el usuario deberá encargarse de
llevar el producto a un centro de recogida selectiva
adecuado o devolvérselo al vendedor con ocasión
de la compra de un nuevo producto. En las tiendas
con una supercie de venta de al menos 400 m2,
es posible entregar gratuitamente, sin obligación de
compra, los productos que se deben eliminar con
unas dimensiones inferiores a 25 cm. La recogida
selectiva adecuada para proceder posteriormente
al reciclaje, al tratamiento y a la eliminación del
aparato de manera compatible con el medio
ambiente contribuye a evitar posibles efectos
negativos en el medio ambiente y en la salud
y favorece la reutilización y/o el reciclaje de los
materiales de los que se compone el aparato.
REEE - Informação dos
utilizadores
O símbolo do contentor de lixo barrado com
uma cruz, axado no equipamento ou na
embalagem, indica que o produto, no m da sua
vida útil, deve ser recolhido separadamente dos
outros resíduos. No nal da utilização, o utilizador
deverá encarregar-se de entregar o produto num
centro de recolha seletiva adequado ou de devolvê-
lo ao revendedor no ato da aquisição de um novo
produto. Nas superfícies de venda com, pelo
menos, 400 m2, é possível entregar gratuitamente,
sem obrigação de compra, os produtos a eliminar
com dimensão inferior a 25 cm. A adequada
recolha diferenciada para dar início à reciclagem,
ao tratamento e à eliminação ambientalmente
compatível, contribui para evitar possíveis efeitos
negativos ao ambiente e à saúde e favorece a
reutilização e/ou reciclagem dos materiais que
constituem o aparelho.
2
884G/S - 884H/S
7
5
3
1
2
6
1234
O12
PRI
P1
5
3
6
2
R
N. SI573
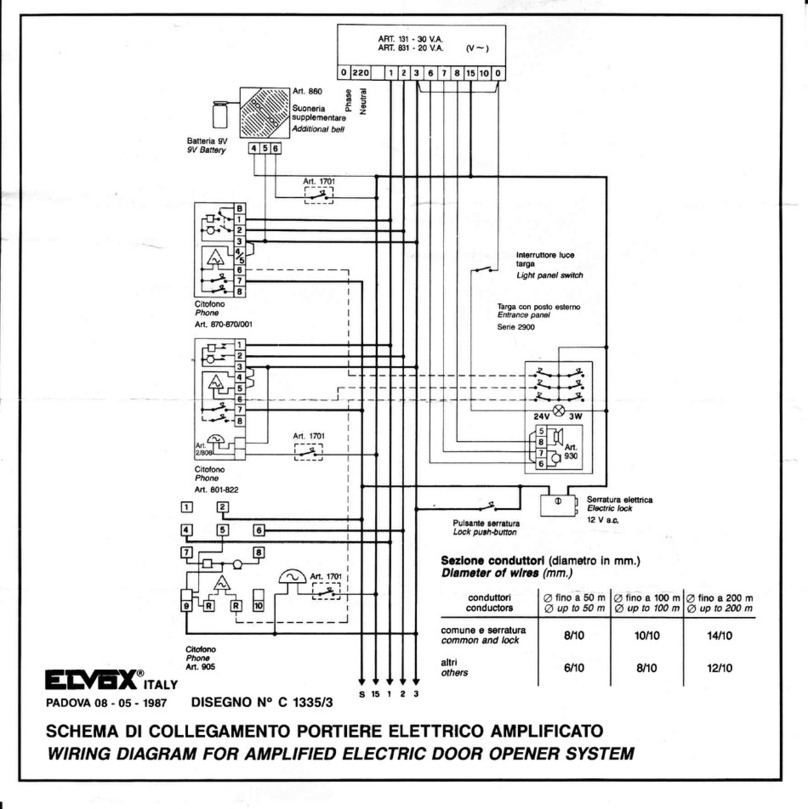
SCHEMA COLLEGAMENTO - WIRING DIAGRAM - SCHÉMA DES CONNEXIONS
SCHALTPLAN - ESQUEMA DE CONEXIONADO - ESQUEMA DE LIGAÇÃO
RETE-NETWORK
RÉSEAU-NETZ
RED-REDE
Serratura
Lock
Gâche
Türöffner
Cerradura
Trinco
12V ~
Art. 8911
Art. M832
Art. 8874
Ripetitore di chiamata
Call repeater
Répétiteur d’appel
Lautsprecher für
Rufverdoppelung
Repetidor de llamada
Repetidor de chamada
Art. 0002/841.05
Art. 930B
Collegamento solo audio: utiliz-
zare solo due conduttori da 0,65
mm2 no a 150m.
Audio connection only: use two
0.65mm2 no a 150m. of dis-
tance.
Connexion phonie uniquement:
utiliser deux câbles de 0,65mm2
jusqu’à 150 m.
Anschluß der Sprechverbindung:
verwenden Sie zwei Drahte mit
0,65 mm2 Querschnitt, bis max.
150m.
Instalación de audio solamente:
utilizar dos conductore de 0,65
mm2hasta 150m.
Ligação sómente do audio:
utilizar dois conductores de
0,65mm2até 150m.
Collegamento audio e serratura:
utilizzare cavo da 1 mm2 no a
50m.
Audio and lock connection: use
two 1mm2 no a 50m. of dis-
tance.
Connexion phonie uniquement:
utiliser deux câbles de 1mm2
jusqu’à 50 m.
Anschluß der Sprechverbindung
und des Türöffner: verwenden
Sie Draht mit 1 mm2Querschnitt,
bis max. 50m.
Instalación de audio y cerradura:
utilizar cable de 1 mm2hasta
50m.
Ligação sómente do audio e
trinco: utilizar conductores de
1mm2até 50m.
All’interno sollevare il microtelefono ed incominciare a parlare.
Premere l’apposito pulsante per azionare la serratura elettrica.
Answer calls by lifting phone handset. Operate electric lock by push-
ing appropriate button.
Pour répondre aux appels soulever le combiné du poste d’apparte-
ment, la gâche électrique est commandée par le bouton approprié.
Nach Abheben des Haustelefons ist die Gesprächsverbindung herg-
estellt. Türöffner durch entsprechende Taste betätigen.
En el interior, levantar el microteléfono y comenzar a hablar. Apretar
el pulsador apropiado para accionar la cerradura eléctrica.
No interior levantar o telefone e começar a falar. Premir o botão re-
spectivo para accionar o trinco eléctrico.
Eseguire la chiamata dall’esterno premendo il pulsante della targa e
parlare a mani libere dopo aver ricevuto la risposta.
Make calls by pushing door panel button and talk handsfree after
receiving reply.
Appeler en appuyant sur le bouton-poussoir de la plaque de rue et
parler mains libres après avoir reçu la réponse.
Herstellung des Rufes durch Betätigung des Klingeltasters.
LLamar desde el exterior apretando el pulsador de la tarjeta y hablar
a manos libres después de haber recibido la respuesta.
Efectuar a chamada do exterior premindo o botão da botoneira e falar
a mãos livres depois de receber a resposta.
USO - OPERATION - MODE D’EMPLOI - FUNKTION - UTILIZAÇÃO
3
884G/S - 884H/S
Per aprire il citofono
To open interphone
Pour ouvrir le poste
Öffnen des Haustelefone
Para abrir el teléfono
Para abrir o telefono
INSTALLAZIONE DEL CITOFONO - PHONE INSTALLATION - INSTALLATION DU POSTE
HAUSTELEFON INSTALLIERUNG - INSTALACION DO TELÉFONO- INSTALAÇÃO DO TELEFONE
Regolazione del volume esterno all’interno del citofono potenziometro: P1, 470 Ohm.
External volume adjustement inside the interphone potentiometer: P1, 470 Ohm.
Réglage du volume externe à l’intérieur du combiné: potentiomètre: P1, 470 Ohm.
Externlautstärkeregelung innen im Haustelefon Potentiometer: P1, 470 Ohm.
Regulación del volumen externo a l’interior del teléfono potenciómetro: P1, 470 Ohm.
Regulação do volume externo ao interior do telefone potenciómetro: P1, 470 Ohm.
1 Fixer la vis supérieure (A) dans la boîte
de raccordement (ou vis à goujon) en
laissant saillir la tête de la vis pour 2-3
mm.
2 Accrocher le poste à la vis supérieure en
utilisant le trou approprié, le rapprocher
à la paroi et en le tirant vers le bas en
suivant la direction des èches.
3 Completer le montage avec la vis in-
férieure (B) xée dans le trou approprié.
1 Fijar el tornillo superior (A) en la caja em-
potrada (o taco) dejando la cabeza del
tornillo unos 2-3 mm fuera.
2 Enganchar el teléfono al tornillo superior
utilizando el correspondiente oricio pos-
terior; acercarlo a la pared y tirar de él
hacia abajo en la dirección ilustradas por
las echas.
3 Com ple tar la jación con el tornillo infe-
rior (B) en el correspondiente oricio.
1 Partially fasten upper screw “A” to back
box leaving it out for 2 or 3 mm.
2 Hook interphone to upper screw “A” in
rear hole and pull it downwards. 1 - 2
3 Complete mounting with lower screw “B”
in prepared hole.
1 Die obere Schraube (A) am Unter-
putz-Gehäuse (oder Dübel) befestigen.
Die Schraube 2-3 mm vorstehen lassen.
2 Das Haustelefon an der Schraube (A)
durch das rückseitige Lock zuhacken und
es nach unten laut dem Zeichen ziehen.
3 Die untere Schraube (B) im bestimmten
Loch befestigen.
1 Fixar o parafuso superior (A) no local de
encaixe deixando a cabeça do parafuso
saliente 2 a 3 mm.
2 Prender o telefone ao parafuso superior,
utilizando o furo posterior adequado,
aproximando-o da parede e puxando-o
para baixo na direcção da seta.
3 Completar a xação com o parafuso (B)
no furo apropriado.
1 Fissare la vite superiore (A) nella scatola
incasso (o tassello) lasciando sporgere la
testa della vite per 2-3 mm.
2 Agganciare il citofono alla vite superiore
utilizzando l’apposito foro posteriore ac-
costandolo alla parete e tirandolo verso il
basso in direzione delle frecce.
3 Completare il ssaggio con la vite inferi-
ore (B) nell’apposito foro.
4
884G/S - 884H/S
INSTALLAZIONE DELLE TARGHE - MOUNTING INSTRUCTIONS OF ENTRANCE PANEL
INSTALLATION DE LA PLAQUE DE RUE -MONTAGEHINWEISE FÜR TÜRSPRECHSTELLE
INSTALACION DE LA PLACA EXTERNA - INSTALAÇÃO DA BOTONEIRA EXTERIOR
To separe front plate from back box, follow
there instructions:
1: Loosen screw in lower border of front
plate to limit of thread, using special
key provided.
2: Lift lower border of front plate slightly
out wards and upwards.
3-4: Detach front plate by pulling it down-
wards.
Pour séparer la plaque de la boîte à encas-
trer suivre ces opérations:
1: Desserer la vis placée sur le bord in-
férieur de la plaque jusq’à la butée en
utilisant la clé spéciale fournie dans
l’emballage.
2: Soulever de 2 cm le bord inférieur de
la plaque en la tenant poussée vers le
haut.
3-4: Enlever la plaque en la tirant vers le
bas.
Un die Frontplatte vom Up-gehäuse zu ent-
fernen, gehen Sie wie folgt vor:
1: Schraube am unteren Prolrand bis
zum Anschlag mit vergesehenem
Schlüssel aufdrehen.
2: Das Prol unten um 2 cm. abheben,
die Frontplatte nach oben schieben
und ausrasten.
3-4: Frontplatte nach unten ziehen und ab-
hehmen.
Para separar le placa desde la caja de em-
potre seguir estas operaciones.
1: Aojar el tornillo puesto sobre el borde
inferior de la placa hasta el nal del
lete con la llave especial provista.
2: Alejar de 2 cm. la orilla inferior de la
placa teniéndola empujada hacia ar-
riba.
3-4: Separar la placa jalàndola hacia abajo.
Para se pa rar a pla ca botoneira da caixa,
seguir as seguintes operações:
1: Desapertar o parafuso da parte inferior
da placa até ao m através de chave
especial junta.
2: Afastar 2 cm. a parte inferior da placa
mantendo-a encostada no topo.
3-4: Separar a placa puxando-a baixo e
reteira-la.
Per separare la placca dalla scatola da in-
casso eseguire le seguenti operazioni:
1: Allentare la vite posta sul bordo infe-
rio re della plac ca no a ne cor sa a
mezzo della chiavetta in dotazione.
2: Allontanare di 2 cm. il bordo inferiore
della placca tenendola spinta verso
l’alto.
3-4: Togliere la placca ti ran do la ver so il
basso.
Montare la targa esterna su scatola rettangolare o con tasselli.
Fix door panel on rectangular box or with expansion screws.
Installer la plaque de rue sur boîte rectangulaire ou avec vis à goujouns.
Klingeltableau an der Wand mit Schrauben und Dübel montieren.
Montar la tarjeta externa sobre la caja rectangular o con cuñas.
Montar a botoneira através de parafusos.
Per accedere al cartellino portanomi togliere il fermacartellino dal retro come mostra la  gu ra.
To reach name-tag, remove name-tag holder from the back, as shown.
Pour acceder à l’étiquette porte-noms enlever le porte-étiquette de la partie postérieure
comme le montre la gure.
Um das Namensschild zu erhalten, entfernen Sie die Namenschildhalterung von der Rück-
seite, wie dezeigt.
Para acceder a la tarjetita portanombres mover el sujetatarjetita desde atrás como muestra
la gura.
Para ter acesso ao cartão porta-nomes extrair a tampa de plástico que o prende como mostra
a gura.
ESTRAZIONE DEL CARTELLINO PORTANOME-NAME - TAG REMOVING
EXTRACTION DE L’ÉTIQUETTE PORTE - NOMS-HERAUSZIEHEN DES NAMENSSCHIELD
ESTRACCIÓN DE LA TARJETITA PORTANOMBRES - EXTRAÇÃO DO CARTÃO PORTA-NOMES
5
884G/S - 884H/S
INSTALLAZIONE DEGLI ALIMENTATORI - POWER SUPPLY INSTALLATION
INSTALLATION DES ALIMENTATIONS - INSTALLATION DER NETZGERÄTE
INSTALACIÓN DE LOS ALIMENTADORES - INSTALACIÓN DE LOS ALIMENTADORES
Caratteristiche
Temporizzazione (cicli) e carico:
Morsetti: 12/0: 12V a.c. 0,8A continua + 1A
intermittente 30 sec. ON 150 sec OFF
P = 35VA alimentazione 230V a.c. (altre ten-
sioni su richiesta) 50-60Hz
PRI: Protezione tramite PTC
Attenzione: Per ripristinare l’apparecchio
dopo un sovraccarico togliere la tensione di
rete per 3 minuti.
Installazione
L’alimentatore andrà posto in un luogo
asciutto e lontano da polvere e fonti di ca-
lore.
Al ne di facilitare controlli e messe a punto
curare che il luogo sia facilmente accessi-
bile.
Fissare a parete l’alimentatore mediante i
tasselli in dotazione o inserendolo in appo-
sito quadro con barra DIN ad omega.
Features
Timing (cycles) and load:
Terminals: 12/0: 12V a.c. 0,8A continuous
+ 1A intermittent 30 sec. ON 150 sec. OFF
P = 35VA supply voltage 230V a.c. (other
voltages upon request) 50-60 Hz
PRI: Protection by PTC
Warning: Cut off mains supply for 3 minutes
to reset the device after an overloading.
Installation
The power supply must be installed in a dry
place away from direct heat or dust.
Ensure easy access for inspection and
maintenance.
Secure the unit to the wall with the anchor
bolts provided or insert it into a rack with a
omega DIN bar.
Caractéristiques
Temporisation (cycles) et charge:
Bornes: 12/0: 12V a.c. 0,8A continu + 1A
intermittent 30 sec. ON 150 sec. OFF
P = 35VA alimentation 230V a.c. (d’autres
tensions sur demande) 50-60 Hz
PRI: Protection avec PTC
Attention: An de mettre en fonction l’appa-
reil de nouveau après une surcharge, enle-
ver la tension pendant 3 minutes.
Installation
L’alimentation devra être placée dans un
endroit sec, à l’abri de la poussière et loin
de toute source de chaleur.
An de faciliter les contrôles et les mises
au point, choisir un endroit facilement ac-
cessible.
Fixer l’alimentation sur le mur à l’aide des
chevilles fournies de série ou en l’insérant
dans un tableau approprié avec barre DIN
en oméga.
REGOLE DI INSTALLAZIONE.
L’installazione deve essere effettuata da
personale qualificato con l’osservanza
delle disposizioni regolanti l’installazione del
materiale elettrico in vigore nel paese dove i
prodotti sono installati.
Garantire delle distanze minime attorno
all’apparecchio in modo che vi sia una suf-
ciente ventilazione.
L’apparecchio non deve essere sottoposto a
stillicidio o a spruzzi d’acqua.
ATTENZIONE: Per evitare di ferirsi , l’appa-
recchio deve essere assicurato alla parete
secondo quanto indicato nelle istruzioni di
installazione.
A monte dell’alimentatore, deve essere instal-
lato un interruttore di tipo bipolare facilmente
accessibile con separazione tra i contatti di
almeno 3 mm.
CONFORMITÀ NORMATIVA.
Direttiva BT
Direttiva EMC
Norme EN 60065, EN 61000-6-1, EN
61000-6-3.
Gli alimentatori costituiscono una sorgente
SELV rispettando i requisiti previsti dall’arti-
colo 411.1.2.2 della norma CEI 64-8 (2012).
La produzione del trasformatore è sotto co-
stante sorveglianza:
DVE
INSTALLATION RULES.
Installation should be carried out by qualied
personnel in compliance with the current reg-
ulations regarding the installation of electrical
equipment in the country where the products
are installed.
Ensure clearance around the appliance so
there is sufcient ventilation.
There must be no dripping or splashes of
water on the appliance.
WARNING: To prevent injury, the appliance
must be secured to the wall as described in
the installation instructions.
Above the power supply there must be a
bipolar circuit breaker that is easily accessible
with a contact gap of at least 3 mm.
CONFORMITY.
LV directive
EMC directive
Standards EN 60065, EN 61000-6-1, EN
61000-6-3.
Power supply units constitute SELV sources
in compliance with the requirements stip-
ulated in Article 411.1.2.2 of CEI standard
64-8 (2012).
Production of the transformer is subject to
costant surveillance:
DVE
RÈGLES D’INSTALLATION.
L’installation doit etre confiee a des per-
sonnel qualies et executee conformement
aux dispositions qui regissent l’installation
du materiel electrique en vigueur dans le
pays concerne.
Garantir des distances minimums autour
de l’appareil pour obtenir une ventilation
sufsante.
L’appareil ne doit pas être soumis à un suin-
tement ou des éclabous sures d’eau.
ATTENTION: Pour éviter toute blessure,
l’appareil doit être assuré au mur selon les
instructions d’installation.
En amont de l’alimentateur, installer un
interrupteur de type bipolaire facilement
accessible avec separation des contact d’au
moins 3 mm.
CONFORMITÉ AUX NORMES.
Directive BT
Directive EMC
Normes EN 60065, EN 61000-6-1, EN
61000-6-3.
Les alimentations constituent une source
SELV et respectent les qualités requises
par l’article 411.1.2.2 de la norme CEI 64-8
(2012).
La production du transformateur est sous
constante surveillance:
DVE
Transformer Art. M832 230V
Trasformatore Art. M832 230V Transformateur Art. M832 230V
6
884G/S - 884H/S
INSTALLAZIONE DEGLI ALIMENTATORI - POWER SUPPLY INSTALLATION
INSTALLATION DES ALIMENTATIONS - INSTALLATION DER NETZGERÄTE
INSTALACIÓN DE LOS ALIMENTADORES - INSTALACIÓN DE LOS ALIMENTADORES
Eingeschaften
Zeitrechner (Zyklen) und Belastung:
KLemmen: 12/0: 12V a.c. 0,8A ständig +
1A intermittierend 30 sec. ON 150 sec. OFF
P = 35VA Versorgungsspannung 230V a.c.
(andere Spannugen auf Wunsch) 50-60 Hz
PRI: Sicherung durch PTC
Vorsicht: Um den Apparat nach einer Über-
lastung wieder in Betrieb zu setzen, die
Netzspannung für 3 Minuten entfernen.
Installation
Das Netzgerät ist an einem trockenen und
staubfreien Ort unter Vermeidung der Nähe
von Wärmequellen zu installieren.
Zur Erleichterung von Kontrollen und Ein-
stellungen sollte der Aufstellungsort gut
zugänglich sein.
Das Netzgerät mit den beigepackten Dübeln
an der Wand befestigen oder in einen Vertei-
ler mit DIN-Omegaschiene einsetzen.
INSTALLATIONSVORSCHRIFTEN.
Die Installation muss durch Fachpersonal
gema. den im Anwendungsland des Gerats
geltenden Vorschriften zur Installation elekt-
rischen Materials erfolgen.
Bitte beachten Sie die vorgeschriebenen
Mindestabstände um das Gerät, um eine
ausreichende Belüftung zu gewährleisten.
Das Gerät darf weder Tropfwasser noch
Wasserspritzern ausgesetzt sein.
ACHTUNG: Zum Schutz vor Verletzungen
muss das Gerät nach den Vorgaben der
Installationsanleitungen an der Wand be-
festigt werden.
Vor dem Netzgerät ist ein leicht zugänglicher,
zweipoliger Schalter mit Mindestabstand
zwischen den Kontakten von 3 mm zu
installieren.
NORMKONFORMITÄT.
NS-Richtlinie
EMC-Richtlinie
Normen DIN EN 60065, EN 61000-6-1, EN
61000-6-3.
Die Netzgeräte, die die vom Art. 411.1.2.2
der CEI 64-8 (Ausgabe 2012) Norm Vor-
gesehene Fähigkeiten respektieren, eine
SELV Quelle bestellen.
Die Transformatorserzeugung ist unter stän-
diger Aufsicht:
DVE
Características
Temporización y carga:
Bornes: 12/0: 12V a.c. 0,8A continua + 1A
intermitente 30 sec. ON 150 sec. OFF
P = 35VA alimentación 230V a.c. (otras ten-
siones a pedido) 50-60 Hz
PRI: Protección por PTC
Attención: Para restaurar el aparato des-
pués de una sobrecarga quitar la corriente
durante 3 minutos.
Instalación
El alimentador tiene que ser colocado en
un lugar seco y lejos del polvo y fuentes de
calor.
Al n de facilitar controles y puestas a punto
el lugar de la instalación debe ser fácilmente
accesible.
Fijar a la pared el alimentador por medio
de tacos en dotación o insertándolo en un
cuadro apropiado con barra DIN a omega.
Características
Temporização e carga:
Terminais: 12/0: 12V a.c. 0,8A continua + 1A
intermitente 30 sec. ON 150 sec. OFF
P = 35VA alimentação 230V a.c. (outras ten-
sões sob pedido) 50-60 Hz
PRI: Proteção por PTC
Atenção: Para repor o aparelho após
uma sobrecarga, desligar a alimentação
da rede durante 3 minutos.
Instalación
O alimentador deverá ser colocado num
local seco e ao abrigo do pó e de fontes de
calor.
Para facilitar os controlos e as anações,
certique-se de que o local é de fácil acesso.
Fixe o alimentador à parede com as buchas
fornecidas ou inserindo-o num quadro pró-
prio com calha DIN tipo omega.
NORMAS DE INSTALACIÓN.
La instalacion debe ser realizada por perso-
nal cualicado cumpliendo con las disposi-
ciones en vigor que regulan el montaje del
material electrico en el pais donde se instalen
los productos.
Para garantizar una correcta ventilación del
aparato, hay que dejar un espacio adecuado
a su alrededor.
No dejar que gotas o chorros de agua mojen
el aparato.
ATENCIÓN: para evitar daños personales, el
aparato se ha de jar a la pared tal como se
describe en las instrucciones de instalación.
Aguas arriba del alimentador se ha de instalar
un interruptor bipolar, fácilmente accesible y
con una distancia entre los contactos de al
menos 3 mm.
CONFORMIDAD NORMATIVA.
Directiva BT
Directiva EMC
Normas EN 60065 y EN 61000-6-1, EN
61000-6-3.
Los alimentadores constituyen una fuente
SELV y respectan los requisitos previstos
por el artículo 411.1.2.2 de la norma CEI
64-8 (2012).
A fabrico do transformador está sob a cons-
tante vigilância de:
DVE
REGRAS DE INSTALAÇÃO
A instalação deve ser efetuada por pessoal
qualicado de acordo com as disposições
que regulam a instalação de material elé-
trico, vigentes no País em que os produtos
são instalados.
Não obstruir as aberturas ou ranhuras de
ventilação ou de dissipação de calor e não
expor o aparelho ao estilicidio du pulveriza-
ção de agua.
ATENÇÃO: Para evitar ferir-se, este aparelho
deve ser xado na parede de acordo com as
instruções de instalação.
É necessário instalar, perto da fonte de
alimentação, um interruptor apropriado, do
tipo omnipolar, com uma separação minima
de 3 mm entre os contactos.
CUMPRIMENTO DE REGULAMENTAÇÃO
Directiva BT
Directiva EMC
Normas EN 60065, EN 61000-6-1, EN
61000-6-3.
Os alimentadores constituem uma fonte
SELV e cumprem os requisitos previstos no
artigo 411.1.2.2 da norma CEI 64-8 (2012).
A produção do transformador está sob vigi-
lância constante:
DVE
Transformator Art. M832 230V Transformador Art. M832 230V Transformador Art. M832 230V
7
884G/S - 884H/S
Viale Vicenza, 14
36063 Marostica VI - Italy
www.vimar.com
S6I.884.GS0 06 1808

This manual suits for next models

1

Other Elvox Door Opening System manuals

Elvox EAM7 User manual

Elvox

Elvox EAM7 User manual

Elvox Sound system GIOTTO User manual

Elvox

Elvox Sound system GIOTTO User manual

Elvox 2900 Series Quick start guide

Elvox

Elvox 2900 Series Quick start guide

Elvox 884G Assembly instructions

Elvox

Elvox 884G Assembly instructions

Popular Door Opening System manuals by other brands

Nabco 243681-05 installation instructions

Nabco

Nabco 243681-05 installation instructions

Assa Abloy Yale 2500 Series installation instructions

Assa Abloy

Assa Abloy Yale 2500 Series installation instructions

B&D Roll-A-Door 2 Series installation instructions

B&D

B&D Roll-A-Door 2 Series installation instructions

Henderson MARATHON FDK1 Fitting instructions

Henderson

Henderson MARATHON FDK1 Fitting instructions

Provia QDC 311 installation instructions

Provia

Provia QDC 311 installation instructions

CornellCookson SGH Series manual

CornellCookson

CornellCookson SGH Series manual

ENFORCER Enforcer E-942FC-1K3SQ Technical specifications

ENFORCER

ENFORCER Enforcer E-942FC-1K3SQ Technical specifications

STC 600N manual

STC

STC 600N manual

Assa Abloy SARGENT 351 Series manual

Assa Abloy

Assa Abloy SARGENT 351 Series manual

Dormakaba ED50 installation instructions

Dormakaba

Dormakaba ED50 installation instructions

Sesamo Puma Millenium Installation instruction

Sesamo

Sesamo Puma Millenium Installation instruction

Dorma AGILE 150 Installation instruction

Dorma

Dorma AGILE 150 Installation instruction

Powermatic R100 FITTING INSTRUCTION

Powermatic

Powermatic R100 FITTING INSTRUCTION

Dorma G-EMR Fixing instructions

Dorma

Dorma G-EMR Fixing instructions

Von Duprin 2227-F Service manual

Von Duprin

Von Duprin 2227-F Service manual

DH2 Solutions Housemate user guide

DH2 Solutions

DH2 Solutions Housemate user guide

Dormakaba Muto Premium XL150 Supplemental instructions

Dormakaba

Dormakaba Muto Premium XL150 Supplemental instructions

LARSON SCREEN-AWAY quick start guide

LARSON

LARSON SCREEN-AWAY quick start guide

manuals.online logo
manuals.online logoBrands
  • About & Mission
  • Contact us
  • Privacy Policy
  • Terms and Conditions

Copyright 2025 Manuals.Online. All Rights Reserved.