Eminent EM6304 User manual

EM6304
Full HD Network Video Recorder

2
|
ENGLISH
EM6304 Full HD Network Video Recorder
Table of contents
1.0 Introduction ...........................................................................................................3
1.1 Packing contents ...............................................................................................3
2.0 Explanation of the connections ..............................................................................4
2.1 EM6304 4 Port network video recorder..............................................................4
3.0 Using the surveillance recorder .............................................................................4
3.1 Connecting the surveillance recorder to your television or monitor.....................4
3.2 Connecting the mouse to the surveillance recorder ...........................................5
3.3 Connecting the surveillance recorder to your network........................................5
3.4 Connecting the surveillance recorder to the power grid......................................5
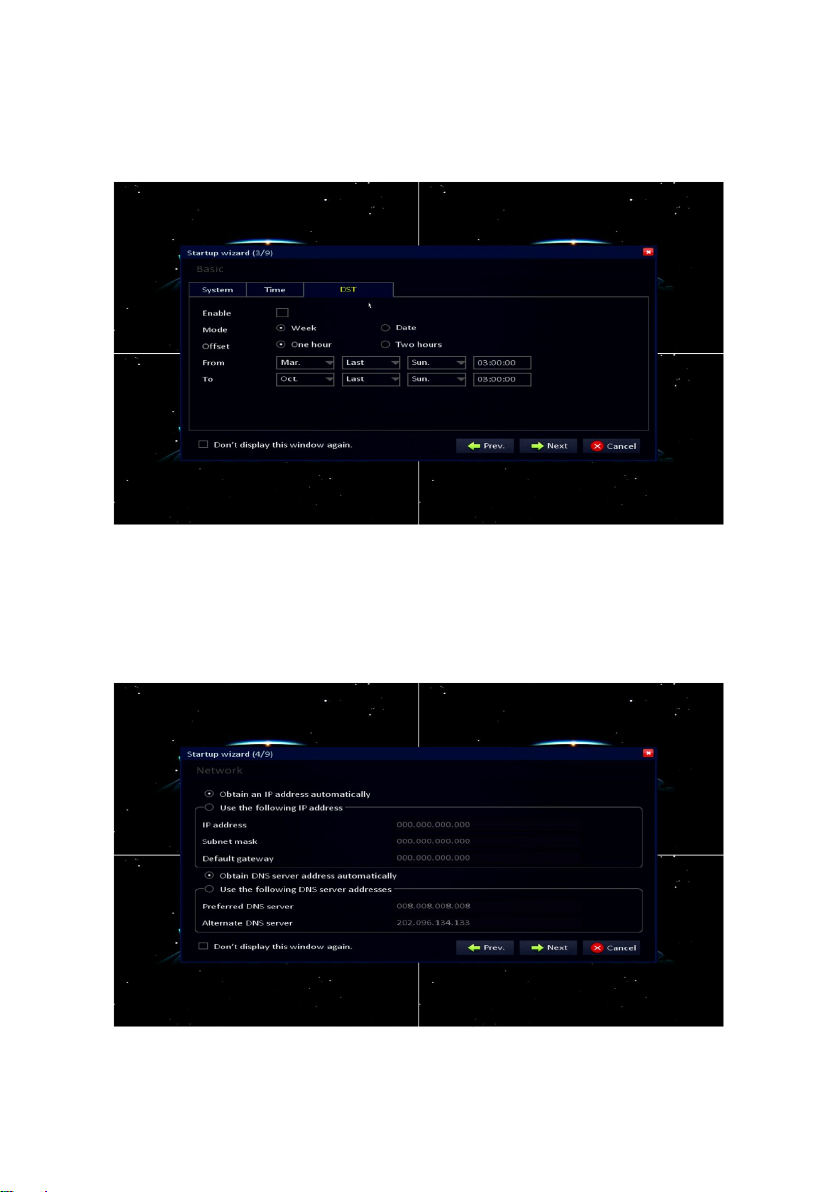
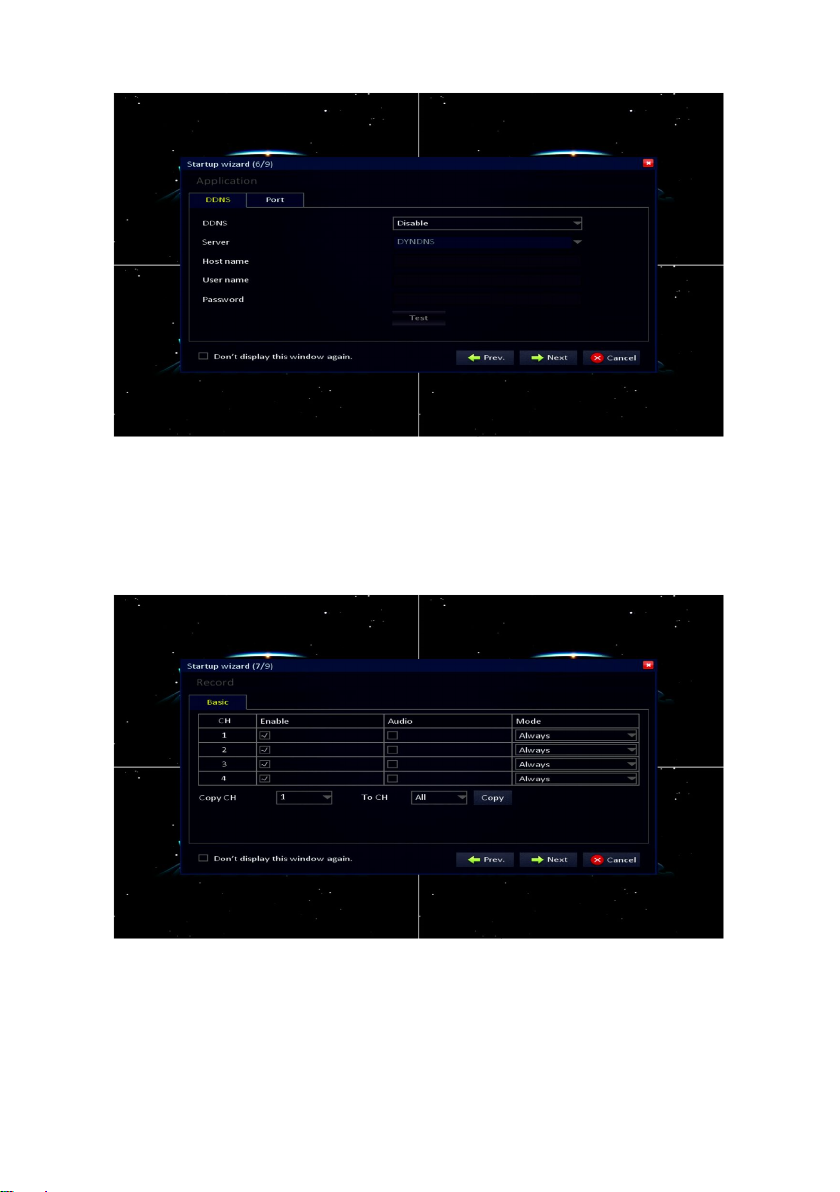
4.0 Using the setup wizard ..........................................................................................5
5.0 Manual settings ...................................................................................................11
5.1 Setting up passwords ......................................................................................12
5.1.1 Setting up a user account ..........................................................................12
5.1.2 Setting up an admin account .....................................................................15
5.2 Setting up date and time..................................................................................17
5.3 Setting up network settings..............................................................................20
5.4 Selecting the screen language.........................................................................21
6.0 Connecting a camera ..........................................................................................22
6.1 Connecting an IP camera ................................................................................22
6.2 Checking the cameras image ..........................................................................25
6.3 Setting up the surveillance recorder for PTZ usage .........................................25
6.4 Checking the PTZ camera ...............................................................................28
6.5 Adjusting the surveillance recorder’s resolution ...............................................28
7.0 Recording............................................................................................................30
7.1 Resolution and bit rate of the recordings..........................................................30
7.2 Recording manually.........................................................................................33
7.3 Recording continuously ...................................................................................34
7.4 Recording during motion detection ..................................................................37
7.5 Time based recording with motion detection ....................................................40
8.0 Setting up an alarm notification............................................................................43
8.1 Setting up an alarm notification during motion detection ..................................43
8.2 Sending an email during alarm notification.......................................................46
9.0 Control the recordings of the surveillance recorder ..............................................48
9.1 Searching for recordings at a specific time.......................................................49
9.2 Backup a recording..........................................................................................51
10.0 Access the surveillance recorder locally ............................................................53
10.1 Take a snapshot using the web interface .......................................................60
10.2 Recording using the web interface .................................................................61
10.3 Playback the recordings ................................................................................62
11.0 Accessing the surveillance recorder externally and the use of DDNS ................65
11.1 Accessing the surveillance recorder through the Internet ...............................65

3
|
ENGLISH
11.2 Using DDNS ..................................................................................................65
11.2.1 What is DDNS? .......................................................................................66
11.2.2 Setting up DDNS in the surveillance recorder ..........................................66
12.0 Playback images on your smartphone or tablet .................................................68
12.1 Setting up the surveillance recorder for your smartphone or tablet.................68
12.3 Setting up your smartphone or tablet .............................................................69
15.0 Other functions ..................................................................................................75
16.0 Frequently Asked Questions and other related information ................................76
17.0 Service and support...........................................................................................76
18.0 Warning and points of attention .........................................................................76
19.0 Warranty conditions...........................................................................................78
1.0 Introduction
Congratulations with the purchase of this high-quality Eminent product! This product
has undergone extensive testing by Eminent’s technical experts. Should you
experience any problems with this product, you are covered by Eminent
warranty. Please keep this manual and the receipt in a safe place.
Register your product now on www.eminent-online.com and receive product updates!
1.1 Packing contents
The following parts need to be present in the packing:
•Full HD Network Video Recorder
•Power supply
•Remote control
•2 Batteries
•Mouse
•4 screws for HDD
•Quick install guide

4
|
ENGLISH
2.0 Explanation of the connections
2.1 EM6304 4 Port network video recorder
1. Line-In: Can be used to connect a microphone to the Audio-In channel.
2. Audio-Out: Can be used to connect to an analogue receiver or powered speaker.
Video-Out: Can be used to connect a CVBS cable to receive the surveillance
recorder’s image(s).
3. VGA connection. Used to connect a VGA monitor or TV to view the Surveillance
recorders Video streams.
4. HDMI connection. Used to connect a HDMI monitor or TV to view the Surveillance
recorders Video streams (Recommended).
5. LAN connection.
6. 2x USB ports which can be used for USB drive, keyboard or mouse.
7. Power connector.
3.0 Using the surveillance recorder
During the following chapters we will explain how to setup the Network video recorder.
3.1 Connecting the surveillance recorder to your
television or monitor
1. Take the surveillance recorder out of the packaging.
2. Connect the surveillance recorder to a monitor/TV which has a VGA or HDMI
connection. Also, you can connect the surveillance recorder to a special security
monitor which has a BNC connection. If you connect the surveillance recorder to a
television which has a cinch connection, then you can use an optional BNC to
cinch converter. (You can also use the surveillance recorder without the use of a
monitor, then you can view the images of the surveillance recorder via your
network, using a computer).

5
|
ENGLISH
3.2 Connecting the mouse to the surveillance recorder
1. Take the mouse out of the packaging.
2. Connect the USB mouse to one of the available USB ports on the surveillance
recorder.
3.3 Connecting the surveillance recorder to your network
1. Connect a network cable to the ‘RJ45’ port of the surveillance recorder.
2. Connect the other side of the network cable to your modem, router or switch.
3.4 Connecting the surveillance recorder to the power grid
1. Connect the plug of the power supply to the ‘DC +12V IN’ of the surveillance
recorder.
2. Connect the power supply to a wall outlet.
3. The recorder will now boot. It last 90 seconds before you will see an image.
4.0 Using the setup wizard
Once the surveillance recorder has been booted, a setup wizard will be shown. Using
this wizard, you can setup the basic settings of the surveillance recorder.
Note: The surveillance recorder will always start in the English language until you
have chosen a different language!
Hint: If you do not want the setup wizard to be shown again, you need to mark ‘don’t
display this window again’.
Step 1:
The wizard starts with the text ‘Welcome to the Setup Wizard’. Click ‘Next’.

6
|
ENGLISH
Step 2:
In the following screen, you can setup a password for the ‘admin’ account. Fill out a
password at the ‘Password’ field. Confirm your chosen password at the ‘Retype
password’ field. Click ‘Next’.
Step 3:
Select your ‘Video format’. Select ‘PAL’. Also, select your language. In this case,
‘English’.

7
|
ENGLISH
Select the tab ‘Time’ if to set the correct date and time. Also, you can select the ‘Time
format’ and ‘Time zone’. At ‘Time server’, you can select an online time server which
will synchronize the date and time. Mark ‘Auto update’ if you want the time and date
to be updated automatically.
Important: In order to add an Eminent IP camera properly it is necessary to
setup the correct date and time. You can either change the time manually or
mark “Auto Update”. When you enable “Auto update” we advise you to
reboot the NVR after finishing the wizard. You can find the option “Reboot”
under tab “Maintenance”

8
|
ENGLISH
Select the tab ‘DST’. In the following screen, you can select the daylight saving time,
by placing a mark at ‘Enable’. Also, you can set the ‘Offset’ in hours. For example:
One hour. You can also set the starting and end date of the daylight saving time (DST)
at the ‘From’ and ‘To’ fields. Click ‘Next’.
Step 4:
In the following screen, you need to select whether you want to obtain an IP Address
by DHCP or setting an IP Address manually. Usually, obtaining an IP Address
automatically is sufficient. If you want to obtain the IP Address automatically, click
‘Next’.
However, it can be handy to set the IP Address data manually. If you do not have a
DHCP server in your network, in that case, select ‘Use the following IP address’ and

9
|
ENGLISH
fill out the correct data such ‘IP address’, ‘Subnet mask’ and ‘default gateway’. ( Use
the mouse to select and change the data). Also, fill out the correct ‘Preferred’ and
‘Alternate DNS Server’. Click ‘Next’.
Step 5:
A new screen appears. The network connection will be tested first. Then, an overview
appears. This overview shows the IP-Address data, DNS server addresses and your
(Internet) WAN IP Address. Click ‘Next’.
Step 6:
If you want to use a DDNS account, set the ‘DDNS’ option to ‘Enable’ in the following
screen and then select your DDNS provider. Also, you need to fill out the hostname,
user name and password of your DDNS account.
Click ‘Port’. In this screen, the ‘Media port’ and the ‘Web port’ are shown. The
‘Media port’ is used by devices such as smartphones which are accessing the
surveillance recorder externally. The ‘Web port’ is used by computers which are
accessing the surveillance recorder externally. If needed, the ‘Media port’ and ‘Web
port’ can be changed manually. Click ‘Next’.

10
|
ENGLISH
Step 7:
In the following screen, you can select from which channel (CH) you want to record.
Each channel represents a connected camera. If a mark is placed at ‘Enable’ at the
corresponding channel, it means recording from this channel is activated. You can
also select whether audio needs to be recorded at ‘Audio’. At ‘Mode’, you can select
whether the recordings need to take place continuously, or scheduled.
Step 8:
At the following screen, you can see the status of the internal hard disk and the
capacity of the internal hard disk. At ‘Overwrite’, you can select the ‘by capacity’
option. Which means that the oldest recorded files will be overwritten when the hard
disk reaches its maximum capacity.

11
|
ENGLISH
If you want the files to be overwritten after a pre-set amount of days, select ‘by days’
and set the amount of days.
Place a mark at ‘Format’ and then click ‘Format’ to begin formatting the internal hard
disk. Please be patient while the hard disk is being formatted. Click ‘Save’.
Step 9:
Click ‘OK’ to finish the setup wizard.
5.0 Manual settings
If you have not used the setup wizard, or you want to setup a password manually to
prevent third parties to gain access, or you want to manually set the date and time,

12
|
ENGLISH
you can manually set the surveillance recorder. If your surveillance recorder has been
connected to your network, you can manually set the IP address data.
5.1 Setting up passwords
In order to prevent third parties gaining access to the settings of the surveillance
recorder, you can setup a password in the surveillance recorder. There are two
different types of accounts which can be used to setup a password: a user account
with a password and an admin account with a password. A user account is supposed
to be used for the ‘normal’ user which can only view images and cannot alter any
settings. If needed, you can also create a user account and add privileges you want to
add for this user account.
An admin account is supposed to be used for the person who is able to view and alter
all settings.
5.1.1 Setting up a user account
1. Make sure the surveillance recorder is completely booted, and you can see the
surveillance recorder’s image on your screen.
2. Click ‘Start’.
3. Fill out the password you have set during the wizard and click ‘Login’. Leave the
password field empty when there is no password or the wizard has not been used
and click ‘Login’.

13
|
ENGLISH
4. Click ‘Basic and then select ‘User’.
5. Click ‘Add user’.

14
|
ENGLISH
6. Fill out a user name for this account at ‘User name’. Use the mouse and the
onscreen keyboard to fill out the data and click ‘Enter’ to confirm.
7. Fill out a password for this account at ‘Password’. Use the mouse and the
onscreen keyboard to fill out the data and click ‘Enter’ to confirm.
8. Confirm the password at ‘Retype password’. Use the mouse and the onscreen
keyboard to fill out the data and click ‘Enter’ to confirm.
9. Select the ‘Authority’ tab.
10. If this account only may have access to the images of the camera’s (no privilege
to change anything), click ‘Clear’.

15
|
ENGLISH
11. Click ‘Apply’.
12. Click ‘OK’ at the ‘Successfully saved’ screen.
13. Click ‘Exit’ until you are at the ‘User’ menu.
Note: Your password can have a maximum of 16 characters.
5.1.2 Setting up an admin account
1. Click ‘Add user’.

16
|
ENGLISH
2. Fill out a user name for this account at ‘User name’. Use the mouse and the
onscreen keyboard to fill out the data and click ‘Enter’ to confirm.
3. Fill out a password for this account at ‘Password’. Use the mouse and the
onscreen keyboard to fill out the data and click ‘Enter’ to confirm.
4. Confirm the password at ‘Retype password’. Use the mouse and the onscreen
keyboard to fill out the data and click ‘Enter’ to confirm.
5. Select the ‘Authority’ tab.
6. Since we are creating an admin account, we need to make sure all items are
selected. You can select this manually or select the button “All”

17
|
ENGLISH
7. Click ‘Apply’.
8. Click ‘OK’ at the ‘successfully saved’ screen.
9. Click ‘Exit’ until you are at the main menu.
Note: Your password may contain a maximum of 16 characters.
5.2 Setting up date and time
1. Click ‘Basic’.
2. Click ‘Date/Time’.

18
|
ENGLISH
3. Fill out the date, year and time at the ‘Date/Time’ field.
4. You can set the display of date, time and year at the ‘Date Format’ field.
5. Fill out the time display at the ‘Time format’ field. You can choose between ’24-
Hour’ and ’12-Hour’.
6. Select the correct time zone at the ‘Time zone’ field.
7. Place a mark at ‘Auto update’ if you want the time and date to be updated
automatically.
8. Select a time server at the ‘Time server’ field. You can select an online time
server which will synchronize the date and time.
Important: In order to add an Eminent IP camera properly it is necessary to
setup the correct date and time. You can either change the time manually or
mark “Auto Update”. When you enable “Auto update” we advise you to
reboot the NVR after applying the date/time settings. You can find the option
“Reboot” under tab “Maintenance”

19
|
ENGLISH
9. Click ‘DST’. In the following screen, you can select the daylight saving time, by
placing a mark at ‘Enable’. Also, you can set the ‘Offset’ in hours. For example:
One hour. You can also set the starting and end date of the daylight saving time
(DST) at the ‘From’ and ‘To’ fields.
10. Click ‘Apply’ to save these settings.
11. Click ‘OK’ at the ‘successfully saved’ screen.

20
|
ENGLISH
12. Click ‘Exit’ until you are at the main menu.
5.3 Setting up network settings
1. Click ‘Advance’.
2. Click ‘Network’.
3. ‘Obtain an IP address automatically’ and ‘Obtain DNS server automatically’
are selected by default. This is the ideal setting if you have a DHCP server within
your network and you do not want to setup the network data manually.
4. If there is no DHCP active within your network, or you want to manually fill out an
IP Address, place the mark at ‘Use the following IP address’ and fill out the correct
data such as ‘IP address’, ‘Subnet mask’ and ‘Default gateway’. (You can use
Table of contents