Eminent CamLine Pro EM6360 User manual

EM6360
CamLine Pro HD dome outdoor IP camera

2|ENGLISH
EM6360 –CamLine Pro HD dome outdoor IP
camera
Table of contents
1.0 Introduction ...........................................................................................................3
1.1 Packing contents...............................................................................................4
1.2 Requirements to access the camera..................................................................4
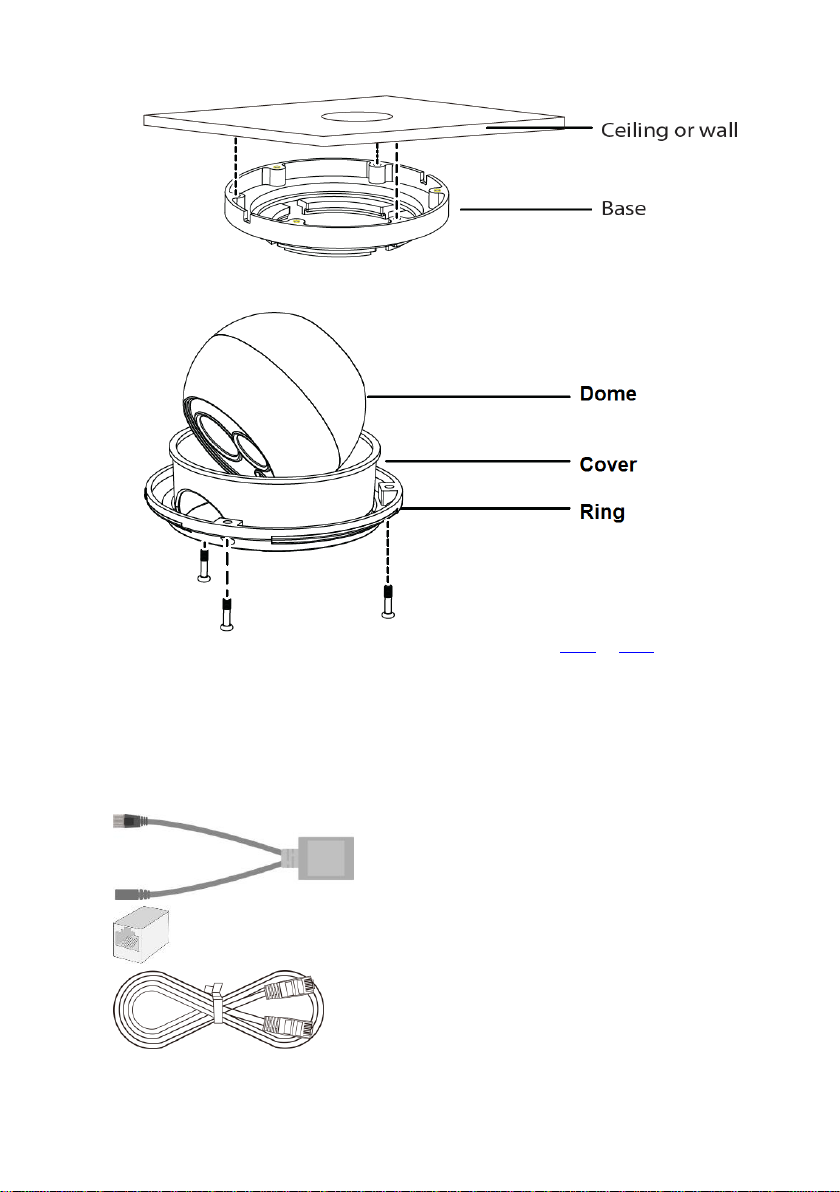
1.3 Major hardware components. ............................................................................4
2.0 Installing the camera .............................................................................................5
2.1 micro SD-Card installation.................................................................................5
2.2 Mounting the camera on the ceiling...................................................................7
2.3 Connecting the camera to your network using a network cable..........................8
2.3.1 Option 1 Power adapter is plugged near the EM6360................................. 9
2.3.2 Option 2 Power adapter is plugged near the router/modem/switch.............. 9
2.4 Installing the CamLine Pro App on an Apple/Android device............................10
2.5 Installing/removing the camera in the APP on Apple/Android device................11
2.5.1 Delete the camera from the camera list .....................................................11
2.5.2 Remove the video stream from the camera overview in the main screen...12
2.6 Installing the software and camera on a PC or notebook (Windows)................12
3.0 Viewing images...................................................................................................13
3.1 On your smartphone/tablet (Android, iPhone, iPad).........................................13
3.2 On your PC (Windows) in a remote location. ...................................................13
4.0 CamLine Pro for iPhone/iPad/Android .................................................................14
4.1 The Layout of CamLine Pro.............................................................................14
4.2 Menu of the app...............................................................................................14
4.3 Overview and control of the camera ................................................................15
4.4 Settings of the camera.....................................................................................17
4.4.1 Select a different camera...........................................................................17
4.4.2 View recordings stored on the SD-card......................................................18
4.4.3 View recordings stored on the locally.........................................................18
4.4.4 Remove camera from overview .................................................................18
4.4.5 Camera settings ........................................................................................19
4.5 Camera settings ..............................................................................................19
4.5.1 Reconnect.................................................................................................19
4.5.2 Remove this device...................................................................................19
4.5.3 Reboot this device.....................................................................................20
4.6 Advanced settings...........................................................................................20
4.6.1 Camera password .....................................................................................20
4.6.2 Time zone settings ....................................................................................21
4.6.3 WiFi (Not available for EM6360)................................................................21
4.6.4 Alarm settings............................................................................................22
4.6.5 FTP settings..............................................................................................24
4.6.6 Mail settings ..............................................................................................25
4.6.7 SD card settings........................................................................................26

3|ENGLISH
5.0 CamLine Pro PC software...................................................................................27
5.1 The overview of the CamLine Pro PC software................................................27
5.2 Software settings.............................................................................................28
5.2.1 Software settings.......................................................................................28
5.2.2 Config manager.........................................................................................28
5.2.3 User manager............................................................................................28
5.2.4 Recording manager...................................................................................28
5.2.5 Alarm manager..........................................................................................28
5.3 Camera settings ..............................................................................................28
5.3.1 UID............................................................................................................28
5.3.2 Recording..................................................................................................29
5.3.3 Alarm.........................................................................................................30
5.3.4 WiFi setting (not available for EM6360) .....................................................31
5.3.5 Date/Time..................................................................................................31
5.3.6 Device settings..........................................................................................31
5.4 Playback local recordings................................................................................36
5.5 Pan/Tilt (not available for EM6360)..................................................................38
6.0 The webpage of the camera................................................................................38
6.1 Login by Web browser.....................................................................................38
6.2 The layout of CamLine Pro..............................................................................39
6.3 FTP setting......................................................................................................40
6.4 Alarm settings..................................................................................................40
6.5 System settings...............................................................................................41
7.0 Upgrade Device Firmware..................................................................................41
8.0 Frequently Asked Questions and other related information..................................41
9.0 Service and support.............................................................................................41
10.0 Warning and points of attention .........................................................................42
11.0 Warranty conditions...........................................................................................43
1.0 Introduction
Congratulations with the purchase of this high-quality Eminent product! This product
has undergone extensive testing by Eminent’s technical experts. Should you
experience any problems with this product, you are covered by a five-year Eminent
warranty. Please keep this manual and the receipt in a safe place.
Register your product now on www.eminent-online.com and receive product updates!

4|ENGLISH
1.1 Packing contents
The following parts need to be present in the packing:
EM6360
Power supply
Splitter Cable
RJ45 coupler
Quick install guide
Network cable
Mounting material: screws and plugs
Window sticker
ID/Password card
1.2 Requirements to access the camera.
It is very easy to access the video images of the EM6360 on your smartphone, tablet
or PC. You only need the ID or QR code that is displayed on your bottom label and
download the application for your device. You do not need to remember or setup the
configuration of your modem/router to be able to access the camera.
1.3 Major hardware components.
The major components on the front panel of the EM6360 are:
1. Lens –the focus of the lens is fixed.
2. IR LED –for the Infra-red lighting of the night mode.
3. LAN/Power –this is a combined connector LAN and to power the camera
connection (with supplied PoE injector). The power needed for this EM6360 is
12V/1A, please make sure you are using the correct power adapter.

5|ENGLISH
2.0 Installing the camera
A few short and simple steps are necessary to connect and assign the camera, and to
enjoy the use of the camera. Use the following steps to connect the camera.
2.1 micro SD-Card installation
The video streams can be recorded and be stored onto an internal micro SD-Card.
To install the micro SD-Card you will need to open the IP Camera.
First remove the 3 screws on the base
Remove the camera ring from the base
Unscrew the top and bottom of the dome to open the camera and access the
micro SD-card slot.

6|ENGLISH
Then plug the micro SD-card into the micro SD-card slot inside the IP Camera.
Note: When you reassemble the camera, please ensure the top and bottom of the
dome is closed tightly to be sure the camera will not have a leakage.
Note: When you plug in the micro SD-card while the camera is powered, please
reboot the camera for the micro SD-card to work properly.

7|ENGLISH
2.2 Mounting the camera on the ceiling
1. First remove the 3 screws on the base
2. Remove the camera ring from the base.
3. Use the mounting stand to mark the holes at the location where you want to mount
the camera (optionally mark a hole for the Ethernet cable as well).
4. Drill the holes and fill the holes with the supplied plugs.
5. Make sure the Ethernet cable of the camera is situated correctly before mounting
the bracket.
6. Mount the bracket stand to the wall or ceiling using the supplied screws.

8|ENGLISH
7. Mount the camera housing to the bracket with the camera base (do not tighten the
screws to much so the camera angle can still be adjusted.
8. Connect the power and data cable as described in chapter 2.3.1 or 2.3.2
9. Once the camera is aligned correctly after checking the view in the APP tighten
the screws to secure the cameras angle.
2.3 Connecting the camera to your network using a
network cable
You will need the following components to connect your EM6360 to your network.
”Splitter cable”
”RJ45 Coupler”
”Ethernet cable”

9|ENGLISH
”Power Adapter”
Please connect the accessories to the EM6360 correctly, including the power adapter
and Ethernet cable. And connect the other end of the Ethernet cable to your network.
Usually, this Ethernet cable is plugged into a router or an Ethernet switch. Since the
default settings of the EM6360 use DHCP the EM6360 should be connected to the
Internet immediately. The Internet status LED should be lit constantly.
There are two ways to connect the camera to your wired network.
Please choose the best option for your setup.
2.3.1 Option 1 Power adapter is plugged near the EM6360.
1. Connect a Ethernet cable (max. 50m) to your router/modem/switch.
2. Connect the other end of the Ethernet cable to the “RJ45 coupler”.
3. Connect the Ethernet plug of the Splitter cable to the “RJ45 coupler”
4. Connect the supplied power adapter to the supplied “Splitter cable”.
5. Connect the Power + Ethernet plug from the EM6360 to the “RJ45 coupler”.
2.3.2 Option 2 Power adapter is plugged near the router/modem/switch.
1. Connect the supplied power adapter to the supplied “Splitter cable”.
2. Connect the Ethernet plug of the “Splitter cable” to the router/modem/switch..
3. Connect a Ethernet cable (max.50m) to the “Splitter cable”.
4. Connect the other end of the Ethernet cable to the “RJ45 coupler”.
5. Connect the Power + Ethernet plug from the EM6360 to the “RJ45 coupler”.

10 |ENGLISH
Warning: DO NOT connect the splitter cable as illustrated below this will damage your
router/modem/switch.
2.4 Installing the CamLine Pro App on an Apple/Android
device
The EM6360 can be controlled and configured by using the “CamLine Pro” APP.
Search for the CamLine Pro APP in the Apple App-store or in the Google Play Store.
Download and install the APP on your phone/tablet.

11 |ENGLISH
2.5 Installing/removing the camera in the APP on
Apple/Android device
1. Open “CamLine Pro”.
2. Select the “+” (A).
3. Select “Add camera”.
4. Choose for option 1 or 2 (B) the option that matches the best with your setup
situation and press “Add camera”.
5. Follow the instructions on the screen
6. Press “Add” to add the camera.
2.5.1 Delete the camera from the camera list
On iOS:
1. To delete a camera from the camera list. Press the menu button in the upper left
corner and select “Camera list”.
2. Slide the camera you wish to delete from right to left, the “Delete” button will
appear.
3. Press the “Delete” button to remove the camera from the list.
On Android:

12 |ENGLISH
1. To delete a camera from the camera list. Press the menu button in the upper left
corner and select “Camera list”.
2. Press “Edit”.
3. A button will appear next to the camera.
4. Press the button next to the camera to delete the camera from the camera list
2.5.2 Remove the video stream from the camera overview in the main screen
When you wish to remove a video stream from the main screen press the icon
from the video stream you wish to remove and press to remove the video stream
from the main screen.
2.6 Installing the software and camera on a PC or
notebook (Windows).
Before you can view the video of the camera, you need to install the software
”CamLine Pro”.
1. Download the PC software from our website www.eminent-online.com
2. Unzip the file on your windows PC
3. Click the file setup.exe
4. Run the wizard to install the application CamLine Pro.
5. The application is installed on the PC
6. Open “CamLine Pro”. (If prompted with a screen about the firewall click “always
allow”).
7. A pop-up screen will appear to enter the user credentials. Default user = admin,
default password = admin
8. Click the icon to add the camera
9. Give the camera you wish to add a name for example “Living room”.
10. To add the camera manually enter the camera ID located on the ID/password card
(proceed with step 13).
11. If the computer and the EM6360 is connected to the same network, the Camera
can be added by clicking “LAN search”.
12. The ID of the camera located on the Camera ID card or the bottom label will
appear in the camera list and can now be selected.
13. Press “OK”.
14. The default password entered by the PC software is “ipcam” select the password
field and change the password to match the password located on the Camera ID
card and press “OK”.

13 |ENGLISH
3.0 Viewing images
You can view the images both on your computer and on your smartphone screen, as
we explain in the sections below.
Optionally, you can install the supplied software so you can find the camera directly
with your computer and make recordings with your computer.
3.1 On your smartphone/tablet (Android, iPhone, iPad)
Start the App CamLine Pro, press the camera view of the camera you wish to
view/control from the 4-camera view. The device will start connecting with the camera
and will show live images of the camera including the camera control buttons. If the
smartphone is rotated to landscape the video stream will be displayed in Full-screen
(rotation feature of the smartphone needs to be enabled).
3.2 On your PC (Windows) in a remote location.
After CamLine Pro software is installed, it’s very easy to add a camera into the camera
list of the CamLine Pro software, press the “+” button, key in the CAM ID and
password (from the ID/Password Card) and press “OK”. The camera will be added to
the camera list. To view the stream select and drag and drop the camera in the screen
you wish to display the stream of the camera. You will then see the video stream
immediately. No further NAT/router setting modifications are needed. The camera can
be controlled remotely as well.

14 |ENGLISH
4.0 CamLine Pro for iPhone/iPad/Android
4.1 The Layout of CamLine Pro
iOS Android
4.2 Menu of the app
iOS
Add camera
App information
Menu
Camera list

15 |ENGLISH
Android
4.3 Overview and control of the camera
Portrait view
App information
Camera list
Installation video
Exit app

16 |ENGLISH
Landscape view
Press the currently displayed stream to get more options
Option overview (swipe to the left to view all available options)
1. Mute
2. Record video (locally)
3. Take snapshot (locally)
4. Change video quality
5. Manage camera presets
6. Mirror horizontally
7. Mirror vertically
8. Change the environments frequency
9. Optical zoom + (only available for certain models)
10. Optical zoom - (only available for certain models)
11. Change the contrast
12. Change clearance
13. Manage IR LED switch
14. Restore default camera settings
1 2 3 4 5 6 7 8 9 10 11 12 13 14

17 |ENGLISH
4.4 Settings of the camera
4.4.1 Select a different camera
Using this option you can select a different camera from the camera list to display in
the overview.
1. Select a different camera
2. View recordings stored on the SD-card
3. View recordings stored locally
4. Camera settings
5. Remove camera from overview
1
2
3
4
5

18 |ENGLISH
4.4.2 View recordings stored on the SD-card
4.4.3 View recordings stored on the locally
4.4.4 Remove camera from overview

19 |ENGLISH
4.4.5 Camera settings
4.5 Camera settings
4.5.1 Reconnect
4.5.2 Remove this device

20 |ENGLISH
4.5.3 Reboot this device
4.6 Advanced settings
The settings of the camera are available in the menu option “Advanced settings”.
4.6.1 Camera password
Here you can change the password of the camera.
Set new password
Table of contents
Other Eminent Security Camera manuals

Eminent
Eminent EM6325 R1 User manual

Eminent
Eminent EM6050 User manual

Eminent
Eminent EM6275 User manual

Eminent
Eminent EM6027 User manual

Eminent
Eminent EM6220 User manual

Eminent
Eminent EM6355 User manual

Eminent
Eminent CamLine Pro EM6331 User manual

Eminent
Eminent Easy Pro View EM6260 User manual

Eminent
Eminent EM6270 User manual

Eminent
Eminent Easy Pro View User manual