www.eminent-online.com
4b*
4a*
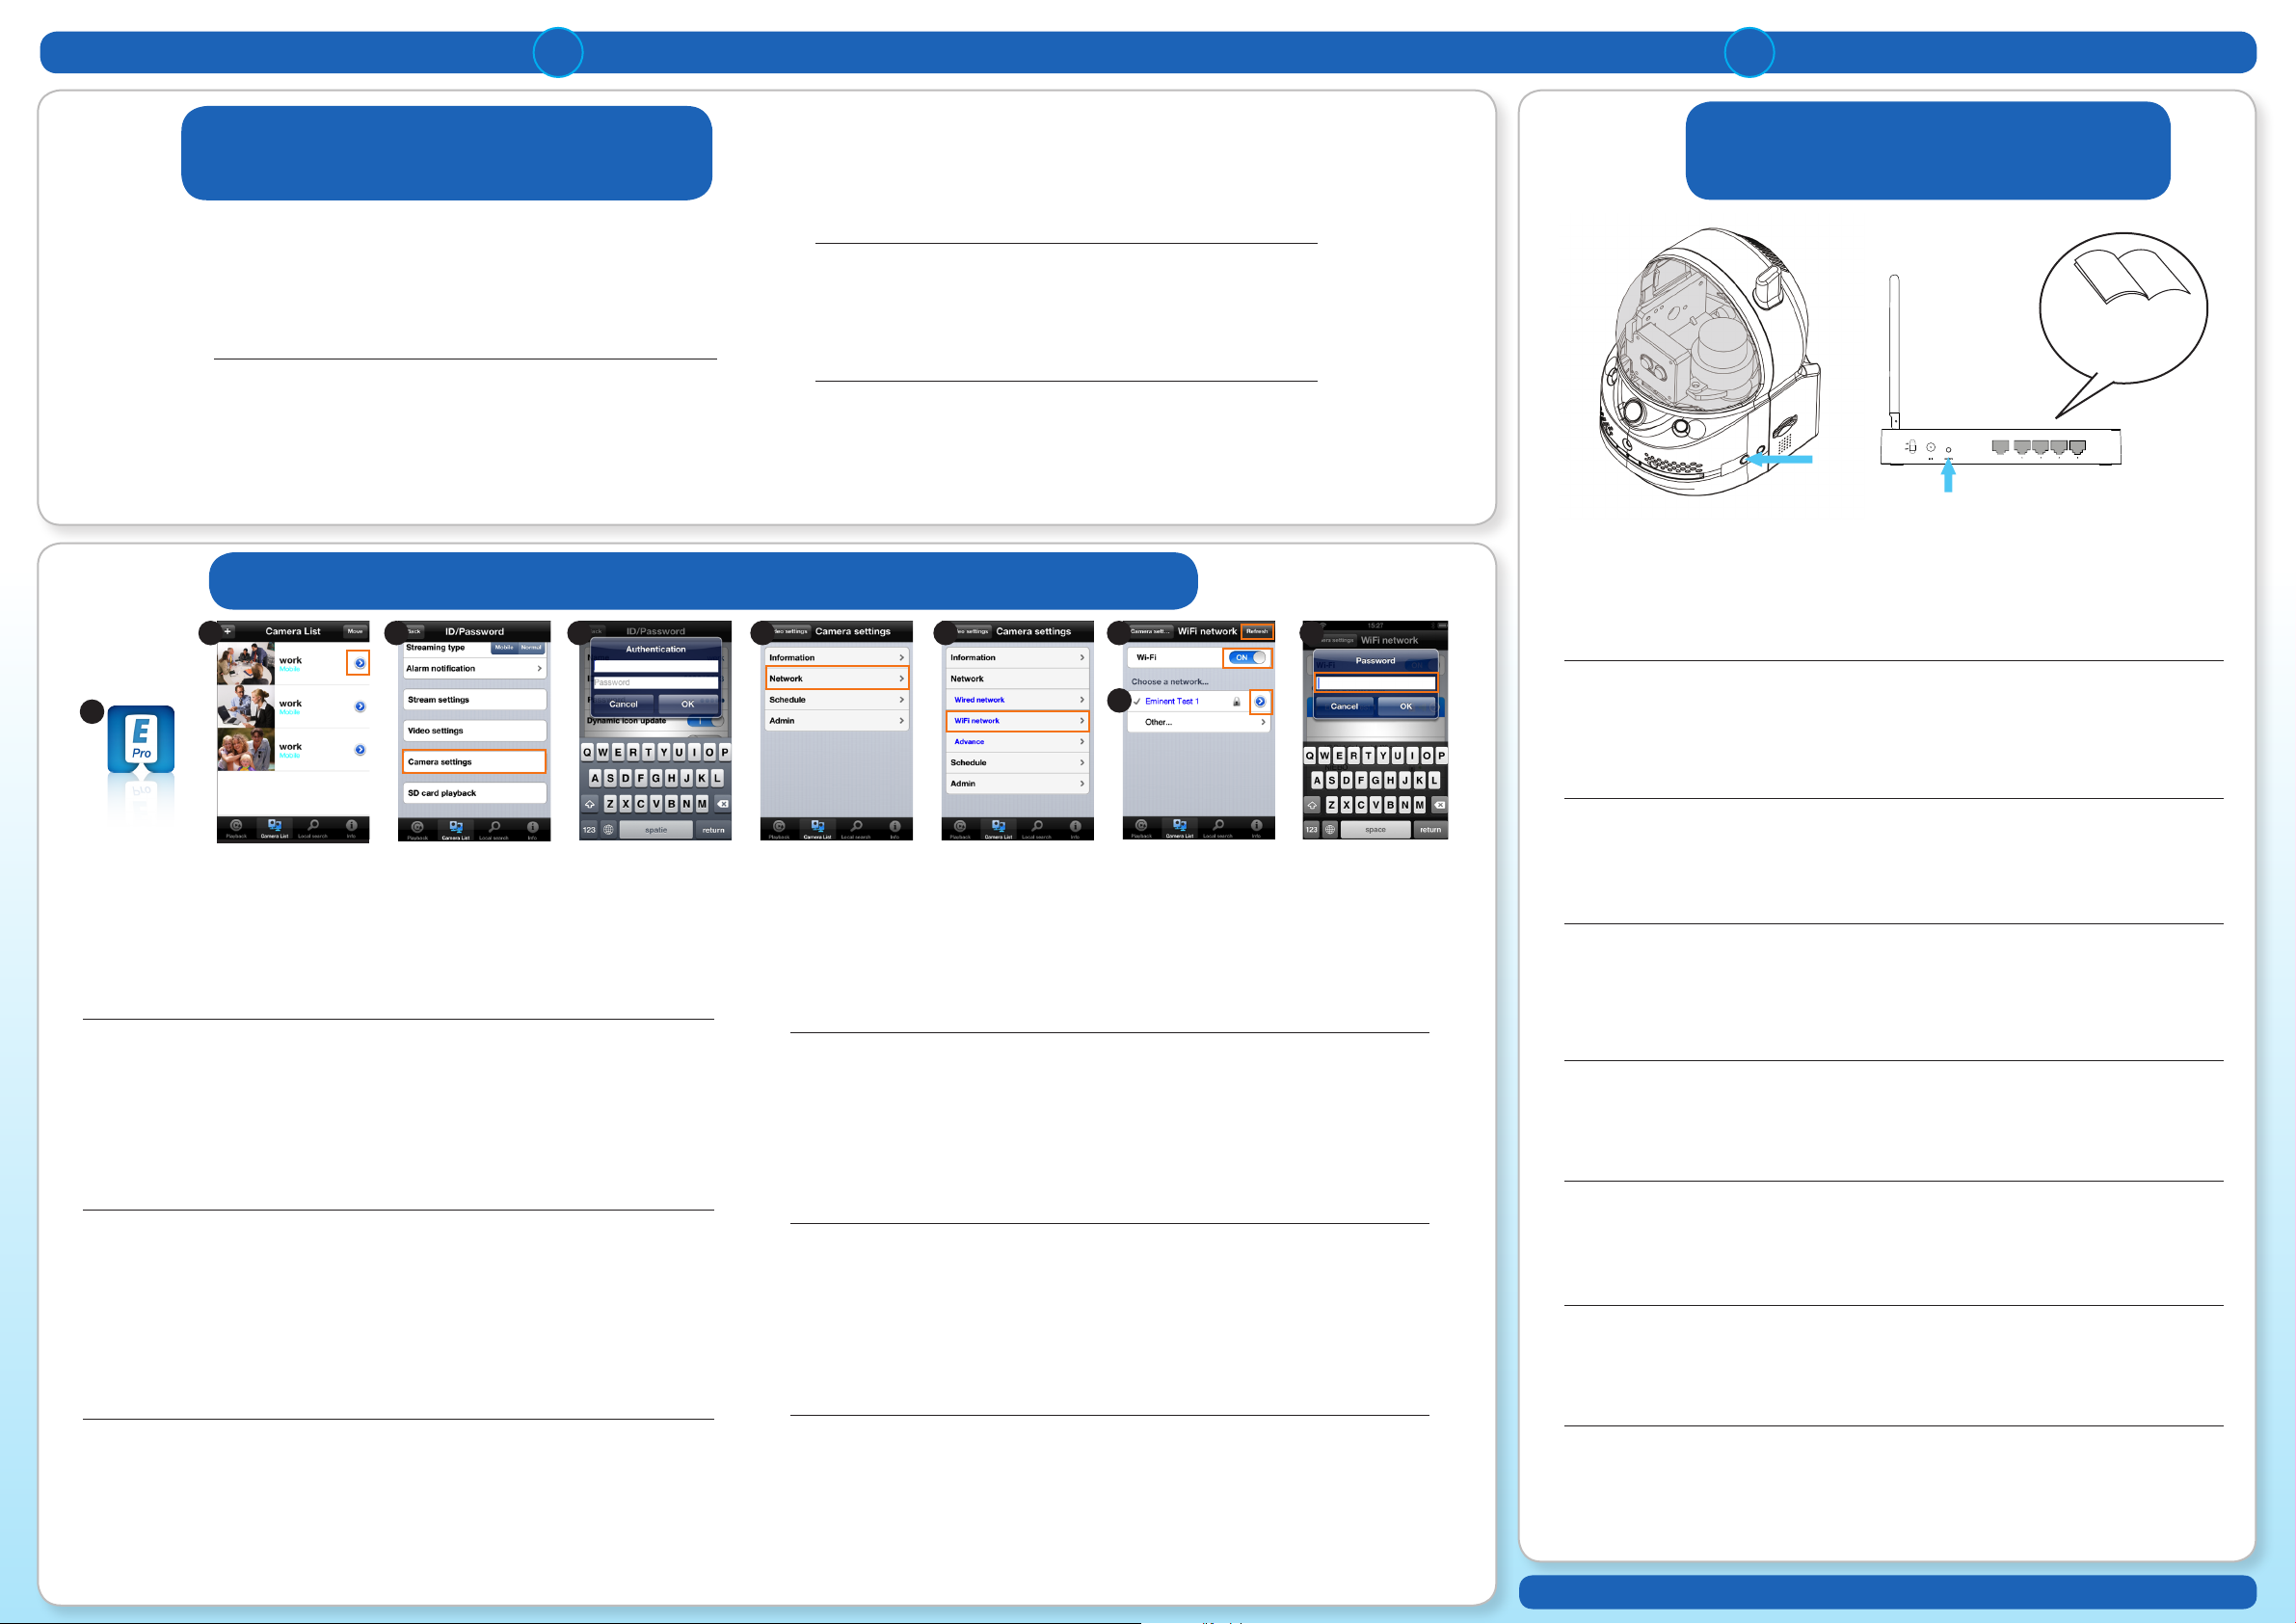
1. Disconnect the Ethernet cable from the camera.
2. Press the WPS button on the camera.(1 second)
3. Press the WPS button on your modem/router.(please refer to the manual of the modem router for
information about how to start WPS synchronization)
4. The blue LED will start blinking (Camera is synchronizing the wireless encryption settings with your
modem/router). The synchronization is ready when the Blue status LED continuously lit.
1. Ontkoppel de netwerk kabel van de camera.
2. Druk nu op de WPS knop op de camera (1 seconde).
3. Druk vervolgens op de WPS knop op de Modem/Router. (Raadpleeg de handleiding van de modem
router hoe je WPS synchronisatie start)
4. De blauwe LED op de camera zal gaan knipperen (opvragen van de beveiliging instellingen van de
modem/router). Zodra de blauwe LED continu brandt (+/- 1 minuut) heeft de camera een verbinding
met het draadloos netwerk.
1. Débranchez le câble Ethernet de la caméra.
2. Appuyez sur le bouton WPS de la caméra. (1 seconde)
3. Appuyez sur le bouton WPS de votre modem/routeur (Veuillez consulter le manuel du modem ou
routeur pour plus d’informations sur la synchronisation WPS).
4. La DEL bleue commence à clignoter (La caméra se synchronise avec les paramètres de cryptage sans l
de votre modem/routeur). La synchronisation est terminée lorsque la DEL d’état bleue est, éclairée en continu.
1. Desconecte el cable Ethernet de la cámara.
2. Pulse el botón WPS en la cámara (durante 1 segundo).
3. Pulse el botón WPS en su módem/enrutador (consulte el manual del módem o enrutador para obtener
información sobre cómo iniciar la sincronización WPS).
4. El indicador LED azul empezará a parpadear (la cámara estará sincronizando la conguración de cifrado
inalámbrico con su módem/enrutador). La sincronización estará preparada cuando el indicador LED azul
permanezca encendido constantemente.
1. Trennen Sie das Ethernetkabel von der Kamera.
2. Drücken Sie auf die WPS-Taste an der Kamera (1 Sekunde).
3. Drücken Sie auf die WPS-Taste an Ihrem Modem/Router (Hinweise zur WPS-Synchronisierung
entnehmen Sie bitte dem Handbuch zu Ihrem Modem/Router).
4. Die blaue LED beginnt zu blinken (die Kamera synchronisiert die WLAN-Verschlüsselung mit Ihrem
Modem/Router). Die Synchronisierung ist abgeschlossen, sobald die blaue Status-LED dauerhaft leuchtet.
1. Staccare il cavo Ethernet dalla telecamera.
2. Premere il pulsante WPS sulla telecamera (1 secondo)
3. Premere il pulsante WPS sul modem/router. (Consultare il manuale del modem/router per le informazioni
su come avviare la sincronizzazione WPS)
4. Il LED blu inizierà a lampeggiare (la telecamera sta sincronizzando le impostazioni di crittograa con il
modem/router). La sincronizzazione è pronta quando il LED blu resta accesso in modo sso.
1. Desligue o cabo de Ethernet da câmara.
2. Prima o botão WPS na câmara (1 segundo).
3. Prima o botão WPS no modem/router (consulte o manual do modem/router para informações sobre
como executar a sincronização WPS).
4. LED azul começará a piscar (a câmara está em processo de sincronização das denições de encriptação
sem os com o modem/router). A sincronização está concluída quando o LED azul apresentar a luz xa.
1. Húzza ki az Ethernet kábelt a kamerából.
2. Nyomja meg a WPS gombot a kamerán. (1 másodperc)
3. Nyomja meg a WPS gombot a modemen / routeren. (Kérjük, olvassa el a kézikönyvet a modem/router
és a WPS szinkronizálásának információiért.
4. A kék LED elkezd villogni (A kamera szinkronizálja a vezeték nélküli titkosítási beállításokat a modemel /
routerrel). Amikor a szinkronizálás kész, a kék állapotjelző LED folyamatosan világít.
EN
FR
DE
NL
IT
1. Starten Sie die Easy Pro View-Anwendung.
2. Klicken Sie auf das + Symbol in der linken Ecke.
3. Geben Sie Ihren Kameranamen (erstellen Sie Ihren eigenen Namen), die
Cam-ID und das Kennwort ein. (Diese Informationen nden Sie auf der ID-/Kennwortkarte).
4. Klicken Sie auf OK (Android) oder Fertig (Apple)
5. Wählen Sie die neu hinzugefügte Kamera auf der Hauptseite aus.
6. Erweiterte Einstellungen nden Sie im vollständigen Handbuch auf der CD-ROM.
1. Avviare l’applicazione Easy Pro View.
2. Fare clic sul + simbolo sull’angolo sinistro.
3. Inserire il nome della telecamera (creare un nome personalizzato),
l’ID della telecamera e la password. (le informazioni si trovano nella scheda ID/password).
4. Fare clic su OK (Android) o Fine (Apple)
5. Selezionare la nuova telecamera aggiunta dalla schermata principale.
6. Per le impostazioni avanzate, fare riferimento al manuale completo sul CD-Rom.
DE
IT
HU
PT
IT
HU
PT
ES
ES
1. Inicie la aplicación Easy Pro View.
2. Haga clic en el + símbolo situado en la esquina izquierda.
3. Especique el nombre de la cámara (puede crear el suyo propio), el identicador de la cámara y
la contraseña. (esta información se puede encontrar en la tarjeta de identicación y de contraseña).
4. Haga clic en Aceptar (Android) o Hecho (Apple)
5. Seleccione la nueva cámara recién agregada en la pantalla principal.
6. Para obtener información sobre la conguración avanzada, consulte
el manual completo en el CD-ROM.
1. Indítsa el az Easy Pro View alkalmazást.
2. A bal alsó sarokban kattintson a + szimbólumra.
3. Töltse ki a kamera nevét (hozza létre sajátját), kamera azonosítót és jelszót. (az információ
az Azonosító/Jelszó kártyán található).
4. Kattintson az OK (Android) vagy kész (Apple) gombra
5. Válassza ki az újonnan hozzáadott kamerát a főképernyőn.
6. A speciális funkciók használatának ismertetését a CD-ROM-on lévő teljes használati útmutatóban találja.
ES
HU
PT
EM6270
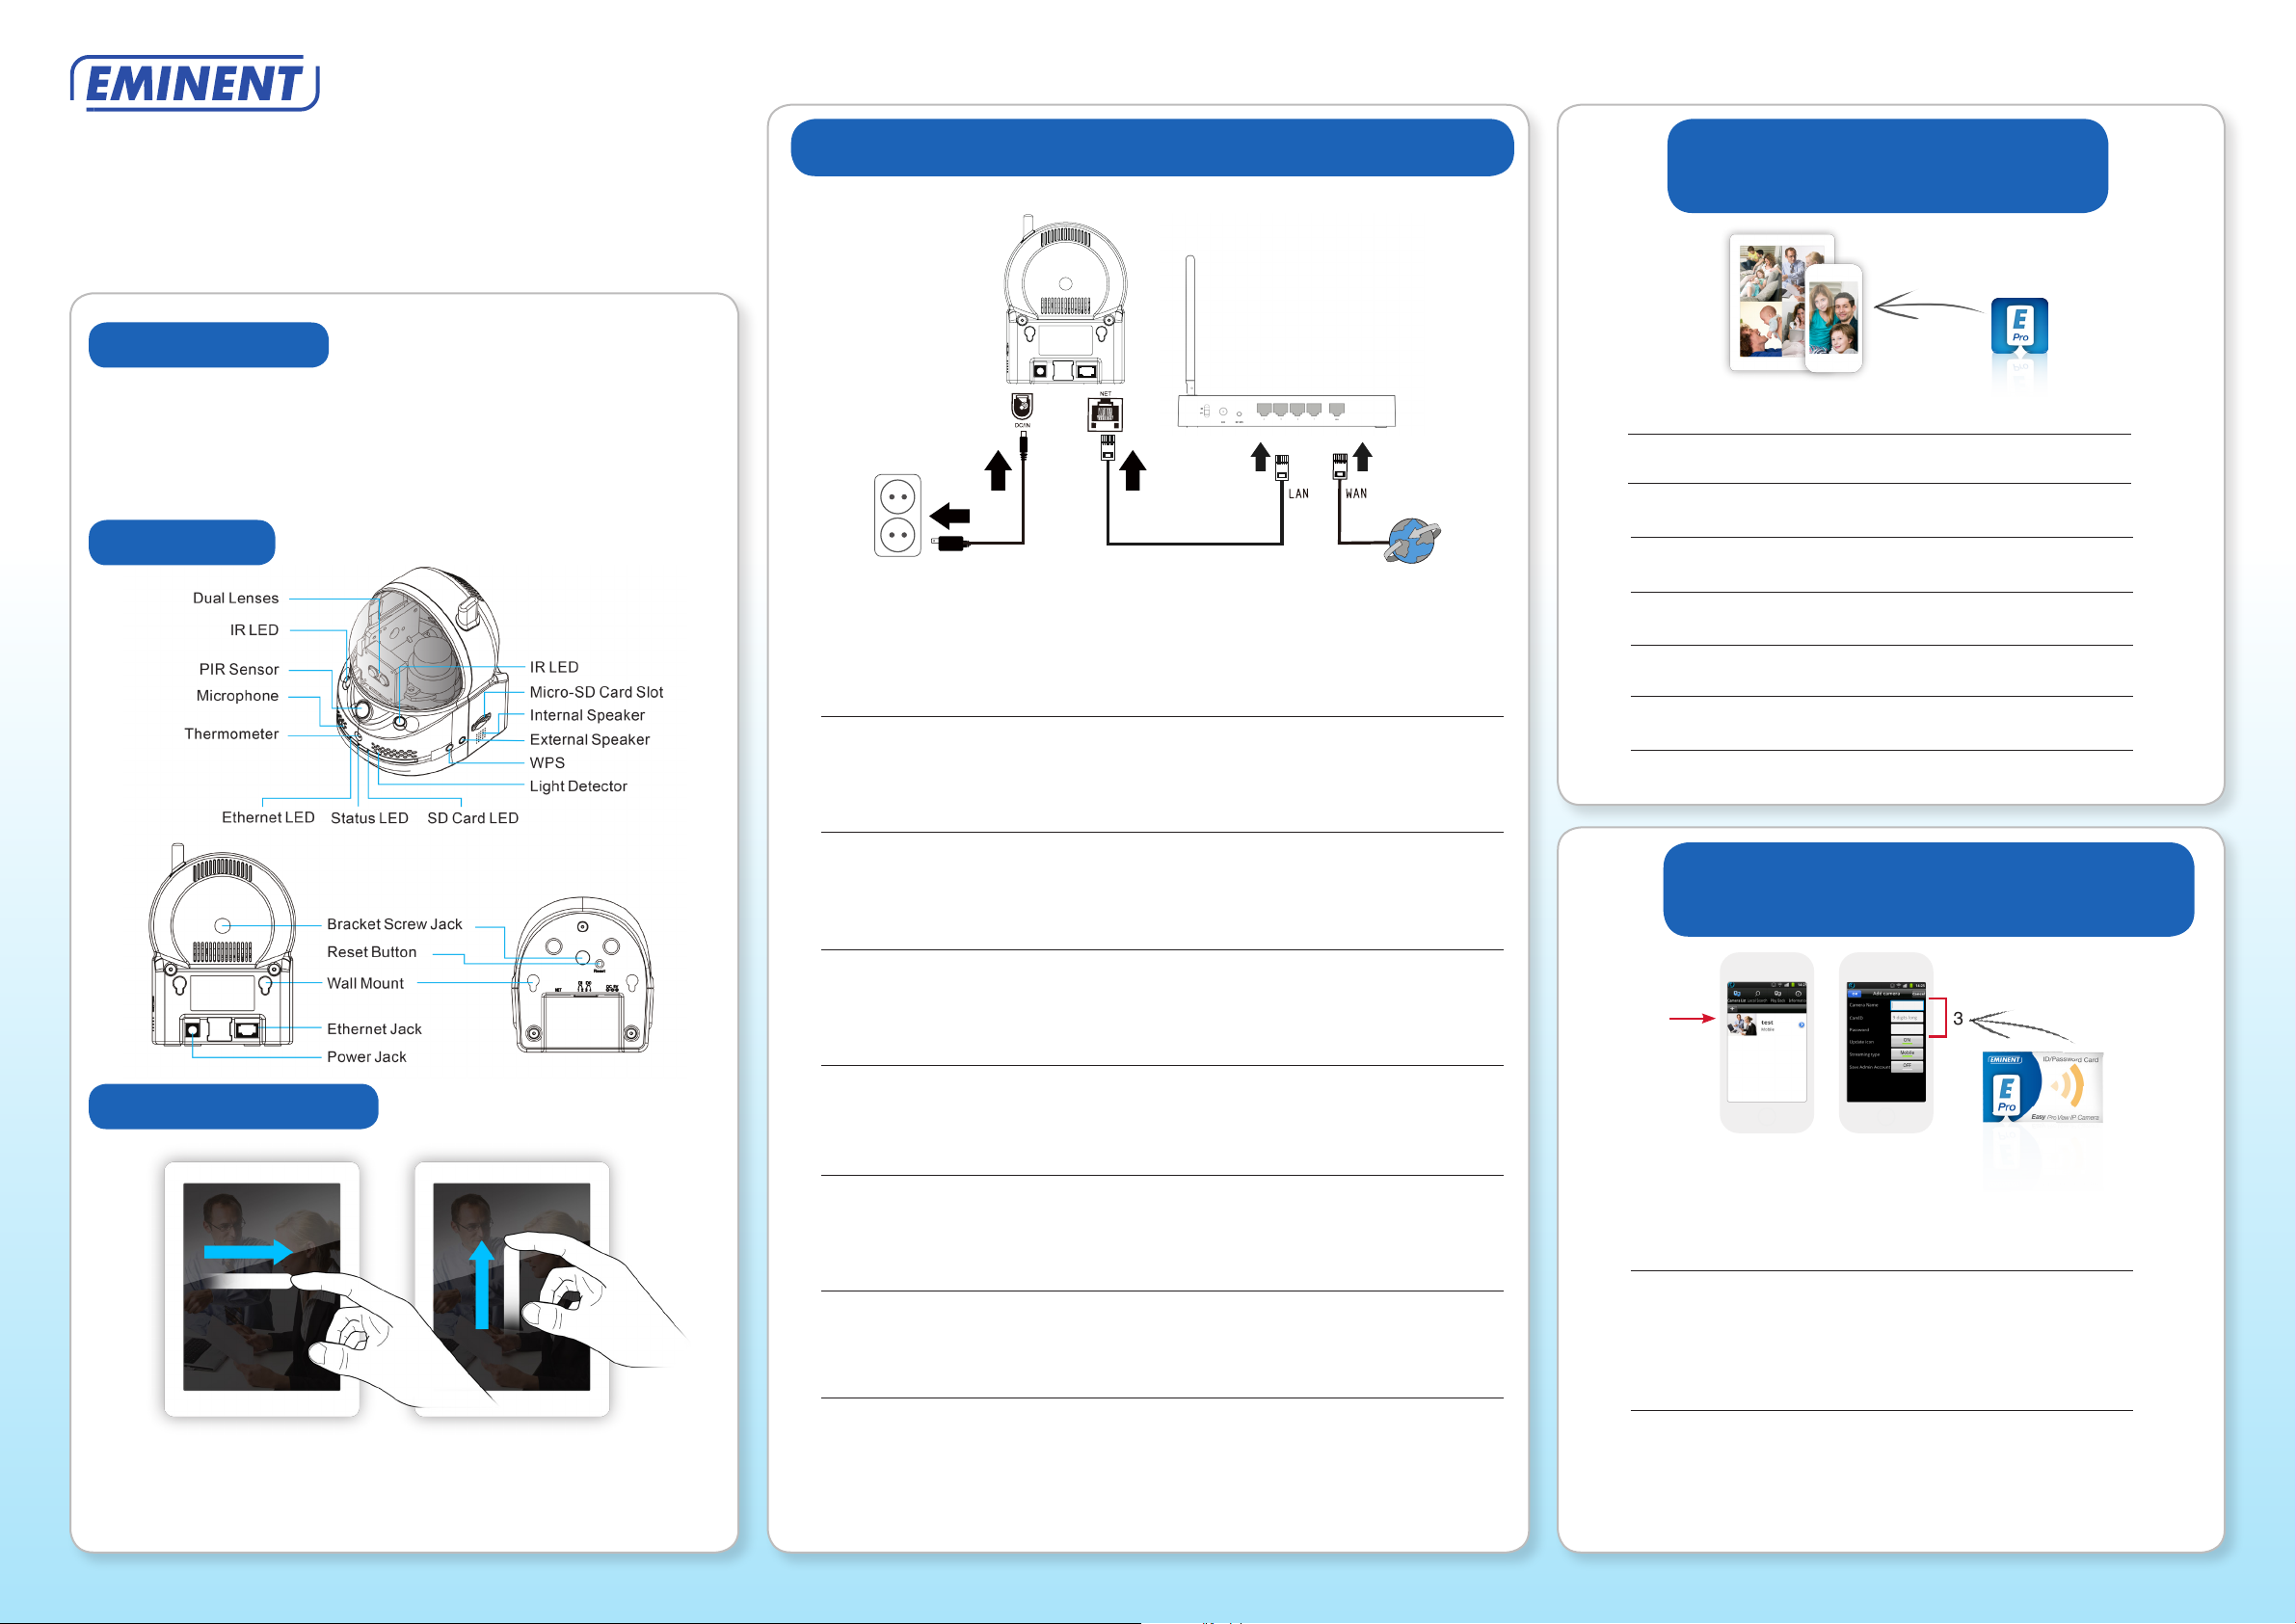
For wireless installation choose 4a and connect the IP Cam using the app. For wireless installation using WPS choose 4b.
3
EN
FR
NL
*
Connecting the IP Cam to the internet using the App
Connecting the IP Cam
to the internet using WPS
1. Execute a aplicação Easy Pro View.
2. Clique no + símbolo no canto esquerdo.
3. Introduza o nome da Câmara (crie o seu próprio nome), ID da Câmara e Palavra-passe.
(estas informações podem ser encontradas no Cartão de ID/Palavra-passe).
4. Clique OK (Android) ou concluído (Apple)
5. Selecione a nova câmara adicionada no ecrã principal.
6. Para as denições avançadas, consulte o manual completo no CD-rom.
1
2 3 4 5 6 7
8
1. Start the App “Easy Pro View”.
2. Open the menu by pressing the arrow next to the camera.
3. Select the “Camera settings”.
4. If prompted Login with username: (default “admin”) Password: (default “leave blank”).
5. Select “Network”.
6. Select “Wi-Fi Network”.
7. Enable “Wi-Fi Network”. A list of available wireless networks will be displayed.
8. Select the wireless network you want to connect to (if not displayed press “refresh”).
9. Enter the wireless encryption key and press “ok”.
1. Start de App “Easy Pro View”.
2. Open het menu door op het pijltje naast de camera te drukken.
3. Selecteer “Camera instellingen”.
4. Wanneer er om login gegevens wordt gevraagd login met gebruikersnaam: (standaard “admin”)
wachtwoord: (standaard “leeg”).
5. Selecteer “Netwerk”.
6. Selecteer “Wi-Fi Netwerk”.
7. Zet Wi-Fi netwerk aan. Er wordt een lijst weergegeven van alle beschikbare draadloze netwerken.
8. Selecteer het netwerk waarmee je verbinding wilt maken (wanneer deze er niet bij staat druk op “vernieuw”).
9. Vul het wachtwoord van het draadloos netwerk in en druk op “OK”.
1. Démarrez l’application « Easy Pro View ».
2. Sélectionnez le menu en appuyant sur la èche à côté de la caméra que vous souhaitez congurer.
3. Sélectionnez « Paramètres de la caméra ».
4. (si cela vous est demandé, connectez-vous avec le nom d’utilisateur : (par défaut « admin »).
Mot de passe : (« llaissez vide » par défaut).
5. Sélectionnez « Réseau ».
6. Sélectionnez « Réseau Wi-Fi».
7. Activer Wi-Fi. Une liste de tous les réseaux sans l disponibles s’afche.
8. Sélectionnez le réseau sans l auquel vous souhaitez vous connecter.
(s’il n’est pas afché, appuyez sur « Actualiser »).
9. Saisissez la clé de cryptage sans l et appuyez sur « OK ».
1. Avviare l’app “Easy Pro View”.
2. Selezionare il menu premendo la freccia accanto alla telecamera che si desidera congurare.
3. Selezionare “Impostazioni telecamera”.
4. (al prompt effettuare il login con il nome utente: (“admin” di default) Password: (“leave blank” di default).
5. Selezionare “Rete”.
6. Selezionare “Rete Wi-Fi”.
7. Attivare il Wi-Fi. Sarà visualizzato un elenco delle reti wireless disponibili.
8. Selezionare la rete wireless a cui ci si desidera connettere (se non viene visualizzata premere “Aggiorna”).
9. Inserire il codice crittograco wireless e premere “Ok”.
1. Öffnen Sie die Anwendung „Easy Pro View“.
2. Wählen Sie das Menü indem Sie den Pfeil neben der Kamera anklicken.
3. Wählen Sie „Kameraeinstellungen“.
4. Sofern Sie zur Anmeldung mit dem Benutzernamen aufgefordert werden: (Standard „admin“)
Kennwort: (Standard „leer lassen“).
5. Wählen Sie „Netzwerk“.
6. Wählen Sie „Wi-Fi Netzwerk”.
7. Aktivieren Sie WLAN. Eine Liste mit sämtlichen WLAN-Netzwerken in Reichweite wird angezeigt.
8. Wählen Sie das WLAN, mit dem Sie sich verbinden möchten (ggf. auf „Aktualisieren“ drücken).
9. Geben Sie den Verschlüsselungscode ein und drücken Sie auf „OK“.
1. Inicie la aplicación “Easy Pro View”.
2. Seleccione el menú pulsando la echa que aparece al lado de la cámara que desee congurar.
3. Seleccione “Conguración de la cámara”
4. (si se le pide, inicie la sesión con el nombre de usuario: (predeterminado: “admin”)
Contraseña: (predeternado: “dejar en blanco”)
5. Seleccione “Red”.
6. Seleccione “Red Wi-Fi”.
7. Habilite la conexión Wi-Fi. Aparecerá una lista con las redes inalámbricas disponibles.
8. Seleccione la red inalámbrica a la que desee conectarse (si no aparece, pulse “Actualizar”).
9. Introduzca la clave de cifrado inalámbrico y pulse “aceptar”.
1. Indítsa el az “Easy Pro View”alkalmazást.
2. Válassza ki a menüt arra nyílra kattintva, amelyik kamerát szeretné beállítani.
3. Válassza ki a “Kamera beállítások”
4. (ha engedélyezett a belépés felhasználó névvel, az alapértelemezett: “admin”)
Jelszó:: (alapértelmezett “hagyja üresen”)
5. “Hálózat”
6. “Wi-Fi Hálózat”
7. Engedélyezett Wi-Fi. A rendelkezésre álló vezeték nélküli hálózatok megjelennek.
8. Válassza ki a vezeték nélküli hálózatot, amelyhez csatlakozni kíván (ha nem jelenik meg nyomja meg a “frissítés”-t).
9. Adja meg a vezeték nélküli titkosítási kulcsot és nyomja meg az “ok”-t
1. Execute o software “Easy Pro View”.
2. Selecione o menu clicando sobre a seta junto a´câmara que pretende congurar.
3. Selecione “Denições da câmara”
4. (se solicitado, introduza o nome de utilizador: (predenição “admin”) e a palavra-passe:
(predenição “deixar em branco”)
5. Selecione a “Rede”.
6. Selecione a “Rede Wi-Fi”
7. Active a funcionalidade Wi-Fi. Será apresentada uma lista de redes sem os disponíveis.
8. Selecione a rede sem os a que pretende estabelecer ligação (se não for apresentada, clique em “atualizar”)
9. Introduza a chave de encriptação sem os e clique em “ok”
Start using the camera
with your ID and Password
DE
admin
9
Read the manual
supplied with your
router or modem
Press
1 second
WAN
Press