manuals.online logo
Brands
  1. Home
  2. •
  3. Brands
  4. •
  5. Eminent
  6. •
  7. Security Camera
  8. •
  9. Eminent Easy Pro View User manual

Eminent Easy Pro View User manual

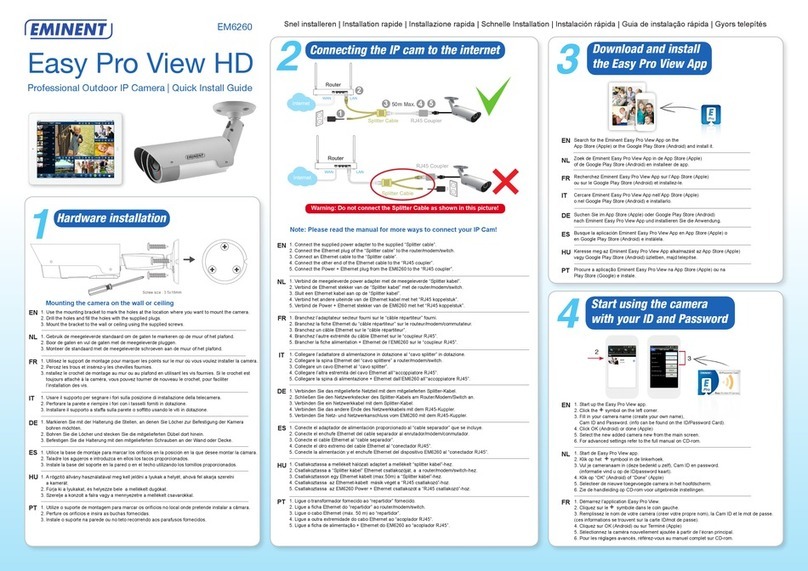
Connecting the IP cam to the internet
Hardware installation
1. Branchez l’adaptateur secteur sur la caméra et surs le secteur. La LED rouge de la caméra s’allume.
2. Connectez le câble Ethernet au modem / routeur et à la caméra IP. La LED bleue s’allume.
3. La caméra IP obtient une adresse IP à partir du modem / routeur (avec DHCP activé) et est automatiquement connectée à Internet.
Vériez si les LED rouge et bleue de la caméra IP sont allumés. Si la LED rouge clignote, veuillez vériez à nouveau les étapes 1 et 2.
1. Collegare l’adattatore di alimentazione alla telecamera e alla rete. Il LED rosso della telecamera si accende.
2. Collegare il cavo Ethernet al modem/router e alla telecamera IP. Il LED blu si accende.
3. La telecamera IP ottiene automaticamente un indirizzo IP dal modem/router (con DHCP abilitato) e viene connessa ad Internet.
Controllare se i LED rosso e blu della telecamera IP sono accesi. Se il LED rosso lampeggia, controllare di nuovo i passi 1 e 2.
1. Verbinden Sie das Netzteil mit der Kamera und dem Netzstrom. Die rote LED an der Kamera leuchtet jetzt.
2. Verbinden Sie das Ethernet-Kabel mit dem Modem/Router und der IP-Kamera. Die blaue LED leuchtet jetzt.
3. Die IP-Kamera bezieht eine IP-Adresse automatisch vom Modem/Router(bei aktiviertem DHCP) und verbindet sich mit dem Internet.
Vergewissern Sie sich, dass die roten und blauen LEDs der IP-Kamera leuchten. Sollte die rote LED blinken, wiederholen Sie bitte die Schritte 1 und 2.
1. Conecte el adaptador de alimentación a la cámara y a la toma de corriente. El LED de color rojo de la cámara se encenderá.
2. Conecte el cable Ethernet al módem o enrutador y a la cámara IP. El LED azul se encenderá.
3. La cámara IP obtendrá una dirección IP del módem o enrutador (con la función DHCP habilitada) automáticamente y se conectará a Internet.
Compruebe si los LED rojo y azul de la cámara IP están encendidos. Si el LED rojo parpadea, compruebe los pasos 1 y 2 de nuevo.
1. Csatlakoztassa a hálózati adaptert a kamerához és az áramforráshoz. A kamerán lévő vörös LED bekapcsolódik.
2. Csatlakoztassa az Ethernet kábelt a Modem/Routerhez és az IP kamerához. A kék LED bekapcsolódik.
3. Az IP kamera az IP-címet a Modem/Routertől automatikusan megkapja (engedélyezett DHCP mellett) és az internethez csatlakozik.
Ellenőrizze, hogy az IP-kamera vörös és kék LED-jei világítanak-e. Ha a vörös LED villog, ellenőrizze újra az 1. és 2. lépést.
1. Ligue o transformador à câmara e à tomada elétrica. O LED vermelho na câmara irá acender.
2. Ligue o cabo Ethernet ao Modem/Router e à Câmara IP. O LED azul irá acender.
3. A Câmara IP irá obter um endereço IP a partir do Modem/Router (com DHCP ativado) automaticamente e será ligada à Internet.
Verique se os LED vermelho e azul da Câmara IP estão ligados. Se o LED vermelho estiver intermitente, volte a efetuar os passos 1 e 2.
Easy Pro View
Professional IP Camera | Quick Install Guide
Snel installeren | Installation rapide | Installazione rapida | Schnelle Installation | Instalación rápida | Guia de instalação rápida | Gyors telepítés
EN
FR
DE
DE
NL
IT
IT
HU
PT
HU
PT
ES
ES
Use the Screw Driver “A” counterclockwise
to loosen the screw “B” a little.
Draai de schroevendraaier “A” tegen de
klok in, om de schroef wat losser te draaien.
Utilisez le tournevis “A” dans le sens
antihoraire pour desserrer un peu la vis “B”.
Girare il cacciavite “A” in senso antiorario per allentare
leggermente la vite “B”.
Drehen Sie den Schraubendreher “A” gegen den
Uhrzeigersinn, um die Schraube “B” ein wenig zu lösen.
Utilice el destornillador “A” girándolo en sentido contrario a
las agujas del reloj para aojar el tornillo “B” un poco.
Az “A” csavarhúzó segítségével lazítsa meg kissé a “B”
csavart annak balra forgatásával.
Com a chave de fendas “A”,
rode no sentido contrário aos ponteiros do relógio para
desapertar o parafuso “B” ligeiramente.
Place the bracket in the mounting hole,
and adjust it to the appropriate angle.
Plaats de houder in het montagegat en
en draai de montagebeugel naar de gewenste stand.
Placez le support dans le trou de montage,
et ajustez-le à l’angle approprié.
Posizionare la staffa nel foro
di montaggio e regolarla all’angolo adeguato.
Stecken Sie die Halterung in das Montageloch und richten.
Sie sie in einem passenden Winkel aus.
Coloque el soporte en el oricio de montaje y
ajústelo al ángulo apropiado.
Illessze a konzolt a szerelőlyukra, majd állítsa be, hogy a
megfelelő szögben álljon.
Coloque o suporte no orifício de montagem,
e ajuste-o até obter o ângulo adequado.
Use the Screw Driver “A” clockwise to
tighten the screw “B”
Draai de schroevendraaier “A” met de
klok mee om de schroef vast te draaien.
Utilisez le tournevis “A” dans
le sens horaire pour serrer la vis “B”
Girare il cacciavite “A” in senso orario
per serrare la vite “B”
Drehen Sie den Schraubendreher “A” im Uhrzeigersinn,
um die Schraube “B” fest anzuziehen.
Utilice el destornillador “A” girándolo en
el sentido de las agujas del reloj para apretar el tornillo “B”
Az “A” csavarhúzó segítségével húzza meg
a “B” csavart annak jobbra forgatásával.
“Com a chave de fendas ”A”, rode no sentido dos ponteiros
do relógio para apertar o parafuso ”B”.
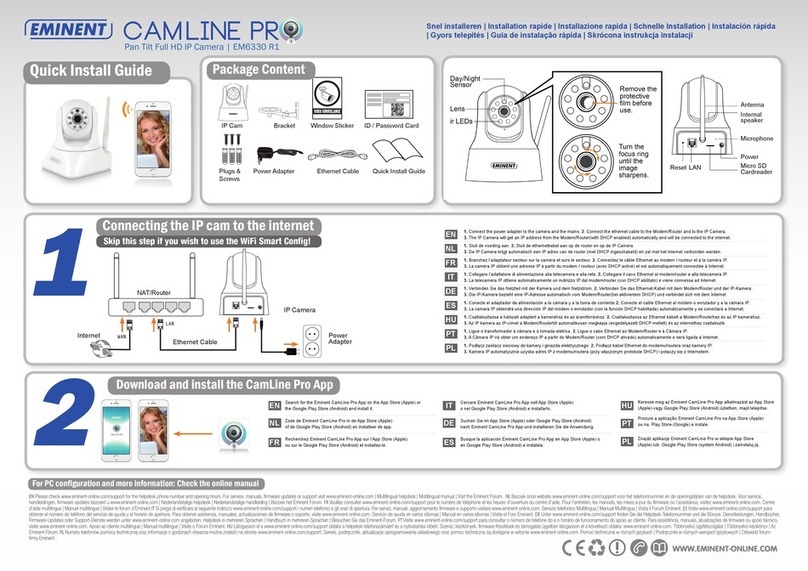
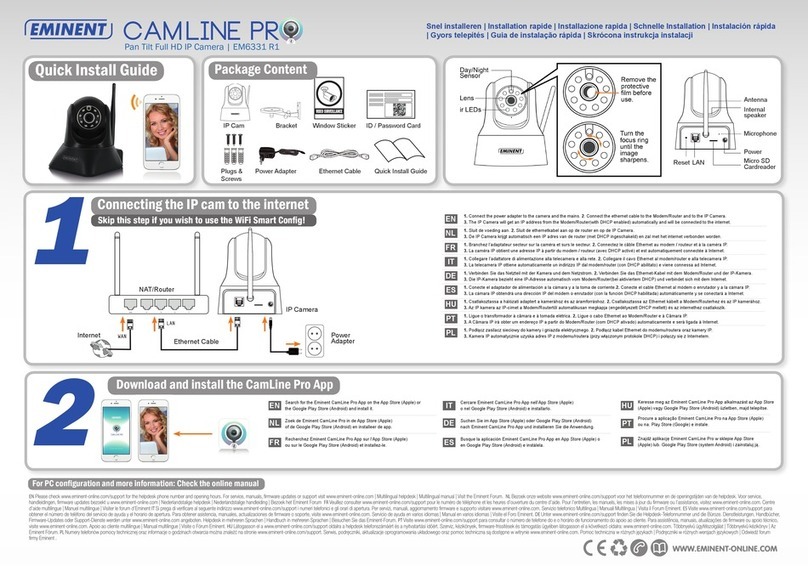
1. Connect the power adapter to the camera and the mains. The red LED on the camera will be on.
2. Connect the ethernet cable to the Modem/Router and to the IP Camera. The blue LED will be on.
3. The IP Camera will get an IP address from the Modem/Router(with DHCP enabled) automatically and will be connected to the internet.
Check if the red and blue LEDs of the IP Camera are on. If the red LED is blinking, please check step 1 and 2 again.
1. Sluit de voeding aan. De rode LED zal aangaan.
2. Sluit de ethernetkabel aan op de router en op de IP Camera. De blauwe LED zal aangaan.
3. De IP Camera krijgt automatisch een IP adres van de router (met DHCP ingeschakeld) en zal met het internet verbonden worden.
Controleer of de rode en blauwe LED’s van de IP camera aanstaan. Controleer stap 1 en 2, als de rode LED knippert.
EN
FR
NL
1
Package Content
IP Cam Bracket Installation CD ID/Password Card Quick Install Guide
Plugs &
Screws
Power Adapter Ethernet Cable Screw Driver
Internet
NAT/Router
IP Cam
Ethernet CablePower Adapter
Start using the camera with your ID and Password
1. Start up the Easy Pro View app.
2. Click the +symbol on the left corner.
3. Fill in your camera name (create your own name),
Cam ID and Password. (info can be found on the ID/Password Card).
4. Click OK (Android) or done (Apple)
5. Select the new added camera new from the main screen.
6. For advanced settings refer to the full manual on CD-rom.
1. Démarrez l’application Easy Pro View.
2. Cliquez sur le + symbole dans le coin gauche.
3. Remplissez le nom de votre caméra (créer votre propre nom), la Cam ID et le mot de passe.
(ces informations se trouvent sur la carte ID / mot de passe).
4. Cliquez sur OK (Android) ou sur Terminé (Apple)
5. Sélectionnez la caméra nouvellement ajoutée à partir de l’écran principal.
6. Pour les réglages avancés, référez-vous au manuel complet sur CD-rom.
1. Inicie la aplicación Easy Pro View.
2. Haga clic en el + símbolo situado en la esquina izquierda.
3. Especique el nombre de la cámara (puede crear el suyo propio), el
identicador de la cámara y la contraseña. (esta información se puede
encontrar en la tarjeta de identicación y de contraseña).
4. Haga clic en Aceptar (Android) o Hecho (Apple)
5. Seleccione la nueva cámara recién agregada en la pantalla principal.
6. Para obtener información sobre la conguración avanzada, consulte
el manual completo en el CD-ROM.
1. Starten Sie die Easy Pro View-Anwendung.
2. Klicken Sie auf das + Symbol in der linken Ecke.
3. Geben Sie Ihren Kameranamen (erstellen Sie Ihren eigenen Namen), die
Cam-ID und das Kennwort ein. (Diese Informationen nden Sie auf der ID-/Kennwortkarte).
4. Klicken Sie auf OK (Android) oder Fertig (Apple)
5. Wählen Sie die neu hinzugefügte Kamera auf der Hauptseite aus.
6. Erweiterte Einstellungen nden Sie im vollständigen Handbuch
auf der CD-ROM.
For wireless/WPS installation or PC conguration check the full manual on the CD-Rom.
Raadpleeg de handleiding op CD-Rom, voor draadloze/WPS installatie of PC instellingen.
Pour l’installation sans l / WPS installation ou la conguration PC, consultez le manuel complet sur le CD-Rom.
Per l’installazione wireless/WPS o la congurazione del PC, fare riferimento al manuale completo sul CD-Rom.
Für eine Drahtlos-/WPS-Installation oder PC-Konguration beziehen Sie sich auf das vollständige Handbuch auf der CD-ROM.
Para obtener información sobre una instalación inalámbrica o WPS, o sobre la conguración de su PC consulte el manual completo en el CD-ROM.
A vezeték nélküli/WPS telepítést vagy PC kongurációt illetően tekintse meg a teljes használati útmutatót a CD-ROM-on.
Para instalação sem-os/WPS ou conguração do PC, consulte o manual completo no CD-Rom.
EN EN
FR
FR
NL
NL
DE
DE
ES
ES
HU
HU
PT
PT
IT
IT
2
3
1. Avviare l’applicazione Easy Pro View.
2. Fare clic sul + simbolo sull’angolo sinistro.
3. Inserire il nome della telecamera (creare un nome personalizzato),
l’ID della telecamera e la password. (le informazioni si trovano nella scheda ID/password).
4. Fare clic su OK (Android) o Fine (Apple)
5. Selezionare la nuova telecamera aggiunta dalla schermata principale.
6. Per le impostazioni avanzate, fare riferimento al manuale completo sul CD-Rom.
1. Indítsa el az Easy Pro View alkalmazást.
2. A bal alsó sarokban kattintson a + szimbólumra.
3. Töltse ki a kamera nevét (hozza létre sajátját), kamera azonosítót
és jelszót. (az információ az Azonosító/Jelszó kártyán található).
4. Kattintson az OK (Android) vagy kész (Apple) gombra
5. Válassza ki az újonnan hozzáadott kamerát a főképernyőn.
6. A speciális funkciók használatának ismertetését a CD-ROM-on
lévő teljes használati útmutatóban találja.
1. Execute a aplicação Easy Pro View.
2. Clique no + símbolo no canto esquerdo.
3. Introduza o nome da Câmara (crie o seu próprio nome), ID da Câmara e Palavra-passe.
(estas informações podem ser encontradas no Cartão de ID/Palavra-passe).
4. Clique OK (Android) ou concluído (Apple)
5. Selecione a nova câmara adicionada no ecrã principal.
6. Para as denições avançadas, consulte o manual completo no CD-rom.
1. Start de Easy Pro View app.
2. Klik op het + symbool in de linkerhoek.
3. Vul je cameranaam in (deze bedenkt u zelf), Cam ID en password.
(informatie vind u op de ID/password kaart).
4. Klik op “OK” (Android) of “Done” (Apple)
5. Selecteer de nieuwe toegevoegde camera in het hoofdscherm.
6. Zie de handleiding op CD-rom voor uitgebreide instellingen.
Download and install the Easy Pro View App
Wireless installation or PC configuration
The full manual can be found on the cd-rom. Please check our website www.eminent-online.com for the newest updated manual, drivers and firmware.
Also, you will find frequently asked questions in the FAQ section.
De volledige handleiding vindt u op CD-Rom. Bezoek onze website www.eminent-online.com voor de meest actuele handleiding, drivers en firmware.
Bekijk ook onze FAQ sectie voor veelgestelde vragen.
Le manuel complet est disponible sur le CD-ROM. Veuillez consulter notre site Web www.eminent-online.com pour les manuel, pilotes et firmware nouveaux
et mis à jour. En outre, vous trouverez des questions fréquemment posées dans la section FAQ.
Il manuale completo lo potete trovare all’interno del CD-ROM. Controllate sul sito www.eminent-online.com per i nuovi aggiornamenti del manuale, driver
e firmware. Inoltre troverete le domande più frequenti nella sezione FAQ.
Das vollständige Handbuch finden Sie auf der CD-ROM. Die aktuellste Version des Handbuchs sowie aktuelle Treiber und Firmware finden Sie auf unserer
Website www.eminent-online.com. Der FAQ-Abschnitt enthält außerdem häufig gestellte Fragen.
Puede encontrar el manual completo en el CD-ROM. Visite nuestro sitio Web www.eminent-online.com para obtener el manual, los controladores y el
firmware actualizados más recientes. También encontrará preguntas frecuentes en la sección correspondiente.
A teljes kézikönyv a CD-ROM-on található. Látogasson el a www.eminent-online.com honlapra a legújabb kézikönyvért, meghajtókért és firmware-ért.
Ugyanakkor megtalálja a gyakran feltett kérdéseket a GYIK részben.
O manual completo pode ser encontrado no CD-ROM. Por favor, consulte o nosso site
www.eminent-online.com para o manual mais recente drivers atualizados e firmware. Perguntas mais freqüentes que você vai encontrar na seção FAQ.
Full Manual on CD-Rom
www.eminent-online.com
Search for the Eminent Easy Pro View App on the App Store (Apple) or
the Google Play Store (Android) and install it.
Zoek de Eminent Easy Pro View App in de App Store (Apple)
of de Google Play Store (Android) en installeer de app.
Recherchez Eminent Easy Pro View App sur l’App Store (Apple)
ou sur le Google Play Store (Android) et installez-le.
Cercare Eminent Easy Pro View App nell’App Store (Apple)
o nel Google Play Store (Android) e installarlo.
Suchen Sie im App Store (Apple) oder Google Play Store (Android)
nach Eminent Easy Pro View App und installieren Sie die Anwendung.
Busque la aplicación Eminent Easy Pro View App en App Store (Apple) o
en Google Play Store (Android) e instálela.
Keresse meg az Eminent Easy Pro View App alkalmazást az App Store (Apple)
vagy Google Play Store (Android) üzletben, majd telepítse.
Procure a aplicação Eminent Easy Pro View na App Store (Apple) ou na
Play Store (Google) e instale.
DE
DE
IT
IT
HU
HU
PT
PT
ES
ES
EN
EN
FR
FR
NL
NL
2
3

Other Eminent Security Camera manuals

Eminent EM6027 User manual

Eminent

Eminent EM6027 User manual

Eminent EM6050 User manual

Eminent

Eminent EM6050 User manual

Eminent EM6325 R1 User manual

Eminent

Eminent EM6325 R1 User manual

Eminent EM6270 User manual

Eminent

Eminent EM6270 User manual

Eminent EM6220 User manual

Eminent

Eminent EM6220 User manual

Eminent CAMLINE PRO EM6331 R1 User manual

Eminent

Eminent CAMLINE PRO EM6331 R1 User manual

Eminent Easy Pro View EM6260 User manual

Eminent

Eminent Easy Pro View EM6260 User manual

Eminent EM6355 User manual

Eminent

Eminent EM6355 User manual

Eminent EM6275 User manual

Eminent

Eminent EM6275 User manual

Eminent CamLine Pro EM6360 User manual

Eminent

Eminent CamLine Pro EM6360 User manual

Eminent CamLine Pro EM6331 User manual

Eminent

Eminent CamLine Pro EM6331 User manual

Eminent CAMLINE PRO EM6330 R1 User manual

Eminent

Eminent CAMLINE PRO EM6330 R1 User manual

Eminent CamLine Pro EM6325 User manual

Eminent

Eminent CamLine Pro EM6325 User manual

Popular Security Camera manuals by other brands

Z3 Technology HE4K-DCK-10 instructions

Z3 Technology

Z3 Technology HE4K-DCK-10 instructions

HIK VISION DS-2TD8167-190ZE2F/W user manual

HIK VISION

HIK VISION DS-2TD8167-190ZE2F/W user manual

Mega Video MPV-720-M2 manual

Mega Video

Mega Video MPV-720-M2 manual

Abus TVCC50030 user manual

Abus

Abus TVCC50030 user manual

HIK VISION Explosion-Proof quick start guide

HIK VISION

HIK VISION Explosion-Proof quick start guide

ENFORCER EV-2625-NKEQ manual

ENFORCER

ENFORCER EV-2625-NKEQ manual

HIK VISION DS?2CC1173P?VF user manual

HIK VISION

HIK VISION DS?2CC1173P?VF user manual

Delta VIVOTEK IB9387-EHTV-V3 Quick installation guide

Delta

Delta VIVOTEK IB9387-EHTV-V3 Quick installation guide

Axis Axis 216FD installation guide

Axis

Axis Axis 216FD installation guide

FLIR IP N253EA8 Series quick start guide

FLIR IP

FLIR IP N253EA8 Series quick start guide

dallmeier Picodome DDF4220HDV Series Configuration guide

dallmeier

dallmeier Picodome DDF4220HDV Series Configuration guide

Velleman Camcolbul16N user manual

Velleman

Velleman Camcolbul16N user manual

ENFORCER EV-2706-NFGQ manual 

ENFORCER

ENFORCER EV-2706-NFGQ manual 

Dalsa Spyder3 S3-14-01k40-00-R user manual

Dalsa

Dalsa Spyder3 S3-14-01k40-00-R user manual

Pentatech KA06 Operating and safety instructions

Pentatech

Pentatech KA06 Operating and safety instructions

TP-Link Tapo C320WS user manual

TP-Link

TP-Link Tapo C320WS user manual

Vacron VFH-8335I Osd operation manual

Vacron

Vacron VFH-8335I Osd operation manual

Axis Q3538-SLVE installation guide

Axis

Axis Q3538-SLVE installation guide

manuals.online logo
manuals.online logoBrands
  • About & Mission
  • Contact us
  • Privacy Policy
  • Terms and Conditions

Copyright 2025 Manuals.Online. All Rights Reserved.