EML SBS314 User manual

UM-780-3981-SBS314 Lite Manual –v2.0
SBS314 Lite Rain Gauge
User Manual

UM-780-3981-SBS314 Lite Manual –v2.0 2 | P a g e
PUBLISHED BY
Environmental Measurements Limited (EML)
7 Jupiter Court
Orion Business Park
North Shields NE29 7SE
United Kingdom
Visit our internet pages at http://www.emltd.net
©EML 2023
No part of this manual may be reproduced without any form or by any means, electronic or
mechanical (including photocopying), nor may its contents be communicated to a third party
without prior written permission of the copyright holder.
The contents are subject to change without prior notice.
Please observe that this manual does not create any legally binding obligation for EML
towards the customer or end user. All legally binding commitments and agreements are
included exclusively in the applicable supply contract or Conditions of Sale.

UM-780-3981-SBS314 Lite Manual –v2.0 3 | P a g e
Table of Contents
List of Figures ..........................................................................................................................................4
List of Tables ...........................................................................................................................................4
1. General Information.......................................................................................................................5
About this Manual ..............................................................................................................................5
Version Information........................................................................................................................5
Related Manuals .............................................................................................................................5
2. Introduction....................................................................................................................................6
3. Site and Installation Requirements ...............................................................................................6
Choosing a site....................................................................................................................................6
Unpacking the rain gauge ...................................................................................................................7
Levelling the rain gauge ......................................................................................................................7
Alternative mounting options.............................................................................................................8
4. Wiring Guidelines...........................................................................................................................9
Wiring for internal loggers..................................................................................................................9
5. Operation......................................................................................................................................10
Operation of the gauge.....................................................................................................................10
6. Maintenance and Calibration ......................................................................................................12
Basic Maintenance............................................................................................................................12
Calibration.........................................................................................................................................12
7. Specifications................................................................................................................................13
Gauge Specifications.........................................................................................................................13
Cable Specifications (if fitted)...........................................................................................................13
Appendix A –SBS LITE products, accessories and spares ...................................................................14

UM-780-3981-SBS314 Lite Manual –v2.0 4 | P a g e
List of Figures
Figure 1 - Cable gland and cable (left), levelling feet (right)...................................................................7
Figure 2 –SBS LITE Levelling Feet ...........................................................................................................7
Figure 3 –Rain gauge fitted to a pedestal as part of the EML system ...................................................8
Figure 4 - Reed switch and resistor.........................................................................................................9
Figure 5 - Filter and filter cap (left) / Nozzle delivering water into tipping bucket (right) ...................10
Figure 6 - Internal image of the SBS LITE tipping bucket mechanism...................................................11
List of Tables
Table 1 - Document Revisions.................................................................................................................5
Table 2 - Related Manuals ......................................................................................................................5
Table 3 - Gauge Specifications for SBS LITE ..........................................................................................13
Table 4 - Cable Specifications (if fitted) ................................................................................................13
Table 5 –SBS LITE products ..................................................................................................................14
Table 6 - Accessories and spare parts for the SBS LITE.........................................................................14
UM-780-3981-SBS314 Lite Manual –v2.0 5 | P a g e
1. General Information
About this Manual
This manual is intended as a general guide for installing, wiring and using the SBS LITE range of rain
gauges. The information contained in this manual may not cover all aspects of SBS LITE applications.
Please refer to associated equipment manuals or consult papers and technical notes on the EML
website (www.emltd.net) or contact EML for more details ([email protected]t).
Version Information
Table 1 - Document Revisions
EML Document Number:
Description:
UM-P-780-3981
Version 1.0 - First Release, dated 27/01/2023
UM-780-3981
Version 2.0 - Second Release, dated 27/06/2023
Related Manuals
Table 2 - Related Manuals
EML Document Number:
Description:

UM-780-3981-SBS314 Lite Manual –v2.0 6 | P a g e
2. Introduction
The SBS LITE is an excellent solution for many hydrological or meteorological applications such as
weather stations and flood warning systems. The SBS LITE is a versatile gauge suitable for climates
with all types and intensities of rainfall. The injection moulded UV-stabilised material from which the
base of the gauge is made, enhanced with the marine grade shot blasted aluminium funnel, means
that the SBS LITE is an extremely robust and versatile instrument, ideal for applications where data
precision and accuracy are critically important.
The internal tipping bucket mechanism has been designed to ensure maximum performance
repeatability.
Traditional cylinder-shaped rain gauges are inaccurate due to the effect of wind blowing over the
orifice. The physical presence of the gauge causes air to accelerate, carrying rainfall away from the
collecting vessel. The effect of this can be up to a 20% reduction in rainfall catch. The unique
aerodynamic shape of the EML range of scientific standard rain gauges reduces this effect, ensuring a
high level of confidence in the accuracy of our measurements.
3. Site and Installation Requirements
Choosing a site
A rain gauge site is often a compromise between exposure requirements and operational constraints.
The ideal site is level ground with a uniform scattering of objects in the surrounding area thus reducing
overall wind speeds. However, these objects should not be too large to cause eddying or high gusts to
occur near to the gauge, or so close to prevent rain from entering the gauge. The gauge should ideally
be no closer than at least twice the height of the obstruction. Extensive details on rain gauge siting
best-practice can be found in Chapter 6 of the WMO Guide to Meteorological Instruments and
Methods of Observation. Although the SBS LITE rain gauge is designed to operate in higher wind
speeds, care must still be taken to avoid over-exposing the gauge where possible. Large expanses of
open flat land should be avoided. If the application is very specific, such as monitoring a building site,
then the siting of the rain gauge is largely prescribed by use. Those users who wish to enquire more
fully into rain gauge exposure are referred to the EML website for more technical information and
papers (www.emltd.net).
NOTES: No two rain gauge designs are ever likely to produce identical results, and even two identical
rain gauges can give slightly different catches even when sited close to each other.
If the gauge is to be operated in the area of livestock then a fence will almost always be required to
prevent damage from and to the animals.
ATTENTION! Remove packing piece and fit levelling feet! The tipping-bucket mechanism is
immobilised before shipping to prevent damage in transit. To release the mechanism for use, remove
the funnel assembly from its base by loosening/removing the three screws and then lifting the funnel.
Remove the piece of foam from under the bucket mechanism. This foam may be saved and used
whenever the rain gauge is transported. The SBS LITE is supplied fully assembled except for the three
levelling feet, which need to be fitted to the gauge. There should be a locking nut above and below
the gauge base, and the feet should be positioned below, as in Figure 2.

UM-780-3981-SBS314 Lite Manual –v2.0 7 | P a g e
Unpacking the rain gauge
1) Included in the box: SBS LITE Gauge, three levelling feet plus fixings (Figure 1 right), cable
gland (if not already fitted) and cable if ordered (Figure 1 left)
2) Fit the three levelling feet as shown in Figure 2.
3) Carefully remove the packing foam from underneath the tipping bucket.
4) Your gauge is now ready to use.
Figure 1 - Cable gland and cable (left), levelling feet (right)
Levelling the rain gauge
The SBS LITE can be mounted directly onto any flat surface, and securely fastened as required. There
is a small circular spirit level provided on the outside of the base of the rain gauge, which should be
used to level the rain gauge. Levelling is one of the simplest means of ensuring the accuracy of rainfall
measurements, failure to do this properly will result in a systematic error. Always check the level on
every site visit. The gauge is levelled by slackening the locking nuts on the adjustable feet, adjust feet
for level and tighten locking nuts (Figure 2). Pegs can be fitted if necessary, through the holes provided
next to the adjusters.
Figure 2 –SBS LITE Levelling Feet
UM-780-3981-SBS314 Lite Manual –v2.0 8 | P a g e
Alternative mounting options
It is not always possible to mount a rain gauge on the ground surface. Examples of applications which
make use of rain gauges mounted above the ground include; urban monitoring, areas prone to
ground-flooding and areas prone to snowfall. It should be noted that regardless of which option is
used to mount the gauge, it must be firmly fixed and not susceptible to vibration. Vibration may lead
to ‘false-tipping’ of the bucket mechanism and thus contribute to erroneous or inaccurate
measurements. There are options which can be used to mount the SBS LITE above the ground.
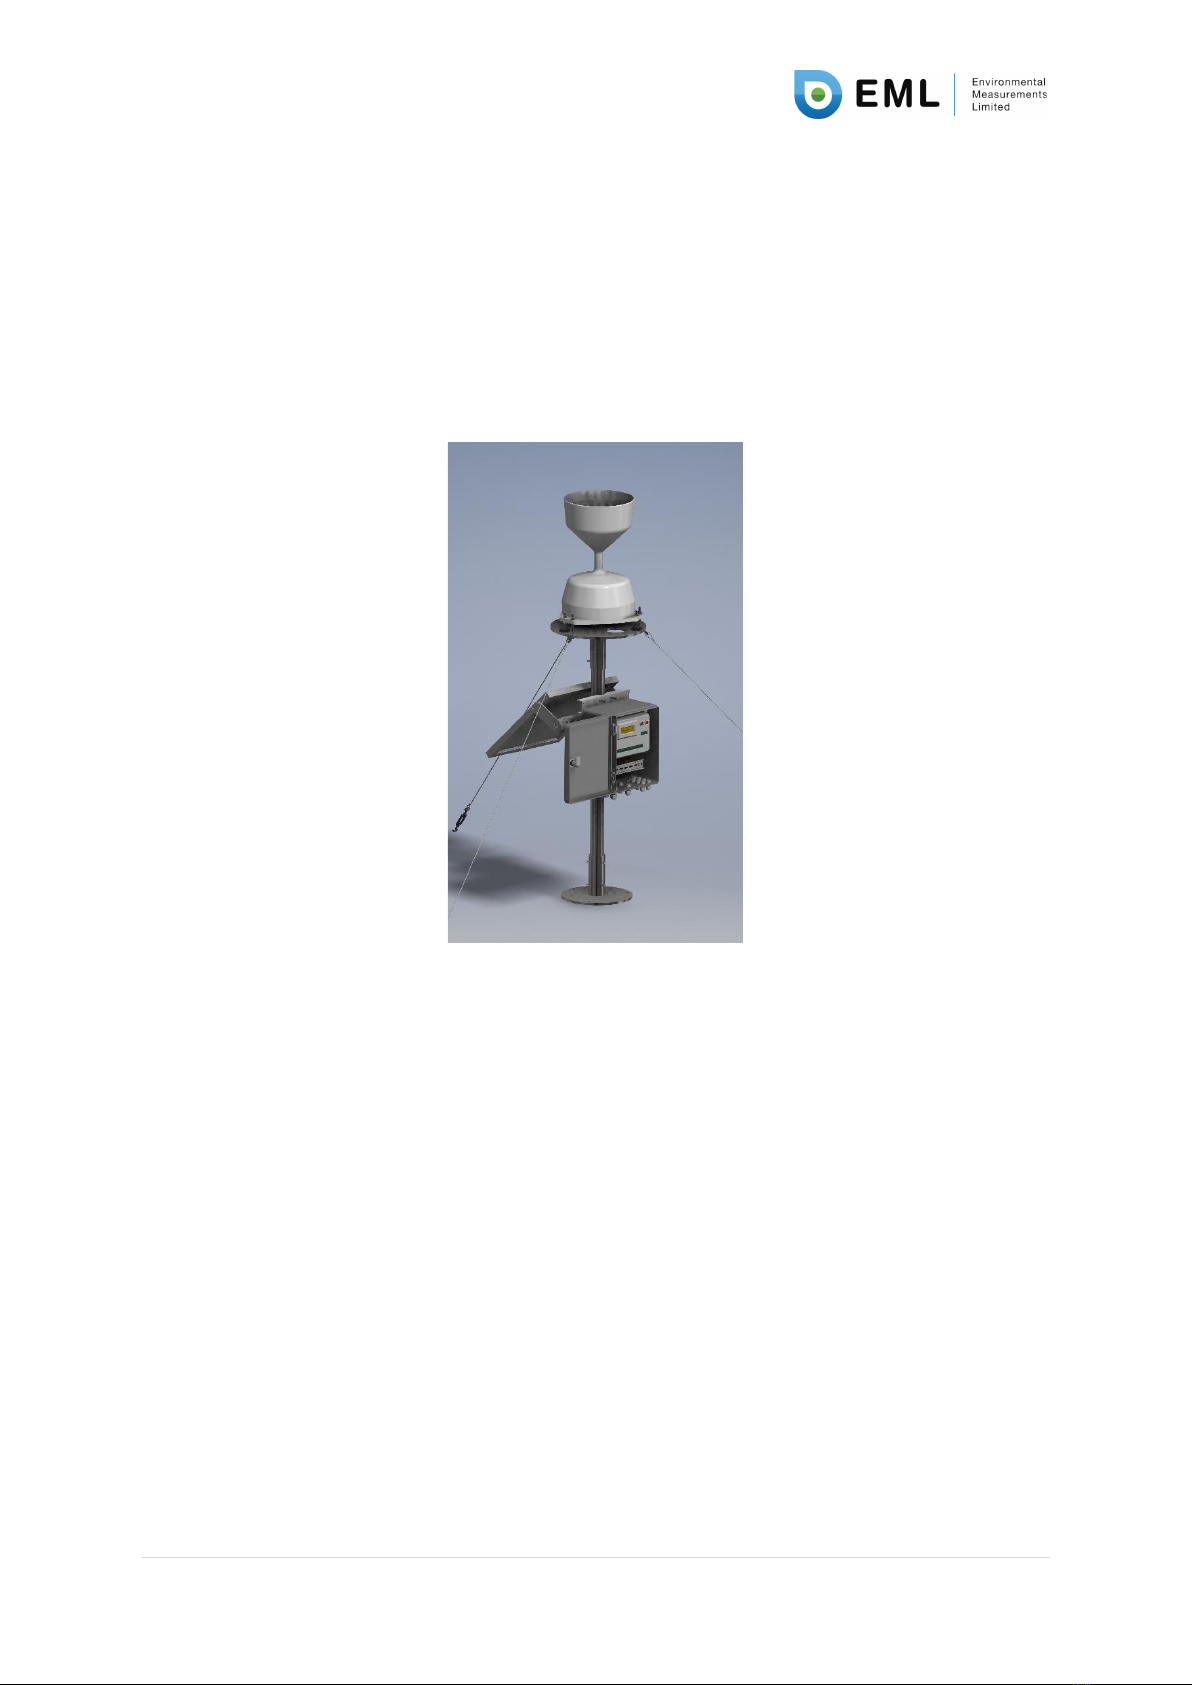
The SBS LITE can be purchased with a rain gauge pedestal and guy kit or a rain gauge pedestal only.
An example of this configuration is shown in Figure 3.
Figure 3 –Rain gauge fitted to a pedestal as part of the EML system

UM-780-3981-SBS314 Lite Manual –v2.0 9 | P a g e
4. Wiring Guidelines
This section gives information on the wiring of SBS LITE rain gauge.
For most applications, the rain gauge may be connected directly to a pulse counting input (contact
closure) on a data logger, but some care is needed if long cables are used. In a long cable significant
capacitance can exist between the conductors, which discharges across the reed switch as it closes.
As well as shortening the life of the switch, a voltage transient may be induced in any other wires
which run close to the rain gauge cable each time the rain gauges tips. To help this situation, 100
resistors are pre-fitted to each of the reed switches (Figure 4), these will help protect the switches
from arcing and help prevent transients.
Figure 4 - Reed switch and resistor
Wiring for internal loggers
To connect an internal data logger or counter, two wires have to be connected to the green connector
terminal block and taken to the contact closure input of your chosen logging device.
The SBS LITE includes a 2-way terminal for connection (the green terminal). As this is a contact closure
(switch) device it does not matter which way you connect this to your logging device or counter.

UM-780-3981-SBS314 Lite Manual –v2.0 10 | P a g e
5. Operation
Operation of the gauge
Rainfall is measured by the well-proven tipping bucket method. Precipitation is collected by the funnel
and flows through a stainless-steel gauze filter, trapping and removing any leaves, dirt, etc. Figure 5.
Water then drips from the nozzle into one of the two halves of the tipping bucket.
Figure 5 - Filter and filter cap (left) / Nozzle delivering water into tipping bucket (right)
UM-780-3981-SBS314 Lite Manual –v2.0 11 | P a g e
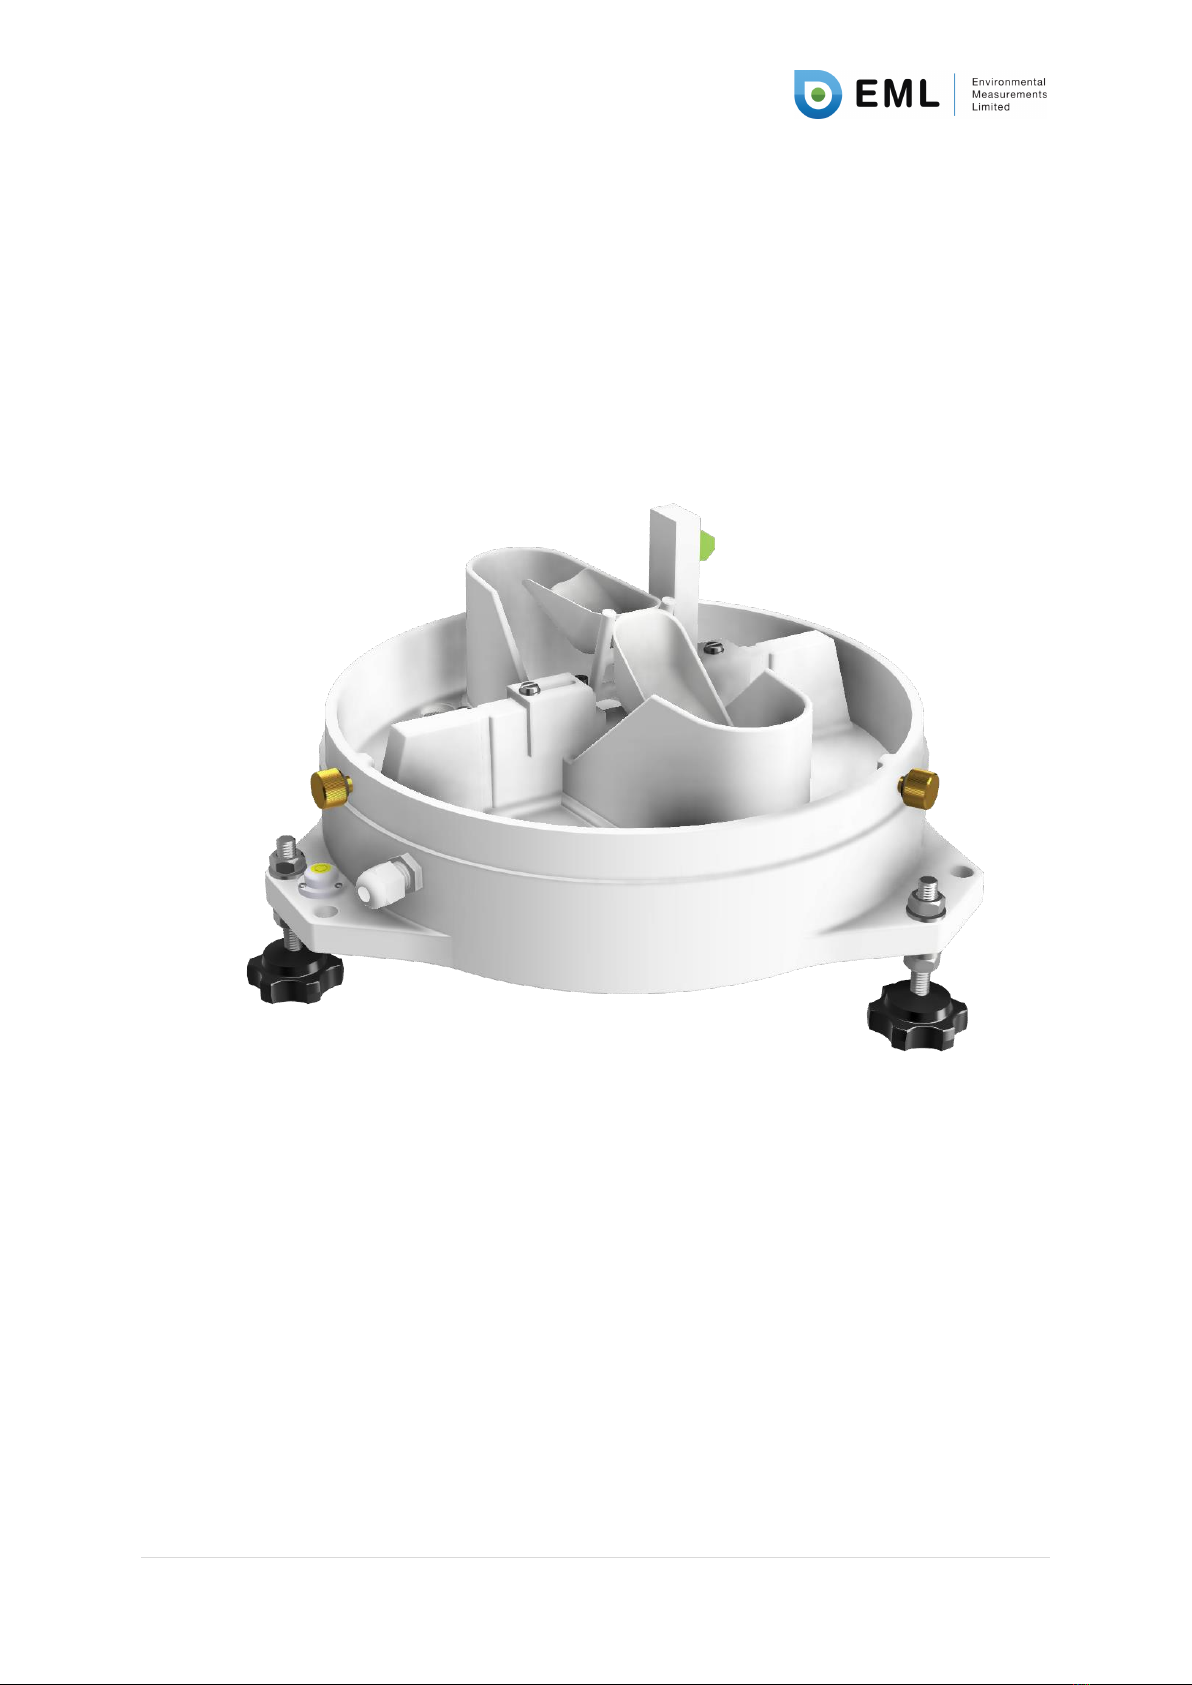
The internal tipping bucket assembly rotates around precision rolling pivot bearings. The balance arm
tips when the first bucket is full, emptying this rain water and positioning the second bucket under
the funnel. The tipping process repeats indefinitely as long as the rain continues to fall, with each tip
corresponding to a calibrated fixed quantity of rainfall. At each tip of the bucket the moving arm
forces the magnet past the reed switch causing contact to be made for a few milliseconds. As each
bucket side is used in turn, the outgoing water is drained away via outlets and discarded. Figure 6
shows the internal mechanism of the SBS LITE.
Figure 6 - Internal image of the SBS LITE tipping bucket mechanism
The exact calibration of each tip is pre-set by adjustable stops located under the tipping buckets. Do
not alter these stops unless as part of a calibration exercise. A levelling bubble is provided as an aid
to levelling of the rain gauge. Connections to the reed switches are made via the green connector
terminal.

UM-780-3981-SBS314 Lite Manual –v2.0 12 | P a g e
6. Maintenance and Calibration
Basic Maintenance
To ensure reliable and accurate measurements it is recommended that the following checks are
carried out at each visit to the rain gauge (if the gauge is still connected to a data logger and the logger
is operating, care must be taken to avoid tipping the bucket when carrying out these checks).
1. Inspect the funnel and filter for any damage or blockage. Depending upon geographical
location, at certain times of the year leaves may accumulate in the funnel, dirt and dust can
also block the filter preventing or reducing the flow rate to the buckets beneath. The leaves
can easily be removed from the funnel and the filter cleaned by removing the end cap from
the filter tube, remove the stainless-steel filter gauze carefully, clean and re-fit the filter and
cap.
2. Check that the gauge is still level. Small movements may occur over time.
3. Remove and clean any dirt from the tipping bucket, being careful not to tip the bucket should
the rain gauge still be logging.
4. During any occasion when the rain gauge is disconnected from the logger, it is good practice
to check the balance arm of the tipping bucket for stiffness. The easiest way to do this in the
field is to try and balance the bucket in its centre position, it should be very difficult if not
impossible to achieve this, if the bucket balances easily then examine the bucket closely for
any dirt or wear on the pivot pin and bucket tubes.
PLEASE NOTE: A spares kit is available with filter, cap, and screws. Contact EML sales
([email protected]t) for more information.
Calibration
The sensitivity of the rain gauge is accurately calibrated during the manufacturing to a nominal
0.2mm/tip using a purpose-built calibration rig supplying an adjustable constant head of water
allowing accurate calibration of the rain gauge. Each rain gauge is supplied with its own calibration
figure to three decimal places. All gauges are calibrated to a tolerance of 2% of the 0.2mm tip value.
A re-calibration and overhaul service is also offered to customers; EML recommends re-calibration
every 12 to 24 months depending on applications.
For information on how we calibrate the rain gauges see British Standards document BS 7843-1:2012
and the CIMO Guide to Meteorological Instruments and Methods of Observation (Chapter 6). These
documents describe the processes of bucket balancing, static calibration at a fixed intensity, and
dynamic calibration using variable intensities.
There is also a Rain Gauge Field Test Kit which can be deployed in the field to test the accuracy of the
calibration at different rainfall intensities. Contact EML Sales (sales@emltd.net) for more information.

UM-780-3981-SBS314 Lite Manual –v2.0 13 | P a g e
7. Specifications
Gauge Specifications
Table 3 - Gauge Specifications for SBS LITE
Technical Specifications
Resolution
Metric: 0.1mm, 0.2mm, 0.5mm
Imperial: 0.005 inch, 0.01 inch, 0.02 inch
WMO Compliant
Yes
Output
Contact Closure (Reed Switch)
Dual reed switch upgrade available
Typical Accuracy
All gauges +/- 2% up to 25mm/hr (Class A)
0.1mm Gauge +/- 3% up to 50mm/hr (Class A)
0.2mm / 0.5mm Gauges +/- 3% up to 120mm/hr (Class A)
Rainfall Intensity
With mathematical correction
0.1mm +/- 3% up to 500mm/hr (Class A)
0.2mm +/- 3% up to 1000mm/hr (Class A)
0.5mm +/- 3% up to 1500mm/hr (Class A)
Operating Temperature
0°C - 70°C
Funnel Diameter
20.0cm / 7.87 Inch
Funnel Area
314cm2 / 48.67 sq. Inch
Height
42.5cm to 45.5cm (with feet adjustment)
Weight
3 Kg
Colour
White
Cable Specifications (if fitted)
The standard cable used in all extended versions (on request) of the rain gauge is a single twisted pair
of 7/0.25mm (22awg) tinned copper conductors, insulated with polyethylene, wrapped in an
aluminised tape with a 7/0.25mm tinned drain wire and a PVC outer sheath.
Table 4 - Cable Specifications (if fitted)
Technical Specifications
Temperature Range
-30°C to +70°C
Overall diameter
4.6 mm
Char. impedance
85
Capacitance/metre
154 pF
Equivalents
Alpha 2401
Belden 8761
UL style2092

UM-780-3981-SBS314 Lite Manual –v2.0 14 | P a g e
Appendix A –SBS LITE products, accessories and spares
Table 5 –SBS LITE products
Product code
Description
P-780-3981
SBS314 LITE Rain gauge 0.1mm
P-780-3982
SBS314 LITE Rain gauge 0.2mm
P-780-3983
SBS314 LITE Rain gauge 0.5mm
C-102-008
Additional Cable (Per Metre)
Table 6 - Accessories and spare parts for the SBS LITE
Product code
Description
P-780-490
SBS Spares Kit
P-780-491
SBS Spares Kit Including Nozzle
P-780-320
Dual Switch Upgrade
P-780-453
SBS314 Funnel Assembly
P-780-350
Calibration
P-780-361
Base and Cross Support
P-780-363
Calibrated Base Assembly
P-780-365
Bucket & Frame Assembly
P-780-367
Reed & PCB Housing
P-780-475
SBS Filter Cap
P-780-4762
SBS LITE Filter Mesh
P-780-474
SBS LITE Funnel Nozzle
P-780-487
SBS LITE Set of 3 Brass Funnel Screws (with shoulder)
Table of contents
Other EML Measuring Instrument manuals


