EMOJO Caddy User manual

OWNER’S MANUAL
1
3
5
13
16
17
19
20
21
2
6
7
8
9-12
14
18
4
15
Front wheel installation and seat adjustment
LCD Control keys
Contact us 22
PAS Control

Instructions
1.
4.
5.
8.
9.
1

2

Overall Bike
L
a
y
out
Actual product may slightly differ from this picture
P
edals
Quick wiring connectors
B
atte
r
y
E
lect
r
ic
m
oto
r
Rear basket.
Max.
capacity: 55 Lbs S
eat pole
S
eat pole
qu
ick
r
elease le
v
e
r
H
eadlight
(
optional
)
Fr
ont
b
asket
.
M
a
x.
capacity
:
55
Lb
s
3
R
ea
r
disc
br
ake
Stem
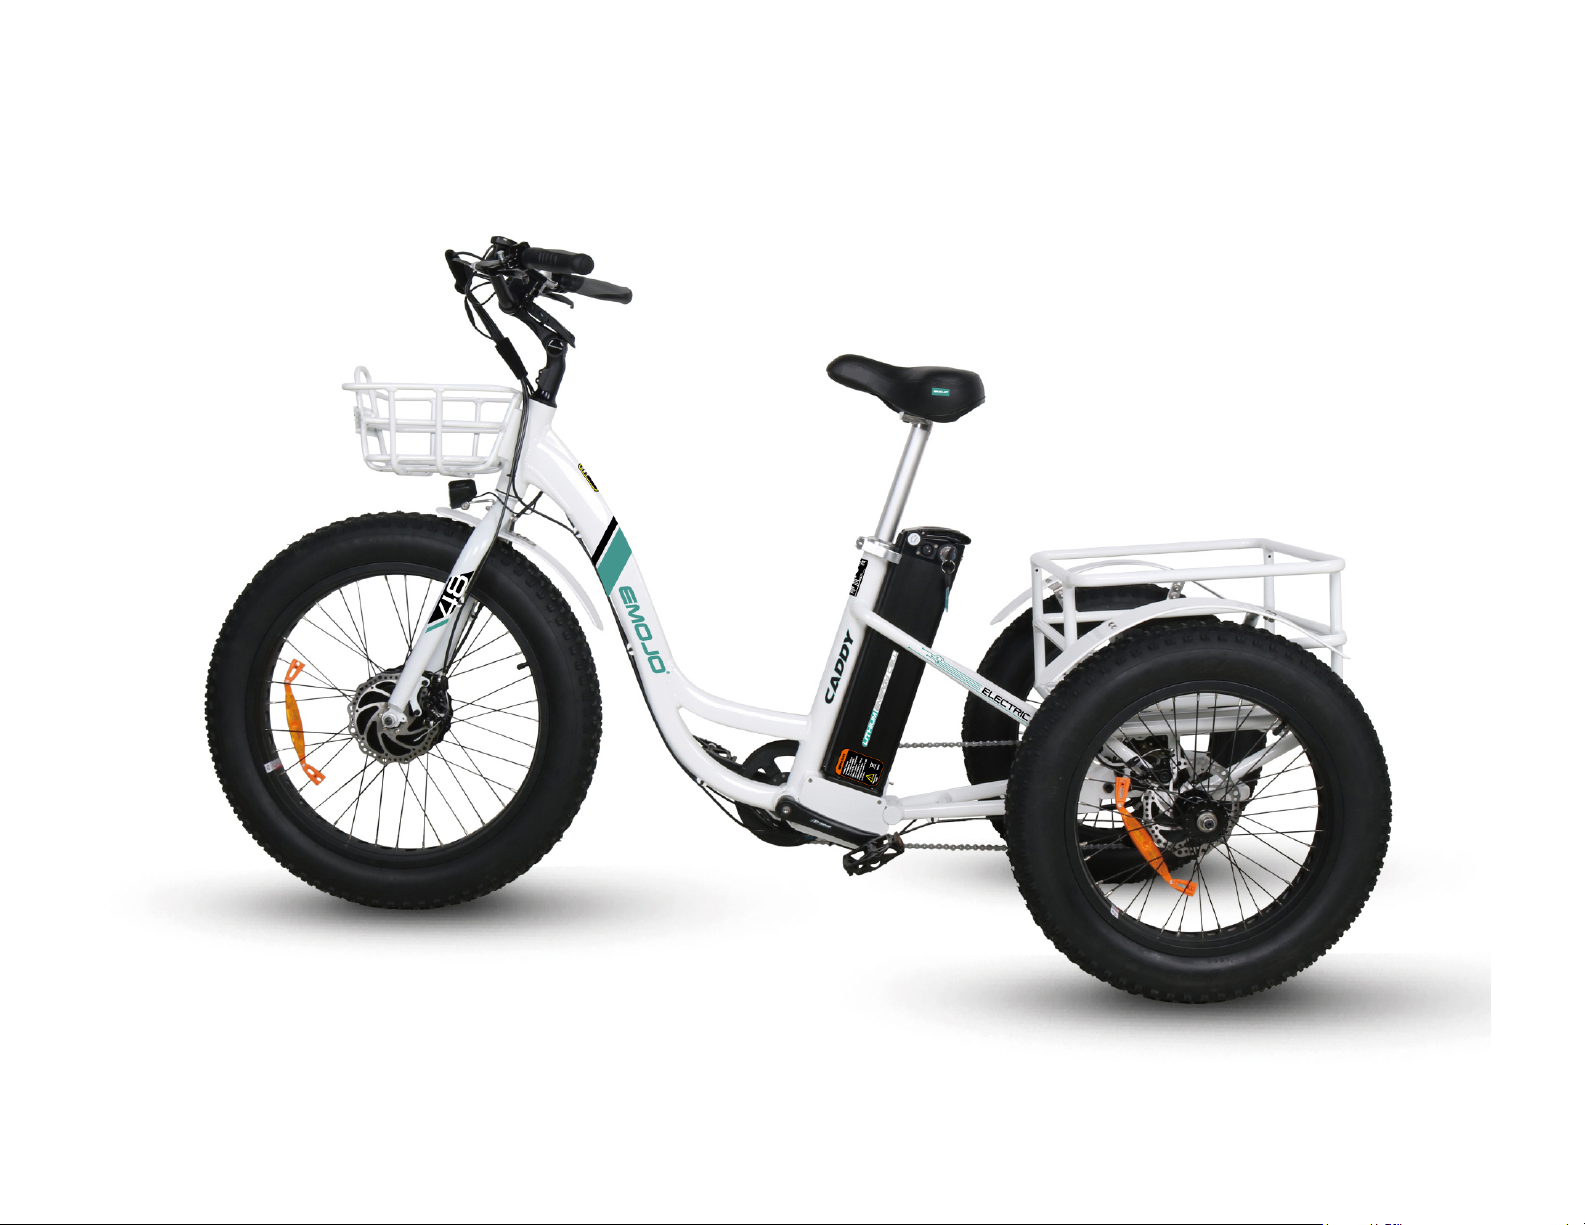
Actual product may slightly differ from this picture
3
Front disc brake
Controller board box
Rear fenders
Front fender
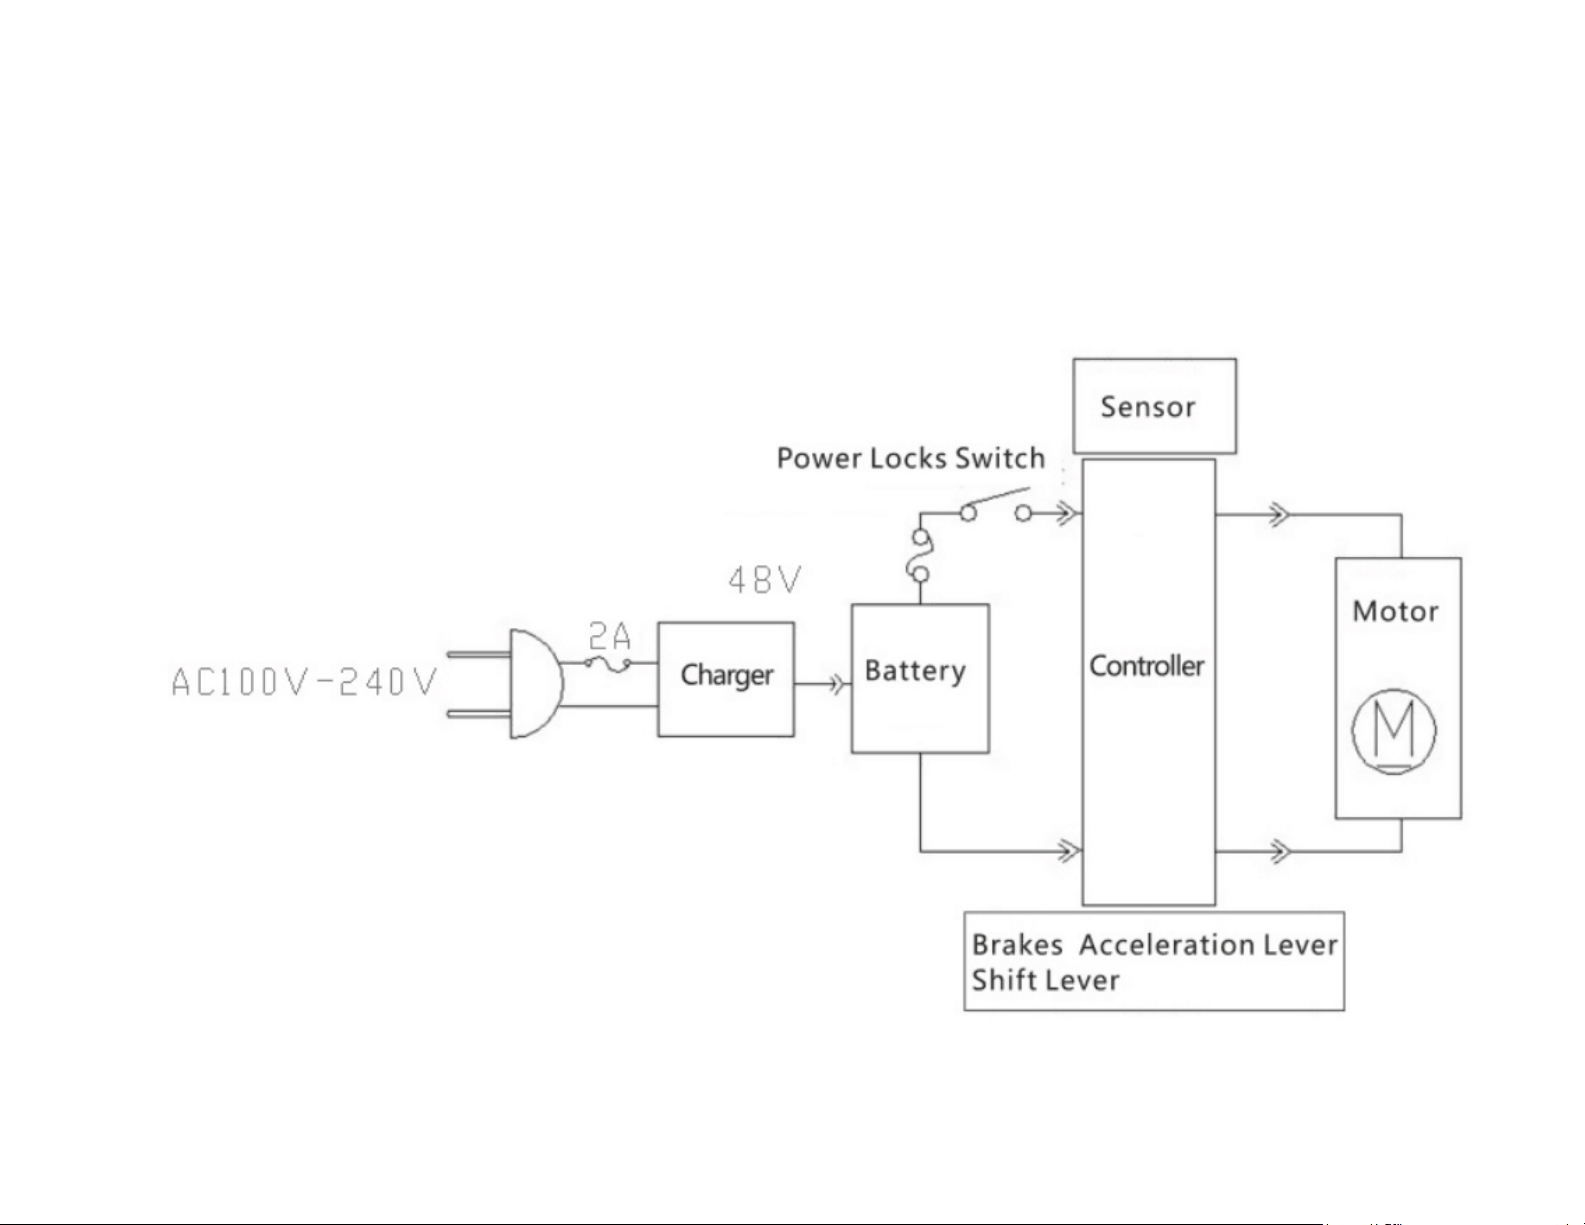
Diagram of the Electric Bicycle:
4

Main Technical Parameters
Item Index
I
5

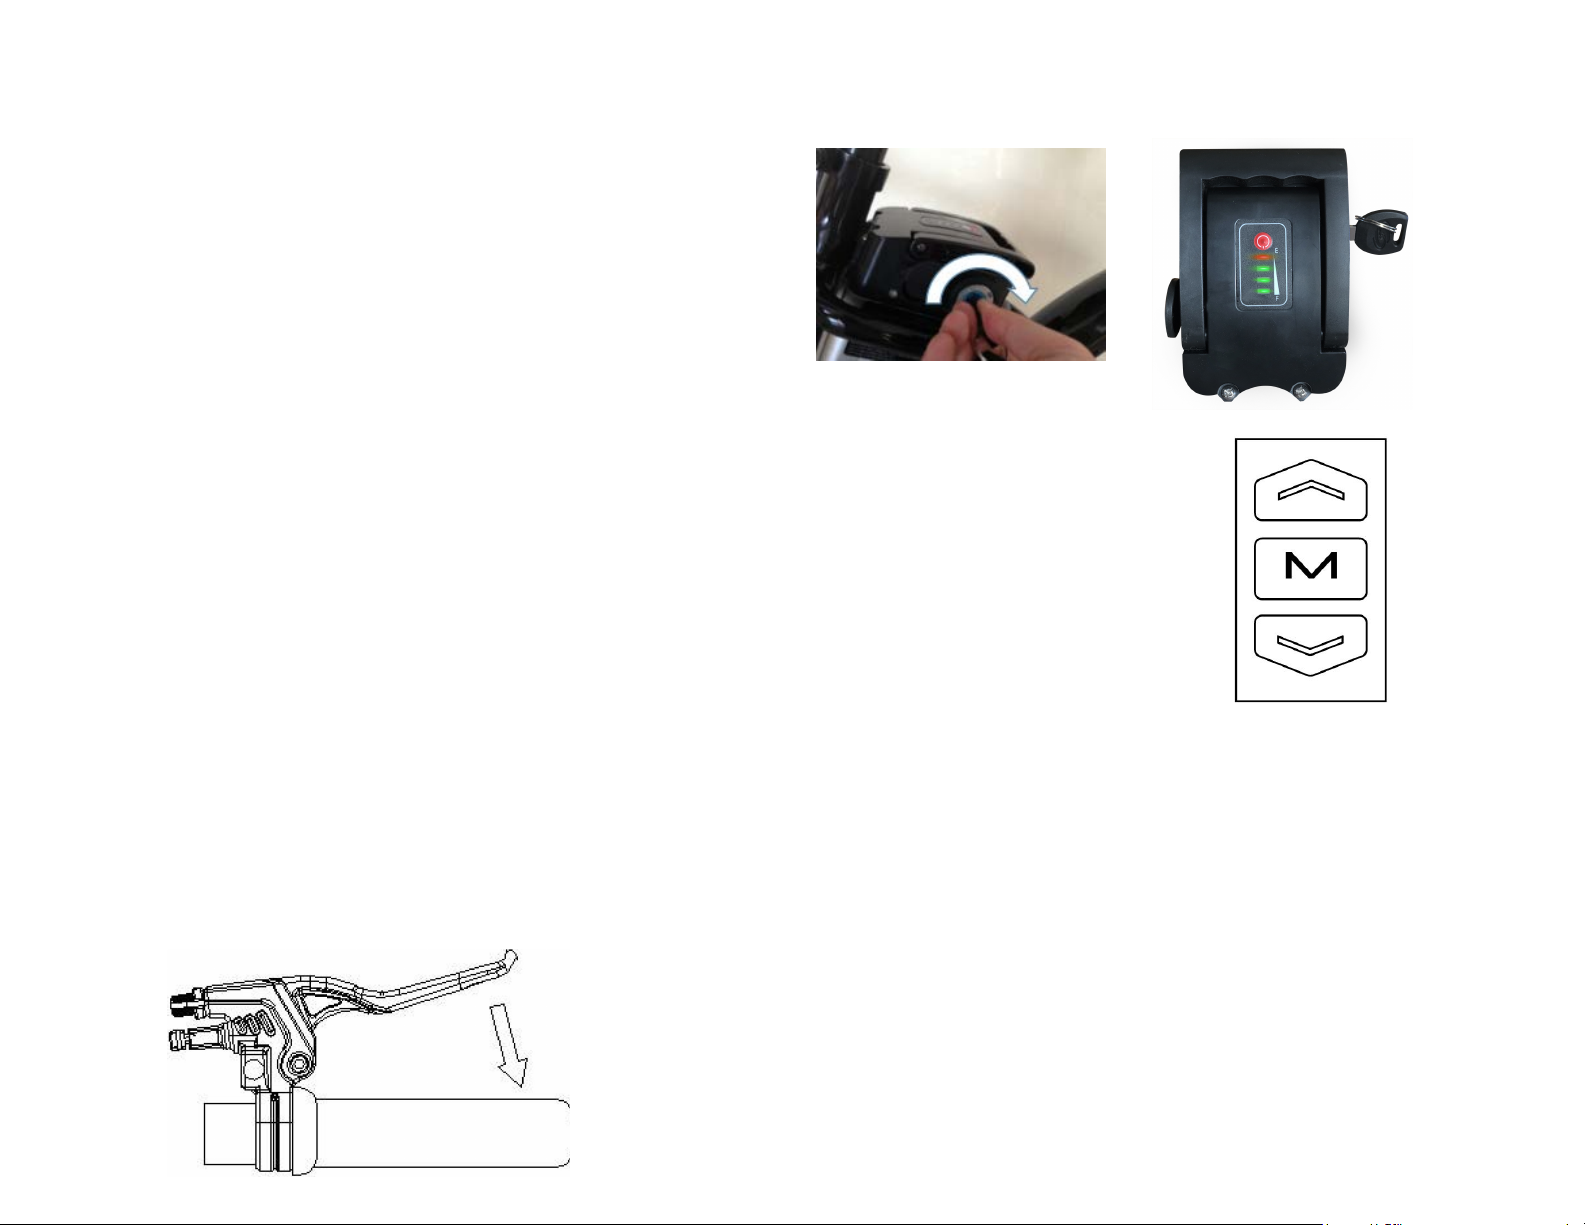
Hand Throttle Control
EM
J
x
j
5
6

LCD
Cont
r
ol
k
e
y
s
There are several functions on the screen of your Caddy trike, all of the functions and settings are controlled by the 3 keys on
the left side handlebar module.
The key operations consists of short press, long press or a combination of 2 keys
:
1- Short press
U
P
/DO
W
N
keys
:
Change PAS assist level during riding.
2- Short press the
M
key to switch the information displayed on the multi-function display section
3-
L
ong press on a single key is used to toggle between mode
/
on
/
off status
/L
ong press on combination of keys to set parameters.
4- L
ong press
M
+
U
P arrow to switch speed display type
(
km
/
h
M
P
H)
5-
L
ong pres arrow
DO
W
N
when the vehicle is fully stopped to Enable
/
D
isable
6
km
/
h cruise speed limiter
6- L
ong press arrow
DO
W
N
when the vehicle is in motion to enter real time cruise control mode.
L
ong press again to exit cruise control mode.
7-
L
ong press arrow
U
P to turn on
/
off the lights.
8- L
ong press the button
M
on
/
off the
L
C
D
Panel.
9-
Short press
M
to switch from readings on the multifunction section
SETTI
NG
PA
R
A
M
ETE
R
S
10-
L
ong press arrows
U
P and
DO
W
N
simultaneously to enter the menu to customi
z
e some parameters such as
:
Wheel
D
iameter
(
unit
:
inch
); M
agnet Steel
N
umber
; B
ack light
B
rightness
; L
ow
V
oltage Threshold
(
refer to setting
:
P01-P1
4)
11- Short press the
M
button to navigate between the parameters, use the
U
P
/DO
W
N
arrows to enter the values, they will blink while editable,
once set, short press the
M
button to save. The values will be solid and no longer blink.
12- Short press the
M
button to move to the news customi
z
able parameter
13- Short press the
U
P and
DO
W
N
arrows to exit the custom parameter settings.
3
-K
e
y
contro
l
mo
d
u
l
e on the
l
eft si
d
e of the han
dl
ebar
7
Correct Operation Stages
ON
(
)
4
Motor On/Pedal Assist
M
2
B:
Th
rottle onl
y
Y
M
Note:
8

◆Display Interface
After switching on the E-bike system, the display shows current speed and total
distance except, battery indicator and assistance level
◆To change the indicated information, press the MODE button to show in turn as
follows: Current Speed (Km/h) → Trip Distance (Km) Trip Time (Hour) → Max.
Speed (Km/h) → Avg. Speed (Km/h) → Motor-output (W) →Current Speed (Km/h).
◆Switching PAS Off: There is a preset setting which allows your bike to cruise at a
steady speed of 3.7 MPH (6Km/h), the letter "P" is shown at the screen. To engage this
cruise control feature press and hold the "-" button for a few seconds until the letter "P"
shows on the screen. To disengage this function press the brakes.
Pedal Assist Mode Control LCD
Please read the following steps and images to help you understand
how to read and operate all the functions.
M
LCD
M
10

Pedal Assist Mode LCD Screen
:
S
B
S
S
O
Assistance-Level
M
U
DO
N
M
Display functions
5
:
k
5
x
(
)
11
9
:
B
k
B
(
:
k
;
:
),
:
(
:
;
:
),
:
V
:
48V
(
), P04:
Hibernation Time (0: never, other figures refer to the hibernation
time) Unit: minute
P05: Power Gear – 0/3 Gear Mode: Gear 1: 2V Gear 2: 3V Gear 3:
4V 1/5, P06: Wheel Diameter Unit: inch (Precision: 0.1)
P07: Magnet Steel Number for Speed Test Range: 1-100, P08:Speed
Limit
12
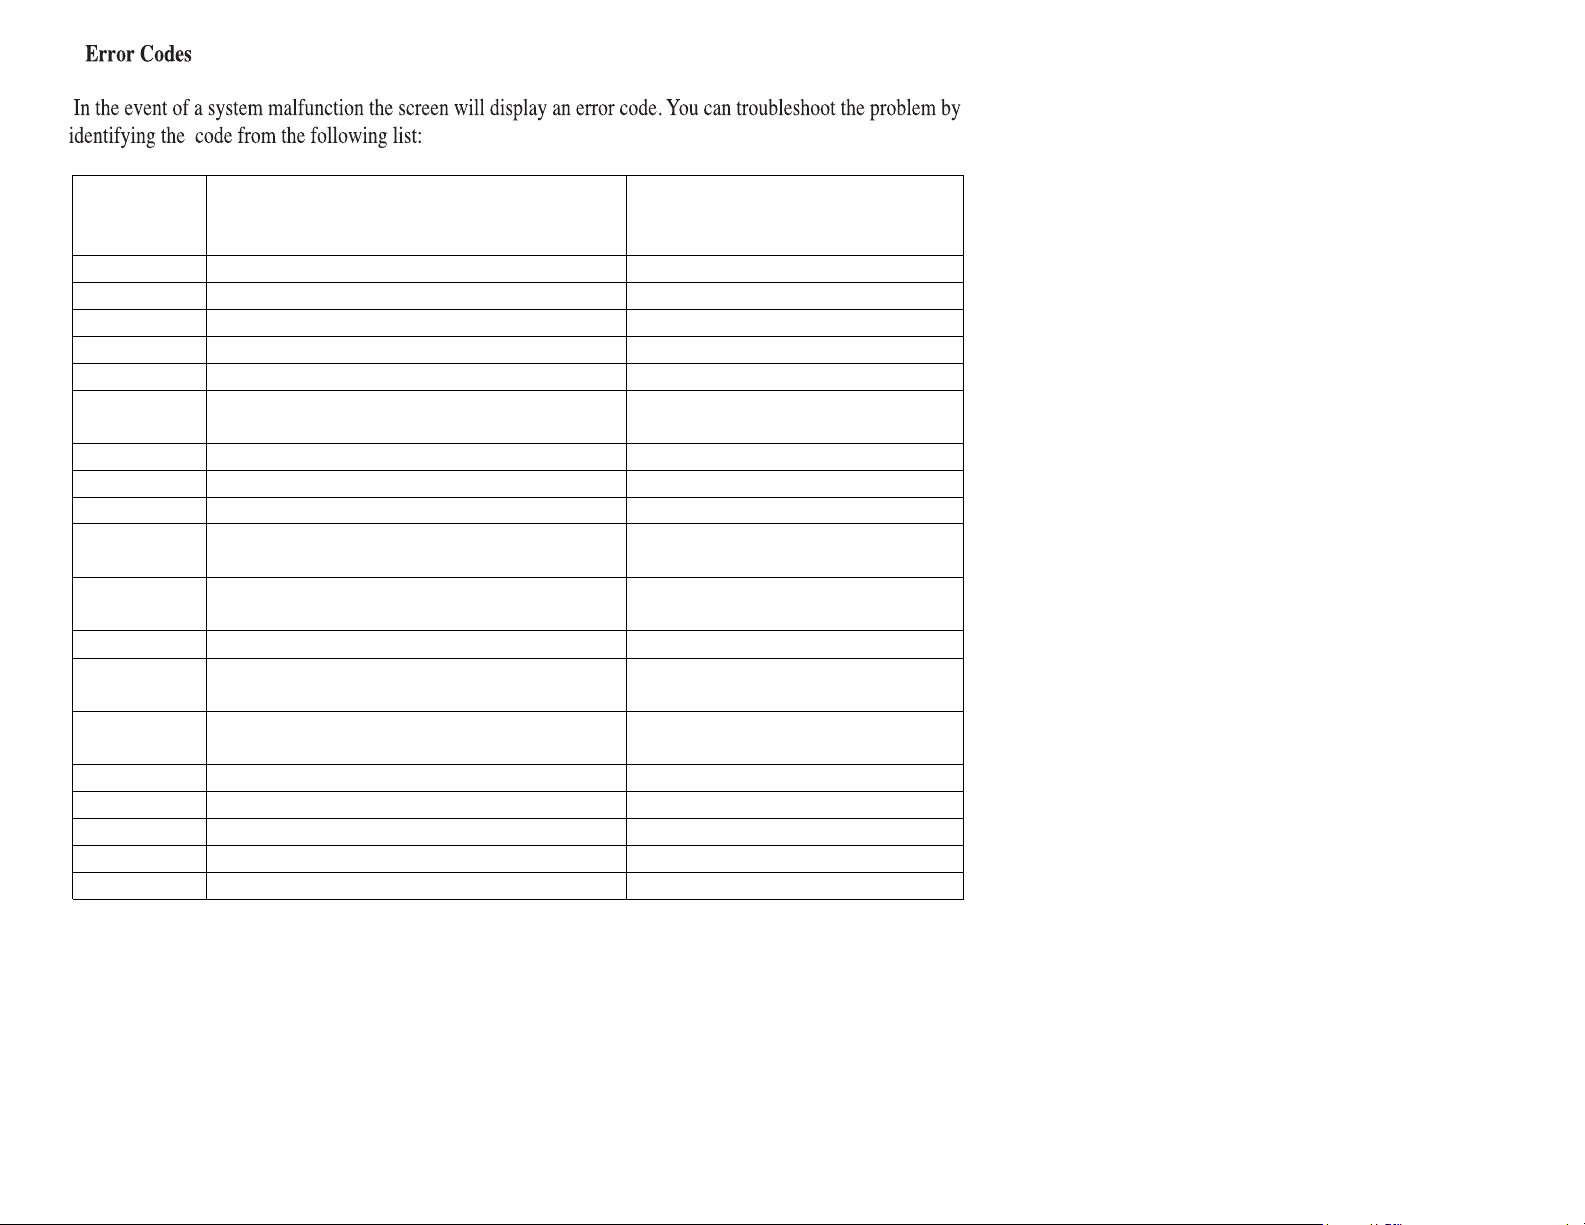
0x01 Normal condition Front LED ligtht is ON
0x02 Brake problem(electromagnetism) Check brake lever
0x03 Brake problem(power off) Check brake lever
0x04 Throttle is not Initialization Check the throttle
0x05 Throttle is damaged Change the throttle
0x06 Battery low-voltage protection Check the battery voltage and
capacity
0x07 Battery high-voltage protection Change the battery
0x08 Hall sensor problem Check the hall sensor
0x09 Motor phase line problem Change the motor
0x10 Controller Temperature protection After cooling, motor will work
again
0x11 Controller Temperature sensor problem The motor can still work,
better to repair controller
0x12 Current sensor problem Change the motor
0x13 The temperature of the battery is
problem
Check the battery
0x14 Motor temperature problem Motor can still work, better to
repair motor
0x21 Speed sensor problem Check the speed sensor
0x22 BMS problem Check BMS
0x23 Lighting problem Check light
0x24 Lighting sensor problem Check light
0x30 Communication problem Change the display
Code Indications Meaning

Charging Methods and Steps
Slide open the protective hatch to access the charging port
13

Attention:
Battery mounting and removal
in
ing
Insert the battery into the designated area behind the seat pole, aligning the battery
guide and botto
m
power socket. Aer hearing a click, the battery
is properly installed.
U
se the pro
v
ided keys to lock the battery to the
f
ra
m
e.
B
B
B
14

Fro
nt
wh
eel inst
a
ll
a
ti
o
n
z
z
E
OJO
Assembly of the ont wheel unit:
I
F
B
T
Adjustment of Saddle:
Sa Line
Fig A. Fig B. Fig C.
Free rotation between disc
and caliper.
15

Disc Brakes
E
OJO
10
1
j
Figure 1
WARNING:
(b)
New Bres Bed-in Procedure
1
Important Note: Do not lock up the wheels at any point
2
3
4
16

4. Pedal Installation and Adjustment:
5. Check and Adjustment of Tire Pressure
6. Brake Adjustment
4
0
PSI
10CM
A.
z
: 20 x 4.0 K1188
Tube size:
x 4
17

Magnetic disk
3-Smm
Sensor
Freewheel
Chain
Common Faults and Maintenance
Common Faults Troubleshooting
18
Other manuals for Caddy
1
Table of contents
Other EMOJO Bicycle manuals


