EMOJO BISON PRO User manual

Assembly guide

Your trike comes packed into 3 separate boxes:
Box 1: Seat, battery, and front frame section
Box 2: Rear frame section with wheels, front basket, fenders,
charger and accessory box (pedals and headlight inside)
Box 3 : Front wheel
and rear basket

Identify the hardware
Socket head bolts,
pressure washers and
safety nuts to connect
front and rear frame
sections
Bolts for the front basket x 4
Pedals
Chain
Headlamp
Long screw and
nut for the headlamp
and front fender
Tail light
Socket head bolts,
pressure washers and
safety nuts for the
fear fenders
Black socket head
bolts for the front basket
Socket head bolts,
pressure washers and
safety nuts for rear
fender brackets
Flat washers for the front
basket
Front fender
Rear fenders
Rear fender brackets
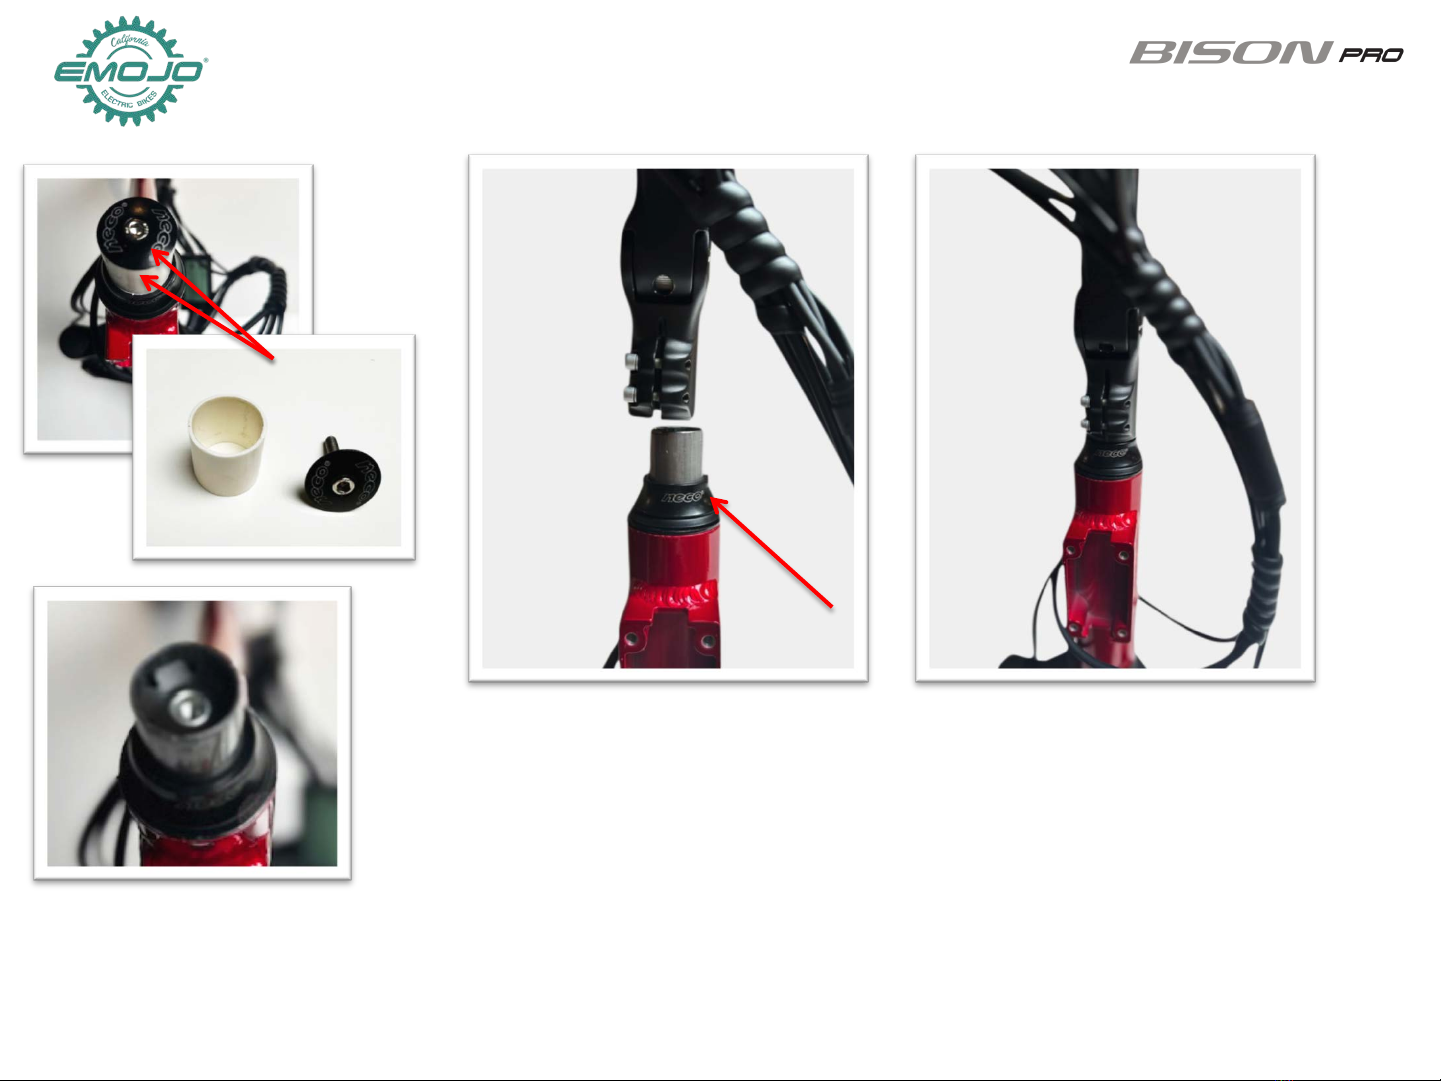
STEP 1: Assemble the stem and handlebar.
A-Remove the protective cap
and ring from the steering tube
C-Align the stem/handlebar in
a straight position
Continues on the next page….
B-Insert the stem into the tube.
Use the spacer ring (arrow) to
increase the handlebar height, for
lower handlebar position you can
remove the spacer ring.

STEP 3: Assemble the stem and handlebar.
F-Adjust the angle of the handlebar with
the horizontal screw, once you reached the
desired angle close the latch.
E-Tighten the bottom clamp
socket head screws with an allen
wrench
D-Secure the handlebar tightening the
top screw with an allen wrench

STEP 4: Connect the front and rear frame sections
Use the 6 socket head bolts and safety nuts to connect
both sections but do not tighten yet, you will need to
adjust the chain before fully tightening
Connect the front and rear sections

STEP 5: Install the front wheel
1-Remove the shipping axle from the front
fork and dispose it.
2-Make sure to have the spacer washers (a)
and safety washers (b) on both sides between
the fork
(b)!
(a)!

STEP 5: Install the front wheel
3-Insert the front tire into the fork, the
disc needs to slide into the brake caliper.
4-Connect the motor cable on
the right side of the fork.

STEP 6: Install the chain
1-Pull down the derailleur
2-Start loading one end of the chain from top to bottom around the first
small sprocket (blue arrow)… then around the second small sprocket
(green arrow) and finally onto the third small sprocket (red arrow)...
Continues on the next page….

STEP 6: Install the chain
3-Keep reeling out the chain towards the front. The chain should
now be routed around all the gears.
4-Make sure the chain also
wraps around the main
sprocket.
Continues on the next page….

STEP 6: Install the chain
4-Using a wrench # 17, tighten the 6
bolts that connect the front and rear frame
sections.
3-Link the chain together, insert the pin
lock and secure using the chainbreaker
(included)

STEP 7: Shifter cable
Follow the route for the shifter cable
to connect it to the derailleur.
1-Insert the bare metal wire into the guide on
the shifter
2-The wire will come to a stop once the
rubber jacket hits the guide, tighten
the security nut with a #9 wrench.

STEP 8: Brakes
2-Adjust the alignment, use the top screws on both ends
of the caliper to adjust, make sure the wheel spins freely
without rubbing the disc rubbing the caliper.
1-Fix the calipers to the frame.
Use the black sockethead bolts,
2 bolts per side.

STEP 9: Front fender and headlight
Attach the bracket to the front fender
1-Install together the front fender and headlamp onto
the front fork hole
2-Secure both with the socket long head bolt

It#is#highly#recommended#to#a2ach#the#rear#fenders#to#the#rear#basket#before#fixing#the#basket#to#
the#frame.#
1-Fix the rear fender brackets to the
rear basket
3- Attach the rear fenders to the brackets
with the short bolts
Continues on the next page….
STEP 10: Rear fenders and basket
2-Adjust the angle of the brackets

STEP 10: Rear fenders and basket
Fix the rear basket with
fenders to the frame using
the long bolts with washers
Secure from underneath with
the safety nuts

STEP 11: Rear tail light
Attach the tail light the rear end of the trike Connect the trail light cable to the trike

STEP 12: Battery installation
Slide the batteries into their rails under the
basket
Push the batteries all the way in
until they click into position
Connect the plugs of the battery
rails to the main harness

STEP 13: Headlight
Plug the end of the headlight cable to the other end
from the trike.
Tuck into the frame the excess cable
Continues on the next page….

STEP 13: Headlight
Press and hold
M button to
turn system on
Press and hold UP
button to
turn light on/off
Light ON indicator
on the screen
To turn your headlight on:
1-Turn on your electric system by pressing and holding the M button for 3 seconds
2-Press and hold the arrow Up button until the light comes on, you will see the light icon
on the screen
3-To turn off the light press and hold the Up button again. The light icon will turn off from the screen.
Other EMOJO Bicycle manuals


