Stealth B-52 User manual

STEALTH B-52
STEALTH F-37
STEALTH H-52
STEALTH P-7
V2.4
7

STEALTH ELECTRIC BIKES OWNER’S MANUAL
V 2.4 PAGE | 2
CONGRATULATIONS!
Welcome to the Stealth Electric Bike community and congratulations on your purchase.
Stealth Electric Bikes redefine the ride experience. They are considered by peers to be the world’s toughest and most
powerful hybrid electric bikes.
Featuring heavy duty suspension, 2-hour charge time, silent operation and zero emissions, using your Stealth Electric Bike
will turn every ride into an adventure.
Ready for flight?
Stealth Electric Bikes manufacture a range of e-bikes so this manual may contain some information that does not apply to
your bike. Some illustrations may vary from your actual bike.
If you have any questions after reading the information in this manual, consult your local dealer.

STEALTH ELECTRIC BIKES OWNER’S MANUAL
V 2.4 PAGE | 3
IMPORTANT:
This manual contains important safety, performance and service information. Read it before you take the first ride on your
new Stealth Bike, and keep it for future reference.
Additional safety, performance and service information for specific components such as transmission, suspension or brakes
on your bike may also be available. Make sure that your dealer has given you all the manufacturers’ literature that was
included with your bike or accessories. In case of a conflict between the instructions in this manual and information
provided by a component manufacturer, always follow the component manufacturer’s instructions.
To the best knowledge of Stealth Electric Bikes, the material contained herein is accurate as of the date this publication was
approved for printing. Stealth Electric Bikes reserves the right to change specifications, equipment, or designs at any time
without notice and without incurring obligation. Illustrations in this manual are merely for demonstration purposes and
may not exactly match the detail described.
NOTE: This manual is not intended as a comprehensive use, service, repair or maintenance manual. Please see your dealer
for all service, repairs or maintenance. Your dealer may also be able to refer you to classes, clinics or books on bike use,
service, repair or maintenance.
Please read entire manual before riding your Stealth Electrical Bike

STEALTH ELECTRIC BIKES OWNER’S MANUAL
V 2.4 PAGE | 4
CONTENTS
PRODUCT REGISTRATION............................................................................................................................................................. 5
GENERAL WARNING..................................................................................................................................................................... 5
ASSEMBLY .................................................................................................................................................................................... 6
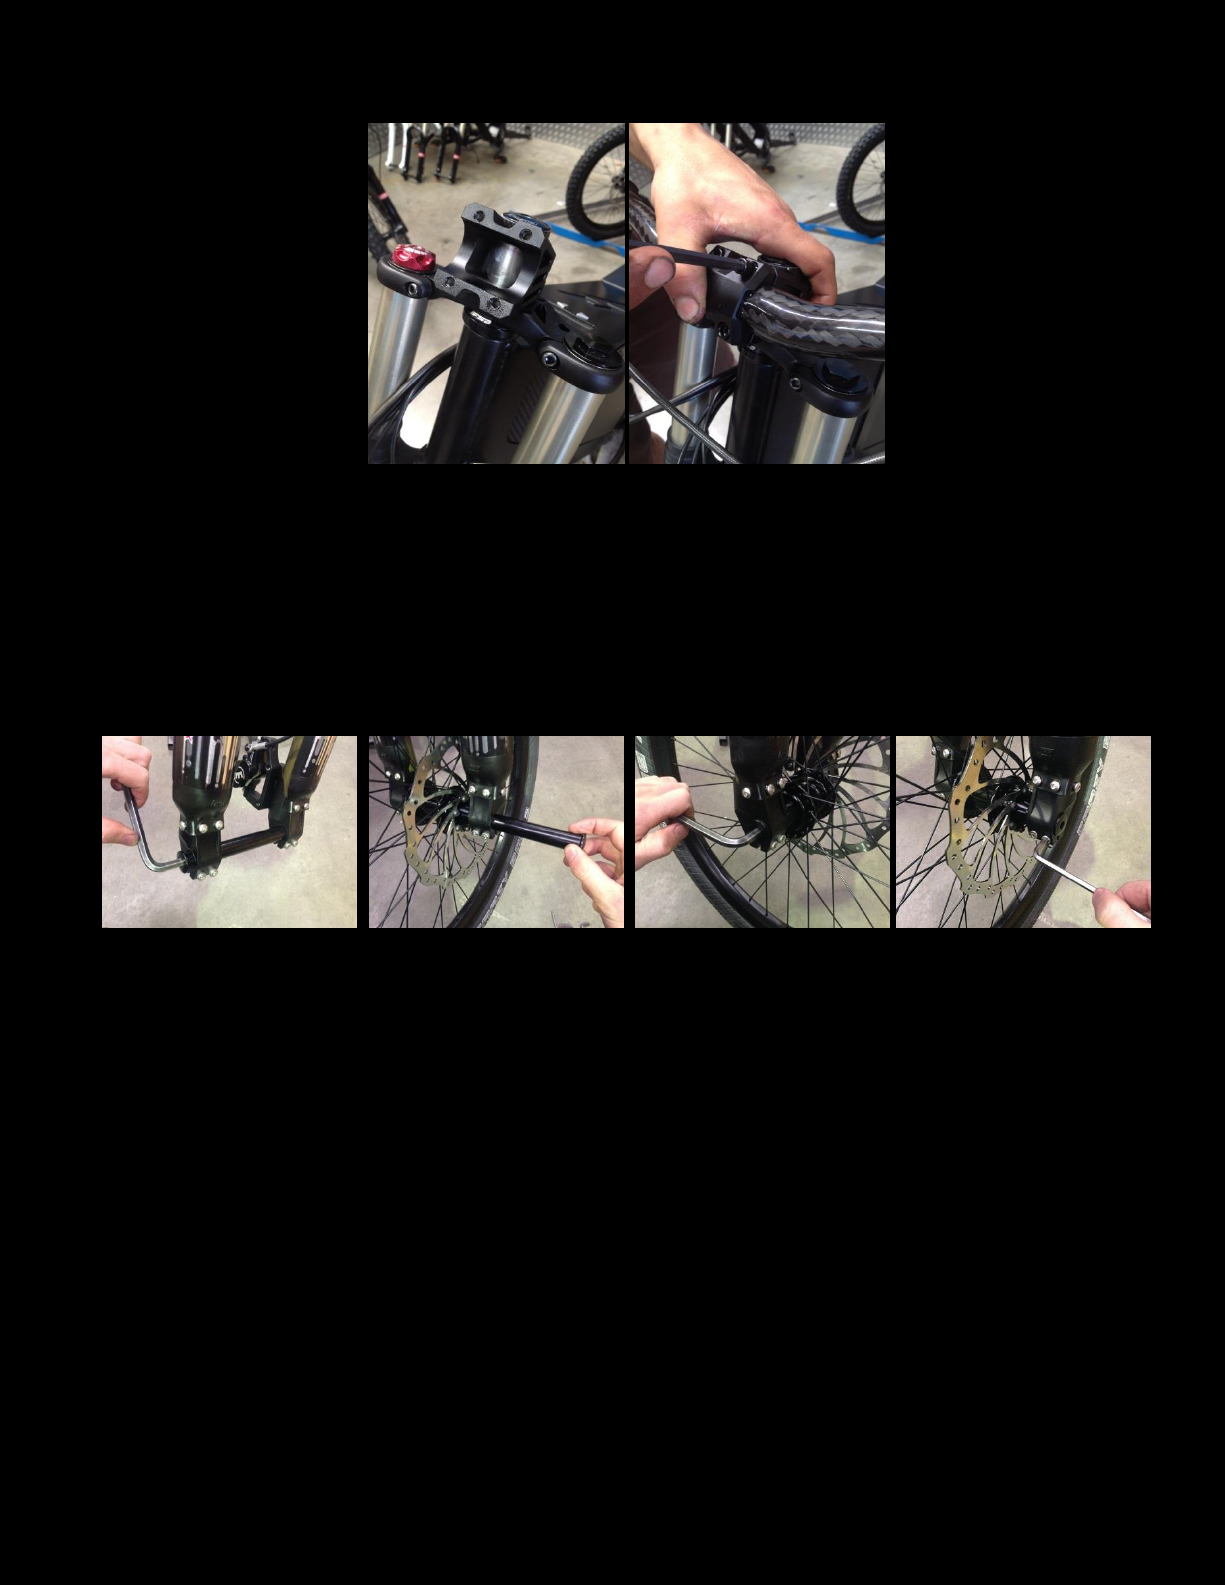
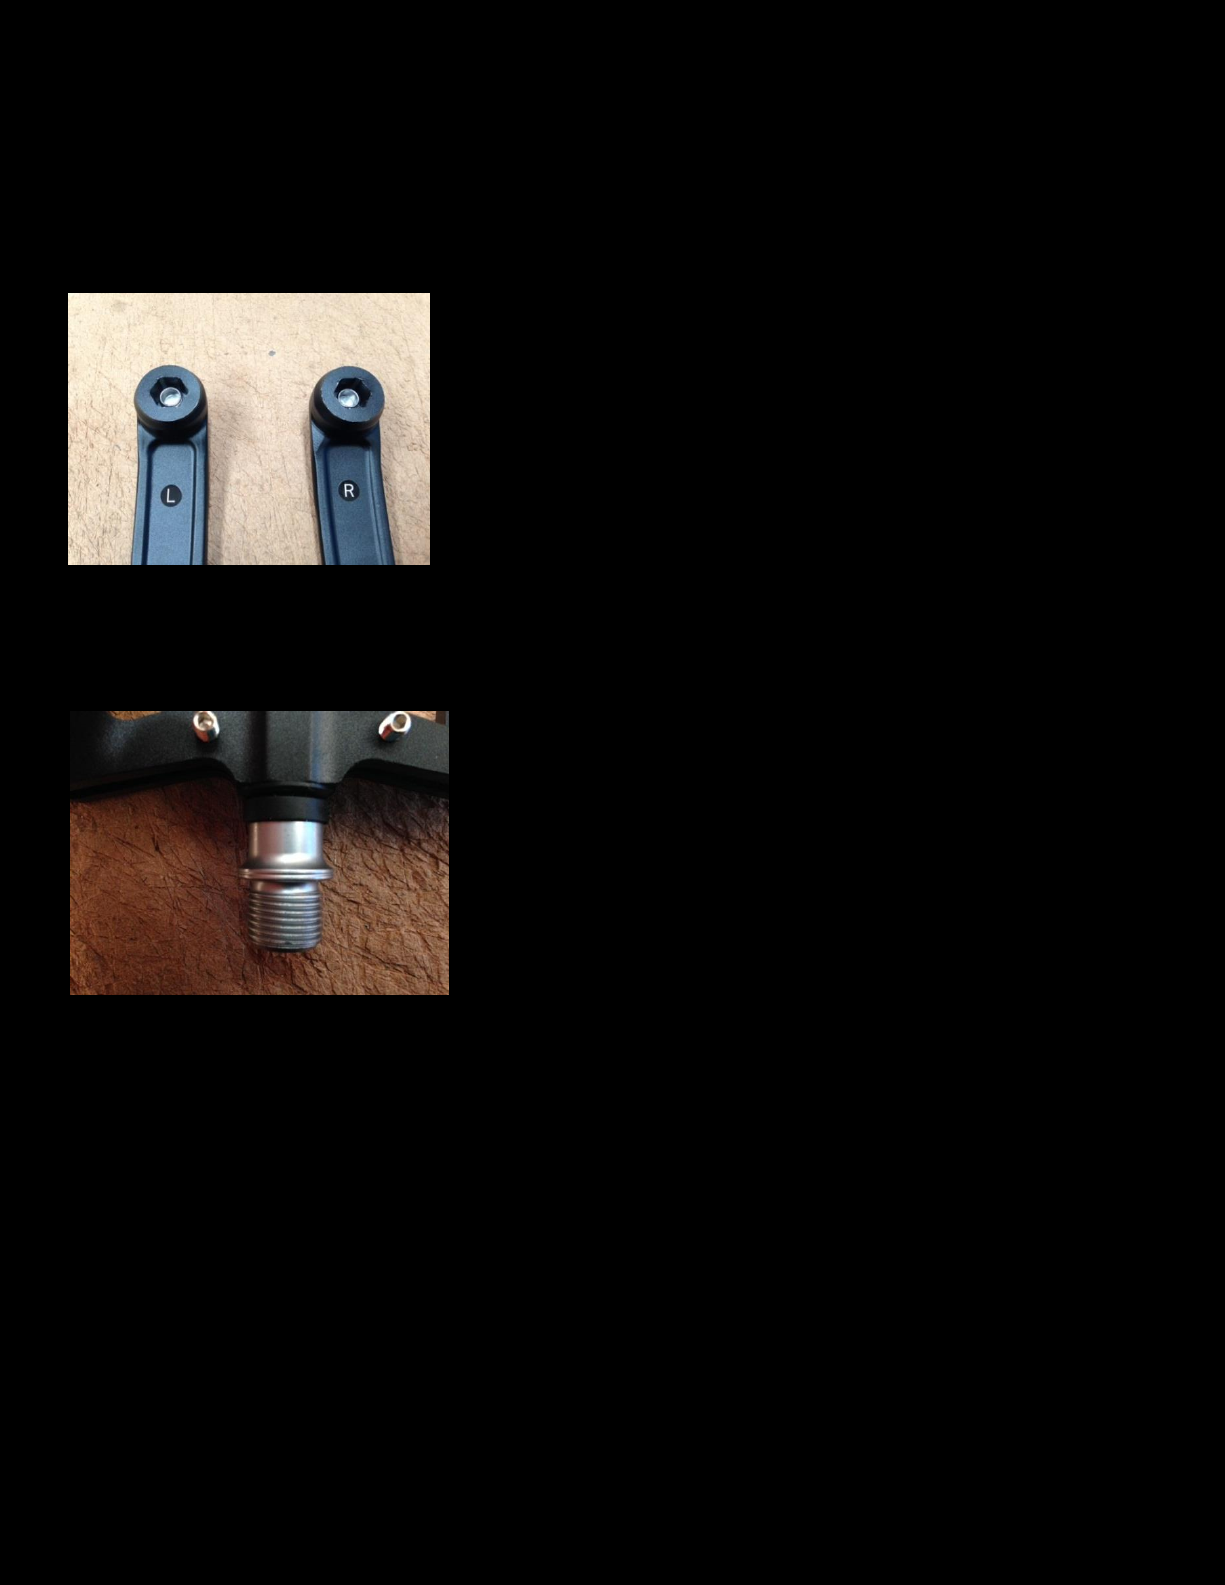
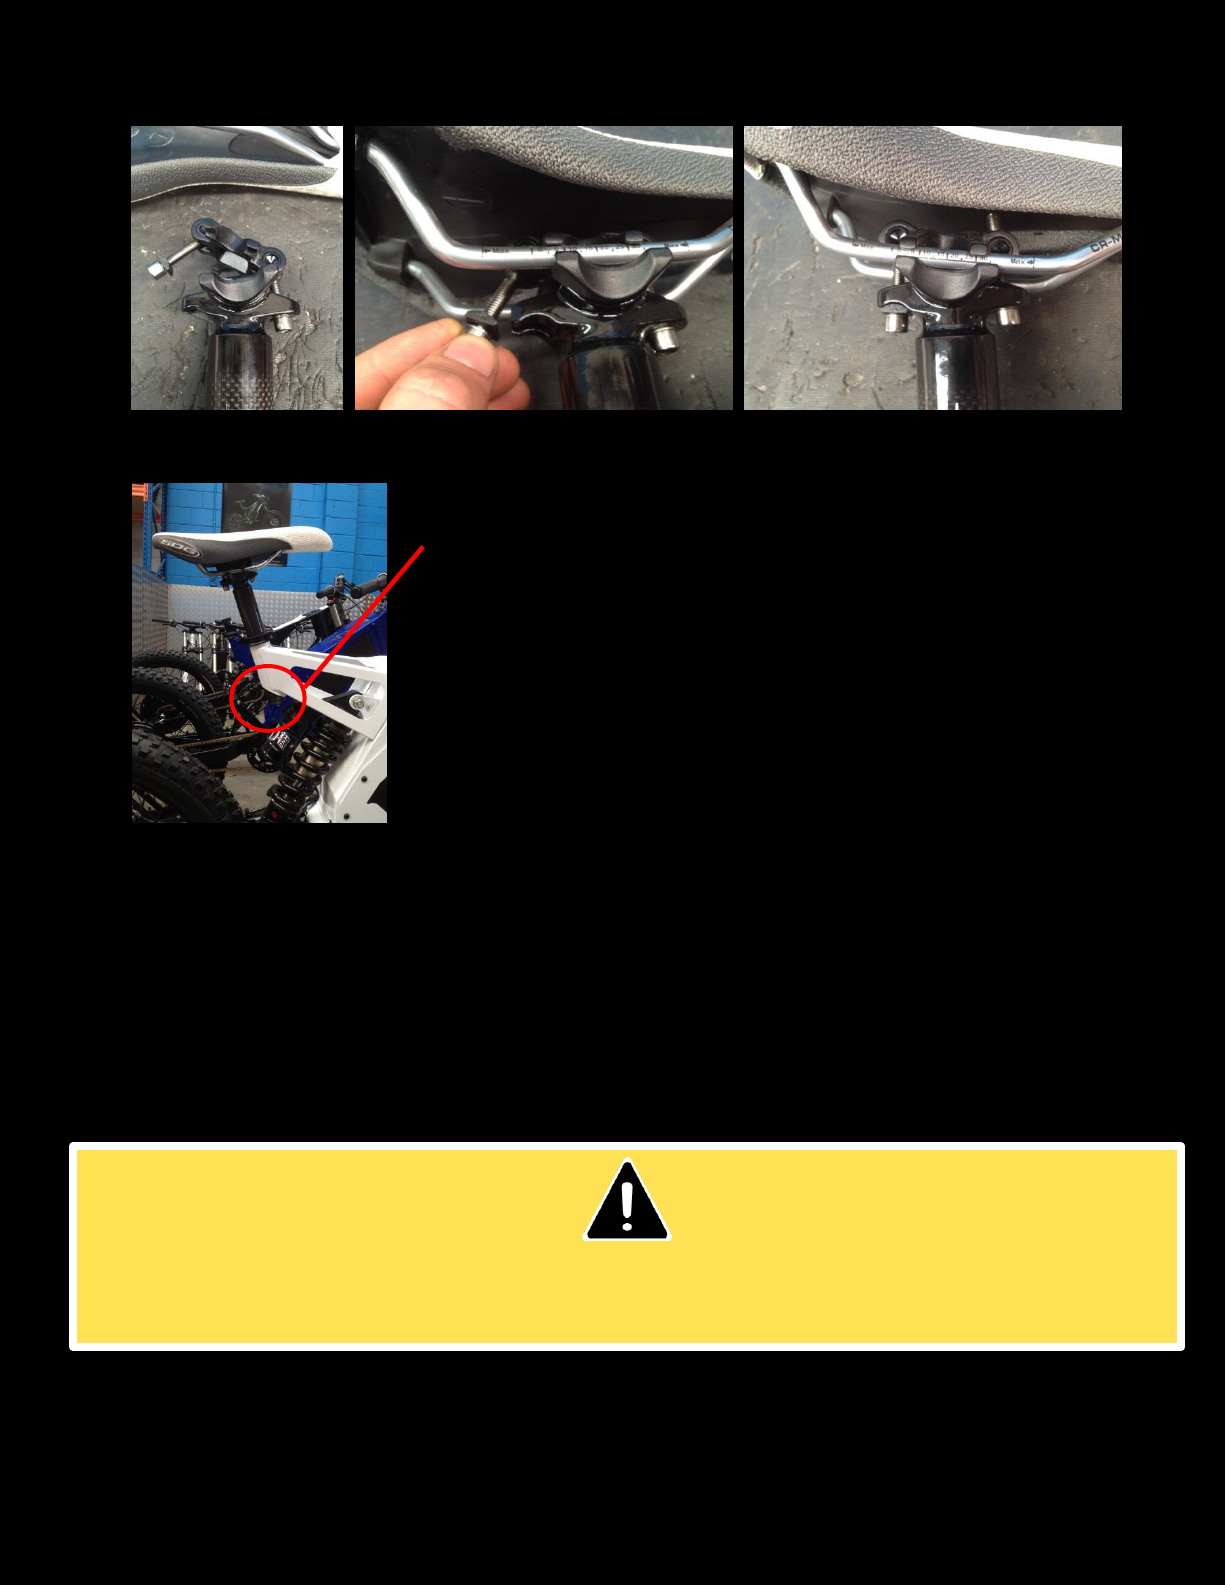
OUT OF THE CRATE .................................................................................................................................................................. 6
BATTERY ..................................................................................................................................................................................... 17
RANGE.................................................................................................................................................................................... 18
CHARGING.............................................................................................................................................................................. 18
BATTERY CARE........................................................................................................................................................................ 19
STORING BATTERY AND STEALTH BIKE FOR LONG PERIODS ................................................................................................. 20
BEFORE RIDING YOUR BIKE........................................................................................................................................................ 21
YOUR FIRST RIDE ........................................................................................................................................................................ 22
IMPORTANT COMPONENTS AND CONTROLS ........................................................................................................................ 22
DC-1 AND ELECTRONIC SECURITY.......................................................................................................................................... 24
DC-1 SCREENS ........................................................................................................................................................................ 25
WHILE RIDING ............................................................................................................................................................................ 31
TRIP INFORMATION ............................................................................................................................................................... 32
POWER MODES AND LIMITS.................................................................................................................................................. 32
RIDING TECHNIQUE................................................................................................................................................................ 36
RIDING EFFICIENTLY ............................................................................................................................................................... 36
STEALTH BIKE CARE.................................................................................................................................................................... 38
CLEANING............................................................................................................................................................................... 38
ADJUSTING YOUR BIKE........................................................................................................................................................... 38
MAINTENANCE SCHEDULE..................................................................................................................................................... 42
TROUBLESHOOTING................................................................................................................................................................... 43
BMS RESET PROCEDURE ........................................................................................................................................................ 44
APPENDIX 1: COMPONENT MANUALS....................................................................................................................................... 45
LIMITED WARRANTY .................................................................................................................................................................. 45

STEALTH ELECTRIC BIKES OWNER’S MANUAL
V 2.4 PAGE | 5
PRODUCT REGISTRATION
To receive full warranty support, you must completely fill out the online warranty registration form upon receiving your
bike.
This can be found at: http://www.stealthelectricbikes.com/register-your-stealth-2/
To read Stealth Electric Bikes current limited warranty and related warranty claims information please see the terms at the
end of this manual.
Warranty policies vary depending upon the Stealth Distributor in the country of your purchase. Please check with your
Stealth Dealer or the Stealth Distributor in your country for the warranty policy covering your purchase.
GENERAL WARNING
Action sports involve a risk of injury or death. In choosing to ride a Stealth Bike, you accept that risk and
take responsibility to learn and practise safe and responsible riding.
This e-bike is sold with a limited warranty against defective workmanship. In some countries, it does not
conform to federal motor vehicle safety standards and operation on public roads, streets or highways
and consequently may be illegal to operate. Before operating this vehicle, first determine that its use is
legal in that given area. It’s your responsibility to familiarse yourself with the laws of the areas where
you ride, and to comply with all applicable laws.
The bike is designed and constructed as an operator only model. The load limit and seating configuration
does not safely permit the carrying of passengers.
Do not ignore any warnings displayed in this manual. They indicate a potentially hazardous situation
which, if not avoided, could result in death or serious injury.

STEALTH ELECTRIC BIKES OWNER’S MANUAL
V 2.4 PAGE | 6
ASSEMBLY
OUT OF THE CRATE
Stealth bikes are partially disassembled for packing. Several components must be reassembled before riding. Batteries are
sent separate to the bike for non-Australian customers.
Tools required to assemble the remaining components:
•A set of metric Hex Keys (2, 2.5, 3, 4, 5, 6, 8, 10mm)
•A T25 Torx key
•15mm pedal spanner
•Calibrated torque wrench with hex key attachments
Stealth Electric Bicycles should only be assembled by a skilled mechanic. If you are not confident with
assembling the bike yourself please contact your nearest dealer for assistance.
The bike must be assembled in a safe workspace that is free of volatile materials, water, unauthorised
personal and tripping hazards.
Ensure that the power is switched off and the battery/motor cables are disconnected.

STEALTH ELECTRIC BIKES OWNER’S MANUAL
V 2.4 PAGE | 7
Torque Specifications:
Bolt
Torque (Nm)
Front axle
Check the manufactures specifications
Axle lockout
10
Rear axle nuts
45
Stem handlebar clamp
12.5
Stem steerer tube clamp
15
V-boxx cranks (B52 and H47 only)
60
Schlumpf speed drive bolts (F37
only)
50
Magura brake lever clamps
3
Side cover fasteners
7.5
1. INSTALL THE HANDLEBARS
The handlebars come from the factory with all controls installed and ready. Ensure that a torque wrench is used when
tightening bolts so that the correct torque value is reached.
I. Remove the 4 bolts around stem cap using a 6mm Allen key.
II. Remove cap from stem.
III. Gently and carefully cut tape securing forks to stem and remove bubble wrap.
IV. Install handlebars on stem making sure that wires and cables are moving freely and not fouled in any way.
V. Loosely reinstall the end cap on the stem using the same 4 bolts.
VI. Check alignment of handlebars and preferred riding position.
VII. Evenly tighten bolts to correct tension (see Torque Specifications table).

STEALTH ELECTRIC BIKES OWNER’S MANUAL
V 2.4 PAGE | 8
2. INSTALL THE FRONT WHEEL
For ease of transport, your bike may come with the front wheel uninstalled. The 20mm thru axle needs to be correctly
inserted into the dropout when installing the wheel.
DNM forks
MRP or SR Suntour forks
If your bike is equipped with MRP or SR Suntour forks see their respective manuals for wheel and axle installation.
3. INSTALL THE PEDALS
The B-52 model may come with the cranks removed from the SR Suntour V-boxx. To install these cranks insert them onto
the axle on either side of the bike. Make sure the cranks are parallel and oriented opposite ways. They are tightened with a
torque wrench hex key to the specified torque value.
The other stealth models have the cranks already installed. The pedals need to be installed on the correct side. The right-
hand crank and pedal has a standard thread and the left side has a reverse thread. The pedals should be tightened by hand
Remove stem cap
Hold assembly for
ease of installation
Loosen clamps (5mm Allen
key) and remove axle lock
nut (8mm Allen key). Remove
axle from fork legs.
Put wheel in place being careful
that the brake rotor sits within
the calliper. Slide axle through
hub. Note: sprung fork leg will
need to be compressed slightly to
allow axle to install
Tighten lock nut with
8mm Allen key
Tighten clamps with 5mm
Allen key. Spin wheel and test
brakes before riding.

STEALTH ELECTRIC BIKES OWNER’S MANUAL
V 2.4 PAGE | 9
first to ensure they are not cross threaded or have the wrong thread. Using a hex key or pedal spanner the pedals can be
tightened to the prescribed torque.
Stealth B-52:
Pedals come pre-fitted to the cranks at delivery. The pedal/crank assemblies can be installed using an 8mm Allen key.
I. Ensure pedal is securely fastened to the crank.
II. Connect pedal/crank assembly to gearbox being careful to match left
and right cranks to their respective sides (cranks are marked with L and Ras
shown).
Stealth F-37 and Stealth P-7:
Cranks come pre-fitted to bike. The pedals can be fitted using a 15mm pedal spanner.
I. Unwrap pedals and separate left from right if labelled. If not labelled, the
right pedal always has a standard thread and will only tighten CLOCKWISE into
the right crank. The left pedal is the opposite.
II. Tighten pedals on to their respective cranks using an 8mm Allen key if there
is no surface for a 15mm pedal wrench.
4. INSTALL THE SEAT POST (STEALTH B-52, F-37 AND P-7 MODELS)
The supplied seat posts are extra-long and suitable for taller riders. Shorter riders may find that they need to cut the length
of the seat post to avoid contact with the rear shock. Avoid contact between the shock spring and the seat post and make
sure that the shock will not contact the seat post when the suspension is fully compressed.
I. Bolt the seat to the post loosely.
II. Slide the seat post into the seat tube and adjust the height accordingly.
III. Adjust the tilt of the seat back and forth using the adjusters located on the seat post.
IV. Tighten all bolts. Ensure that there is always a minimum of 50mm of overlap between the seat post and the seat
tube (frame).

STEALTH ELECTRIC BIKES OWNER’S MANUAL
V 2.4 PAGE | 10
5. INFLATE THE TIRES
Tyres should be inflated no greater than the maximum recommended pressure printed on the sidewall of the tire.
Periodically check the wear and tear on the tyres and replace if damaged.
6. INSTALL THE BATTERY (FOR STEALTH B-52, F-37 AND H-52 MODELS)
If your battery has been shipped to you separately you will need to install the battery into the bike.
Check that the seat post will not
collide with shock under full
compression before riding
Loosen rear bolt
Fit clamp to seat rails.
Tighten bolts to get desired
seat angle.
Ensure key is removed when performing any work on bike. Accidental acceleration of bike may cause
serious personal injury.

STEALTH ELECTRIC BIKES OWNER’S MANUAL
V 2.4 PAGE | 11
Before installing the battery, make sure that the foam surrounding the battery position is in place and intact.
Carefully position battery in opening and push into place. Be careful that battery doesn’t compress or pull on wiring or
brake lines as it is pushed into place. All wires, brake lines and gearbox controls should run above and below the battery,
nothing is to run between battery and side covers.
If the battery feels loose, add foam strips to the upper side of the housing so the battery fit is firm. Make sure that the
battery connectors are free and accessible.
Add foam if battery is loose
Gently position battery in bike
Be careful that wires are not pinched when
fitting the battery
Ensure foam is clean and clear of obstructions

STEALTH ELECTRIC BIKES OWNER’S MANUAL
V 2.4 PAGE | 12
The main connector simply pushes together.
When connecting the charge port, be sure that the correct connection is made and that the red and green connectors line
up. Install locking pin so that the plug does not detach.
6.1 INSTALL THE BATTERY (STEALTH P-7 ONLY)
The Battery for the P-7 can be accessed from underneath the frame by removing the retaining plate held on by 4 button
head screws. Carefully turn the bike upside down so that it is resting on its handlebars and seat. This will allow for easier
installation.
Connect and insert pin
Ensure charge port wire
is selected
Tuck connector into frame
Push main connector together

STEALTH ELECTRIC BIKES OWNER’S MANUAL
V 2.4 PAGE | 13
Before installing the battery, remove the make sure that the foam surrounding the battery position is in place and intact.
There are two different capacity batteries used for the P-7. They are slightly different sizes. The larger of the two will have
two distinct plugs exiting the battery, the other will have just one. The P-7 with a smaller battery will come with an adapter
installed on the bike so the battery can be plugged in directly to the P-7.
The foam that retains your battery will have been installed to fit the battery capacity ordered with your bike.
Ensure foam is clean and clear of obstructions
Ensure Remove the 4 bolts with a 4mm hex key.
foam is clean and clear of obstructions

STEALTH ELECTRIC BIKES OWNER’S MANUAL
V 2.4 PAGE | 14
Carefully insert the battery into the frame. Pay close attention to the cables and ensure none are pinched, pulled, bent or
compressed in the process. Avoid installing the battery at an angle. It should fit snugly in the P-7 frame, if not please consult
with your nearest dealer. make sure the battery all the way back toward the back of the bike.
All wires, brake lines and gearbox controls should run above and below the battery, nothing is to run between battery and
side covers.
Connect the small battery to the P-7
Slide the battery straight into the frame

STEALTH ELECTRIC BIKES OWNER’S MANUAL
V 2.4 PAGE | 15
For the larger battery, connect the two battery cables to the Stealth P-7. They are distinctly different connections.
Again, carefully insert the battery into the frame. Pay close attention to the cables and ensure none are pinched or bent in
the process. Avoid installing the battery at an angle. It should fit snugly in the P-7 frame, if not please consult with your
nearest dealer.
More foam may be needed to ensure the
battery does not move inside the frame
Slide the battery straight into the frame and make sure it is pushed
all the way back to the back of the bike. Careful of cables.
Connect and insert
pin

STEALTH ELECTRIC BIKES OWNER’S MANUAL
V 2.4 PAGE | 16
The bottom plate should have a slightly bent shape. It should be oriented so the edges bend away from the frame. This
allows the gasket to be firmly in position for the whole length of the cover and create a seal against moisture and dirt.
More foam may be needed to ensure the
battery does not move inside the frame
Place the rubber gasket over the battery
area. The holes should line up with the bolt
holes.
Install the bottom plate over the gasket like so.

STEALTH ELECTRIC BIKES OWNER’S MANUAL
V 2.4 PAGE | 17
7. INSERT JUMPER
The jumper will be taped to the inside of the side cover, this needs to be inserted into the underside of the DC-1 as shown.
BATTERY
Do not disassemble the battery case under any circumstances. Tampering with the battery will void
warranty and could lead to explosions causing serious injury or death.
Do not use any charging unit other than the approved Stealth battery charger. Failure to do so will void
the warranty and could result in death or serious injury
Insert jumper into this position
The DC-1 won’t store any ride or diagnostic information if the jumper is not installed. Make sure the
jumper is installed if planning to ride the bike in the near future.

STEALTH ELECTRIC BIKES OWNER’S MANUAL
V 2.4 PAGE | 18
RANGE
Your battery has been pre-tested and will last around 700 charge cycles or 2 years, whichever comes first. Performance and
mileage of the battery varies depending on ambient temperature, terrain, rider weight and how aggressively you ride.
The table below shows the typical maximum range for each Stealth model, set to economy or 250W mode, wirh a 75kg
rider on a flat roads, minimal wind resistance and slick tires.
Stealth Model
Maximum Range of fully charged battery
B-52
80km/50miles
F-37
100km/62miles
H-52
60km/37miles
P-7
100km/62miles or 150km/93miles (Depending on
battery model)
There are some actions you can take to ensure maximum capacity from each charge.
•Ensure battery is fully charged before use.
•Only recharge battery when more than 30% has been used. Otherwise charge before use.
•When charging and where possible, allow charger to remain connected to bike and switched on for 30 minutes
after charge is complete. The charger may cycle on and off during this time.
When storing your bike for extended periods (1 month or more), ensure that the battery is kept at 60% charge and
disconnect the battery from the bike.
Stealth battery packs have no memory effect. This means that they can be recharged or discharged from any state of
charge. Wherever possible keep your battery fully charged.
CHARGING
If your battery charger has a switch to operate on 2 different voltages (120V/240V) ensure that the setting
matches the mains power supply. The voltage depends on the region/country.
.

STEALTH ELECTRIC BIKES OWNER’S MANUAL
V 2.4 PAGE | 19
Follow the steps below to charge your stealth battery:
i. Ensure the bike is switched off and the charge port is clean and dry.
ii. Connect the charger to the wall socket. A red and a green light should illuminate.
iii. Now connect the charge plug to the charge socket located on the front LHS of the bike. The charger should then
display 2 red lights, and the charge cycle should commence.
iv. The complete charge period should last approximately 2-3 hours (depending on model). At the end of the charge
cycle the charger will illuminate 1 red and 1 green light. This indicates that the battery is fully charged and the
charger can be disconnected.
NOTE: Red and green lights may cycle on and off toward the end of the charge period. This indicates that the battery is
balancing and it is best to wait until the cycling has stopped to get the best from your battery pack.
BATTERY CARE
1. If less than 40% of the battery life remains, charge after use. Otherwise, only charge before use.
2. For maximum battery life, it is always best to store your battery between 40% and 60% of it is at maximum charge.
3. Exercise caution when removing the battery pack. Always ensure that hands are dry and never insert any object
into the ends of the battery connectors.
4. Do not drop, or throw the battery and avoid puncturing or subjecting the battery to excessive vibration or impacts.
Ensure bike is turned off
Ensure charge port is clean
and dry
A red and green light is
displayed when charger is
disconnected from bike or
battery is fully charged
Connect charger to charge
port
Two red lights are displayed
when battery is charging.
You should also be able to
hear the fan running

STEALTH ELECTRIC BIKES OWNER’S MANUAL
V 2.4 PAGE | 20
5. Do not subject the battery pack to temperatures above 35˚C or below -5˚C.
6. Never leave the battery unoccupied whilst charging.
7. Do not leave the charger connected and switched on for prolonged periods. i.e. days at a time.
8. For maximum battery cycle life, it is best to operate the battery between 20% and 80% of it is at maximum charge.
9. Follow storage instructions within this manual when the bike will not be used for a period greater than one month.
STORING BATTERY AND STEALTH BIKE FOR LONG PERIODS (More than 1 month at a time)
If the bike is going to be stored for periods of more than one month, the battery needs to be disconnected from the bike at
80% of capacity for optimum battery life. To do this:
1. Fully charge the bike and then ride the bike until the DC-1 display indicates 80% of battery life.
2. Use a 4mm Allen key to remove the 7 screws securing the left side cover of the bike.
3. Separate the large battery connector
4. Remove jumper from the underside of the DC-1 display and tape it to the inside of the frame so that it is not lost.
5. For B-52, F-37 and H-52 models, with the key removed from the bike, spray CRC 5.56 (Boesheild T9 or any other fish
oil based water dispersant) into the motor through the breathing hole (shown on right). Lift the rear wheel off the
ground and spray while slowly turning the wheel by hand for two full revolutions. Once complete, spin the wheel by
hand 10-15 rotations.
6. The bike will need to be fully charged (and ridden until it shows 80% for optimum storage) every 6 weeks of
storage. As the battery will slowly discharge over time, failure to do this will damage the battery.
Due to the weight and unique style of your Stealth Bike, only an approved Stealth Electric Bike rack should be used to carry
your bike. Bikes should be properly secured in an upright position to prevent damage to the controls and cranks during
transport.
Disconnect large connector
Spray through breather hole
(Stealth B-52, F-37 and H-52
models only)
Remove jumper and tape it to
bike
Proper storage of the battery is recommended if is not going to be used for long periods of time. Improper
storage can result in significantly reduced battery performance
This manual suits for next models
3
Table of contents
Other Stealth Bicycle manuals