Emotiva Differential Reference XDA-3 User manual

Differential Reference
TM
DAC
User Manual

Important Safety Precautions and Explanation of Symbols
!
The exclamation point within an equilateral triangle is intended to alert the user to the presence of
important installation, operation, and service instructions in this manual.
The lightning ash with arrowhead symbol within an equilateral triangle is intended to alert the user to the
presence of uninsulated dangerous voltages within the enclosure that may be of sucient magnitude to
constitute a risk of electrical shock to the user.
Please read this manual thoroughly before attempting to install, congure, or operate the XDA-3
Dierential Reference DAC. After successful installation and conguration of the XDA-3, be sure to retain
this manual in a safe place for future reference.
Safety is a key component to a long lasting and trouble free installation. Please read and follow all
instructions and heed all warnings on the XDA-3 and in this manual. The vast majority of the subsequent
safety precautions are common sense. If you are not comfortable with the installation of audio/video
entertainment equipment, you should seek the services of a qualied installation professional or call us for
help.
WARNING: TO REDUCE THE RISK OF FIRE OR ELECTRIC SHOCK, DO NOT USE THE XDA3 NEAR WATER
OR IN WET LOCATIONS, DO NOT EXPOSE IT TO RAIN OR MOISTURE, DO NOT EXPOSE IT TO DRIPPING
OR SPLASHING FROM OTHER SOURCES, AND ENSURE THAT NO OBJECTS FILLED WITH LIQUIDS SUCH
AS VASES ARE PLACED ON IT. DOING SO MAY RESULT IN DAMAGE TO THE UNIT AND THE RISK OF
ELECTRIC SHOCK, WHICH MAY RESULT IN BODILY INJURY OR DEATH.
WARNING: TO REDUCE THE RISK OF ELECTRIC SHOCK, DO NOT REMOVE THE COVER FROM THE
XDA3. THERE ARE NO USERSERVICEABLE PARTS INSIDE THE UNIT. REFER ALL SERVICE TO QUALIFIED
SERVICE PERSONNEL.
Do not install the XDA-3 near or above any heat sources such as radiators, heating vents, or other apparatus
that produces heat. Do not block any ventilation openings or heat sinks. Avoid installing the unit directly
above other heat-producing equipment unless sucient ventilation or forced-air cooling is provided.
Do not install the XDA-3 in locations without proper ventilation. The XDA-3 itself produces very little
heat, but the top panel will still get warm and requires some clearance for air ow. The unit should not
be installed in an enclosed location such as a bookcase, cabinet, or closed equipment rack with other
equipment that will produce excessive heat unless sucient forced-air ventilation is provided.
Always install your XDA-3 according to the manufacturer’s instructions and only use attachments or
accessories specied by the manufacturer.
Do not install the XDA-3 on any stand, shelf, or other piece of furniture that is unable to support its weight.
If a cart is used to move the unit, use caution to avoid injury from tip-over.
Connect the XDA-3 only to power sources of the correct voltage (as shown in this manual and on the
XDA-3 unit).
Protect power supply cables from being pinched, walked on, or otherwise damaged. Be especially careful
where the power cable enters the power outlet and the unit.
Only connect the XDA-3 to an electrical outlet or extension cord of appropriate type and rating.
DO NOT defeat the safety purpose of a grounding or polarized plug by removing ground pins or using
unsafe adapters. A polarized plug has two blades - one wider than the other. A grounding plug has a
third ground prong in addition to the two main conductors. The wide blade or third groundling prong is
provided for your safety. If the provided plug does not t your outlet, consult an electrician to replace your
obsolete outlet. If you replace the power cord, only use one of similar type and equal or greater current
rating.
!

The power cable for the XDA-3 should be unplugged from the outlet during severe electrical storms, or when
unused for a long period of time.
Only replace the fuse(s) in the XDA-3 with fuse(s) of proper value and voltage rating.
The XDA-3 should only be cleaned as directed in the manual. Avoid spraying liquids directly onto the unit. Do not
insert or allow small parts or hardware to fall into the connectors on the unit.
You should seek service for your XDA-3 by qualied service personnel if any of the following occur:
1. The power-supply cord or the plug has been damaged.
2. Objects or liquid have fallen or spilled into the unit.
3. The unit has been exposed to rain.
4. The unit exhibits a marked change in performance.
5. The unit has been dropped, or its enclosure or chassis is damaged.
NOTE: TO COMPLETELY DISCONNECT THE XDA-3 FROM THE AC POWER MAINS, DISCONNECT THE AC POWER
CORD FROM THE AC RECEPTACLE.
NOTE: THE POWER CORD ON THE XDA-3 MUST REMAIN READILY ACCESSIBLE AT ALL TIMES.
!
CAUTION
CAUTION: TO REDUCE THE RISK
OF ELECTRICAL SHOCK, DO
NOT REMOVE COVER. NO USER
SERVICEABLE PARTS INSIDE.
REFER SERVICING TO QUALIFIED
SERVICE PERSONNEL.
FCC Interference Statement
Note: This equipment has been tested and found to comply with the limits for a Class B digital device, pursuant to Part 15 of the
FCC rules. These limits are designed to provide reasonable protection against harmful interference in a residential installation.
This equipment generates, uses and can radiate radio frequency energy and, if not installed and used in accordance with the
instructions, may cause harmful interference to radio communications. However, there is no guarantee that the interference will
not occur in a particular installation. If this equipment does cause harmful interference to radio or television reception, which can
be determined by turning the equipment o and on, the user is encouraged to try to correct the interference by one or more of
the following measures:
Reorient or relocate the receiving antenna.
Increase the separation between the equipment and receiver.
Connect the equipment into an outlet on a circuit dierent from that of the receiver.
Consult the dealer or an experienced radio/TV technician for help.
Emotiva Audio Corporation
Attn: Repair Department
139 Southeast Parkway Court
Franklin, TN 37064
Tel 1-877-366-8324
www.emotiva.com

Page 1
XDA-3 Differential Reference DAC
Contents
Important Safety Precautions and Explanation of Symbols
FCC Interference Statement
XDA-3 Dierential Reference™ DAC .........................................................................1
Introduction......................................................................................................................3
About This Manual..........................................................................................................4
Features ..............................................................................................................................5
Unpacking..........................................................................................................................6
XDA-3 Front Panel...........................................................................................................7
XDA-3 Remote Control..................................................................................................9
XDA-3 Rear Panel.......................................................................................................... 11
Quick Start ...................................................................................................................... 14
Using The USB Input.................................................................................................... 15
Using The HDMI-ARC Input....................................................................................... 17
Care and Maintenance ............................................................................................... 18
Inputs and Outputs ..................................................................................................... 19
Specications................................................................................................................. 20
Emotiva Audio Corporation Five-Year Limited Warranty............................... 23
Notes................................................................................................................................. 26
XDA-3 Dierential Reference™ DAC

Page 2
XDA-3 Differential Reference DAC

Page 3
XDA-3 Differential Reference DAC
Introduction
Thank you for purchasing the new Emotiva XDA-3 Dierential Reference DAC.
The XDA-3 Dierential Reference DAC is a lot more than just a superb audiophile quality digital-to-
analog converter. The XDA-3 is also a fully capable audiophile preamp and control center, with both
digital and analog inputs, an HDMI ARC input that can accept a digital audio signal directly from
your TV, a real analog ladder network volume control, and a high-performance super-low-distortion
headphone amplier.
The XDA-3 has a variety of standard digital audio inputs, including two optical (Toslink) S/PDIF inputs,
two electrical (Coax) S/PDIF inputs, and one high performance USB digital audio input. The USB input
on the XDA-3 accepts stereo PCM digital audio at bit depths and sample rates up to 32/768k,
DSD digital audio in the DoP format up to DSD256, and DSD digital audio in the native DSD format up
to DSD512. The HDMI-ARC input accepts a digital audio signal directly from your TV, which enables the
XDA-3 to play audio from TV apps, and from other HDMI sources connected to your TV. The XDA-3 also
includes two pairs of stereo line level analog inputs, one balanced and one unbalanced, which you can
use to connect analog source devices like a phono preamp or portable music player.
Digital audio received by the XDA-3 is converted into analog by an audiophile quality ESS ES9038Q2M
SABRE32 Reference DAC chip and its associated precision power supply and reference circuitry. The
fully balanced fully dierential analog output from the DAC is then routed to the digitally controlled
analog ladder network volume control, and then to the balanced outputs, via OPA1656 low-distortion
ultra-low-noise op amps. A separate balanced-to-unbalanced converter stage derives the unbalanced
output signal for the RCA outputs directly from the fully dierential output signal. The XDA-3 oers a
choice of seven user selectable oversampling lters, each of which oers a subtly dierent listening
experience, and which can be accessed directly from the remote control. Analog inputs to the XDA-3
are routed directly to the output, via precision buer circuitry, and the analog ladder network volume
control, and always remain in the analog domain.
The XDA-3 also includes a high-quality current feedback headphone amplier which oers superb
performance and incredibly low distortion. An attractive, fully dimmable, blue OLED display shows
the current Volume setting and Input choice, as well as the sample rate and format of the incoming
audio signal. The display switches momentarily to show additional information when the format of
the incoming audio signal changes or you change the selected oversampling lter. In addition to the
display, the front panel of the XDA-3 includes separate buttons for changing Inputs, adjusting the
Volume, and toggling Standby mode, and a convenient full-sized 1/4”stereo headphone output.
The full function machined aluminum remote control oers separate buttons for selecting each input
individually, controlling volume and muting, adjusting the display brightness, and displaying or
changing the selected oversampling lter.
We designed the XDA-3 from the ground up to deliver the same superb listening experience with
both digital and analog sources... either as a source component or as a fully capable digital and analog
preamp and control center. We hope you enjoy using your XDA-3 as much as we enjoyed designing
and perfecting it.
Happy Listening!
The Emotiva Team

Page 4
XDA-3 Differential Reference DAC
About This Manual
This manual will provide you with all the information you need to get great sound, and many
years of reliable service, from your XDA-3. The manual also includes a brief summary of the
features oered by the XDA-3 and describes how the controls work and how to perform common
operations.
We suggest that you read through the entire manual; we kept things as short and direct as
possible. Even if you’re an expert user, you will probably nd some interesting information and
useful suggestions.
You may wish to keep a copy of this manual with your records, and record serial numbers or other
purchase information on the Notes page at the back.

Page 5
XDA-3 Differential Reference DAC
Features
The XDA-3 is an audiophile quality two-channel digital-to-analog converter (DAC), with both
digital and analog inputs, which can be used as both a DAC and a control center or preamp. The
digital audio inputs on the XDA-3 support most standard sample rates and stereo digital audio
formats, the HDMI-ARC input accepts digital audio directly from your TV, and the analog inputs
enable you to connect analog sources like a phono preamp or portable audio player. Unlike many
less sophisticated DACs, the XDA-3 uses a digitally controlled analog ladder network volume
control, which doesn’t reduce the resolution at low listening levels, for both its digital and analog
inputs. The XDA-3 also includes a high quality internal headphone amp, with a full-sized 1/4”front
panel headphone jack. An informative front panel display shows the current Volume and Input
selections, and changes to show the sample rate and format when you select a new Input or the
signal changes. We’ve also included a solid metal full function infrared remote control, which
enables you to control all major functions, including the seven user-selectable oversampling
lters provided by the XDA-3’s audiophile quality ESS ES9038Q2M SABRE32 Reference DAC chip.
Features oered by the XDA-3 include:
• The XDA-3 is both an audiophile quality DAC and a preamp, with both digital and analog
inputs, an analog ladder network volume control, and a high quality headphone amplier.
• Four digital inputs (2 Coax and 2 Optical) which support up to 24/192k stereo PCM audio.
• One high-performance USB digital input that supports stereo PCM digital audio up to
32/768k, DoP DSD audio up to DSD256, and native DSD audio up to DSD512.
• One HDMI-ARC input which accepts digital audio directly from your TV.
• Audiophile quality ESS ES9038Q2M SABRE32 Reference DAC chip.
• ESS Hyperstream®II DAC architecture and Time Domain Jitter Eliminator for exceptional
digital performance and superb sound quality.
• Seven user-selectable oversampling lters to customize your listening experience.
• Dierential Reference™ balanced design with OPA1656 low-distortion ultra-low-noise
op amps used throughout the analog stages.
• TPA6120A2 monolithic Class A/B current feedback headphone amplier that delivers plenty of
power with exceptionally low noise and distortion.
• True fully balanced fully dierential operation from the DAC chip to the balanced outputs.
• Separate balanced-to-unbalanced converter stage for the unbalanced outputs.
• Fully analog signal path for both balanced and unbalanced analog inputs.
• Trigger Input and Trigger Output enable the XDA-3 to both control and be controlled by other
trigger-enabled equipment.
• All features can be accessed and controlled directly from the machined aluminum full
function remote control (no complex menu system).
• Informative front panel display (with congurable brightness) for input and sample rate.
• Independent control and retention of main output level and headphone volume.
• Universal AC voltage—automatic 115VAC/230VAC operation.
• Transferrable 5-year warranty, 30-day in-home trial.
You can nd more information about the Emotiva XDA-3 on our website at www.emotiva.com.

Page 6
XDA-3 Differential Reference DAC
Unpacking
Your XDA-3 was carefully packed and should reach you in perfect condition. If you notice any
shipping damage or other issues when you unpack it, please contact Emotiva immediately.
Gently remove your XDA-3 from the packing carton and remove all wrappings and shipping
material.
It is important to save the box and all packing materials in case your XDA-3 ever needs to be
moved or shipped back to the factory for service.
We truly value customer feedback and would like to hear from you.
Included in the box you will nd:
• Your XDA-3 Dierential Reference DAC.
• Machined Aluminum Remote Control.
• Detachable IEC Power Cable.

Page 7
XDA-3 Differential Reference DAC
XDA-3 Front Panel
1. Headphone Jack (1/4”)
The XDA-3 includes a monolithic high performance current feedback headphone amplier with
wide dynamic range and exceptionally low noise and distortion. When there are headphones
plugged into this jack, the main outputs are muted, and the Volume buttons on the front panel
(and on the remote control) adjust the headphone output level.
2. Input Selector Buttons
Press either of the Input Selector buttons to cycle the XDA-3 through its available inputs. Each
Input is momentarily displayed full-screen on the front panel OLED display as it is selected.
(The Input buttons on the remote control switch directly to each input.)
3. Front Panel Display (Alphanumeric OLED Display)
The easy to read alphanumeric OLED display on the front panel of the XDA-3 normally displays
the Volume setting, the selected Input, and the sample rate of the incoming audio signal. It
switches to a more focused single-mode display when relevant information is available. For
example, when you change Volume, a full screen Volume bar is displayed and, when you select
an Input, the name of that Input is displayed full screen. The brightness of this display can be
adjusted by using the Dim button on the remote control.
4. Volume Up and Volume Down Buttons
Press the Volume Up and Volume Down buttons to raise and lower the Volume on the XDA-3.
A single press moves the Volume one step, holding the button causes the Volume to continuously
move smoothly up or down. When there are headphones plugged in, the Volume buttons on the
front panel (and on the remote control) adjust the headphone output level. When no headphones
are plugged in, the Volume buttons adjust the main output level. Both settings are stored
independently.
Volume control for both digital and analog audio inputs is via a precision digitally controlled
analog resistor ladder network, which moves in precise 0.5 dB steps, and ensures absolute
repeatability and near-perfect channel matching at all Volume settings. Unlike digital volume
controls, the XDA-3’s analog volume control doesn’t reduce bit depth, nor introduce grain or
distortion, at low volume settings.
1 2 43 5
INPUT
XDA-3
VOLUME
Volume
192kUSB
-33.0dB

Page 8
XDA-3 Differential Reference DAC
5. Standby Button and Standby Indicator
When the rear panel AC Power switch is On, press this button to switch the XDA-3 On; press it
again to return to Standby. You may also switch the XDA-3 On and O using the On and Standby
buttons on the remote control.
Note: When the XDA-3 is in Standby Mode the Standby Indicator will be illuminated AMBER.
When the XDA-3 is On the Standby Indicator will NOT be lit.
Note: The rear panel AC Power switch must be on for the XDA-3 to operate. If the rear panel
AC Power switch is O, the XDA-3 will not respond to either the front panel controls or the
remote control.
Page 9
XDA-3 Differential Reference DAC
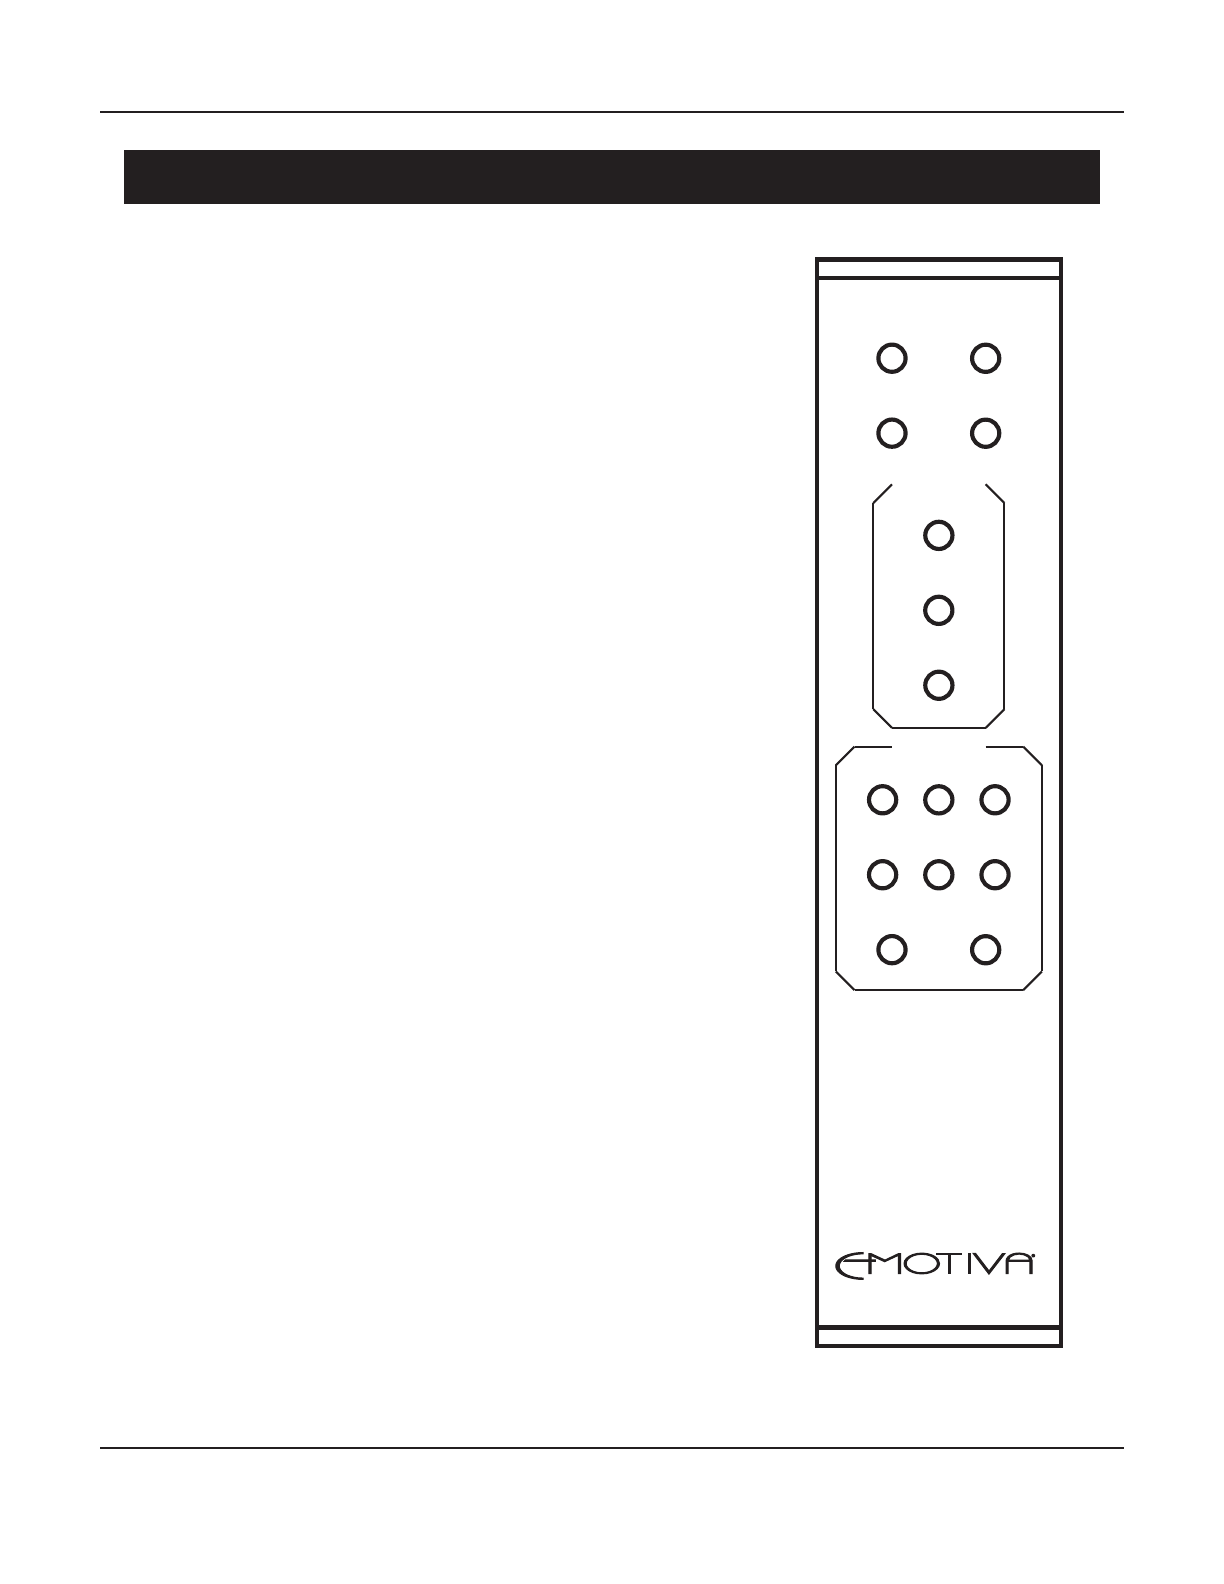
XDA-3 Remote Control
XDA-3
STANDBY
FILTERS DIM
ON
MUTE
VOLUME
-
CO1 OPT1 USB
CO2 OPT2 ARC
RCA BAL
+
INPUTS
The solid aluminum full-function remote control for the XDA-3
includes several functions that are not included in the front panel
controls, including the Mute, Dim, and Filter buttons, as well as
buttons that enable you to directly select Inputs.
Standby & On Buttons
Press the On button to turn the XDA-3 On from Standby Mode.
Press the Standby button to return the XDA-3 to Standby Mode.
Note: The rear panel AC Power switch must be On for the XDA-3
to operate. If the rear panel AC power switch is O, the XDA-3
will not respond to either the front panel controls or the remote
control.
Filters Button
The Sabre ES9038Q2M DAC includes a choice of seven
user-selectable oversampling lters, each of which delivers a
subtly dierent user listening experience. The rst time you
press the Filters button it will display the number of the currently
selected Filter. Pressing the Filters button repeatedly while the
Filter Number is displayed will cycle through the available lters.
To select a Filter simply stop pressing the button when the
desired Filter Number is displayed and wait a few seconds.
Dim Button
Press the Dim button once to see the current Brightness setting.
Pressing the Dim button repeatedly will cycle through the
available Brightness settings. To select a Brightness setting
simply stop pressing the button when the desired setting is
displayed and wait a few seconds.
Note: The front panel display and LEDs will be fully o with the
Brightness set to 0. The maximum Brightness setting is 10.

Page 10
XDA-3 Differential Reference DAC
Volume (+) & Volume (-) Button
Press the Volume (+) and Volume (-) buttons to raise and lower the Volume. A single press moves
the Volume one step, holding the button causes the Volume to continuously move smoothly up
or down. When there are headphones plugged in, the Volume buttons on the front panel (and on
the remote control) adjust the headphone output level. When no headphones are plugged in, the
Volume buttons adjust the main output level. Both settings are stored independently.
Volume control for both digital and analog audio inputs is via a precision digitally controlled
analog resistor ladder network, which moves in precise 0.5 dB steps, and ensures absolute
repeatability and near-perfect channel matching at all Volume settings. Unlike digital volume
controls, the XDA-3’s analog volume control doesn’t reduce bit depth, nor introduce grain or
distortion, at low volume settings.
Note: If the XDA-3 is in Mute Mode pressing the Volume (+) button will toggle Mute O.
Inputs (Direct Select)
Press any of these buttons to directly select the Input of your choice.
• CO1 - Coax (electrical S/PDIF) Digital Audio Input (#1)
• CO2 - Coax (electrical S/PDIF) Digital Audio Input (#2)
• OPT1- Toslink (optical S/PDIF) Digital Audio Input (#1)
• OPT2 - Toslink (optical S/PDIF) Digital Audio Input (#2)
• USB - USB Digital Audio Input
• ARC - ARC (TV audio return channel) Digital Audio Input
• RCA - Unbalanced Analog Audio Input
• BAL - Balanced (XLR) Analog Audio Input

Page 11
XDA-3 Differential Reference DAC
XDA-3 Rear Panel
1. Balanced (Analog) Inputs
Connect any stereo balanced analog audio source to these Inputs.
2. Unbalanced (Analog) Inputs
Connect any stereo unbalanced analog audio source to these Inputs.
3. Balanced & Unbalanced (Analog) Outputs
Connect these outputs to a set of balanced or unbalanced inputs on your preamp if you want to
use the XDA-3 as a DAC or source component. Connect them directly to your power amplier if
you want to use the XDA-3 as a high performance DAC and preamplier / control center.
Note: Both Balanced and Unbalanced outputs are active at the same time. The level of both sets
of outputs is controlled by the Volume and Mute controls.
Note: The main outputs are muted when headphones are plugged into the front panel. When
there are headphones plugged in, the Volume buttons on the front panel (and on the remote
control) adjust the headphone output level. When no headphones are plugged in, the Volume
buttons adjust the main output level. The XDA-3 stores both settings independently. When you
unplug the headphones, the main output level will return to its previous setting; when you plug
the headphones back in, they will return to their previous setting.
4. USB (Digital) Input
Connect your computer or other similar digital audio source to this input. Your computer
or source device will recognize the XDA-3 as a USB Audio Class 2 (UAC2) compliant“USB
audio output device”or“external USB DAC”. (Some source devices may identify the XDA-3 as
“Emotiva XDA-3”. Others may report it as“SXW CTUAD768 PRM-A”, which is the name of the
high performance audio interface chip we use. And, if you’ve installed special drivers, it may be
identied by the driver or drivers you’ve chosen to use.)
See the section entitled Using The USB Input for more details.
1 2 43 5 7
6 8 9
ANALOG INPUTS ANALOG OUTPUTS USB HDMI ARC DIGITAL INPUTS TRIG IN TRIG OUT
COAX 1
OPT 2OPT 1
COAX 2
AC INPUT POWER
R L R L
R
L
R
LXDA-3

Page 12
XDA-3 Differential Reference DAC
5. HDMI ARC (Digital) Input
Use this input to connect the XDA-3 to the ARC (Audio Return Channel) output of a TV set or
projector. The XDA-3 is a STEREO DAC and so will only accept a stereo audio input.
See the section entitled Using The HDMI ARC Input for more details.
Note: The HDMI-ARC connection on your TV is intended to deliver a digital audio OUTPUT to
an AVR or preamp/processor when the audio source is either an App running on your TV or
a device connected directly to one of the other inputs on your TV. HOWEVER, EVEN THOUGH
YOU WILL BE USING THE HDMI-ARC CONNECTION ON YOUR TV TO OUTPUT A DIGITAL AUDIO
SIGNAL, BECAUSE THAT CONNECTION IS ALSO NORMALLY USED TO INPUT A VIDEO SIGNAL TO
THE TV, IT WILL BE LABELED ON YOUR TV AS AN “HDMI-CEC INPUT” or “HDMI/ARC INPUT”.
Note: The HDMI-ARC connection between your TV and the XDA-3 uses an ordinary HDMI cable.
This connection does not require a high speed HDMI cable. HOWEVER, BE SURE TO USE AN
HDMI CABLE THAT INCLUDES AN ARC CONNECTION, WHICH VIRTUALLY ALL MODERN HDMI
CABLES INCLUDE. IF YOU PLAN TO USE A SPECIAL POWERED HDMI CABLE OR OTHER TYPE OF
HDMI EXTENDER, BE SURE THAT IT ALSO SUPPORTS ARC. ALSO NOTE THAT, WHILE WE EXPECT
HDMI-ARC ON THE XDA-3 TO WORK WITH MOST POWERED CABLES AND EXTENDERS THAT
SUPPORT ARC, WE CANNOT PROMISE THAT IT WILL, AND CANNOT PROVIDE SUPPORT IF YOU
ARE UNABLE TO GET IT TO WORK.
6. Optical 1 & Optical 2 Toslink Optical S/PDIF (Digital) Inputs
Coaxial 1 & Coaxial 2 Electrical S/PDIF (Digital) Inputs
These inputs accept optical S/PDIF (Toslink) and electrical S/PDIF (Coax) digital audio signals, in
stereo PCM format, at sample rates up to 192k and bit depths up to 24 bits.
Note: The XDA-3 is a stereo PCM DAC and only accepts STEREO PCM digital audio signals. The
XDA-3 CANNOT decode DTS, Dolby Digital, or other surround sound audio formats.
Note: For computer-based sources, or other source devices that support either higher sample
rates, or other formats like DSD, use the USB Digital Audio input.
Note: If you attempt to play DTS-encoded audio les on some equipment that doesn’t recognize
DTS encoding, the undecoded DTS audio les may be sent to the XDA-3, which may result in an
unpleasant digital screeching noise. (This will not harm anything, but suggests that your source
equipment either cannot properly process DTS-encoded les, or is not congured correctly to
do so.)
6. Trigger Input & Trigger Output
The Trigger Input will enable the XDA-3 to be turned on by a trigger signal from another piece
of trigger-enabled gear. The Trigger Output on the XDA-3 will enable the XDA-3 to turn on other
trigger-enabled gear. The Trigger Output on the XDA-3 is active when the XDA-3 is On.
Note: The XDA-3 can only be turned on by a trigger signal if it is in Standby Mode. The
XDA-3 will NOT respond to a trigger signal if the rear panel AC Power Switch is O.

Page 13
XDA-3 Differential Reference DAC
8. IEC Power Cord Receptacle
Accepts a standard IEC power cable. A high quality commercial power cord is provided with the
XDA-3.
9. AC Power Switch
Switches the main AC power to the XDA-3 On and O. When this switch is O, no controls operate,
and the XDA-3 cannot be turned On by the remote control or a trigger signal.

Page 14
XDA-3 Differential Reference DAC
Quick Start
To get the most from your XDA-3, we urge you to read the entire manual. If you just can’t wait to
listen to it, this section will cover the basics you need to get started.
• Find a secure location for your XDA-3.
• Connect your XDA-3 to one or more digital audio sources.
• Connect the analog output of your XDA-3 to a line level input on your preamp, or directly to
your power amp.
• Find some music you really like to listen to.
• Turn on the AC Power switch and turn up the volume a bit!
• Enjoy!
Note: The USB input on the XDA-3 will work, without additional drivers, on both current
Windows and Apple computers, as well as many smart phones and other source devices.
However, you will probably have to congure your source device to support anything beyond
its default sample rate, or to support audio formats other than PCM.

Page 15
XDA-3 Differential Reference DAC
Using The USB Input
The USB Input on the XDA-3 is intended for connecting a computer or other computer-based
digital audio source. The USB input on the XDA-3 will be recognized by the computer or source
device as a standard USB Audio Class 2 external DAC or sound card, and supports PCM playback at
bit depths and sample rates up to 32/768k, without the need to install any additional drivers. The
XDA-3 will show up on your list of output devices as either Emotiva XDA-3 or SXW CTUAD768
(the high performance USB hardware in the XDA-3).
The XDA-3 also supports playback of DSD audio les via USB. The XDA-3 supports DoP-via-USB
at rates up to DoP256 and native-DSD at rates up to DSD512. Additional ASIO drivers, which we
provide, must be installed in order to support playback of DSD les on Microsoft Windows. Some
player programs for Apple computers reportedly include internal support for one or both of these
options as well.
Note: The USB input on the XDA-3 will work, without additional drivers, on both current
Windows and Apple computers, as well as many smart phones and other source devices, and
supports PCM at sample rates up to and including 32/768k. However, by default, both Windows
and Apple computers resample any digital audio they play to a preset default sample rate.
Many higher quality player programs oer ways to bypass this resampling but each has specic
settings and conguration options to do so.
Note: The XDA-3 supports true DSD playback via USB using two dierent methods:
“DoP” and “native DSD”. Both of these methods are ways in which a DSD digital audio stream
can be encapsulated and sent to the DAC via a PCM audio stream over USB. Both deliver an
identical bit-perfect copy of the original DSD digital audio stream. (Native DSD uses packet
bandwidth somewhat more eciently and so permits a slightly higher DSD sample rate to be
supported over a given connection.)
DoP, which is the more standard method, is supported by many high quality player programs.
In order to use DoP on Windows computers, you must install the ASIO drivers, which we
provide. Some Apple player programs also support DoP, with the necessary driver support
being provided internally by the computer.
Native DSD, which is really a variant of DoP, is more complex, and may require additional
settings or additional software. (For example, in FooBar2000, a separate proxy converter
program must be installed and congured in addition to the ASIO driver and support required
to support the standard DoP format.)
Note: By default both Microsoft Windows and Apple computers use PCM as their preferred
format for sending audio data to a DAC. In addition to this, some programs, when specically
congured to do so, can send DSD directly to the DAC. However, when you play other types of
encoded or compressed audio les, like FLAC, or ALAC, or MP3, or AAC, the le is rst decoded
by the player program, then sent to the DAC as PCM (or DSD). Therefore, you have no need to
worry about whether your DAC supports a specic le format, as long as your player program
supports it.

Page 16
XDA-3 Differential Reference DAC
Note: The USB Input on the XDA-3 will appear to your computer or other source component as
an external DAC or sound card. The XDA-3 CANNOT play audio les directly from a USB stick.
Note: If you play MQA les, or MQA encoded audio from streaming sources like Tidal, the
important “rst unfold” is usually performed by your player program. The XDA-3 is neither
“an MQA renderer” nor “an MQA decoder”. However you will nd that MQA les that are
unfolded by the player client, for example tracks that you play on Tidal using the Tidal client,
will still sound excellent when played through the XDA-3.
WHILE WE CANNOT OFFER DETAILED SUPPORT FOR EVERY SOURCE DEVICE OR COMPUTER
YOU MAY CHOOSE TO USE WITH THE XDA-3, WE WILL BE HAPPY TO OFFER YOU SUPPORT FOR
CONFIGURING AND ENJOYING YOUR XDA-3, AND AS MUCH SUPPORT AS WE CAN REGARDING
HOW TO CONFIGURE VARIOUS PLAYER PROGRAMS TO WORK WITH IT. WE HAVE ALLOCATED
ROOM ON OUR SERVERS FOR A COLLECTION OF RESOURCES ABOUT HOW TO USE YOUR
XDA-3 WITH VARIOUS SOURCES, PLAYER PROGRAMS, AND OTHER DEVICES. THIS LOCATION
WILL ALSO BE A REPOSITORY FOR THE CURRENT ASIO DRIVERS FOR THE XDA-3.
We also expect to start a section on our forum, The Emotiva Lounge, dedicated to both the
XDA-3, and to various resources and sources for high quality music.
You can access the XDA-3 Resource Collection from the following link:
https://www.dropbox.com/scl/fo/snikkaww2oa299merjabz/h?dl=0&rlkey=0b3xnjhyardkatoldfw5d9mkr
You will also nd a link to it on the bottom of the XDA-3 product page on our website.
Or you can access it by clicking on the QR code below.
Table of contents
Other Emotiva Media Converter manuals


