Empire 360096 User manual

7/22/2013

OPERATION MANUAL
BVS
CARTRIDGE DUST COLLECTOR
Page 2
Table of Contents Page
Introduction 2
Warning Decal 3
Equipment Operation Decal 4
Description, Intended Use, Specifications 5
Operation 6
Installation 8
StartUp 11
Maintenance 13
Trouble shooting 16
PartsList 18
Appendix
“Recommended Safety Practices”
“Initial Unit Start up Procedure For All Direct Drive Fans”
“Installation, Safety, Operation &Maintenance and Parts List”
Introduction
Congratulations and THANK YOU for selecting the BVS Cartridge Dust Collector
System from Empire Abrasive Equipment Company. This booklet is provided to
assist you in the proper use and maintenance of this dust collector.
Please read this booklet carefully and keep it in a handy location for future
reference. If you have any questions about the operation or maintenance of this
equipment, please contact your Empire Distributor or Empire’s Technical
Service Group (800-497-4543).
Empire: The leader in air-blast technology
Empire specializes in the design and manufacture of air-blast equipment and
continues as an industry leader for more than 70 years. Today, Empire
produces the most extensive line of air-blast products in the world. In addition
to PEB blast booths and BVS dust collectors, our product lines include
ProFinishand ProFormercabinets, Econ-o-Finishand Modified cabinets,
fully Automated Blast Systems, Hoffman Blast Rooms and SuperBlast
Portable blasters.
Empire Abrasive Equipment Company’s reputation as a leader in air-blast
technology is the result of meeting our customer’s demand for quality
equipment and systems that deliver increased productivity. We support our
equipment with training, service, and testing programs. When you need advice,
assistance, or equipment on short notice, our national network of Empire
distributors assures that help is nearby.

OPERATION MANUAL
BVS
CARTRIDGE DUST COLLECTOR
Page 3
Equipment Warnings
WARNING
DECAL 567402

OPERATION MANUAL
BVS
CARTRIDGE DUST COLLECTOR
Page 4
Equipment Operation
DECAL 567412

OPERATION MANUAL
BVS
CARTRIDGE DUST COLLECTOR
Page 5
Collector Description
The Empire BVS Dust Collector is a continuous operation, self contained blast booth
ventilation system with continuous duty cartridge filter cleaning during dust collector
operation.
The BVS Dust Collector System components consists of a divided (dirty and clean side)
Collector Housing, with (6) Empire Cartridge Filters, Air Inlet Baffle, Reverse Pulse
Cartridge Cleaning System, (2) waste Dust Drawers and a 10 HP Fan Assembly.
The BVS collector provides the blast booth interior with a slight negative air pressure
which prevents dust/fines from migrating from the booth during the blasting operation.
Intended Use
The Empire BVS Dust Collector is specifically designed to provide air ventilation for
Abrasive Air Blast Booths. Proper ventilation greatly improves visibility inside the blast
booth for personnel, provides a cleaner environment, and removes dust and fines from the
blast system.
Specifications
• Fully enclosed dust collector
• 5,000 to 6,000 CFM
• 6 filter cartridges, 918 square feet of filter surface
• Filter rated at MERV 14
• Automatic electronic compressed air reverse pulse filter cleaning controls
• 50 psig max filter pulse pressure (air connection kit Part #360091)
• Controls 120V/60/50Hz
• Magnehelic gauge zero to 10 inches W.C. scale
• 10 HP Fan motor
• (2) 1½ Ft³ plastic dust drawer
• Painted Finish - Empire machine tool beige
BVS Optional Components
• Photohelic gauge ensures filters only cleaned when dirty
• Silencer ensures less than 85 dBA sound level from dust collector fan
• HEPA Filter rated at 99.97 % efficient on 0.3 micron particles

OPERATION MANUAL
BVS
CARTRIDGE DUST COLLECTOR
Page 6
BVS Operation
The Empire BVS Dust Collector is a continuous operation, self contained blast booth
ventilation system with on demand cartridge filter cleaning during dust collector
operation.
The BVS Dust Collector System ventilates the blast booth by drawing air into the booth
through the baffled air inlets and through the room picking up airborne dust and fines.
The dust/fines laden air passes around the booth Air Exhaust Baffle to the collector
Cartridge Filters. As the dirty air enters the filter surface, the dust/fines are captured on
the outside of the filters and the cleaned air passes through the filter to the clean air
chamber of the collector, to the fan and is discharged from the fan exhaust. (See below)
As dust/fines accumulate on the outside of the cartridge filters, booth ventilation air flow
through the filters is restricted. The reverse pulse filter cleaning system solid state timer
sequentially releases a burst of compressed air from a diaphragm valve into the center of
each cartridge filter (See below). The pulse air gently passes from the inside of the
cartridge to the outside removing accumulated dust which then falls and accumulates in
the dust drawers below.

OPERATION MANUAL
BVS
CARTRIDGE DUST COLLECTOR
Page 7
Reverse Pulse Solenoids & Timer
The BVS Solenoid Valve Enclosure with Timer is located inside the dust collector
housing, behind the bottom access panel. The Solenoid and Timer continually pulse
clean the cartridge filters during system operation. There are timer adjustments for
pulsing but no other customer serviceable components.
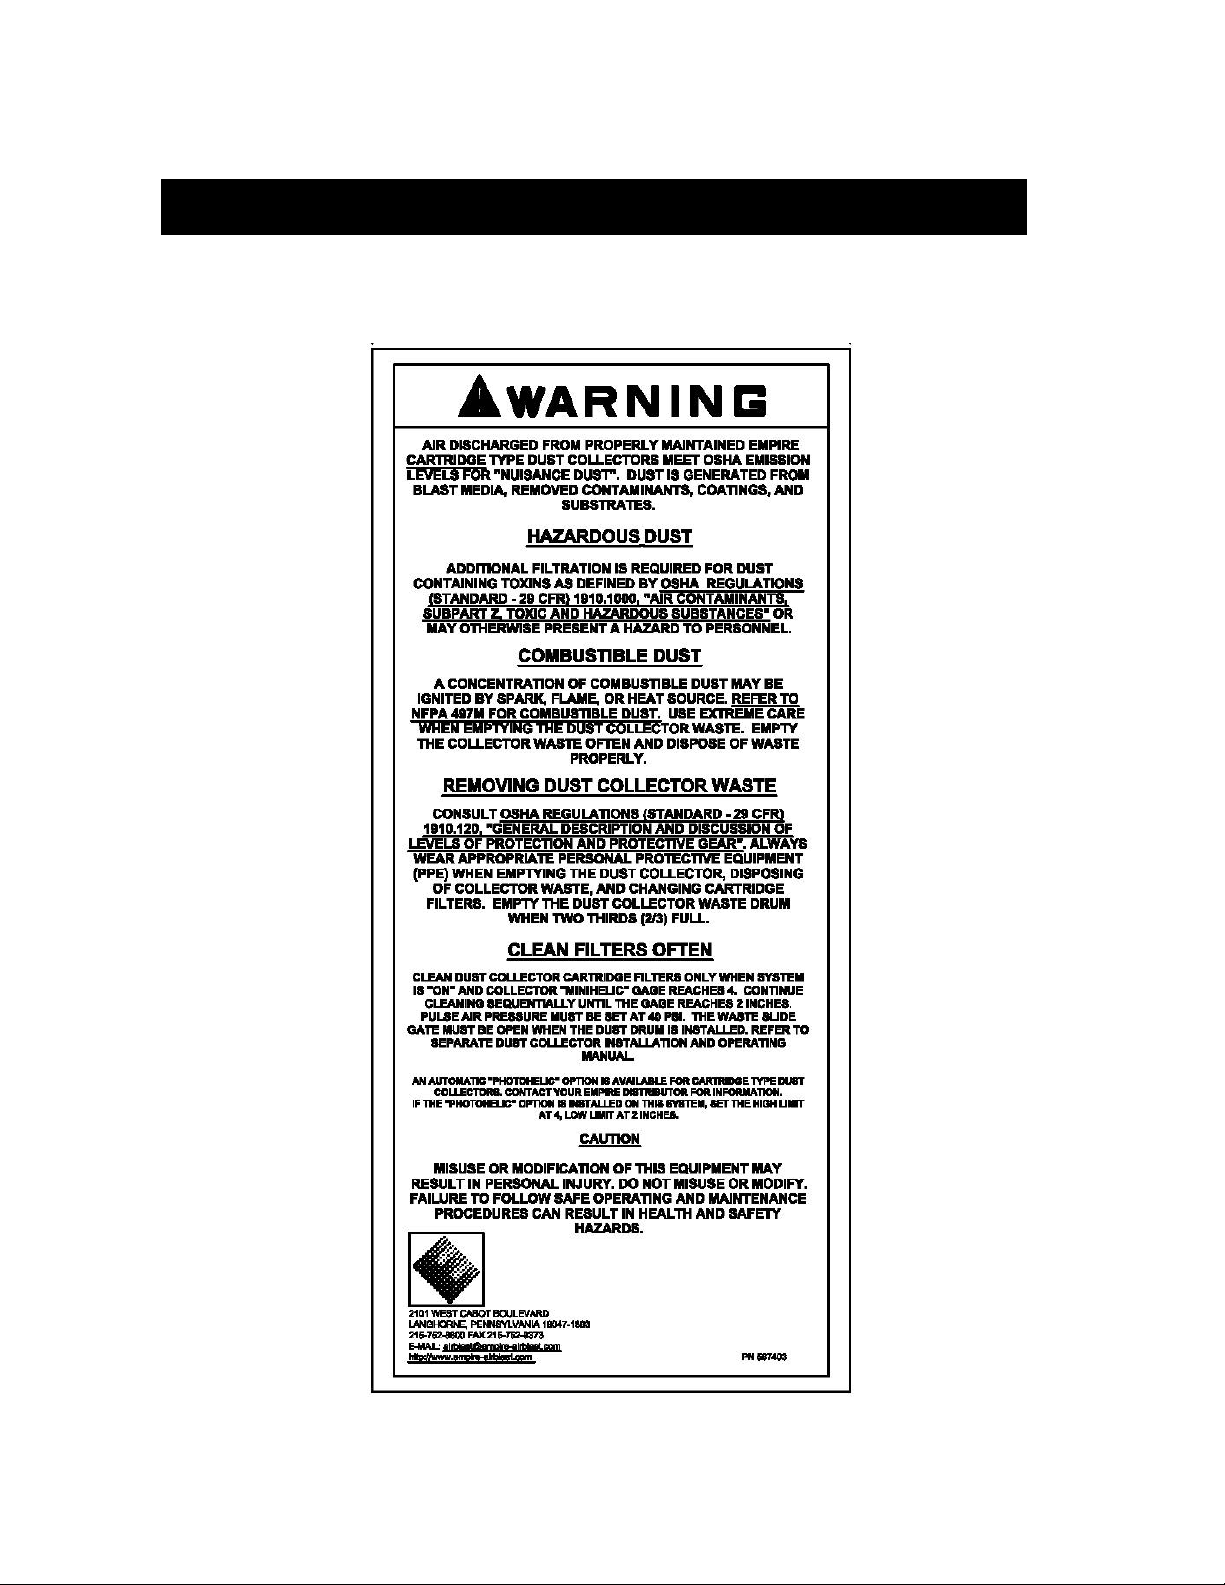
Magnehelic Gauge
The Magnehelic gauge with a scale of zero to 10 inches W.C. scale is provided to
measure the cleanliness of the cartridge filters. Acceptable gauge pressure is 0 to 4
inches. When the pressure increases to 4 inches and can not be reduced, filters require
replacement.
Compressed Air Connection
The BVS Dust Collector requires a regulated oil and moisture free compressed air supply
(minimum of 50 psig.) for Reverse Pulse Controls. An air pressure regulator and general
purpose filter must be installed in this air supply to ensure components are not
contaminated and the reverse pulse air pressure does not exceed 60 psig. If pulse
pressure exceeds 60 psig, component damage will occur. 1.0 CFM at 60 psi is required.
Optional Components
Photohelic Gauge Option # 360097 with zero to 15 inch scale, reduces dust collector
component wear and compressed air consumption by cleaning filters only when required.
The Photohelic gauge option may be ordered and installed at a later date.
BVS Exhaust Silencer Option # 360098 is bolted to the top flange of the dust collector.
The silencer will reduce fan noise to less than 85 dBA and can not be used if a HEPA
filter is installed.
HEPA Filter Option # 360099 is bolted to the top flange of the dust collector. The
HEPA filter is rated at MERV 13 and 99.97 % efficient on 0.3 micron particles. A
Magnehelic gauge with a zero to 2 inch scale is provided to indicate the condition of the
HEPA filter during system operation. The HEPA can not be used with the Silencer.
BVS Compressed Air Connection Kit # 360091 includes ¼ inch general purpose filter,
pressure regulator, pressure gauge, ball valve, nipples, elbow, air hose and fitting to
connect a compressed air supply required for the reverse pulse cleaning system of the
BVS Dust Collector.

OPERATION MANUAL
BVS
CARTRIDGE DUST COLLECTOR
Page 8
BVS Installation
1. The BVS Dust Collector is installed as part of the blast booth end wall assembly
during blast booth construction. See “Installation Instructions Pre Engineered Blast
Booth”
Electrical
***
All electrical wiring is to be made by a qualified electrician following adopted codes,
standards, and procedures specified by the authority having jurisdiction for that
location.
***
1. Wire the BVS fan motor and pulse controls per the electrical drawings supplied with
this PEB blast booth system.
2. Optional Photohelic gauge installation, see Optional Component Installation,
Photohelic Gauge, below.
Magnehelic Gauge
1. Locate and plan to mount the zero to 10 inch scale Magnehelic gauge on the right side
wall of the BVS Dust Collector (as viewed from the BVS access doors).
2. Plug the (2) ports on the back of the gauge using
1/8” plugs supplied with the gauge.
3. Place the gauge in the mounting bracket and attach
the bracket to the dust collector wall using supplied
self drilling/tapping screws.
4. Install the 1/8” hose barbs supplied with the gauge
in the gauge ports.
5. Connect the supplied tubing to the hose barb in the
wall of the collector adjacent to the access doors.
6. Create several 12 inch diameter loops in the tubing around the gauge mounting
bracket and connect the tubing to the bottom port of the gauge.
7. The top port of the gauge is to be left open to atmosphere.
Dust Drawers
Ensure the (2) Dust Drawers have been placed in the bottom of the BVS collector
properly.
End Wall Baffle
Ensure the End Wall Baffle is installed to protect the cartridge filters from damage.

OPERATION MANUAL
BVS
CARTRIDGE DUST COLLECTOR
Page 9
BVS Optional Component Installation
Photohelic Gauge
***
All electrical wiring is to be made by a qualified electrician following adopted codes,
standards, and procedures specified by the authority having jurisdiction for that
location.
***
1. Locate and plan to mount the zero to 15 inch scale Photohelic gauge on the right side
wall (as viewed from the BVS access doors) of the collector.
2. Disassemble the back cover of the gauge and install (2) jumper wires, 120Vpower
supply with ground, and (2) signal wires. Use Drawing
B122104.
3. Use your separately supplied Electrical Assembly
Drawings to determine the correct power supply for the
gauge and controls.
4. When wiring is complete, mount the gauge in the
mounting bracket and attach the bracket to the dust
collector wall using supplied self drilling/tapping screws.
5. Install the 1/8” hose barb supplied with the gauge in the
bottom gauge port.
6. Connect the supplied clear tubing to the hose barb in the wall of the collector adjacent
to the access doors.
7. Create several 12 inch diameter loops in the tubing around the gauge mounting
bracket and connect the tubing to the bottom port of the gauge.
8. The top port of the gauge is to be left open to atmosphere.
Silencer
1. The silencer is shipped separately and must be installed on the top of the dust
collector.
2. Remove the Air Deflector from the top of the dust collector (Deflector is directly
above the fan motor) and set aside.
3. Install the Air Deflector in the top of the silencer, foam side down, re-using original
hardware.
4. Install supplied ½” x ¼”self stick gasket on the top flange of the dust collector.
5. Place the silencer on top of collector. Use supplied 5/16” X 1” bolts, lock and flat
washers and bolt through matching holes in silencer and dust collector top flange to
secure the silencer.

OPERATION MANUAL
BVS
CARTRIDGE DUST COLLECTOR
Page 10
HEPA Filter
1. The HEPA filter assembly is shipped separate from the BVS collector and must be
installed on the top of the dust collector, then the HEPA filters are installed.
2. Three (3) HEPA cartridge filters have been shipped inside the HEPA housing. Use
care and do not damage the HEPA filters when removing the filter housing from the
shipping pallet.
3. Remove the Air Deflector from the top of the dust collector (Deflector is directly
above the fan motor) and set aside.
4. Install the supplied ½” X ¼”self stick gasket on the top flange of dust collector.
5. Place the HEPA filter housing on top of the collector. Use supplied 5/16” X 1” bolts,
lock and flat washers and bolt through matching holes in HEPA housing and collector
top flange to secure the HEPA housing.
6. .Use extreme care not to damage HEPA filters.
7. Carefully remove the HEPA filters from their cardboard boxes. Note that only one
end of the filter has a gasket. Install (1) filter gasketed end first in each “U” shaped
filter rack.
8. Use a set of (4) supplied 5/16” X 1” bolts, lock and flat washers and Filter Retainer
Plates at the (4) corners of the filter rack. Tighten the hardware compressing the
HEPA gasket 50%, sealing the gasketed end of the HEPA filter to the HEPA housing.
9. Locate and plan to mount the zero to 2 inch scale Magnehelic gauge on the right side
wall of the BVS dust collector (as viewed from the BVS access doors) adjacent to the
BVS Magnehelic or Photohelic gauge.
10. Place the gauge in the mounting bracket and attach the bracket to the dust collector
wall using supplied self drilling/tapping screws.
11. Plug the (2) ports on the back of the gauge using 1/8” plugs supplied with the gauge.
12. Install a 1/8” hose barb supplied with the gauge in the side, bottom gauge port and in
the 1/8” elbow in the HEPA filter housing.
13. Connect the supplied clear tubing to the hose barb in the 1/8” elbow of the HEPA
filter housing.
14. Create several 12 inch diameter loops in the tubing around the gauge mounting
bracket and connect the tubing to the bottom port of the gauge.
15. The top port of the gauge is to be left open to atmosphere.

OPERATION MANUAL
BVS
CARTRIDGE DUST COLLECTOR
Page 11
BVS Start Up
***
When performing equipment inspections or start up, use Lock out, Tag out
procedures as required (electric, compressed air, etc) and wear the appropriate
Personal Protective Equipment (PPE) for the job(s) being preformed.
***
BVS Fan Start up
1. All electrical work must be performed by a qualified electrician in accordance with
all applicable codes.
2. Cincinnati Fan has provided three (3) manuals for the BVS Dust Collector fan
assembly: “Recommended Safety Practices”, “Initial Unit Start up Procedure
For All Direct Drive Fans” and “Installation, Safety, Operation &Maintenance
and Parts List”. These manuals are stored in the plastic envelope on the side of the
dust collector. Copies are available on our web site www.empire-airblast.com
3. Read all manuals listed above before starting and operating the BVS Dust Collector.
4. Follow the “Initial Unit Start up Procedure For All Direct Drive Fans” manual
and record pre-startup and post start up check list data.
***Failure to comply with above instruction manuals may void your warranty***
5. Check fan wheel set screws/bushing are tightened to specified torque values.
6. Proper fan rotation is clockwise viewed from the motor end of the fan assembly.
Reverse Pulse Solenoids & Timer
The BVS Solenoid Valve Enclosure and
Timer (Part # 516370) has been factory set for
your installation. It is located inside of the
dust collector housing, behind the bottom
access panel.
There are three (3) settings that have been
factory set for the proper performance of the
pulse cleaning system, Time Off, Time On,
and Optional Photohelic gauge. Refer to this
chart for proper settings when used with the
Magnehelic (Standard) or Photohelic
(optional) gauge operation.
No other components of this control are
customer serviceable.
Std.
Magnehelic
Settings
Optional
Photohelic
Set to E
(210 sec.)
Set to 1
(20 sec.)
Set to
“Min”
(150 msec.)
Set to
“Min”
(150 msec.)
1 Off
2 On
3 Off
4 Off
1 Off
2 On
3 Off
4 Off

OPERATION MANUAL
BVS
CARTRIDGE DUST COLLECTOR
Page 12
Compressed Air Connection
The BVS Dust Collector requires a regulated, oil and moisture free compressed air supply
(minimum of 50 psig.) for the collector Reverse Pulse Controls. An air pressure regulator
and general purpose filter must be installed in the air supply line to ensure reverse pulse
components and filters are not contaminated and the reverse pulse air pressure does not
exceed 60 psig. If pulse pressure exceeds 60 psig, component damage will occur. 1.0
CFM at 60 psi is required.
The regulated pulse air supply enters the BVS collector below the bottom access panel
supplying air to the manifold inside the clean air side of the dust collector.
Magnehelic Gauge
One length of tubing is supplied to be connected to the bottom port of the Magnehelic
gauge. The top port of the gauge is left open venting to atmosphere. Ensure the gauge is
set at zero with fan off. With the fan motor running, the cartridge filters will be pulsed
every 210 seconds.
Photohelic Gauge Option
One length of tubing is supplied to be connected to the bottom port of the Photohelic
gauge. The top port of the gauge is left open venting to atmosphere. Ensure the gauge is
set at zero with fan off.
Adjust the gauge set points (red needles) to 2, low limit and 4, high limit. The Photohelic
gauge is a pressure switch that permits filter cleaning only when dirty and require
cleaning. When the ∆P (pressure drop across the filters measured in inches of water
column WC) reaches the high limit of 4, cleaning commences, pulsing every 20 seconds
until the ∆P is reduced to the low limit of 2, pulsing will then stop.

OPERATION MANUAL
BVS
CARTRIDGE DUST COLLECTOR
Page 13
BVS Maintenance
***When performing maintenance on BVS components, Lock out, Tag out all
utilities (electric, compressed air, etc) and wear the appropriate Personal Protective
Equipment (PPE) for the job(s) being preformed.***
Air Inlet Baffle
The two-piece BVS Air Inlet Baffle hangs on the end wall of the blast booth. The baffle
protects the collector cartridge filters from the blast operation that would destroy filters
and it ensures uniform air flow across the blast booth. Removing the lower baffle
provides greater access to remove and empty the Dust Draws.
The lower baffle hangs on the bottom of the top baffle and is removed by lifting the
lower baffle up, back and lowering to the floor. The top baffle is removed by lifting up,
back and lowering the baffle to the floor. With both baffle piece removed, the BVS
cartridge filters can be removed and new Empire filters installed and securely tightened.
Cartridge Filter Removal & Installation
***When performing maintenance on BVS components, Lock out, Tag out all
utilities (electric, compressed air, etc) and wear the appropriate Personal Protective
Equipment (PPE) for the job(s) being preformed.***
FILTER REMOVAL
1. Only remove cartridge filters from the BVS Dust Collector when you will install new
filters. Use Empire Cartridge Filter 516365.
2. Remove the BVS Air Inlet Baffles from the blast booth end wall and place them to
the side.
3. All personnel engaged in this activity must wear appropriate PPE equipment.
4. Remove, empty and re-install dust drawers. Dispose of waste properly.
5. Remove the top two filters first and work down removing the middle and then bottom
two filters.
a. Loosen and remove the large metal knob, ½” flat washer and rubber washer from the
center of the filter end.
b. Rotate the filter 180° permitting accumulated dust and debris to fall from the filter.
c. Use care, dirty filters can weigh as much as 50 lbs. Pull and slide the filter off the
yoke and out of the dust collector. Place filter in plastic bag and seal to contain dust.
d. When the dust drawers are 2/3 full, remove, empty debris and re-install dust drawers.
Dispose of waste properly.
e. After all filters are removed, clean dust and debris from the dirty side of the collector
including the filter seal plate, remove and empty debris from dust drawers. Dispose of
waste properly.

OPERATION MANUAL
BVS
CARTRIDGE DUST COLLECTOR
Page 14
FILTER INSTALLATION
USE ONLY EMPIRE REPLACEMENT CARTRIDGE FILTER # 516365
1. Stand replacement cartridge filter cardboard box on end and open end flaps. Care
must be taken with any knife used to open the box that the filter is not damaged.
2. Remove the filter from the carton, note one end of the filter is open with a gasket
around the end plate and the other end is fully capped with a rubber washer inserted
in the center hole. Remove and save the rubber washer.
3. Inspect the new filter for shipping damage before installing in the collector. Do not
install damaged filters in the dust collector.
4. Holding the new filter horizontal, place the gasketed open end of the filter over the
yoke and the threaded end of the yoke must pass through the cartridge filter solid end
cap center hole.
5. Install the new rubber washer (rubber washer supplied with filter) then ½” flat steel
washer, followed by threading the large metal knob onto the yoke threads.
6. Hand tighten only until the filter gasket is compressed 50%, leaving a ¼” gap
between the filter end cap and the collector seal plate.
7. Install the remaining filters, dust drawers and end wall baffles.
Dust Drawers
Accumulated dust and debris in the BVS Dust Collector can be removed by reaching
under the lower air inlet baffle and pulling (2) Dust Drawers from the bottom of the dust
collector. Dispose of the collector waste properly.
Removal of the Lower Air Inlet Baffle will provide greater access for cleaning the bottom
of the dust collector before re-installing the Dust Drawers.
Magnehelic Gauge
1. Inspect the BVS zero to 10 Magnehelic gauge for
damage (gauge lens, tubing, etc.).
2. Inspect the clear tubing for accumulation of dust in
tubing coils. Disconnect the tubing from the gauge
hose barb, blow dust from tubing and re-install tubing.
3. Check gauge is set to ZERO when system is off.
Reverse Pulse Solenoids & Timer
With BVS fan running, check by listening that all (6) reverse pulse air valves are
sequencing at 210 second intervals.

OPERATION MANUAL
BVS
CARTRIDGE DUST COLLECTOR
Page 15
Optional Components Maintenance
Photohelic Gauge
1. Inspect the BVS Photohelic gauge for damage (broken set
point adjustment knobs, gauge lens, tubing, etc.).
2. Inspect the clear tubing for accumulation of dust in tubing
coils. Disconnect the tubing from the gauge hose barb, blow
dust from tubing and re-install tubing.
3. Check gauge is set to ZERO when system is off.
HEPA Filter Gauge
1. Inspect the HEPA filter zero to 2 inch scale
Magnehelic gauge for damage (gauge lens, tubing, etc.).
2. Inspect the clear tubing for accumulation of dust in
tubing coils. Disconnect the tubing from the gauge hose
barb, blow dust from tubing and re-install tubing.
3. Check gauge is set to ZERO when system is off.
4. If the HEPA filter gauge reads 1.0 inches or higher,
when system is on, the HEPA filter must be changed.
5. The BVS filters should also be inspected for damage,
leakage, and replaced as required.
HEPA Filter Replacement
1. USE ONLY GENUINE EMPIRE REPLACEMENT HEPA FILTERS # 395055
2. With the BVS fan off and locked out, loosen the set of (4) 5/16” X 1” bolts, lock and
flat washers and Filter Retainer Plates at the (4) corners of the HEPA filter rack.
3. Rotate the Filter Retaining Plates and remove the used filter. Repeat for each filter.
4. Carefully remove each new HEPA filter from the cardboard box. Use extreme care
not to damage filters.
5. Note that only one end of the filter has a gasket. Install (1) filter gasketed end first in
the “U” shaped filter rack.
6. Adjust and tighten (4) sets of bolts, lock and flat washers and Filter Retainer Plates at
the (4) corners of the filter rack. Tighten the hardware compressing the gasket 50%
sealing the gasketed end of the HEPA filter to the HEPA housing. Repeat for each
filter.

OPERATION MANUAL
BVS
CARTRIDGE DUST COLLECTOR
Page 16
BVS Trouble Shooting
Problem Probable Cause & Solution
Dust collector
fan will not
start
Main system electric disconnect switch is off, turn disconnect on
Fan motor inverter fault, check inverter user manual for fault codes,
descriptions and corrective actions
Blown high voltage fuse(s). Check and correct wiring and components
for short circuit, ground, failed component, etc. Replace fuses after
repairs.
Blown low voltage control fuse(s), check and correct wiring and
components for short circuit, ground, failed component, etc. Replace
fuses after repairs.
Power outage to system, restored power.
Low air flow
through blast
booth
Check fan rotation, reference rotation arrow on fan housing, change as
required. (Fan will move air in either direction of rotation.)
Air inlets or exhaust obstructed, remove objects blocking air flow into
and out of the room and/or dust collector.
HEPA Filter Option, check HEPA Magnehelic gauge, if reading 1 inch
or above, replace HEPA filter. Also check collector cartridge filters for
dust leakage and replace cartridge filters if damaged.
BVS Magnehelic/Photohelic gauge reads below 4 inches of pressure
differential (∆P), ensure gauge tubing and ports are not obstructed and
with system off gauge reads zero. Re zero as required.
BVS Magnehelic/Photohelic gauge reads above 4 inches of pressure
differential (∆P) will restrict air flow. See below
Dust collector
Magnehelic
gauge reads
above 4
Check main and reverse pulse compressed air supply valves are open
supplying air to the collector cleaning controls.
The reverse pulse pressure regulator to be set at 50 psi.
Ensure there is 120 volt power from the control panel to reverse pulse
controller.
With system ON, 120 volt power to Solenoid Valve Enclosure and
Timer, set dip switch #4 to ON. The collector should pulse
continuously at one second intervals.
If no pulsing, check that there is 120 volt power supply to solenoid
assembly. If 120 volt power is present, replace Solenoid Valve
Enclosure and Timer, Part # 516370 (this part is not customer
serviceable).
Listen and ensure that each of the (6) diaphragm valves pulses during
the test above. If a valve does not pulse, check the solenoid valve for
compressed air leakage. See next step.
Check solenoid valves for leaking compressed air at exhaust port. If
leaking, replace Solenoid Valve Enclosure and Timer, Part # 516370
(this part is not customer serviceable).

OPERATION MANUAL
BVS
CARTRIDGE DUST COLLECTOR
Page 17
BVS Trouble Shooting continued
Dust collector
Photohelic
Gauge Option
reads above 4”
With system ON, 120 volt power to Solenoid Valve Enclosure and
Timer, set dip switch #4 to ON. The collector should pulse
continuously at one second intervals.
If no pulsing, check that there is 120 volt power supply to solenoid
assembly. If 120 volt power is present, replace Solenoid Valve
Enclosure and Timer, Part # 516370 (this part is not customer
serviceable).
If pulsing occurs with dip switch #4 ON, check for contact closure of
the Photohelic gauge when gauge is above 4 inches. If there is no
closure, Photohelic gauge contact or relay has failed, replace Photohelic
gauge Part # 550074.

OPERATION MANUAL
BVS
CARTRIDGE DUST COLLECTOR
Page 18
BVS Parts
Ref.
Part
Number
Description
Ship
Weight
2 516360 BVS BLOWER, 10HP, 6,000CFM, 6"SP 95
5 761679 YOKE, BVS, SINGLE FILTER 8
9 549344 VENTURI, EDC 2
10 516365 FILTER CARTRIDGE 24
12 516420 KNOB, MULTIPLE LOBE, 1/2-13 THREAD 3
13 516302 PLASTIC DUST DRAWER, BVS 8
15 516370 SOLENOID VALVE ENCLOSURE WITH TIMER, 6 VALVE 6
16 510541 TUBING, POLYETHYLENE, .17" ID X .25" OD" 1
17 520432 ELBOW, BRASS, 1/8" MPT X 1/4" TUBE X 90" 1
18 516352 VALVE, DIAPHRAGM, 1" NPT, PULSE JET, DWYER" 2
33 524471 GASKET, 1/16" X 1" X 50', OPENCELL, PSA" 1
53 552902 WASHER, FLAT, 1/2", STEEL 1
** 550383 GAUGE ONLY, MAGNEHELIC, 0-10 WC--STANDARD 4
** 550074 GAUGE ONLY, PHOTOHELIC, 0-15 WG---OPTIONAL 8

OPERATION MANUAL
BVS
CARTRIDGE DUST COLLECTOR
Page 19
Appendix
“Recommended Safety Practices”
“Initial Unit Start up Procedure For All Direct Drive Fans”
“Installation, Safety, Operation &Maintenance and Parts List”

Table of contents
Popular Dust Collector manuals by other brands

Grizzly
Grizzly T10252 instructions

National Flooring Equipment
National Flooring Equipment 3474 HEPA instruction manual

Oneida Air Systems
Oneida Air Systems XXK100300 owner's manual

Nederman
Nederman S-Series Installation & operation manual

Nederman
Nederman FlexPAK 800 Installation and service manual

MaxVac
MaxVac Dustblocker Pro 25 instruction manual

Oneida Air Systems
Oneida Air Systems Super Dust Gorilla owner's manual

AAF
AAF RotoClone W Installation, operation and maintenance manual

Chiko
Chiko CCB-080AT-08-HC-V1 instruction manual

U.S. FILTER
U.S. FILTER Blastrac 1-15D manual

Grizzly
Grizzly G0638 Parts Breakdown

Trion
Trion MA600 Installation, Operation And Service