Eneo MAM-5MM2203M0A Installation instructions

EN
Full Manual
4K HD-TVI, AHD, HDCVI, CVBS,
to HDMI, VGA, CVBS, indoor
MAM-5MM2203M0A

1
Introduction
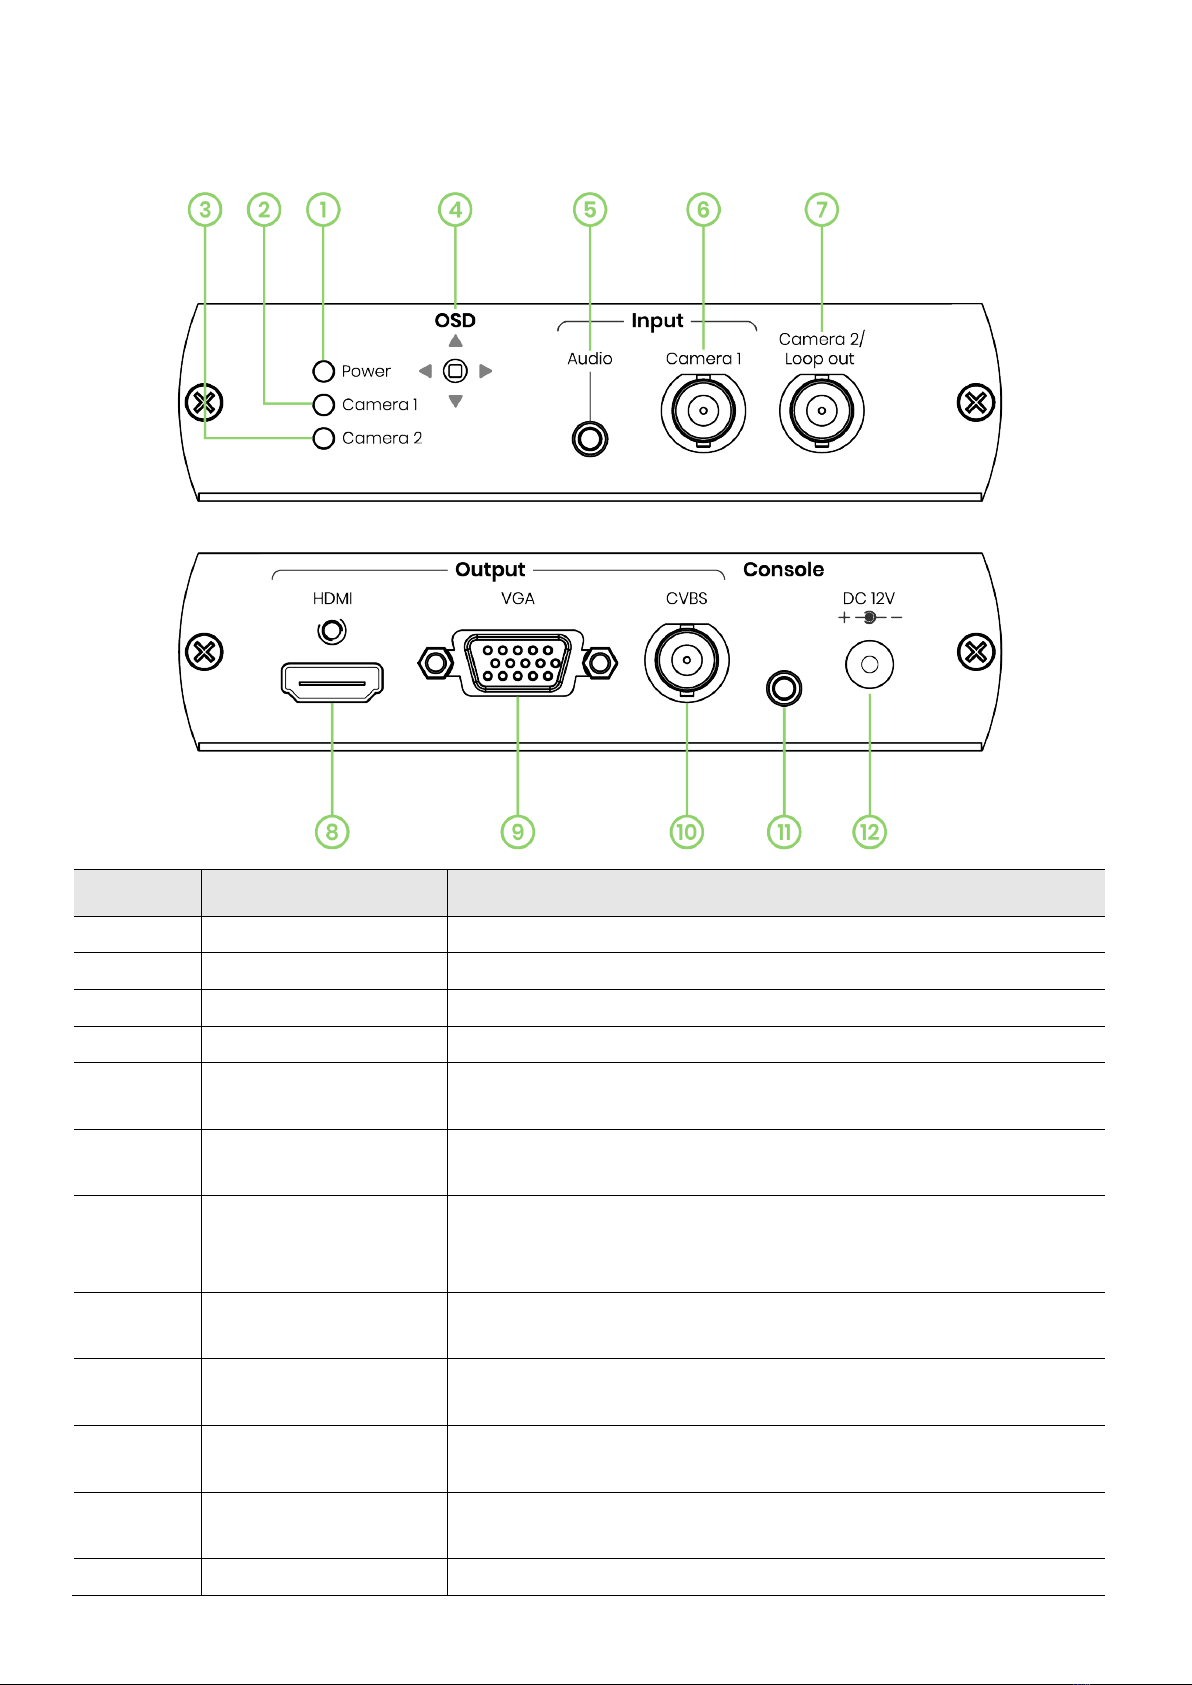
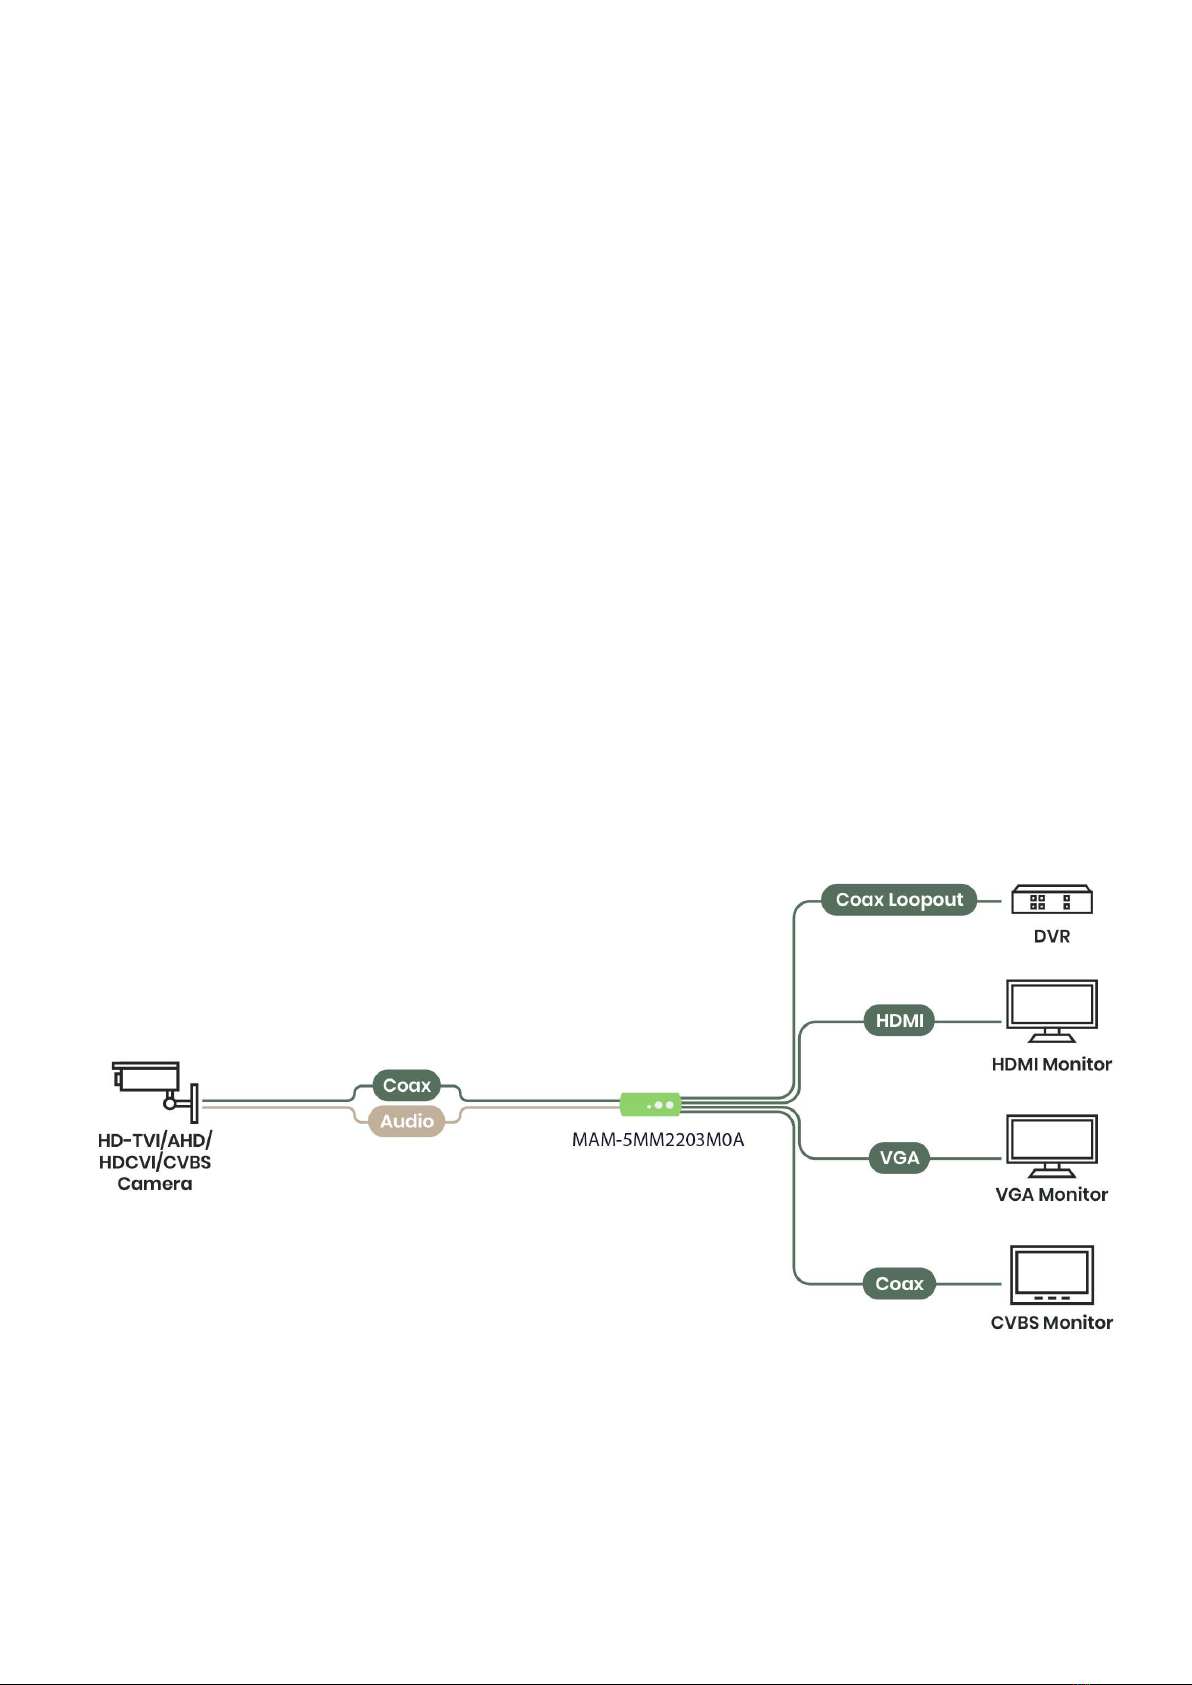
MAM-5MM2203M0A is a C C TV HD c onverter tha t supports up to 8MP video input for HD-TVI/ AHD/ HDC VI/
C VBS; it a llow s s urve illa nc e video to be shown on 4K HDMI,VGA,and CVBS displays at the same time.If
don’thave a 4K TV, you can watch s u rve illa nc e v ide o s on a n e xis ting d is p la y . In a ddition,the converter
has a 3.5mm audio inputto play the camera sound on an HDMITV.It’s very suita ble for groc ery stores,
tra in sta tions, metro stations and public parking garages.
Features
Video input resolution up to 4K/ 8MP.
Video output resolution up to 4K for HDMI, 1080p fo r V G A, a nd NTSC / PAL for C VBS.
Built-in loop out for da is y c ha in or a DVR.
Built-in 3 .5 m m audio input (Output through HDMI TV or external audio accepter).
Built-in RS232 Interfa c e for RS232 com m a nds or firm wa re upgra de.
Camera video displa ys on HDMI, VGA, C VBS displa ys a t the sa m e tim e.
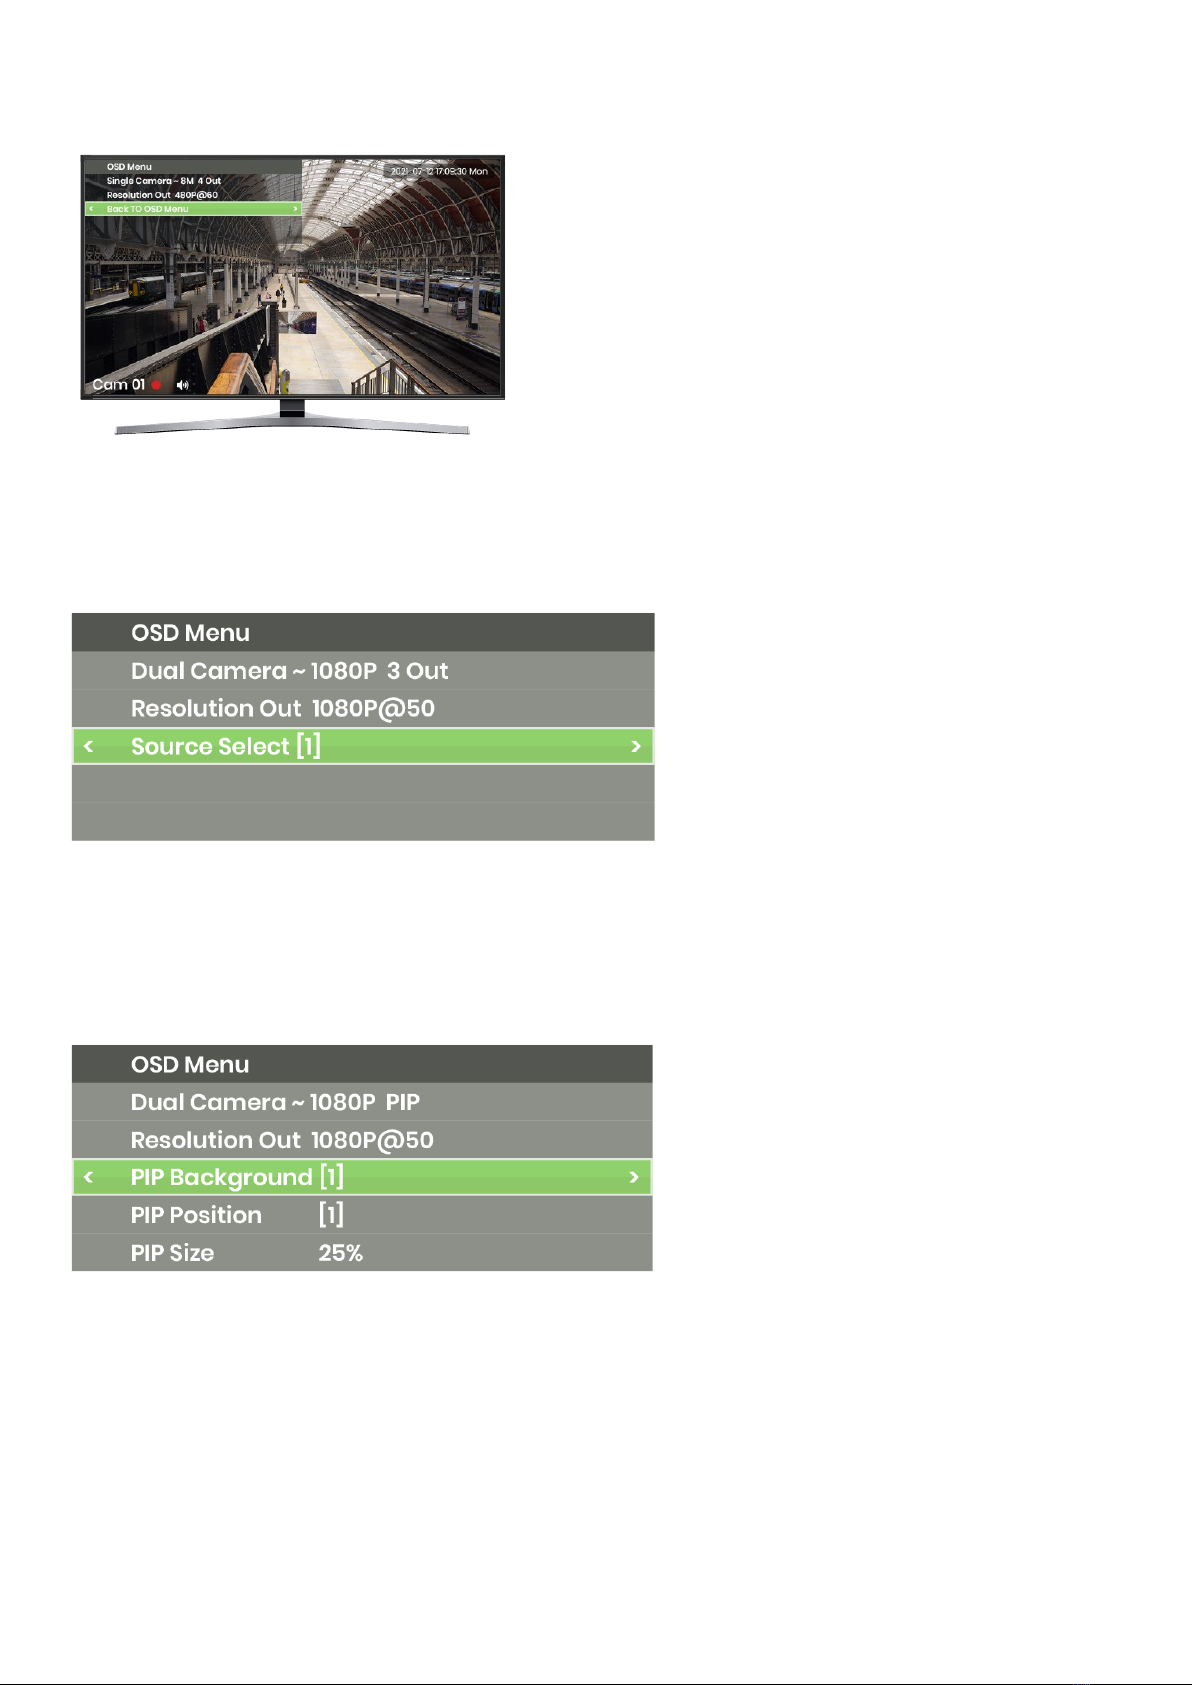
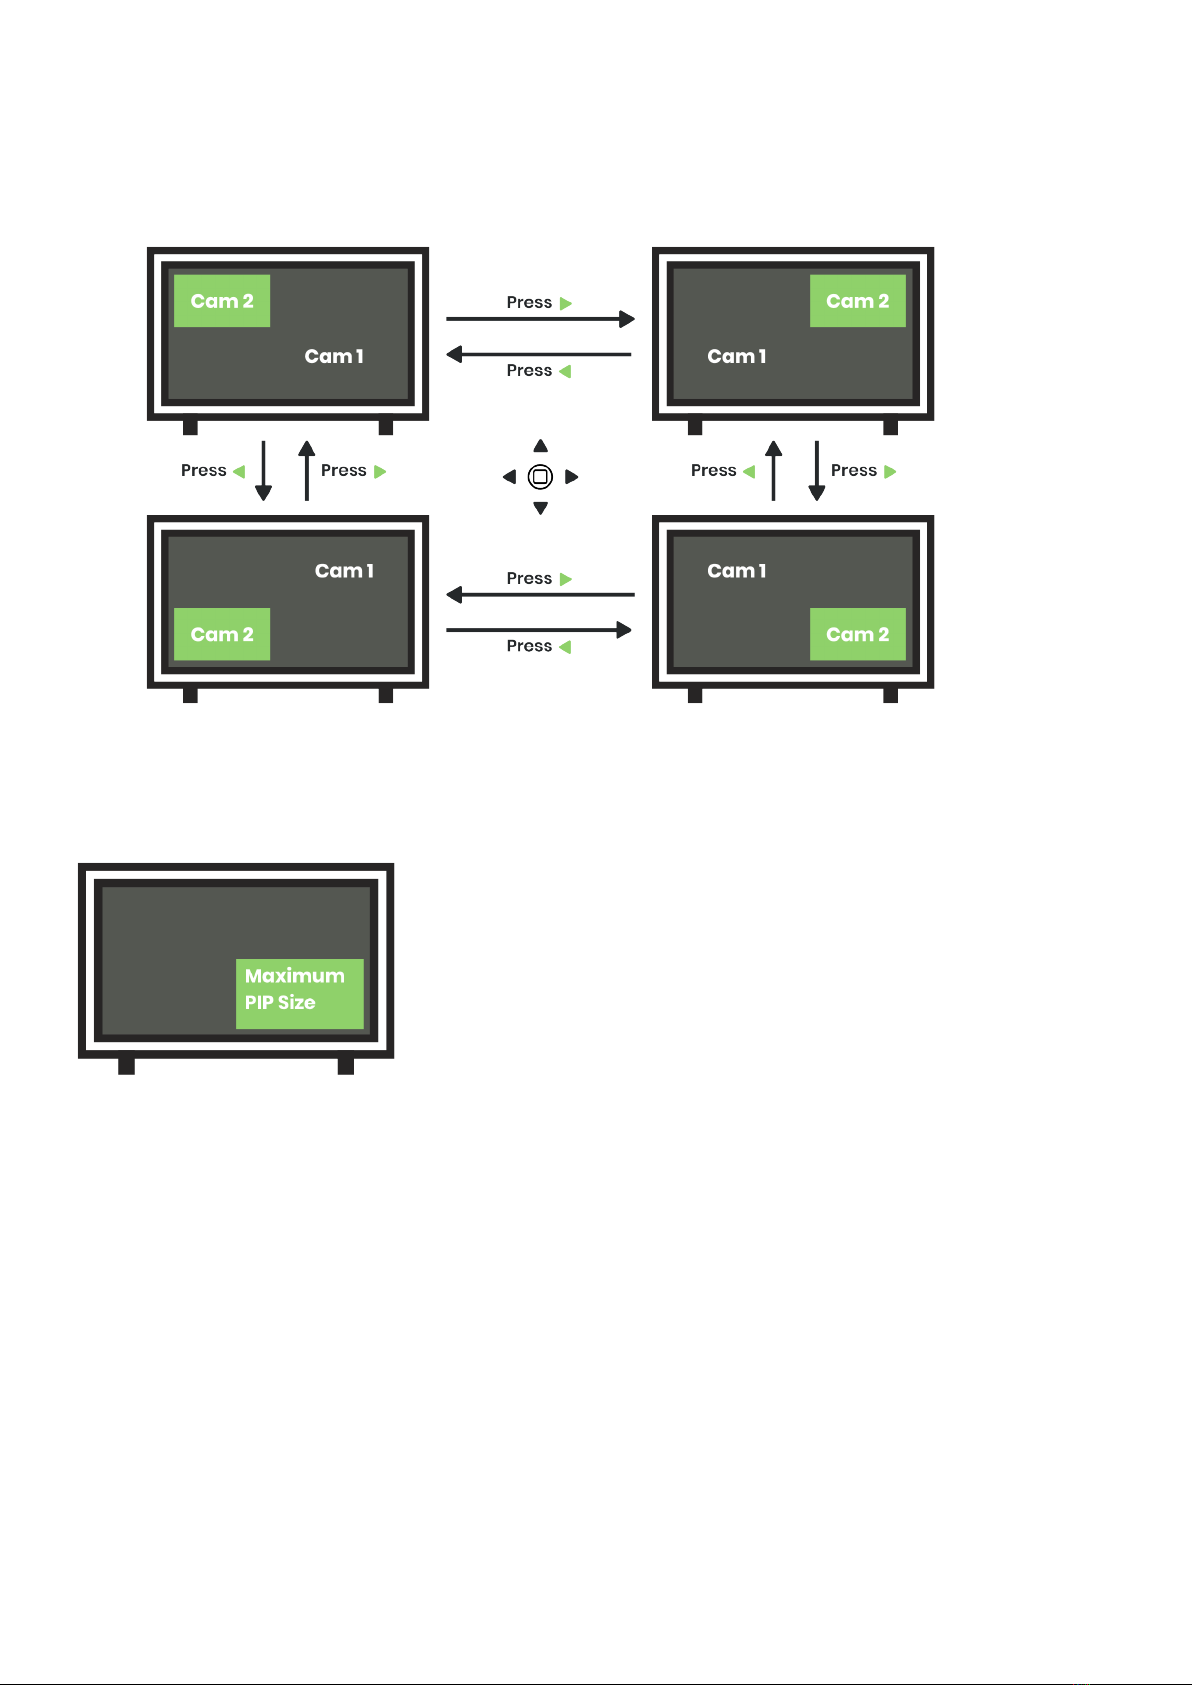
Supports PIP ( Pic tu re in Pic ture ) .
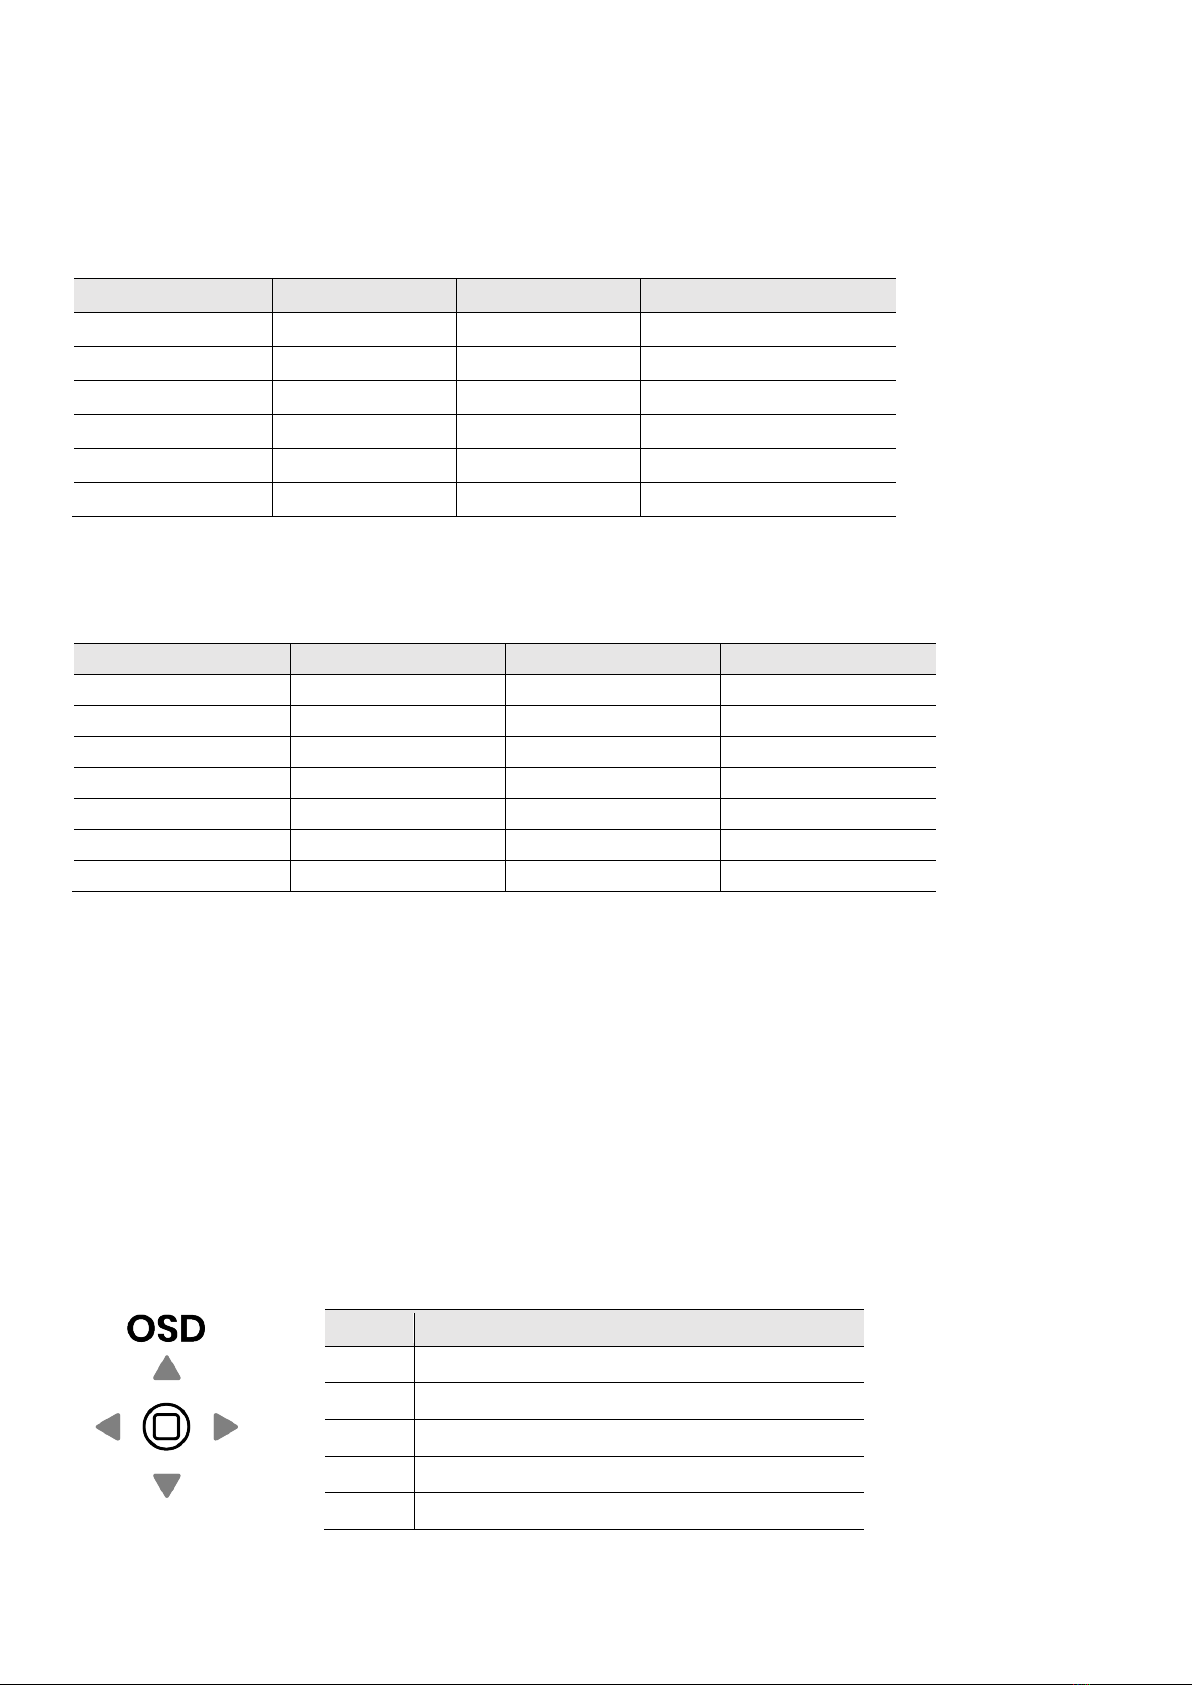
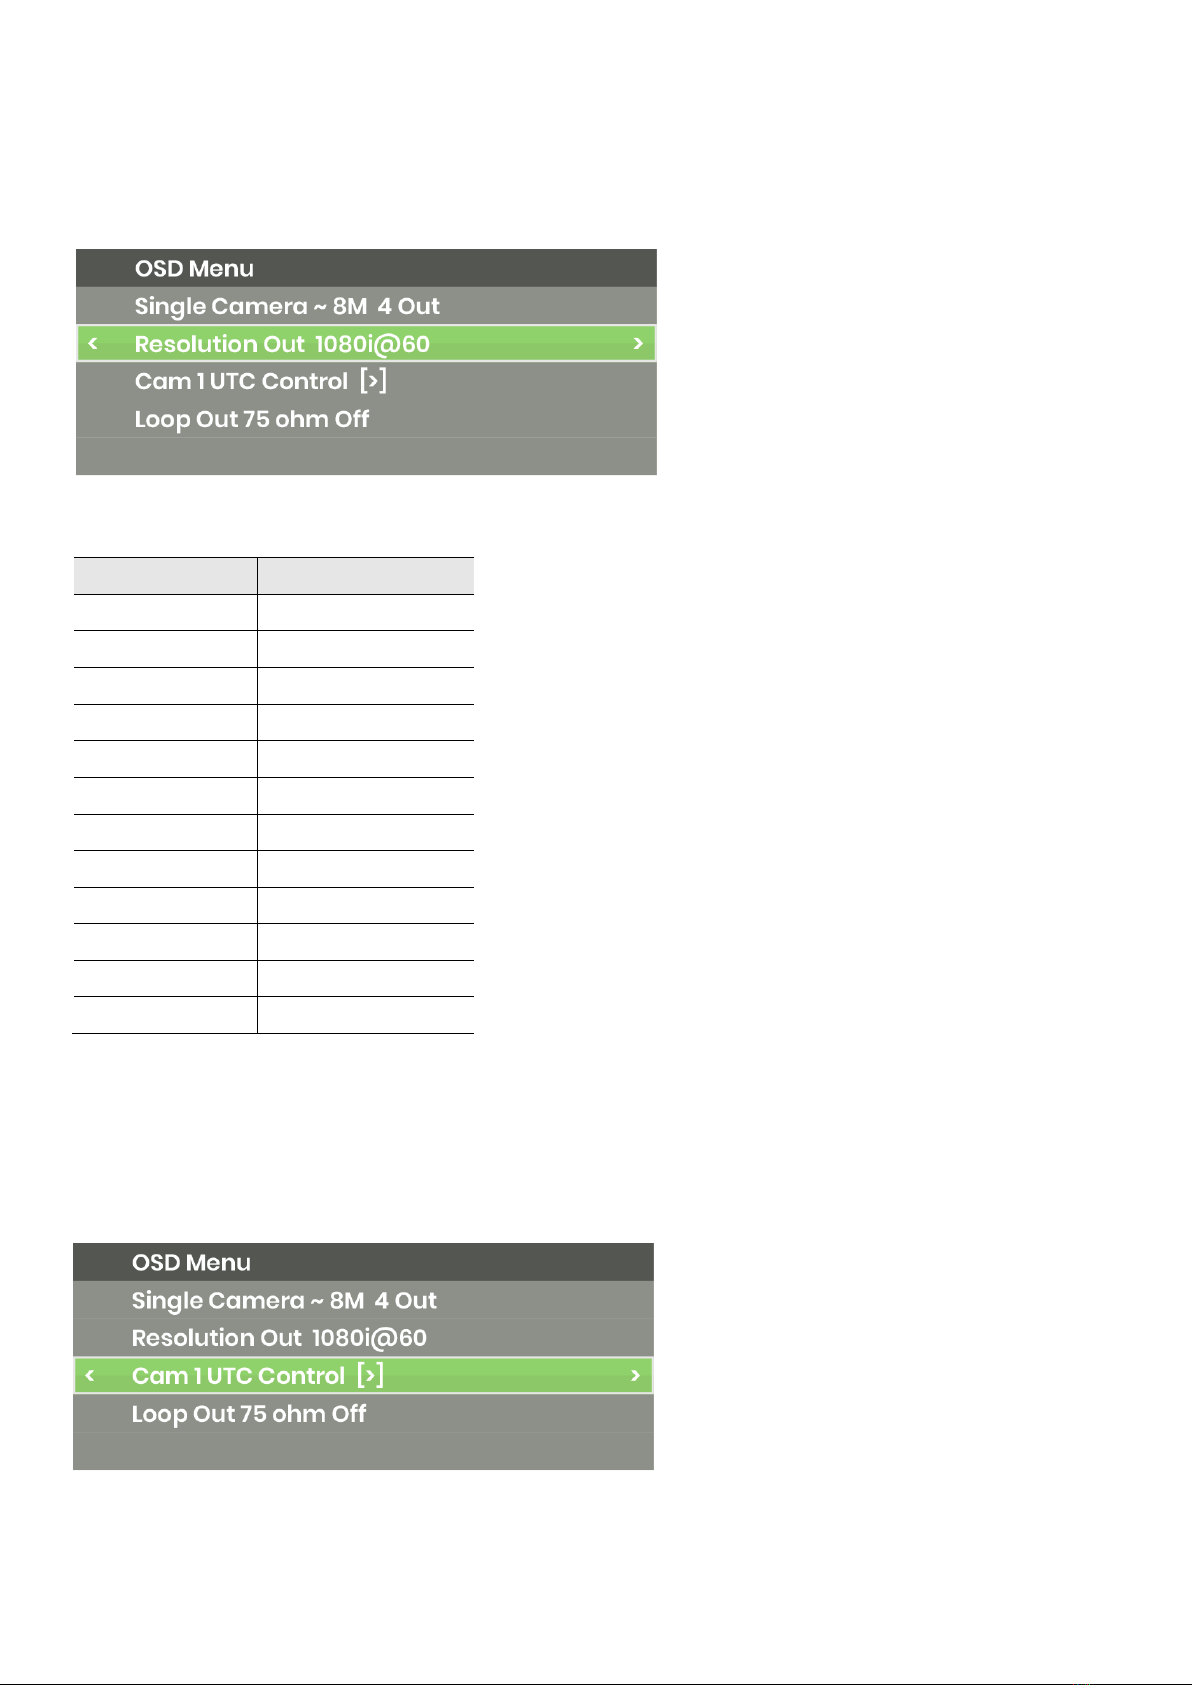
Support OSD (On Screen Display) to configure parameter.
Support UTC (Up the C oaxial) control and pass through.
Diagram
1in 4 out Mode (HDMI, VGA, CVBS output a t the sa m e tim e)

2
2 in 2 out Mode (Dualcameras with PIP)
2 in 3 out Mode (Dua l cam eras with m a nua l switching Cam 1/ 2)

3
Panel View
No Inte rfa c e Func tion
1
Power LED
To indic a te power sta tus (Refer to Description 1).
2 C a m era 1LED To indic a te C a m era 1sta tus (Refer to Description 1).
3 C a m era 2 LED To indicate Camera 2status ( Refer to Description 1).
4
OSD
To control OSD m enu (Refer to De s c rip tion 4 ).
5 Audio To use a 3.5m m audio ca ble to connect an audio source from a
HD-TVI, AHD, HDC V I c a m era (Refer to Description 2).
6 C a m era 1 To use a coaxial cable to connect with a HD-TVI, AHD, HDC VI
c a m era (Refer to Description 2).
7 Ca m era 2 / Loop Out
To use a coaxial cable to connect with a HD-TVI, AHD, HDC VI
c a m era , a DVR or a nother MAM-5MM2203M0A (
Refer to
De s c rip tion 3, 5) .
8 HDMI To use a n HDMI c a ble to c onnec t with a n HDMI displa y (Refer to
De s c rip tion 3).
9 VGA To use a VGA cable to connect with a VGA display (Refer to
De s c rip tion 3).
10 C VBS To use a coaxial cable to connect with a CVBS display (Refer to
De s c rip tion 3).
11 C ons ole To us e a 3 .5 m m to RS232 c a ble to c onnec t with a PC (Refer to
De s c rip tion 2) .
12 D C 12 V To connect with a DC12V 500mA power a da pter.

4
Des c ription 1– LED In d ic a tor
Description 2 – Installation and Cabling
Avoid being in areas with electrical interferences,such as mobile phones, microwaves and so on,
when insta lling your MAM-5MM2203M0A.
Remove the power before ins ta lla tion.
Audio Input
If connecting to a c amera with a built-in microphone, MAM-5MM2203M0A can only output the
video source.
C ons ole
Use DB9(Female) to 3.5mm stereo phone jack.
C onfigure RS232 pa ra m eter a t 115 2 0 0 / 8- N- 1.
Pinout Instruc tions:
3.5m m Stereo Phone Ja ck
PIN De fine
Pin 1 RX
Pin 2 TX
Pin 3 GND
Inte rfa c e LED Color Sta tus
Power Green ON/ OFF Power ON/ OFF
C a m era 1 Green ON/ OFF Signal Detected/ No V id e o
C a m era 2 Green ON/ OFF Sig na l Detected/ No V id e o
DB9 (Female)
PIN De fine
Pin 2 TX
Pin 3 RX
Pin 5 GND

5
Des c ription 3 – Video Form a t & Resolutions
Video In put Format & Resolutions (Auto Define HD- TVI, AHD, HDCVI, CVBS Video Format)
Resolutions HD- TVI AHD HDCVI
8MP (4K) 12.5/15 FPS 15 FPS 15 FPS
6MP X X 20 FPS
5MP 12.5/20 FPS 20 FPS X
4MP 25/30 FPS 25/30 FPS 25/30 FPS
2MP (1080p) 25/30 FPS 25/30 FPS 25/30 FPS
1.3MP (720p) 30 FPS 25/30 FPS 25/30/50/60 FPS
Video Output Format & Resolutions
Resolution
HDMI
VGA
CVBS
4K2K
30/ 25Hz
X
X
2160p 30/ 25Hz X X
1080p
60/ 50Hz
60/ 50Hz
X
1080i 60/ 50Hz 60/ 50Hz X
720p
60/ 50Hz
60/ 50Hz
X
576p
60Hz
60Hz
PAL
480p
60Hz
60Hz
NTSC
When HDMI/ VGA resolution is set to
480p, 720 p @ 6 0 , 1080i@ 60, 1080p@ 60, 2 16 0 p @ 3 0 , 4K2K@ 30, CVBS w ill be NTSC .
5 76 p , 720p@ 50, 1080i@ 50, 1080p@ 50, 2160p@ 25, 4K2K@ 25, CVBS will b e PAL.
Des c ription 4 – OSD Settings
Use 5 - W a y Ta c tile Switc h to Control OSD Menu
Button Features
●Turn ON/ OFF OSD m enu
▲Up
▼Down
�Switc h func tion
�Switc h func tion

6
Turn On OSD Menu
Press●a nd enter OSD m enu.
Switc h Mode s
Press�� to select Single Camera (Default) and presstuto change modes
Supported Modes
1in 4 out mode (with UTC pass through/ control)
2 in 3 out mode
2 in 2 out mode (with PIP)
Refer to the chart below to change modes :
Inte rfa c e 1in 4 out 2 in 3 out 2 in 2out (PIP)
Input
Cam 1
Up to 8MP
Up to 1080p
Up to 1080p
Cam 2
Loop out
(Re s olutio n
same as Cam 1)
Up to 1080p Up to 1080p
Output
HDMI
Up to 4K
Up to 4K
Up to 4K
VGA
Up to 1080p
Up to 1080p
Up to 1080p
C VBS NTSC /PAL NTSC /PAL Not Supported
Caution
※The resolution of the two cameras must be at the range between 480p and 1080p. Otherwise, the
screen will display an OutRange reminder.
※VGA resolution only supports up to 1080p.
※Ma ke sure your TV's supported resolutions when switching resolutions from MAM-5MM2203M0A.
※Set up the same frame rate for both cameras when having dual camera inputs.

7
Change Resolutions
Press▲▼to selec t “Resolution Out”, then presstuto select a desired resolution
Refer to the chart below to switch the desired resolution :
Switching Order
Resolutions
1
480p
2
576P
3
720p@60Hz
4
720p@50Hz
5
1080p@60Hz
6
1080p@50Hz
7
2160p@30Hz
8
2160p@25Hz
9
4K2K@30Hz
10
4K2K@25Hz
11
1080i@60Hz
12
1080i@50Hz
Turn O n UTC
In 1 in 4 out mode, press ▲▼to select “UTC Control ” and press u , and then you can press
▲▼tuto control camera directions.

8
Turn Off UTC
In the semi-tra nspa rent OSD menu, select “Ba c k to OSD MENU” a nd presstto turn off UTC .
Change Video Source
In 2 in 2 out or 2 in 3 out modes,press▲▼to selec t “Source Select” and presstuto choose C amera 1or 2.
Turn on PIP
In 2 in 2 out m ode, press▲▼to selec t “PIP Ba c kground” a nd presstuto select Camera 1or 2 a s the
ba c kground.

9
Change PIP Pos ition
Press▲▼ to select “PIP Position” and then presstor uto selec t position 1/ 2/ 3/ 4.
Adjust PIP Size
Press▲▼ to select “PIP Size ” a nd presstor uto enlarge/ reduce picture size (Max 1/4 TV size).
Perform Factory Reset
•Step 1- Press and hold ●when power off.
•Step 2 -Power o n, and press and hold � for 5 secs until seeing Camera 1a nd C a m era 2/ Lo o p out
LEDs fla shing.
•Step 3 - Wa it for the device to reboot.

10
Factory Default
De fa ult Mod e 1in 4 out Mode
De fa ult Re s olutio n
480p
De fa ult Dua l V ide o C a m era 1[ 1]
De fa ult PIP Ba c kground
C a m era 1[ 1]
De fa ult PIP Position Upper Right [2]
De fa ult PIP Size
20%
Loop out for Da isy C ha in
Refer to the chart below to configure 75Ωimpedance before daisy chain.Make sure to turn on 75 Ω
im peda nc e when not using da isy c hain.
Da is y Cha in Lim it
Re s olutio n Cable Length Da isy Chain Amount
1080p 100M 4 pcs
4K
100M
2 pc s
Da is y Chain Settings (Da isy chain 4 pcs of MAM-5MM2203M0A a s the exa m ple below )
La s t MAM-5MM2203M0A not connecting a DVR
Da isy Chain Amount
#1
#2
#3
#4
1 75ΩON
2
75ΩOFF
75ΩON
3
75ΩOFF
75ΩOFF
75ΩON
4 75ΩOFF 75ΩOFF 75 ΩOFF 75ΩON
La s t MAM-5MM2203M0A connecting a DVR
Da isy Chain Amount #1 #2 #3 #4
1 75ΩOFFDVR
2
75ΩOFF
75ΩOFF
DVR
3 75ΩOFF 75ΩOFF 75 ΩOFFDVR
4 75ΩOFF 75ΩOFF 75 ΩOFF 75ΩOFF DVR

11
Turn ON/ OFF 75 ΩIm peda nc e
Press▲▼ to select “Loop Out 75 ohm” a nd presstuto turn ON/ OFF.
Caution
※Turn ON 75Ωimpedance when MAM-5MM2203M0A is not connec ted to a DVR; othe rw is e , turn OFF
75Ωim p e da nce when connected with a DV R.
※You can only configure 75 Ωim pe d a nc e in 1in 4 out m o d e . In other modes, it will turn ON the 75Ω
impedance automatically.
※When using daisy chain, MAM-5MM2203M0A won’t support audio input for c a m era .
Desc ription 5 – RS232 Com ma nds
Com mands Func tions
RESET
Perform Fa c tory Reset
VERSION Show Firm wa re Version
W OSD ▲
A
OSD
▼
S
OSD t
D OSD
u
E
OSD
●
Turn ON/ OFF
I
UTC
▲
K UTC ▼
J
UTC t
L
UTC u
O UTC ●Turn ON/ OFF
DEFAULT Perform Fa c tory Reset
HELP
Show All C om m a nd s
?

12
Package
Item Amount
MAM- 5MM2203M0A
1 pc
DC 12V 500mA Power Adapter
1 pc
SMT Self- tapping Screw
4 pcs
Wall Plug
4 pcs
Rubber Pad
4 pcs
Specification
Ite m No MAM-5MM2203M0A
Support
Video Forma t HD-TV I, AHD, HDC V I, HDMI, V G A, C VBS
V id e o In put Re s olu tio n
8 M P @ 12 / 15 H z
HDMI Resolution 480p、5 76 p、720p/50/60、1080p/50/60、2160p/25/30、4K2K/25/30、
1080i/50/60
VGA Resolution
480p
、
5 76 p
、
720p@ 50/60
、
1080p@ 50/60
、
1080i@ 50/60
C VBS Re s olutio n NTSC 、PAL
Ports & Interfa c es
V id e o Inp ut 1x 75ΩBNC (1Vpp)
Video Output
1 x HDMI Type A, 1 x V G A ( D- S U B 15 ) , 1 x 75ΩBNC (1Vpp)
Video Loop out 1 x 75 ΩBNC (1Vpp)
Audio Input
1x (3.5mm) Phone Jack
C onsole (RS232)
1x (3.5mm) Phone Jack
Power
Power Supply
DC 12V 500mA/ DC 12V 1000mA
Power C onsumption 320mA
Am b ie nt Tem pera ture
Operation 0 to 70 ℃
Stora ge
- 40 to 12 5
℃
Hum id ity up to 90%
Physic a l C ha ra c te ris tic s
Dim e ns io n 12 5 x 130 x 30mm
W e ig h 370g
Ins ta lla tion Guide
Ite m

13
A W a ll Plug x4
B SMT Self-ta p p ing Sc re w x4
C Rubber Pad x4
Ins ta ll On A Ta ble Or A W a ll
Step 1: Eve nly fix SMT sc rews on a platform and le ave a 2m m high clearance.

14
Step 2: Pla c e MAM-5MM2203M0A on the pla tform and fit its holes in the c orresponding s c re w p os itions .
Step 3 : Move MAM- 5MM2203M0A until it gets fixed.

15
Use Rubber Pa ds to Prevent the Product from Slipping down The Pla tform
Fix ea c h rubber pa d a t ea c h c orner of the produc t.

eneo® is a registered trademark of
VIDEOR E. Hartig GmbH
Exclusive distribution through special-
ised trade channels only.
VIDEOR E. Hartig GmbH
Carl-Zeiss-Straße 8
63322 Rödermark/Germany
Tel. +49 (0) 6074 / 888-0
Fax +49 (0) 6074 / 888-100
www.videor.com
www.eneo-security.com
Technical changes reserved
© Copyright by VIDEOR E. Hartig GmbH
Version 11/2022
Other manuals for MAM-5MM2203M0A
1
Table of contents
Other Eneo Media Converter manuals
Popular Media Converter manuals by other brands

Extron electronics
Extron electronics RGB to DVI Scaler RGB-DVI 300 Setup instructions

Kiloview
Kiloview RE-1 quick start guide

Art
Art CleanBOX Specifications

ADLINK Technology
ADLINK Technology ReadyBoard 740 user manual

Decimator
Decimator DMON-4S operating manual

Texas Instruments
Texas Instruments HPA070 user guide