Energetics ST 880 User manual

ST 880 Rudergerät
Manual - Bedienungsanleitung - Návod k použití - Návod na obsluhu - Használási útasitás
D
CZ
SK
H
GB

2
Table of contents - Inhaltsverzeichnis - Obsah - Obsah - Tartalomjegyzék
1. English P. 3
2. Deutsch P.16
3. Česky P.29
4. Slovensky P.42
5. Magyar P.55
© The owner’s manual is only for the customer reference. ENERGETICS can not guarantee for mistakes occurring due to
translation or change in technical specification of the product.
©Die Gebrauchsanweisung dient nur zur Referenz für den Kunden. ENERGETICS übernimmt keine Haftung für Fehler die
durch Übersetzung oder technische Änderungen des Produkts entstehen.
©Návod k použití je pouze doporučení pro zákazníky. ENERGETICS nepřebírá žádné ručení za chyby způsobené překladem
či změnami v technické specfikaci výrobku.
© Tento návod je určený len pre potrebu zákazníkov. ENERGETICS nezodpovedá za chyby, ktoré sa môžu vyskytnúť kvôli
chybnému prekladu, alebo zmenám v technickej špecifikácii produktu.
© A használati útmutató kizárólag felhasználói referenciaként szolgál. az ENERGETICS nem vállal felelősséget a fordítási
hibákból vagy a termék műszaki módosításaiból eredő hibákért.
© Copyright by ENERGETICS

3
Dear Customer,
Congratulations on your purchase of an ENERGETICS home exerciser. This product has been designed and
manufactured to meet the needs and requirements of in-home use. Please carefully read the instructions prior
to assembly and first use. Be sure to keep the instructions for reference and/ or maintenance. If you have any
further questions, please contact us. We wish you lots of success and fun while training,
Your - Team
Warranty
ENERGETICS offers high quality home exercisers that have been tested and certified according to European
Norm EN 957.
ENERGETICS warrants to the original purchaser 2 years against possible defects in material and workmanship.
Excluded are damages caused by misuse and wearing parts. All electronic parts are warranted for a period of 1
year. The warranty period starts at the date the product was purchased (retain your sales receipt).
Safety Instructions
Consult your physician before starting with any exercise programme to receive advice on the optimal
training.
Warning: incorrect/ excessive training can cause health injuries. Stop using the home exerciser when
feeling uncomfortable.
Please follow the advice for correct training as detailed in the training instructions.
Ensure that training only starts after correct assembly, adjustment and inspection of the home exerciser.
Always start with a warm-up session.
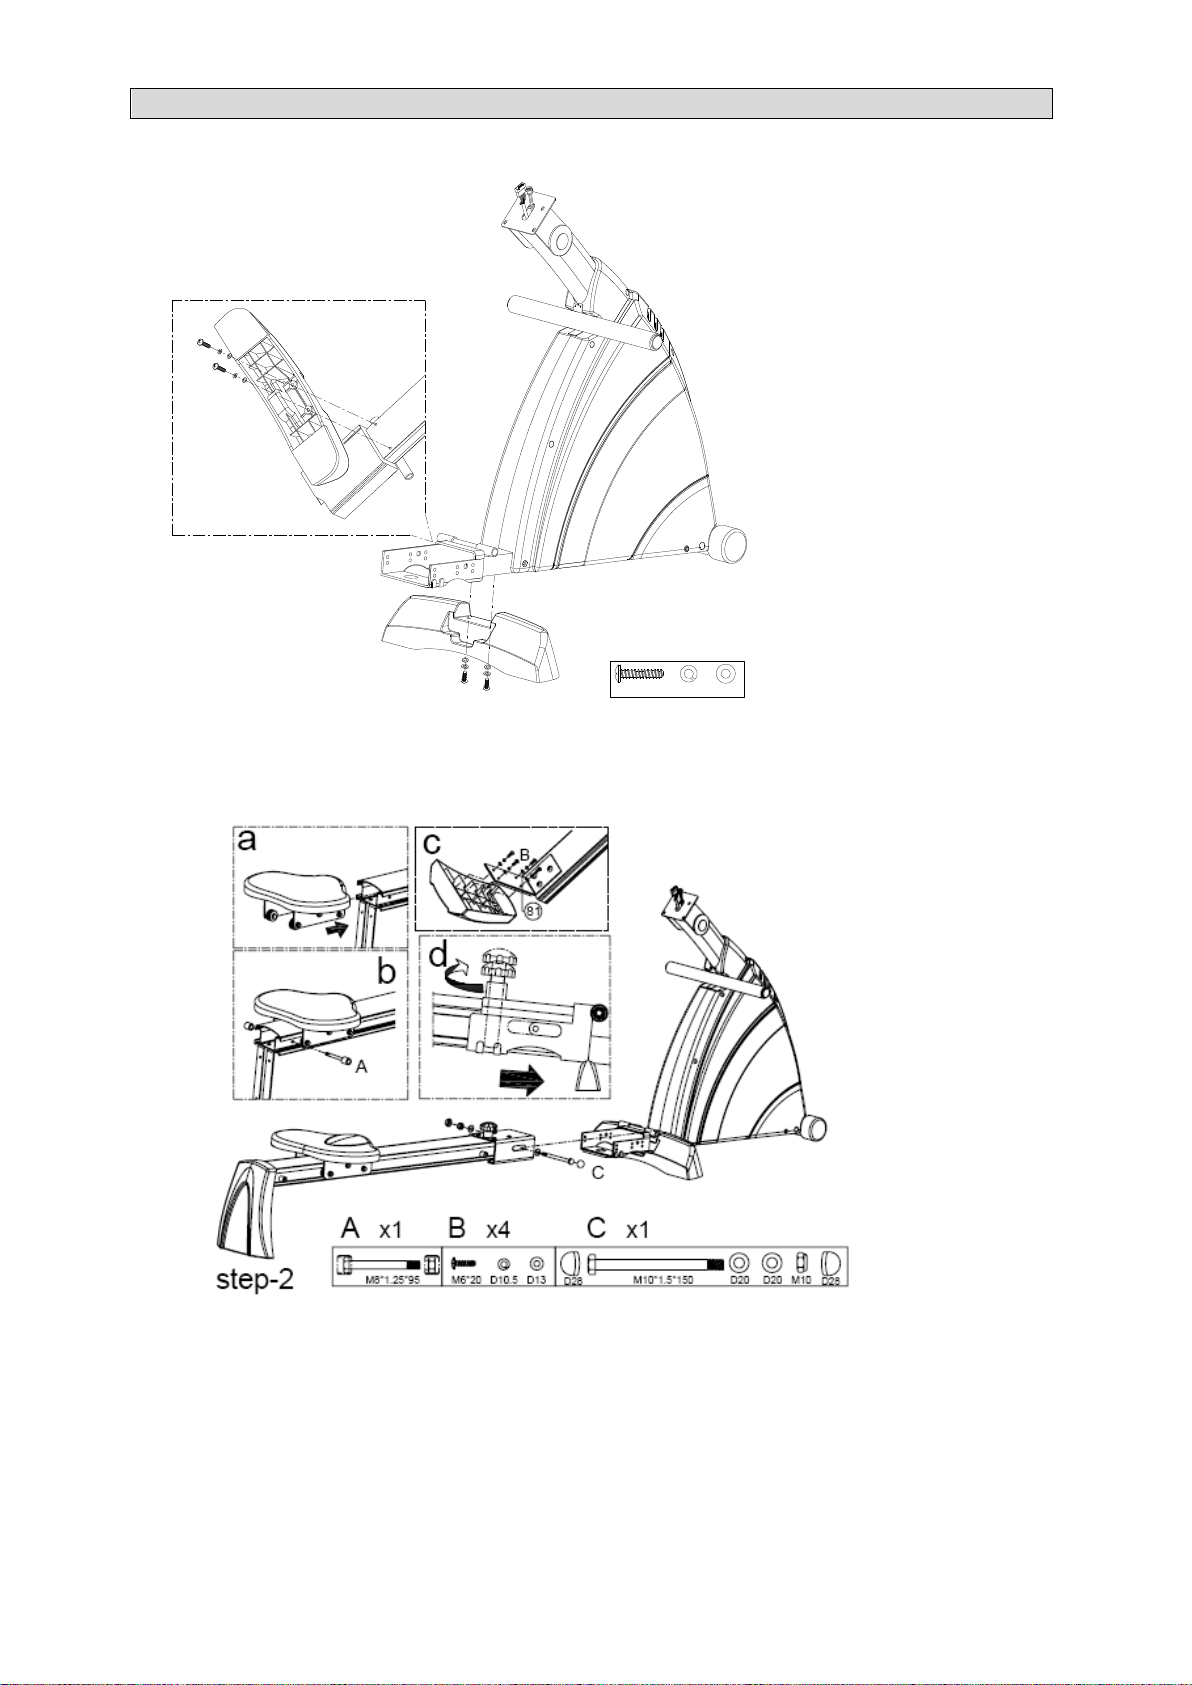
Only use original ENERGETICS parts as delivered (see checklist).
Follow the steps of the assembly instruction carefully.
Only use suitable tools for assembly and ask for assistance if necessary.
Place the home exerciser on an even, non-slippery surface.
Make sure the front wheels are placed in the correct position: see assembly instruction.
Tighten all adjustable parts to prevent sudden movement while training.
This product is designed for adults. Please ensure that children only use it under the supervision of an
adult.
Ensure that those present are aware of possible hazards, e.g. movable parts during training.
The resistance level can be adjusted to your personal preference: see training instructions.
Do not use the home exerciser without shoes or loose shoes.
Ensure that sufficient space is available to use the home exerciser.
Be aware of non-fixed or moving parts whilst mounting or dismounting the home exerciser.
This product is made for home use only and tested up to a maximum body weight of 120 kilograms.
GB

4
Handling and storage
The transportation wheels on the front foot caps allow for easy manoeuvring. Simply pull back on the rear of
aluminum bean until the wheels touch the floor. Then roll the unit to a desired location.
Care and Maintenance
-The home exerciser should not be used or stored in a moist area because of possible corrosion.
-Check at least every 4 weeks that all connecting elements are tightly fitted and in good condition.
-In case of repair please ask your dealer for advice.
-Replace defective components immediately and/or keep the equipment out of use until repair.
-Only use original spare parts for repair.
-Use a damp cloth to clean the Home Exerciser and avoid the use of aggressive detergents when
cleaning the bike.
-After exercising, immediately wipe of the sweat; perspiration can ruin the appearance and proper
function of the Home Exerciser.

5
Checklist

6
step-1
A
AA x2
M6*30 D10.5 D13
Assembly Instructions
Step 1
Assemble the supporting bracket for sliding beam (5) to the main frame (22) by the screw (80), the spring
washer (86) and the flat washer (81).
Step 2
1) Assemble the seat support (25) with the seat (24) to the sliding beam (19) shown as fig. a.
2) Assemble the bolt (85) and the buffer (61) to the sliding beam (19) shown as fig. b.
3) Assemble the back cover (12) with the supporting bracket for back cover (13) to the sliding beam (19) by
the bolt (87), the spring washer (74) and the flat washer (76) shown as fig. c.
4) Assemble the sliding beam (19) to the main frame (22) by the screw cap (92), the bolt (84), the flat washer
(78) and the Nylon nut (79).
5) Put the sliding beam forward shown as the arrow and turn the ball knob (17) clockwise in order to tight
the sliding beam.

7
step-3
A
A
M8*15 D25
A x2
Step 3
Assemble the pedal (10) to the main frame (22) by the axle for pedals (16), the bolt (91), the rubber ring (14)
and the flat washer (77).
Step 4
step-4
A
M5*10
A x4
a
1) Assemble the computer (1) to the main frame (22) by the screws that are attached to the computer.
2) User could adjust the position of the computer shown as fig. a.
3) Assemble the adaptor (38) to the main frame (22) and turn on the computer.

8
Step 5
C
B
A
Users could fold the sliding beam show as the fig. A. B. C.
Fig. A: Turn the ball knob (17) anticlockwise shown as the arrow.
Fig. B: Fold the sliding beam vertically shown as the arrow.
Fig. C: Push the sliding beam down shown as the arrow.

9
Computer instructions
SUMMARY:
This system is designed for programmable ROWING MACHINE. There are 3 parts to this System the monitor,
motor & controller and magnetic braking system.
A. Power up:
a. Connect all of the cables to the monitor.
b. After power up, all LCD segments will light up for 2seconds and CPU Will be
reset the resistance into level1. The monitor will go to initial mode.
1. If the connection cables were installed incorrectly, monitor will display
“E1”on matrix display and generate a beep sound. Before asking service,
please examine if all connection cables are well connected and then reset
the power to release the beep sound or press “START/PAUSE (Hold to
reset)”button to restart system. If the monitor still show”E1”message,
please call service.
2. If the monitor shows”E2”message, please call service.
B. KEY BOARD:
ENTER:
1. During PAUSE mode, press ENTER key to enter desired program.
2. Confirm the setting values of TIME, COUNT, DISTANCE, CALORLES and PULSE in
the heart rate control program8, and PROGRAM PROFILE in the user setting
program.
START/PAUSE/RESET:
1. To start or pause exercising.
2. Hold this button for 2 secondes can enter initial mode & reset all value to zero.
⊕▲:
1. During the pause mode, select Program or increase the setting value of TIME,
COUNT, DISTANCE, CALORIES and PULES in the heart rate control program 8,and
PROGRAM PROFILE in the User setting program.
2. During the exercise mode, press this button to increase the load level.
○,-▼:
1. During the pause mode, select Program or decrease the setting value of TIME,
COUNT, DISTANCE, CALORIES and PULES in the heart rate control program 8,and
PROGRAM PROFILE in the User setting program.
2. During the exercise mode, press this button to decrease the load level.
PULSE RECOVERY
Press this button going into pulse recovery detecting.
F1.0=Excellent F2.0=Good F3.0=Fair F4.0= below average F5.0=no good F6.0=Poor

10
FUNCTIONS:
TIME
Exercise time will be show on the display when exercising. If there is no signal is detected within 4seconds,it
will halt.
Count up: Without setting the time value, the monitor will count up the time from 0:00 to 99:59.
Count down: setting the exercise time, the monitor will count down from your setting values. Once reach
setting value and monitor will produce bi sounds, and then the value of time becomes counting up form 0:00
COUNT
Count will be shown on the display when exercising. If there is no signal is detected within 4 seconds, it will
reset zero.
Count up: Without setting the count value, the monitor will count up the count from 0 to 9999.
Count down: setting the exercise time, the monitor will count down from your setting values. Once reach
setting value, monitor will produce bi sounds, and then the value of count becomes counting up from 0.
CALORIE
The calories burned will be displayed on the window. Its scope is 0.0-999kcal.
Count up: Without setting the calorie value, the monitor will count up the count from 0.0 to 999.
Count down: setting the calorie consumption, the monitor will count down from your setting values. Once
reach setting value, monitor will produce bi sounds, and then the value of count becomes counting up
form0.0.
DISTANCE
The distance will display will be displayed on the window. The monitor begins to calculate from 1 meter to
999meter and the measure unit is 1 meter. After reach 1 KM, the measure unit become to 0.1KM(100 meter).
The monitor will display from 1.1KM to99.9KM.
Count up: Without setting the distance value, the monitor will count up from 0.1-99.9KM or Mile.
Count down: Setting the exercise distance, the monitor will count down from your setting values. Once reach
setting value, monitor will produce bi sounds, and then the value of count becomes counting up form 1 meter.
PULSE
The monitor will display your current heart beat rate in beats per minute .The value of pulse make count is 40-
220.If signal is input, the monitor will count the beats. If no pulse input is detected within 16 seconds, the
display will indicate “p”. This is power saving device.
Setting the pulse value, the heart rate will limit on certain value (90-220) as your setting .One your heart rate
is more than your setting value. The window will blink and remind you the value is higher than your setting
value .You need to work slowly to reduce heart rate.

11
OPERATION
This system contains of 8 different programs and you can preset the workout time and system will divide the
time by 10 intervals. If you don’t preset workout time, system will cont up the workout time in one-second
increment. Without setting the workout time, the time will count up and each interval will retain 3 minutes.
Preset Program: Program 1 –Program 7
1. Press the up and down button to the desired program.
2. Press the enter button to enter your desired program.
3. The time display will flash, and then press the “up or down” button to set up the desire time to do
the exercise. Press enter button to confirm your setting value.
4. The count display will flash, and then press the “up or down “button to set up the desired value.
Press enter button to confirm your setting value.
5. The distance display will flash, and then press the “up or down “button to set up the desired distance
you would like to reach. Press enter button to confirm your setting value.
6. The calorie display will flash, and then press the “up or down” button to set up the desired calorie
you would like to reach. Press enter button to confirm your setting value.
7. Press the start/stop to begin exercise.
Note:
1. If you would like to skip the function setting, press the enter button to the next setting
function.
2. When you reach the target, the monitor will produce beep sound and then stop.
3. If you set up more than one target and you would like to reach next target, press start to
exercise again.
TARGET HEART RATE PROGRAM (PROGRAM 8)
In this program, the computer will adjust the level of loading according to the heart rate detected. For
example the level of loading may increase while the heart rate detected is lower than TARGET H.R. Also, the
level of loading may decrease while the heart rate detected is higher than TARGET H.R. As a result, the user’s
heart rate will be adjusted to close the TARGET H.R. in the rang of TARGET H.R.-5 and TARGET.H.R. +5.
1. Press the up and down button to the program8.
2. Press the enter button to enter your target heart rate program.
3. The pulse display will flash, and then press the “up and down”
Button to set up the desire limited heart rate you would like to keep. Press ENTER button to
confirm your setting value.
4. The time display will flash, and then press the “up or down” button to set up the desire time to do
the exercise. Press enter button to confirm your setting value.
5. The count display will flash, and then press the “up or down” button to set up the desired value.
Press enter button to confirm your setting value.
6. The distance display will flash, and then press the “up or down “button to set up the desired
distance you would like to reach. Press enter button to confirm your setting value.
7. The calorie display will flash, and then press the “up or down” button to set up the desired calorie
you would like to reach. Press ENTER button to confirm your setting value.
8. press the start/stop button to begin exercise.
Note:
1. You must set up the pulse value in this program, because it is a heart rate control program.
2. If you do not set the pulse value, the initial setting value is 90bpm(heart beats per minute).
3. When you reach the one of the targets such as time, count, Distance and calories, the monitor will
produce beep sound and then stop.
4. If you set up more than one target and you would like to reach next target, press start to exercise
again.

12
PROGRAMPROFILE
PROGRAM 1 (MANUELL)
PROGRAM 2 (ROLLING)
PROGRAM 3 (VALLEY)
PROGRAM 4 (FAT BURN)

13

14

15
Partlist
Part No.
Description
Q’ty
Part No.
Description
Q’ty
1
Computer
1
51
Bolt M8*P1.25*60L
1
2
Cover for axle
2
52
Left chain cover
1
3
Fixing set for computer
1
53
Right chain cover
1
4
Oval cap
1
54
Spring D13*D1.2*85.5L
1
5
Supporting bracket for sliding beam
1
55
Nut M10*1.5*10T
1
6
Pulling rope D5*2000L
1
56
Volute spring 20*0.7T
1
7
Foam roller
1
57
Nylon nut M8*1.25*8T
1
8
Half-ball plug
2
58
Bushing D12*D8.2*12.6L
6
9
Foam
1
59
Fixing plate for spring D120*3T
1
10
Pedal
2
60
Fixing plate for spring (II) D100*3T
1
11
Ankle strap
2
61
Buffer D24*D8*22
4
12
Back cover
1
61A
Nut M8*P1.25*6T
2
13
Supporting bracket for back cover
1
62
Fixing bracket for spring
1
14
Rubber ring (black)
2
63
Flywheel axle
1
15
Bushing D12.5*F9.3*7T
1
64
Bearing #6000 ZZ
2
16
Axle for pedals
1
65
Plastic flat washer D50*D10*1.0T
2
17
Ball knob
1
66
Side cover
2
18
Welding set for sliding beam
1
67
Screw ST4.2*1.4*20L
6
19
Sliding beam
1
68
Flat washer D21*D8.5*1.5T
1
20
Fixing bracket
1
69
Pulley D37.4*D8*11
4
21
Fixing set for sensor
1
70
Reinforcement plate
1
22
Main frame
1
71
Bolt M8*25
1
23
Bolt M5*0.8*10L
4
72
Fixing bolt M6*1.0*20L
4
24
Seat
1
73
Ladder bolt D10*55.5
1
25
Seat support
1
74
Spring washer D15.4*D8.2*2T
13
26
Pulley D32*D18*10
2
75
Domed nut M8*1.25*15L
6
27
Nut D9.5*5T(3/8”-26UNF)
3
76
Flat washer D16*D8.5*1.2T
21
28
Electrical cable 700L
1
77
Flat washer D25*D8.5*2.0T
2
29
Lower computer cable 500L
1
78
Flat washer D20*D11*2T
2
30
Sensor (I)
1
79
Nylon nut M10*1.5*10T
1
Sensor
1
80
Screw M6*1*30L
2
30A
Sensor connecting cable 400L
1
81
Flat washer D13*D6.5*1.0T
6
31
Tension cable D1.5*340
1
82
Spanner 139*5T
2
32
Buffer
1
83
Spanner M6
1
33
Motor
1
84
Bolt M10*1.5*150L
1
34
Wheel for pulling rope
1
85
Bolt M8*1.25*95L
2
35
Anti-loose nut 3/8”-26UNF*6.5T
4
86
Spring washer D10.5*D6.1*1.3T
6
36
Bushing D13.5*D10.2*9
2
87
Bolt M8*1.25*20L
9
37
Pulley D45*26L
1
88
Bolt M8*1.25*75L
4
38
Adapter
1
89
Bolt M8*1.25*35L
6
39
Magnet
4
90
C-ring S-10 (1T)
1
40
Flat washer D21*D8.5*1.5T
1
91
Bolt M8*1.25*15
2
41
Spring D3*D17*65L
1
92
Screw cap D28*17
2
42
Plastic cap for spring D3*30L
2
93
Nylon nut M8*1.25*8T
1
43
Bolt M10*35L
1
94
Allen spanner
1
44
Idle wheel
1
95
Nylon nut M8*1.25*8T
1
45
Fixing plate for idle wheel
1
96
Screw M5*10L
4
46
Magnetic system
1
97
Guidance for pulling rope
1
47
Bushing D20*D14*11.5T
1
98
Screw ST3*10L
2
48
Multi-groove belt
1
99L
Left rubber pad
1
49
Foot cap
2
99R
Right rubber pad
1
50
C-ring S-10 (1T)
2

16
Sehr geehrte Kundin, sehr geehrter Kunde,
wir gratulieren Ihnen zum Kauf eines ENERGETICS Rudergerätes. Dieses Produkt ist für den Heimbereich
konzipiert um den Wünschen und Anforderungen dieses Bedarfs gerecht zu werden. Bitte lesen Sie vor dem
Aufbau und dem ersten Gebrauch zunächst sorgfältig diese Anleitung. Bitte bewahren Sie die Anleitung als
Referenz und für den richtigen Umgang mit Ihrem Fitness-Gerät auf. .Bei weiteren Fragen dazu stehen wir
Ihnen selbstverständlich gerne zur Verfügung. Wir wünschen Ihnen viel Spaß und Erfolg bei Ihrem Training.
Ihr - Team
Garantie
ENERGETICS Qualitätsprodukte werden konstruiert und getestet um für ein engagiertes Fitness-Training
eingesetzt zu werden. Dieses Gerät entspricht der europäischen Norm EN 957.
ENERGETICS gewährt auf Material- und Verarbeitungsfehler eine Garantie von 2 Jahren. Von der Garantie
ausgeschlossen sind sowohl Schäden, die durch unsachgemäße Anwendung des Produktes entstehen als auch
auf Verschleißteile. Auf elektronische Komponenten wird eine Garantie von 1 Jahr offeriert. Die Garantiezeit
beginnt mit dem Verkaufsdatum (bitte Kaufbeleg sorgfältig aufbewahren).
Sicherheitshinweise
Bei gesundheitlichen Einschränkungen oder für individuelle und persönliche Trainingsparameter
konsultieren Sie bitte zunächst Ihren Arzt. Er kann Ihnen sagen, welche Art des Trainings und welche
Belastung für Sie geeignet sind.
Achtung: Falsches oder exzessives Training kann Ihre Gesundheit gefährden.
Für ein sicheres und effektives Training folgen Sie bitte den Hinweisen in der Trainingsanleitung.
Beginnen Sie erst mit dem Training, nachdem Sie sichergestellt haben, dass das Rudergerät korrekt
aufgebaut und eingestellt ist.
Starten Sie immer mit einer Aufwärm-Phase.
Verwenden sie nur die der Lieferung beigelegten ENERGETICS Originalteile (siehe Check-Liste).
Gehen Sie beim Aufbau des Geräts exakt nach der Montageanweisung vor.
Verwenden Sie nur geeignetes Werkzeug für die Montage und lassen Sie sich ggf. von einer zweiten
Person helfen
Stellen Sie das Gerät auf einem ebenen, rutschfesten Untergrund auf.
Stellen Sie sicher, dass die vorderen Transportrollen in der richtigen Position angebracht sind. (siehe
Aufbauanleitung)
Schrauben Sie vor dem Training alle verstellbaren Teile fest, um eine Lockerung während des Trainings zu
vermeiden.
Das Gerät ist für das Training erwachsener Personen konzipiert. Stellen Sie sicher, dass eine Nutzung des
Geräts von Kindern nur unter Aufsicht von Erwachsenen erfolgt.
Weisen Sie anwesende Personen auf Gefährdung, z.B. durch bewegliche Teile, hin.
Der Widerstand kann auf Ihre persönlichen Bedürfnisse eingestellt werden: siehe auch Trainingsanleitung.
Verwenden Sie das Rudergerät nicht ohne Schuhe oder mit losem Schuhwerk.
Stellen Sie sicher, dass ausreichend Platz vorhanden ist, um das Rudergerät zu benutzen.
Beachten Sie die nicht fixierten oder beweglichen Teile während der Montage/Demontage des
Rudergerätes.
Dieses Gerät ist ausschließlich für den Heimanwendungsbereich konzipiert und mit einem maximalen
Körpergewicht von 120 Kilogramm getestet.
D

17
Handhabung und Lagerung
Die Transporträder an den vorderen Schienenkappen ermöglichen eine problemlose Positionierung des
Gerätes. Ziehen Sie einfach das hintere Aluminiumteil nach hinten, bis die Räder den Untergrund berühren.
Rollen Sie das Gerät anschließend in die gewünschte Position.
Pflege und Wartung
-Der Heimtrainer darf keinesfalls in einem feuchten Bereich verwendet oder gelagert werden, da
ansonsten Korrosionsgefahr besteht.
-Überprüfen Sie mindestens alle 4 Wochen, ob sämtliche Verbindungselemente fest angezogen sind
und sich in gutem Zustand befinden.
-Im Falle einer notwendigen Reparatur wenden Sie sich bitte an Ihren Händler.
-Tauschen Sie defekte Teile sofort aus und/oder verwenden Sie das Gerät keinesfalls während der
Reparaturarbeiten.
-Verwenden Sie zu Reparaturzwecken ausschließlich Originalersatzteile.
-Verwenden Sie ein feuchtes Tuch, um den Heimtrainer zu reinigen und vermeiden Sie den Einsatz von
aggressiven Reinigungsmitteln.
-Entfernen Sie Schweiß sofort nach dem Training, da dieser sowohl das optische Erscheinungsbild als
auch die einwandfreie Funktionstauglichkeit des Heimtrainers negativ beeinflussen kann.

18
Prüfliste

19
step-1
A
AA x2
M6*30 D10.5 D13
Montageanweisung
Schritt 1:
Montieren Sie die Stützklammern für die Gleitschiene (5) mithilfe der Schraube (80), des Federrings (86) und
der Unterlegscheibe (81) auf den Hauptrahmen (22).
Schritt 2:
1) Montieren Sie nun die Sitzstütze (25) mit dem Sitz (24), wie in Abb. a dargestellt, auf die Gleitschiene (19).
2) Montieren Sie den Schraubbolzen (85) und den Dämpfer (61) und die Halterung für die Abdeckung (13)
wie in Abb. b dargestellt, auf die Gleitschiene (19).
3) Montieren Sie anschließend die hintere Abdeckung (12) auf die Gleitschiene (19) mithilfe des
Schraubbolzens (87), des Federrings (74) und der Unterlegscheibe (76), wie in Abb. c dargestellt,
4) Montieren Sie die Gleitschiene (19) mithilfe der Schraubenkappe (92), des Schraubbolzens (84), der
Unterlegscheibe (78) und der Kunststoffmutter (79) auf den Hauptrahmen (22).
5) Bringen Sie die Gleitschiene wie mit dem Pfeil angezeigt an und drehen Sie den Rundknauf (17) im
Uhrzeigersinn, um so die Gleitschiene zu arretieren.

20
step-3
A
A
M8*15 D25
A x2
Schritt 3:
Montieren Sie das Pedal (10) mithilfe der Pedalachse (16), des Schraubbolzens (91), des Gummirings (14) und
der Unterlegscheibe (77) auf den Hauptrahmen (22).
Schritt 4:
step-4
A
M5*10
A x4
a
1) Montieren Sie den Computer (1) mithilfe der an Computer befestigten Schrauben auf den Hauptrahmen
(22).
2) Der Benutzer kann die Position des Computer, wie in Abb. a dargestellt, anpassen.
3) Montieren Sie den Adapter (38) auf den Hauptrahmen (22) und schalten Sie den Computer ein.
Table of contents
Languages:
Other Energetics Home Gym manuals

Energetics
Energetics JE6461 Operator's manual

Energetics
Energetics DPB 2.1 Leg Curl User manual

Energetics
Energetics Basic Bench 3.1 User manual

Energetics
Energetics Deluxe Power Rack 3.1 User manual

Energetics
Energetics Deluxe Power Bench 2.1 User manual

Energetics
Energetics Deluxe Power Bench 4.1 User manual

Energetics
Energetics Deluxe Power Tower 7.1 User manual

Energetics
Energetics Multi Trainer 5.1 User manual

Energetics
Energetics Basic Bench 2.1 User manual